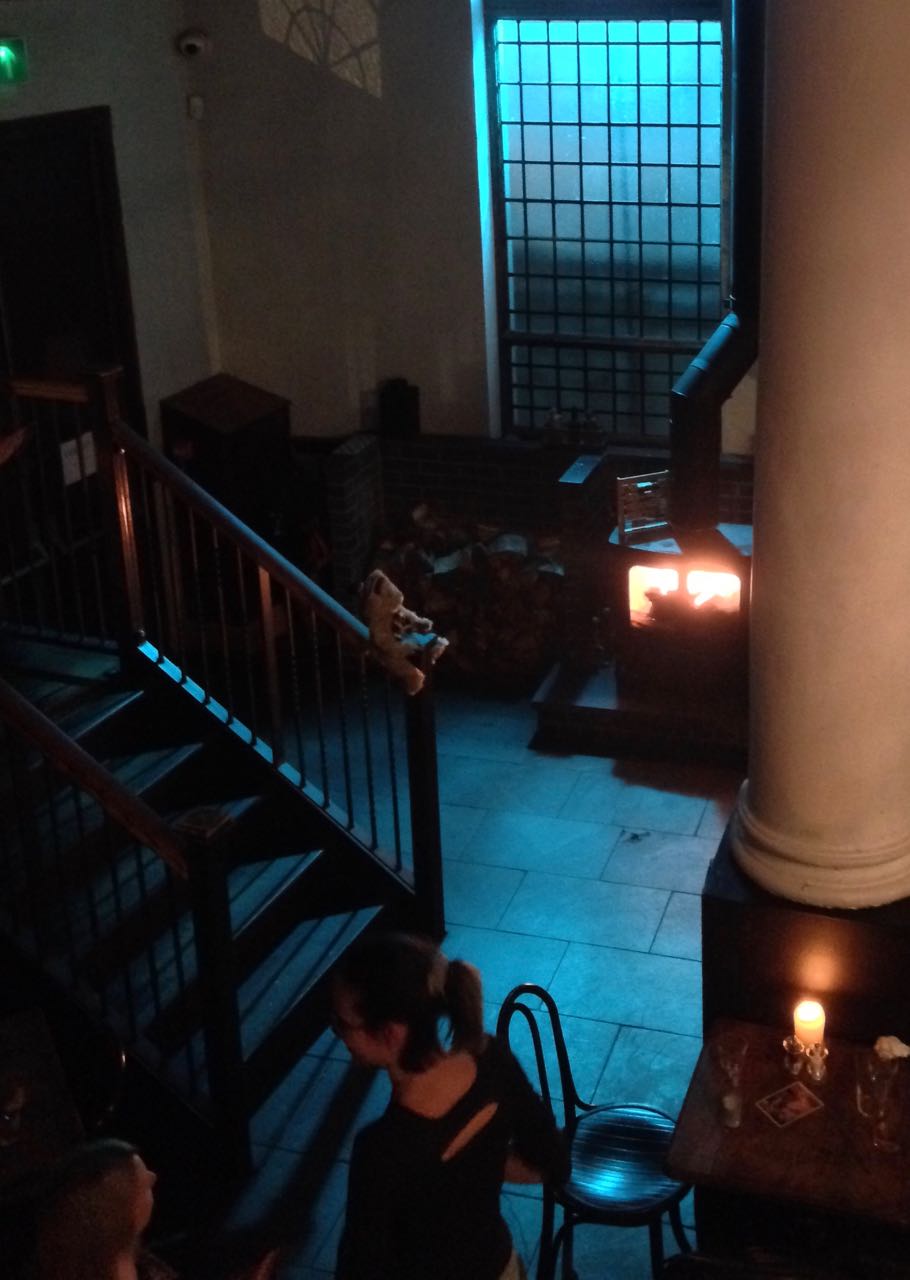
There were no practicals in this corner of the pub, so we placed an 800 open-face outside the window, gelled with Midnight Blue, and a 1×1′ LED panel in the wood-burner, gelled with CTO.
This year I’ve shot a couple of productions on the Sony FS7, a camera I’ve been very impressed by. Its most interesting feature is its high native ISO of 2000, which makes quite an impact on how you go about lighting. The light shed by practicals is often enough to illuminate a scene, or a large part of it, and sometimes you need to take existing practicals away in order to maintain contrast and shape, similar to how you take ambient light away (negative fill) when shooting exteriors.
It’s a strange thing about being a DP that, yes, sometimes you’re required to plan a mammoth lighting set-up using tens of kilowatts of power, but other times it’s just a case of saying, “Take the bulb out of that sconce.” You’re working to exactly the same principles, using your creative eye just as much in both scenarios.
Let’s look at some examples from a promotional film I shot with director Oliver Park for Closer Each Day, an improvised stage soap.
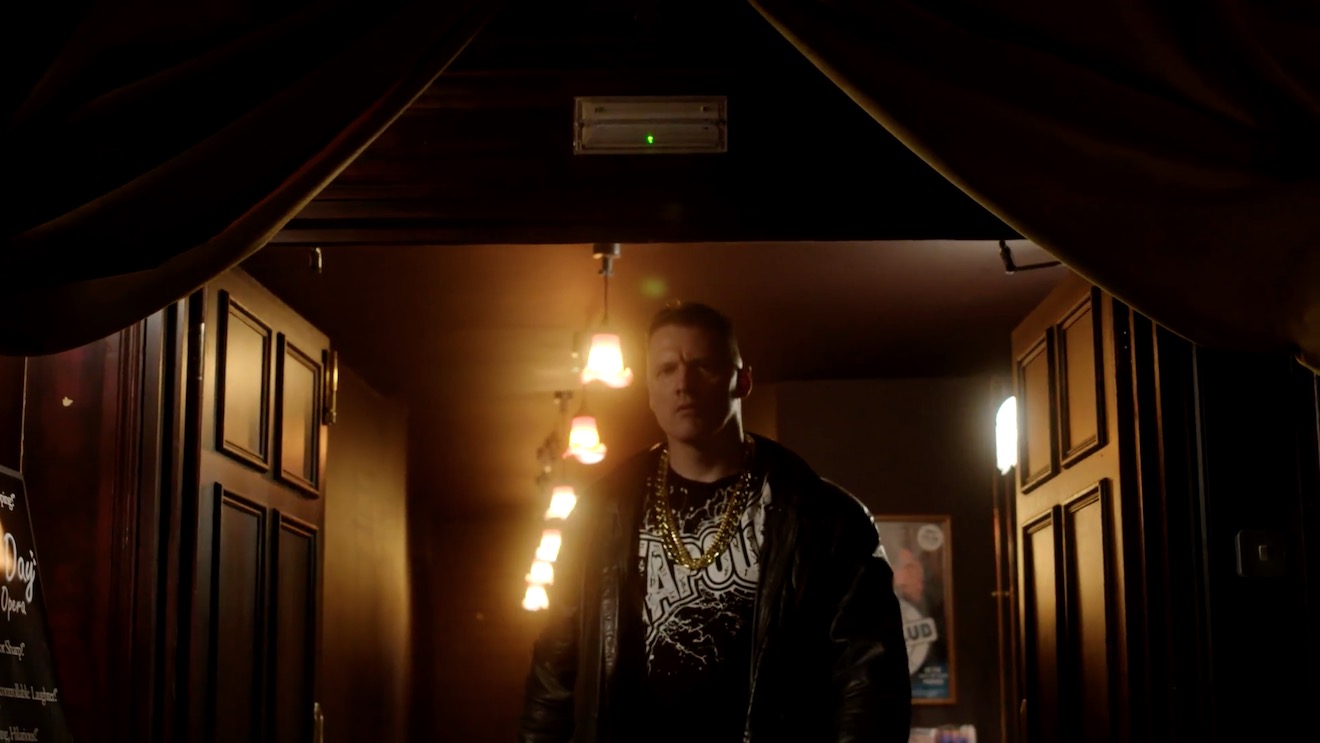
Our location was a pub, which had a large number of existing practicals: mainly wall sconces, but some overheads above the bar and in the corridors too. The film had to be shot in a single night, entirely on Steadicam, with some shots revealing almost the whole room, and to further complicate matters I was a last-minute hire due to another DP having to step down. Keeping the lighting simple, and avoiding putting any “film lights” on the floor where the roving camera might see them, was clearly the way to go.
I identified the darker areas of the room and added a few extra sources: two blue-gelled 800s outside the windows, an orange-gelled 1×1′ LED panel in the wood-burner, an LED reporter light in one key corner, and a small tungsten fresnel toplight onto a key table, firing down from the mezzanine so it would never be in shot. Other than those, and a low level of fill bounced off the ceiling, we relied exclusively on the existing practicals. (They were mainly fluorescent, and ideally we would have reglobed these all with tungsten, but it wasn’t possible.)
This view from the mezzanine shows the diffused 300W fresnel top-lighting the drinking contest table, and the black-wrapped 650 firing into the ceiling for fill.
So, that’s the “positive” lighting. Here are three examples of “negative” lighting in the film…
When Big Dick Johnson (yep, that’s the character’s name) first enters the pub, I put a piece of tape over a little halogen spotlight just above his point of entry. This was partly because it was very bright and I didn’t want him to blow out as he walked under it, but it also made for a much better sense of depth in the overall shot. As I’ve often mentioned on this blog, the best depth in an image is usually achieved by having the foreground dark, the mid-ground at key and the background bright. Killing the halogen spotlight helped create this progression of brightness and therefore depth. It’s also just nice in a shot like this to come out of darkness into the light, enhancing the reveal of the new space to the viewers.
When Billy De Burgh scrambles to buy a ticket at the box office, there are two practicals just above his head. Depending on which way we were shooting, I de-globed one of the fixtures – always the one closest to camera. This ensured that Billy always had backlight, and never had a really hot, toppy front-light shining harshly down on him.
On a side note, the blue light inside the box office was existing – I guess they were using cool white LED bulbs in there – and I really like the way it differentiates the spaces on camera. It puts the bored ticket-seller in a cold, detached world very separate to Billy’s warmer, more urgent world.
This doorway where Big Dick ends the film had sconces on both sides. It’s never very interesting to have an actor evenly lit on both sides of their face, and especially as Dick is such a tough, unpleasant character, I felt that more contrast was required. I chose to remove the globe from the righthand sconce, so that when he turns camera left to look at the sign he turns into the remaining sconce, his key-light. We filled in the other side of his face a tiny touch with a reflector.
I would love to have been able to exercise the same control over the street-lamps in the opening scene of the film – some of them are quite flat and frontal – but unfortunately time, budget and permissions made that impossible. We would have needed huge flags, or a council-approved electrician to switch the lamps off.
That’s all for today. Next time you’re in Bristol, check out Closer Each Day. I didn’t get chance to see it, but I hear it’s brilliant.
I wrote the bulk of this post over two years ago, when I wrapped photography on Sophie Black’s short drama Night Owls. As usual for no-budget shorts, there followed a long postproduction and then a festival run (it premiered at London Short Film Festival this January) which prevented us releasing any footage online.
But this week a number of great things have happened for the film. Firstly, Night Owls has been released online – you can see it here – and every view counts towards Promofest’s “Short of the Year” competition, so have a watch and help us win! Secondly, the film won an Honourable Mention and Best Actor (Jonny McPherson) at the LA Film Awards. Thirdly, my work on the film won me Best Cinematography at the Festigious International Film Festival.
Photo by Elly Lucas
So this is the perfect time to finally publish this look at the decisions and techniques I used in lighting and lensing the film. Night Owls was one of the first projects I shot on my Blackmagic Production Camera, and you can read what I thought of the camera in action in this post from May 2014.
Sophie wanted a soft, warm and cozy look to the short, which is set over a single night, mostly in one room, and tells how a teenage girl and an older man become unlikely friends. At the same time, the dialogue-driven script had moments which hinted at darkness and suffering in the past of both characters. And a cozy look suggests practicals like table lamps, which by their nature cast pools of light and leave other areas in darkness.
On a practical level – if you’ll excuse the pun – I knew that the need to hide lights that would boost the apparent output of the practicals would limit my options in the wide shots, and therefore also in the close-ups which would of course have to match. When shooting a day interior, you can easily stick a huge light outside the window and then shoot pretty much anywhere in the room, crabbing the light to one side or the other if it threatens to come into shot or cast a shadow of the camera. In a night scene with practicals, it’s not so simple.
Dedo rail
We knew in advance that we could not screw anything into the location’s ceiling, so I was relieved to find that the room had a nice, chunky picture rail all the way around. This soon became a dedo rail, as I used magic arms and k-clamps to rig two of the little spotlights in a classic cross-lighting formation. What I mean by this is that each light was positioned so as to provide backlight on one character and frontlight on the other. This is almost always my starting point when lighting a scene with two characters, and it really came into its own on this project. (See my post on cross-backlighting for more info.)
We had to shoot most of the scenes during the day, so the windows were blacked out. The one that appears on camera was tented around so that we could shine in a blue-gelled redhead, to suggest moonlight, without allowing any daylight in. Another blue-gelled redhead was set in the hall outside the door, creating depth and colour contrast. Our 1.2K HMI was placed in the next room, right at the far end. In front of it we rigged a sort of faux stained glass panel, that had conveniently broken out of another door in the house just the previous week, in order to cast a window-like shadow and give the impression of moonlight coming through a window in the next room.
The reason we rigged so many cool sources was that the first scene in the living room featured only Kent (played by Jonny McPherson), and Sophie had requested that the images only become warmer when Mari (played by Holly Rushbrooke) enters the film. We turned on fewer of the practicals for this first scene, but it was still necessary for their light (represented by the dedos) to be warm in colour to establish that for the later scenes. To counteract this and bring everything back into the blues a bit more, I set up a third dedo, gelled blue, to produce a cool lens flare.
Setting up for the first living room scene. The crossed dedos can be seen in the top left and top right, while the dedo in the foreground is solely to produce lens flare.
Sophie and I had talked about various ways of softening the image. We considered hiring a black promist filter, but after rewatching Christopher Ecclestone’s season of Doctor Who, which appears to be have been entirely shot using a black promist, I decided the look was far too cheesy. In the end we went for a set of Zeiss lenses which had had their anti-flare coating ground off. We felt that lens flares would give some sparkle and magic to the images, as well as giving us the opportunity to soften the contrast in the image when necessary. The flares were usually created by an additional lamp, often a dedo or a battery-powered pag light held by Col, aimed directly at the lens.
When Mari enters, Kent has lit the fire, so Col and I set up our usual cluster of 100W tungsten bulbs covered with an orange gel and rigged to a dimmer board. With hindsight we could have gone much more orange with the gel and much more flickery with the dimmer board action, but since the fire at the location was a wood burning stove with only a very small window, it’s probably good that the source of the light remains ambiguous. For the close-ups, the cluster of four bulbs was rearranged into a straight line, which gave a lovely, soft underlight to the character’s faces.
Night Owls’ signature overhead shot. Sophie had a far more complicated shot planned, but it just wasn’t achievable with equipment we could afford.Shooting the top-down shot. The redhead in the centre of the image is providing lens flare. The white blob at the end of the C-stand arm on the left is a 100W bulb surrounded by a string-of-crystals lampshade.
A major scene later on sees the two characters lying top-and-tail on the floor, and was shot from a jib kindly provided by All Doors Lead Somewhere Productions. Overhead shots of people lying down can look very flat, but rather than trying to combat that with cross-lighting, I decided to embrace it and light entirely from above. Sophie and Anya Kordecki, the production designer, had found these great practical lights surrounded by strings of crystals, which cast lovely shadows. Knowing that two of these lights were supposed to be just out of shot on either side of frame, I took some license and rigged them one directly over each character’s face, replacing the 40W bulbs with 100W ones. This created a nice pattern of light and shadow radiating out from the faces. To add further contrast, I spotted two dedos up on the actors as well, one for each, gelled with half CTB, so that the centre of each radial pattern had a cooler, brighter circle of light. I decided to shoot on a white balance of 4,500K so that these centre spots would appear white and the radiating pattern would appear slightly orange.
When the characters sit up later in the scene, the two practical lights were almost perfectly positioned to provide cross-backlight. Again I used the dedos to produce the light that is supposedly coming from the practicals. I cheated Mari’s key light around quite a bit; it should really have lit the camera-right side of her face given where the practical was positioned, but we lost too much of her expression that way when she looked at Kent, not to mention that it didn’t look as aesthetically pleasing.
The film noir shot. A dedo out the rear left of frame provides the hot backlight, while Mari’s key is a second dedo also off left, but in front of her. A miniscule amount of fill is provided by another practical behind the camera.
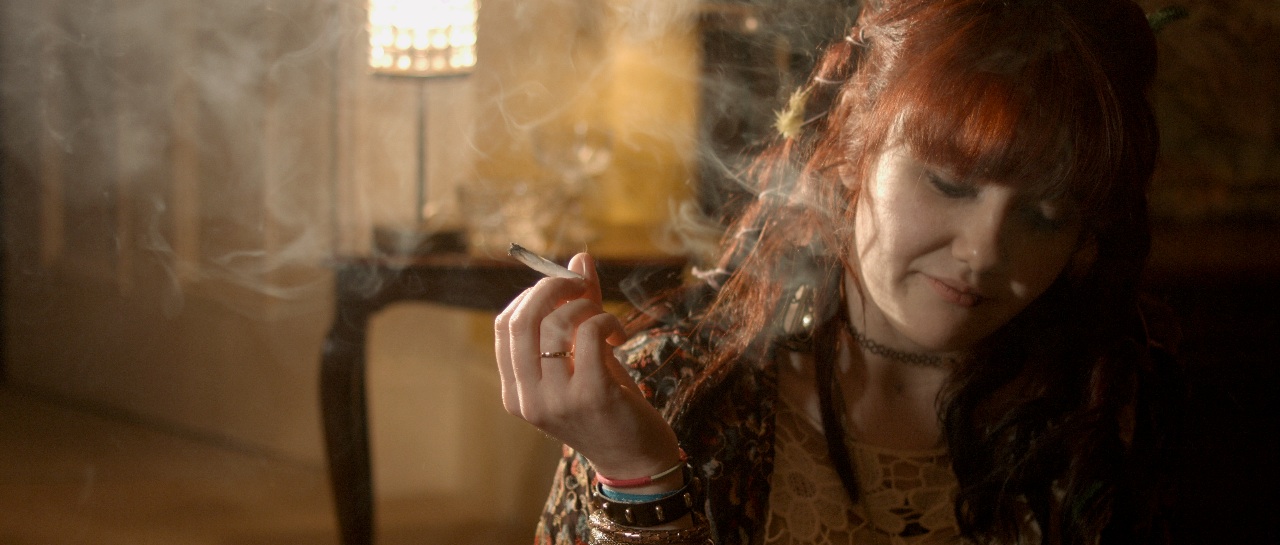
I hadn’t been intending to use so much hardlight. I’d actually purchased a sheet of unbleached muslin prior to the shoot with the aim of rigging some kind of book light, and I almost did it for these sitting-up close-ups. But Sophie had asked for Mari’s close-up to have a film noir look, highlighting the smoke from her spliff, besides which the weed was bringing out some home truths for the characters, so it made sense to go with stark lighting. The dedos were perfect for this, with their intense, focused light showing up the smoke brilliantly when shone from behind, and spotlighting the actors when shone in from the side. The dark sides of the characters’ faces were lit by a tiny amount of light that’s genuinely coming from the practicals.
The sun – a 1.2K HMI – bursts through.
Near the end of the film, the sun rises, throwing a shaft of light into the room. This was supplied by the 1.2K HMI. With hindsight, cranking up a wind-up stand would have been the best way to create the rising effect, but we didn’t have one, so instead the lamp remained static and Col lowered a sheet of card to give the impression of the sun rising over the horizon. Copious smoke was used so that the beam of “sunlight” would show up on camera.
The 1.2K HMI backlights Mari and the rain, while Kent holds a practical just out of frame for key.
Night Owls is book-ended by doorstep scenes, the first set at night during a rainstorm, the other on a sunny morning. For both scenes I used the HMI as backlight. This was particularly neccesary for the night scene in order for the rain – actually created by a hosepipe – to show up. (For more on faking rain, check out this post.) At night I set my white balance to 3,200K so that the HMI would appear blue, suggesting moonlight, and in the morning I gelled the HMI with Light Straw and shot on a 5,600K white balance. Fill light was provided at night by the electric candelabra Kent was holding, and in the morning by a makeshift bounce card (a square piece of mountboard covered in silver wrapping paper) hidden from camera by Kent’s body, plus a blue-gelled redhead off to the side of the hall. When we turned round to shoot outdoors looking in, it was necessary to diffuse or dim the HMI, and to break up its light (which now looked very flat due to the lamp being so close to the camera) using tree branches.
That’s about it! Though I think I would do some things differently if I was shooting it now (more soft light, definitely), I’m still really proud of the film and the work I did on it. It’s very satisfying that Night Owls is now gaining the recognition it deserves. Don’t forget to check the film out here. And if you want to know more about the lighting set-ups described above, subscribe to my Instagram feed to see some lighting diagrams and behind-the-scenes photos over the next few days.
Images from Night Owls courtesy of Triskelle Pictures, Stella Vision and Team Chameleon. Produced by Sophia Ramcharan and Lauren Parker. Starring Jonny McPherson and Holly Rushbrooke.
From time to time I help out my friend Kate Madison shooting show reels for actors. The fun and the challenge is in creating and lighting little micro-sets to capture angles that look like they might be lifted out of a scene from a much larger production, all with limited equipment.
Here’s an interesting shot from a recent showreel for Dana Hajaj. This was intended to resemble a Good Wife style legal drama, though actually the first reference that the lawyer’s office setting brought to my mind was Ally McBeal. I remember how they often had hot sunlight coming in through their office windows which would hit the talent from the chest down, while softer, indirect daylight would illuminate the faces.
Clearly this technique wasn’t exactly going to work for an MCU, but it did get me thinking about windows as two-in-one sources: a hard source which adds interest and ‘sheen’ to the image but is too harsh to hit faces with, and a soft sources for faces. Often cinematographers will use two different lights through the same window to achieve these two distinct effects. (I sometimes employ what I call a “Window Wrap” to this end.)
Now, the set for this showreel shot was just a red wall and sconce. (We tried a plant in the corner but couldn’t get it to work.) I wanted to suggest what the rest of the set might be, beyond the borders of this MCU, and simulating a window seemed like a natural choice. Furthermore, a window with Venetian blinds would help sell what was really a living room as a place of business. But this was not film noir; I didn’t want stripes of light on Dana’s face. Instead I used them to add interest to the wall.
Kate had a slatted-top stool in the hall which threw convincing “blinds” shadows when clamped to a C-stand in front of an 800W Arrilite. Ideally the shadows would have been sharper, but without a Dedo or a par this was the best I could do.
To get the maximum richness from the practical, I put a topper (black wrap clipped to the stool!) on the 800 to keep it off the sconce, and placed CTO inside the lampshade to warm up the fluorescent bulb.
To key Dana, I fired a 1K Arrilite into a 4’x4′ polyboard which was positioned next to the stool. Tungsten bounced off poly gives a beautiful soft, matt quality of light, and is a great way to key talent.
The backlight comes from a 1’x1′ LED panel set to about 4500K. What is the motivation for this source? North light coming from another window maybe? The great thing about micro-sets is there’s no wide shot so I don’t have to worry about that if I don’t want to! The motivation is that cold backlight looks good on black hair, and that’s that.
As we prepared to roll, I wondered if I should increase the contrast more. I could have done this by (a) flagging the poly bounce to prevent it filling in the “blinds” shadows on the wall and (b) bringing in negative fill on the talent’s camera right side to kill the ambience. But I decided that more contrast was not appropriate for this kind of piece.
For another scene for Dana’s reel, we mocked up a remote Arabian campsite on Kate’s patio! Kate used a piece of fabric hung from a post and two light stands to represent the tent.
I wanted to give the impression that if we cut to a wide shot – which of course we never do, but if we did – that it would show a vast landscape, perhaps a desert, all backlit by moonlight. On this hypothetical production, I would generate that moonlight with 18Ks on condor cranes, gelled with Steel Blue.
But on this tight shot I was able to achieve the same effect with two far smaller sources, both gelled with Steel Blue. (This is a blue with more green in it than CTB. It’s prettier and has connotations of many 80s and 90s thrillers and action movies that seemed to use copious amounts of this gel.) In the deep background is an LED panel, 3/4 backlighting a couple of blurry apple trees that could maybe play as vegetation around an oasis. Immediately behind the “tent” is a 40″ C-stand, top floor, with a 1K Arrilite on it. So close to the talent, the 1K comes down at a steep enough angle to imply moonlight, or an 18K on a condor, depending on how you want to look at it.
The flames from the fire pit weren’t doing much to light Dana, so I bounced another 1K off a gold reflector on the floor next to the fire. During takes I wiggled the reflector to add dynamics to the light.
To add a final touch of production value, I suggested a foreground practical. Kate found a candle lantern which we hung from a flag arm just in front of camera. Every frame of a Blockbuster movie is packed with details, so things like this help a lot to sell the scale.
The 1K “moon” backlight is at top left. The gold reflector for the fire source is in the bottom centre, with the 1K bouncing into it visible two-thirds of the way down the right-hand edge of this image. The camera is just out of the bottom right corner of this frame. Not pictured is the LED background light, way back off left of this frame.
Season one of Ren: The Girl with the Mark has come to an end, and to ease the pain a little, here’s one last video breakdown of the show’s cinematography. This week I talk about the exterior scenes from daylight through sunset to night.
Here is the lighting plan for the final scene:
Check out the article I wrote during the shoot about the sunset scene if you’re still hungry for details. And here is an unpublished blog post I wrote during the shoot about the village night exteriors…
The 2.5K HMI backlight. The dimmer board for the Cyclotron can be seen in the lower right.
The last two days of principal photography on Ren were actually night shoots. It was great to take the village set that I’d shot in natural light for five weeks and chuck some of my own light at it.
In his American Cinematographer interview about The Monuments Men (February 2014), Phedon Papamichael said, “My big night-exterior lighting setups usually have one source” – often a backlight, judging by the examples given in the article – “and then I use whatever practicals are in the shot.” My approach is much the same, though a big source for me is a 2.5K HMI, not an Arri T12, sadly!
One of the Urban Sodium-gelled 800W Arrilites beefing up the braziers
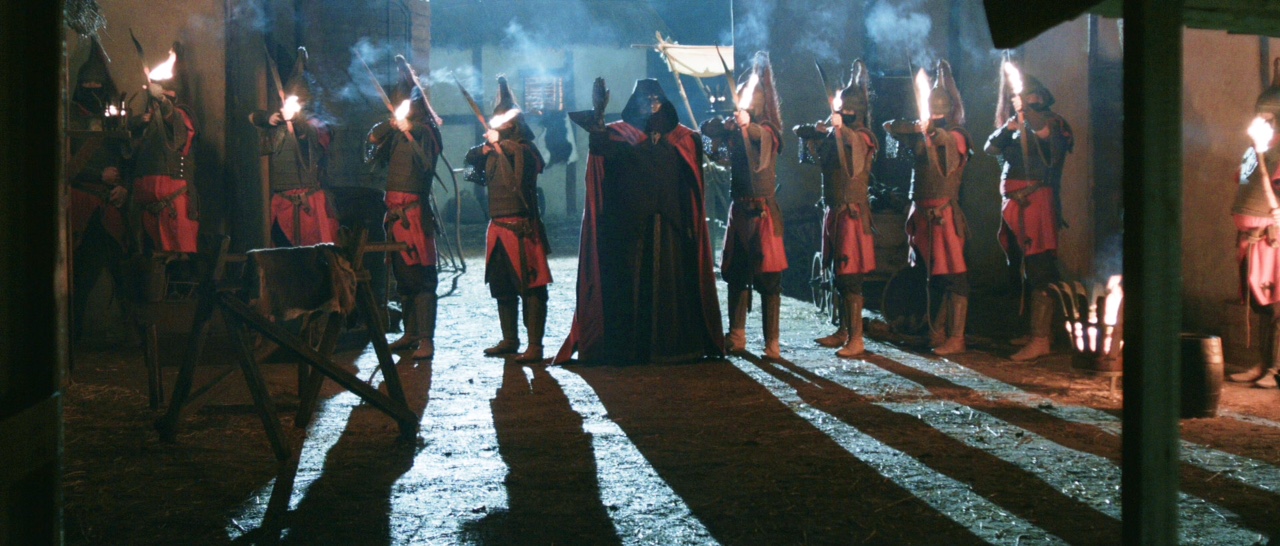
I knew our key shot was going to be Ren’s POV looking up the street to the Kah’Nath Master flanked by several archers, with Karn and Baynon in the background. I set up my 2.5K dead in the back of the shot, its stand hidden by the furthest house facade.
One of the Urban Sodium-gelled 800W Arrilites beefing up the braziers
The plan was for the archers to light their arrows from two braziers, one either side of the street, so Chris Dane and Amanda Stekly dressed these in accordingly. I set up an Arrilite 800 near each one, choosing Urban Sodium gel to give the “firelight” a grungy colour appropriate to the bad guys. (I was shooting on a tungsten white balance to turn the HMI moonlight blue.)
The dimmers controlling the Arrilites
Chris – by this time well-attuned to my lighting needs – also rigged a third brazier to act as the key light for himself (Karn) and James Malpas (Baynon), towards the back of the set. The Arrilite for this one I gelled with full CTO for a yellower, friendlier colour.
All three Arrilites were run through in-line dimmers, and various bystanders were co-opted to flicker them throughout the evening.
The Cyclotron
I rigged a Cyclotron behind the window of the background house – four 100W bulbs under a sheet of CTO, wired to Colin’s dimmer board so they too could be flickered, suggesting firelight inside the house.
The Celotex bounce board
I figured that the front of this house would still be very dark, being out of range of the Arrilites and facing away from the HMI, so I had gaffer Richard Roberts rig a Celotex board to bounce some of the HMI light back onto it. As it turned out, when it got dark and we fired everything up, there was lots of bounce off the set pieces closest to the HMI anyway. This was a nice bonus that gave us more options when blocking Karn and Baynon’s actions, without having to set up extra lamps.
A sunset view of the lighting set-up from roughly the master camera position. The LED panel on the left was used only as a work light.
When the braziers were lit and the Master and soldiers strode onto the set in their awesome costumes (courtesy of Miriam Spring Davies and stand-in wardrobe supervisor Claire Finn), we all felt we had a truly epic sequence in the can.
If you’ve missed any of Lensing Ren or Ren itself, here’s a playlist featuring every episode of the fantasy series, interspersed with the corresponding cinematography breakdowns:
On Tuesday the penultimate episode of Ren: The Girl with the Mark was released and so here’s my video breaking down the cinematography of that fourth episode. This week I cover lighting the guardroom and the prison cell, and demonstrate cross-backlighting.
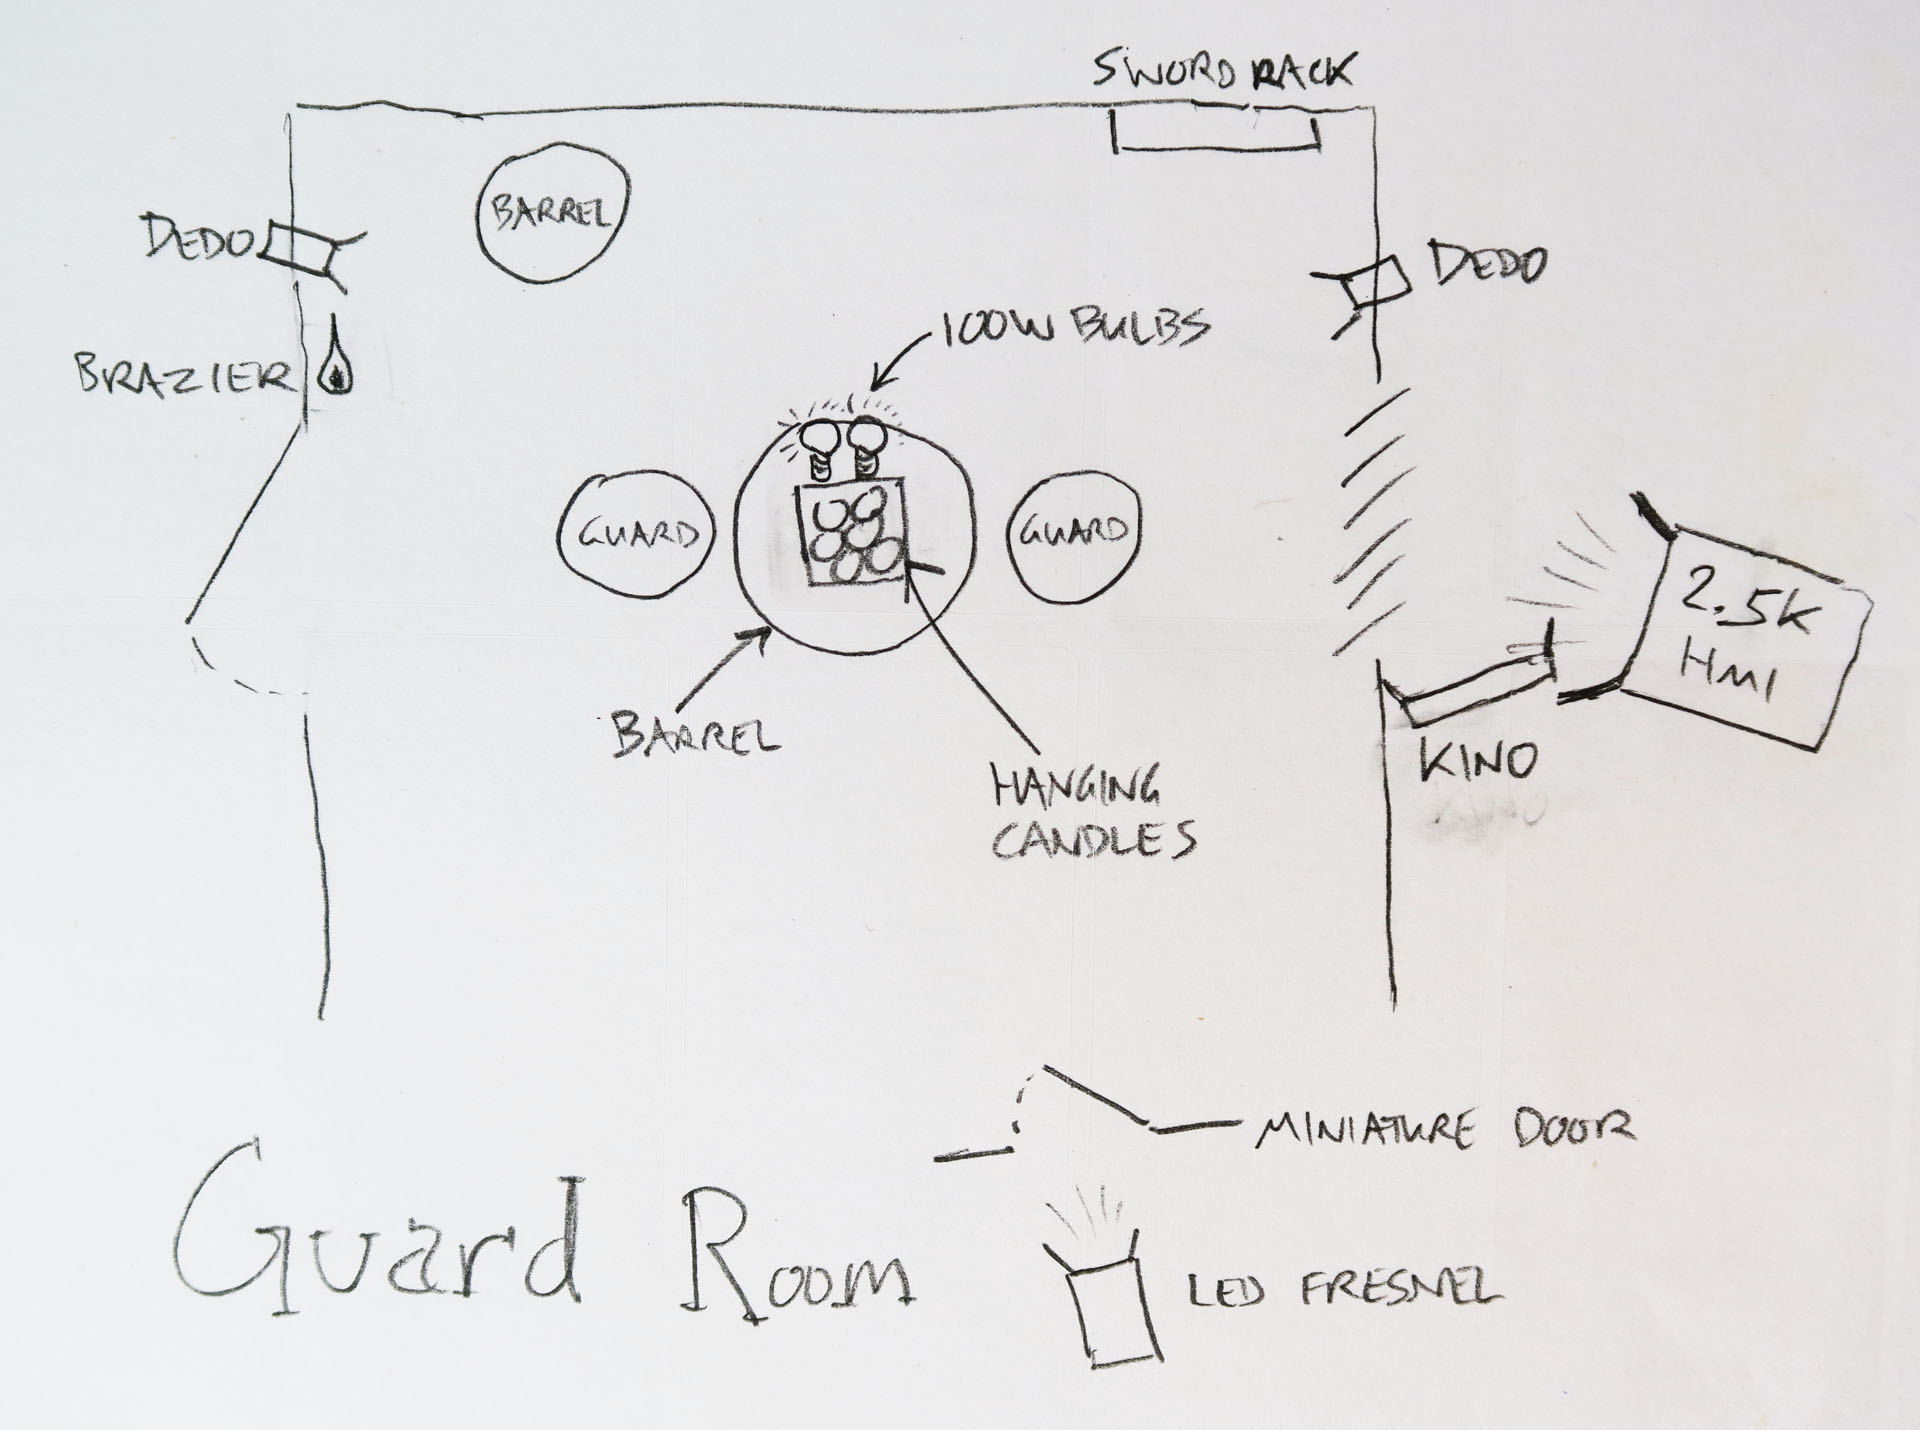
Here are the lighting plans for the guardroom and the cell:
You may also be interested to read the blog I wrote during the shoot about Lighting the Prison Cell, and my post explaining the technique of Cross-backlighting. And here is an unpublished post I wrote during the shoot about the guardroom….
The guard room shoot came at the end of a long and intense week of shooting interiors. By Sunday most of the lead actors had left, we had crested the hill and the end of principal photography was in sight. The atmosphere was even more relaxed and informal than usual, particularly as everyone’s favourite spouter of inappropriate comments, Richard “Squish” Roberts, was playing the lead jailor.
A behind-the-scenes view of the lighting set-up for the window and swords
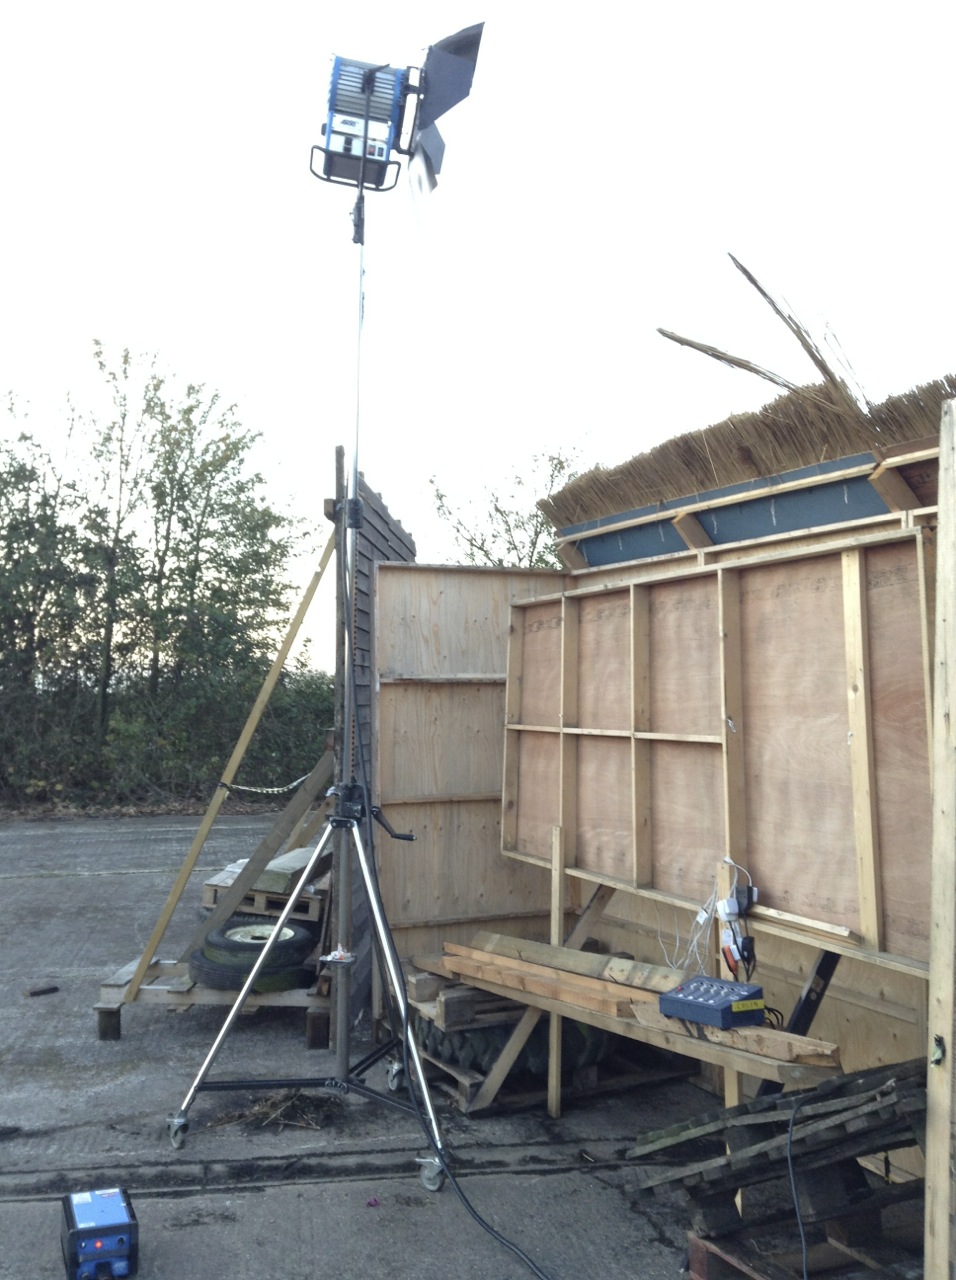
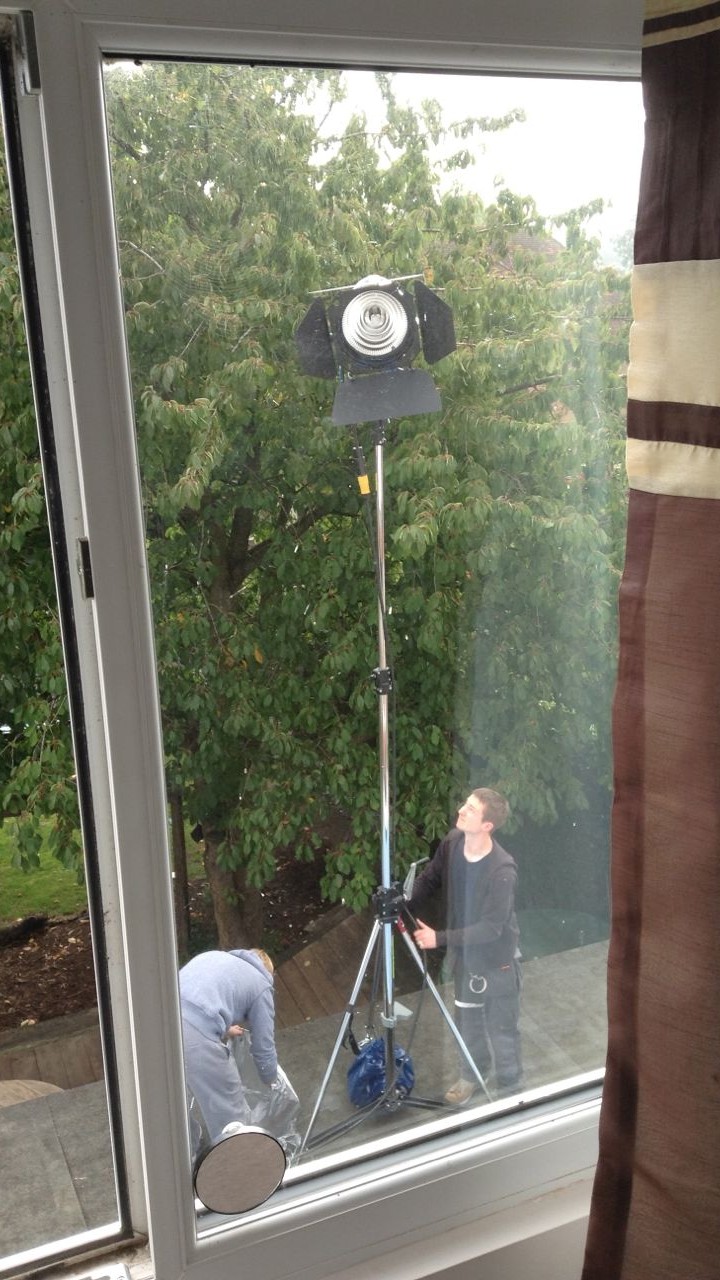
Ren’s bedroom had been repainted and redressed to be the Kah’Nath guard room. This meant a single, small window again, and as usual I couldn’t resist blasting a 2.5K HMI through there for a shaft of hot, smoky sunlight.
The Window Wrap in action on the swords
I wanted to highlight the rack of swords next to the window, which the shaft of light wasn’t catching, so I used a variant on my Window Wrap technique. I put a 2′ 4-bank kinoflo outside the window at such an angle as to light up the swords without blocking any of the HMI light.
I was interested to find that the art team had done something a bit different with the room’s candles, hanging a cluster of them from an overhead beam. I asked for the “table” (actually a barrel) – where the guards would be playing a board game – to be placed directly under that.
The Dedos (left and right of the picture) and 100W globes used to enhance the light from the candles
The candles wouldn’t shed light directly down on the game in the classic single-light-source-coming-straight-down-onto-the-poker-table style, but I felt it would give me an excuse to cross-backlight. I clamped a Dedo to the top of each side of the set, each one spotted on one of the two characters who would face each other across the barrel.
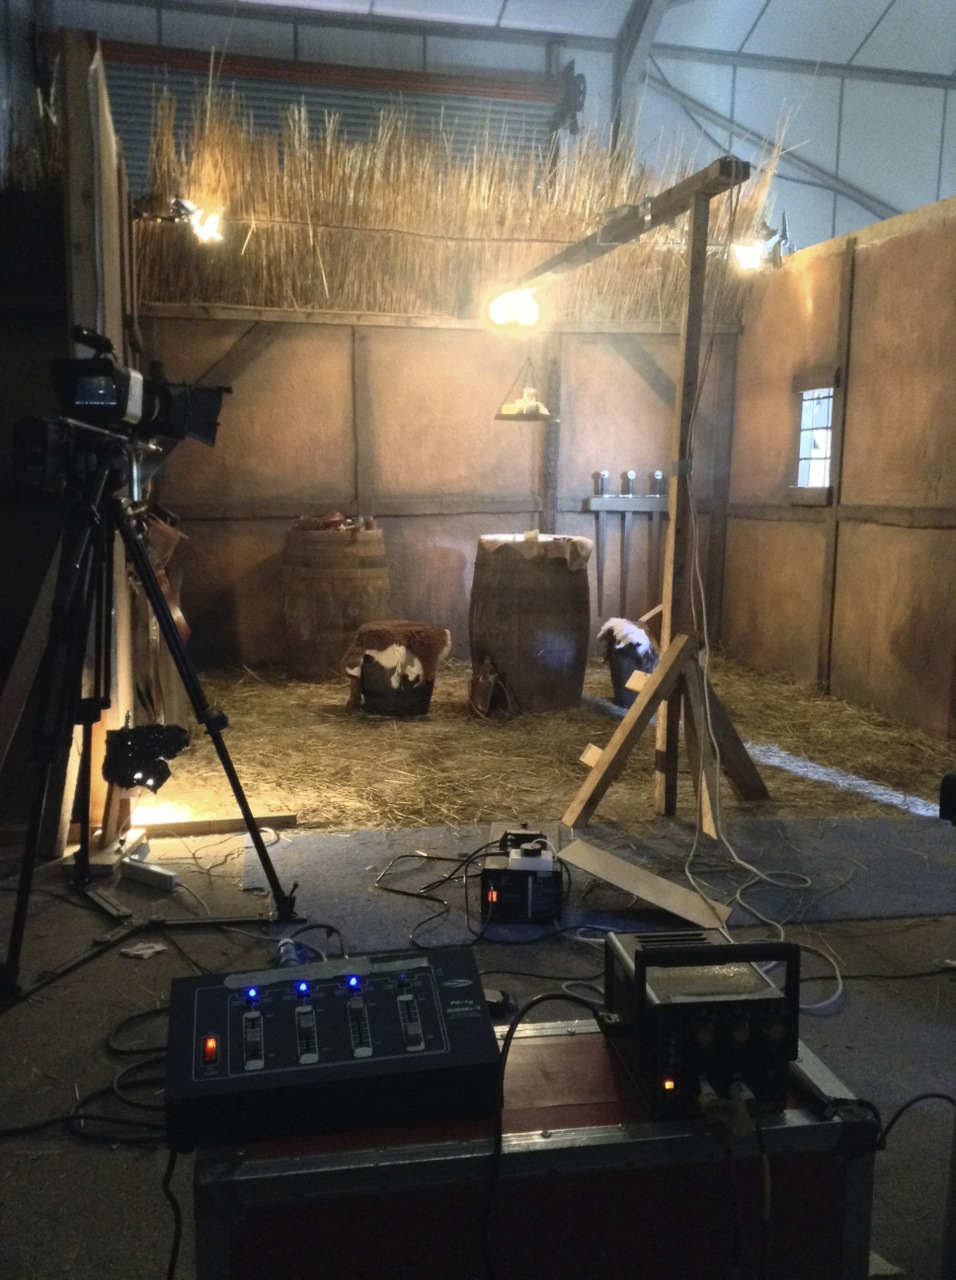
A view of the finished lighting set-up from over the dimmer boards. On the floor to the right can be seen the shaft of light from the LED fresnel coming through the fake door (off right).
These Dedos couldn’t be flickered, being the kind which go into a single control box with only three discreet settings for brightness. So to introduce some dynamics, and soften the light a bit, I clipped a dimmable 100W bulb to either side of the beam from which the candles hung. This would also ensure that Hunter would be lit when he stood next to the barrel.
An additional light source in the set was a small brazier on the wall next to the dungeon door. This seemed bright enough to shed plenty of light by itself, particularly as Squish would be standing right next to it for a large part of the scene.
The final touch for lighting was to re-use the fake door to create the effect of daylight spilling in as characters exited and entered from off camera. This time I placed an LED fresnel behind it.
Check back next Saturday for another instalment of Lensing Ren, and meanwhile watch the next episode of Ren itself from Tuesday at 8pm GMT at rentheseries.com
It’s the mid-point of season one of Ren: The Girl with the Mark and here’s my video breaking down the cinematography of that third episode. Topics covered this week include grip equipment, aspect ratio, smoke and faking candlelight.
Here is the lighting plan for Ren’s bedroom:
There is more on simulating firelight in my First Musketeer blog post Candlelight.
For my thoughts on composing for the cinemascope aspect ratio, take a look at 2.39:1 Composition.
Check back next Saturday for another instalment of Lensing Ren, and meanwhile watch the next episode of Ren itself from Tuesday at 8pm GMT at rentheseries.com
Here’s my video breaking down the cinematography of episode two of Ren: The Girl with the Mark. This week I discuss lighting Ren’s house, tweaking wide-shot lighting for close-ups, and depth of field.
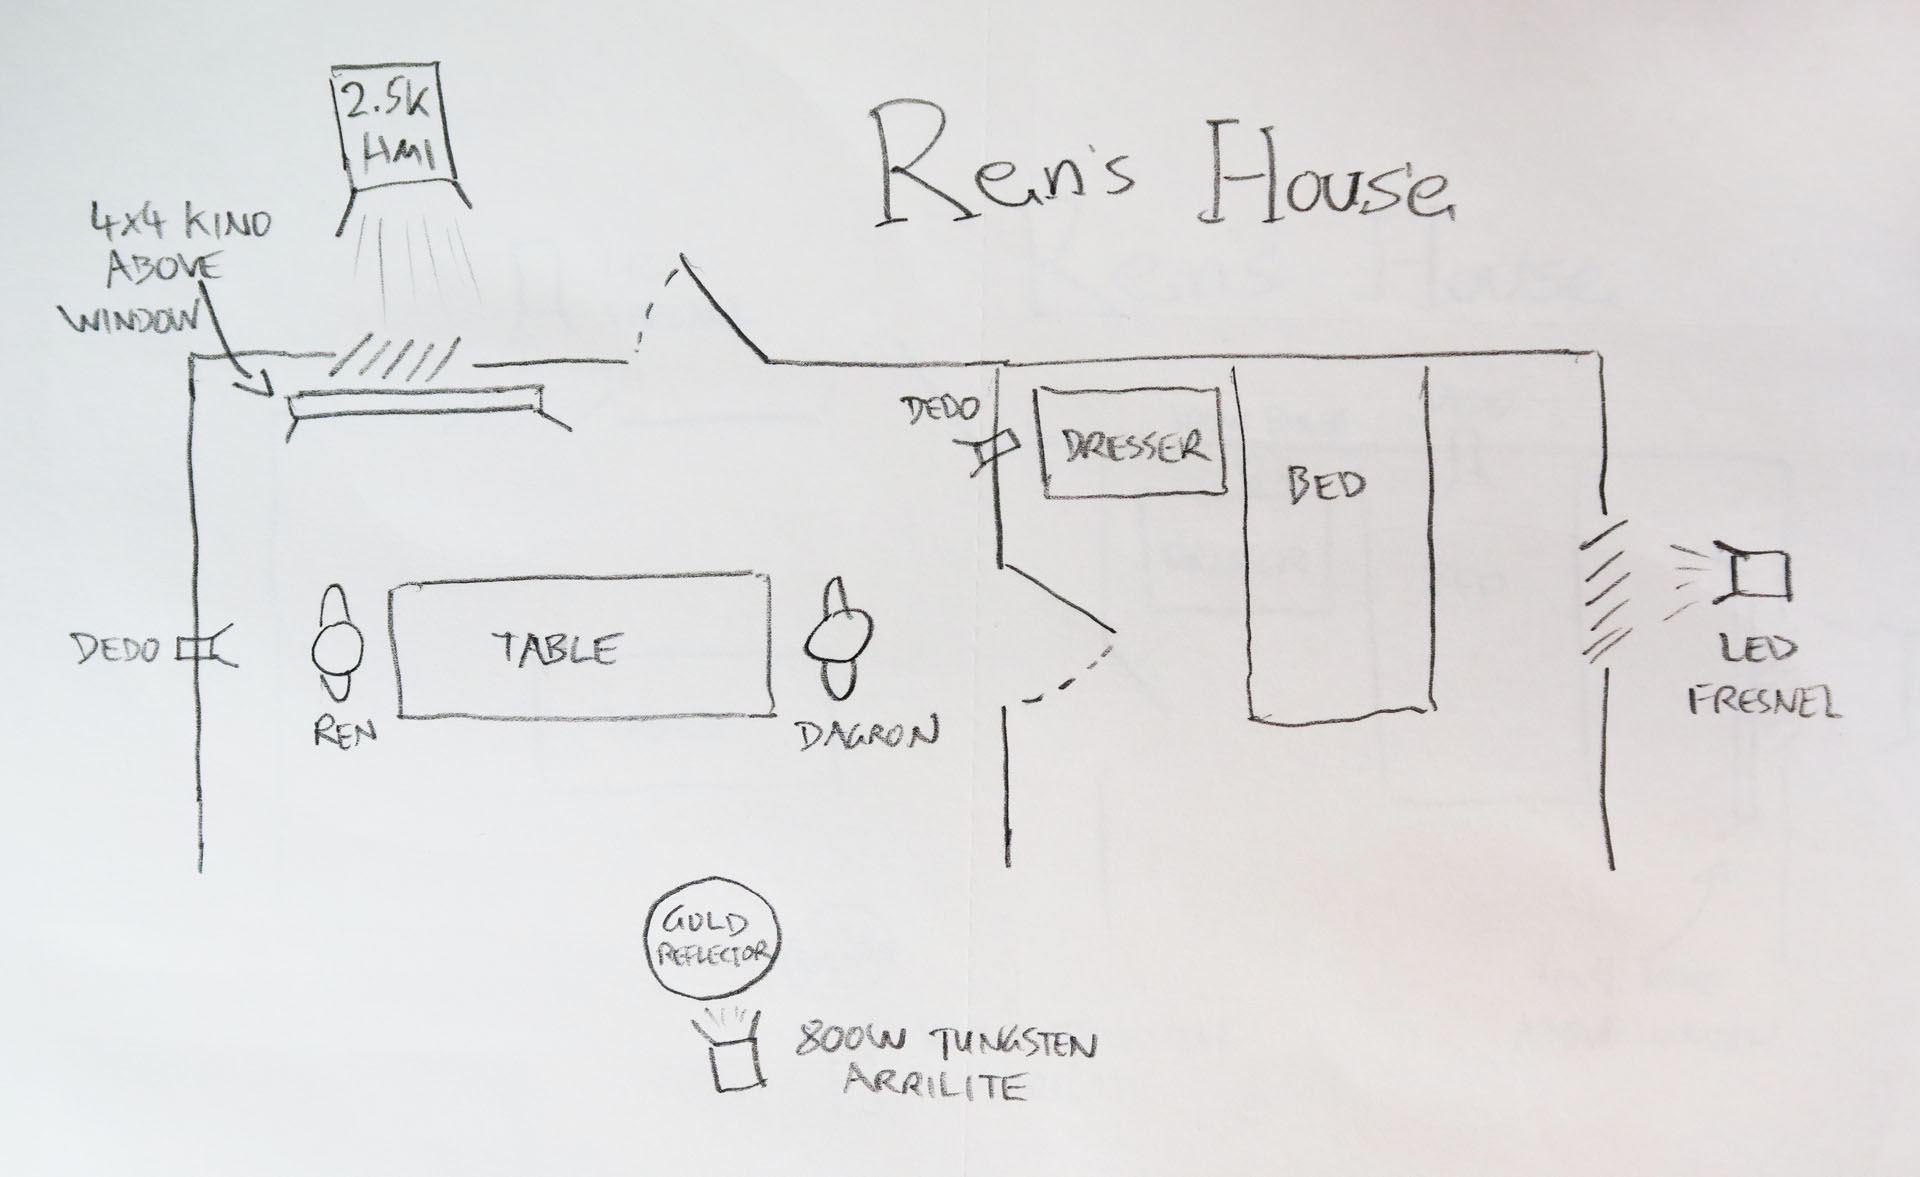
Here is the lighting plan for Ren’s house:
And here is a video blog from the set of Ren’s house:
Check back next Saturday for another instalment of Lensing Ren, and meanwhile watch the next episode of Ren itself from Tuesday at 8pm GMT at rentheseries.com
Here is the first in a series of cinematography videos I’m publishing to compliment the five episodes of Ren: The Girl with the Mark as they are released over the coming weeks. These videos will tell you the how, what and why of photographing the show. This week I discuss the camera equipment used, differentiating characters photographically, and lighting Karn’s magical woodland house.
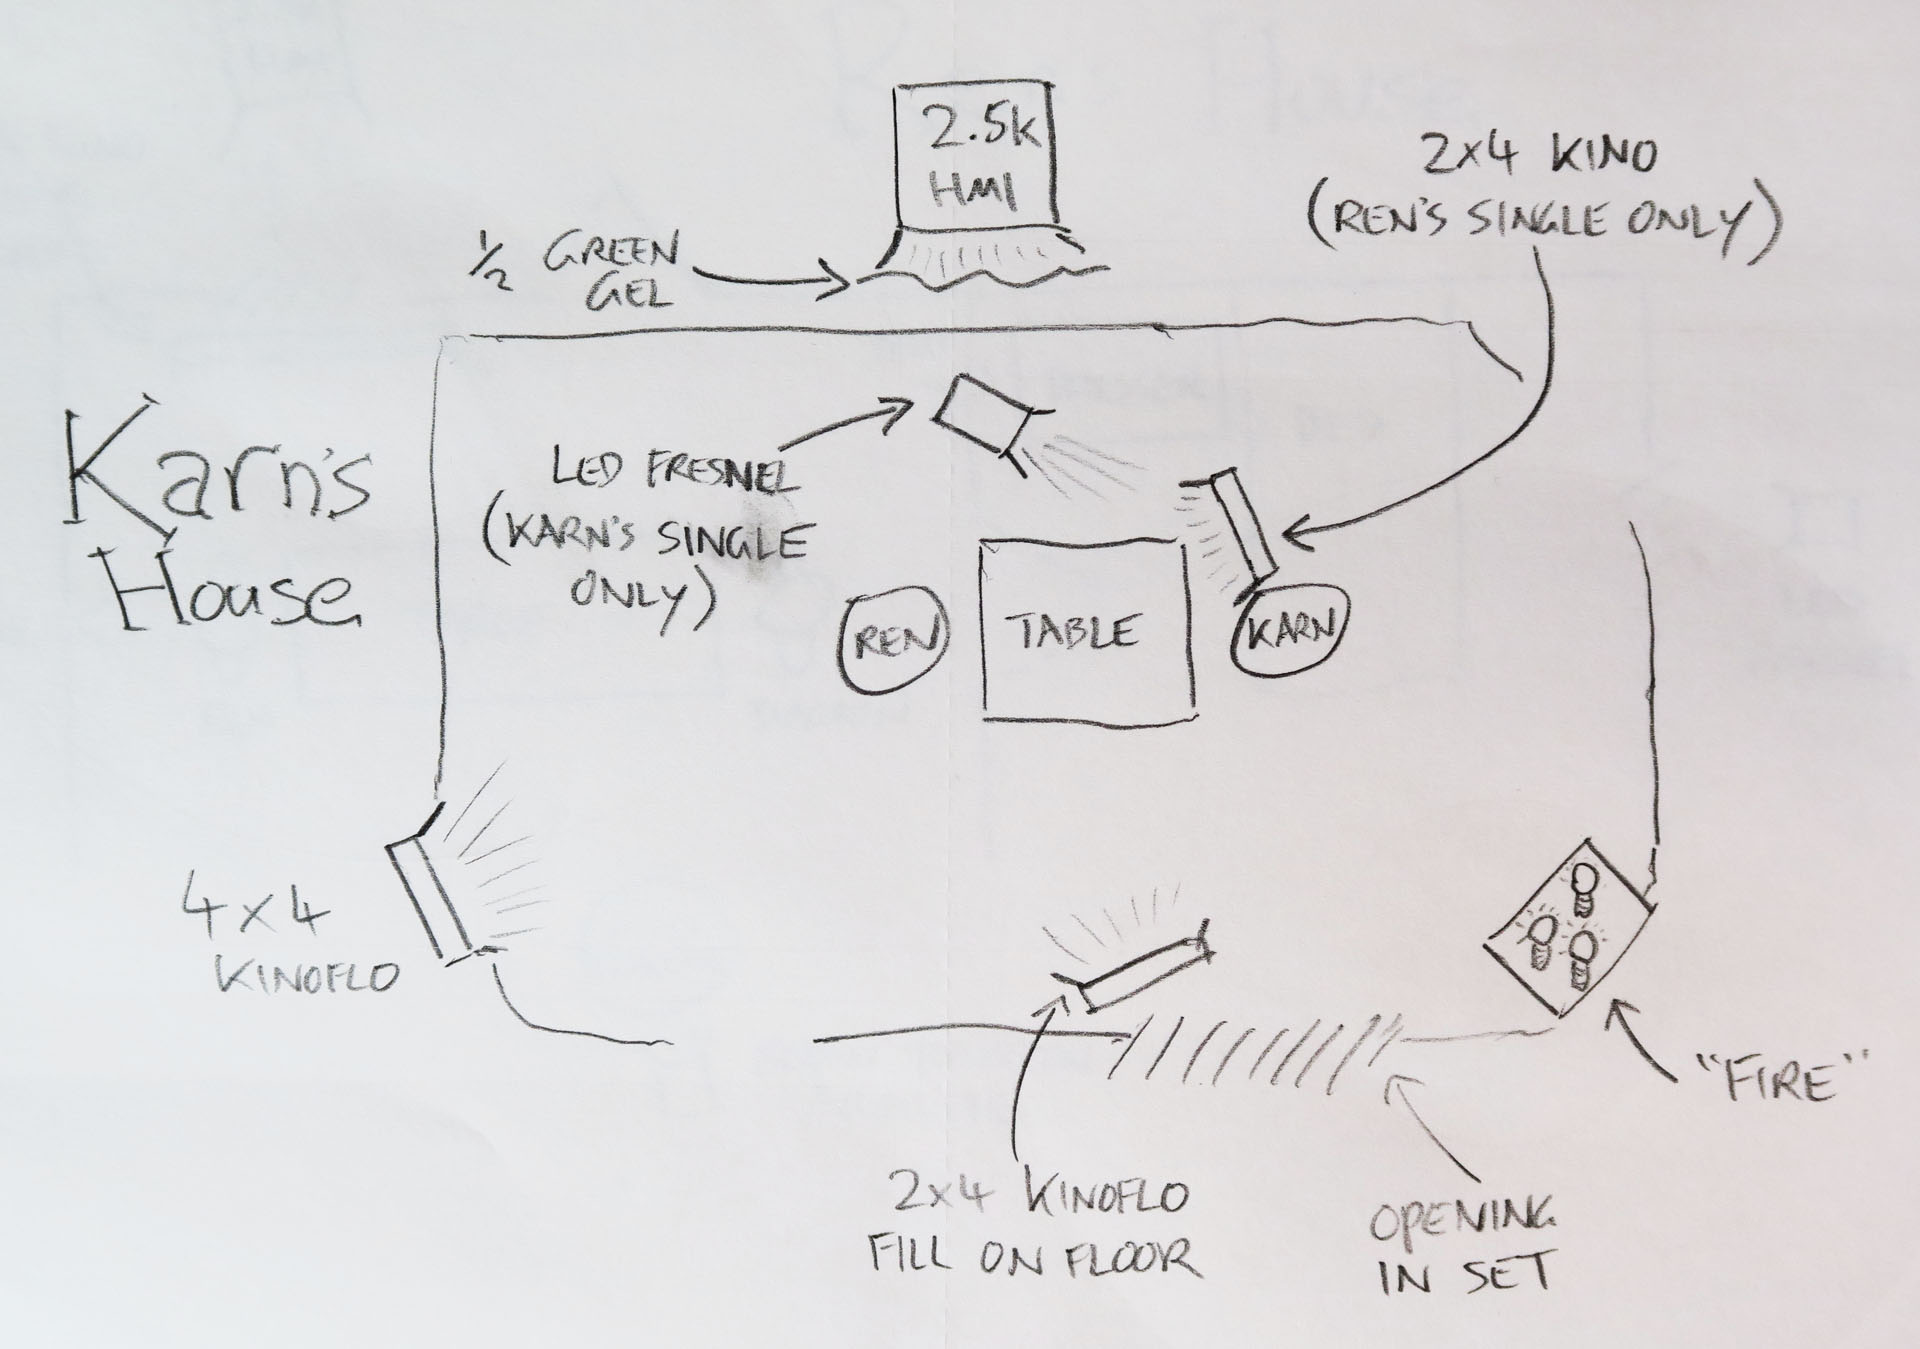
Here is the lighting plan for Karn’s house:
And here is a video blog from the set of Karn’s house:
You may be interested to read my article on Masculine and Feminine Lighting, which gives some more detail on the techniques used to light Ren and Karn in the riverside scene.
Check back next Saturday for another instalment of Lensing Ren, and meanwhile watch the next episode of Ren itself from Tuesday at 8pm GMT at rentheseries.com
The final scene of Crossing Paths to go before the camera was a sombre daylight interior in a bedroom. If you’ve read my last two blog posts you’ll know that backlight is the central pillar of my approach to lighting both day exteriors and night exteriors. Daylight interiors are no different.
For day exteriors your backlight is the sun. For night exteriors it’s usually the moon. For day interiors it’s windows.
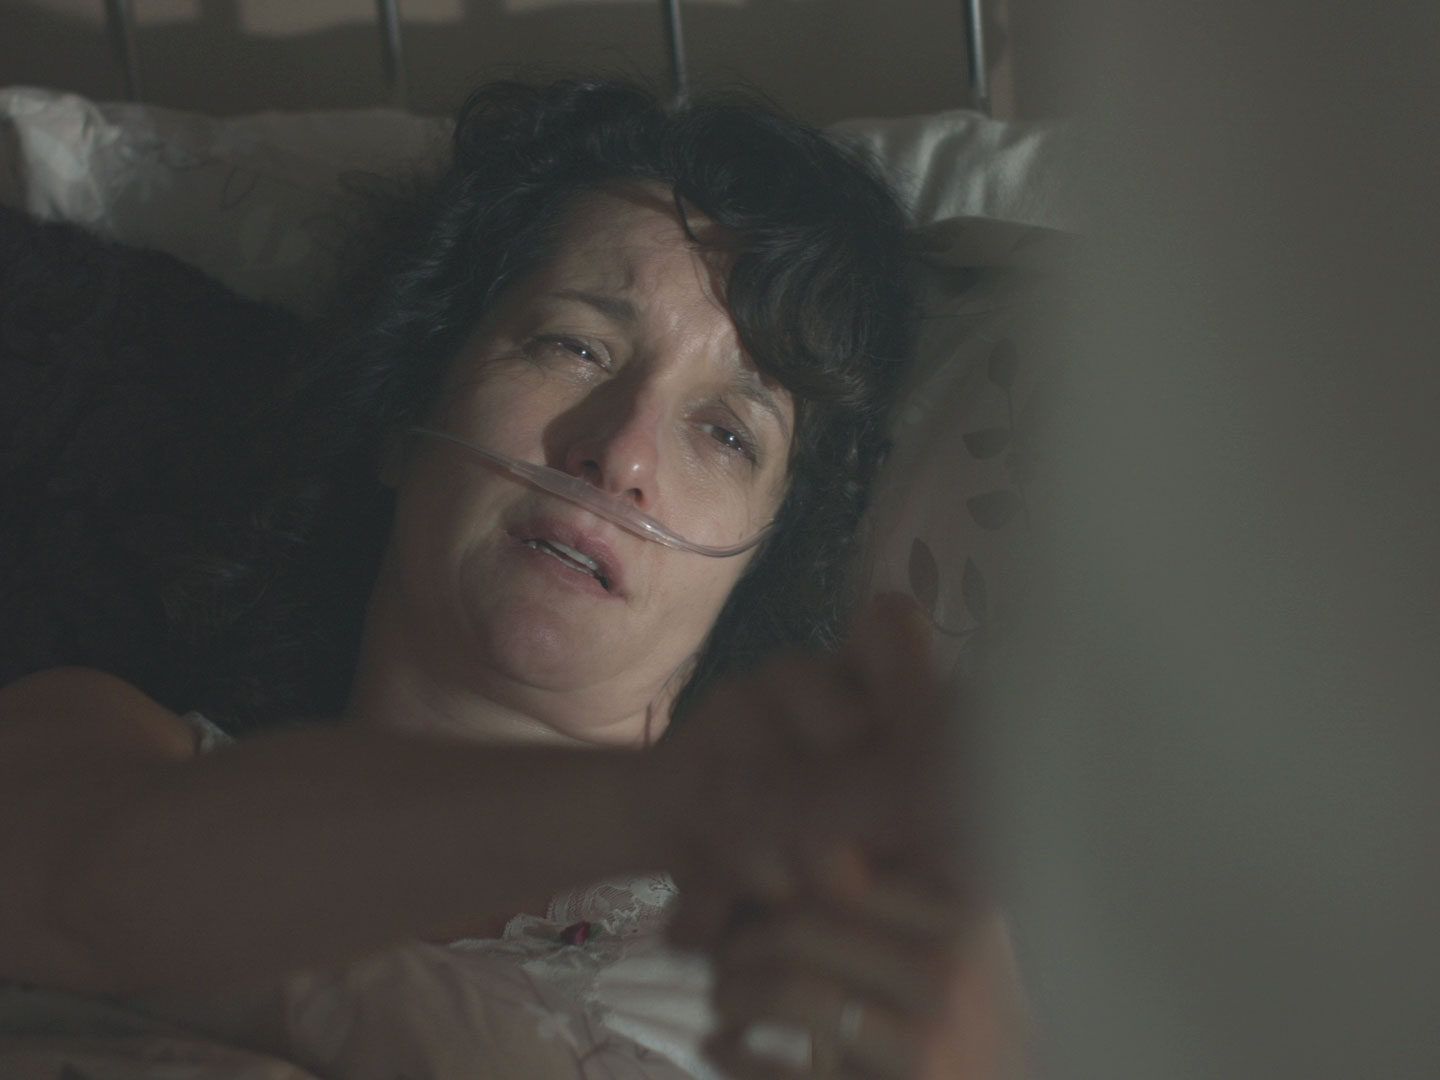
On the location recce I’d agreed with director Ben Bloore and production designer Sophie Black that we were going to shoot mostly towards the bedroom’s window. Given that the bed was the focal point of the scene, this decision was also cinematographically sound because it made for the most depth in the image, the window being in a dormer that distanced it from the bed.
To punch up the natural light coming in through the window – which was on the second floor – I had my crew clamber up on the flat roof of the extension and erect our Arri M18 on a double wind-up stand. Luckily the geography of the room and the blocking permitted the M18’s light to hit Tina’s face as she lay in the bed.
Sophie had dressed a floor lamp in next to the bed, which gave me the perfect motivation to clamp a dedo to the bedframe, uplighting Phil’s face. The cool M18 coming in from the rear right and the warm dedo coming in from the rear left picked out the actors’ profiles nicely, as you can see below. This is a kind of cross-backlight set-up, as explained in Lighting Techniques #2.
Frame grab (C) 2015 B Squared ProductionsThis CU of Tina shows how the M18 coming through the window worked as her key. (C) 2015 B Squared Productions
Immediately above the camera position there was a skylight with a roller blind. By opening or closing the blind I could effectively increase or decrease the level of fill in the lighting. For most of the scene I chose none. Some would argue that it’s best to add fill and then crush it out in post if you don’t like it, but I like to make decisions on the set wherever possible, to deliver the most cinematic image straight out of the camera.
The Magnum 650, a worthy successor to the classic 550
To soften the scene I pumped in lots of smoke. Col had kindly gifted me a Magnum 650 (to fill the smoke machine void in my life since my Magnum 550 packed up last year) and we let that baby rip in that tiny little room! The smoke helped add to the sense of decay and reacted beautifully to the curtains being opened mid-scene.
That’s all from the set of Crossing Paths. I believe the edit is now underway, and I look forward to seeing how this lovely little short film turns out.
The Blackmagic Production Camera, with a native ISO of 400, is not the most sensitive of cameras. But with this scene being a flashback, I gained a stop of light by changing my shutter angle to 360 degrees and making that extra motion blur part of the film’s flashback look. (Click here to read my post on Understanding Shutter Angles.)
ArriMax M18
Just as a DP normally looks to orientate a daylight scene to use the sun as backlight, so they often aim to do the same with the moon at night. Except of course, unless you’re shooting on a Sony A7S, the actual position of the moon is irrelevant because it’s too dim to shed any readable light. Instead you set up a fake moon – usually an HMI – in the position that works best for you.
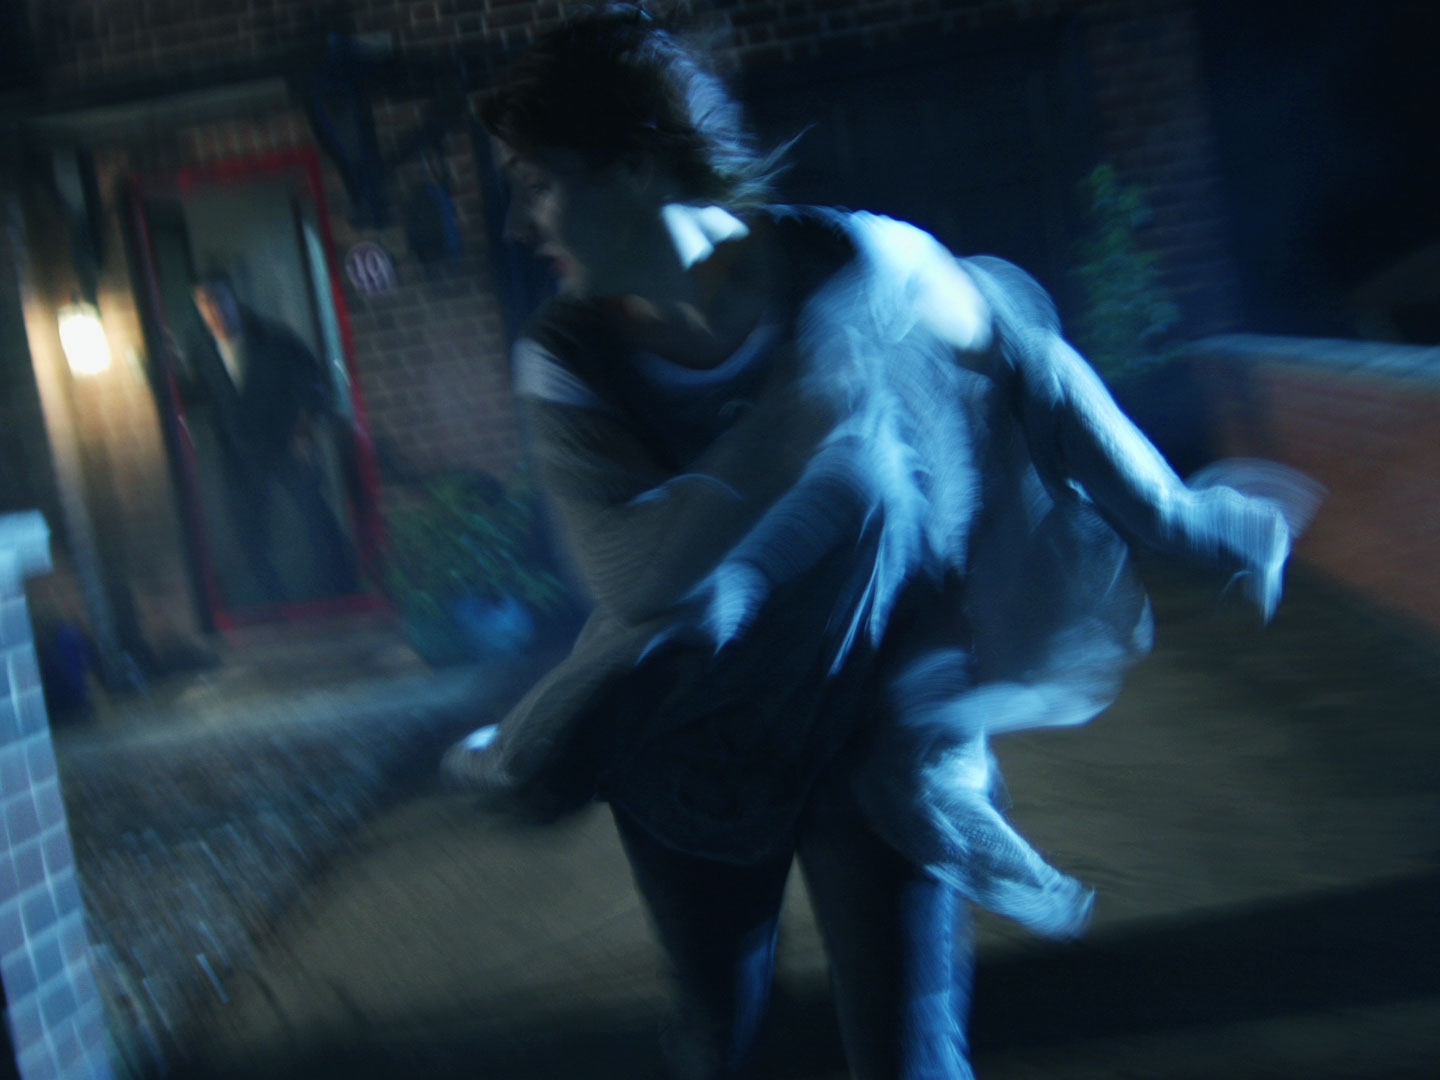
I knew that there would be two main camera angles for this scene, in which Michelle runs out of her house and across the road. One would be a handheld tracking shot, leading Michelle as she runs. The other would be an angle looking up the road. So the first angle would be looking towards the house and the second would be at 90 degrees to that.
Gulliver
Where to put the backlight? (I was going to use an ArriMax M18 for the moon.) Clearly not behind the house, because I didn’t have a massive crane to put it on! Similarly I could not put it at the end of the road without it being in shot. The clear solution was to put it mid-way between these two positions, in a neighbour’s garden. From there it would provide 3/4 backlight (from the left) for the view down the road, and side-light (from the right) for the view towards the house, developing to 3/4 backlight as Michelle crosses the road.
To get my backlight fix at the start of the handheld leading shot, I placed a Dedo at the top of the stairs shining down.
3 x 300W Gulliver lamps, kindly supplied by spark Colin Stannard, were also used in the scene. Two were hidden behind trees down the road, pointing at parts of the background to stop it being black. (The road’s sodium streetlamps provided some nice bokeh as they reflected in parked cars, but did nothing to illuminate the scene.)
A Gulliver, on the left of this image, shines on the front door through a tree.
The third Gulliver was used to 3/4 front-light Michelle in the first half of the leading shot. I put it on a C-stand, nice and high, shining through a tree so as to break up the light – always a good trick for frontal light sources at night.
To ensure Michelle’s face was visible in the second half of the leading shot, an 8’x4′ poly was used to bounce some of the “moonlight” back at her.
Frame grab from the leading shot. The warmer light from frame left is from the Gulliver shining through the tree, while the colder light from the right is from the M18. (C) 2015 B Squared Productions