I’ve shot three features on Arri Alexas, but I’ve never moved the ISO away from its native setting of 800 for fear of noise and general image degradation. Recently I read an article about the cinematography of My Cousin Rachel, in which DP Mike Eley mentioned shooting the night scenes at ISO 1600. I deliberately set off for the cinema in order to analyse the image quality of this ISO on the big screen. Undoubtedly I’ve unwittingly seen many things that were shot on an Alexa at ISO 1600 over the past few years, but this was the first time I’d given it any real thought.
To my eye, My Cousin Rachel looked great. So when I was at Arri Rental the other week testing some lenses, I decided to shoot a quick ISO test to see exactly what would happen when I moved away from the native 800.
But before we get to the test footage, for those of you unsure exactly what ISO is, here’s an introduction. The more experienced amongst you may wish to skip down to the video and analysis.
What is ISO?
A revised and updated version of this section is available.
ISO is a measure of a camera’s light sensitivity; the higher the ISO, the less light it requires to expose an image.
The acronym actually stands for International Organization for Standardization [sic], the body which in 1974 combined the old ASA (American Standards Association) units of film speed with the German DIN standard. That’s why you’ll often hear the terms ISO and ASA used interchangeably. On some cameras, like the Alexa, you’ll see it called EI (Exposure Index) in the menus.
A common ISO to shoot at today is 800. One way of defining ISO 800 is that it’s the sensitivity required to correctly expose a key-light of 3 foot-candles with a lens of T-stop 1.4 and a 180° shutter at 24fps, as we saw in my Barry Lyndon blog.
If we double the ISO we double the effective sensitivity of the camera, or halve the amount of light it requires. So at ISO 1600 we would only need 1.5 foot-candles of light (all the other settings being the same), and at ISO 3200 we would need just 0.75 foot-candles. Conversely, at ISO 400 we would need 6 foot-candles, or 12 at ISO 200. Check out this exposure chart if it’s still unclear.
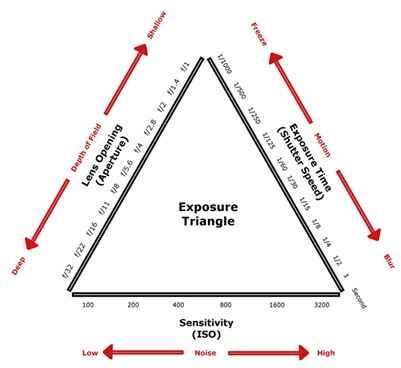 ISO is one of the three corners of the Exposure Triangle, well-known to stills photographers the world over. You can read my posts on the other two corners: Understanding Shutter Angles and F-stops, T-stops and Optical Density.
Just as altering the shutter angle (exposure time) has the side effect of changing the amount of motion blur, and altering the aperture affects the depth of field, so ISO has its own side effect: noise. Increase the ISO and you increase the electronic noise in the picture.
This is because turning the ISO up causes the camera to electronically boost the signals it’s receiving from the sensor. It’s exactly the same as turning up the volume on an amplifier; you hear more hiss because the noise floor is being boosted along with the signal itself.
I remember the days of Mini-DV cameras, which instead of ISO had gain; my Canon XL1 had gain settings of -3dB, +6dB and +12dB. It was the exact same thing, just with a different name. What the XL1 called 0dB of gain was what today we call the native ISO. It’s the ISO at which the camera is designed to give the best images.
ISO and Dynamic Range
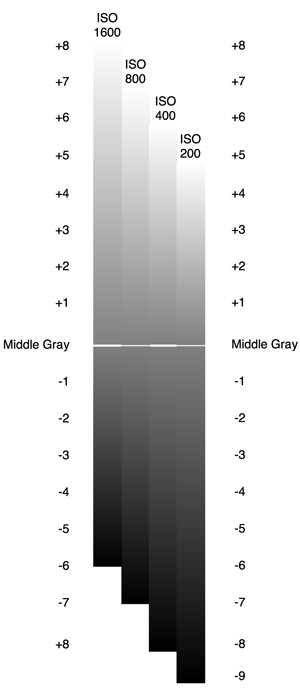 The Alexa has a dynamic range of 14 stops. That means it can simultaneously record detail in an area of brightness x and an area of brightness x times 2 to the power 14. At its native ISO of 800, those 14 stops of dynamic range are equally distributed above and below “correct” exposure (known as middle grey), so you can overexpose by up to 7 stops, and underexpose by up to 7 stops, without losing detail.
If you increase the ISO, those limits of under- and overexposure still apply, but they’re effectively shifted around middle grey, as the graphic to the left illustrates. (The Pro Video Coalition post this graphic comes from is a great read if you want more detail.) You will see the effects of this shifting of dynamic range very clearly in the test video and images below.
In principle, shooting at ISO 1600 is the same as shooting at ISO 800, underexposing by a stop (giving you more highlight detail) and then bringing it back up a stop in post. The boosting of the signal in that case would come right at the end of the image path instead of near the beginning, so the results would never be identical, but they’d be close. If you were on a bigger project with a DIT, you could create a LUT to bring the exposure up a stop which again would achieve much the same thing.
All of the above assumes you’re shooting log ProRes. If you’re shooting Raw then everything is simply recorded at the native ISO and any other ISO you select is merely metadata. But again, assuming you exposed for that other ISO (in terms of iris, shutter and ND filters), you will effectively get that same dynamic range shift, just further along the pipeline.
If this all got a bit too technical for you, don’t worry. Just remember:
Doubling the ISO
- increases overall exposure by one stop,
- gives you one more stop of detail in the highlights,
- gives you one less stop of detail in the shadows, and
- increases picture noise.
Halving the ISO
- decreases overall exposure by one stop,
- gives you one less stop of detail in the highlights,
- gives you one more stop of detail in the shadows, and
- decreases picture noise.
The Test
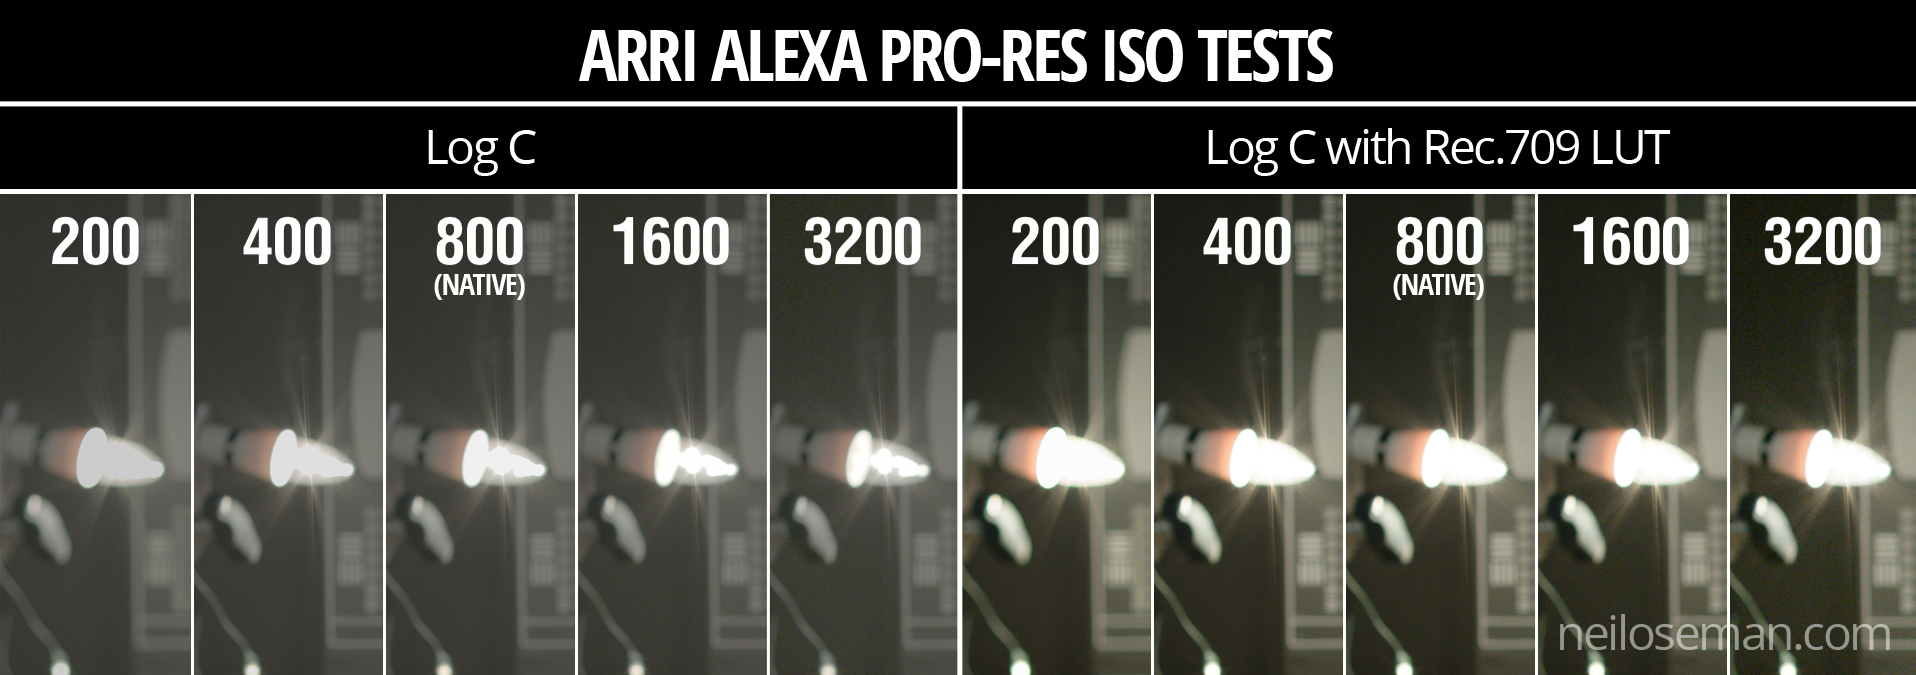
I lit the subject, Rupert “Are You Ready?” Peddle, with a 650W tungsten fresnel bounced off poly, and placed a 40W candle globe and some LED fairy lights in the background to show highlight clipping. We shot the tests in ProRes 4444 XQ on an Alexa XT Plus with a 32mm Cooke S4, altering the shutter angle to compensate for the changing ISOs. At ISO 400 the shutter angle was maxed out, so we opened the lens a stop for ISO 200.
We tested five settings, the ones corresponding to a series of stops (i.e. doublings or halvings of sensitivity): 200, 400, 800, 1600 and 3200. I have presented the tests in the video both as recorded in the original log C, and with a standard Rec.709 LUT.
You’ll need to watch the video at full-screen at 1080P to have any chance of seeing the differences, and even then you might see the compression artefacts caused by the noise more than the noise itself. Check out the stills below for a clearer picture of what’s going on. (Click on them for full resolution.)
Analysis
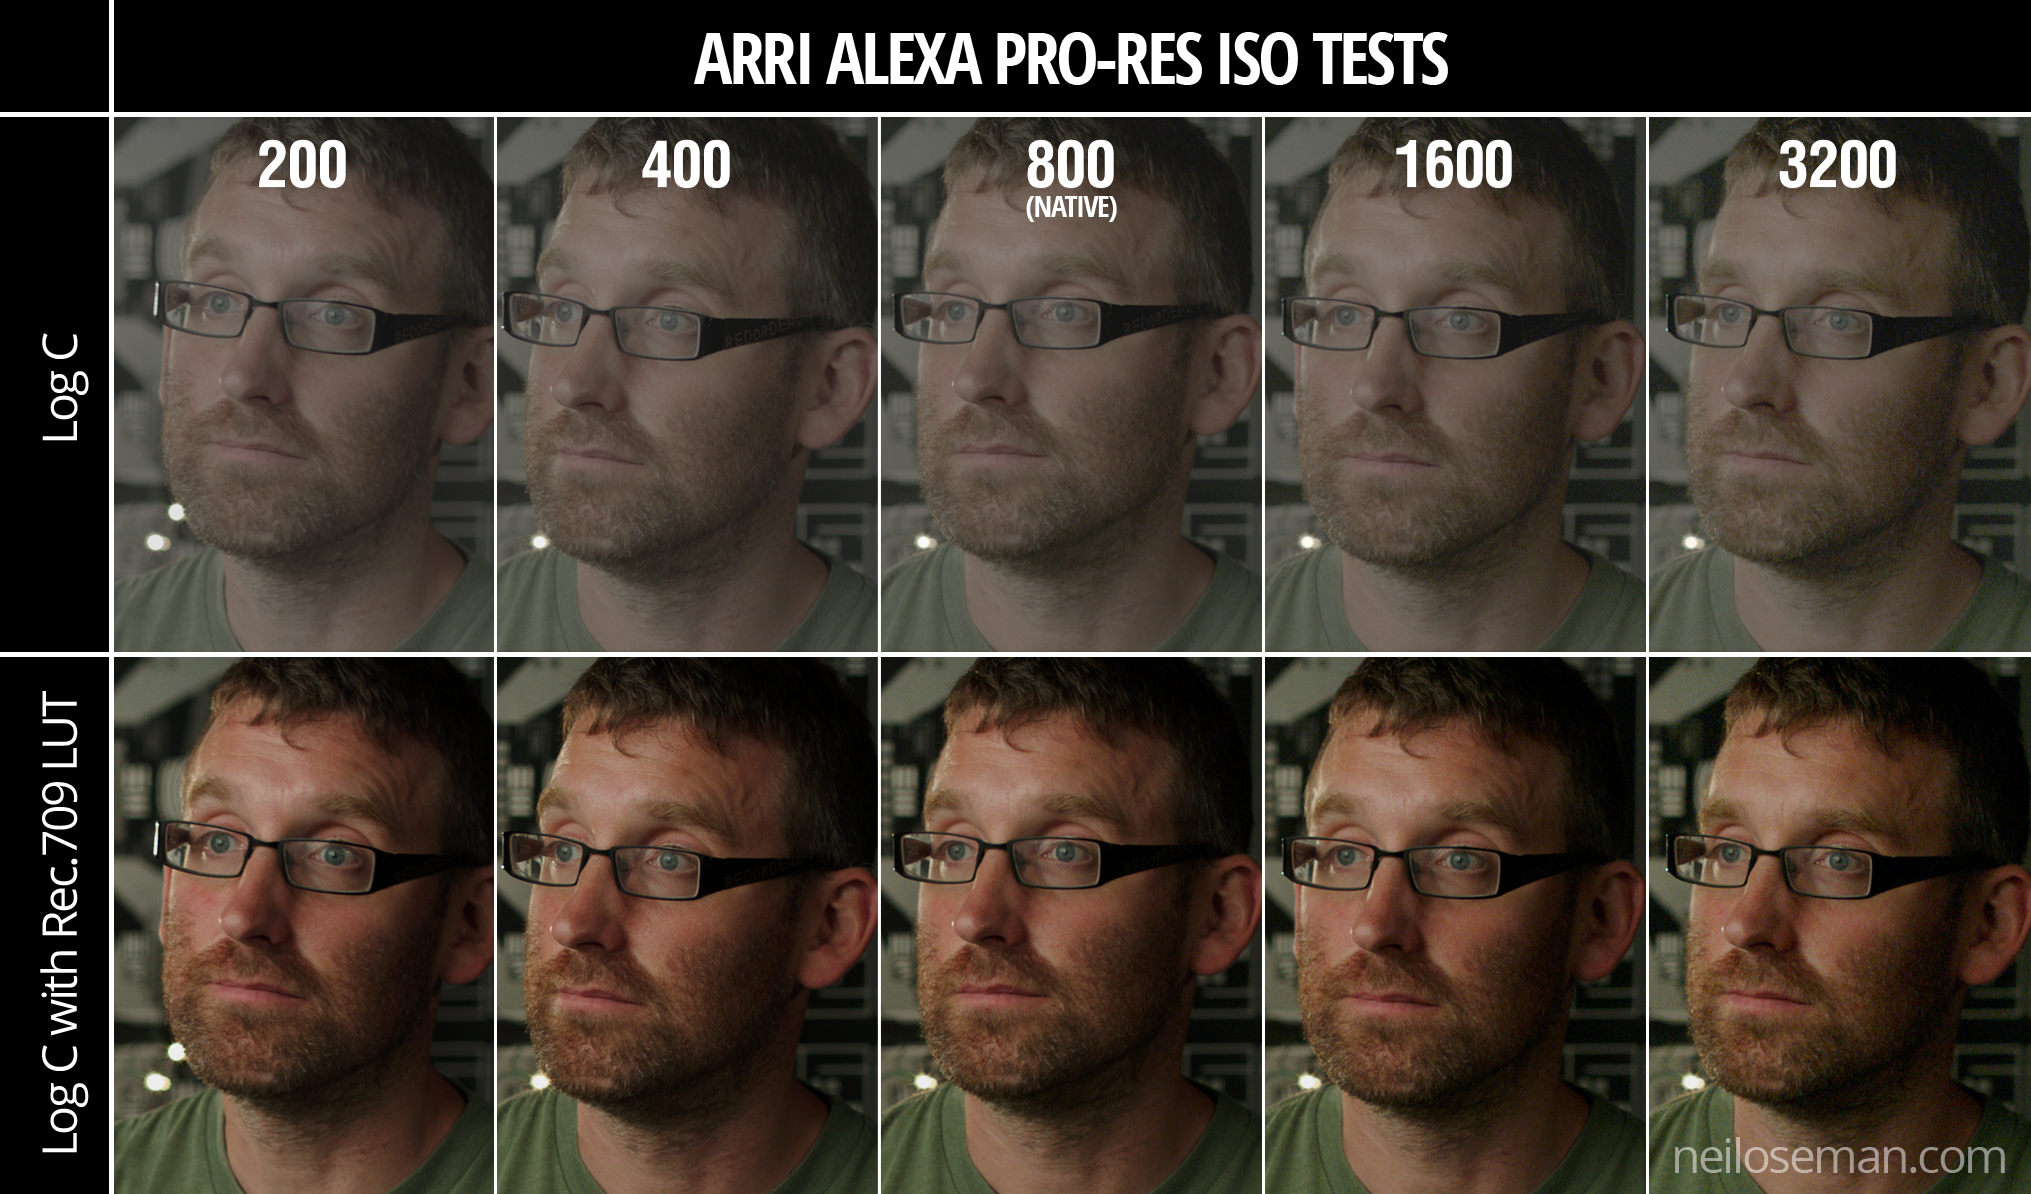
To me, the most important thing with every test is how skin tones are rendered. Looking at the original ProRes of these comparisons I think I see a little more life and vibrance in the skin tones at lower ISOs, but it’s extremely subtle. More noticeable is a magenta shift at the lower ISOs versus a green shift at higher ones. The contrast also increases with the ISO, as you can see most clearly in the log images.
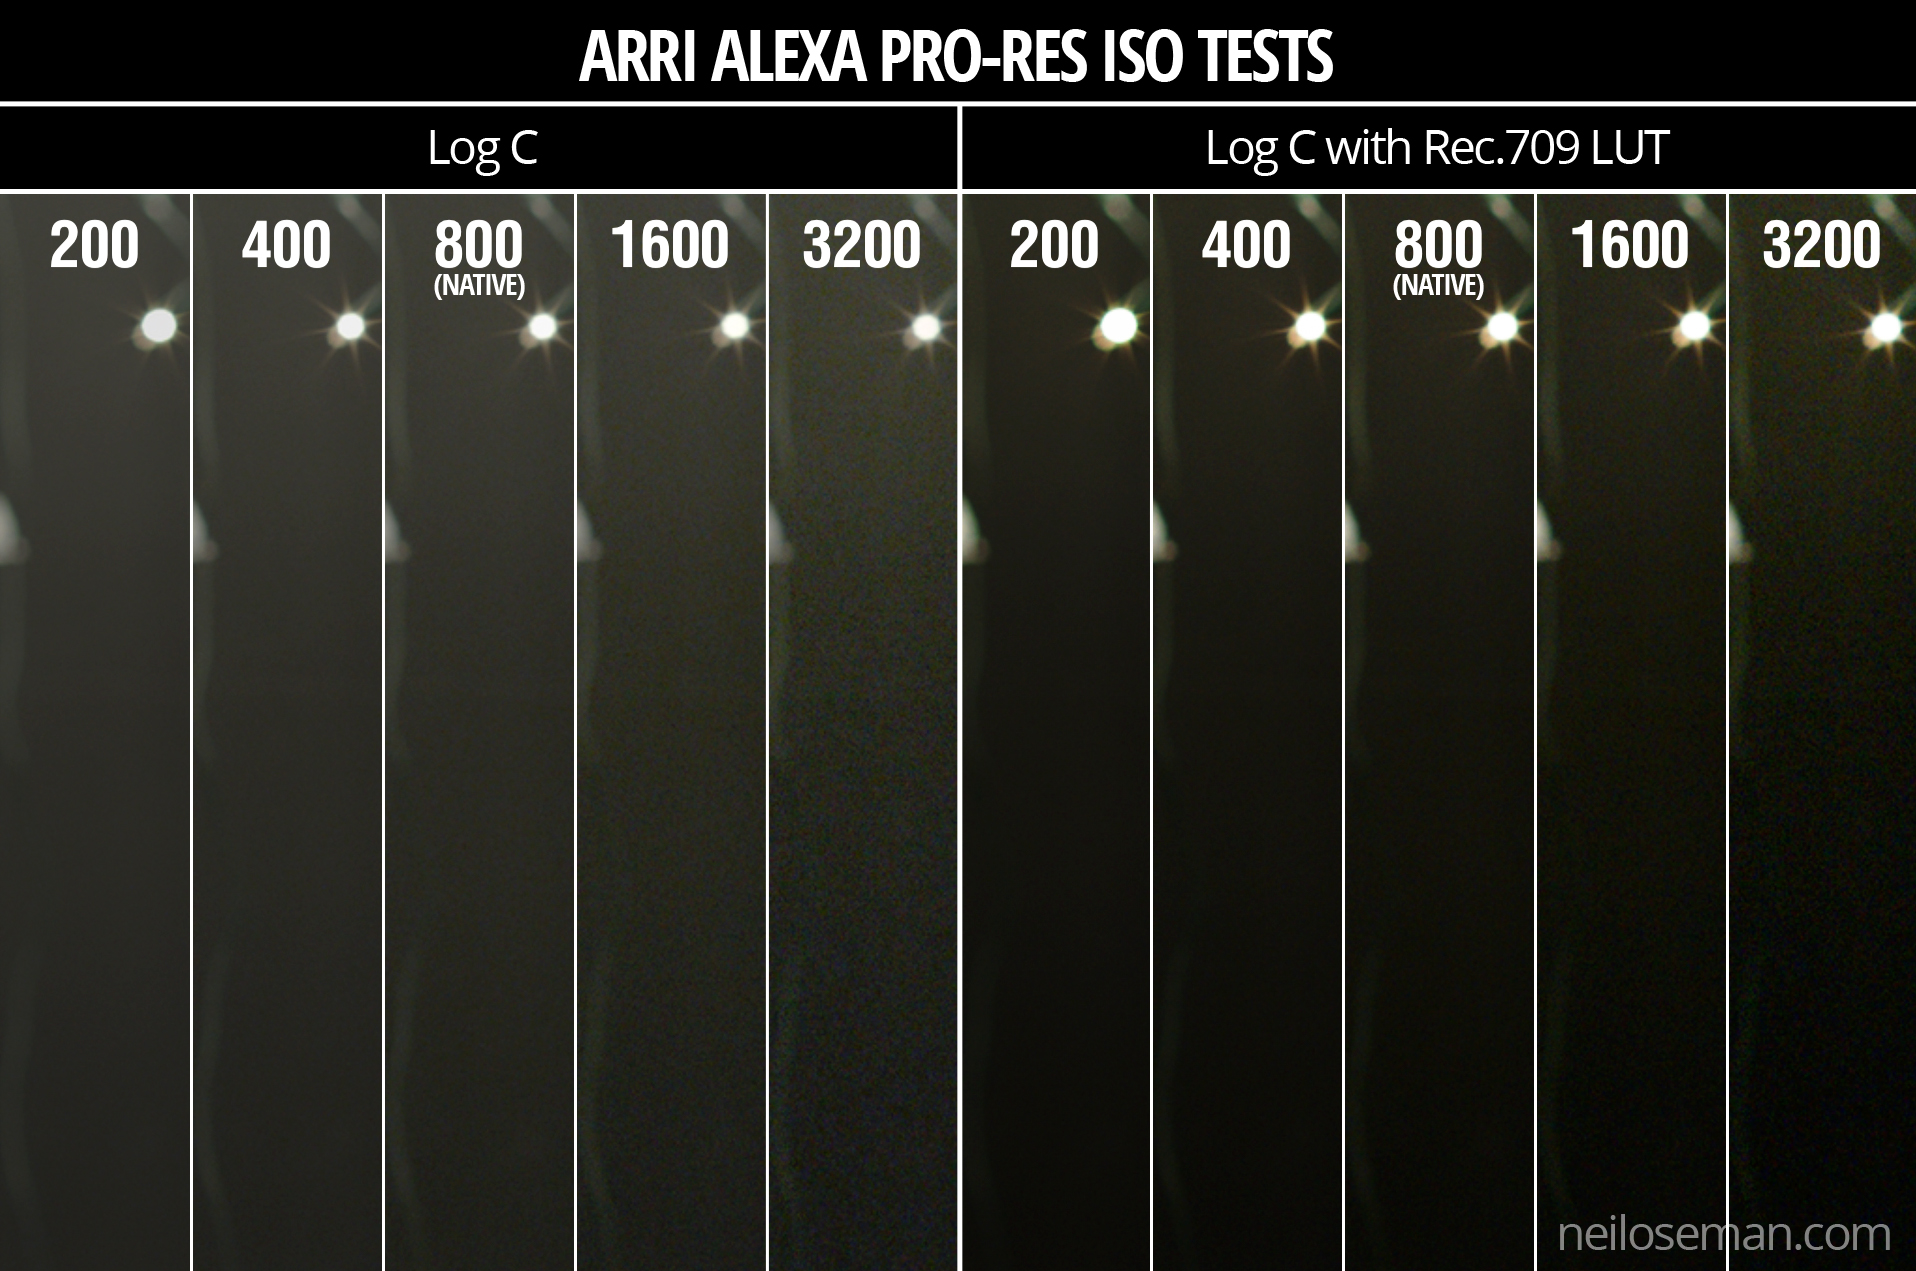
At the lower ISOs you are not really aware of any noise in the picture. It’s only at ISO 1600 that it becomes noticeable, but I have to say that I really liked this level of noise; it gives the image a texture reminiscent of film grain. At ISO 3200 the noise is quite significant, and would probably be unacceptable to many people.
The really interesting thing for me was the shifting of the dynamic range. In the above comparison image, look at the globe in log – see how it starts off as one big white blob at ISO 200 and becomes more detailed as the ISO rises? Now look at the dark wall around the globe, both here and in the previous image – see how it subtly and smoothly graduates into darkness at the lower ISOs, but becomes a grainy mess at the higher ones?
I can see an immediate benefit to shooting at ISO 1600 in scenes lit predominantly with practicals. Such scenes tend to have a low overall level of illumination, while the practicals themselves often blow out on camera. Going to ISO 1600 would give me extra exposure and extra detail in the practicals. I would be sacrificing shadow detail, so I would have to be a little more careful not to underexpose any faces or other important elements of the frame, but I can deal with that. In fact, I often find myself determining my exposure in these types of scenes by how blown out the practicals are, wishing I could open up a little more to see the faces better but not wanting to turn the lamps into big white blobs. Increasing the ISO would be the perfect solution, so I’m very glad I did this test to alleviate my ungrounded fears.
What about scenarios in which a lower-than-native ISO would be useful? Perhaps a scene outside a building with an open door, where the dark interior is visible in the background and more detail is required in it. Or maybe one of those night scenes which in reality would be pitch black but for movie purposes have a low level of ambient light with no highlights.
I hope you’ve found this test as useful and interesting as I have. Watch this space or subscribe to my YouTube Channel for the lens test.
Thanks to Rupert Peddle, awesome steadicam op and focus puller – check out his site at pedhead.net – for appearing in front of the lens. Thanks also to Bex Clives, who was busy wrangling data from the lens tests while we were shooting these ISO tests, and of course Arri Rental UK.