![]() With the temporary closure of Cineworlds around the UK, the future of theatrical exhibition once more hangs in the balance. But just a couple of months ago cinemas were reopening and people were positive that the industry would recover. One of the classic blockbusters that was re-released to plug the gaps in the release schedule ahead of Christopher Nolan’s Tenet was a certain quite popular film about dinosaurs. I described my trip to see it recently, but let’s put that hideous experience behind us and concentrate on the film itself.
With the temporary closure of Cineworlds around the UK, the future of theatrical exhibition once more hangs in the balance. But just a couple of months ago cinemas were reopening and people were positive that the industry would recover. One of the classic blockbusters that was re-released to plug the gaps in the release schedule ahead of Christopher Nolan’s Tenet was a certain quite popular film about dinosaurs. I described my trip to see it recently, but let’s put that hideous experience behind us and concentrate on the film itself.
Thanks in no small part to the excellent “making of” book by Don Shay and Jody Duncan, Jurassic Park was a formative experience for the 13-year-old Neil Oseman, setting me irrevocably on the path to filmmaking as a career. So let me take you back in time and behind the scenes of an iconic piece of popcorn fodder.
Man creates dinosaurs
Even before author Michael Crichton delivered the manuscript of his new novel in May 1990, Steven Spielberg had expressed an interest in adapting it. A brief bidding war between studios saw Joe Dante (Gremlins), Tim Burton (Batman) and Richard Donner (Superman) in the frame to direct, but Spielberg and Universal Pictures were the victors.

The screenplay went through several drafts, first by Crichton himself, then by Malio Scotch Marmo and finally by David Koepp, who would go on to script Mission: Impossible, Spider-Man and Panic Room. Pre-production began long before Koepp finished writing, with Spielberg generating storyboards based directly on scenes from the book so that his team could figure out how they were going to bring the dinosaurs to life.
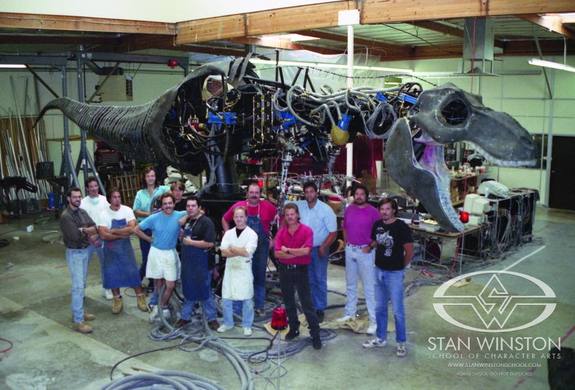
Inspired by a life-size theme park animatronic of King Kong, Spielberg initially wanted all the dinsoaurs to be full-scale physical creatures throughout. This was quickly recognised as impractical, and instead Stan Winston Studio, creators of the Terminator endoskeleton, the Predator make-up and the fifteen-foot-tall Alien queen, focused on building full-scale hydraulically-actuated dinosaurs that would serve primarily for close-ups and mids.
Meanwhile, to accomplish the wider shots, Spielberg hired veteran stop-motion animator Phil Tippett, whose prior work included ED-209 in RoboCop, the tauntaun and AT-AT walkers in The Empire Strikes Back, and perhaps most relevantly, the titular creature from Dragonslayer. After producing some beautiful animatics – to give the crew a clearer previsualisation of the action than storyboards could provide – Tippett shot test footage of the “go-motion” process he intended to employ for the real scenes. Whilst this footage greatly improved on traditional stop-motion by incorporating motion blur, it failed to convince Spielberg.
https://youtu.be/_7tUlXz9MrA
At this point, Dennis Muren of Industrial Light and Magic stepped in. Muren was the visual effects supervisor behind the most significant milestones in computer-generated imagery up to that point: the stained-glass knight in Young Sherlock Holmes (1986), the water tendril in The Abyss (1989) and the liquid metal T-1000 in Terminator 2: Judgment Day (1991). When Spielberg saw his test footage – initially just skeletons running in a black void – the fluidity of the movement immediately grabbed the director’s attention. Further tests, culminating in a fully-skinned tyrannosaur stalking a herd of gallimimuses, had Spielberg completely convinced. On seeing the tests himself, Tippett famously quipped: “I think I’m extinct.”
Tippett continued to work on Jurassic Park, however, ultimately earning a credit as dinosaur supervisor. Manipulating a custom-built armature named the Dinosaur Input Device, Tippett and his team were able to have their hands-on techniques recorded by computer and used to drive the CG models.
Building on his experiences working with the E.T. puppet, Spielberg pushed for realistic animal behaviours, visible breathing, and bird-like movements reflecting the latest paleontological theories, all of which would lend credibility to the dinosaurs. Effects co-supervisor Mark Dippe stated: “We used to go outdoors and run around and pretend we were gallimisuses or T-Rexes hunting each other, and shoot [reference] film.”
Dinosaurs eat man

Production began in August 1992 with three weeks on the Hawaiian island of Kauai. Filming progressed smoothly until the final day on location, which had to be scrubbed due to Hurrican Iniki (although shots of the storm made it into the finished film). After a brief stint in the Mojave Desert, the crew settled into the stages at Universal Studios and Warner Brothers to record the bulk of the picture.
The most challenging sequence to film would also prove to be the movie’s most memorable: the T-Rex attack on the jeeps containing Sam Neill’s Dr. Grant, Jeff Goldblum’s Ian Malcolm, lawyer Gennaro and the children, Lex and Tim. It was the ultimate test for Stan Winston’s full-scale dinosaurs.

The main T-Rex puppet weighed over six tonnes and was mounted on a flight simulator-style platform that had to be anchored into the bedrock under the soundstage. Although its actions were occasionally pre-programmed, the animal was mostly puppeteered live using something similar to the Dinosaur Input Device.
But the torrential rain in which the scene takes place was anathema to the finely tuned mechanics and electronics of the tyrannosaur. “As [the T-Rex] would get rained on,” Winston explained, “his skin would soak up water, his weight would change, and in the middle of the day he would start having the shakes and we would have to dry him down.”
Although hints of this shaking can be detected by an eagle-eyed viewer, the thrilling impact of the overall sequence was clear to Spielberg, who recognised that the T-Rex was the star of his picture. He hastily rewrote the ending to bring the mighty creature back, relying entirely on CGI for the new climax in which it battles raptors in the visitor centre’s rotunda.

Woman inherits the earth
After wrapping 12 days ahead of schedule, Jurassic Park hit US cinemas on June 11th, 1993. It became the highest-grossing film of all time, a title which it would hold until Titanic’s release four years later. 1994’s Oscar ceremony saw the prehistoric blockbuster awarded not only Best Visual Effects but also Best Sound Editing and Best Sound Mixing. Indeed, Gary Rydstrom’s contribution to the film – using everything from a dolphin/walrus combination for the raptors’ calls, to the sound of his own dog playing with a rope toy for the T-Rex – cannot be overstated.
Jurassic Park has spawned four sequels to date (with a fifth on the way), and its impact on visual effects was enormous. For many years afterwards, blockbusters were filled with CGI that was unable to equal, let alone surpass, the quality of Jurassic Park’s. Watching it today, the CGI is still impressive if a little plasticky in texture, but I believe that the full-size animatronics which form the lion’s share of the dinosaurs’ screen time are what truly give the creatures their memorable verisimilitude. The film may be 27 years old, but it’s still every bit as entertaining as it was in 1993.
This article first appeared on RedShark News.