A revised and updated version of this article can be found here (aperture) and here (ND filters).
Imagine this scenario. I’m lensing a daylight exterior and my light meter gives me a reading of f/11, but I want to shoot with an aperture of T4, because that’s the depth of field I like. I know that I need to use a .9 ND (neutral density) filter. But how did I work that out? How on earth does anyone arrive at the number 0.9 from the numbers 11 and 4?
Let me explain from the beginning. First of all, let’s remind ourselves what f-stops are. You have probably seen those familiar numbers printed on the sides of lenses many times…
1 1.4 2 2.8 4 5.6 8 11 16 22
They are ratios: ratios of the lens’ focal length to its iris diameter. So a 50mm lens with a 25mm diameter iris is at f/2. If you close up the iris to just under 9mm in diameter, you’ll be at f/5.6 (50 divided by 5.6 is 8.93).
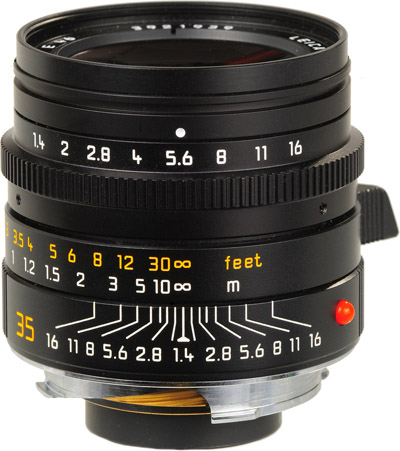
But why not label a lens 1, 2, 3, 4? Why 1, 1.2, 2, 2.8…? These magic numbers are f-stops. A lens set to f/1 will let in twice as much light as (or ‘one stop more than’) one set to f/1.4, which in turn will let in twice as much as one set to f/2, and so on. Conversely, a lens set to f/2 will let in half as much light as (or ‘one stop less than’) one set to f/1.4, and so on.
If you think back to high school maths and the Pi r squared formula for calculating the area of a circle from its radius, the reason for the seemingly random series of numbers will start to become clear. Letting in twice as much light requires twice as much area for those light rays to fall on, and remember that the f-number is the ratio of the focal length to the iris diameter, so you can see how square roots are going to get involved and why f-stops aren’t just plain old round numbers.

Now, earlier I mentioned T4. How did I get from f-stops to T-stops? Well, T-stops are f-stops adjusted to compensate for the light transmission efficiency. Two different f/2 lenses will not necessarily produce equally bright images, because some percentage of light travelling through the elements will always be lost, and that percentage will vary depending on the quality of the glass and the number of elements. A lens with 100% light transmission would have the same f-number and T-number, but in practice the T-number will always be a little higher than the f-number. For example, Cooke’s 15-40mm zoom is rated at a maximum aperture of T2 or f/1.84.
So, let’s go back to my original scenario and see where we are. My light meter reads f/11. However, I expressed my target stop as a T-number though, T4, because I’m using cinema lenses and they’re marked up in T-stops rather than f-stops. (I can still use the f-number my meter gives me though; in fact if my lens were marked in f-stops then my exposure would be slightly off because the meter does not know the transmission efficiency of my lens.)
By looking at the series of f-numbers permanently displayed on my light meter (the same series listed near the top of this post, or on any lens barrel) I can see that f/11 (or T11) is 3 stops above f/4 (or T4) – because 11 is three numbers to the right of 4 in the series. I can often be seen on set counting the stops like this on my light meter or on my fingers. It is of course possible to work it out mathematically, but screw that!

So I need an ND filter that cuts 3 stops of light. But we’re not out of the mathematical woods yet.
The most popular ND filters amongst professional cinematographers are those made by Tiffen, and a typical set might be labelled as follows:
.3 .6 .9 1.2
Argh! What do those numbers mean? That’s the optical density, a property defined as the natural logarithm of the ratio of the quantity of light entering the filter to the quantity of light exiting it on the other side. A .3 ND reduces the light by half because 10 raised to the power of -0.3 is 0.5, or near as damn it. And reducing light by half, as we established earlier, means dropping one stop.
If that fries your brain, don’t worry; it does mine too. All you really need to do is multiply the number of stops you want to drop by 0.3 to find the filter you need. So to drop three stops you pick the .9 ND.
And that’s why you need a .9 ND to shoot at T4 when your light meter says f/11. Clear as mud, right? Once you get your head around it, and memorise the f-stops, this all becomes a lot easier than it seems at first glance.
Here are a couple more examples:
- Light meter reads f/8 and you want to shoot at T5.6. That’s a one stop difference. (5.6 and 8 are right next to each other in the stop series, as you’ll see if you scroll back to the top.) 1 x 0.3 = 0.3 so you should use the .3 ND.
- Light meter reads f/22 and you want to shoot at T2.8. That’s a six stop difference (scroll back up and count them), and 6 x 0.3 = 1.8, so you need a 1.8 ND filter. If you don’t have one, you need to stack two NDs in your matte box that add up to 1.8, e.g. a 1.2 and a .6.