One of the big benefits of the Blackmagic cameras is their ability to shoot raw – lossless Cinema DNG files that capture an incredible range of detail. But encoding those files into a useable format for editing can be tricky, especially if your computer won’t run the processor-intensive DaVinci Resolve which ships with the camera.
You can usually turn to the Adobe Creative Suite when faced with intractable transcoding problems, and sure enough After Effects provides one solution for raw to ProRes conversion.
I’ll take you through it, step by step. Let’s assume you’ve been shooting on a Blackmagic Cinema Camera and you have some 2.5K raw shots which you want to drop into your edit timeline alongside 1080P ProRes 422HQ material.
1. In After Effects’ launch window, select New Composition. A dialogue box will appear in which you can spec up your project. For this example, we’re going to choose the standard HDTV resolution of 1920×1080. It’s critical that you get your frame rate right, or your audio won’t sync. Click OK once you’ve set everything to your liking.
2. Now go to the File menu and select Import > File. Navigate to the raw material on your hard drive. The BMCC creates a folder for each raw clip, containing the individual Cinema DNG frames and a WAV audio file. Select the first DNG file in the folder and ensure that Camera Raw Sequence is ticked, then click OK.
3. You’ll then have the chance to do a basic grade on the shot – though with only the first frame to judge it by.
4. Use Import > File again to import the WAV audio file.
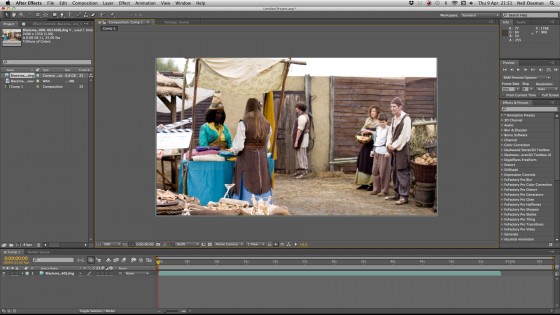
5. Your project bin should now contain the DNG sequence – shown as a single item – along with the WAV audio and the composition. Drag the DNG sequence into the main viewer window. Because the BMCC’s raw mode records at a resolution of 2.5K and you set your composition to 1080P, the image will appear cropped.
6. If necessary, zoom out (using the drop-down menu in the bottom left of the Composition window) so you can see the wireframe of the 2.5K image. Then click and drag the bottom right corner of that wireframe to shrink the image until it fits into the 1080P frame. Hold down shift while dragging to maintain the aspect ratio.
7. Drag the WAV audio onto the timeline, taking care to align it precisely with the video.
8. Go to Composition Settings in the Composition menu and alter the duration of the composition to match the duration of the clip (which you can see by clicking the DNG sequence in the project bin).
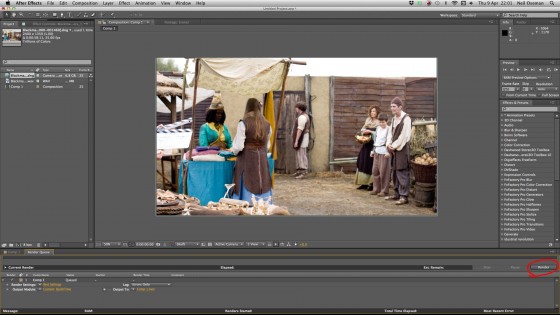
9. Go to the Composition menu again and select Add to Render Queue. The composition timeline will give way to the Render Queue tab.
10. Next to the words Output Module in the Render Queue, you’ll see a clickable Lossless setting (yellow and underlined). Click this to open the Output Module Settings.
11. In the Video Output section, click on Format Options… We’re going to pick ProRes 422 HQ, to match with the non-raw shots we hypothetically filmed. Click OK to close the Format Options.
12. You should now be back in Output Module Settings. Before clicking OK to close this, be sure to tick the Audio Output box to make sure you don’t end up with a mute clip. You should not need to change the default output settings of 48kHz 16-bit stereo PCM.
13. In the Render Queue tab, next to the words Output to you’ll see a clickable filename – the default is Comp1.mov. Click on this to bring up a file selector and choose where to save your ProRes file.
14. Click Render (top far right of the Render Queue tab). Now just sit back and wait for your computer to crunch the numbers.
I’ve never used After Effects before, so there are probably ways to streamline this process which I’m unaware of. Can anyone out there suggest any improvements to this workflow? Is it possible to automate a batch?


