Almost every film today has visual effects of some kind or another, be it compositing a phone screen for a couple of shots or adding a fleet of attacking spaceships and their laser blasts destroying distant CG buildings. Many smaller productions cannot afford to have a VFX supervisor on set, however, so a conscientious DP should be looking out for ways they can ensure the footage they capture is not going to cause complications or rack up extra costs down the line.
1. Interactive Light
VFX will often look a lot more convincing if they affect the lighting on the actors or set. This could be as simple as flashing a lamp for a gunshot that’s going to be added in post, or it could involve programming a dynamic lighting effect into a row of Astera tubes. Remember that it could be negative lighting; I once had to shoot day exterior scenes next to an alien spaceship that wasn’t really there, so I had the gaffer rig a wall of floppy flags to create its shadow.
Beware though: inaccurate interactive lighting – be it mistimed, the wrong colour or casting unrealistic shadows – is worse than none at all. I would always advise shooting a take without the interactive lighting, because even if you do it perfectly there is always the chance that the effect will be changed in post-production from what was agreed.
An unused take from “Ren: The Girl with the Mark” in which I used green interactive light to match the concept art of the VFX. The VFX colour was changed to gold in post and we were very glad we’d done a safety take without the light!
2. Tracking
If you are doing a moving shot to which something will be added in post, consider adding some tracking crosses into the scene. Tracking software is really good now, but it doesn’t hurt to help it along, especially if you’re dealing with a fairly featureless surface like a blank TV screen, and definitely with green screens. A simple X made of white camera tape will do the job. Be careful not to cover up any detail that will make the X hard to paint out.
3. Recording Mode
If you are not generally shooting at the highest quality your camera permits, consider switching up to it for VFX shots at least. This means going to RAW if you were in, say, ProRes, or increasing the bit depth, and reducing the compression ratio. The cleaner the image, the easier you make life for the VFX team, particularly when it comes to pulling keys and motion tracking.
If you’re able to increase the resolution so that there is extra image outside the frame that will help VFX with any stabilisation, artificial image shake or adjustments of the camera move they need to make once the CG elements are in.
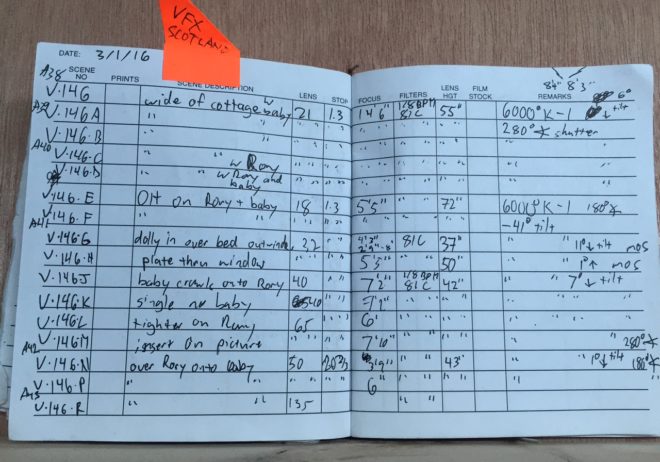
4. Camera Log
This camera log from “Rory’s Way” includes extra details because a baby had to be composited into some of the shots.
Accurate information about the lens and camera is important for the VFX department. Normally your 2nd AC will be recording focal length, T-stop, white balance, ISO, shutter angle and filtration, but for VFX shots a few extra things will be useful: lens height from the ground, tilt angle (use an inclinometer app) and at least a rough focal distance.
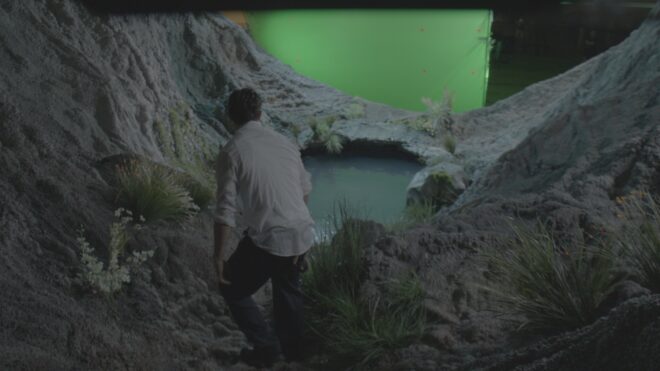
5. Green Screens
There are a whole host of things to look out for when you’re shooting on blue or green screens, but the main one is lighting. You should light the screen as evenly as possible, and to the same level as your key light. Once the camera position is set, a good tip is to bring in a couple of flags just out of the sides of frame to cut as much green spill as possible off the talent, so that the VFX team can pull a clean key.
Note the tracking crosses on the green screen in this log frame from “The Little Mermaid”.
With the runaway success of the first instalment, there was no way that Universal Pictures weren’t going to make another Back to the Future, with or without creators Bob Gale and Robert Zemeckis. So after confirming that Michael J. Fox and Christopher Lloyd were willing to reprise their roles as Marty McFly and Doc Emmett Brown, the producer and director got together to thrash out story ideas.
They knew from the fan mail which had been pouring in that they had to pick up the saga where they had left off: with Doc, Marty and his girlfriend Jennifer zooming into the future to do “something about your kids!” They soon hit upon the idea of an almanac of sport results being taken from 2015 into the past by Marty’s nemesis Biff Tannen (Thomas F. Wilson), resulting in a “Biff-horrific” alternate 1985 which Marty and Doc must undo by journeying into the past themselves.
Gale’s first draft of the sequel, written up while Zemeckis was away in England shooting Who Framed Roger Rabbit?, had Biff giving the almanac to his younger self in 1967. Marty would don bell-bottom trousers and love beads to blend into the hippy culture, meet his older siblings as very young children and his mother Lorraine as an anti-war protestor, and endanger his own existence again by preventing his parents going on the second honeymoon during which he was conceived.
Upon returning from England and reading the draft, Zemeckis had two main notes: add a fourth act set in the Wild West, and how about 1955 again instead of 1967? “We could actually do what the audience really, really wants, which is to go back and revisit the movie they just saw,” Zemeckis later explained. “That is the thing that excited me most, this idea of seeing the same movie from a different angle.”
Adding the Wild West act ballooned the script to over two-and-a-half hours with an estimated budget of $60 million, far more than Universal wanted to spend. So Gale revised the screenplay, expanding it further with a neat point in the middle where it could be split in half. As two films, each budgeted at $35 million but shot back-to-back over 11 months, the project was much more appealing to the studio. However, it was still a bold and unusual move for Universal to green-light two sequels simultaneously, something that it’s easy to forget in these days of long-form movie franchises planned out years in advance.
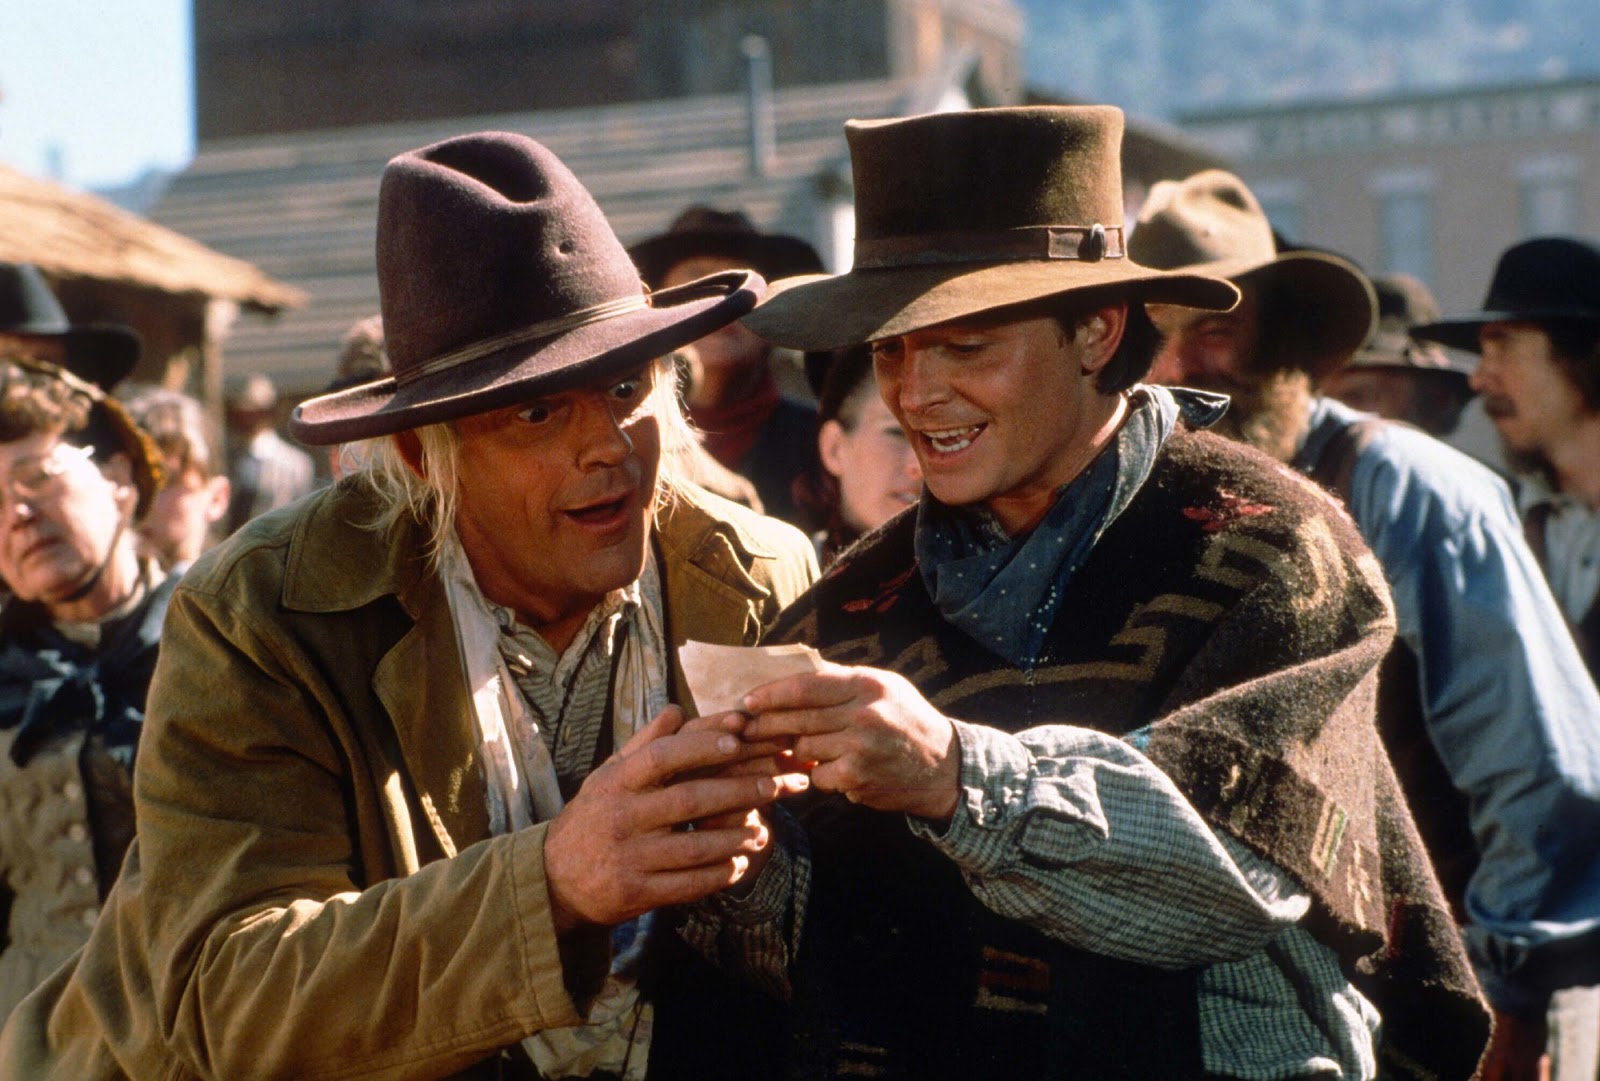
A sticking point was Crispin Glover. As Marty’s father George McFly he had been a difficult actor to work with on the first film, and now he was demanding more than a ten-fold pay increase to appear in the sequels. “Crispin… asked for the same money that Michael J. Fox was receiving, as well as script approval and director approval,” according to Gale. He gave Glover’s agent two weeks to come back with a more realistic offer, but it didn’t come. Glover would not be reprising his role.
Jeffrey Weissman in prosthetic make-up as George McFly
Gale accordingly made George dead in the Biff-horrific 1985, and Zemeckis employed several tricks to accomplish his other scenes. These included the reuse of footage from Part I, and hanging cheap replacement actor Jeffrey Weissman upside-down in a futuristic back brace throughout the 2015 scenes. Life casts of Glover’s face taken for the ageing effects in Part I were even used to produce prosthetic make-up appliances for Weissman so that he would resemble Glover more closely. “Oh, Crispin ain’t going to like this,” Fox reportedly remarked, and he was right. Glover would go on to successfully sue the production for using his likeness without permission, with the case triggering new Screen Actors Guild rules about likeness rights.
Make-up was a huge part of the second film, since all the main actors had to portray their characters at at least two different ages, and some played other members of the family too. A 3am start in the make-up chair was not unusual, the prosthetics became hot and uncomfortable during the long working days, and the chemicals used in their application and removal burnt the actors’ skin. “It was a true psychological challenge to retain enough concentration to approach the character correctly and maintain the performance,” said Wilson at the time.
Filming began in February 1989 with the ’55 scenes. To save time and money, only one side of the Hill Valley set – still standing on the Universal backlot – was dressed for this period. The company then shot on stage for a few weeks before returning to the backlot in March, by which time production designer Rick Carter and his team had transformed the set into a gangland nightmare to represent Biff-horrific 1985. In May the company revisited the Hill Valley set once more to record the 2015 scenes.
When the real 2015 rolled around, many were quick to compare the film’s vision of the future to reality, but Gale always knew that he would fail if he tried to make genuine predictions. “We decided that the only way to deal with it was to make it optimistic, and have a good time with it.” Microwave meals had begun to compete with home cooking in the ‘80s, so Gale invented a leap forward with the pizza-inflating food hydrator. Kids watched too much TV, so he envisaged a future in which this was taken to a ridiculous extreme, with Marty Jr. watching six channels simultaneously – not a million miles from today’s device-filled reality.
While the opening instalment of the trilogy had been relatively light on visual effects, Part II required everything from groundbreaking split-screens to flying cars and hoverboards. This last employed a range of techniques mostly involving Fox, Wilson and three other actors, plus five operators, hanging from cranes by wires. While every effort was made to hide these wires from camera – even to the extent of designing the set with a lot of camouflaging vertical lines – the film went down in VFX history as one of the first uses of digital wire removal.
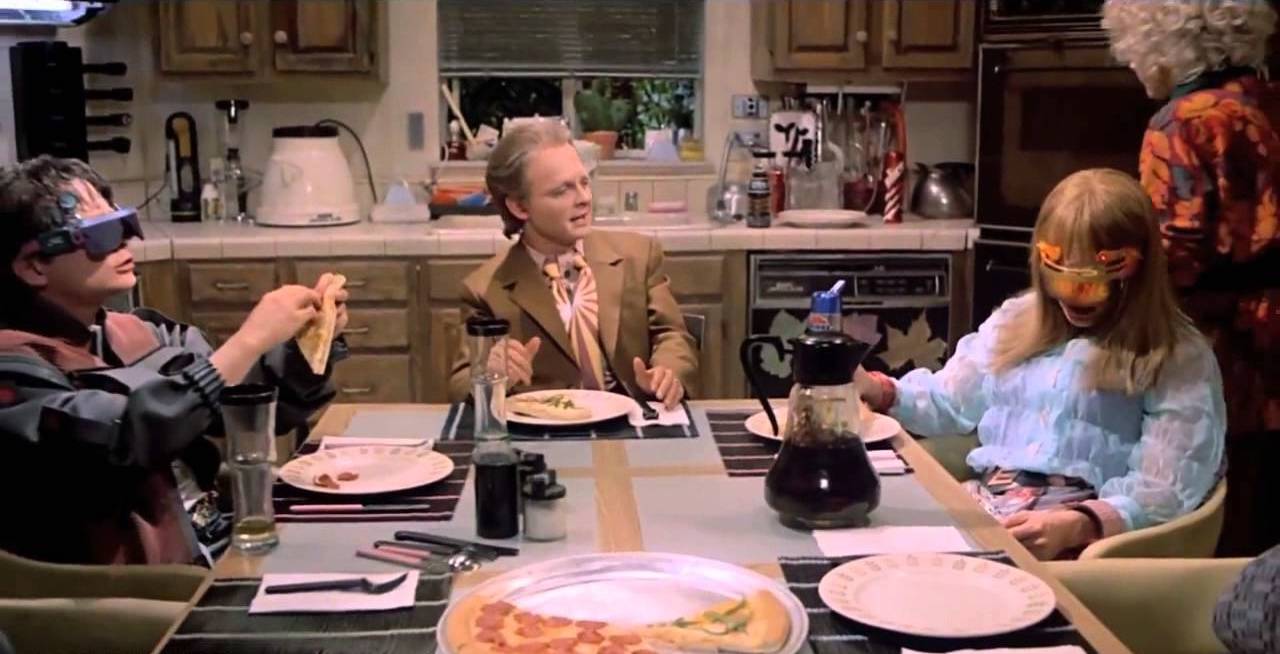
But perhaps the most complex effect in the film was a seemingly innocuous dinner scene in which Marty, Marty Jr. and Marlene McFly all share a pizza. The complication was that all three roles were played by Michael J. Fox. To photograph the scene and numerous others in which cast members portrayed old and young versions of themselves, visual effects wizards Industrial Light & Magic developed a system called VistaGlide.
Based on the motion control rigs that had been used to shoot spaceships for Star Wars, the VistaGlide camera was mounted on a computer-controlled dolly. For the dinner scene, Fox was first filmed as old Marty by a human camera operator, with the VistaGlide recording its movements. Once Fox had switched to his Marty Jr. or Marlene costume and make-up, the rig could automatically repeat the camerawork while piping Fox’s earlier dialogue to a hidden earpiece so that he could speak to himself. Later the three elements were painstakingly and seamlessly assembled using hand-drawn masks and an analogue device called an optical printer.
The technically challenging Part II shoot came to an end on August 1st, 1989, as the team captured the last pieces of the rain-drenched scene in which Marty receives a 70-year-old letter telling him that Doc is living in the Old West. Four weeks later, the whole cast and crew were following Doc’s example as they began filming Part III.
In order to have open country visible beyond the edges of 1885’s Hill Valley, the filmmakers opted to leave the Universal backlot and build a set 350 miles north in Sonora, California. The town – which had appeared in classic westerns like High Noon and Pale Rider – was chosen for its extant railway line and its genuine 19th century steam locomotive which would form a pivotal part of the plot.
Joining the cast was Mary Steenburgen as Doc’s love interest Clara. Initially unsure about the role, she was persuaded to take it by her children who were fans of the original film. “I confess to having been infatuated with her, and I think it was mutual,” LLoyd later admitted of his co-star. Though the pair never got involved, Part III’s romantic subplot did provide the veteran of over 30 films with his first on-screen kiss.
By all accounts, an enjoyable time was had by the whole cast and crew in the fresh air and open spaces of Sonora. Fox, who had simultaneously been working on Family Ties during the first two films, finally had the time to relax between scenes, even leading fishing trips to a nearby lake.
The set acquired the nickname “Club Hill Valley” as a volleyball court, mini golf and shooting range were constructed. “We had a great caterer,” recalled director of photography Dean Cundey, “but everybody would rush their meal so that they could get off to spend the rest of their lunch hour in their favourite activity.”
There was one person who was not relaxed, however: Robert Zemeckis. Part II was due for release on November 20th, about halfway through the shoot for Part III. While filming the action-packed climax in which the steam train propels the DeLorean to 88mph, the director was simultaneously supervising the sound mix for the previous instalment. After wrapping at the railway line, Zemeckis would fly to Burbank and eat his dinner on the dubbing stage while giving the sound team notes. He’d then sleep at the Sheraton Universal and get up at 4:30am to fly back to Sonora.
The train sequence had plenty of other challenges. Multiple DeLoreans had been employed in the making of the trilogy so far, including a lightweight fibreglass version that was lifted on cables or hoisted on a forklift for Part II’s flying scenes, and two off-road versions housing Volkswagen racing engines for Part III’s desert work. Another was now outfitted with railway wheels by physical effects designer Michael Lantieri. “One of the scariest things to do was the DeLorean doing the wheelie in front of the train,” he noted in 2015. “We had cables and had it hooked to the front of the train… A big cylinder would raise the front of the car.”
The film’s insurance company was unhappy about the risks of putting Michael J. Fox inside a car that could potentially derail and be crushed by the train, so whenever it was not possible to use a stunt double the action was played out in reverse; the locomotive would pull the DeLorean, and the footage would subsequently be run backwards.
The makers of Mission: Impossible 7 recently drove a full-scale mock-up of a steam locomotive off an unfinished bridge, but Back to the Future’s team opted to accomplish a very similar stunt in miniature. A quarter-scale locomotive was constructed along with a matching DeLorean, and propelled to its doom at 20mph with six cameras covering the action. Marty, of course, has returned safely to 1985 moments earlier.
Part III wrapped on January 12th, 1990 and was released on May 25th, just six months after Part II. Although each instalment made less money than its predecessor, the trilogy as a whole grossed almost $1 billion around the world, about ten times its total production cost. The franchise spawned a theme park ride, an animated series, comics and most recently a West End musical.
But what about Part IV? Thomas F. Wilson is a stand-up comedian as well as an actor, and on YouTube you can find a track of his called “Biff’s Questions Song” which humorously answers the most common queries he gets from fans. The penultimate chorus reveals all: “Do you all hang out together? No we don’t / How’s Crispin Glover? Never talk to him / Back to the Future IV? Not happening / Stop asking me the question!”
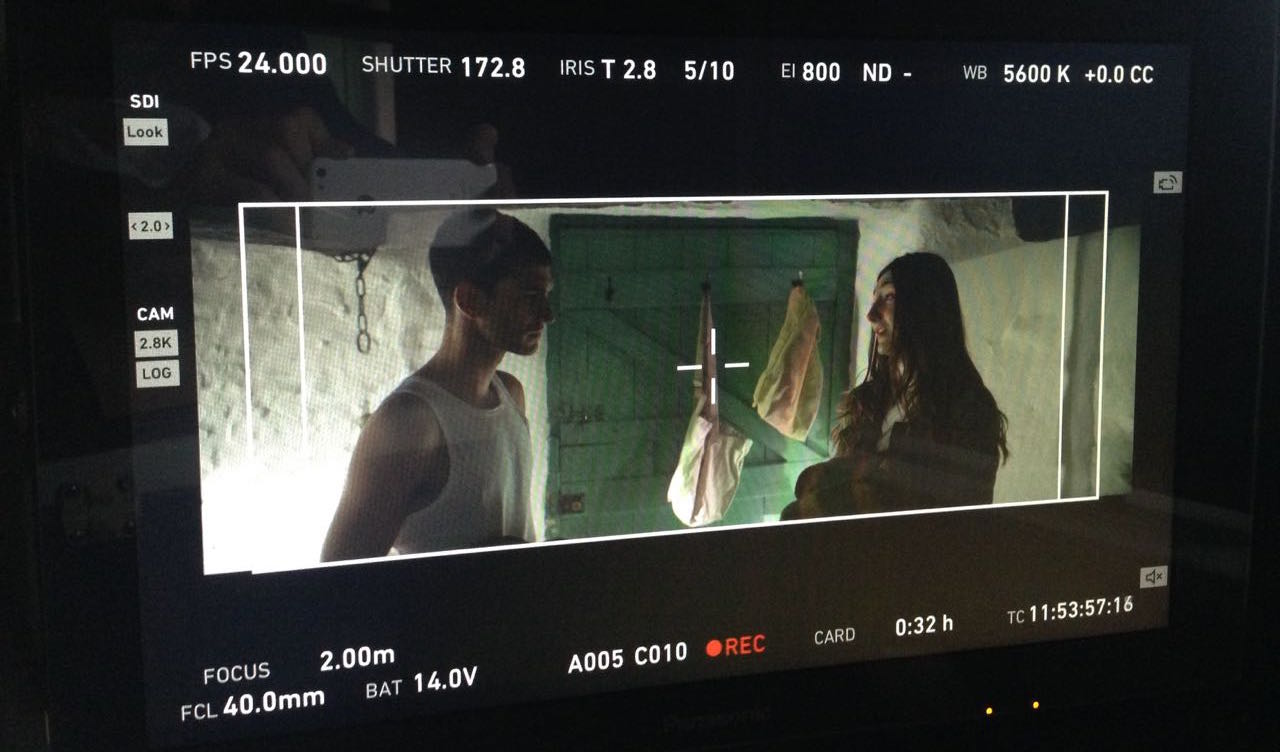
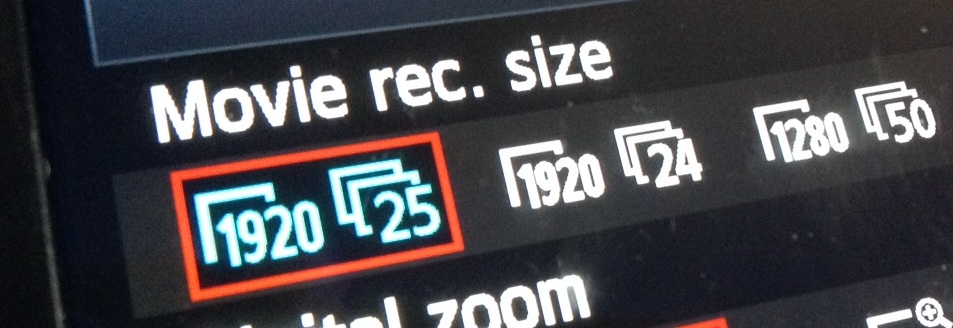
The monitor overlays here show how “Annabel Lee” was shot at 24fps with a shutter angle of 172.8 to prevent flickering of non-incandescent light sources, a typical recipe for UK filmmakers today.
An article of mine from 2014 weighing the merits of shooting at 24 vs. 25 frames per second has recently been getting a lot of hits. I’m surprised that there’s still so much uncertainty around this issue, because for me it’s pretty clear-cut these days.
When I started out making films at the turn of the millennium, 25fps (or its interlaced variant, 50i) was the only option for video. The tapes ran at that speed and that was that. Cathode ray tube TVs were similarly inflexible, as was PAL DVD when it emerged.
Film could be shot at 24fps, and generally was for theatrical movies, since most cinema projectors only run at that speed, but film for television was shot at 25fps.
Three big technological shifts occurred in the late noughties: the delivery of video over the internet, flat-screen TVs and tapeless cameras. All of these support multiple frame rates, so gradually we found that we had a choice. At the start of a shoot, as a DP I would have to ask which frame rate to set.
The frame rate and resolution menu from my old Canon 600D, the first time I owned a camera that could shoot 24fps.
Americans and others in NTSC regions are in a different situation. Their TV standard of 30fps has a discernibly different look to the international movie standard of 24fps, so the choice of frame rate is as much creative as it is technical. I don’t think anyone can tell the difference between 24 and 25fps, even on a subconscious level, so in Europe it seems we must decide on a purely technical basis.
But in fact, the decision is as much about what people are used to as anything else. I shot a feature film pilot once on 35mm at 25fps and it really freaked out the lab simply because they weren’t used to it.
I shot the 35mm pilot for “The Dark Side of the Earth” (2008) at 25fps because tapes still played a part in postproduction at that time. Today I would not hesitate to shoot at 24.
And what people seem to be most used to and comfortable with in the UK today is 24fps. It offers the most compatibility with digital cinemas and Blu-ray without needing frame rate conversion. (Some cinemas can play 25fps DCPs, and Blu-rays support 25fps in a 50i wrapper which might not play in a lot of US machines, but 24 is always a safer bet for these formats.)
Historically, flickering of non-incandescent light sources and any TV screens in shot was a problem when shooting 24fps in the UK. These days it’s very easy to set your shutter to 172.8° (if your camera measures it as an angle) or 1/50th (if your camera measures it as an interval). This ensures that every frame – even though there are 24 of them per second – captures 1/50th of a second, in sync with the 50Hz mains supply.
The Times when 25fps is best
There are some situations in which 25fps is still the best or only option though, most notably when you’re shooting something intended primarily for broadcast on a traditional TV channel in the UK or Europe. The same goes if your primary distribution is on PAL DVD, which I know is still the case for certain types of corporate and educational videos.
Once I was puzzled by a director’s monitor not working on a short film shoot, and discovered that it didn’t support 24fps signals, so I had to choose 25 as my frame rate for that film. So it might be worth checking your monitors if you haven’t shot 24fps with them before.
“Finding Hope” was shot at 25fps simply because the director’s monitor wouldn’t accept 24fps signals.
Finally, if your film contains a lot of archive material or stock footage at 25fps, it makes sense to match that frame rate.
Whichever frame rate you ultimately choose, always discuss it with your postproduction team ahead of time to make sure that you’re all on the same page.
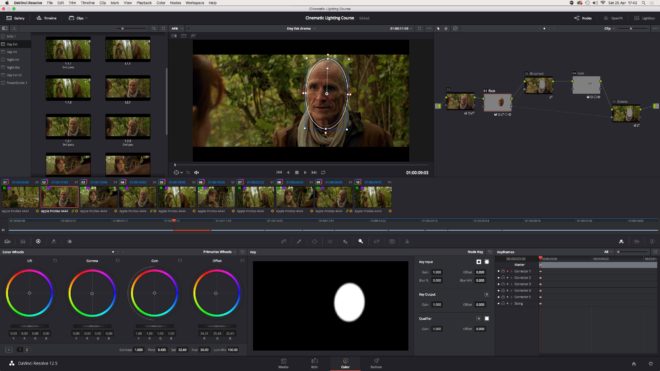
Last week I posted an article I wrote a while back (originally for RedShark News), entitled “Why You Can’t Relight Footage in Post”. You may detect that this article comes from a slightly anti-colourist place. I have been, for most of my career, afraid of grading – afraid of colourists ruining my images, indignant that my amazing material should even need grading. Arrogance? Ego? Delusion? Perhaps, but I suspect all DPs have felt this way from time to time.
I think I have finally started to let go of this fear and to understand the symbiotic relationship betwixt DP and colourist. As I mentioned a couple of weeks ago, one of the things I’ve been doing to keep myself occupied during the Covid-19 lockdown is learning to grade. This is so that I can grade the dramatic scenes in my upcoming lighting course, but also an attempt to understand a colourist’s job better. The course I’m taking is this one by Matthew Falconer on Udemy. At 31 hours, it takes some serious commitment to complete, commitment I fear I lack. But I’ve got through enough to have learnt the ins and outs of Davinci Resolve, where to start when correcting an image, the techniques of primary and secondary grades, and how to use the scopes and waveforms. I would certainly recommend the course if you want to learn the craft.
As I worked my way through grading the supplied demo footage, I was struck by two similarities. Firstly, as I tracked an actor’s face and brightened it up, I felt like I was in the darkroom dodging a print. (Dodging involves blocking some of the light reaching a certain part of the image when making an enlargement from a film negative, resulting in a brighter patch.) Subtly lifting the brightness and contrast of your subject’s face can really help draw the viewer’s eye to the right part of the image, but digital colourists were hardly the first people to recognise this. Photographers have been dodging – and the opposite, burning – prints pretty much since the invention of the negative process almost 200 years ago.
The second similarity struck me when I was drawing a power curve around an actor’s shirt in order to adjust its colour separately from the rest of the image. I was reminded of this image from Painting with Light, John Alton’s seminal 1949 work on cinematography…
The chin scrim is a U-shaped scrim… used to cut the light off hot white collars worn with black dinner jackets.
It’s hard for a modern cinematographer to imagine blocking static enough for such a scrim to be useful, or indeed a schedule generous enough to permit the setting-up of such an esoteric tool. But this was how you did a power window in 1949: in camera.
Sometimes I’ve thought that modern grading, particularly secondaries (which target only specific areas of the image) are unnecessary; after all, we got through a century of cinema just fine without them. But in a world where DPs don’t have the time to set up chin scrims, and can’t possibly expect a spark to follow an actor around with one, adding one in post is a great solution. Our cameras might have more dynamic range than 1940s film stock, meaning that that white collar probably won’t blow out, but we certainly don’t want it distracting the eye in the final grade.
Like I said in my previous post, what digital grading does so well are adjustments of emphasis. This is not to belittle the process at all. Those adjustments of emphasis make a huge difference. And while the laws of physics mean that a scene can’t feasibly be relit in post, they also mean that a chin scrim can’t feasibly follow an actor around a set, and you can’t realistically brighten an actor’s face with a follow spot.
What I’m trying to say is, do what’s possible on set, and do what’s impossible in post. This is how lighting and grading work in harmony.
The concept of “re-lighting in post” is one that has enjoyed a popularity amongst some no-budget filmmakers, and which sometimes gets bandied around on much bigger sets as well. If there isn’t the time, the money or perhaps simply the will to light a scene well on the day, the flexibility of RAW recording and the power of modern grading software mean that the lighting can be completely changed in postproduction, so the idea goes.
I can understand why it’s attractive. Lighting equipment can be expensive, and setting it up and finessing it is one of the biggest consumers of time on any set. The time of a single wizard colourist can seem appealingly cost-effective – especially on an unpaid, no-budget production! – compared with the money pit that is a crew, cast, location, catering, etc, etc. Delaying the pain until a little further down the line can seem like a no-brainer.
There’s just one problem: re-lighting footage is fundamentally impossible. To even talk about “re-lighting” footage demonstrates a complete misunderstanding of what photographing a film actually is.
This video, captured at a trillion frames per second, shows the tranmission and reflection of light.
The word “photography” comes from Greek, meaning “drawing with light”. This is not just an excuse for pompous DPs to compare themselves with the great artists of the past as they “paint with light”; it is a concise explanation of what a camera does.
A camera can’t record a face. It can’t record a room, or a landscape, or an animal, or objects of any kind. The only thing a camera can record is light. All photographs and videos are patterns of light which the viewer’s brain reverse-engineers into a three-dimensional scene, just as our brains reverse-engineer the patterns of light on the retinae every moment of every day, to make sense of our surroundings.
The light from this object gets gradually brighter then gradually darker again – therefore it is a curved surface. There is light on the top of that nose but not on the underneath, so it must be sticking out. These oval surfaces are absorbing all the red and blue light and reflecting only green, so it must be plant life. Such are the deductions made continuously by the brain’s visual centre.
A compound lens for a prototype light-field camera by Adobe
To suggest that footage can be re-lit is to suggest that recorded light can somehow be separated from the underlying physical objects off which that light reflected. Now of course that is within the realms of today’s technology; you could analyse a filmed scene and build a virtual 3D model of it to match the footage. Then you could “re-light” this recreated scene, but it would be a hell of a lot of work and would, at best, occupy the Uncanny Valley.
Some day, perhaps some day quite soon, artificial intelligence will be clever enough to do this for us. Feed in a 2D video and the computer will analyse the parallax and light shading to build a moving 3D model to match it, allowing a complete change of lighting and indeed composition.
Volumetric capture is already a functioning technology, currently using a mix of infrared and visible-light cameras in an environment lit as flatly as possible for maximum information – like log footage pushed to its inevitable conclusion. By surrounding the subject with cameras, a moving 3D image results.
Sir David Attenborough getting his volume captured by Microsoft
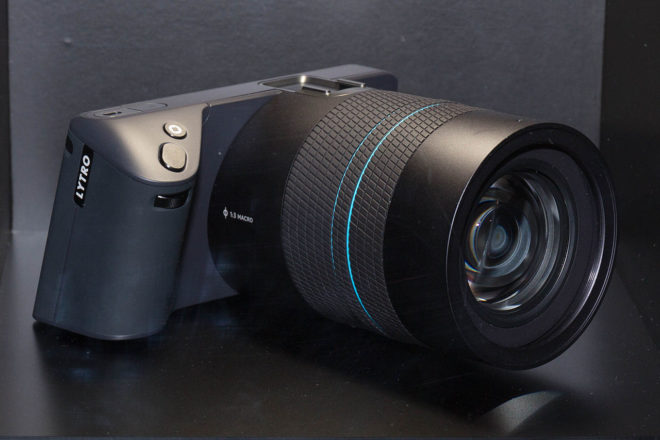
Such rigs are a type of light-field imaging, a technology that reared its head a few years ago in the form of Lytro, with viral videos showing how depth of field and even camera angle (to a limited extent) could be altered with this seemingly magical system. But even Lytro was capturing light, albeit it in a way that allowed for much more digital manipulation.
Perhaps movies will eventually be captured with some kind of Radar-type technology, bouncing electromagnetic waves outside the visible spectrum off the sets and actors to build a moving 3D model. At that point the need for light will have been completely eliminated from the production process, and the job of the director of photography will be purely a postproduction one.
While I suspect most DPs would prefer to be on a physical set than hunched over a computer, we would certainly make the transition if that was the only way to retain meaningful authorship of the image. After all, most of us are already keen to attend grading sessions to ensure our vision survives postproduction.
The Lytro Illum 2015 CP+ by Morio – own work, CC BY-SA 3.0, https://commons.wikimedia.org/w/index.php?curid=38422894
But for the moment at least, lighting must be done on set; re-lighting after the fact is just not possible in any practical way. This is not to take away from the amazing things that a skilled colourist can do, but the vignettes, the split-toning, the power windows, the masking and the tracking – these are adjustments of emphasis.
A soft shadow can be added, but without 3D modelling it can never fall and move as a real shadow would. A face can be brightened, but the quality of light falling on it can’t be changed from soft to hard. The angle of that light can’t be altered. Cinematographers refer to a key-light as the “modelling” light for a reason: because it defines the 3D model which your brain reverse-engineers when it sees the image.
So if you’re ever tempted to leave the job of lighting to postproduction, remember that your footage is literally made of light. If you don’t take the time to get your lighting right, you might as well not have any footage at all.
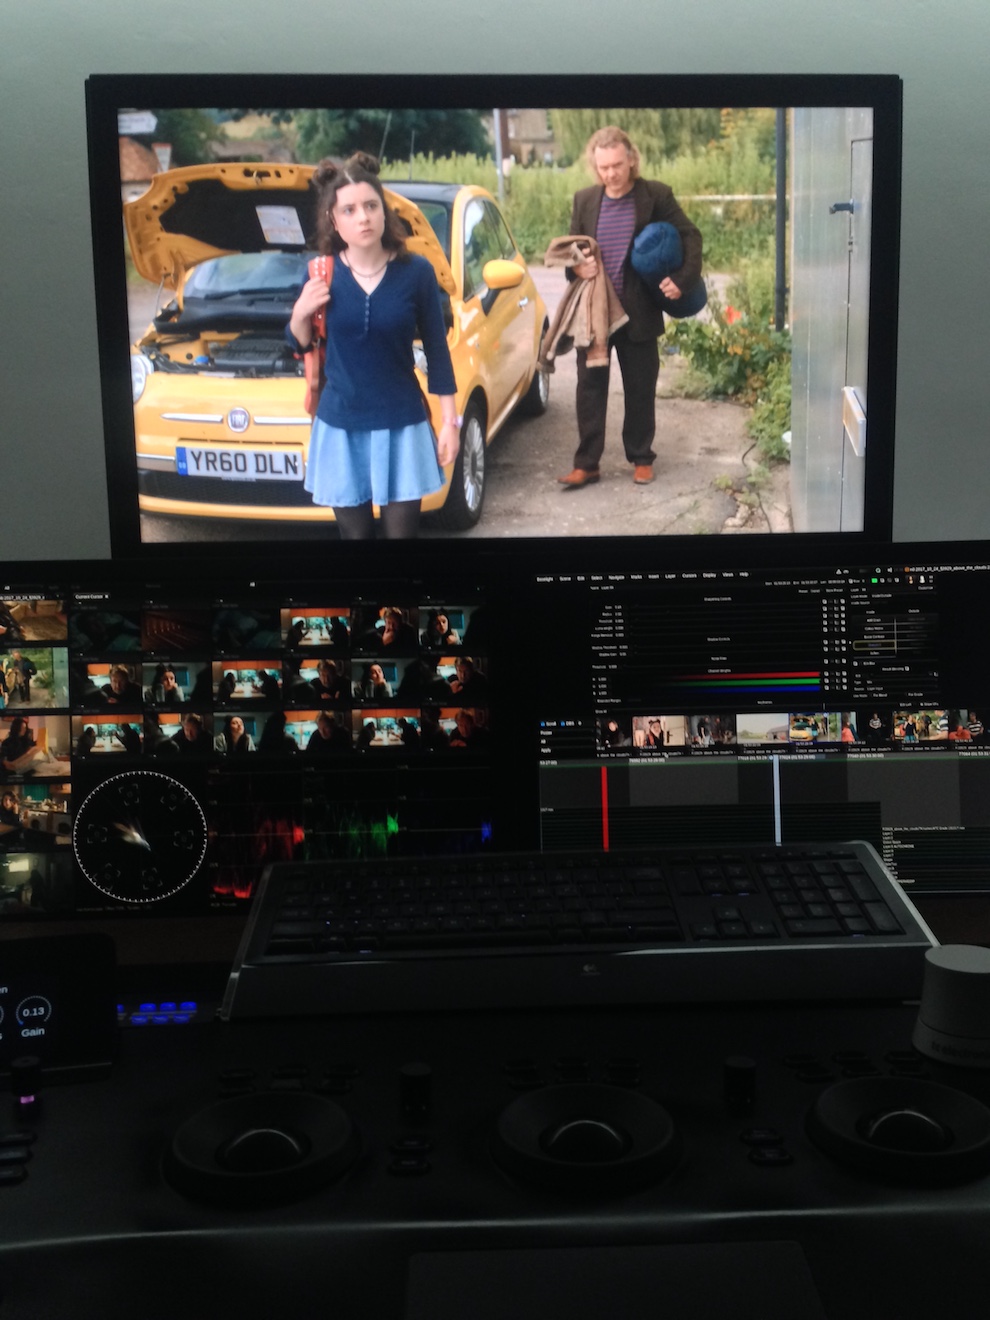
Recently work began on colour grading Above the Clouds, a comedy road movie I shot for director Leon Chambers. I’ve covered every day of shooting here on my blog, but the story wouldn’t be complete without an account of this crucial stage of postproduction.
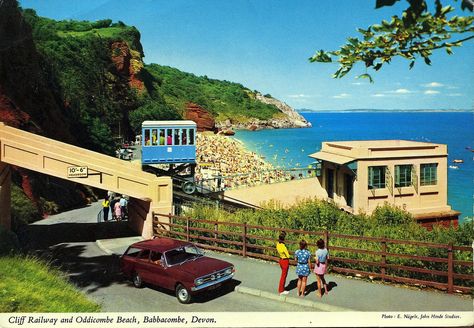
I must confess I didn’t give much thought to the grade during the shoot, monitoring in Rec.709 and not envisaging any particular “look”. So when Leon asked if I had any thoughts or references to pass on to colourist Duncan Russell, I had to put my thinking cap on. I came up with a few different ideas and met with Leon to discuss them. The one that clicked with his own thoughts was a super-saturated vintage postcard (above). He also liked how, in a frame grab I’d been playing about with, I had warmed up the yellow of the car – an important character in the movie!
Leon was keen to position Above the Clouds‘ visual tone somewhere between the grim reality of a typical British drama and the high-key gloss of Hollywood comedies. Finding exactly the right spot on that wide spectrum was the challenge!
“Real but beautiful” was Duncan’s mantra when Leon and I sat down with him last week for a session in Freefolk’s Baselight One suite. He pointed to the John Lewis “Tiny Dancer” ad as a good touchstone for this approach.
We spent the day looking at the film’s key sequences. There was a shot of Charlie, Oz and the Yellow Peril (the car) outside the garage from week one which Duncan used to establish a look for the three characters. It’s commonplace nowadays to track faces and apply individual grades to them, making it possible to fine-tune skin-tones with digital precision. I’m pleased that Duncan embraced the existing contrast between Charlie’s pale, freckled innocence and Oz’s dirty, craggy world-weariness.
Above the Clouds was mainly shot on an Alexa Mini, in Log C ProRes 4444, so there was plenty of detail captured beyond the Rec.709 image that I was (mostly) monitoring. A simple example of this coming in useful is the torchlight charity shop scene, shot at the end of week two. At one point Leo reaches for something on a shelf and his arm moves right in front of his torch. Power-windowing Leo’s arm, Duncan was able to bring back the highlight detail, because it had all been captured in the Log C.
But just because all the detail is there, it doesn’t mean you can always use it. Take the gallery scenes, also shot in week two, at the Turner Contemporary in Margate. The location has large sea-view windows and white walls. Many of the key shots featured Oz and Charlie with their backs towards the windows. This is a classic contrasty situation, but I knew from checking the false colours in log mode that all the detail was being captured.
Duncan initially tried to retain all the exterior detail in the grade, by separating the highlights from the mid-tones and treating them differently. He succeeded, but it didn’t look real. It looked like Oz and Charlie were green-screened over a separate background. Our subconscious minds know that a daylight exterior cannot be only slightly brighter than an interior, so it appeared artificial. It was necessary to back off on the sky detail to keep it feeling real. (Had we been grading in HDR [High Dynamic Range], which may one day be the norm, we could theoretically have retained all the detail while still keeping it realistic. However, if what I’ve heard of HDR is correct, it may have been unpleasant for audiences to look at Charlie and Oz against the bright light of the window beyond.)
There were other technical challenges to deal with in the film as well. One was the infra-red problem we encountered with our ND filters during last autumn’s pick-ups, which meant that Duncan had to key out Oz’s apparently pink jacket and restore it to blue. Another was the mix of formats employed for the various pick-ups: in addition to the Alexa Mini, there was footage from an Arri Amira, a Blackmagic Micro Cinema Camera (BMMCC) and even a Canon 5D Mk III. Although the latter had an intentionally different look, the other three had to match as closely as possible.
A twilight scene set in a rural village contains perhaps the most disparate elements. Many shots were done day-for-dusk on the Alexa Mini in Scotland, at the end of week four. Additional angles were captured on the BMMCC in Kent a few months later, both day-for-dusk and dusk-for-dusk. This outdoor material continues directly into indoor scenes, shot on a set this February on the Amira. Having said all that, they didn’t match too badly at all, but some juggling was required to find a level of darkness that worked for the whole sequence while retaining consistency.
In other sequences, like the ones in Margate near the start of the film, a big continuity issue is the clouds. Given the film’s title, I always tried to frame in plenty of sky and retain detail in it, using graduated ND filters where necessary. Duncan was able to bring out, suppress or manipulate detail as needed, to maintain continuity with adjacent shots.
Consistency is important in a big-picture sense too. One of the last scenes we looked at was the interior of Leo’s house, from weeks two and three, for which Duncan hit upon a nice, painterly grade with a bit of mystery to it. The question is, does that jar with the rest of the movie, which is fairly light overall, and does it give the audience the right clues about the tone of the scene which will unfold? We may not know the answers until we watch the whole film through.
Duncan has plenty more work to do on Above the Clouds, but I’m confident it’s in very good hands. I will probably attend another session when it’s close to completion, so watch this space for that.
Nofilmschool today posted a brilliant short film called The Secret World of Foley, which inspired me to share this DVD extra from Stop/Eject. It looks at the whole sound process on this short film, from production audio, through ADR, foley, effects and music to the final mix.
And here’s The Secret World of Foley – well worth a watch.
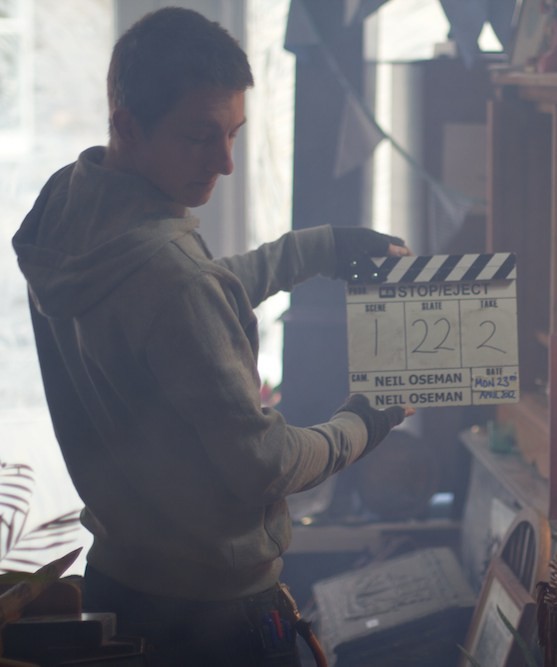
Colin Smith slates a shot on Stop/Eject. Photo: Paul Bednall
While syncing sound in an edit recently I came across a number of little mistakes that cost me time, so I decided to put together some on-set and off-set tips for smooth sound syncing.
On set: tips for the 2nd AC
Get the slate and take number on the slate right. This means a dedicated 2nd AC (this American term seems to have supplanted the more traditional British clapper-loader), not just any old crew member grabbing the slate at the last minute.
Get the date on the slate right. This can be very helpful for starting to match up sound and picture in a large project if other methods fail.
Hold the slate so that your fingers are not covering any of the info on it.
Make MOS (mute) shots very clear by holding the sticks with your fingers through them.
Make sure the rest of the cast and crew appreciate the importance of being quiet while the slate and take number are read out. It’s a real pain for the editing department if the numbers can’t be heard over chit-chat and last-minute notes from the director.
Speak clearly and differentiate any numbers that could be misheard, e.g. “slate one three” and “slate three zero” instead of the similar-sounding “slate thirteen” and “slate thirty”.
Rick Goldsmith slates a steadicam shot on Stop/Eject. Photo: Paul Bednall
For more on best slating practice, see my Slating 101 blog post.
Off set: tips for the DIT and assistant editor
I recommend renaming both sound and video files to contain the slate and take number, but be sure to do this immediately after ingesting the material and on all copies of it. There is nothing worse than having copies of the same file with different names floating around.
This should be obvious, but please, please, please sync your sound BEFORE starting to edit or I will hunt you down and kill you. No excuses.
An esoteric one for any dinosaurs like me still using Final Cut 7: make sure you’ve set your project’s frame rate correctly (in Easy Setup) before importing your audio rushes. Otherwise FCP will assign them timecodes based on the wrong rate, leading to errors and sound falling out of sync if you ever need to relink your project’s media.
Follow these guidelines and dual system sound will be painless – well, as painless as it can ever be!
Discussing the next set-up on the Ren pick-ups shoot with director Kate Madison. Photo: Michael Hudson
Recently I’ve been involved in pick-ups shoots for a couple of projects I lensed last year: action-comedy feature The Gong Fu Connection and fantasy series Ren. Both pick-up shoots were strange experiences, featuring some very familiar aspects of the original shoot – locations, sets, costumes – but noticeably lacking others – certain actors, crew members and so on. The Ren pick-ups in particular were like re-living principal photography in microcosm, with stressful crowd shoots followed by more relaxed, smaller scenes and finally night shots with flaming arrows again!
A CTB-gelled Arrilite 1000 stands in for the 2.5K HMI used for backlight during principal photography on Ren! Photo: Michael Hudson
I’ve blogged previously about how a director/producer can prepare for pick-ups – by keeping certain key props and costumes, for example – but today I have a few thoughts from a DP’s perspective.
1. Keep a record of lighting plans. I have a pretty good memory for my lighting set-ups, but not everyone does, so keeping notes is a good idea. Your gaffer may even do this for you. I frequently use this blog as a means of recording lighting set-ups, and indeed tried to access it during the Ren pick-ups shoot but was foiled by dodgy wifi.
2. Keep camera logs. On a properly crewed shoot this will be the 2nd AC’s job. The logs should include at least the following info for each slate: lens, aperture, ASA, white balance and shutter angle. This can be useful in principal photography too, for example if you shoot the two parts of a shot-reverse at different ends of the day or different days all together, and need to make sure you use the same lens.
Production assistant Claire Finn tends the brazier which provides smoke in the absence of the Artem smoke gun used during principal photography. Photo: Michael Hudson
3. Have the original scene handy when you shoot the pick-ups. Load the edit onto a laptop or tablet so that you can compare it on set to the new material you’re framing up.
4. Own a bit of lighting kit if you can. In the shed I have some battered old Arrilites and a few other bits and pieces of gear that has seen better days. On a proper shoot I would leave this at home and have the production hire much better kit. But for pick-ups, when there’s often no money left, this stuff can come in handy.
5. Keep gels. If you employ an unusual colour of gel during principal photography, try to keep a piece of it in case you need to revisit that lighting set-up in pick-ups. Production will have to pay for the gel once it’s been used anyway. On the Ren pick-ups shoot, after pulling all of my gels out of the plastic kitchen bin I keep them in, I was relieved to find that I still had two pieces of the Urban Sodium gel I used in the flaming arrows scene the first time around.
Urban Sodium gel provides the grungy orange light for the flaming arrows scene, just as it did last November. Photo: Hermes Contreras
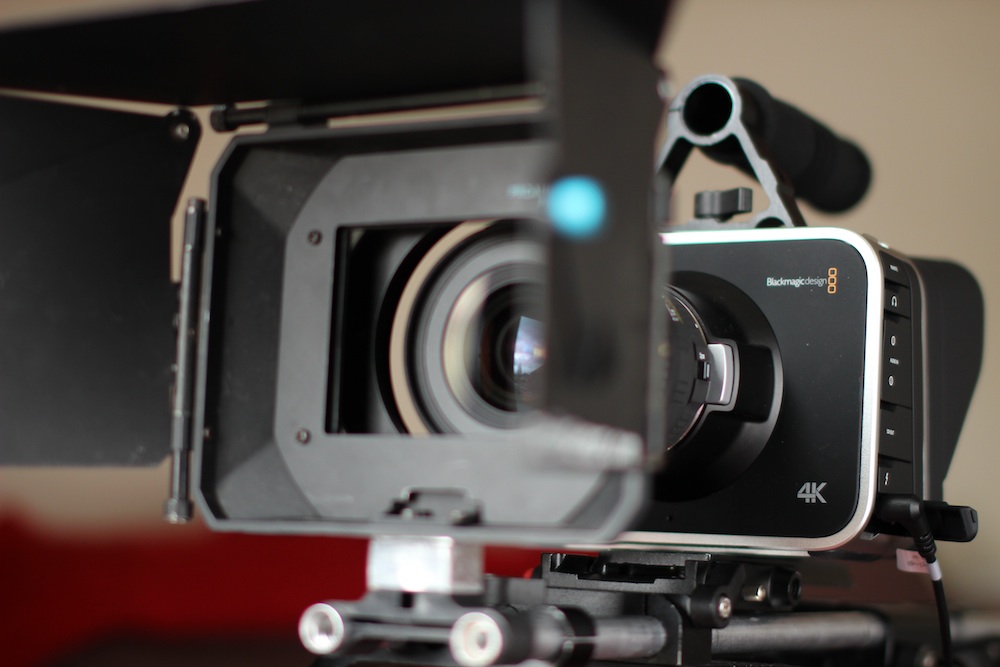
One of the big benefits of the Blackmagic cameras is their ability to shoot raw – lossless Cinema DNG files that capture an incredible range of detail. But encoding those files into a useable format for editing can be tricky, especially if your computer won’t run the processor-intensive DaVinci Resolve which ships with the camera.
You can usually turn to the Adobe Creative Suite when faced with intractable transcoding problems, and sure enough After Effects provides one solution for raw to ProRes conversion.
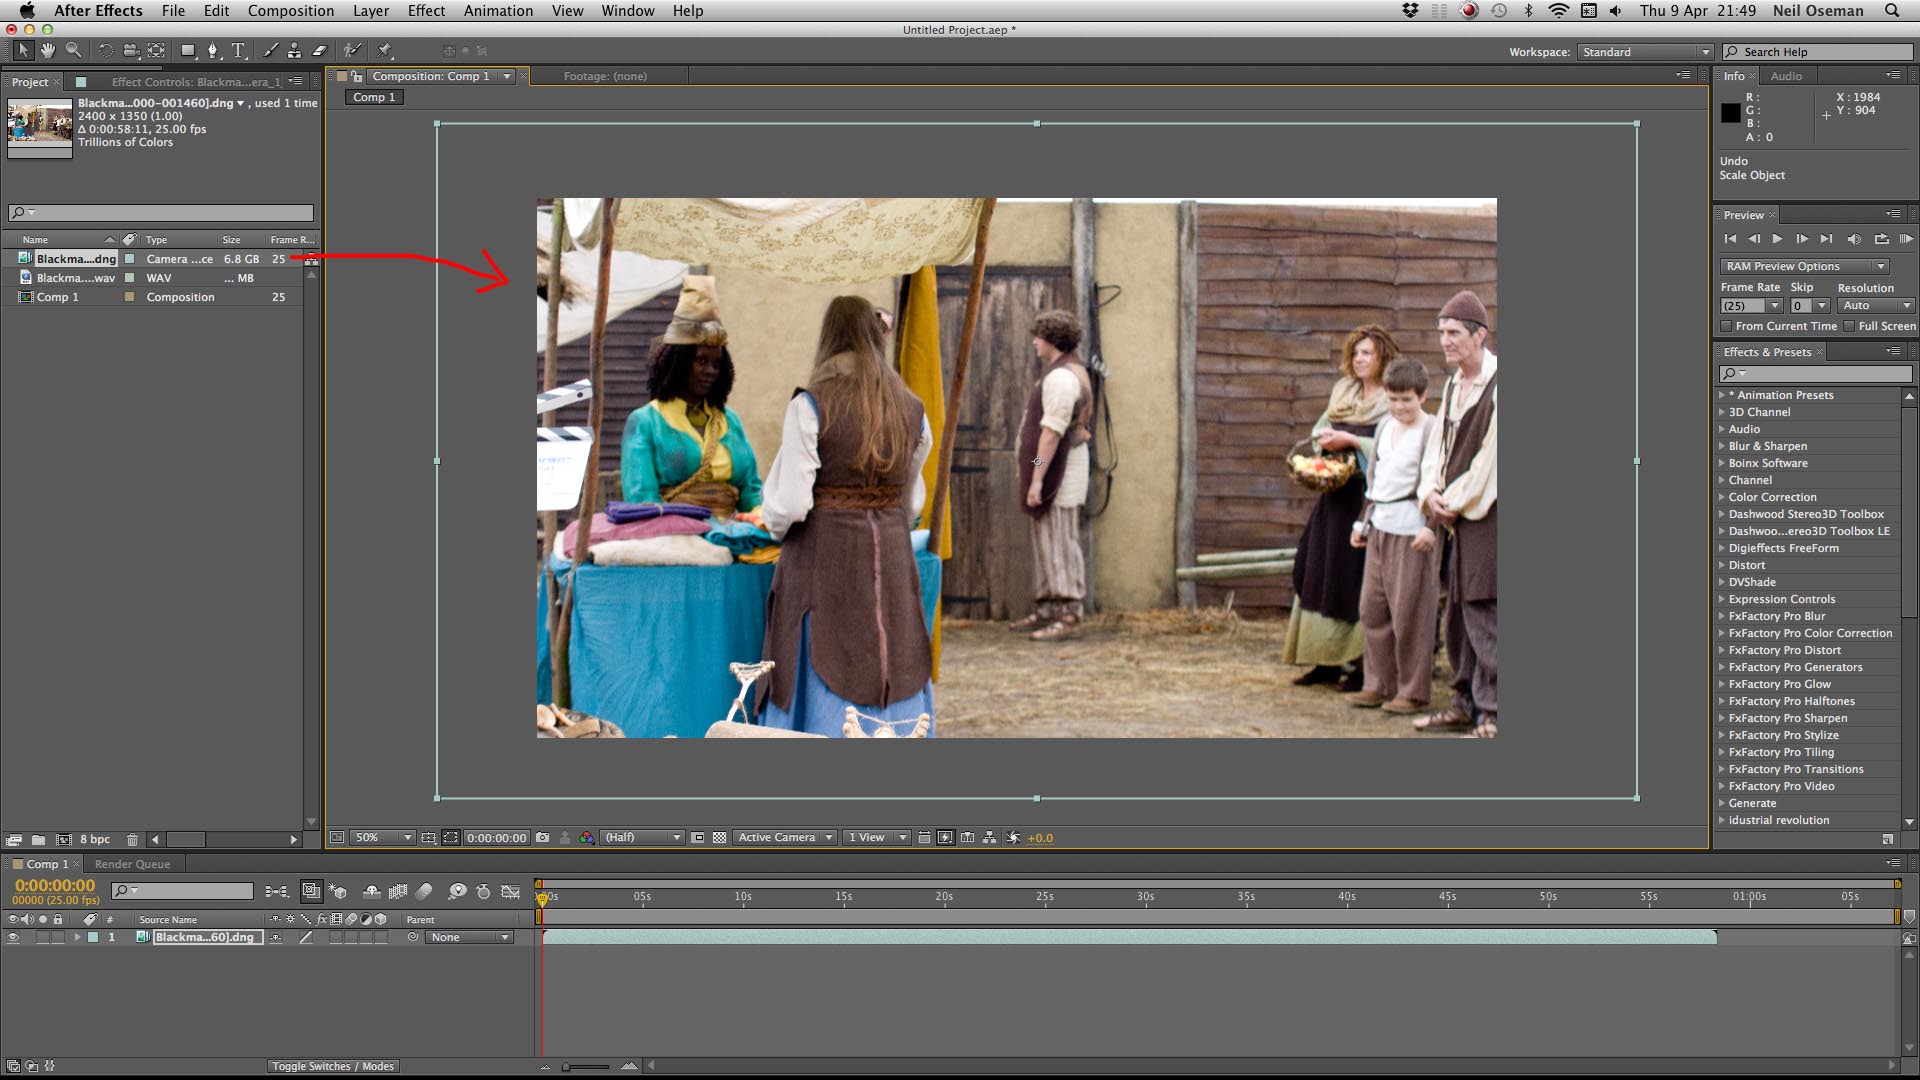
I’ll take you through it, step by step. Let’s assume you’ve been shooting on a Blackmagic Cinema Camera and you have some 2.5K raw shots which you want to drop into your edit timeline alongside 1080P ProRes 422HQ material.
1. In After Effects’ launch window, select New Composition. A dialogue box will appear in which you can spec up your project. For this example, we’re going to choose the standard HDTV resolution of 1920×1080. It’s critical that you get your frame rate right, or your audio won’t sync. Click OK once you’ve set everything to your liking.
2. Now go to the File menu and select Import > File. Navigate to the raw material on your hard drive. The BMCC creates a folder for each raw clip, containing the individual Cinema DNG frames and a WAV audio file. Select the first DNG file in the folder and ensure that Camera Raw Sequence is ticked, then click OK.
3. You’ll then have the chance to do a basic grade on the shot – though with only the first frame to judge it by.
4. Use Import > File again to import the WAV audio file.
5. Your project bin should now contain the DNG sequence – shown as a single item – along with the WAV audio and the composition. Drag the DNG sequence into the main viewer window. Because the BMCC’s raw mode records at a resolution of 2.5K and you set your composition to 1080P, the image will appear cropped.
6. If necessary, zoom out (using the drop-down menu in the bottom left of the Composition window) so you can see the wireframe of the 2.5K image. Then click and drag the bottom right corner of that wireframe to shrink the image until it fits into the 1080P frame. Hold down shift while dragging to maintain the aspect ratio.
7. Drag the WAV audio onto the timeline, taking care to align it precisely with the video.
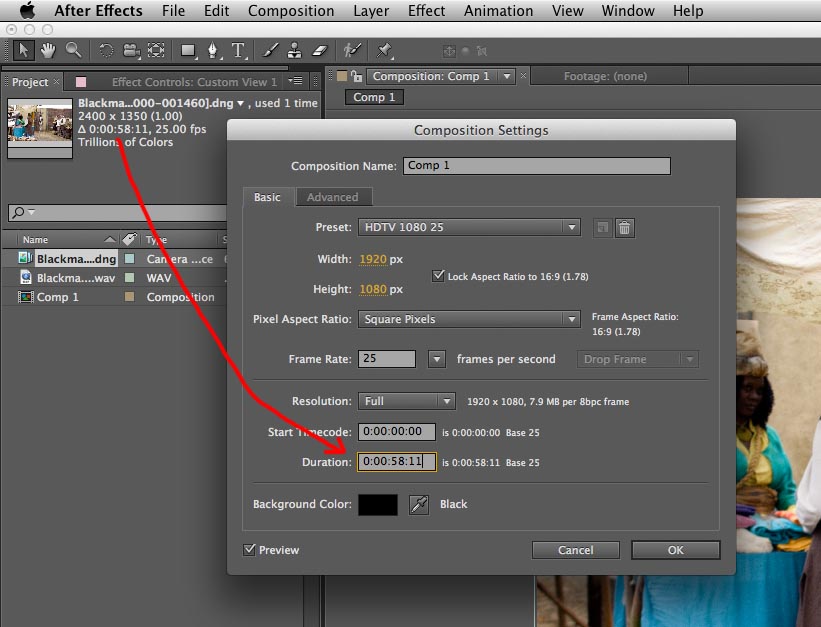
8. Go to Composition Settings in the Composition menu and alter the duration of the composition to match the duration of the clip (which you can see by clicking the DNG sequence in the project bin).
9. Go to the Composition menu again and select Add to Render Queue. The composition timeline will give way to the Render Queue tab.
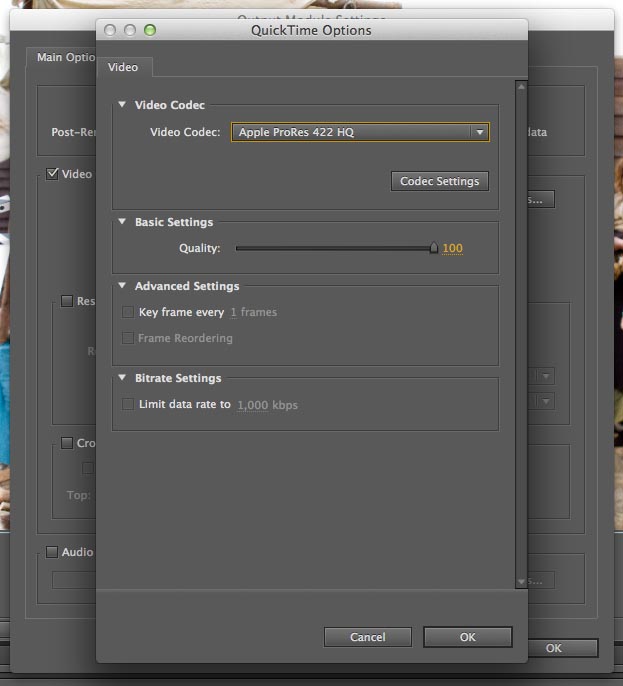
10. Next to the words Output Module in the Render Queue, you’ll see a clickable Lossless setting (yellow and underlined). Click this to open the Output Module Settings.
11. In the Video Output section, click on Format Options… We’re going to pick ProRes 422 HQ, to match with the non-raw shots we hypothetically filmed. Click OK to close the Format Options.
12. You should now be back in Output Module Settings. Before clicking OK to close this, be sure to tick the Audio Output box to make sure you don’t end up with a mute clip. You should not need to change the default output settings of 48kHz 16-bit stereo PCM.
13. In the Render Queue tab, next to the words Output to you’ll see a clickable filename – the default is Comp1.mov. Click on this to bring up a file selector and choose where to save your ProRes file.
14. Click Render (top far right of the Render Queue tab). Now just sit back and wait for your computer to crunch the numbers.
I’ve never used After Effects before, so there are probably ways to streamline this process which I’m unaware of. Can anyone out there suggest any improvements to this workflow? Is it possible to automate a batch?