RedShark News recently published an article called “The DSLR is now dead”, based on the fact that the Canon 1D X Mark III will be the last flagship DSLR from the company and that mirrorless cameras are now first choice for most photographers. This prompted me to reflect on some of the things I learnt when I bought my first (and only) DSLR.
It was 2011, and I documented some of the challenges my new Canon 600D created for me in this blog post. But what the DSLR did really well was to introduce me to a workflow very similar in many ways to the bigger productions I’m working on now. Previously I had shot everything on prosumer camcorders, so the following things were new to me with DSLRs and have been constant ever since.
Shallow Depth of Field
I had been used to everything being in focus, so not really thinking about my aperture setting, just turning the iris dial until the exposure looked right. My Canon 600D set me on a journey of understanding f-stops, and eventually choosing a target stop to shoot at for focus reasons and then using lighting or ND filters to achieve that stop.
Prime Lenses
Although for several years I owned a Canon XL1-S, which had interchangeable lenses, I only ever owned a couple of zooms for it. As far as I’m aware, no prime lenses to fit the XL1-S’s proprietary mount were ever made, so prime lenses were completely new to me when I got my 600D. As with aperture, it forced me to think about what field of view and degree of perspective or compression I wanted, select the appropriate lens, and then place the camera accordingly, rather than lazily zooming to get the desired framing.
Dual-System Sound
It’s weird now to think that I used to be tethered to the sound recordist before I switched to DSLR shooting. At the time I was doing most of my own editing as well, so syncing the sound was a pain in the arse, but it was a valuable introduction to this industry-standard way of working. It’s also weird to think that clapperboards were optional for me before this.
Building a camera rig
All my cameras before the 600D had a built-in viewfinder, handgrip, shoulder mount (if the camera was large enough to need one) and lens (except the XL1-S), and there was no need to add an external battery plate or a follow-focus. The idea that a camera rig needed to be built, and that it could be customised to suit different operators and situations, was a novel one to me. I have to say that I still prefer cameras that have more things built in, like the Alexa Classic. A good part of the reason I rarely use Reds is because they don’t come with viewfinders. Why anyone ever thinks a viewfinder is an optional part of a camera is utterly beyond me. It’s an important point of stabilising contact for handheld work, and your face shields it completely from extraneous light, unlike a monitor.
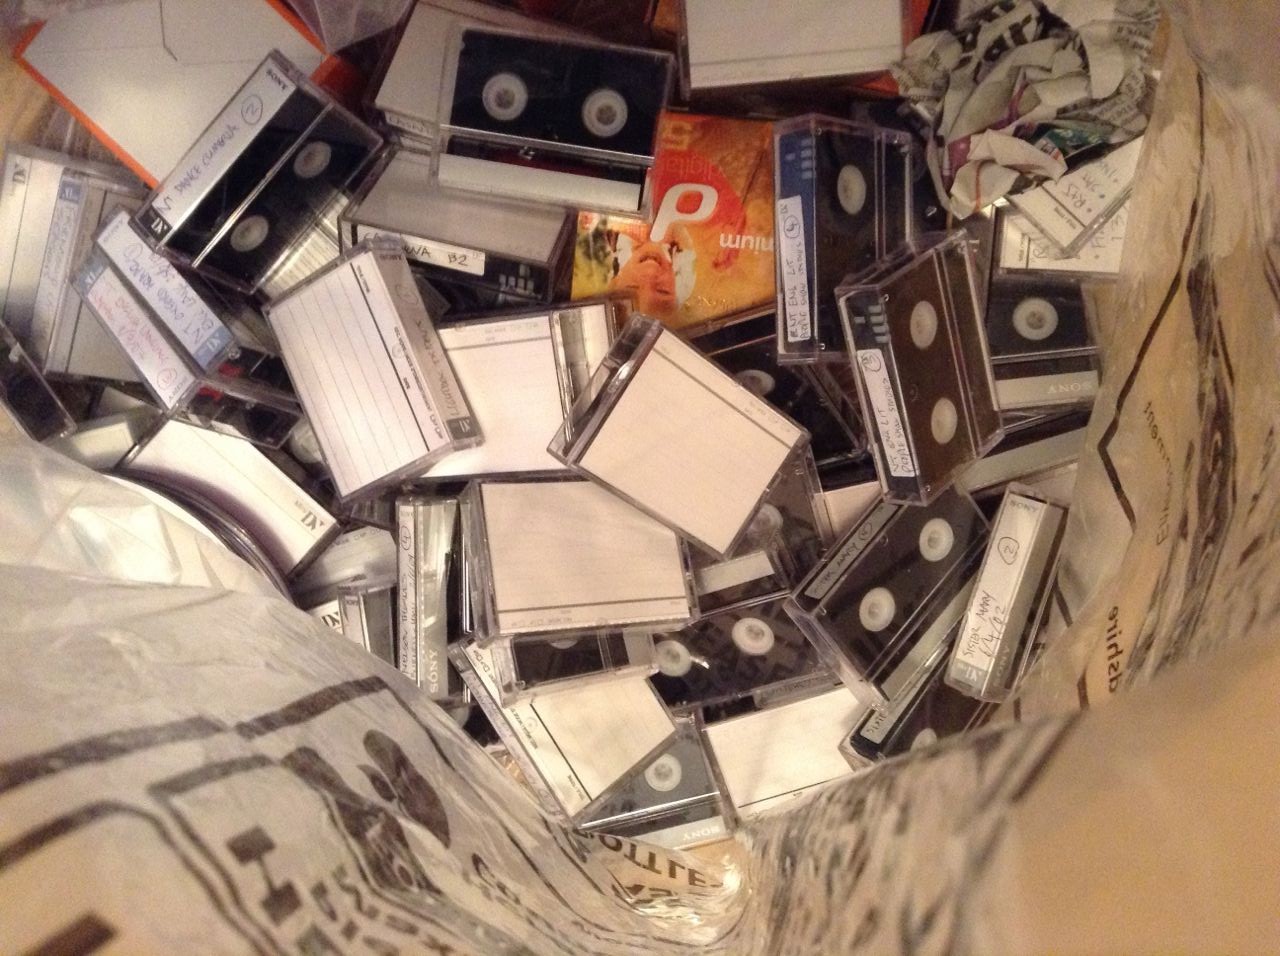
Tapeless recording
The 600D was my first camera to record to memory cards rather than magnetic tape. It was certainly scary to have to wipe the cards during a shoot, being careful to back everything up a couple of times first. Data wrangling was a tricky thing to deal with on the kind of tiny-crewed productions I was usually doing back then, but of course now it’s completely normal. Just last week I shot my new cinematography course and had the fun of staying up until 2:30am after a long day of shooting, to make sure all the footage was safely ingested! More on that course soon.
“The Handmaid’s Tale: Offred” (2017, DP: Colin Watkinson, ASC, BSC)
When DSLR video exploded onto the indie filmmaking scene a decade ago, film festivals were soon awash with shorts with ultra-blurry backgrounds. Now that we have some distance from that first novelty of large-sensor cinematography we can think more intelligently about how depth of field – be it shallow or deep – is best used to help tell our stories.
First, let’s recap the basics. Depth of field is the distance between the nearest and farthest points from camera that are in focus. The smaller the depth of field, the less the subject has to move before they go out of focus, and the blurrier any background and foreground objects appear. On the other hand, a very large depth of field may make everything from the foreground to infinity acceptably sharp.
Everyone’s favourite time machine at f/5 (left) and f/1.8 (right)
Depth of field is affected by four things: sensor (or film) size, focal length (i.e. lens length), focal distance, and aperture. In the days of tiny Mini-DV sensors, I was often asked by a director to zoom in (increase the focal length) to decrease the depth of field, but sometimes that was counter-productive because it meant moving the camera physically further away, thus increasing the focal distance, thus increasing the depth of field.
It was the large 35mm sensors of DSLRs, compared with the smaller 1/3” or 2/3” chips of traditional video cameras, that made them so popular with filmmakers. Suddenly the shallow depth of field seen in a Super-35 movie could be achieved on a micro-budget. It is worth noting for the purists, however, that a larger sensor technically makes for a deeper depth of field. The shallower depth of field associated with larger sensors is actually a product of the longer lenses required to obtain the same field of view.
Once a camera is selected and filming is underway, aperture is the main tool that DPs tend to use to control depth of field. A small aperture (large f- or T-number) gives a large depth of field; a large aperture (small f- or T-number) gives a narrow depth of field. What all those early DSLR filmmakers, high on bokeh, failed to notice is that aperture is, and always has been, a creative choice. Plenty of directors and DPs throughout the history of cinema have chosen deep focus when they felt it was the best way of telling their particular story.
“Citizen Kane” (1941, DP: Gregg Toland, ASC)
One of the most famous deep-focus films is 1941’s Citizen Kane, frequently voted the greatest movie ever made. First-time director Orson Welles came from a theatre background, and instructed DP Gregg Toland to keep everything in focus so that the audience could choose what to look at just as they could in a theatre. “What if they don’t look at what they’re supposed to look at?” Welles was apparently asked. “If that happens, I would be a very bad director,” was his reply.
Stanley Kubrick was also fond of crisp backgrounds. The infamous f/0.7 NASA lenses used for the candlelight scenes in Barry Lyndon were a rare and extreme exception borne of low-light necessity. A typical Kubrick shot has a formal, symmetrical composition with a single-point perspective and everything in focus right into the distance. Take the barracks in Full Metal Jacket, for example, where the background soldiers are just as sharp as the foreground ones. Like Welles, Kubrick’s reasons may have lain in a desire to emulate traditional art-forms, in this case paintings, where nothing is ever blurry.
“Full Metal Jacket” (1987, DP: Douglas Milsome, ASC, BSC)
The Indiana Jones trilogy was shot at a surprisingly slow stop by the late, great Douglas Slocombe. “I prefer to work in the aperture range of T14-T14.5 when I am shooting an anamorphic film like Raiders,” he said at the time. “The feeling of depth contributed to the look.” Janusz Kamiński continued that deep-focus look, shooting at T8-T11 when he inherited the franchise for Kingdom of the Crystal Skull.
At the other end of the aperture scale, the current Hulu series The Handmaid’s Tale makes great creative use of a shallow depth of field, creating a private world for the oppressed protagonist which works in tandem with voiceovers to put the viewer inside her head, the only place where she is free.
A director called James Reynolds had a similar idea in mind when I shot his short film, Exile Incessant. He wanted to photograph closed-minded characters with shallow focus, and show the more tolerant characters in deep focus, symbolising their openness and connection with the world. (Unfortunately the tiny lighting budget made deep focus impossible, so we instead achieved the symbolism by varying the harshness of the lighting.)
“Ren: The Girl with the Mark” (2016, DP: Neil Oseman)
One production where I did vary the depth of field was Ren: The Girl with the Mark, where I chose f/4 as my standard working stop, but reduced it to as little as f/1.4 when the lead character was bonding with the mysterious spirit inside her. It was the same principle again of separating the subject from the world around her.
Depth of field is a fantastic creative tool, and one which we are lucky to have so much control over with today’s cameras. But it will always be most effective when it’s used expressively, not just aesthetically.
A couple of weeks ago I shared my thoughts about whether a director of photography should own equipment. My conclusion was that it can be useful early in your career, when you’re shooting corporates or tiny films with no hire budget. So what is the best camera for indie cinematography?
I’m not going to answer that, but I will tell you what to look for when investing in a camera. Hopefully these tips will help you choose the one that’s right for you from the huge and ever-changing array of professional cameras on the market, from the humble DSLR to the ubiquitous Reds and everything in between.
1. Image quality
Shooting on a Sony FS7 for “Finding Hope”
The quality of the image is of course the most imporant attribute of any camera. Rather than any technical specifications, I’m talking about the aesthetic quality here: how does it feel? Does it have that elusive “cinematic” quality? Is it “filmic”? Does it remind you of certain kinds of movies?
A good place to start is to look up sample footage on YouTube, or better still Vimeo for less compression muddying the issue. If you can borrow the camera and try it out before you buy, even better. Take away some test footage and try grading it too.
2. Resolution
Resolution, the sheer number of pixels a camera can record, is part of image quality, but I include it as a separate point because I see it as more of a technical consideration than an aesthetic one. You should ask yourself what longevity you require from your films – will people still be watching them, say two or three years from now, and if so what sort of resolution might be the norm by then?
Also consider your delivery platform. If everything you shoot is going on YouTube, perhaps you don’t need more than 1080P (standard HD).
3. Dynamic Range
Dynamic range is a measure of how much contrast a camera can handle. Too small a dynamic range and you will frequently struggle with bright areas “clipping” – i.e. losing details – or dark areas getting lost in the image noise. Also, the wider the dynamic range, the more flexibility you will have in grading.
For a cinematic image, 12 stops of dynamic range is the absolute minimum, with 14 or more being ideal.
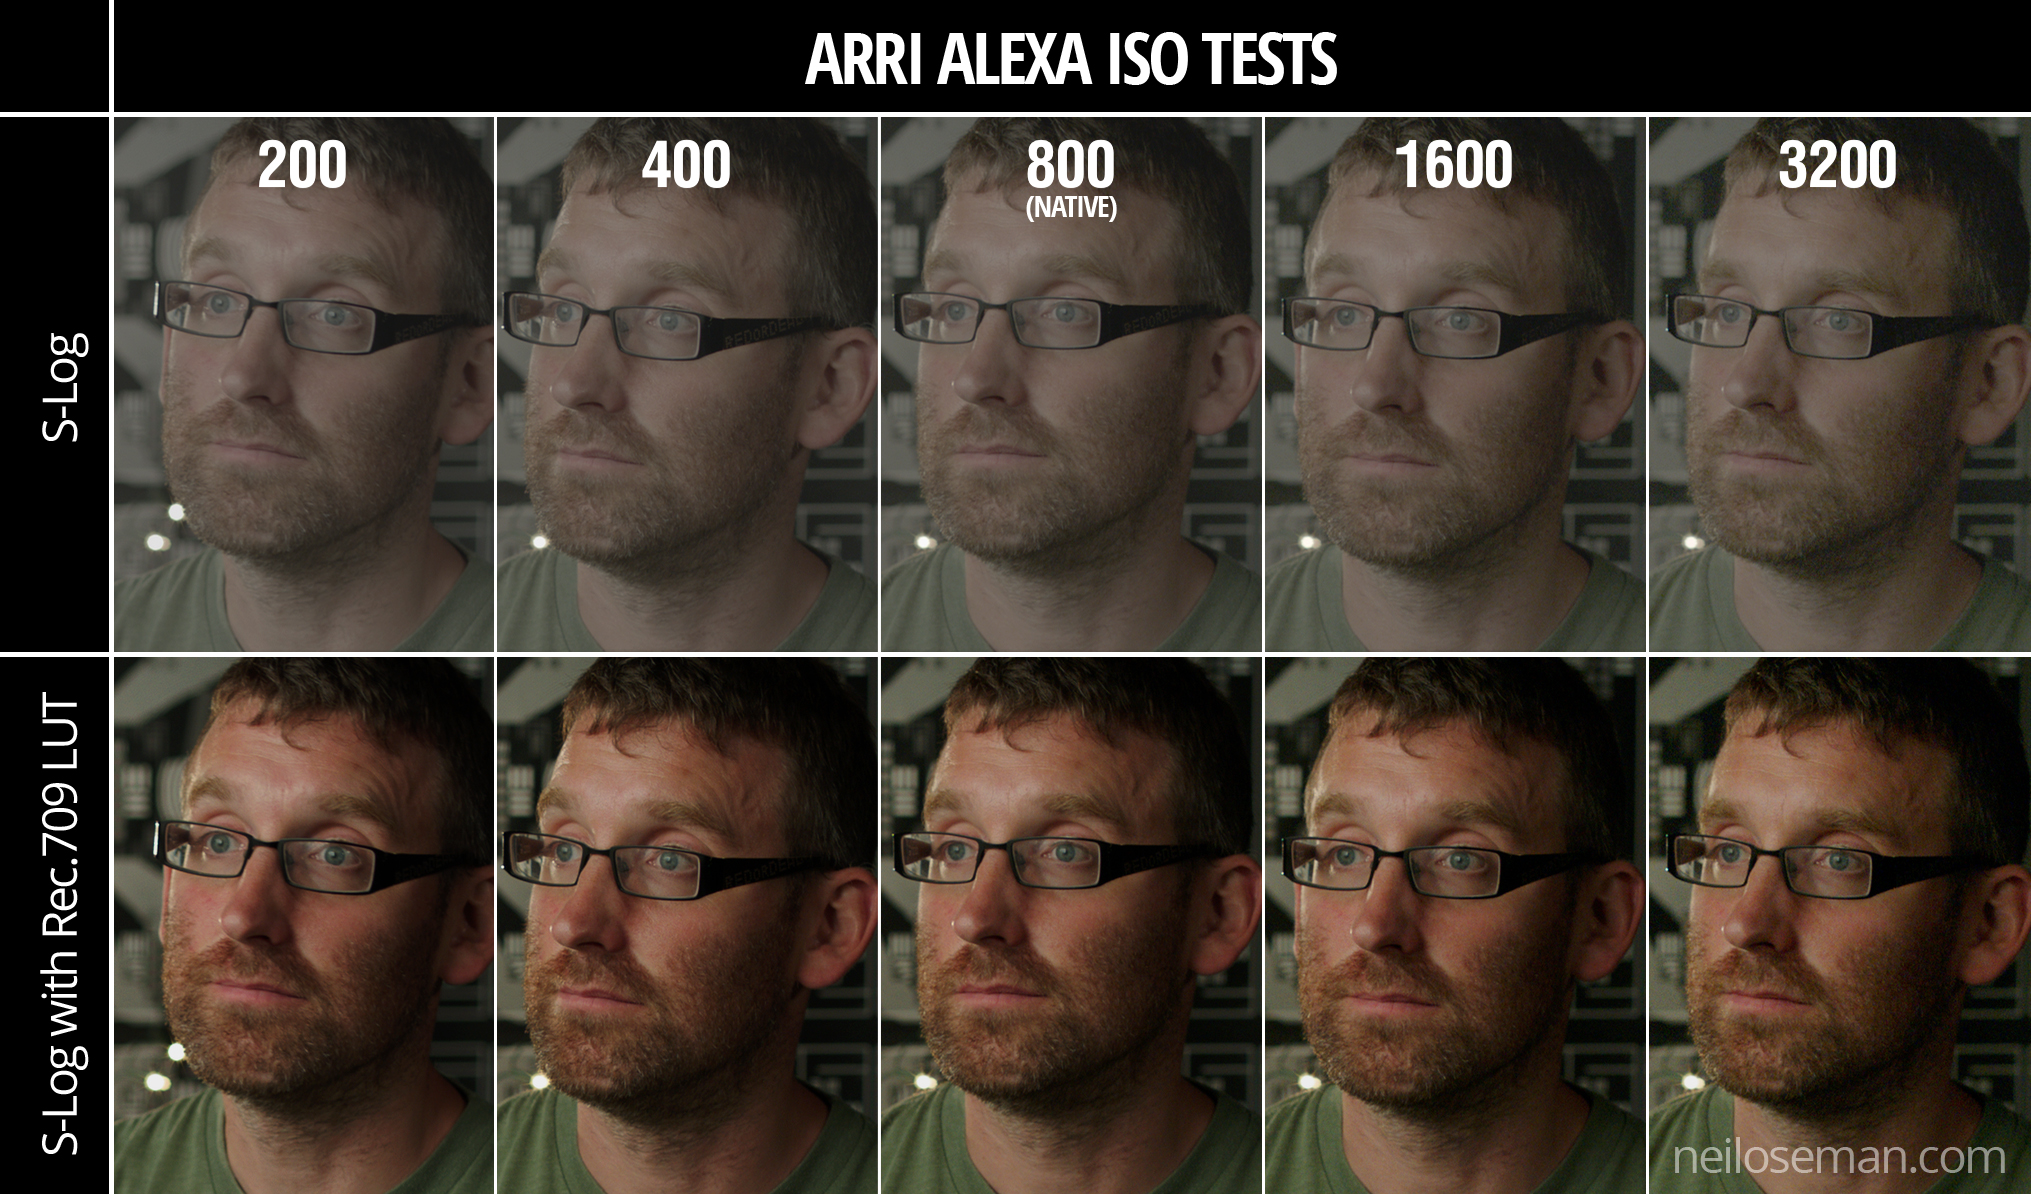
4. Maximum ISO
Some ISO tests I conducted on an Arri Alexa Classic in 2017
The ISO (International Standards Organisation) scale rates the light sensitivity of a camera. The most important thing is the native ISO, the one at which the camera is optimised to give the cleanest image with the most detail. On some cameras, setting an ISO other than the native one reduces the image quality considerably.
The higher the ISO, the less light will be required to expose an image correctly. 800 is typical these days, but many cameras go much higher than that. It is worth thinking about spending more money to get a camera with a higher native ISO, because you may save a lot of money on lighting.
5. Lens Mount
This is crucial because you may already have a collection of lenses, or you may intend to hire certain lenses, and you need to be sure that they will fit your new camera’s mount.
The Canon EF mount is extremely common and will open up a huge range of options for stills glass as well as some low-end cinema glass. The smaller MFT (micro four-thirds) mount also has a wide range of lenses.
Top-end cameras have PL mounts which take all the beautiful cinema lenses used on big movies, but only choose this route if you are willing to part with a lot of cash!
6. Form Factor
A Blackmagic Micro Cinema Camera, not so micro once it’s rigged with rails, matte box, wireless follow focus, battery, monitor and video transmitter!
When I started in the industry, cameras were all ergonomically designed to sit on your shoulder, with a nice handgrip to the right of the lens and an EVF (electronic viewfinder) to provide a third point of stabilising contact. Nowadays cameras tend to be boxy, heavy and uncomfortable to hold without additional accessories (see below).
Again, try to gets your hands on the camera in a shop and see how it feels before you purchase. As well as handheld shooting, consider how easy it will be to rig onto dollies, sliders, gimbals, etc.
7. Required Accessories
Buying the camera body itself is unlikely to be the end of your expenditure. You will need lenses, batteries, a battery charger, cards, a card reader and almost certainly some kind of stabilising system, be it a simple shoulder rig or an electronic gimbal.
You may also want an EVF, a tripod, matte box, follow focus – the list can seem endless! Be careful to budget your essential accessories before buying the camera. Some cameras seem like bargains until you add up all the extras. Pay particular attention to the media, and to exactly what speed of media you need in order to shoot at the resolution and frame rate that you require, as this can get very expensive.
8. Codec
What file type and codec does the camera shoot? Does your editing system support that format? If not, how time-consuming will it be to convert everything?
What compression ratios does the camera support? How much hard drive space will you need to store an hour of footage at that ratio? What about ten hours, plus back-ups? Often there is a trade-off between a highly compressed format like H.264 which is light on disc space but may need converting before you can edit it, and a lightly compressed format like ProRes which burns through disc space but can be dropped straight into most editing software.
Earlier this year I undertook a personal photography project called Stasis. I deliberately set out to do something different to my cinematography work, shooting in portrait, taking the paintings of Dutch seventeenth century masters as my inspiration, and eschewing traditional lighting fixtures in favour of practical sources. I was therefore a little disappointed when I began showing the images to people and they described them as “cinematic”.
An image from “Stasis”
This experience made me wonder just what people mean by that word, “cinematic”. It’s a term I’ve heard – and used myself – many times during my career. We all seem to have some vague idea of what it means, but few of us are able to define it.
Dictionaries are not much help either, with the Oxford English Dictionary defining it simply as “relating to the cinema” or “having qualities characteristic of films”. But what exactly are those qualities?
Shallow depth of field is certainly a quality that has been widely described as cinematic. Until the late noughties, shallow focus was the preserve of “proper” movies. The size of a 35mm frame (or of the digital cinema sensors which were then emerging) meant that backgrounds could be thrown way out of focus while the subject remained crisp and sharp. The formats which lower-budget productions had thereto been shot on – 2/3” CCDs and Super-16 film – could not achieve such an effect.
Then the DSLR revolution happened, putting sensors as big as – or bigger than – those of Hollywood movies into the hands of anyone with a few hundred pounds to spare. Suddenly everyone could get that “cinematic” depth of field.
My first time utilising the shallow depth of field of a DSLR, on a never-completed feature back in 2011.
Before long, of course, ultra-shallow depth of field became more indicative of a low-budget production trying desperately to look bigger than of something truly cinematic. Gradually young cinematographers started to realise that their idols chose depth of field for storytelling reasons, rather than simply using it because they could. Douglas Slocombe, OBE, BSC, ASC, cinematographer of the original Indiana Jones trilogy, was renowned for his deep depth of field, typically shooting at around T5.6, while Janusz Kaminski, ASC, when shooting Kingdom of the Crystal Skull, stopped down as far as T11.
There was also a time when progressive scan – the recording of discrete frames rather than alternately odd and even horizontal lines to make an interlaced image – was considered cinematic. Now it is standard in most types of production, although deviations from the norm of 24 or 25 frames per second, such as the high frame rate of The Hobbit, still make audiences think of reality TV or news, rejecting it as “uncinematic”.
Other distinctions in shooting style between TV/low-budget film and big-budget film have slipped away too. The grip equipment that enables “cinematic” camera movement – cranes, Steadicams and other stabilisers – is accessible now in some form to most productions. Meanwhile the multi-camera shooting which was once the preserve of TV, looked down upon by filmmakers, has spread into movie production.
A direct comparison may help us drill to the core of what is “cinematic”. Star Trek: Generations, the seventh instalment in the sci-fi film franchise, went into production in spring 1994, immediately after the final TV season of Star Trek: The Next Generation wrapped. The movie shot on the same sets, with the same cast and even the same acquisition format (35mm film) as the TV series. It was directed by David Carson, who had helmed several episodes of the TV series, and whose CV contained no features at that point.
Yet despite all these constants, Star Trek: Generations is more cinematic than the TV series which spawned it. The difference lies with the cinematographer, John A. Alonzo, ASC, one of the few major crew members who had not worked on the TV show, and whose experience was predominantly in features. I suspect he was hired specifically to ensure that Generations looked like a movie, not like TV.
The main thing that stands out to me when comparing the film and the series is the level of contrast in the images. The movie is clearly darker and moodier than the TV show. In fact I can remember my schoolfriend Chris remarking on this at the time – something along the lines of, “Now it’s a movie, they’re in space but they can only afford one 40W bulb to light the ship.”
The bridge of the Enterprise D as seen on TV (top) and in the “Generations” movie (bottom).
It was a distinction borne of technical limitations. Cathode ray tube TVs could only handle a dynamic range of a few stops, requiring lighting with low contrast ratios, while a projected 35mm print could reproduce much more subtlety.
Today, film and TV is shot on the same equipment, and both are viewed on a range of devices which are all good at dealing with contrast (at least compared with CRTs). The result is that, with contrast as with depth of field, camera movement and progressive scan, the distinction between the cinematic and the uncinematic has reduced.
The cinematography of “Better Call Saul” owes much to film noir.
In fact, I’d argue that it’s flipped around. To my eye, many of today’s TV series – and admittedly I’m thinking of high-end ones like The Crown, Better Call Saul or The Man in the High Castle, not Eastenders – look more cinematic than modern movies.
As my friend Chris had realised, the flat, high-key look of Star Trek: The Next Generation was actually far more realistic than that of its cinema counterpart. And now movies seem to have moved towards realism in the lighting, which is less showy and not so much moody for the sake of being moody, while TV has become more daring and stylised.
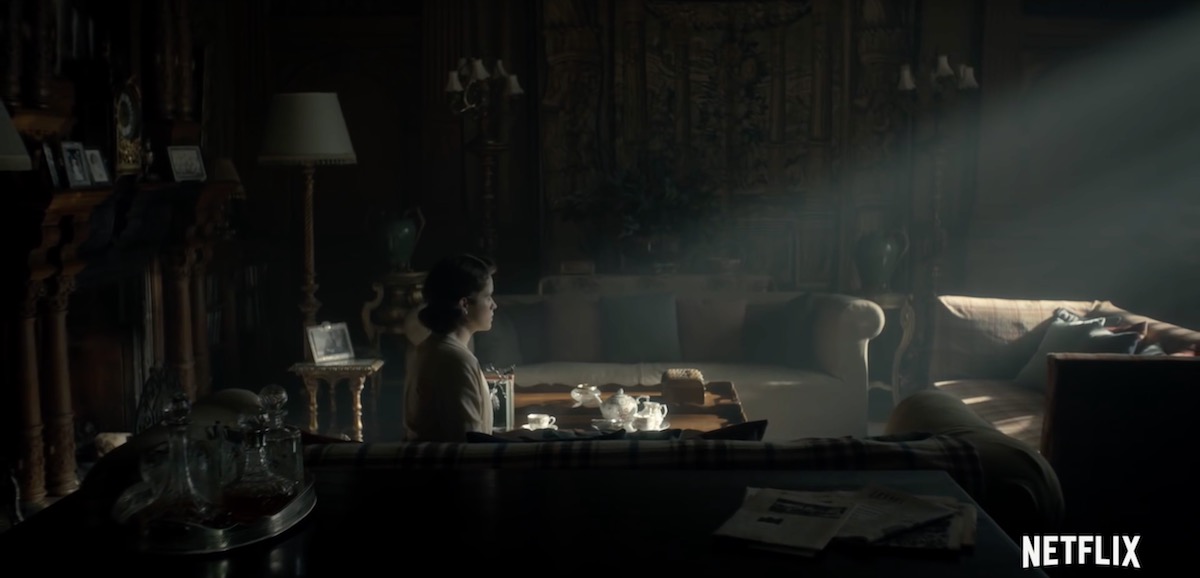
A typically moody and contrasty shot from “The Crown”
The Crown, for examples, blasts a 50KW Soft Sun through the window in almost every scene, bathing the monarchy in divine light to match its supposed divine right, while Better Call Saul paints huge swathes of rich, impenetrable black across the screen to represent the rotten soul of its antihero.
Film lighting today seems to strive for naturalism in the most part. Top DPs like recent Oscar-winner Roger Deakins, CBE, ASC, BSC, talk about relying heavily on practicals and using fewer movie fixtures, and fellow nominee Rachel Morrison, ASC, despite using a lot of movie fixtures, goes to great lengths to make the result look unlit. Could it be that film DPs feel they can be more subtle in the controlled darkness of a cinema, while TV DPs choose extremes to make their vision clear no matter what device it’s viewed on or how much ambient light contaminates it?
“Mudbound”, shot by Rachel Morrison, ASC
Whatever the reason, contrast does seem to be the key to a cinematic look. Even though that look may no longer be exclusive to movies released in cinemas, the perception of high contrast being linked to production value persists. The high contrast of the practically-lit scenes in my Stasis project is – as best I can tell – what makes people describe it as cinematic.
What does all of this mean for a filmmaker? Simply pumping up the contrast in the grade is not the answer. Contrast should be built into the lighting, and used to reveal and enhance form and depth. The importance of good production design, or at least good locations, should not be overlooked; shooting in a friend’s white-walled flat will kill your contrast and your cinematic look stone dead.
A shot of mine from “Forever Alone”, a short film where I was struggling to get a cinematic look out of the white-walled location.
Above all, remember that story – and telling that story in the most visually appropriate way – is the essence of cinema. In the end, that is what makes a film truly cinematic.
Recently work began on colour grading Above the Clouds, a comedy road movie I shot for director Leon Chambers. I’ve covered every day of shooting here on my blog, but the story wouldn’t be complete without an account of this crucial stage of postproduction.
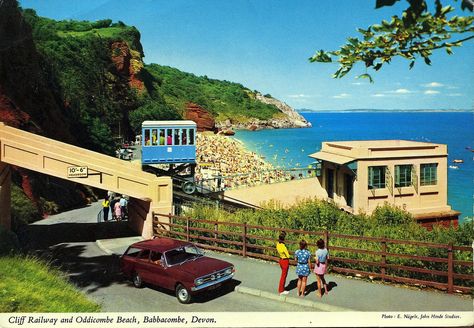
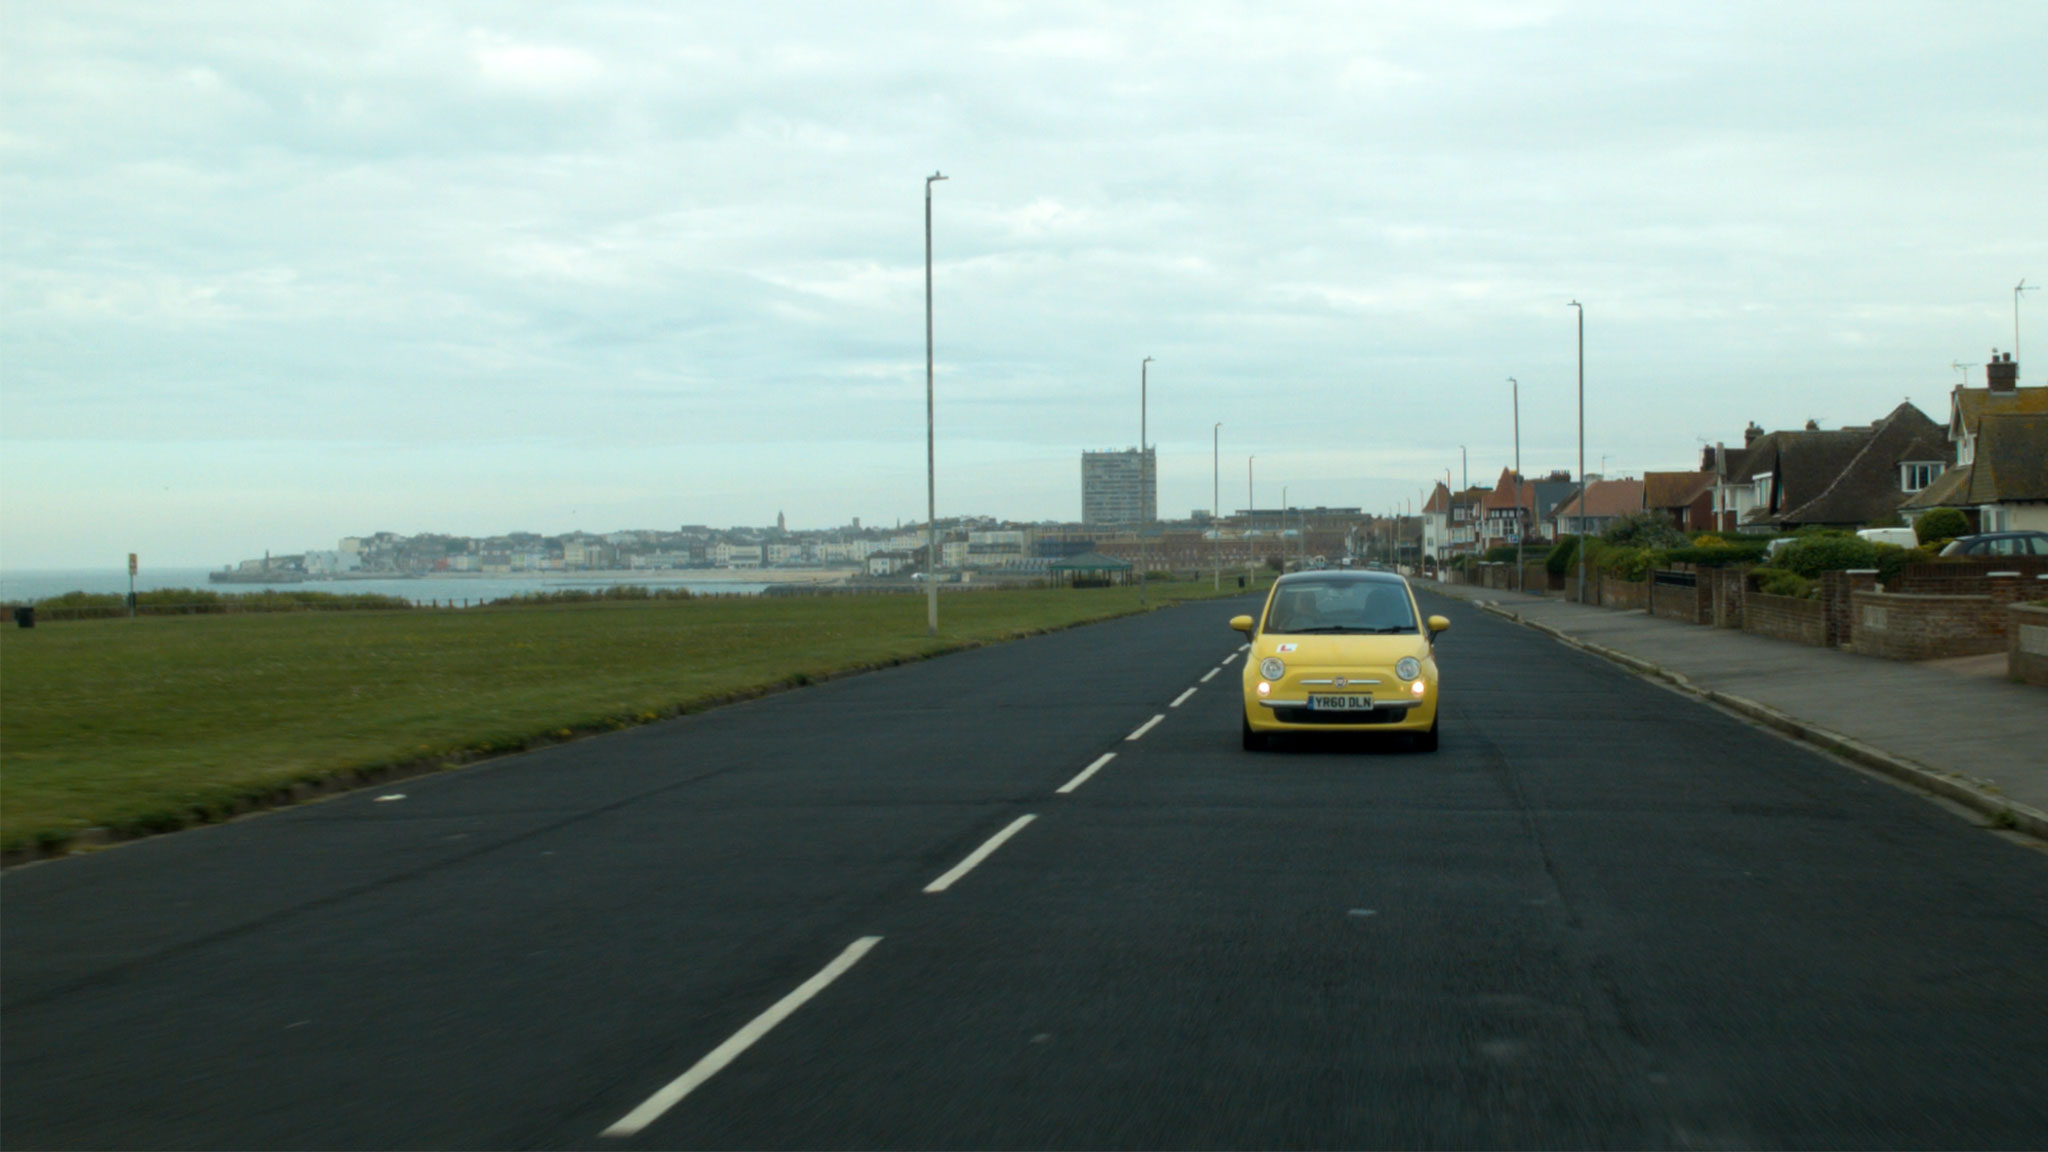
I must confess I didn’t give much thought to the grade during the shoot, monitoring in Rec.709 and not envisaging any particular “look”. So when Leon asked if I had any thoughts or references to pass on to colourist Duncan Russell, I had to put my thinking cap on. I came up with a few different ideas and met with Leon to discuss them. The one that clicked with his own thoughts was a super-saturated vintage postcard (above). He also liked how, in a frame grab I’d been playing about with, I had warmed up the yellow of the car – an important character in the movie!
Leon was keen to position Above the Clouds‘ visual tone somewhere between the grim reality of a typical British drama and the high-key gloss of Hollywood comedies. Finding exactly the right spot on that wide spectrum was the challenge!
“Real but beautiful” was Duncan’s mantra when Leon and I sat down with him last week for a session in Freefolk’s Baselight One suite. He pointed to the John Lewis “Tiny Dancer” ad as a good touchstone for this approach.
We spent the day looking at the film’s key sequences. There was a shot of Charlie, Oz and the Yellow Peril (the car) outside the garage from week one which Duncan used to establish a look for the three characters. It’s commonplace nowadays to track faces and apply individual grades to them, making it possible to fine-tune skin-tones with digital precision. I’m pleased that Duncan embraced the existing contrast between Charlie’s pale, freckled innocence and Oz’s dirty, craggy world-weariness.
Above the Clouds was mainly shot on an Alexa Mini, in Log C ProRes 4444, so there was plenty of detail captured beyond the Rec.709 image that I was (mostly) monitoring. A simple example of this coming in useful is the torchlight charity shop scene, shot at the end of week two. At one point Leo reaches for something on a shelf and his arm moves right in front of his torch. Power-windowing Leo’s arm, Duncan was able to bring back the highlight detail, because it had all been captured in the Log C.
But just because all the detail is there, it doesn’t mean you can always use it. Take the gallery scenes, also shot in week two, at the Turner Contemporary in Margate. The location has large sea-view windows and white walls. Many of the key shots featured Oz and Charlie with their backs towards the windows. This is a classic contrasty situation, but I knew from checking the false colours in log mode that all the detail was being captured.
Duncan initially tried to retain all the exterior detail in the grade, by separating the highlights from the mid-tones and treating them differently. He succeeded, but it didn’t look real. It looked like Oz and Charlie were green-screened over a separate background. Our subconscious minds know that a daylight exterior cannot be only slightly brighter than an interior, so it appeared artificial. It was necessary to back off on the sky detail to keep it feeling real. (Had we been grading in HDR [High Dynamic Range], which may one day be the norm, we could theoretically have retained all the detail while still keeping it realistic. However, if what I’ve heard of HDR is correct, it may have been unpleasant for audiences to look at Charlie and Oz against the bright light of the window beyond.)
There were other technical challenges to deal with in the film as well. One was the infra-red problem we encountered with our ND filters during last autumn’s pick-ups, which meant that Duncan had to key out Oz’s apparently pink jacket and restore it to blue. Another was the mix of formats employed for the various pick-ups: in addition to the Alexa Mini, there was footage from an Arri Amira, a Blackmagic Micro Cinema Camera (BMMCC) and even a Canon 5D Mk III. Although the latter had an intentionally different look, the other three had to match as closely as possible.
A twilight scene set in a rural village contains perhaps the most disparate elements. Many shots were done day-for-dusk on the Alexa Mini in Scotland, at the end of week four. Additional angles were captured on the BMMCC in Kent a few months later, both day-for-dusk and dusk-for-dusk. This outdoor material continues directly into indoor scenes, shot on a set this February on the Amira. Having said all that, they didn’t match too badly at all, but some juggling was required to find a level of darkness that worked for the whole sequence while retaining consistency.
In other sequences, like the ones in Margate near the start of the film, a big continuity issue is the clouds. Given the film’s title, I always tried to frame in plenty of sky and retain detail in it, using graduated ND filters where necessary. Duncan was able to bring out, suppress or manipulate detail as needed, to maintain continuity with adjacent shots.
Consistency is important in a big-picture sense too. One of the last scenes we looked at was the interior of Leo’s house, from weeks two and three, for which Duncan hit upon a nice, painterly grade with a bit of mystery to it. The question is, does that jar with the rest of the movie, which is fairly light overall, and does it give the audience the right clues about the tone of the scene which will unfold? We may not know the answers until we watch the whole film through.
Duncan has plenty more work to do on Above the Clouds, but I’m confident it’s in very good hands. I will probably attend another session when it’s close to completion, so watch this space for that.
This time last year, principal photography had just wrapped on Above the Clouds, a comedy road movie directed by Leon Chambers. We always knew that there would be additional photography, and several days of this have been scattered over the past year.
In May I spent a few odd days with Leon and the Yellow Peril, primarily capturing car-to-car tracking shots. Leon had already shot some of these without me up in Cumbria, so he had the technique down. He attached his Blackmagic Micro Cinema Camera to his roof rack with clamps and suction cups – three points of contact in all, to eliminate vibrations.
The focus was left fixed at the approximate distance the cars would be apart, and I could reach out of the passenger window and tweak it, along with the variable ND filter, if necessary. Recording was triggered from the custom remote which Leon had made for the camera last year when we used it for the autumn pick-ups. I monitored on a 5″ Blackmagic Video Assist which – thanks to a firmware update – now has a false colour display, which was very useful for keeping an eye on the exposure.
We had no means of panning or tilting the camera during takes, so we would frame the car centrally, allowing the maximum space to each side for when we went around the bends. This had the nice effect of making the Peril look small in the landscape, surrounded by it on all sides.
And speaking of the Peril looking small, it had shrunk considerably when I next saw it. But so had the landscape.
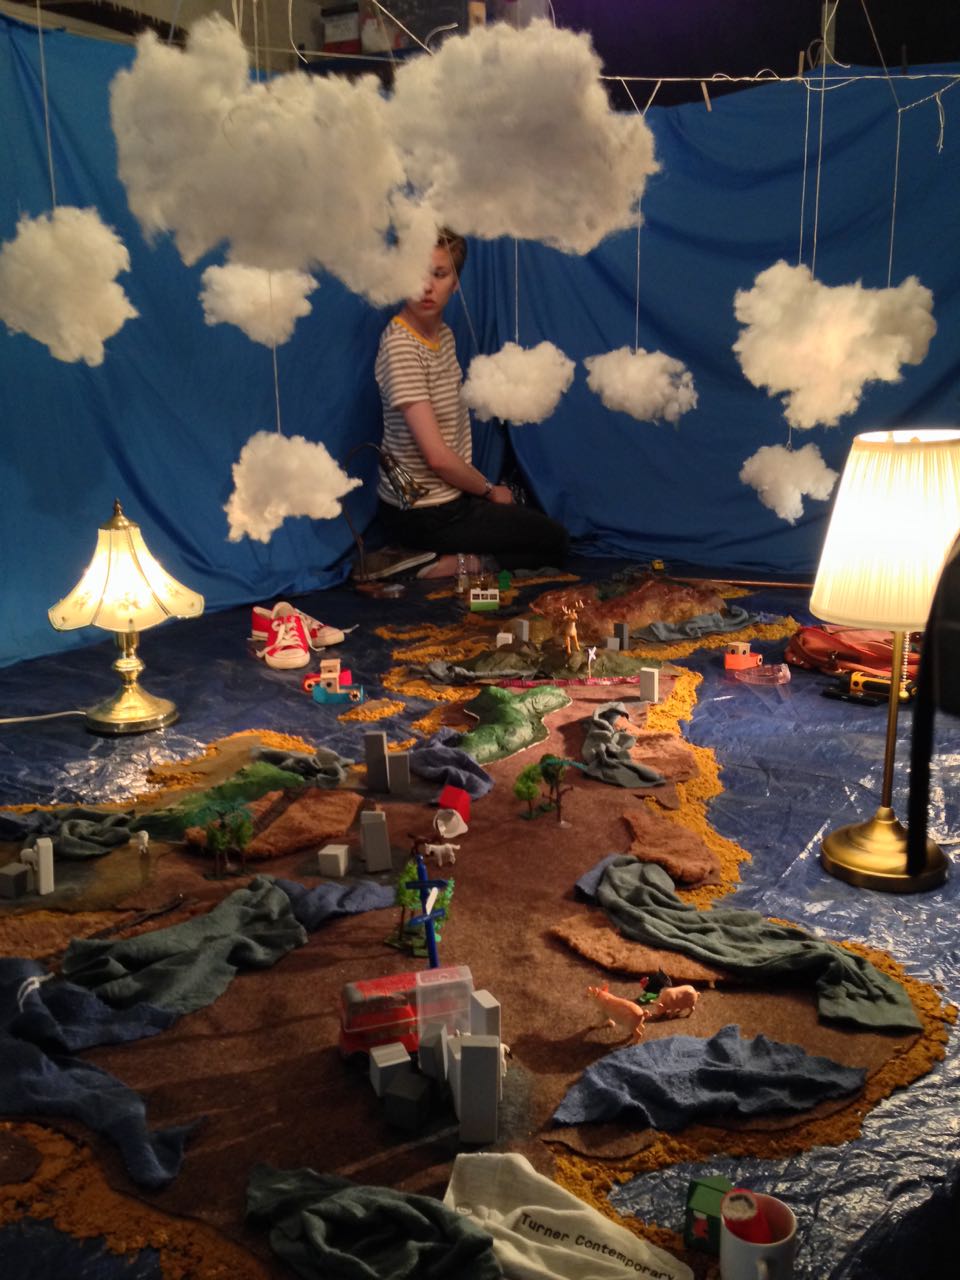
To keep the audience informed of the characters’ progress across Great Britain, Leon planned to cut to a map at a few strategic moments. At some point the original plan of shooting an Ordnance Survey map on a wall turned into something much more elaborate, a work of art featuring found objects, such as the lead character Charlie might have made herself.
Leon knew he wanted to use his jib to drift the camera over the map. But what camera? We both agreed that these shots needed to have a noticeably different look to the rest of the movie. Both Super-8 and Super-16 were discussed, but ultimately neither were viable. Then I suggested shooting on a full-frame DSLR to get a tiny depth of field. I imagined the camera having fixed focus as it skimmed over the map, with features coming in and out of focus as they passed through the field. We didn’t end up doing that, but Leon did like the DSLR idea.
Asahi Pentax-M 50mm/f1.4
So the decision was made to shoot on a Canon 5D Mk III belonging to focus puller Max Quinton. We ended up shooting everything on a single lens, my Asahi Pentax-M 50mm/f1.4. This is a vintage K-mount stills lens which is beautifully sharp, and we mounted it with a passive EF adapter. 50mm on full-frame is equivalent to 35mm on Super 35, very close to the 32mm which was our most used lens length during principal photography.
I added a half Soft FX filter as I usually do. I had briefly considered omitting it, to further differentiate the map shots from the rest of the film, but undiffused shots in a mostly diffused movie draw attention to the filtration and can be quite jarring.
I offered Leon two options for the lighting. One was to simulate the natural light you would see if shooting the British Isles from a high altitude, i.e. a hard sun source and ambient toplight. The other, which he went for, was to carry on the suggestion of Charlie making the map herself, and make it look like she had lit it herself too, with an eclectic mix of practicals around the edge. A couple of tungsten Chinese lanterns were hung overhead as well for soft fill. To help the camera’s limited dynamic range, I put tough-spun diffuser inside some of the practicals’ shades, on the camera side.
The Blackmagic 5″ Video Assist can be seen here mounted on the back of the camera.
There were a couple of “night” scenes on the shot list. For these we turned off the Chinese lanterns and turned on a desk-lamp practical with a blue-ish LED bulb to suggest moonlight. We also used a string of LED fairy lights to represent a road with streetlights.
For the smallest possible depth of field, everything was shot at f1.4. Even at ISO 320, in the daylight scenes it was necessary to add a 0.45 ND filter to bring the exposure down to f1.4. We shot on a neutral picture profile, piping the images via HDMI to the Blackmagic Video Assist, where they were recorded in ProRes 422 HQ.
After a few years shooting on Blackmagics, FS7s and Alexas, the 5D’s colour saturation and contrast seemed very pronounced to me, but that really suited the toy-like nature of the map. And the tiny depth of field made everything look even smaller and cuter than it already was.
So, that’s a wrap on Above the Clouds finally and forever. Apparently.
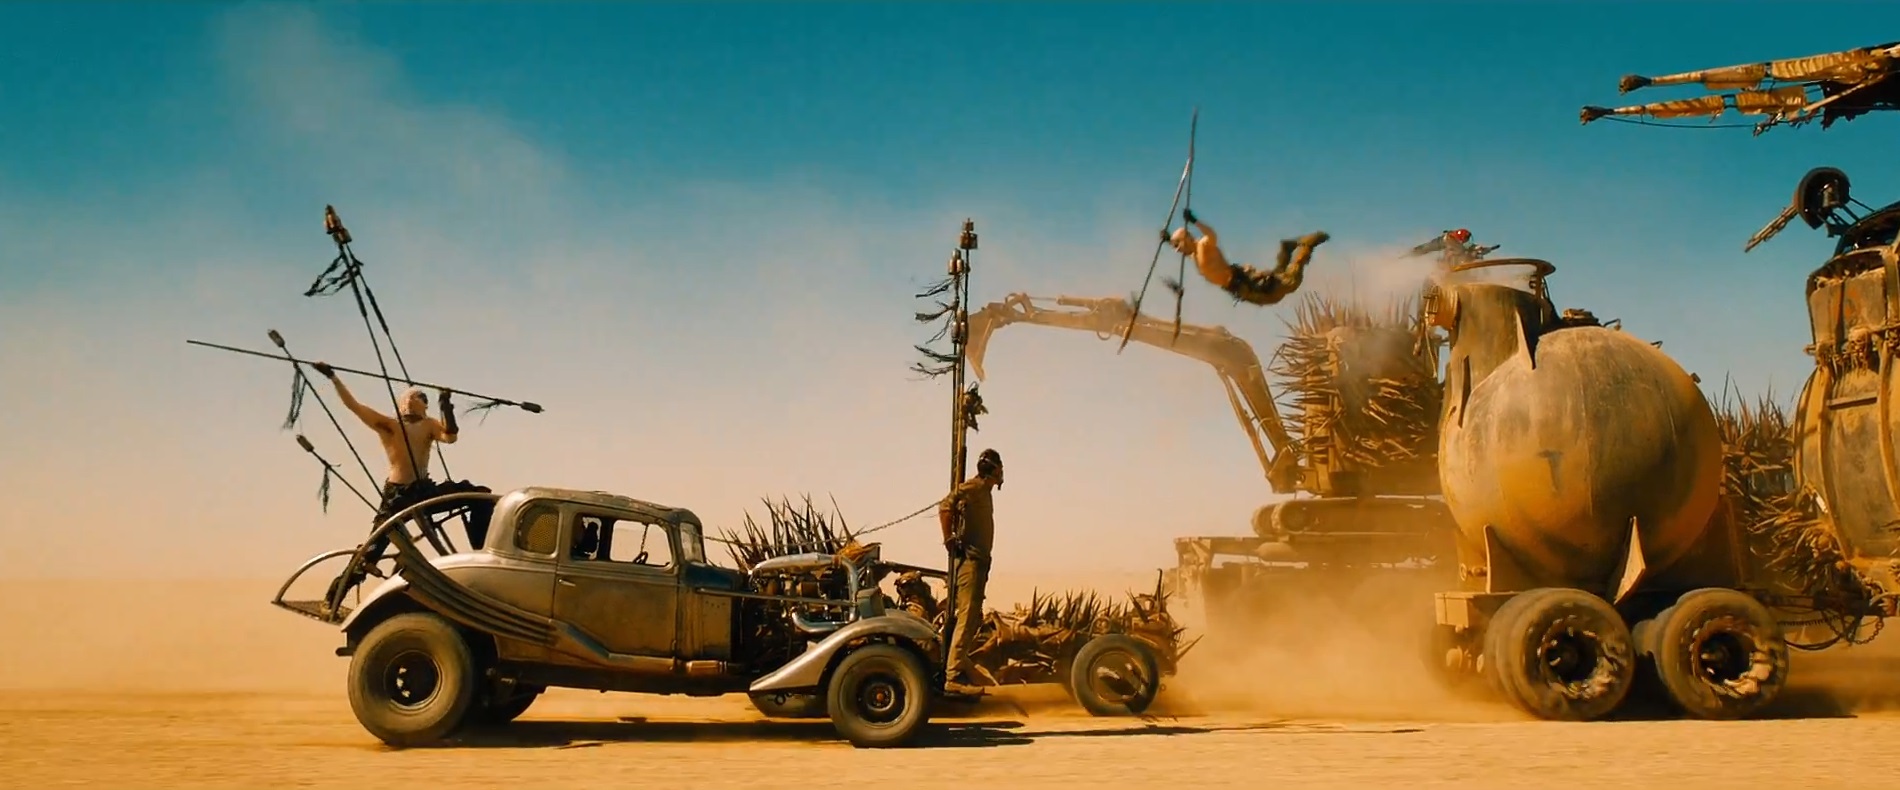
The Australian Cinematographers’ Society has released a video of a two hour talk by Fury Road DP John Seale, ACS, ASC. It’s a fascinating watch, with lots of interesting info and some dry Aussie wit; more than once Seale talks about “taking to the drink” when things got tricky!
Here are the most interesting points I took from it, with a few extra details added from American Cinematographer’s article on Fury Road:
The team spent years developing a new 3D camera based on a sensor built for the US military. Director George Miller wanted something rugged enough to survive dusty desert work and small enough to fit into the truck cabs. Camera tests revealed it had only five stops of dynamic range, nowhere near enough to capture detail both outside and inside the cabs in the same frame.
The film was ultimately shot on Arri Alexas (four Ms and six Pluses) and converted to 3D in post. Absolutely no consideration to the 3D format was given during shooting.
When early footage failed to please DIT Marc Jason Maier and his meters, Seale agreed to downrate the Alexa from its published 800 ASA to 400 ASA. The subsequent footage was deemed technically correct by Maier and made Seale much more comfortable that he was recording what he thought he was recording in terms of exposure.
Dailies were rendered with two different LUTs: the standard Rec 709 and a custom one designed to emulate a one-light celluloid work-print. This was for the benefit of Seale, for whom Fury Road was his first digital movie.
Canon 5D Mark IIs with the Technicolor CineStyle profile were used as crash cams. Sky replacement had to be executed on many of the 5D shots to remove banding, presumably caused by the small colour space.
Olympus and Nikon DSLRs were used a little as well.
For close-ups of Max escaping the Citadel early in the film, a Blackmagic Cinema Camera with a Tokina 11-16mm zoom (a combination I used frequently on The First Musketeer!) was rigged on a Movi.
The film was lensed predominantly on zooms, with a few Super Speed primes kept on standby for when the daylight was running out.
Custom-built 15mm and 16mm primes were used inside the cab of the War Rig. The lenses’ hyperfocal distance had been adjusted so that everything from 0′ to 9′ (i.e. everything inside the cab) would be in focus.
Lighting and camera rigs hung from the roofs of the vehicles had to be stripped back because of the shadows they cast. Instead, platforms were rigged on the sides of the trucks, and a track-and-pulley system was built into the War Rig’s cab’s ceiling from which cameras could be suspended.
Scenes in the cab were shot at T5.6, with strips of LEDs mounted on the ceiling and on the pillars between the front and rear doors to bring up the actors inside.
Day-for-night scenes were overexposed by two stops so that characters in the shadows could be lifted in the grade, if necessary, without noise.
The film was storyboarded early on, but a script was only written when the studio demanded it!
Miller wanted to shoot everything single-camera, including action, but Seale began sneaking in with extra cameras and soon convinced his director of the efficacy of this method.
Much of the film was shot as Poor Man’s Process, or “Sim Trav” as Seale calls it.
In post, Miller chose shots with camera shake that he liked and had that shake digitally applied to other shots.
Miller decreed that the subject of the shot should always be framed centrally. This allowed him to edit faster, because time wouldn’t be lost on each cut as the viewer searched the width of the anamorphic frame for the subject.
Extensive use was made of two Edge Arms. An evolutionary step up from Russian Arms, these are cameras mounted on robotic arms which are in turn mounted on pick-up trucks.
Other vehicle rigs included custom-built buggies with Alexa Pluses mounted front and rear, and a “Ledge” mount which was a 30′ truss tower built on the back of a truck, allowing high angles without the need for drones or helicopters.
Leaf blowers were used, via flexible pipes, to keep sand off the lenses in moving shots.
It’s interesting to hear how laid-back Seale is. He gave his focus puller a great degree of leeway in choosing the lens package, and let his DIT, gaffer and operator handle the technical side of recording and exposing the image. This level of trust in his team must give him tremendous capacity to focus (pardon the pun) on the creative side of his job without worrying about the details.
I’ll leave you with the EPK B-roll from Fury Road…
Today I’m running down the five simplest yet most effective camera tricks I’ve used in my films. These are all techniques that have been used on the biggest Hollywood productions as well.
In amongst all the terrible CGI, The Beacon did feature the odd moment of low-tech triumph. As a damaged helicopter dives towards the Hollywood hills, the famous sign is reflected in the sunglasses of the injured pilot, played by my friend and fellow filmmaker Rick Goldsmith. The letters were actually 2″ high cardboard cut-outs stuck to a black piece of card, and Rick himself is holding it at arm’s length and moving it slowly towards his face.
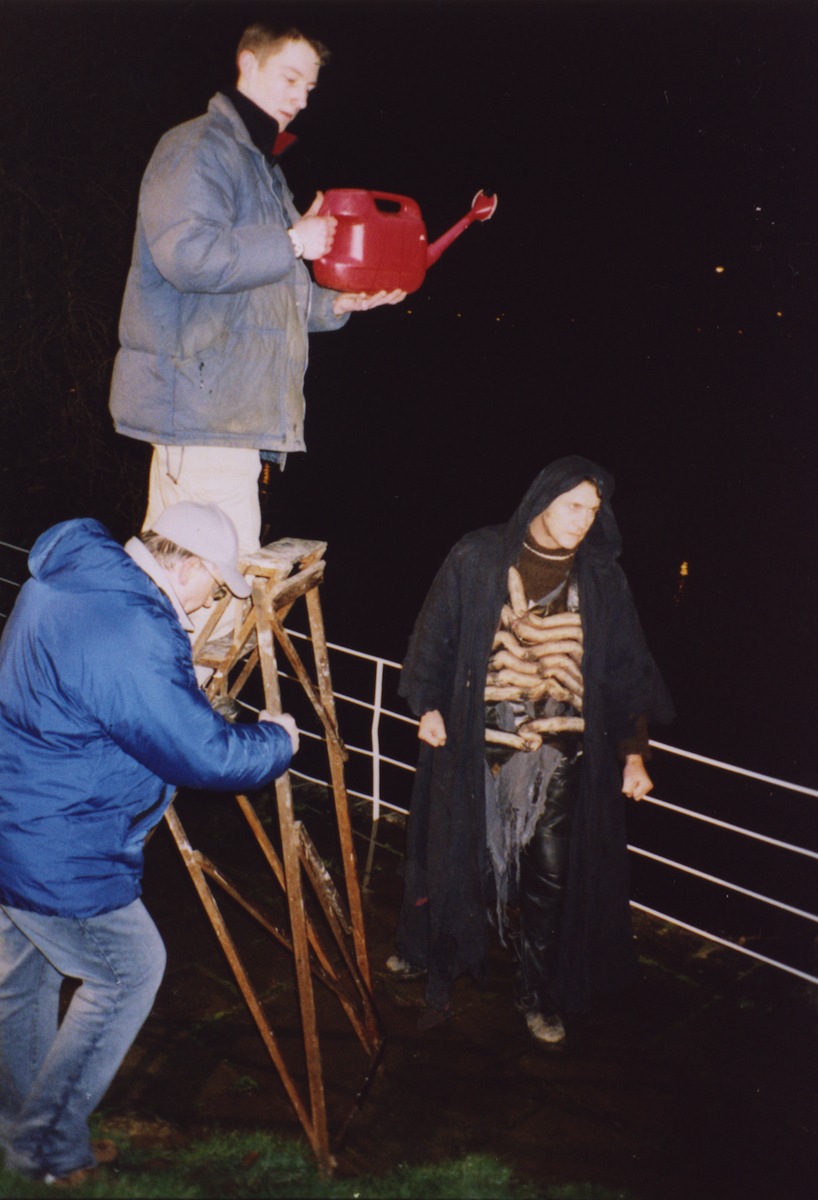
While most of this fight sequence was shot under the downpour created by an industrial hosepipe fired into the air, this wasn’t available when extra close-ups were required later. Instead a watering can was used.
It’s not uncommon for close-ups in a scene to be achieved much more simply than their corresponding wide shots. NASA allowed Bruce Willis and Ben Affleck to be filmed in their training tank for Michael Bay’s Armageddon, but CUs of the other actors had to be shot dry-for-wet with a fishtank in front of the lens and someone blowing bubbles through it.
Getting the puppet to genuinely catch his sword was likely to require a prohibitive number of takes. (We were shooting on 35mm short ends.) So instead we ran the action in reverse, ending with with the sword being pulled up out of the puppet’s hand. When the film is run backwards, he appears to be catching it.
Backwards shots have been used throughout the history of cinema for all kinds of reasons. Examples can be seen in the Face Hugger sequence in Aliens (the creature’s leaps are actually falls in reverse) and in John Carpenter’s The Thing (tentacles grabbing their victims). At the climax of Back to the Future Part III, the insurers refused to allow Michael J. Fox to sit in the DeLorean while it was pushed by the train, in case it crushed him, so instead the train pulled the car backwards and the film was reversed.
At a crucial point in this fantasy-drama about a tape recorder that can stop and rewind time, I needed to show the tape getting worn out and images of the past distorting. I combined two techniques to create a distorted image of Dan (Oliver Park) without any manipulation in post. One was lens whacking, whereby the lens is detached from the camera and held in front of it, moving it around slightly to distort the focal plane. (See this episode of Indy Mogul and this article by Philip Bloom for more on lens whacking.) The other was to shake the camera (and lens) rapidly, to deliberately enhance the rolling shutter “jello” effect which DSLRs suffer from.
Flaws in camera technology can often lead to interesting effects if used appropriately. Let’s not forget that lens flares, which many filmmakers love the look of, are actually side-effects of the optics which lens manufacturers have worked for decades to try to reduce or eliminate. And in the early days of Doctor Who, the crew realised that greatly over-exposing their Marconi TV cameras caused the image to become a negative, and they put this effect to use on the victims of Dalek extermination.
Shooting The One That Got Away. A row of 100W bulbs can be seen on the right.
Using an artificial light to represent the sun is extremely common in cinematography, but showing that lamp in shot is less common. For another example, see the opening Arctic sequence of Captain America: The First Avenger, in which a large HMI stands in for a low sun at the back of the mist-shrouded set.
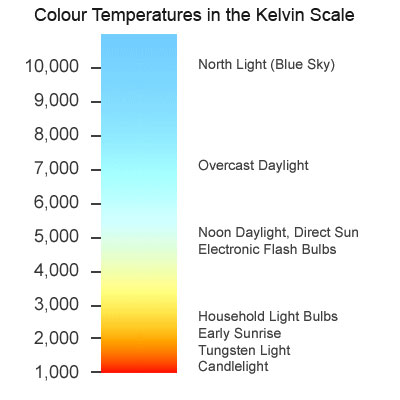
As I was writing my last entry, in which I mentioned the range of colour temperatures in a shot, it occurred to me that some readers might find an explanation of this concept useful. What is colour temperature and why are different light sources different colours?
The answer is more literal than you may expect. It’s based on the simple principal that the hotter something burns, the bluer the light it emits. (Remember from chemistry lessons how the tip of the blue flame was always the sweet spot of the Bunsen Burner?)
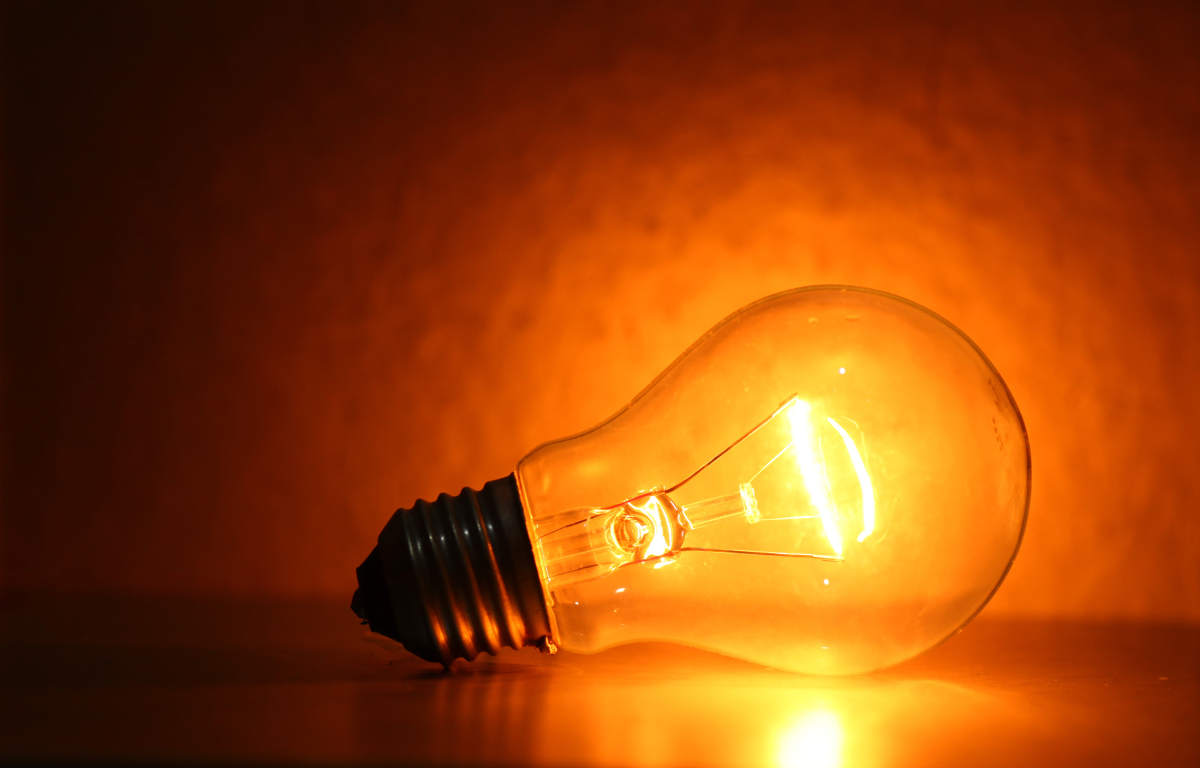
Tungsten bulbs emit an orange light – dim them down and it gets even more orangey.
Colour temperature is measured in kelvins, a scale of temperature that begins at absolute zero (-273°C), the coldest temperature physically possible in the universe. To convert centigrade to kelvin, simply add 273. So the temperature here in Hereford right now is 296 kelvin (23°C).
The filament of a tungsten light bulb reaches a temperature of roughly 3,200K (2,927°C). This means that the light it emits is orange in colour. The surface of the sun is about 5,778K (5,505°C), so it gives us much bluer light.
Colour temperature isn’t necessarily the same as actual temperature. The atmosphere isn’t 7,100K hot, but the light from the sky (as opposed to the sun) is as blue as something burning at that temperature would be.
Digital cameras have a setting called “white balance” which compensates for these differing colour temperatures and makes them appear white. Typical settings include tungsten, daylight, shade and manual, which allows you to callibrate the white balance by holding a white piece of paper in front of the lens as a reference.
Colour temperature chart
Today there are many types of artificial light around other than tungsten – fluorescent and LED being the main two. In the film industry, both of these can be obtained in flavours that match daylight or tungsten, though outside of the industry (if you’re working with existing practical sources) the temperatures can range dramatically.
There is also the issue of how green/magenta the light is, the classic example being that fluorescent tubes – particularly older ones – can make people look green and unhealthy. If you’re buying fluorescent lamps to light a scene with, check the CRI (colour rendering index) on the packaging and get the one with the highest number you can find for the fullest spectrum of light output.
The Magic Lantern hacks for Canon DSLRs allow you not only to dial in the exact colour temperature you want, but also to adjust the green/magenta balance to compensate for fluorescent lighting. But if two light sources are giving out different temperatures and/or CRIs, no amount of white balancing can make them the same.
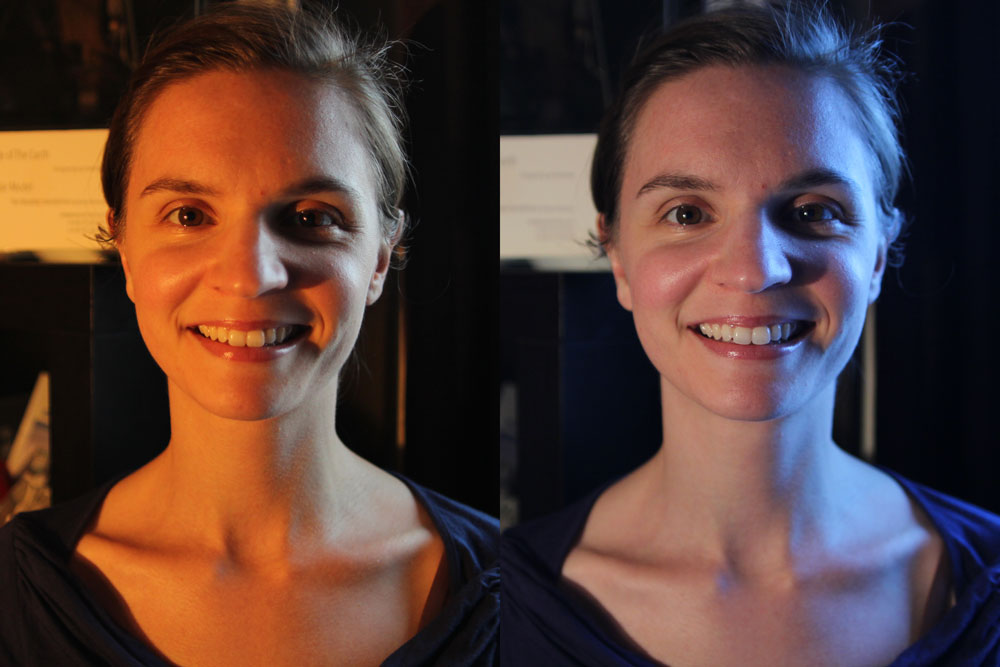
Left: daylight white balance preset (5,600K). Right: tungsten white balance preset (3,200K)
The classic practical example of all this is a person standing in a room with a window on one side of them and a table lamp on the other. Set your camera’s white balance to daylight and the window side of their face looks correct, but the other side looks a nasty orange (above left), or maybe yellowy-green if the lamp has an energy-saving bulb in it. Change the white balance to tungsten or fluorescent and you will correct that side of the subject’s face, but the daylight side will now look blue (above right) or magenta.
This is where gels come in, but that’s a topic for another day.
The beauty of modern digital cinematography is that you can see how it looks in the viewfinder and adjust as necessary. But the more you understand the kind of theory I’ve outlined above, the more you can get it right straight away and save time on set.
Colin Smith lines up the Super-8 camera as director Sophie Black pans the mirror.
After an unseemly delay, here’s the third and final part of my series about lighting Ashes, Sophie Black‘s dark fantasy drama. Read part one here and part two here.
For the fantasy world dubbed “Toybox” by the production team, Sophie wanted a gritty, grainy, comfortable look. She was keen to shoot the scene on Super-8 and wanted to make full use of that high contrast celluloid look with harsh spotlighting, deep shadows and vignetting.
The biggest problem for me was how to get a spotlight effect in a fairly small room with an ordinary daylight fresnel. To get a circle of light small enough to fit entirely within the camera’s frame required the lamp to be much further from the subject than was possible within the space. I suggested shooting at night and putting the light outside the window, but the schedule couldn’t accommodate that.
The problem was solved by bouncing the light off a circular mirror. This masked the light into a relatively sharp circle, because the lamp was the entire length of the room away from the mirror. (The closer a mask is placed to a lamp, the fuzzier the edge of the mask will appear when thrown on the subject, so simply cutting a circle out of cardboard and placing it in front of the lamp would have given us a blob of light instead of a defined circle, because there wouldn’t have been enough space to put the cardboard far enough away from the lamp.)
Bouncing a redhead off a circular mirror for the sweeping light effect. Photo: Sophie Black
Not only did the mirror allow us to achieve a key shadow puppet shot which Sophie had conceived, it also enabled us to create a sweeping light effect for other parts of the sequence. Inspired by one of Lana del Rey’s music videos, Sophie wanted the effect of headlights passing by outside a window. We were able to do this simply by panning a redhead across the mirror.
The Toybox scene was shot both on Super-8 (by Col) and on my Canon 600D as a back-up. I set the ISO to 1600 on the DSLR to bake in a grainy look. I won’t do this again, however, because I failed to take into account the effect of the camera’s H.264 compression. The grain looked fine on the viewfinder, but once compressed and recorded there were lots of blocky artifacts. I hoped that the Super-8 film would come out well so this sub-standard digital material wouldn’t have to be used, but alas there were some focus issues and several of the shots were inexplicably missing from the reels when they came back from the lab. Fortunately the day was saved by a talented VFX artist who applied a very convincing Super-8 look to the 600D footage, which hides the compression artifacts.
Ashes is nearly finished now and we’re all very excited to see how it’s turned out. Meanwhile, here’s the trailer:

 It’s weird now to think that I used to be tethered to the sound recordist before I switched to DSLR shooting. At the time I was doing most of my own editing as well, so syncing the sound was a pain in the arse, but it was a valuable introduction to this industry-standard way of working. It’s also weird to think that clapperboards were optional for me before this.