Undisclosed Project: Experimentation

The main event of last week’s prep was a test at Panavision of the Arri Alexa XT, Red Gemini and Sony F55, along with Cooke Panchro, Cooke Varotal, Zeiss Superspeed and Angenieux glass. More on that below, along with footage.

The week started with Zoom meetings with the costume designer, the make-up artist, potential fight choeographers and a theatrical lighting designer. The latter is handling a number of scenes which take place on a stage, which is a new and exciting collaboration for me. I met with her at the location the next day, along with the gaffer and best boy. After discussing the stage scenes and what extra sources we might need – even as some of them were starting to be rigged – I left the lighting designer to it. The rest of us then toured the various rooms of the location, with the best boy making notes and lighting plans on his tablet as the gaffer and I discussed them. They also took measurements and worked out what distro they would need, delivering a lighting kit list to production the next day.

Meanwhile, at the request of the producer, I began a shot list, beginning with two logistically complex scenes. Despite all the recces so far, I’ve not thought about shots as much as you might think, except where they are specified in the script or where they jumped out at me when viewing the location. I expect that much of the shot planning will be done during the rehearsals, using Artemis Pro. That’s much better and easier than sitting at home trying to imagine things, but it’s useful for other departments to be able to see a shot list as early as possible.

So, the camera tests. I knew all along that I wanted to test multiple cameras and lenses to find the right ones for this project, a practice that is common on features but which, for one reason and another, I’ve never had a proper chance to do before. So I was very excited to spend Wednesday at Panavision, not far from my old stomping ground in Perivale, playing around with expensive equipment.

Specifically we had: an Arri Alexa – a camera I’m very familiar with, and my gut instinct for shooting this project on; a Sony F55 – which I was curious to test because it was used to shoot the beautiful Outlander series; and a Red Gemini – because I haven’t used a Red in years and I wanted to check I wasn’t missing out on something awesome.

For lenses we had: a set of Cooke Panchros – again a gut instinct (I’ve never used them, but from what I’ve read they seemed to fit); a set of Zeiss Superspeeds – selected after reviewing my 2017 test footage from Arri Rental; a couple of Cooke Varotal zooms, and the equivalents by the ever-reliable Angenieux. Other than the Angenieux we used on the B-camera for The Little Mermaid (which I don’t think we ever zoomed during a take), I’ve not used cinema zooms before, but I want the old-fashioned look for this project.

Here are the edited highlights from the tests…

You’ll notice that the Sony F55 disappears from the video quite early on. This is because, although I quite liked the camera on the day, as soon as I looked at the images side by side I could see that the Sony was significantly softer than the other two.

So it was down to the Alexa vs. the Gemini, and the Cookes vs. the Superspeeds. I spent most of Thursday and all of Friday morning playing with the footage in DaVinci Resolve, trying to decide between these two pairs of very close contenders. I tried various LUTs, did some rough grading (very badly, because I’m not a colourist), tested how far I could brighten the footage before it broke down, and examined flares and bokeh obsessively.

Ultimately I chose the Cooke Panchros because (a) they have a beautiful and very natural-looking flare pattern, (b) the bokeh has a slight glow to it which I like, (c) the bokeh remains a nice shape when stopped down, unlike the Superspeeds’, which goes a bit geometric, (d) they seem sharper than the Superspeeds at the edges of frame when wide open, and (e) more lengths are available.

As for the zoom lenses (not included in the video), the Cooke and the Angenieux were very similar indeed. I chose the former because it focuses a little closer and the bokeh again has that nice glow.

I came very close to picking the Gemini as my camera. I think you’d have to say, objectively, it produces a better image than the Alexa, heretical as that may sound. The colours seem more realistic (although we didn’t shoot a colour chart, which was a major oversight) and it grades extremely well. But…

I’m not making a documentary. I want a cinematic look, and while the Gemini is by no means un-cinematic, the Alexa was clearly engineered by people who loved the look of film and strove to recreate it. When comparing the footage with the Godfather and Fanny and Alexander screen-grabs that are the touchstone of the look I want to create, the Alexa was just a little bit closer. My familiarity and comfort level with the Alexa was a factor too, and the ACs felt the same way.

I’m very glad to have tested the Gemini though, and next time I’m called upon to shoot something great and deliver in 4K (not a requirement on this project) I will know exactly where to turn. A couple of interesting things I learnt about it are: (1) whichever resolution (and concomitant crop factor) you select, you can record a down-scaled 2K ProRes file, and this goes for the Helium too; (2) 4K gives the Super-35 field of view, whereas 5K shows more, resulting in some lenses vignetting at this resolution.

Undisclosed Project: Experimentation

8 Things to Look For When Buying a Cinema Camera

A couple of weeks ago I shared my thoughts about whether a director of photography should own equipment. My conclusion was that it can be useful early in your career, when you’re shooting corporates or tiny films with no hire budget. So what is the best camera for indie cinematography?

I’m not going to answer that, but I will tell you what to look for when investing in a camera. Hopefully these tips will help you choose the one that’s right for you from the huge and ever-changing array of professional cameras on the market, from the humble DSLR to the ubiquitous Reds and everything in between.


1. Image quality

Shooting on a Sony FS7 for “Finding Hope”

The quality of the image is of course the most imporant attribute of any camera. Rather than any technical specifications, I’m talking about the aesthetic quality here: how does it feel? Does it have that elusive “cinematic” quality? Is it “filmic”? Does it remind you of certain kinds of movies?

A good place to start is to look up sample footage on YouTube, or better still Vimeo for less compression muddying the issue. If you can borrow the camera and try it out before you buy, even better. Take away some test footage and try grading it too.


2. Resolution

Resolution, the sheer number of pixels a camera can record, is part of image quality, but I include it as a separate point because I see it as more of a technical consideration than an aesthetic one. You should ask yourself what longevity you require from your films – will people still be watching them, say two or three years from now, and if so what sort of resolution might be the norm by then?

Also consider your delivery platform. If everything you shoot is going on YouTube, perhaps you don’t need more than 1080P (standard HD).


3. Dynamic Range

Dynamic range is a measure of how much contrast a camera can handle. Too small a dynamic range and you will frequently struggle with bright areas “clipping” – i.e. losing details – or dark areas getting lost in the image noise. Also, the wider the dynamic range, the more flexibility you will have in grading.

For a cinematic image, 12 stops of dynamic range is the absolute minimum, with 14 or more being ideal.


4. Maximum ISO

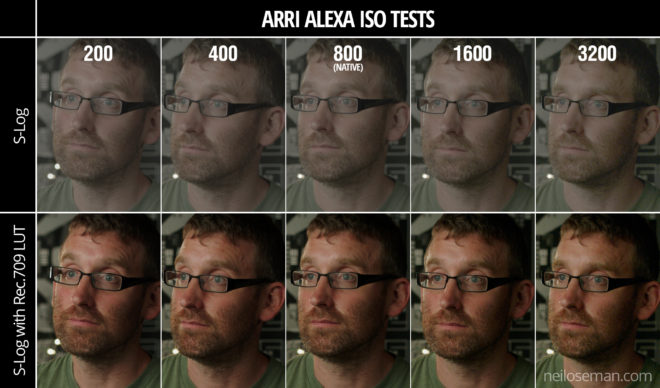
Some ISO tests I conducted on an Arri Alexa Classic in 2017

The ISO (International Standards Organisation) scale rates the light sensitivity of a camera. The most important thing is the native ISO, the one at which the camera is optimised to give the cleanest image with the most detail. On some cameras, setting an ISO other than the native one reduces the image quality considerably.

The higher the ISO, the less light will be required to expose an image correctly. 800 is typical these days, but many cameras go much higher than that. It is worth thinking about spending more money to get a camera with a higher native ISO, because you may save a lot of money on lighting.


5. Lens Mount

This is crucial because you may already have a collection of lenses, or you may intend to hire certain lenses, and you need to be sure that they will fit your new camera’s mount.

The Canon EF mount is extremely common and will open up a huge range of options for stills glass as well as some low-end cinema glass. The smaller MFT (micro four-thirds) mount also has a wide range of lenses.

Top-end cameras have PL mounts which take all the beautiful cinema lenses used on big movies, but only choose this route if you are willing to part with a lot of cash!


6. Form Factor

A Blackmagic Micro Cinema Camera, not so micro once it’s rigged with rails, matte box, wireless follow focus, battery, monitor and video transmitter!

When I started in the industry, cameras were all ergonomically designed to sit on your shoulder, with a nice handgrip to the right of the lens and an EVF (electronic viewfinder) to provide a third point of stabilising contact. Nowadays cameras tend to be boxy, heavy and uncomfortable to hold without additional accessories (see below).

Again, try to gets your hands on the camera in a shop and see how it feels before you purchase. As well as handheld shooting, consider how easy it will be to rig onto dollies, sliders, gimbals, etc.


7. Required Accessories

Buying the camera body itself is unlikely to be the end of your expenditure. You will need lenses, batteries, a battery charger, cards, a card reader and almost certainly some kind of stabilising system, be it a simple shoulder rig or an electronic gimbal.

You may also want an EVF, a tripod, matte box, follow focus – the list can seem endless! Be careful to budget your essential accessories before buying the camera. Some cameras seem like bargains until you add up all the extras. Pay particular attention to the media, and to exactly what speed of media you need in order to shoot at the resolution and frame rate that you require, as this can get very expensive.


8. Codec

What file type and codec does the camera shoot? Does your editing system support that format? If not, how time-consuming will it be to convert everything?

What compression ratios does the camera support? How much hard drive space will you need to store an hour of footage at that ratio? What about ten hours, plus back-ups? Often there is a trade-off between a highly compressed format like H.264 which is light on disc space but may need converting before you can edit it, and a lightly compressed format like ProRes which burns through disc space but can be dropped straight into most editing software.

8 Things to Look For When Buying a Cinema Camera