There is a huge range of glass available to filmmakers today – everything from vintage cinema lenses from the 60s to modern stills glass made for DSLRs. How can a DP choose which is right for their production?
Mount
The first thing to take into account is the lens mount on your camera. If it is PL mount you will have access to a huge range of cinema lenses, some of them with decades of movie history. Other mounts such as Canon EF also provide plenty of choice, but mainly glass aimed at stills rather than cinematography. Some lenses can be mount-converted, some cameras can switch mounts, and adapters are available too, but it’s important to know upfront which lenses are going to be ruled out by your camera choice and which aren’t.
Spherical or Anamorphic
Test of a 30mm Cooke Xtal anamoprhic lens
Anamorphic lenses squeeze the image horizontally, to be unsqueezed in post-production. The results are a wider picture, distinctive oval bokeh (out of focus areas) and often lens flares with horizontal streaks in them. This look is very cinematic, but anamorphic lenses tend to be bigger, heavier, more expensive, need more light than and don’t focus as close as their spherical counterparts, so think carefully before you choose them.
Speed
The speed of a lens – i.e. its maximum aperture – is one of its most important characteristics. A fast prime lens might open to T1.4, while a zoom or anamorphic prime might only go to T4. That’s three stops’ difference, equating to eight times more light required by the T4 lens. That can have a big impact on the size and number of lights you need. The ISO you plan to shoot at will also factor into this, of course.
Also consider how deep or shallow a depth of field you want. If you’re after super-blurry backgrounds, only a fast lens will give you those (though shooting on a large-format camera will help). This brings us to…
Bokeh
A quick bokeh test of a Sigma Cine 50-100mm zoom lens using fairy lights
Bokeh is the appearance of out-of-focus areas in your image. It is most noticeable in small highlights such as fairy lights, which generally turn into big circles when they’re out of focus. Just how big and how smoothly circular depends on the lens and the aperture settings. Some lenses will have more geometric bokeh, octagons for example, which is a result of the shape and number of iris blades within. The bokeh may look rounder when the lens is wide open and more geometric when it is stopped down, or vice versa. It will also have a different shape at the edges of frame. What this comes down to is what look you feel is most aesthetically pleasing or appropriate for your story.
Lens Flares
Testing the flare of a Cooke Century 32mm
Another aesthetic choice. How much does the lens flare when light shines straight into it? What about when the light is just out of frame? Is there much veiling flare – an overall milkiness to the image? Do you like the colours and shapes of the flare? Do they feel natural or intrusive, and which is most fitting for the tone of your piece?
Sharpness
This is an important factor with the resolutions of cameras ever increasing. Any decent lens will be sharp at T5.6, but the more you open the iris the more you might start to see the image softening, especially when it is wide open (or conversely when it is stopped down to its minimum aperture). Check also the edges of frame, which may be less sharp than the centre, especially on a vintage or anamorphic lens. If you plan to do a lot of central framing then soft edges may not matter, or may even help to draw the viewer’s eye to the subject, but if you plan to put your subjects at the extreme sides of the frame then you should be careful what lenses you select.
Breathing
A lens is said to breathe when pulling the focus makes the image zoom in or out slightly. It is most noticeable with zoom lenses, some stills lenses and older glass. If you are racking back and forth between the characters in a deep two-shot, lens breathing can become very distracting.
Other Considerations
Other things to look out for are diffraction spikes, the star effect that happens around bright light sources, and colour rendition, which can vary slightly from lens to lens. If you expect to be physically close to your subject you should note the minimum focus distance of the lenses, which will be different for each length in the series. Also consider what focal lengths your chosen lens series contains – are there enough different lengths to cover everything you hope to shoot, especially at the shortest and longest ends of the range?
If you’re still not sure where to start, test footage and comparison videos of different lenses can be found online, like this one I made in 2017:
Better still, ask a rental house if you can come in for a day and shoot your own tests.
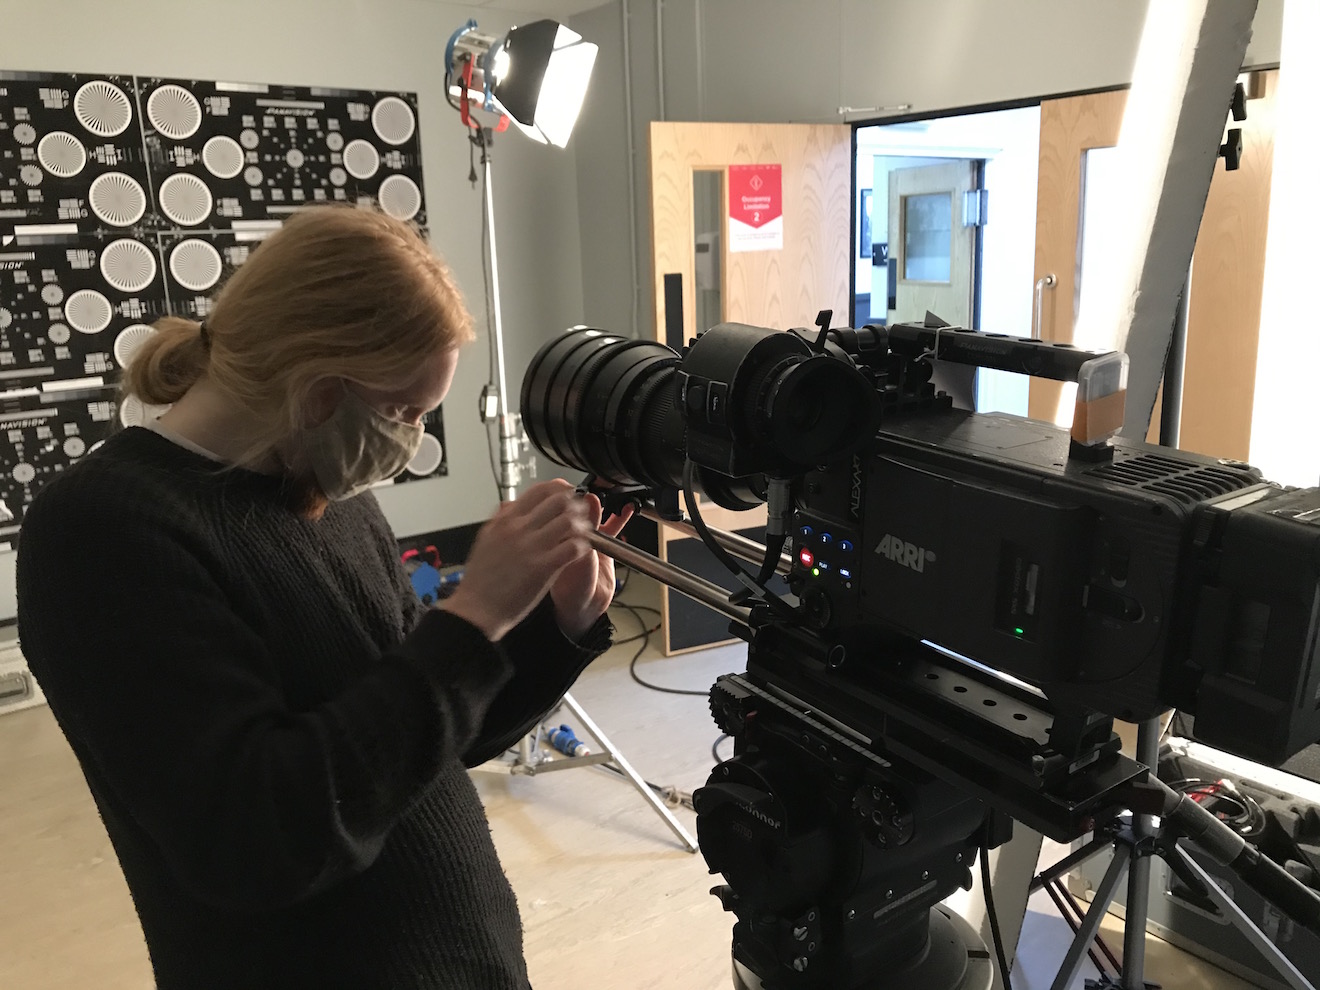
The main event of last week’s prep was a test at Panavision of the Arri Alexa XT, Red Gemini and Sony F55, along with Cooke Panchro, Cooke Varotal, Zeiss Superspeed and Angenieux glass. More on that below, along with footage.
The week started with Zoom meetings with the costume designer, the make-up artist, potential fight choeographers and a theatrical lighting designer. The latter is handling a number of scenes which take place on a stage, which is a new and exciting collaboration for me. I met with her at the location the next day, along with the gaffer and best boy. After discussing the stage scenes and what extra sources we might need – even as some of them were starting to be rigged – I left the lighting designer to it. The rest of us then toured the various rooms of the location, with the best boy making notes and lighting plans on his tablet as the gaffer and I discussed them. They also took measurements and worked out what distro they would need, delivering a lighting kit list to production the next day.
Meanwhile, at the request of the producer, I began a shot list, beginning with two logistically complex scenes. Despite all the recces so far, I’ve not thought about shots as much as you might think, except where they are specified in the script or where they jumped out at me when viewing the location. I expect that much of the shot planning will be done during the rehearsals, using Artemis Pro. That’s much better and easier than sitting at home trying to imagine things, but it’s useful for other departments to be able to see a shot list as early as possible.
So, the camera tests. I knew all along that I wanted to test multiple cameras and lenses to find the right ones for this project, a practice that is common on features but which, for one reason and another, I’ve never had a proper chance to do before. So I was very excited to spend Wednesday at Panavision, not far from my old stomping ground in Perivale, playing around with expensive equipment.
Specifically we had: an Arri Alexa – a camera I’m very familiar with, and my gut instinct for shooting this project on; a Sony F55 – which I was curious to test because it was used to shoot the beautiful Outlander series; and a Red Gemini – because I haven’t used a Red in years and I wanted to check I wasn’t missing out on something awesome.
For lenses we had: a set of Cooke Panchros – again a gut instinct (I’ve never used them, but from what I’ve read they seemed to fit); a set of Zeiss Superspeeds – selected after reviewing my 2017 test footage from Arri Rental; a couple of Cooke Varotal zooms, and the equivalents by the ever-reliable Angenieux. Other than the Angenieux we used on the B-camera for The Little Mermaid (which I don’t think we ever zoomed during a take), I’ve not used cinema zooms before, but I want the old-fashioned look for this project.
Here are the edited highlights from the tests…
You’ll notice that the Sony F55 disappears from the video quite early on. This is because, although I quite liked the camera on the day, as soon as I looked at the images side by side I could see that the Sony was significantly softer than the other two.
So it was down to the Alexa vs. the Gemini, and the Cookes vs. the Superspeeds. I spent most of Thursday and all of Friday morning playing with the footage in DaVinci Resolve, trying to decide between these two pairs of very close contenders. I tried various LUTs, did some rough grading (very badly, because I’m not a colourist), tested how far I could brighten the footage before it broke down, and examined flares and bokeh obsessively.
Ultimately I chose the Cooke Panchros because (a) they have a beautiful and very natural-looking flare pattern, (b) the bokeh has a slight glow to it which I like, (c) the bokeh remains a nice shape when stopped down, unlike the Superspeeds’, which goes a bit geometric, (d) they seem sharper than the Superspeeds at the edges of frame when wide open, and (e) more lengths are available.
As for the zoom lenses (not included in the video), the Cooke and the Angenieux were very similar indeed. I chose the former because it focuses a little closer and the bokeh again has that nice glow.
I came very close to picking the Gemini as my camera. I think you’d have to say, objectively, it produces a better image than the Alexa, heretical as that may sound. The colours seem more realistic (although we didn’t shoot a colour chart, which was a major oversight) and it grades extremely well. But…
I’m not making a documentary. I want a cinematic look, and while the Gemini is by no means un-cinematic, the Alexa was clearly engineered by people who loved the look of film and strove to recreate it. When comparing the footage with the Godfather and Fanny and Alexander screen-grabs that are the touchstone of the look I want to create, the Alexa was just a little bit closer. My familiarity and comfort level with the Alexa was a factor too, and the ACs felt the same way.
I’m very glad to have tested the Gemini though, and next time I’m called upon to shoot something great and deliver in 4K (not a requirement on this project) I will know exactly where to turn. A couple of interesting things I learnt about it are: (1) whichever resolution (and concomitant crop factor) you select, you can record a down-scaled 2K ProRes file, and this goes for the Helium too; (2) 4K gives the Super-35 field of view, whereas 5K shows more, resulting in some lenses vignetting at this resolution.
This week I attended Camerimage for the first time. Centred around the Opera Nova theatre beside the river Brda in Bydgoszcz, Poland, Camerimage is an international film festival celebrating the art of cinematography. It’s a bit like Cannes for DPs, but colder. This is the first part of my account of my three days at the annual hub of motion picture imaging.
The Ryanair flight was dirt cheap but trouble free, and at 9:50am I found myself on the tarmac of Bydgoszcz airport. There I met David Shapton and Matt Gregory, founders of Red Shark News, for the first time. I’ve been contributing articles to Red Shark for a few months so it was nice to finally meet these gentlemen in person.
A taxi (also dirt cheap) dropped me at the Opera Nova – only about three miles from the airport – where I picked up my pass and goodie bag. Bizarrely, said goodies included an Ikea catalogue. How did they know that us DPs love flat-pack furniture so much?
Canon Workshop: Stephen Goldblatt
From the Opera Nova I hurried to a college across the river, where the sports hall formed the venue for a Canon workshop run by Stephen Goldblatt, ASC, BSC, the man behind the lens for the likes of Lethal Weapon 2 and Batman Forever. The blurb for this workshop described Goldblatt as “a master of low light shooting”, and it was certainly pitch black when I walked in a few minutes late, and gingerly picked my way around to the far side of the hall to find a seat.
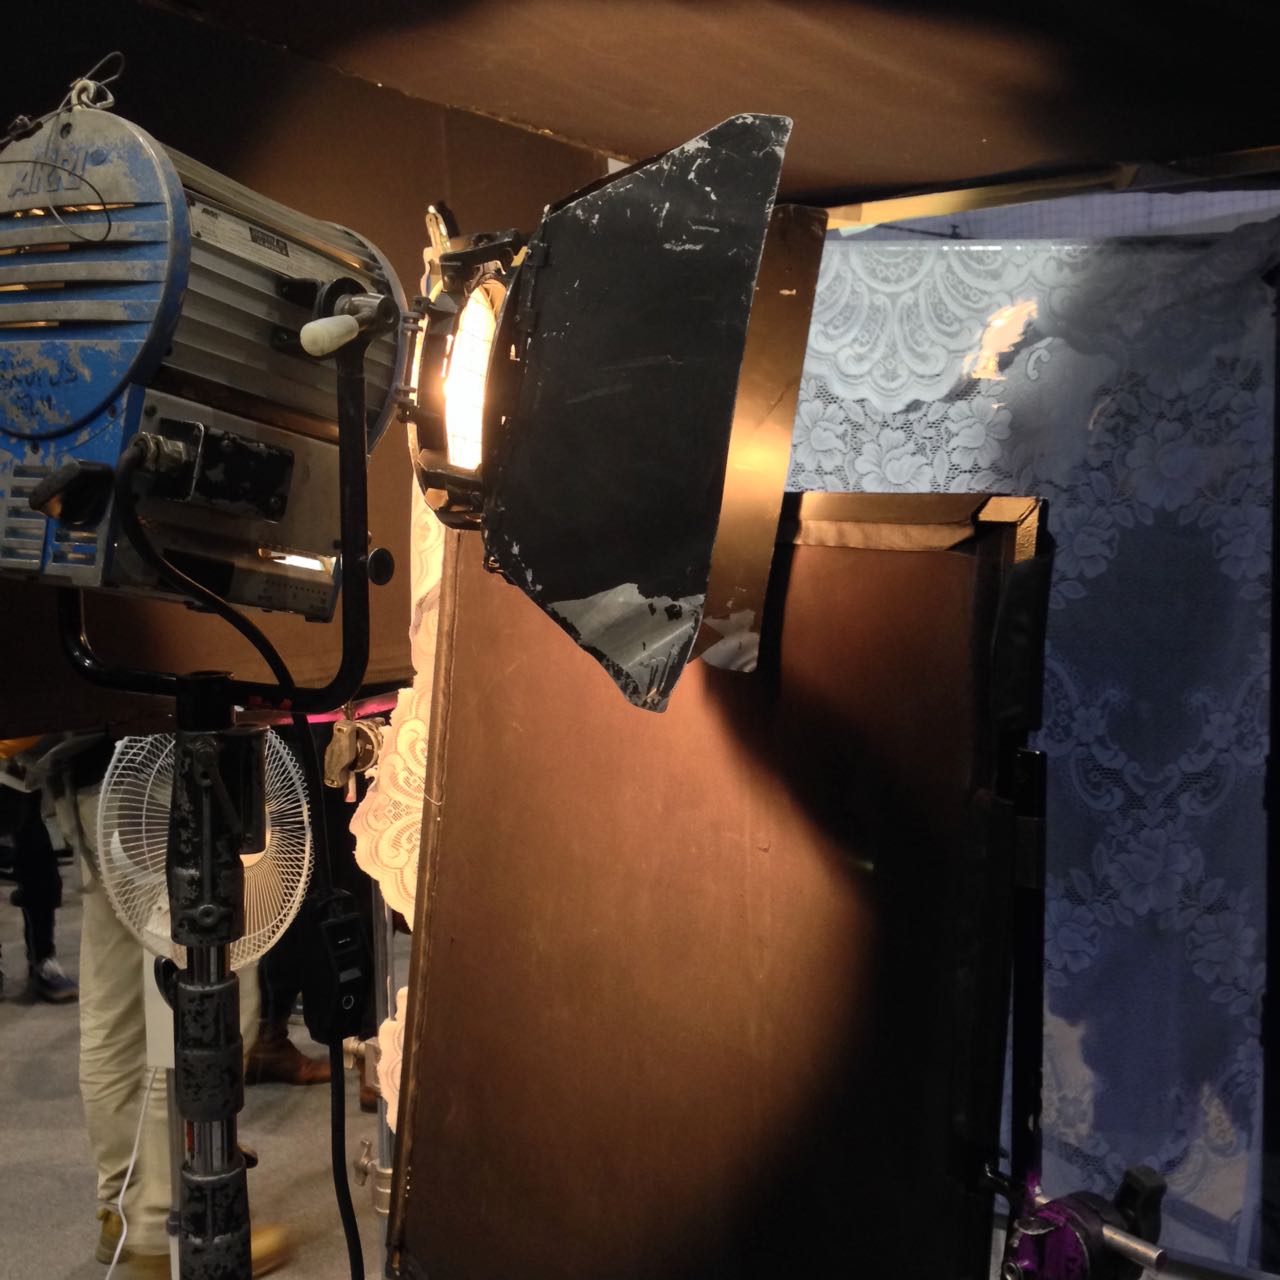
Lighting through lace
On a purpose-built bedroom set, Goldblatt was recreating lighting from the Robert Redford / Jane Fonda romantic drama Our Souls at Night, shot on the Sony F55 and Canon C300 Mark II. To practical lamps on either side of the bed he added egg-crated tungsten soft-boxes to beef up each one. He simulated moonlight through an imagined off-camera window by placing a lace curtain in front of a blue-gelled lamp and blowing it gently with a fan. An additional egg-crated soft-box provided a low level of blue toplight.
As he worked, Goldblatt revealed how he doesn’t miss ceulloid, loving how relatively easy it is now to light night exteriors or moving car scenes. “But just because you don’t need much light,” he cautioned, “it doesn’t mean you don’t want to control it.” Other developments coming down the pipe do not inspire him so much; he feels that high resolutions and HDR are unnecessary, pushed by marketing people rather than creatives.
He placed great emphasis on the importance of the eyes. “A common failing of newer DPs is that they worry more about the set than the eyes,” he said, before explaining how he will often walk beside the handheld camera with a torch, providing eye-light. He also stressed the importance of eye-lines. Although in any one shot it’s not that important how wide or tight the eye-line is, or how high or low, across the two hours of a feature film the decisions have a cumulative effect.
Trying out a Xeen lens in the exhibition hall
Goldblatt no longer uses a light meter. “Trust your eye, develop your eye,” he advised, adding that you must have a strong voice to remain in control of the images through postproduction.
After grabbing lunch, I returned to the Opera Nova to browse the exhibition hall. This closely resembled a mini BSC Expo or Media Production Show, with all the major camera and lens manufacturers displaying their wares, along with several lighting companies. I had a play with some of the cameras, including the actual Alexa 65 used on Rogue One.
Then I met up with Chris Bouchard, one of The Little Mermaid‘s two directors, who had arrived in Poland the previous day. We sauntered over to another venue, the MCK Orzeł, an independent cinema with a nice, chilled, film-buff-friendly atmosphere. The auditorium itself was packed though as we settled in for a seminar on “The Future of Digital Formats”.
Red Seminar: The Future of Digital Formats
Promoting Red’s Monstro sensor, the session was mostly about the benefits of shooting in high resolutions, and giving yourself the maximum flexibility in post. You can read my thoughts on both of those topics in upcoming Red Shark articles.
One of the speakers, Christopher Probst, ASC (DP of Mindhunter and technical editor of American Cinematographer magazine) made some interesting points about ISO. “Traditionally, low ISOs were used for bright scenes like day exteriors, and high ISOs were used for darker scenes like night exteriors,” he explained. “That was based on reducing the grain, getting the cleanest possible image on film.” He advised the opposite for digital capture. “Use a low ISO for nights to get more shadow detail, and a high ISO for days to get more highlight detail [in the sky, for example].”
“Independence Day: Resurgence” – DP: Markus Forderer, BVK
Another interesting nugget came from Markus Förderer, BVK. On Independence Day: Resurgence he switched between spherical, 1.3x anamorphic and 2x anamorphic lenses depending on the situation. For example, flatter lenses were better for wide shots – where anamorphics would distort straight lines – and for VFX work.
Hawk Vantage Seminar: Top cinematographers tell their Hawk stories
I ducked out of the Red session early so that I could pop back to the Opera Nova for the Hawk Vantage seminar, bumping into my Perplexed Music gaffer Sam Meyer on the way. Hawk were launching three new sets of lenses: MiniHawk (T1.7 hybrid anamorphics), Hawk Class-X (T2.2 2x anamorphics) and Hawk65 (T2.2).
A Hawk T1 in the exhibition hall
The MiniHawks in particular seem very exciting. Daniel Pearl, ASC showed us some stunning frame grabs from the upcoming Dennis Quaid vehicle Motivated Seller, shot using these lenses on Alexa Mini. Whilst having key advantages of spherical lenses (speed, small size, low weight, extremely close focus) the MiniHawks have a unique and beautiful cigar-shaped bokeh.
While Pearl had used the latest Hawks, Magdalena Górka, PSC had shot with some old ones, the C series, for Brad Silberling’s drama An Ordinary Man. “I had to frame everything centrally because that’s the only place that was sharp!” she laughed. Also addressing focus fall-off, Andrzej Bartkowiak, ASC (Speed, The Devil’s Advocate) stated, “I like anamorphic because the shallow depth of field allows you to direct the viewer’s eye more.”
Stuart Dryburgh, ASC (The Secret Life of Walter Mitty, Bridget Jones’s Diary) talked about shooting 1.3x anamorphic. He has done this on three-perf 35mm (to achieve a Scope aspect ratio), on an Alexa in 16:9 mode (again for 2.39:1) and on an Alexa in 4:3 mode (to get 1.85:1). He also recommended shooting on Super-16 with 1.3x glass, citing the example of Ed Sheeran’s “Thinking Out Loud” video, which Pearl shot.
Peter Flinckenberg, FCK (Upswing, Concrete Night) noted that, with the shift to digital acquisition, the DP is no longer a magician, “but you can bring back that magic with lighting and glass that has character.”
CW Sonderoptic: Exploring Large format cinematography & Leica lenses
I took my leave, dashing back to the MCK Orzeł for another lens-themed seminar, this time by CWSonderoptic, the makers of Leica. The first half of this panel revolved around a short film shot by Darius Khondji, ASC, AFC (Seven, Delicatessen) on an Alexa 65 with the new Leica Thalias.
The second half was all about Tod Campbell, DP of Stranger Things and Mr. Robot, focusing on the latter show. The second season of Mr. Robot was shot on Leica Summicrons after Campbell found that the Cookes used on season one distorted the many straight lines which became such a key part of the show’s unique look. “I look at season two as kind of the birth of the photography for the show,” he said. With a laugh he added: “Sorry that the lighting looks like shit in season one. I was learning!” (See my spherical lens tests for my own thoughts on Cookes and Leicas.)
One of my favourite shots from “Mr. Robot”
Campbell revealed that season three of Mr. Robot has a different look again, using much more camera movement and “twice as much atmos”. For this season he paired Canon K35 glass with an 8K camera, but due to the Canons’ low resolution he employed Leica Summiluxes for the wide shots.
He also shared some interesting information about his testing process, admitting that he doesn’t really know how other DPs test. He doesn’t use charts, he just makes it up. He always includes a candle, a practical lamp, some kind of highlight in the background, and random foreground objects (as background bokeh can differ from foreground bokeh).
Christopher Doyle Seminar
When the Leica seminar ended I went back to the Opera Nova, where Chris and I had dinner at the nice (and once again cheap – are you detecting a theme?) restaurant. Despite having got up at 4am (3am local time) I wasn’t feeling too tired, so we headed upstairs to the 10pm seminar by Christopher Doyle, HKSC (Hero, Lady in the Water). Many people were nursing beers, including Doyle himself, and the lecture theatre was dimly illuminated by mood lighting. Clearly this session was not going to be like the daytime ones.
“We’re going to fuck things up,” Doyle began, dispelling all doubts. He proceeded to talk disjointedly but entertainingly about his work on The White Girl and what I think was a separate film about a camera obscura. His oratory was liberally sprinkled with great one-liners, a few of which I reproduce here for your edification:
There are only three people in filmmaking: the actor, the audience and the cinematographer in between them.
If actors don’t feel loved, the performance will not come across on camera.
Give the idea the image it deserves.
[Vittorio] Storaro [legendary DP of Apocalypse Now amongst others] can’t tell you how to do it. You have to find it for yourself.
People in space – that’s what cinematography’s about.
The location is very important. It gives the energy, it imposes the style.
The lens doesn’t matter; it’s what it shows that’s important.
You never sleep because you care too much – that’s what filmmaking is.
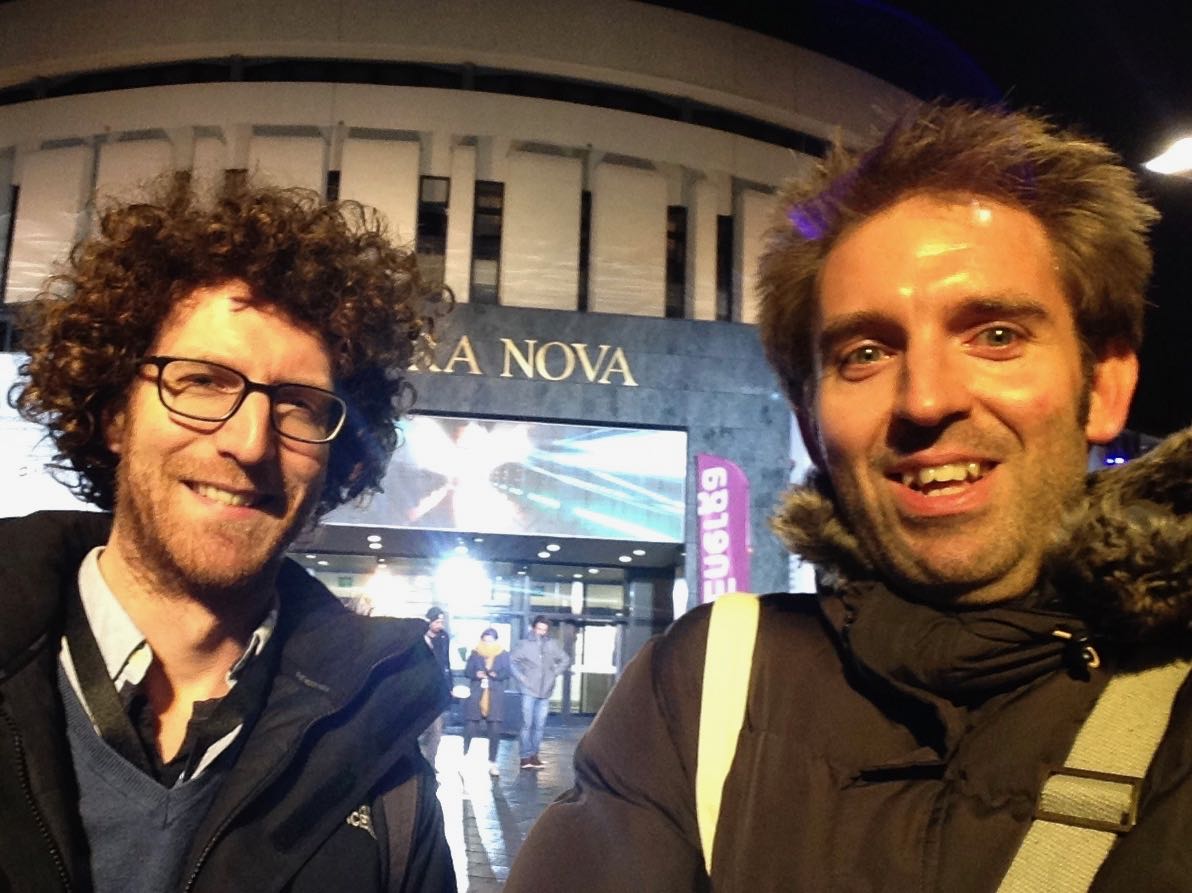
With Chris Bouchard in front of the Opera Nova
Doyle also picked up on a piece of dialogue from a clip he screened: “What is it?” / “I don’t know yet.” It was a great summation of finding the essence of a shot, he said.
Having had our fill of aphorisms, Chris Bouchard and I slipped out to get a drink. The Cheat, the pop-up bar across the road, was absolutely packed, and my early morning was finally catching up with me, so I called it a night. The highstreet of Bydgoszcz was quiet and chilly as I walked briskly to my hotel, curiously located down a service road behind the city’s football stadium, reflecting on all that I had learnt that day.
Tune in next week for tales from my second day at Camerimage.
The other week I spent a day at Arri Rental in Uxbridge, in the Bafta Room no less, conducting various camera and lens tests. I’ve done a number a productions now where I wanted to test but there wasn’t the time or money, so for a while I’ve been meaning to go into Arri on my own time and do some general tests for my education and edification. An upcoming short provided the catalyst for me to get around to it at last.
Aided by 1st AC Rupert Peddle and 2nd AC Bex Clives, I tested a dozen lenses, some spherical, some anamorphic. Today I will cover the spherical lenses; next time I’ll look at the anamorphics.
Method
We shot on an Alexa XT Plus in log C ProRes 4444 XQ at 3.2K. In the video the image has been downscaled to 1080P and a standard Rec.709 LUT has been added.
I set the Alexa to ISO 800 and lit Bex to a T2.8 using a 650W tungsten fresnel bounced off poly. For fill I caught a little of the spill from the fresnel with a matte silver bounce board on the opposite side of camera. I placed fairy lights in the background to observe the bokeh (out of focus areas) and turned on a 100W globe during each take to see what the flare did.
We shot all the lenses at 2.8 – the stop I most commonly use – and also wide open (compensating with the shutter angle), but the direct 2.8 comparison proved most useful, so that’s mainly what you’ll see in the video. We tested a single length: 35mm or the closest available to it.
What we didn’t do was shoot grey-scale or colour charts, or do any testing of vignettes or distortion. (The day after doing these tests, Shane Hurlbut, ASC published an Inner Circle post about how to tests lenses, so I immediately learnt what my omissions were!)
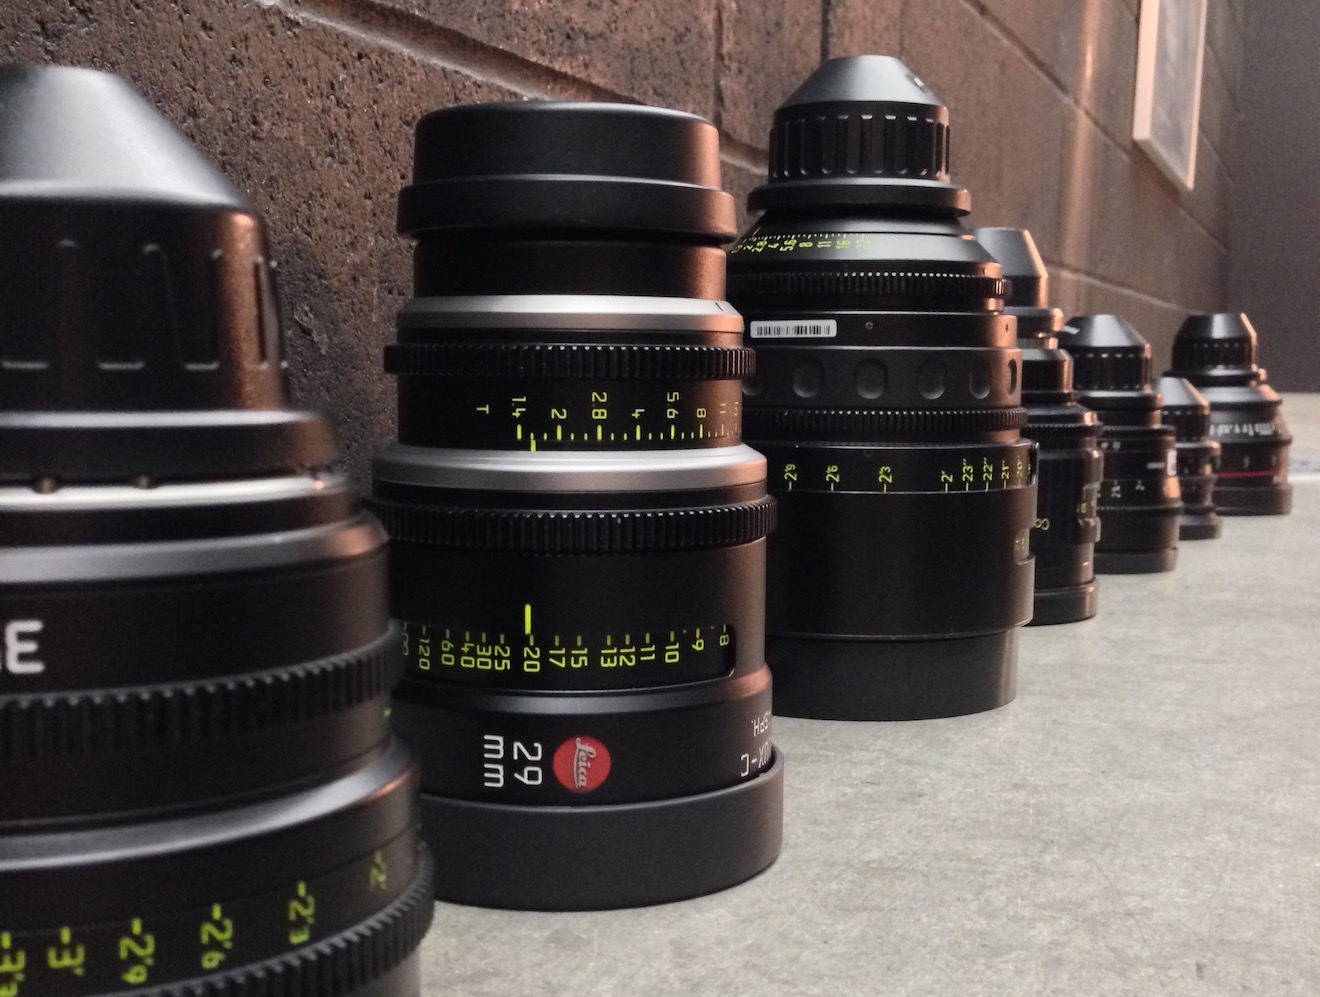
We tested the following lenses:
Series
Length
Speed
CF*
Weight
Price
Leica Summilux-C
29mm
T1.4
18″
1.7kg
£27K
Arri/Zeiss Master Prime
35mm
T1.3
14″
2.2kg
£16K
Cooke S4
32mm
T2
6″
1.85kg
£14K
Leica Summicron-C
35mm
T2
14″
1.3kg
£13K
Zeiss High Speed
(a.k.a. Superspeed Mk III)
35mm
T1.3
14″
0.79kg
£12K
(refurb)
Arri/Zeiss Ultra Prime
32mm
T1.9
15″
1.1kg
£10K
Zeiss T2.1
32mm
T2.1
24″
0.45kg
£4K
(used)
Canon
35mm
T1.5
12″
1.1kg
£3K
* CF = close focus
Here’s the video…
Skin tones
Click the image to see it at best quality.
The Arri/Zeiss Master Prime and the two Leicas seem to have the most vibrant skin tones. To my eye, the Leicas have a slight creaminess that’s very pleasing. The Canon looks just a little cooler and less dynamic. I was surprised to find that the Cooke S4, the lens I’ve used most, appears to have a grey, flat skin tone compared with the Master Prime, Leicas and Canon. I would rank the Ultra Prime and Superspeed next, on a par except that the Ultra Prime has a noticeable magenta cast. My least favourite skin tones are on the Zeiss T2.1, which comparatively makes poor Bex look a little bit ill!
Some of the nuances will be lost in the YouTube and Jpeg compression, but this is a very subjective assessment anyway, so feel free to completely disagree with all of the above. Any of the differences noted above could be corrected by grading, to some extent . But remember that the lens is at the very start of the light’s journey from set to screen, and any wavelengths that don’t get through it are lost forever. It’s like fluorescent lamps with colours missing from the spectrum; you can’t put those back in in post.
Sharpness
I have to say, I’m unable to detect any difference in sharpness between the Master Prime, Cooke S4, Canon and Leicas. The Ultra Prime and Superspeed both look a hair softer, while the T2.1 is very soft.
Breathing
Breathing is the slight zooming effect that you get with some lenses when you pull focus. Looking at 4:44 in the video you can clearly see the differences in breathing between the eight lenses. Because this part of the video is showing a crop of the bottom left corner of the image, the breathing manifests as a shift to the left (zoom in) as the lens is racked closer (goes soft) and a shift to the right (zoom out) as it’s racked deeper (goes sharp).
All the Zeiss lenses except the Master Prime have a significant amount of breath when seen in isolation like this, but not enough to be noticeable to an audience in most real-world situations. The Cooke S4 has a little bit of breathe, and the Canon a hair less. The Master Prime and the Leicas are rock solid.
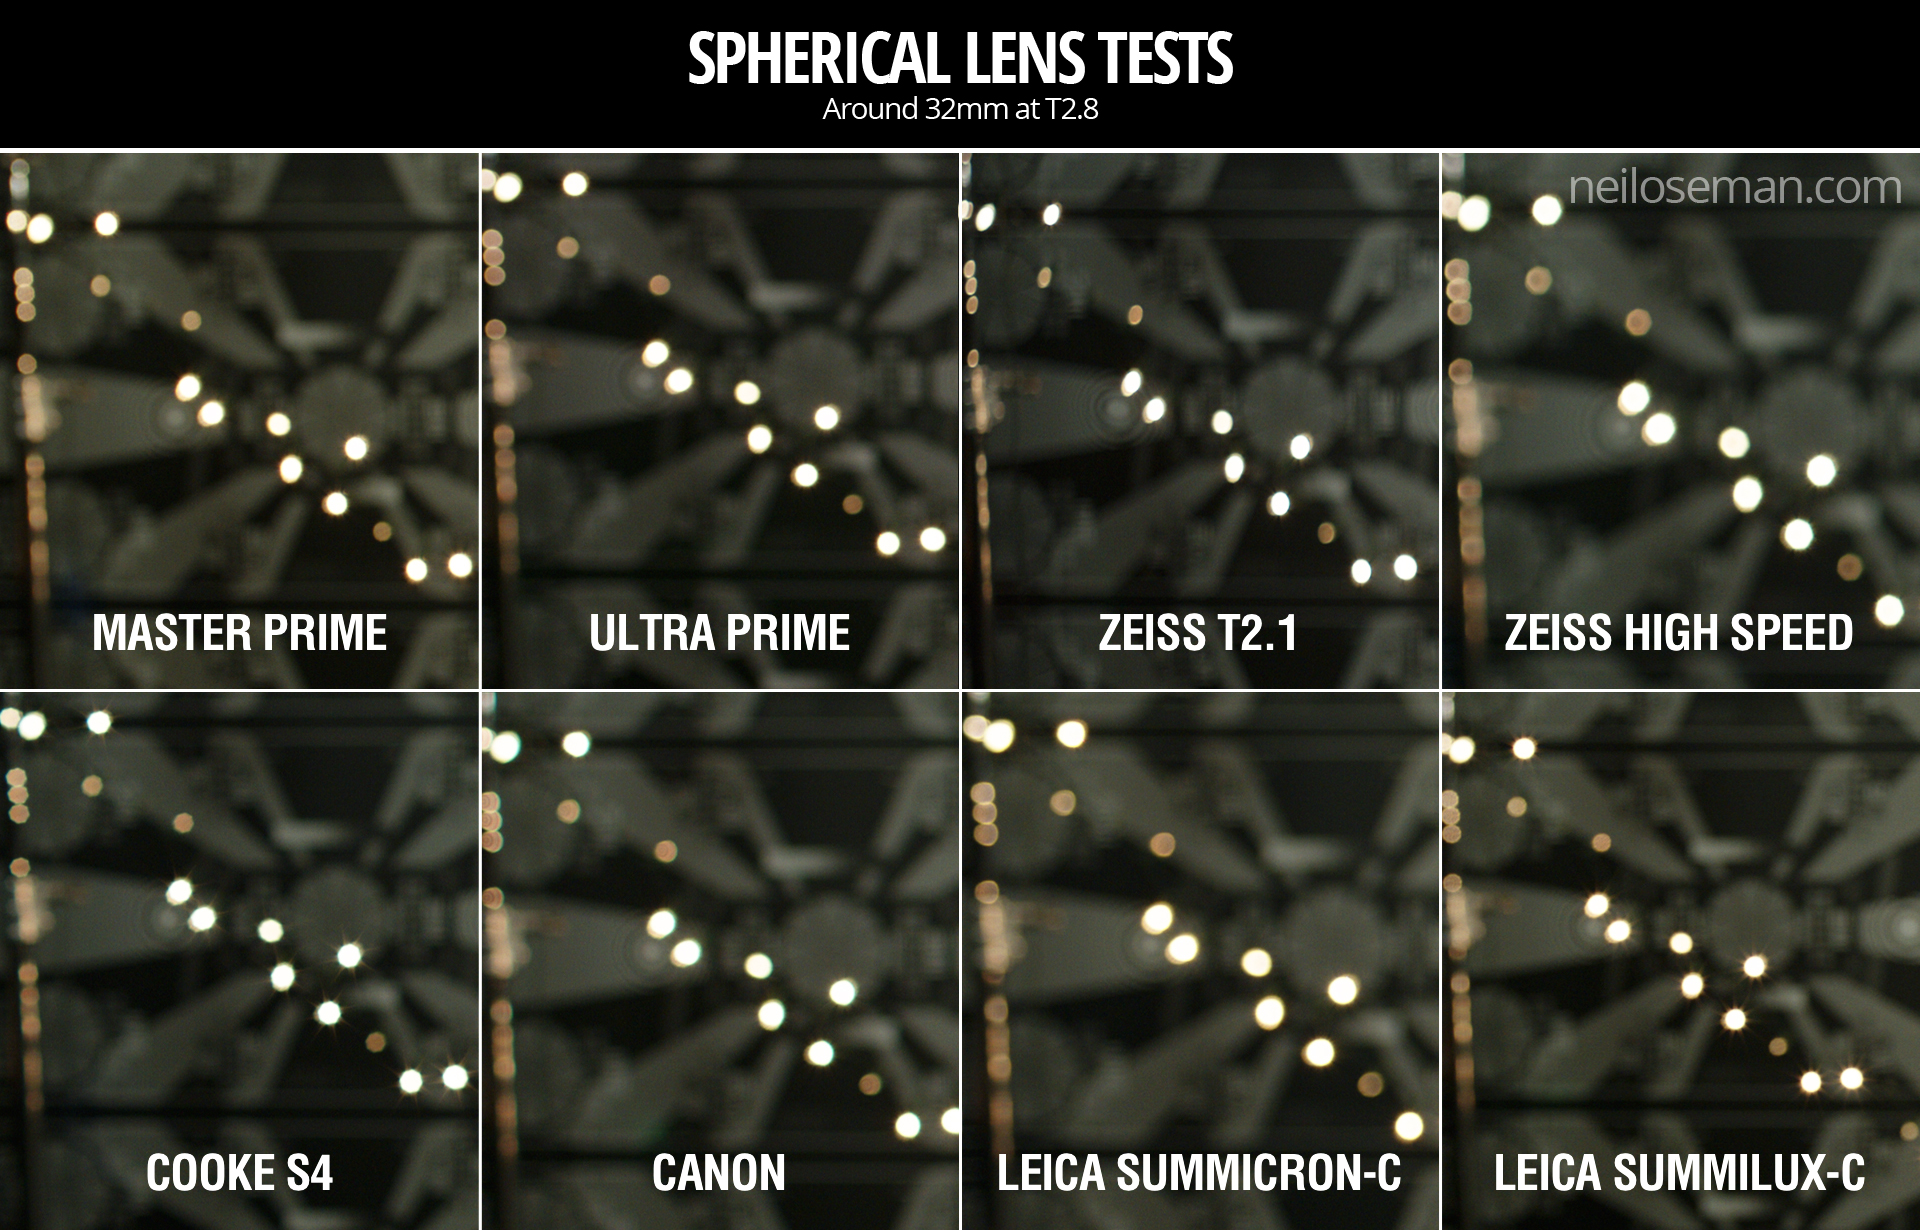
Bokeh
Small points of light, when thrown out of focus, most clearly demonstrate the bokeh pattern of a lens. The shape of the bokeh is determined by the number of iris blades and the shape of those blades. Generally a circle is preferred, because it’s a natural shape, but for certain stories a more unusual shape might be appropriate. The shape of the iris changes with the T-stop, hence the T2.8 and wide open images above.
Immediately noticeable is the difference in the Cooke S4’s bokeh between wide open (circular) and T2.8 (octagonal). All of the other lenses have round bokeh at T2.8, apart from the Superspeed, which has heptagonal (seven-sided) bokeh.
It’s entirely subjective which bokeh you prefer. The only other thing I’ll point out is that the Canon’s bokeh wide open is very fuzzy, with noticeable colour aberration, though this may be due to the bright highlight rather than the defocusing.
Flare
Flare patterns also vary with aperture. The smaller the aperture, the more of a star effect you will get, as the light interacts with the corners in the iris blades. The Summilux shows this most clearly, with a pronounced star at T2.8 (two stops down from its maximum aperture) and almost none when wide open. The Cooke S4 also has a nice star pattern at T2.8. With the other lenses it’s much more subtle, and the Canon has almost none.
Conclusions
The real revelations in these tests, for me, were the Leicas. The Summilux in particular is a beautiful lens, with rich, dynamic skin tones, nice bokeh, no breathing, plus the bonus of nice star flares. I will definitely be looking to work with this glass in the future, although given the price tag that may be optimistic!
The Summicron also performed incredibly well, matching the more expensive Summilux and Master Prime in every respect except speed. I can see this becoming my new go-to lens.
The Master Prime of course produced a beautiful, sharp, clean image, but it lacks character. It might work nicely for science fiction, a drama requiring a neutral look, or something where filtration was being used to give the image character.
The Canon impressed me too – no mean feat given that it’s the cheapest lens we tested. With nice skin tones and attractive flares, I could see this working well for a romantic movie.
The Zeiss T2.1 did not appeal to me, with poor sharpness and cold, washed-out skin tones, so I would avoid it.
The Superspeed is a decent lens, but in most cases I’d plump for an Ultra Prime instead. Ultra Primes are certainly easier to work with for the 1st AC, and have proven to be a good workhorse lens for drama. (I shot Above the Clouds on them.)
The Cooke S4 has been my go-to glass up to now, and while it will probably remain my first choice for period pieces, due to its gentle focus fall-off, I’m excited to try some of the other glass in this test on other productions.
I’ll say it one last time: this is all subjective. Our visual preferences are what make every director of photography unique.
Tune in next week when I’ll look at the anamorphic lenses: Hawk-V, Cooke Xtal and Kowa Mirrorscope.