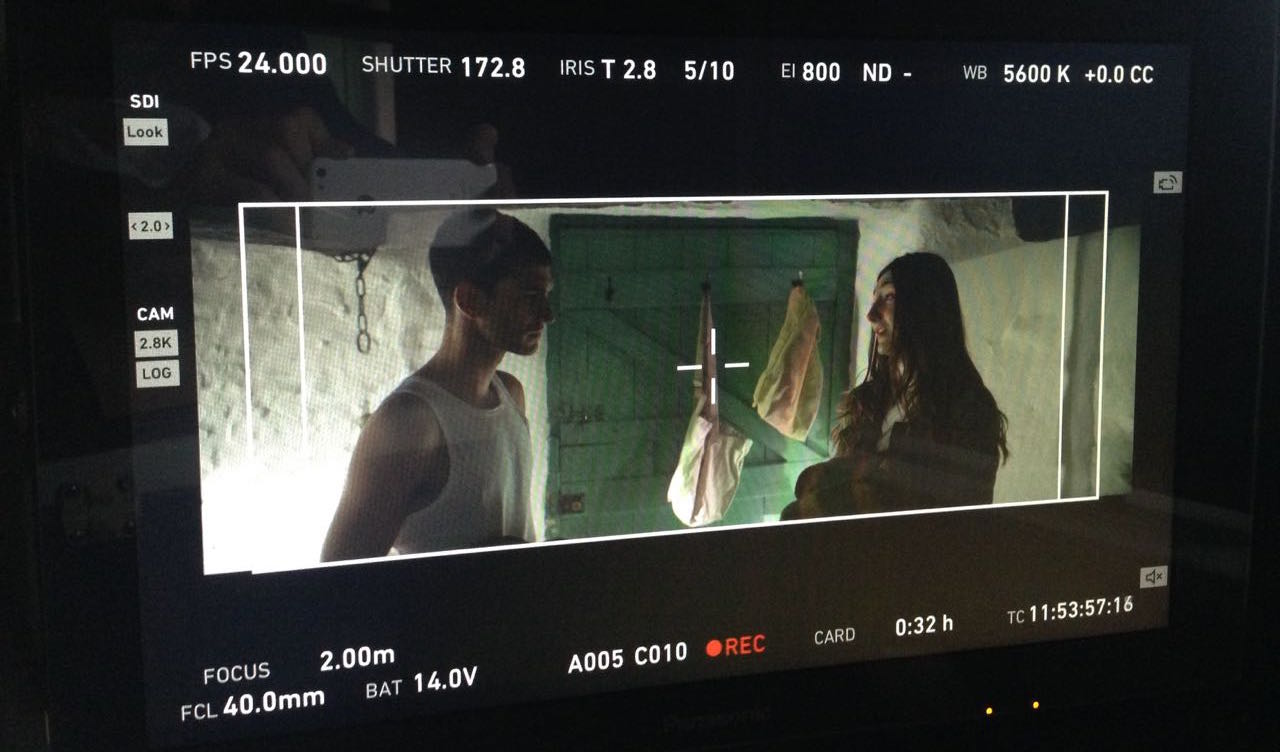
The monitor overlays here show how “Annabel Lee” was shot at 24fps with a shutter angle of 172.8 to prevent flickering of non-incandescent light sources, a typical recipe for UK filmmakers today.
An article of mine from 2014 weighing the merits of shooting at 24 vs. 25 frames per second has recently been getting a lot of hits. I’m surprised that there’s still so much uncertainty around this issue, because for me it’s pretty clear-cut these days.
When I started out making films at the turn of the millennium, 25fps (or its interlaced variant, 50i) was the only option for video. The tapes ran at that speed and that was that. Cathode ray tube TVs were similarly inflexible, as was PAL DVD when it emerged.
Film could be shot at 24fps, and generally was for theatrical movies, since most cinema projectors only run at that speed, but film for television was shot at 25fps.
Three big technological shifts occurred in the late noughties: the delivery of video over the internet, flat-screen TVs and tapeless cameras. All of these support multiple frame rates, so gradually we found that we had a choice. At the start of a shoot, as a DP I would have to ask which frame rate to set.
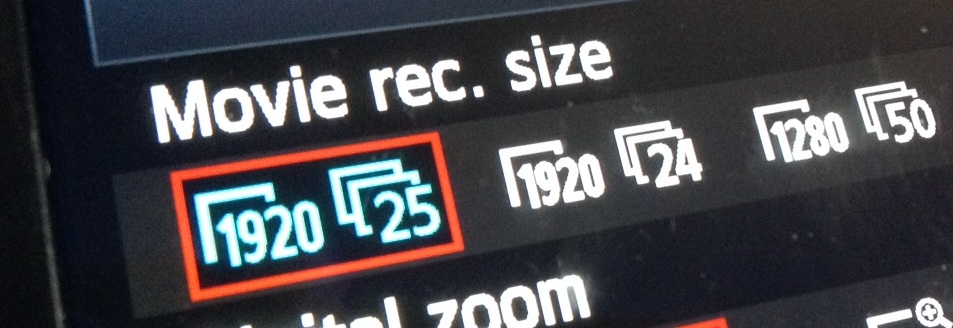
The frame rate and resolution menu from my old Canon 600D, the first time I owned a camera that could shoot 24fps.
Americans and others in NTSC regions are in a different situation. Their TV standard of 30fps has a discernibly different look to the international movie standard of 24fps, so the choice of frame rate is as much creative as it is technical. I don’t think anyone can tell the difference between 24 and 25fps, even on a subconscious level, so in Europe it seems we must decide on a purely technical basis.
But in fact, the decision is as much about what people are used to as anything else. I shot a feature film pilot once on 35mm at 25fps and it really freaked out the lab simply because they weren’t used to it.
I shot the 35mm pilot for “The Dark Side of the Earth” (2008) at 25fps because tapes still played a part in postproduction at that time. Today I would not hesitate to shoot at 24.
And what people seem to be most used to and comfortable with in the UK today is 24fps. It offers the most compatibility with digital cinemas and Blu-ray without needing frame rate conversion. (Some cinemas can play 25fps DCPs, and Blu-rays support 25fps in a 50i wrapper which might not play in a lot of US machines, but 24 is always a safer bet for these formats.)
Historically, flickering of non-incandescent light sources and any TV screens in shot was a problem when shooting 24fps in the UK. These days it’s very easy to set your shutter to 172.8° (if your camera measures it as an angle) or 1/50th (if your camera measures it as an interval). This ensures that every frame – even though there are 24 of them per second – captures 1/50th of a second, in sync with the 50Hz mains supply.
The Times when 25fps is best
There are some situations in which 25fps is still the best or only option though, most notably when you’re shooting something intended primarily for broadcast on a traditional TV channel in the UK or Europe. The same goes if your primary distribution is on PAL DVD, which I know is still the case for certain types of corporate and educational videos.
Once I was puzzled by a director’s monitor not working on a short film shoot, and discovered that it didn’t support 24fps signals, so I had to choose 25 as my frame rate for that film. So it might be worth checking your monitors if you haven’t shot 24fps with them before.
“Finding Hope” was shot at 25fps simply because the director’s monitor wouldn’t accept 24fps signals.
Finally, if your film contains a lot of archive material or stock footage at 25fps, it makes sense to match that frame rate.
Whichever frame rate you ultimately choose, always discuss it with your postproduction team ahead of time to make sure that you’re all on the same page.
I won my first DVD player in a trailer competition on a sort of YouTube forerunner site in December 2000. Over the next decade I was entertained and educated by many extras-packed Digital Versatile Discs. Now, of course, physical media is a thing of the past, but many of the anecdotes I heard in DVD commentaries have stuck in my mind. Some have even helped me on set when facing a new situation.
So, if you’ve got these discs on your shelf and never given the commentary a listen, or if you’re passing a CEX or Cash Convertor with a shiny new pound coin burning a hole in your pocket, you could do worse than seek out these classic chat tracks.
5. Moulin Rouge
DP Don McAlpine is actually quite quiet on this track, leaving director Baz Luhrmann and production designer Catherine Martin to do much of the work. This latter pair explain how sets, miniatures and CGI were blended to create the world of Moulin Rouge. At one point Luhrmann notes that he resisted the temptation to digitally stabilise the crane shots in the Elephant Love Medley, preferring to recall the look of classic 20th century musicals which did not have access to such postproduction trickery. A few nuggets we get from McAlpine include his use of blue light on Satine (Nicole Kidman) to make the most of her pale skin, the anachronistic use of follow spots for the stage shows, and how he was briefed by Luhrmann in one scene to light Jim Broadbent like the devil – which he did with flickering orange firelight from a low angle.
Highlight: Performing in what proves to be her final show, Satine wears a diamond necklace which reflects dazzling light onto Richard Roxburgh’s lustful duke. McAlpine reveals that he created the shimmering reflections by shaking some canvas with pieces of broken mirror on it.
4. X-Men 2
Although the DVD menu lists it as a director’s commentary, Bryan Singer in fact pairs up with his DP Newton Thomas Sigel for this track. Sigel discusses the importance of building practicals into the sets to enhance realism and flexibility of shooting. He explains how he colour-coded certain scenes so that the audience would more readily understand where they were during the fast-paced action sequences; for example, the corridors of the Alkali Lake bunker were lit with a moss green.
Highlight: The brutal claw-fight between Wolverine and Lady Deathstrike features dynamic and unusual camerawork. Sigel and Singer reveal that they used a cable rig to swoop the camera towards the duelling mutants, knowing that the camera would bounce back when it reached the end of its cable, but embracing this for the extra energy it added to the sequence.
3. Garden State
DP Lawrence Sher shares (no pun intended) a commentary track with director Zach Braff and production designer Judy Becker. The trio give an insight into the way that the moods and emotions of the film were enhanced by the colours, design, framing and camera movement. Braff and Sher chose a static look with strong compositions, punctuated by occasional Technocrane moves and at least one quasi-crane move that was actually captured on a Steadicam. Various happy (and unhappy) accidents helped shape the look too, like the constant rain throughout the exterior shoots, the mist and flaring practicals in the pool party scene, and the square of light on the airport wall behind Braff and Natalie Portman in the final shot.
Highlight: Sher explains the use of different film stocks to delineate threads of the story. Scenes with Large’s father (Ian Holm) were rendered cold and clinical by shooting on a sharper, harder Kodak film, while Portman’s sequences were imbued with organic warmth by Fuji stock. The feel was further enhanced by lighting and the colour choices in the respective sets.
2. Alien 3
The departure of director David Fincher from Alien 3 – under a cloud of studio interference and re-edits – is an infamous part of movie lore. Less well known is that the director of photography changed a week into shooting, after original DP Jordan Cronenworth (of Blade Runner fame) fell ill. Alex Thompson stepped in, and his humble, soft-spoken observations are spliced with other crew and cast members to form the commentary track on the Alien Quadrilogyboxset version of this film. Throughout the track he explains how he created the cool, toppy look of the prison’s communal areas, the dark, shadowy environs of the basements, and the hot, hellish feel of the lead-works. There are some interesting remarks about practicals too, such as the deliberate use of mismatched, low-CRI fluorescent tubes to give the canteen a run-down look, and tips for creating convincing firelight flicker.
Highlight: To create the illusion of glowing molten metal in the colony’s lead-works set, Thompson placed a veritable arsenal of lamps – almost 1,000 amps’ worth – underneath sheets of trace. Despite their brilliance, the individual units were still visible on camera, rather than a continuous white glow. According to Thompson, it was Fincher who came to the rescue, wiping grease from the side of his nose onto the lens to diffuse the offending lamps. I hope he let the AC put an optical flat on first!
1. Armageddon
Whatever you think of this slice of outer-space Bayhem, there’s no denying that DP John Schwartzman’s commentary on the Criterion Collection edition (spliced in with two of the film’s scientific advisors) is a fascinating insight into photographing the biggest of big-budget blockbusters. Schwartzman reveals that seven miles of cable were laid by his electrical department in preparation for extreme wide shots of the Armadillo vehicle travelling across the asteroid – in reality the South Dakota Badlands at night. Elsewhere he discusses lighting through coloured windows, shooting under UV lights (pictured above), dealing with spacesuit helmet reflections, and how Spielberg’s lens-meister Janusz Kaminski stepped in to shoot pick-ups of meteorites wiping out Shanghai.
Highlight: Schwartzman and his team photographed two real shuttle launches for the movie. Nasa decreed that the 35mm cameras had to sit in position on the launchpad, threaded with film and ready to go, for two days before take-off. The camera dept undertook extensive testing to making this possible, dealing with such problems as the condensation that would form as the temperature changed over the 48 hours. When they returned to the cameras after the launch and examined the one which had been the closest to the shuttle’s rocket motors, they discovered that the lens was in pieces, the vibrations having undone every single screw!
Following on from last week’s filmmakers commentary, today I’ve posted the cast commentary for Stop/Eject on YouTube. It features Georgina Sherrington, Oliver Park and Therese Collins all chatting about the film as it unrolls before their eyes. Click the annotations in the video to access a commentary-less version if you haven’t seen Stop/Eject before.
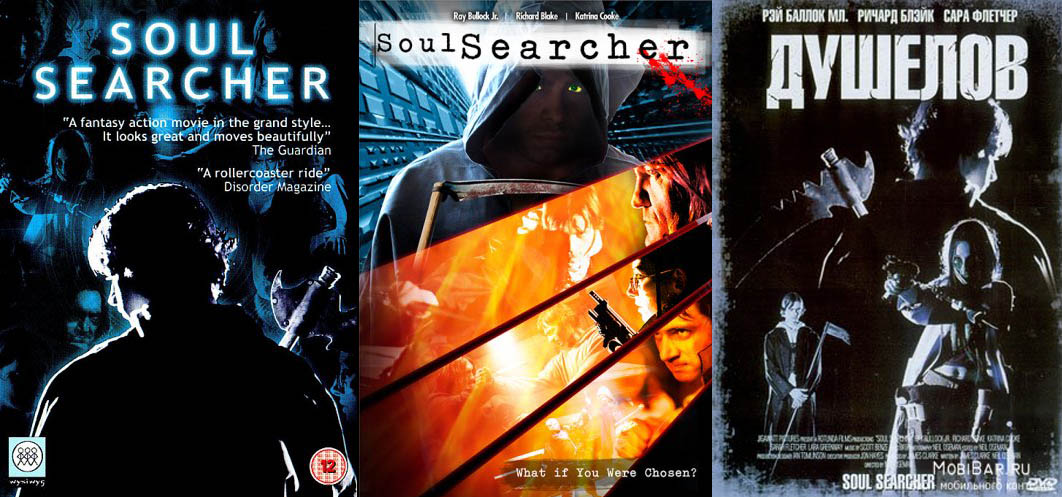
While in Japan recently, I was finally able to get hold of that country’s version of my 2005 feature film, Soul Searcher. I thought this would be a good opportunity to talk a little bit about international distribution and the mysterious M&E mix.
The story of an ordinary guy who gets trained to be the new Grim Reaper, Soul Searcher was picked up for distribution by a small UK company called Wysiwyg Films (now defunct). After releasing it on DVD in the UK, they sold all the foreign rights (much to my chagrin) to American sales agents Loose Cannon. Loose Cannon put out a US DVD, aiming to misleadingly tap the horror market by adding a splash of blood to the cover art, along with a stock photo of a random hooded guy with glowing eyes.
Loose Cannon then sub-sub-licensed the rights to five other territories: Benelux, Russia, Argentina, Thailand and Japan. Russian pirates hilariously dubbed the film into their own language (see some clips here), but the only territory to officially dub rather than subtitle the movie was Japan.
Presumably because of the film’s numerous martial arts fights, the Japanese distributors paid more for the film than any other country: $24,750. I know this from the Loose Cannon sales reports that were eventually forwarded to me by Wysiwyg. The only reason I know anything else about the Japanese release is from extensive googling (using the actors’ names as search terms proved most fruitful) which led me to the Amazon.jp page for the DVD a few years ago.
At first I thought I’d made a mistake. The cover art displayed on the page was completely new to me, showing an unfamiliar man holding a huge sword (a weapon never used by Soul Searcher’s hero). Beneath that was the title, in both Japanese and English: Blade X. It was only after Google Translating the page that the customer reviews confirmed this was indeed my very own Soul Searcher. Perhaps unsurprisingly, the reviews complained of the film’s lack of Wesley Snipes, the lack of correlation between the movie’s scythe-wielding hero and the cover’s sword-bearing imposter, plus many other flaws that are common to the English version!
Sadly, this is how low budget film sales work. The distributors know that the films are unlikely to generate much positive word of mouth, so they resort to tricking consumers into buying them with misleading covers and references to more successful films.
Left to right: the UK, US and Russian covers for Soul Searcher. The Russian one is my favourite.
Anyway, when I saw that Amazon’s tech specs listed a Japanese audio track, I was desperate to get my hands on the DVD. But I could never find a seller who would import it for less than an eye-watering £40, so I waited, and in June this year I finally visited Japan and bought a copy.
But how does dubbing work? Well, amongst the delivery materials that a sales agent will require when you sell them your film will be an M&E mix – that’s Music and Effects. What this means is that you supply a version of the film which contains music, sound effects, foley, atmospheres, everything except the dialogue. This is one of the reasons for the existence of foley (footsteps, clothing rustles and other mundane sounds added to the film in postproduction); if you relied on the footsteps recorded along with the dialogue on set, those footsteps would disappear when you muted the dialogue tracks to produce the M&E mix.
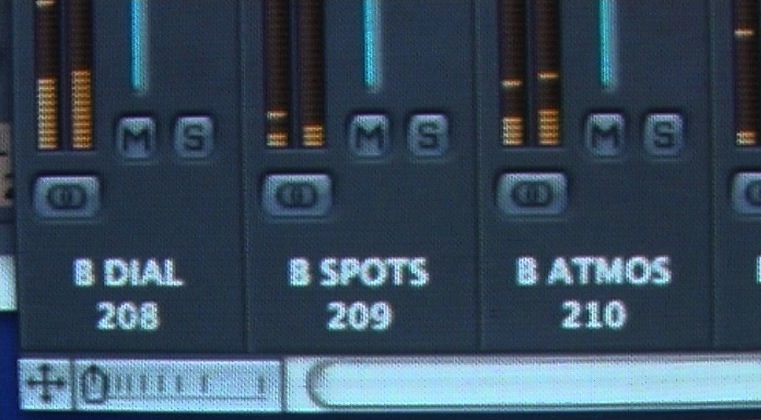
Some of the buses in the Logic mix of Soul Searcher
It’s always worth running off an M&E version when mixing a feature, whatever you feel its chances of achieving distribution are. Trying to create an M&E track after the fact, when the mixer has moved on to other projects, the source files may no longer exist, etc, etc, is likely to be a real headache. Instead, take five minutes in your mixing session to mute the dialogue tracks and bounce it out.
Along with the M&E mix, sales agents will require a dialogue list – essentially a transcription of the film, so it can be translated ready for dubbing or subtitling.
The following video compares some clips from Soul Searcher, showing the original English versions, followed by the M&E track, then the Japanese dub.
The Japanese distributors made a good job of dubbing Soul Searcher. As far as I can tell, the voice cast seem to give decent performances, and the mixer has blended everything carefully together. I wonder how much this dub cost them? Undoubtedly, factoring in the manufacturing and advertising costs, and the $24,750 they paid to Loose Cannon for the rights, they will have spent more on the film than my investors and I did in making it (£28,000).
If you want to know more about distribution contracts, check out my post on what to look for in one, and for the full story of Soul Searcher’s financing, expenditure, and distribution revenue, look no further than this exhaustive, no-holds-barred video…
Today I thought I’d share the process I figured out for creating looping menus in Encore for DVD and Blu-ray. If, like me, you want to do it all from scratch rather than using any of the built-in templates, the process isn’t particularly intuitive, and was sufficiently different from DVD Studio Pro (the software I’m used to) to leave me scratching my head from time to time, but here’s how I did it in the end. I’ll use Stop/Eject‘s main menu as the example. I’m going to assume you already know the basics of Encore and can find your way around Photoshop.
First of all you have to understand how DVDs and Blu-rays (henceforth collectively referred to simply as “discs”) work. They’re not like websites or Flash movies where you can do anything you want; the specifications are quite narrow. A motion menu consists of two elements:
The background, which is a video (typically with audio) that you can create in Final Cut Pro, Premiere, or whatever.
The button highlights, which show the user which button is currently selected. The user will only ever see one of these at a time.
Hang on – background, button hightlights…. but what about the buttons themselves? These have to be part of the background. Yes, you can import your background movie as a Quicktime into Encore and then add buttons to it within Encore, but when you come to build your disc the software will render those buttons into the background movie. All the disc player can deal with is a background movie and the highlights.
I prefer to build my buttons into the background movie in my editing software (Final Cut) rather than add them in Encore, and that’s the approach I’ll outline here.
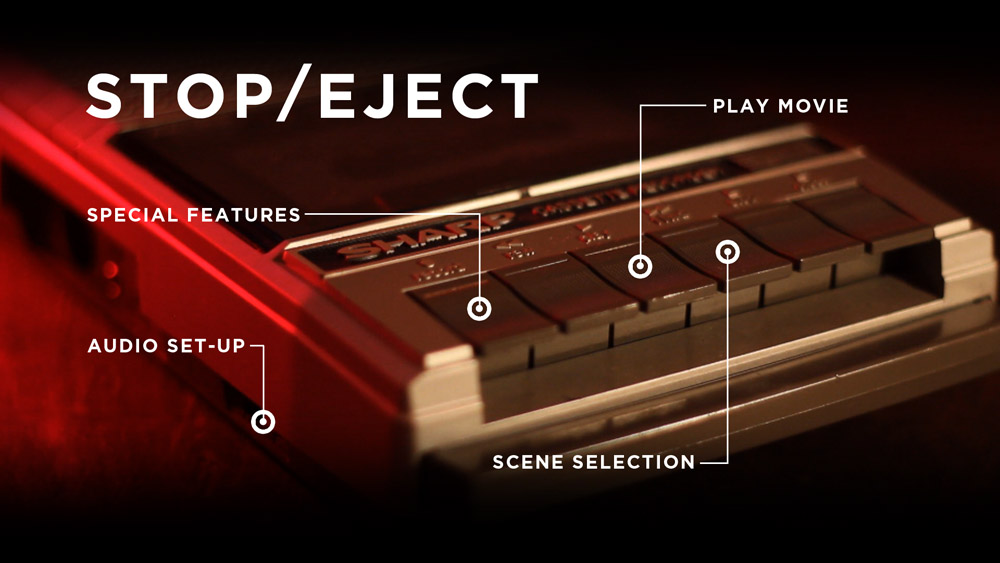
Another crucial point to understand is that each button highlight can only be one colour. So look at the Stop/Eject main menu below. The button highlights are the white rings. They could not be red-and-white striped rings, like life preservers; they can only be one solid colour.
Stop/Eject’s main menu with all the button highlights visible
So, now you appreciate all of the above you can get started on your menu. The first step for me was shooting and editing the background movie, although for most people this will be a computer-generated graphic rather than something shot with a camera. It’s important to think about where your loop point is going to be so that the menu will loop smoothly.
The following video shows my edited background movie. The buttons were created in Photoshop and added to the movie in Final Cut, before exporting as a ProRes Quicktime (with these buttons now baked in) ready to be imported into Encore.
In Encore I can now create a new menu and use the pick-whip in the properties panel to select my Quicktime file as the source for both the video and the audio. I can also set the loop point in the same panel.
I need to make sure that the loop point is at a place in the video where the audio track is silent or at least is playing a constant background noise – e.g. an air conditioning hum – that will not jump unpleasantly when the menu loops. You’ll notice that my menu’s audio track has a beat or two of silence around the loop point. If you’re using music, don’t start it immediately at the loop point as many players take a fraction of a second to kick in the audio after they loop.
I also need to ensure that all of the buttons have appeared before the loop point. This is because the loop point is the place at which the player will start displaying the button highlight. If your menu loops back to a point before the buttons have appeared, the user will momentarily see the highlight without the corresponding button.
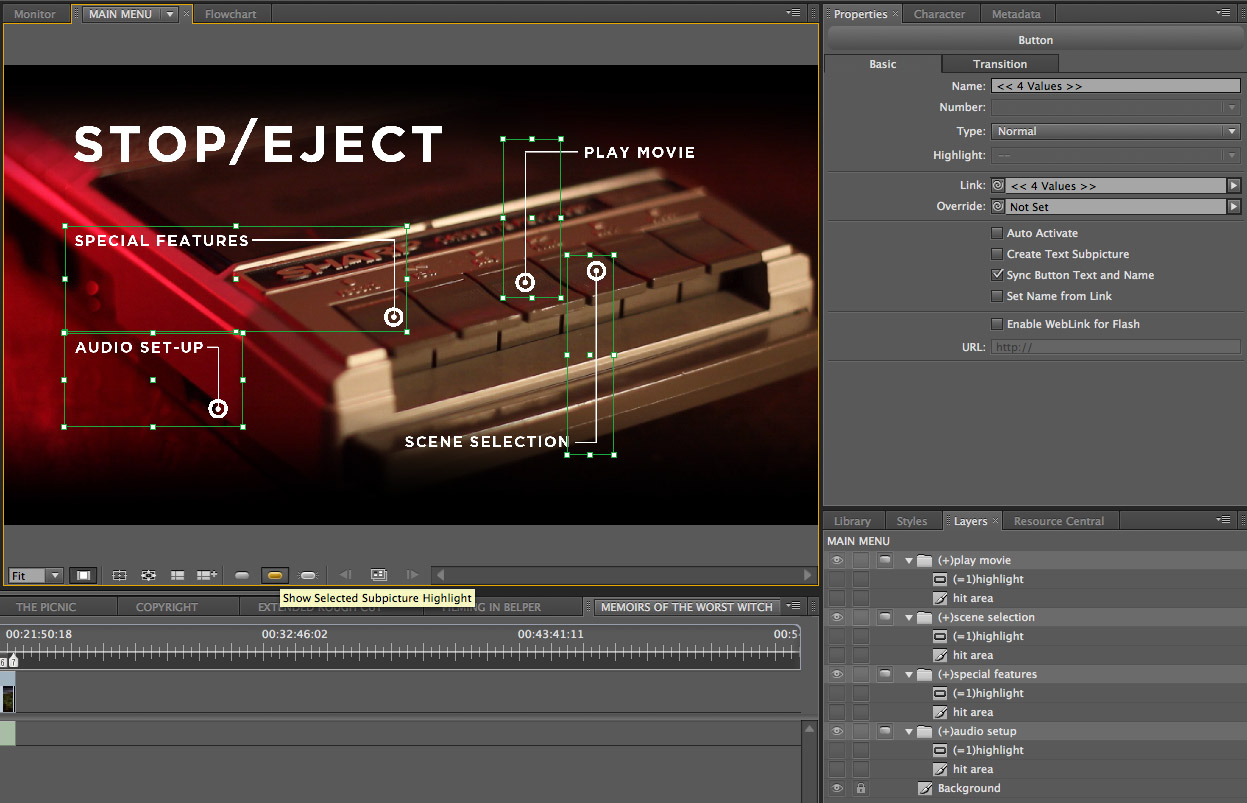
To create the button highlights, right-click (or ctrl-click if you’re using a single button mouse) on the menu and choose “edit menu in Photoshop” from the contextual menu. Photoshop will open with a still of your menu as it appears at the loop point. Annoyingly, this still will be in standard definition even if you’re creating a Blu-ray disc, so the first thing you’ll need to do in Photoshop is to change the pixel aspect ratio to square and re-size the image to 1920×1080.
For each button, create a new group in the layers palette and give it a name that starts with (+). When you go back to Encore it will recognise this folder as pertaining to a button. Within the group, make a new layer and call it (=1)highlight. Draw your button highlight on this layer, remembering that it can only be one colour.
Now we need to pause a moment and consider hit areas. When your disc is played in a computer, the user can select buttons with the mouse. The hit area determines what part of the screen the user must hover the mouse pointer over for the button to be considered selected. This area MUST be rectangular. For each button, Encore will look at all the layers within the relevant group and draw the smallest possible rectangle that will completely enclose all those layers; that will be your button’s hit area.
In my case, right now the only layers in my groups are the white rings which are the button highlights themselves. But what if someone hovers the mouse over the words “special features”? I want the button to be selected then too, so in the (+)special features group I’ll create a second layer (critically, it must be below the highlight layer) and draw a rectangle where I want my hit area to be. I can then click the eye icon next to this in the layer palette so it becomes invisible and doesn’t ruin the look of my menu.
The main menu with the hit areas visible
Another restriction of the DVD/Blu-ray specs is that button hit areas can’t overlap. Given the restriction I mentioned earlier, that they must be rectangular, you can see from the layout of my menu that it isn’t possible for the hit areas of Play Movie and Scene Selection to include the text for those buttons without overlapping each other. I choose not to compromise the design of the menu and trust that users will soon find the hit area with a quick sweep of the mouse over the whole image.
I save the image in Photoshop and return to Encore. I can now see the button hit areas outlined on the menu. If I click the icon for “show selected subpicture highlights” (see below image) I can see the highlights too. It’s now simply a case of setting the target for each button using the pick-whip in the properties panel.
The Encore interface with the button to view the highlights hovered over
When users return to the main menu, after they’ve visited the special features menu, for example, I don’t want them to have to sit through the intro part of the menu again; I want them to go straight to the loop point. So I’ll go to the main menu button in the special features menu and set the target – not using the pick-whip, but through the pull-down menu. I’ll select “specifiy link” and in the dialogue box which appears I make sure to tick the “set to loop point” checkbox.
One final point. The version of Encore I used (CS5.1) has a bug whereby any motion menu longer than 70 seconds will not loop smoothly; a second or so of black will appear each time the player gets to the end of the loop. This issue does not occur in Encore’s preview, only when you’ve burnt the disc. There’s no workaround that I can find other than shortening the menu.
I hope this has been some help to those of you out there who are still burning your films onto physical discs. Let me know if you’d like to hear more about any part of the disc authoring process.
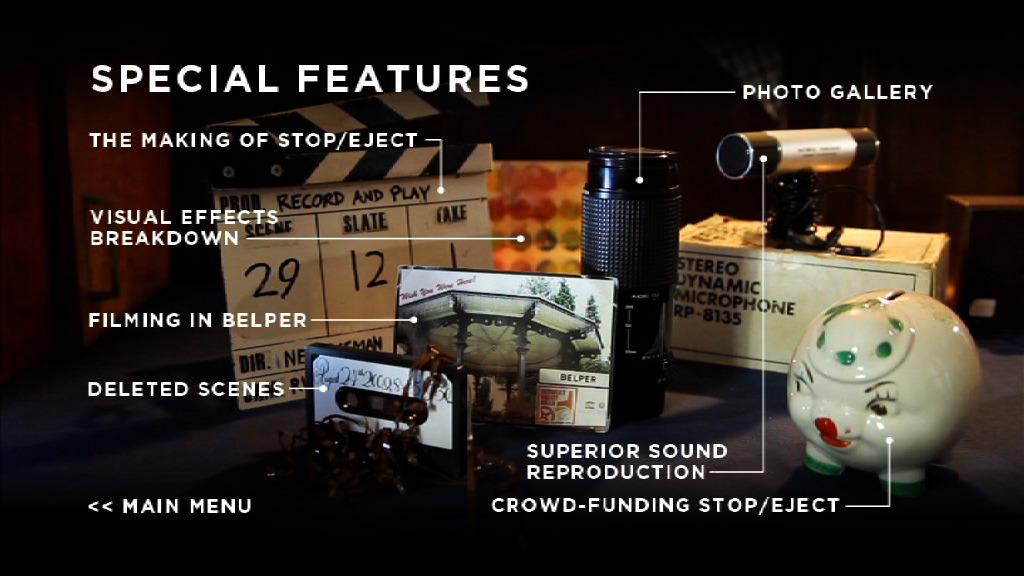
I can at last reveal the full list of bonus features that will grace the DVD and Blu-ray editions of Stop/Eject. Please note these discs are for sponsors, cast and crew only. It is likely to be 18 months or so before the film is available to the general public, other than at festivals.
DVD Special Features menu
DVD edition
The film with Dolby Digital 5.1 surround sound (17 mins)
Cast commentary with Georgina Sherrington (Kate), Oliver Park (Dan) and Therese Collins (Alice)
Filmmakers commentary with producer Sophie Black and the director, Yours Truly
Record & Play: The Making of Stop/Eject – brand new behind-the-scenes documentary featuring interviews with all the cast and crew (30 mins)
Crowd-funding Stop/Eject – Sophie and I relate the ups and downs of financing the film, the many ways we promoted the campaign and the lessons we learnt from it all. (10 mins)
Filming in Belper – visual essay by Sophie about Stop/Eject’s north Derbyshire locations, featuring clips from other independent productions shot in the town and interviews with Stop/Eject’s cast (5 mins)
Superior Sound Reproduction – a unique look at the little-understood area of postproduction sound, from Additional Dialogue Recording (ADR) through sound effects and music to the final mix, featuring interviews with re-recording mixer Jose Pereira, sound designer Henning Knoepfel, composer Scott Benzie, Georgina Sherrington and Oliver Park (10 mins)
Deleted scenes (5 mins)
Visual effects breakdown – revealing the layers of work that went into Stop/Eject’s visual effects shots (3 mins)
Photo gallery
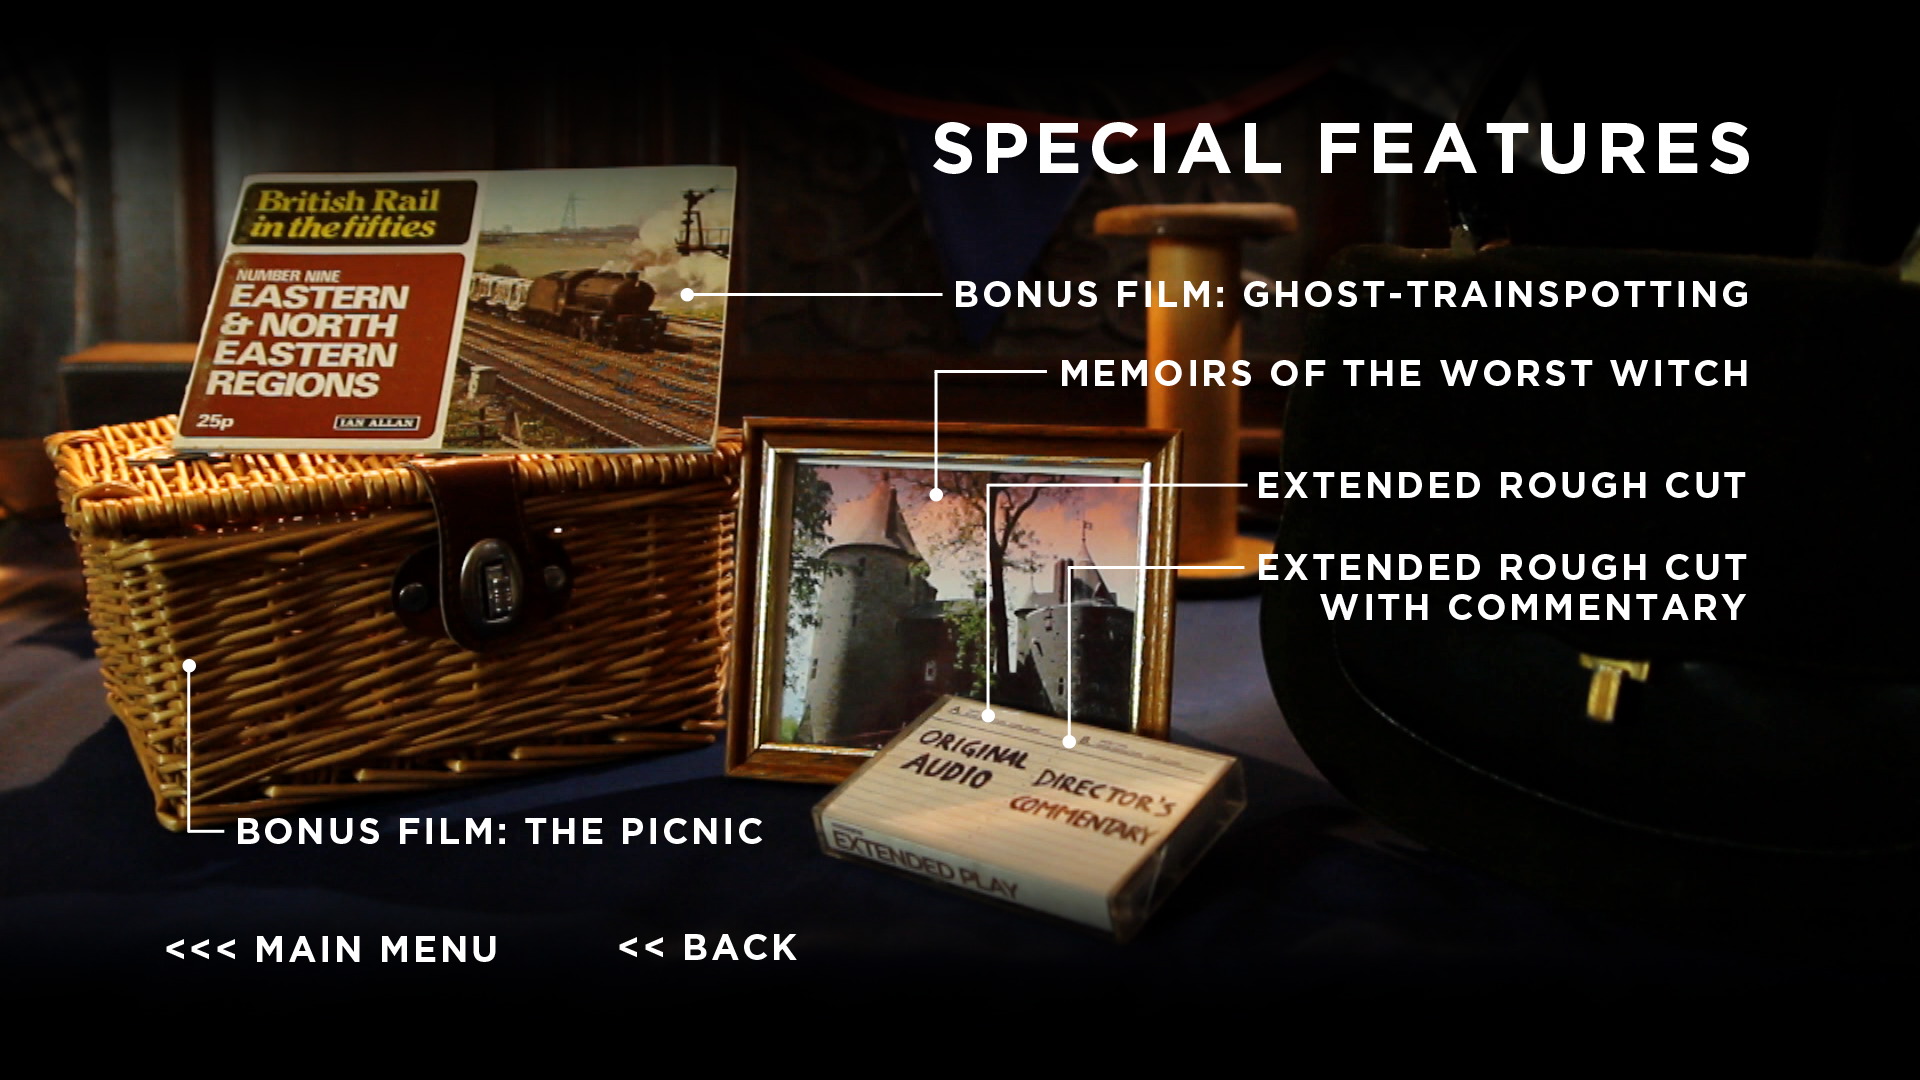
Blu-ray Special Features menu page 2
Blu-ray edition
All of the DVD features except for the deleted scenes
Extended rough cut with optional director’s commentary – an early edit of the film containing dialogue, moments and entire scenes excised from the final version (22 mins)
Memoirs of the Worst Witch – exclusive interview with Georgina Sherrington, looking back on her time playing Mildred Hubble in the popular ITV series (20 mins)
Bonus film: The Picnic – starring Therese Collins. When a gentleman arrives for a romantic picnic with his girlfriend, he is enraged to find her in the arms of another man. (2 mins)
Bonus film: Ghost-trainspotting – Norman sets out to spot the fabled Flying Welshman, the spectre of an ill-fated steam train. (2 mins)
It would be nice to be able to hand out DVDs and Blu-rays to the cast, crew and sponsors at the premiere of Stop/Eject. That means finishing the discs pretty sharpish after the movie is done. I’ve been working on the discs on and off for a while, and yesterday I shot the menus. Yes, you read that right. I shot the menus.
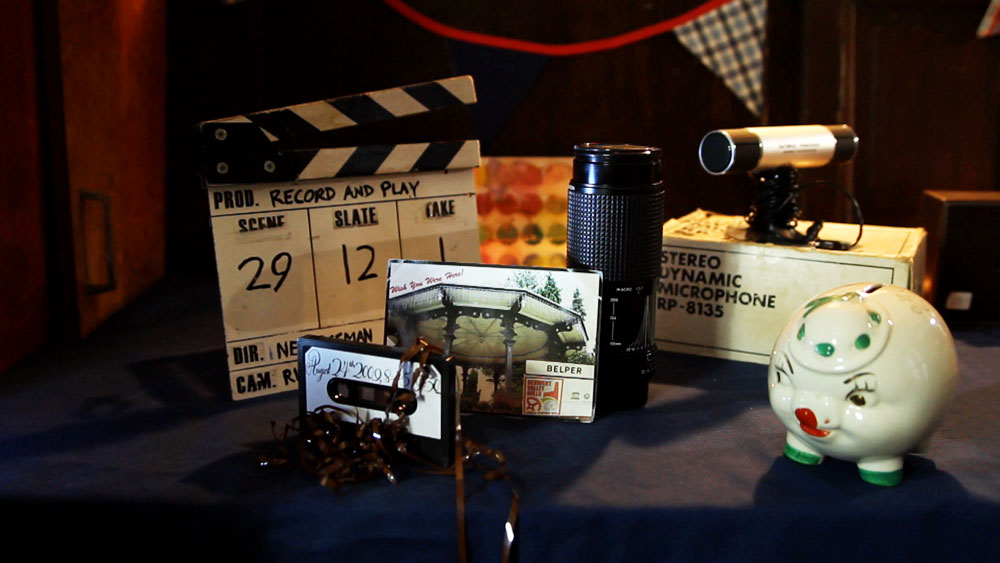
I feel that DVD/BR menus should be an extension of the world of the movie, and I figure: what better way to do that than to use footage from the film combined with new shots that appear to be in the same locations? So, for example, the Special Features menu is a shelf in the charity shop, where each item of junk represents one of the special features. Some of these were found in real charity shops, some of them were made by Sophie, and others were borrowed from friends (thanks to Colin, and Joel at the Rural Media Company). Before long I hope to officially announce the DVD and Blu-ray bonus features, but for now I’ll leave you to guess what each item might represent.
Special Features part 1Special Features part 2 (Blu-ray only)
Here are some more disjointed updates from the post-production of Stop/Eject:
Scott Benzie has written all of the score now. A few cues just need tweaking before we start to think about the logistics of recording it with live players.
The ADR session has been organised for next week. Standing variously for Automated Dialogue Replacement or Additional Dialogue Recording, ADR is the process of dubbing lines because of intrusive background noise or to adjust a performance, or even to add entirely new lines to clarify story points. This will be the first time the principal cast have been reunited since the shoot almost a year ago, and we’ll be taking the opportunity to record some extra bits and pieces for podcasts, DVD extras and sponsor rewards. Lots more news on that to come in the near future.
A VFX shot in progress by Mary Lapena
Work is well underway on visual effects. As expected, there has been a certain amount of attrition amongst the VFX artists, as paying projects understandably take priority. Nonetheless, several key shots involving frozen time and cloned cassette tapes are finished or nearly finished.
Two of the main extra features for the DVD and Bluray are near completion, with work on the menus underway and some commentaries to record in the coming weeks. Sophie Black and Chris Newman will soon be shooting another featurette in their part of the world, along with a last couple of pick-ups for Stop/Eject itself.
Last month the lastest Eric Bana movie, Deadfall, was released in US cinemas. The unusual thing is that it had already been out for a month on demand. This is one of the first examples of yet another massive shift that’s occurring in the film industry.
For the first few decades of its life, cinema was unique. Then television came along. The film industry responded by introducing colour and widescreen aspect ratios to the cinema. TV eventually caught up with both of these developments. As we approached and entered the new millennium our home entertainment options were expanding exponentially. TVs are now huge, 5.1 surround sound systems are highly affordable; you can even watch 3D at home if you want.
So why go to the cinema?
Until recently, the answer was “because you have to if you don’t want to wait months for the DVD release”. This is known as the theatrical window, the time within which a film must be exclusive to cinemas, before it becomes available in other media. Many claim this system fosters piracy. After all, if you could buy or watch a film on demand for a reasonable price as soon as it’s first released, why would you pirate it?
Many others claim that without this system, cinemas would go bust. I suspect this may be true.
I will be interested to see what happens as more and films follow Deadfall’s example. Clearly the aim is to create word of mouth with the on-demand release, building the film up to the point where people will be desperate to see it on the big screen. Sorry, I mean the slightly-bigger-than-the-screen-you-have-at-home screen.
35mm projectors – a thing of the past.
Ask yourself this: what happened to phone boxes when the infinitely convenient and flexible mobile phone became affordable? The same fate, I fear, awaits cinemas.
Because we can all have cinemas in our homes now. If we want to ban popcorn from our living rooms and pause the film whenever some weak-bladdered buffoon has to get up, we can. Or (and I’ll never, ever understand this behaviour) if we want to make phone calls and chat to our mates all through the movie, we can do that too without spoiling anyone else’s enjoyment.
The only possible reason to go to the cinema is to watch a movie on 35mm film….. Oh no, hang on… You can’t do that any more either.
Right, I’m off out to see Les Miserables. At the cinema. While I still can. If I could watch it on demand, would I? Given that it’s f**king cold outside and Hereford Odeon only seems to project digitally now, yes, I’d probably stay home and watch it on demand. A sobering thought.
Terminator 2 boasts some of the most comprehensive DVD extras ever
If your new year’s resolution is to get out and make a film, perhaps you need a bit of inspiration to get you going. For the past decade, one of my biggest sources of both inspiration and knowledge of the craft has been DVD extras. The days of DVDs may be numbered, but that does mean you can pick them up cheaply, so there’s no excuse. Here’s my run-down of the most interesting extras out there.
General
Without doubt the most comprehensive set of extras I’ve ever seen is that on TERMINATOR 2: JUDGMENT DAY. Although a lot of it is text, it leaves absolutely no stone unturned, covering every part of the process from scripting and scheduling through to marketing, release prints, telecine and foreign dubbing. It also breaks down every single VFX shot and special make-up gag in the movie.
PIRATES OF THE CARIBBEAN: DEAD MAN’S CHEST includes a fascinating feature-length documentary following the huge cast and crew as they island-hop with ships full of equipment, building roads as they go to get to some of the remote locations, and weathering a storm that nearly destroys their picture boats. At one point an AD gives some staggering statistics about the shoot; you will not believe how many walkie talkies went missing during production.
The Tarantino-Rodriguez collaboration FROM DUSK TILL DAWN comes with an unusual feature-length doc called Full Tilt Boogie. Rather than dwelling on the action on set, director Sarah Kelly interviews many of the crew – right down to the PAs and runners – to get a unique set of perspectives on the production. Throw in a dispute with the union and the result is a much more revealing doc than we’ve come to expect.
Pre-production
LEMONY SNICKET’S A SERIES OF UNFORTUNATE EVENTS is a movie with a unique look, using traditional techniques like forced perspective and painted backdrops to create its fantasy world. A DVD documentary called A Woeful World explores the incredible artistry that went into this sorely underrated film.
Viewers of the FIGHT CLUB DVD get to come along on the tech scouts – detailed recces where the director tells his heads of department everything he’s going to need at that location so that all the logistical problems can be anticipated.
TITANIC’s four-disc release includes interesting featurettes on previz, the process of creating moving storyboards. Although previz is a CG thing these days, there is much to be learnt from the military precision with which James Cameron plans his deep dives to the shipwreck using miniatures.
Production
For an unedited, fly-on-the-wall view of a small portion of a shooting day on a Hollywood movie (albeit one shot in New Zealand), Peter Jackson’s THE FRIGHTENERS is the place to go.
MISSION: IMPOSSIBLE 2 has a good set of featurettes on the film’s varied stunt sequences, including one which reveals the terrifying way the knife-coming-towards-Tom-Cruise’s-eye shot was achieved.
If cinematography’s your thing, you could do worse than listen to DP John Schwartzman’s commentary track on ARMAGEDDON, where you can learn how to shoot under UV tubes, how to light half a desert and how to make Liv Tyler look her best when she’s on her period.
For a fascinating look at the construction and on-set operation of puppets and animatronics – from little chest-bursters to the huge alien queen – look no further than the ALIENS DVD.
Post-production
THE MATRIX: REVOLUTIONS’ DVD includes an interesting featurette on the specific use of miniatures for a crash shot in a film which mainly relied on CGI to create its illusions.
Staying with traditional FX, SUPERMAN: THE MOVIE includes a great documentary on how they made us believe a man could fly before the digital days with such classic techniques as front projection and optical compositing.
But if the digital era floats your boat, THE FELLOWSHIP OF THE RING has a nice featurette on digital colour timing (a very new process at the time). In general, THE LORD OF THE RINGS trilogy has a remarkable plethora of extras on all aspects of the blockbuster-making process.
Finally, I’m not sure any DVD extra has yet fully explored the world of post-production sound, but Sound & Music on the bonus disc of SPIDER-MAN 2 gives a nice glimpse. Legendary foley artist Gary Hecker takes us through some of the ingenious combinations of mundane items he used to make such sounds as Spidey’s shooting web and Doc Ock’s claws ripping open a bank vault.
Any good ones I’ve missed? Comment and let me know!


 I won my first DVD player in a trailer competition on a sort of YouTube forerunner site in December 2000. Over the next decade I was entertained and educated by many extras-packed Digital Versatile Discs. Now, of course, physical media is a thing of the past, but many of the anecdotes I heard in DVD commentaries have stuck in my mind. Some have even helped me on set when facing a new situation.

 Although the DVD menu lists it as a director’s commentary, Bryan Singer in fact pairs up with his DP Newton Thomas Sigel for this track. Sigel discusses the importance of building practicals into the sets to enhance realism and flexibility of shooting. He explains how he colour-coded certain scenes so that the audience would more readily understand where they were during the fast-paced action sequences; for example, the corridors of the Alkali Lake bunker were lit with a moss green.


 The departure of director David Fincher from Alien 3 – under a cloud of studio interference and re-edits – is an infamous part of movie lore. Less well known is that the director of photography changed a week into shooting, after original DP Jordan Cronenworth (of Blade Runner fame) fell ill. Alex Thompson stepped in, and his humble, soft-spoken observations are spliced with other crew and cast members to form the commentary track on the Alien Quadrilogy boxset version of this film. Throughout the track he explains how he created the cool, toppy look of the prison’s communal areas, the dark, shadowy environs of the basements, and the hot, hellish feel of the lead-works. There are some interesting remarks about practicals too, such as the deliberate use of mismatched, low-CRI fluorescent tubes to give the canteen a run-down look, and tips for creating convincing firelight flicker.