My new second online cinematography course, Cinematography for Drama, is now out on Udemy. The course explains the role of a DP on set, from collaborating with the director in blocking the cast and choosing the camera angles, to lighting the scene with depth and mood.
Across the four modules of the course, I set up and shoot scenes in common contemporary locations: domestic banter in a sunny kitchen, a monologue in a dark bedroom, an awkward first date in a restaurant, and a walk-and-talk in an outdoor bar. Watch me try out different blocking and camera angles to get the most depth and interest in the frame, create movement using a slider and a gimbal, and work out the coverage needed to complete the scene. Then learn the secrets of cinematic lighting as I set up LED, tungsten and practical lights to create a look. Witness the camera rehearsals through to the final take, then sit back and watch the final edited scene. Every step of the way, I explain what I’m doing and why, as well as the alternatives you could consider for your own films.
This is a follow-up to my best-selling Udemy course Cinematic Lighting, which has over 3,600 students and a star rating of 4.5 out of 5. Here is some student feedback:
“Excellent. Informative and enjoyable to watch.” – 5 stars – David C.
“Thank you to Neil and his team for a fantastic course that gives a real insight into the thought process of a cinematographer.” – 5 stars – Dan B.
“Some great tips in this. Really enjoyed watching the decisions being made as and when the scenario is actually being lit, some good workarounds and nice in depth descriptions to why he’s doing what he is. Genuinely feels like your taking in some advice on set! Well worth taking the time to do this!” – 5 stars – Ed L.
You can get the new course for a special low price by using the code IREADTHEBLOG before April 2nd.
My online course, Cinematic Lighting, is available now on Udemy. It’s an advanced and in-depth guide to arguably the most important part of a director of photography’s job: designing the illumination.
The course is aimed at cinematography students, camera operators looking to move up to DP, corporate/industrial filmmakers looking to move into drama, and indie filmmakers looking to increase their production values.
Rather than demonstrating techniques in isolation in a studio, the course takes place entirely on location. The intent is to show the realities of creating beautiful lighting while dealing with the usual challenges of real independent film production, like time, weather and equipment, as well as meeting the requirements of the script.
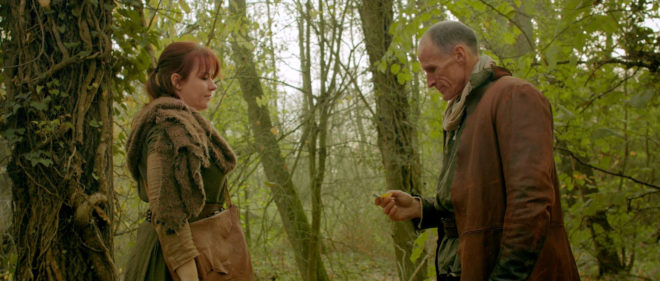
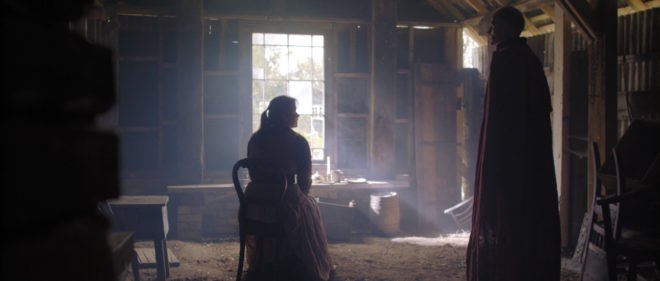
Cinematic Lighting consists of four hour-long modules: Day Exterior, Day Interior, Night Interior and Night Exterior. Each module follows the blocking, lighting and shooting of a short scripted scene (inspired by the fantasy web series Ren: The Girl with the Mark) with two actors in full costume. Watch me and my team set up all the fixtures, control the light with flags and rags, and make adjustments when the camera moves around for the coverage. Every step of the way, I explain what I’m doing and why, as well as the alternatives you could consider for your own films. Each module concludes with the final edited scene so that you can see the end result.
Students should already have a grasp of basic cinematography concepts like white balance and depth of field. A familiarity with the principle of three-point lighting will be useful, but not essential.
You will learn:
how to create depth and contrast in your shots;
how to light for both the master shot and the coverage;
how and when to use HMI, fluorescent, LED and traditional tungsten lighting;
how to use natural light to your advantage, and how to mould it;
how to use a light meter and false colours to correctly expose your image;
how to use smoke or haze to create atmosphere, and
how to simulate sunlight, moonlight and firelight.
Learn how to block your scene to make the most of the natural light, and how to modify that light with flags, bounce and diffusion, as well as how to expose your image correctly.
1.1 Principles & Prep
What to look for on a recce/scout
How to predict the sun path using apps or a compass
How to block action relative to the sun
Three-point lighting
The importance of depth in cinematography
When to shoot in cross-light vs. backlight
How to get rippling reflections off water
1.2 Blocking for Success
Observing a rehearsal with actors Kate and Ivan
What to look for in the blocking
How to get reflections off a blade
When to shoot the master shot
How to choose what order to shoot your coverage in
Using a white poly/bead-board as bounce
1.3 Exposure
Why light meters are still important
Dynamic range and log recording
How to use an incident meter and a spot reflectance meter
The f-stop series
How to use false colours
How to arrive at the right exposure from all this information
How to select the appropriate ND (neutral density) filter
Shooting the wide shot
1.4 Shaping the Singles
Short- and broad-key lighting
Types of reflector
Positioning a reflector
Paying attention to eye reflections
Negative fill
How to use 4×4 floppy flags
Shooting Ivan’s close-up
Using a trace frame
“Health bounce”
Shooting Kate’s close-up
Summary
The final edited scene
MODULE 2: DAY INTERIOR
This module introduces some common lighting instruments, demonstrates how to imitate natural light entering a room, and how to create depth and contrast with black-out and smoke.
2.1 Scouting & Equipment
Identifying light sources in the room
Using apps or a compass to predict how sun will enter through the windows
The principle of dark-to-light depth
Using curtains to modify interior light
Introduction to some common lighting instruments: Dedolights, Kino Flos, an HMI and a Rayzr MC LED panel
2.2 Lighting through a Window
Observing the blocking with actors Kate and Ivan
Direct lighting using an HMI
Controlling contrast with black-out
Diffusing the light with a trace frame
Bouncing the light off poly/bead-board
Bouncing the light off parts of the set
Use of a light meter and false colours to set the correct exposure
2.3 Atmosphere
Use of smoke or haze to add atmosphere to the scene
Reasons to add atmosphere
The concept of aerial perspective
Shooting the master shot
Comparison of the final shot to the other versions demonstrated in 2.2 and 2.3
2.4 Lighting the Reverse
Use of viewfinder apps to find a frame and select a lens
Challenges of front-light
Adjusting the window light to highlight certain areas
Demonstrating a “window wrap” using a Kino Flo
Using light readings and ND filters to arrive at the correct exposure
Shooting the reverse
Summary
The final edited scene
MODULE 3: NIGHT INTERIOR
Create a moody night-time look indoors using practical sources, toplight, and simulated moonlight and firelight.
3.1 Internal vs. External Light
Observing the blocking with actors Kate and Ivan
Approaches to lighting a night interior scene
Lighting from outside with an HMI “moon”
Working with bounced “moonlight” inside the room
Choosing an overhead source as the key light
3.2 Working with Toplight
Time and safety considerations of working with top-light
Rigging a top-light safely
Controlling top-light spill on the set walls
Using unbleached muslin to soften and warm up the light
The inverse square law
3.3 Firelight & Moonlight
Working with practical candles
Reinforcing candles with a hidden LED fixture
Simulating an off-camera fireplace
Lighting the view outside the window
Bringing moonlight into the room to add colour contrast and depth
Shooting the master shot
3.4 Tweaking for the Coverage
Checking the blocking for the first single
Filling in shadows using additional unbleached muslin
Flagging the top-light to control the background
Adjusting the external light to maintain colour contrast
Shooting Kate’s single
Adjusting the fireplace effect to work for a close-up
Shooting Ivan’s single
Summary
The final edited scene
MODULE 4: NIGHT EXTERIOR
Paint with light on the blank canvas of night; set up an artificial moon; create depth, contrast and colour contrast; and use shadows to your advantage.
4.1 Setting the Moon
Observing the blocking with actors Kate and Ivan
Principles of night exterior lighting
Creating believable moonlight
Features of HMI lighting
Choosing a position and height for the HMI “moon”
4.2 Finessing the Master
Use of a practical fire source
Reinforcing a practical fire with an LED fixture
Colour contrast
Using a Kino Flo as an additional soft source
Tackling a difficult shadow
Reading and adjusting lighting ratios using an incident meter
Working with smoke/atmos outdoors
Shooting the master shot
4.3 Shooting the Singles
Adjusting the existing sources to work for a close-up
Browsing in Waterstones not long ago, I came across the third edition of this hefty tome. Although it is clearly aimed primarily at the student market, a flick through convinced me that amongst the egg-sucking tutorials there was enough detail to make it a worthwhile reference book for grandma’s shelf.
The front cover proclaims the book to be “for cinematographer & directors”. The first five chapters are certainly applicable to directors, covering the visual language of cinematography, the metaphors of lighting and composition that help tell the story, the classifications of the various shot types, shooting to edit, and such core concepts as the line of action. Any director willing to read the remaining thirteen chapters, however, should really learn to delegate the techie stuff and go read something like An Actor Prepares instead.
These thirteen chapters cover in detail the topics of colour, exposure, digital sensors, dynamic range, colour space, image control, lighting, lenses, camera movement, on-set procedures and data management. As a devotee of the art of lighting, I was disappointed that this huge part of the DP’s role gets only two chapters. Perhaps this is because Brown has written a separate book devoted to illumination, though he has also written a book on digital imaging and that doesn’t stop him devoting multiple chapters in Cinematography: Theory & Practice to this subject.
Some of you may wonder why, in this age when you can google any topic of which your knowledge is lacking, you would buy a book. Firstly, finding something in the index of a book which you know you can trust can still be quicker and more effective than wading through search engine results. (I’ve already grabbed my copy off the shelf once to check the sensor size comparison chart.) Secondly, if you read the book cover to cover, amongst all the things you expected to learn, there will be unexpected nuggets of knowledge which a google search might never have led you to.
Perhaps the most interesting chapter for me was the one called “Cameras & Sensors”. It taught me loads about how digital sensors capture images, and how they are processed by the camera. And the chapter on “Linear, Gamma, Log” transformed my previously-hazy understanding of log-C into something much more concrete. The chapter on “Measurement” laid out some interesting pros and cons of waveform monitors, histograms, false colours and light meters, explaining how each has its place in choosing exposure.
Cinematography: Theory & Practice is generally well-written and laid out, but sometimes topics creep up in places that don’t quite make sense. It seems illogical, for example, that the chapter on lenses should come much later on than the one on cameras and sensors. Following the light path would have made much more sense to me. Also the proof-reader seems to have fallen asleep for a while, because there are a couple of chapters in the middle sprinkled with typos and minor errors.
If there is a fourth edition, I would like to see the lighting sections expanded, and some more nitty-gritty about how lenses work (Filmmaker IQ’s video on this topic is hard to beat).
These niggles aside, Brown has produced a very solid reference work. While reading it, I’ve been continually impressed by the depth and breadth of the author’s knowledge – or perhaps the quality of his research. There is apparently a companion website containing useful videos, but I was unable to get past the splash page (possibly because I’m some kind of bibliophile Luddite).
For any student of cinematography, this book will provide an excellent grounding. As for working DPs, I would challenge any of them to read the book without learning at least something new. Maybe you won’t read it cover to cover, but I’d be surprised if you couldn’t find a few chapters that could helpfully plug some gaps in your knowledge.
Me (far right) with the cast and crew of Traction in December 1999
Fifteen years ago I made my first professional film, Traction. Okay, it wasn’t professional in the strictest sense – I wasn’t paid – but I racked up a number of important firsts on the project and learnt a lot. Based on a true story, it’s about a teenaged boy undergoing traction for his juvenile arthritis.
Today you can go out and make a film on your smartphone and reach an instant audience via YouTube, which is great, but you need to collaborate with others if your work is ever going to reach its full potential. Here’s how Traction challenged and improved me.
First time having a production company to answer to. Traction was produced by The Rural Media Company as part of its youth media programme, in which I was a participant. It was a completely new experience for me to have to submit a draft script and take on board the feedback of the company’s senior staff. I was probably resistant at first, but their advice was good. You’re not compromising your artistic vision by asking for and acting on feedback from others, you’re making it stronger. And when you work with a budget, you will always have to answer to the people supplying that budget, so get used to arguing your case and sometimes losing.
First time directing anyone other than my friends. I had to learn to be clearer and more communicative to get the best out of the other young people who were acting as my crew. They were all into the project far more than my corralled schoolfriends had ever been into my amateur films, which was great and really energising for me as a director.
First time directing anyone with acting experience. How to work with actors is something I’m still learning to this day, but the process started right there in 1999 when I ran my very first audition at Hereford College of Art and then directed Rowan Middleton for the two days of the shoot. It’s been said many times by many people, but don’t just cast your mates in your films. Unless your mates are really good actors and right for the parts. Obviously.
First time having to stick to a schedule. Although the only costs of Traction’s production were travel and catering expenses, and the youth worker’s fee, I still had a responsibility to ensure that Rural Media did not have to pay for more than the agreed two days’ worth of those costs. This forced me to be prepared, disciplined and ready to compromise when time ran short. Staying on schedule is always a challenge for a director, and the sooner you can start to learn this skill, the better.
First time shooting on digital video. Traction was a great opportunity for me to learn a new medium, having worked exclusively on the analogue Video-8 format up to that point. Most filmmakers own a camera, but have you considered hiring or borrowing a better model for your next project? Push yourself, learn to use a new bit of kit and raise your production values at the same time.
First time using lighting. Many new filmmakers are scared of lighting, and I probably was too before Traction. Don’t be afraid to experiment; it’s one of the best ways to learn.
First time having to use only copyright-cleared music. If you’re only posting your films on YouTube, you can get away with using copyrighted tracks and the system will just put an iTunes link under your video. But dipping into the vast catalogue of pre-existing music can make you lazy. Why not advertise for a composer – there are so many out there desperate to get a start in film scoring – and get some original music for your piece?
First time being limited to a final running time. Traction was made for a competition which had a strict five minute time limit. Nothing sharpens your editing skills more than a hard running time limit, and for that reason I’d recommend that every filmmaker try entering a competition at some point in their career.
If you’re a new filmmaker trying to raise your game, ask yourself if you’ve pushed in every direction you can to improve your work, or are you stuck in your comfort zone?
Left to right: sound recordist John Galloway, me, and actors Rowan Middleton and Rosie Laws
Robert Rodriguez famously said that all you need to do to be a filmmaker is get some business cards printed claiming that you are. Of course there’s more to it than that, so if you’ve just graduated from university or are otherwise starting out in the business, what can you do to get things going?
START MAKING FILMS. Almost everyone now owns a device that can record moving images. Use it. Your first films will be terrible but you’ll learn loads with each one you do.
OBSERVE OTHER FILMMAKERS. This is a crucial one that many people overlook. There’s only so much you can self-teach. You must get onto other people’s sets and see how they do it. The bigger the production the better. You want to learn from the people who are doing it properly, to the high standards of quality and discipline that the top end of the industry demands. In practice this means moving to London or a TV-making hub like Manchester or Cardiff and knocking on lots of doors.
MAKE SOME CORPORATE VIDEOS. Even if you have no interest in these, they bring some money in, help you hone your skills and most importantly the process of dealing with a client’s feedback and requirements will prepare you for producer/studio notes on proper films.
NETWORK. It’s not what you know, it’s who you know, so get to know as many people as you can. Go to events like the London Screenwriters Festival, Cannes, the BAFTA Filmmakers Market, Raindance evening classes. Stick around after the event proper is over and go for a drink with your fellow attendees. Shake lots of hands and give out lots of business cards. Follow up after the event (but don’t pester). Eventually you’ll strike gold when you contact someone at just the moment they have a position to fill.
BUILD A WEBSITE. This is very easy these days with the likes of Wix and WordPress. An online presence will make people take you more seriously, will make you easier to look up online, and can showcase your talents.
WORK SOCIAL MEDIA. The digital equivalent of point 5. When I’m looking for crew these days I’m more likely to do a Facebook shout-out than post on one of the official filmmaking networks. That said, you should still….
JOIN ONLINE FILMMAKING NETWORKS. Shooting People is £30 a year but Mandy and Talent Circle are free. Every day there are several new jobs posted on each one, so get applying.
CUT A GREAT SHOWREEL. Keep it short (3-5 minutes) and punchy. Link to it whenever you apply for a job and keep it on your mobile devices so you can show it at networking events to anyone who displays the slightest interest in you. A great showreel will stick in their mind much better than an eager face.
FIND AN AUDIENCE. This is the tricky one. Once you’ve reached a point where your films are good enough to show the big, wide world, you need to start getting them in front of eyeballs. This means either getting them into festivals, which is largely beyond your control, but still remains the most prestigious route, or posting them online and driving a huge amount of traffic to them (see 6 and 7 above). If you can connect with a significant audience base then congratulations, you’ve made it! Please write in and tell me how to do it.
Terminator 2 boasts some of the most comprehensive DVD extras ever
If your new year’s resolution is to get out and make a film, perhaps you need a bit of inspiration to get you going. For the past decade, one of my biggest sources of both inspiration and knowledge of the craft has been DVD extras. The days of DVDs may be numbered, but that does mean you can pick them up cheaply, so there’s no excuse. Here’s my run-down of the most interesting extras out there.
General
Without doubt the most comprehensive set of extras I’ve ever seen is that on TERMINATOR 2: JUDGMENT DAY. Although a lot of it is text, it leaves absolutely no stone unturned, covering every part of the process from scripting and scheduling through to marketing, release prints, telecine and foreign dubbing. It also breaks down every single VFX shot and special make-up gag in the movie.
PIRATES OF THE CARIBBEAN: DEAD MAN’S CHEST includes a fascinating feature-length documentary following the huge cast and crew as they island-hop with ships full of equipment, building roads as they go to get to some of the remote locations, and weathering a storm that nearly destroys their picture boats. At one point an AD gives some staggering statistics about the shoot; you will not believe how many walkie talkies went missing during production.
The Tarantino-Rodriguez collaboration FROM DUSK TILL DAWN comes with an unusual feature-length doc called Full Tilt Boogie. Rather than dwelling on the action on set, director Sarah Kelly interviews many of the crew – right down to the PAs and runners – to get a unique set of perspectives on the production. Throw in a dispute with the union and the result is a much more revealing doc than we’ve come to expect.
Pre-production
LEMONY SNICKET’S A SERIES OF UNFORTUNATE EVENTS is a movie with a unique look, using traditional techniques like forced perspective and painted backdrops to create its fantasy world. A DVD documentary called A Woeful World explores the incredible artistry that went into this sorely underrated film.
Viewers of the FIGHT CLUB DVD get to come along on the tech scouts – detailed recces where the director tells his heads of department everything he’s going to need at that location so that all the logistical problems can be anticipated.
TITANIC’s four-disc release includes interesting featurettes on previz, the process of creating moving storyboards. Although previz is a CG thing these days, there is much to be learnt from the military precision with which James Cameron plans his deep dives to the shipwreck using miniatures.
Production
For an unedited, fly-on-the-wall view of a small portion of a shooting day on a Hollywood movie (albeit one shot in New Zealand), Peter Jackson’s THE FRIGHTENERS is the place to go.
MISSION: IMPOSSIBLE 2 has a good set of featurettes on the film’s varied stunt sequences, including one which reveals the terrifying way the knife-coming-towards-Tom-Cruise’s-eye shot was achieved.
If cinematography’s your thing, you could do worse than listen to DP John Schwartzman’s commentary track on ARMAGEDDON, where you can learn how to shoot under UV tubes, how to light half a desert and how to make Liv Tyler look her best when she’s on her period.
For a fascinating look at the construction and on-set operation of puppets and animatronics – from little chest-bursters to the huge alien queen – look no further than the ALIENS DVD.
Post-production
THE MATRIX: REVOLUTIONS’ DVD includes an interesting featurette on the specific use of miniatures for a crash shot in a film which mainly relied on CGI to create its illusions.
Staying with traditional FX, SUPERMAN: THE MOVIE includes a great documentary on how they made us believe a man could fly before the digital days with such classic techniques as front projection and optical compositing.
But if the digital era floats your boat, THE FELLOWSHIP OF THE RING has a nice featurette on digital colour timing (a very new process at the time). In general, THE LORD OF THE RINGS trilogy has a remarkable plethora of extras on all aspects of the blockbuster-making process.
Finally, I’m not sure any DVD extra has yet fully explored the world of post-production sound, but Sound & Music on the bonus disc of SPIDER-MAN 2 gives a nice glimpse. Legendary foley artist Gary Hecker takes us through some of the ingenious combinations of mundane items he used to make such sounds as Spidey’s shooting web and Doc Ock’s claws ripping open a bank vault.
Any good ones I’ve missed? Comment and let me know!

 Cinematic Lighting consists of four hour-long modules: Day Exterior, Day Interior, Night Interior and Night Exterior. Each module follows the blocking, lighting and shooting of a short scripted scene (inspired by the fantasy web series