My online course, Cinematic Lighting, is available now on Udemy. It’s an advanced and in-depth guide to arguably the most important part of a director of photography’s job: designing the illumination.
The course is aimed at cinematography students, camera operators looking to move up to DP, corporate/industrial filmmakers looking to move into drama, and indie filmmakers looking to increase their production values.
Rather than demonstrating techniques in isolation in a studio, the course takes place entirely on location. The intent is to show the realities of creating beautiful lighting while dealing with the usual challenges of real independent film production, like time, weather and equipment, as well as meeting the requirements of the script.
 Cinematic Lighting consists of four hour-long modules: Day Exterior, Day Interior, Night Interior and Night Exterior. Each module follows the blocking, lighting and shooting of a short scripted scene (inspired by the fantasy web series Ren: The Girl with the Mark) with two actors in full costume. Watch me and my team set up all the fixtures, control the light with flags and rags, and make adjustments when the camera moves around for the coverage. Every step of the way, I explain what I’m doing and why, as well as the alternatives you could consider for your own films. Each module concludes with the final edited scene so that you can see the end result.
Students should already have a grasp of basic cinematography concepts like white balance and depth of field. A familiarity with the principle of three-point lighting will be useful, but not essential.
You will learn:
- how to create depth and contrast in your shots;
- how to light for both the master shot and the coverage;
- how and when to use HMI, fluorescent, LED and traditional tungsten lighting;
- how to use natural light to your advantage, and how to mould it;
- how to use a light meter and false colours to correctly expose your image;
- how to use smoke or haze to create atmosphere, and
- how to simulate sunlight, moonlight and firelight.
Get lifetime access to Cinematic Lighting now.
Below is a full breakdown of the course content.
MODULE 1: DAY EXTERIOR
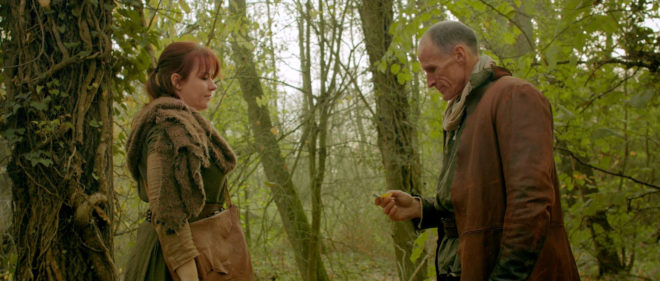
Learn how to block your scene to make the most of the natural light, and how to modify that light with flags, bounce and diffusion, as well as how to expose your image correctly.
1.1 Principles & Prep
- What to look for on a recce/scout
- How to predict the sun path using apps or a compass
- How to block action relative to the sun
- Three-point lighting
- The importance of depth in cinematography
- When to shoot in cross-light vs. backlight
- How to get rippling reflections off water
1.2 Blocking for Success
- Observing a rehearsal with actors Kate and Ivan
- What to look for in the blocking
- How to get reflections off a blade
- When to shoot the master shot
- How to choose what order to shoot your coverage in
- Using a white poly/bead-board as bounce
1.3 Exposure
- Why light meters are still important
- Dynamic range and log recording
- How to use an incident meter and a spot reflectance meter
- The f-stop series
- How to use false colours
- How to arrive at the right exposure from all this information
- How to select the appropriate ND (neutral density) filter
- Shooting the wide shot
1.4 Shaping the Singles
- Short- and broad-key lighting
- Types of reflector
- Positioning a reflector
- Paying attention to eye reflections
- Negative fill
- How to use 4×4 floppy flags
- Shooting Ivan’s close-up
- Using a trace frame
- “Health bounce”
- Shooting Kate’s close-up
- Summary
- The final edited scene
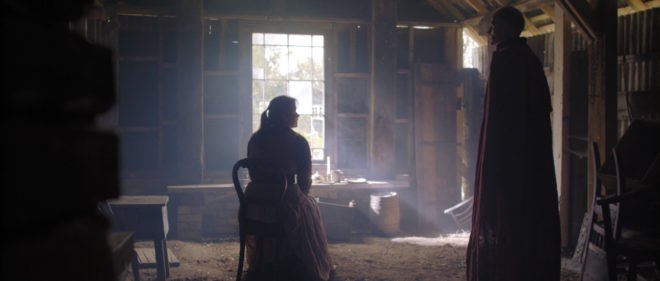
MODULE 2: DAY INTERIOR

This module introduces some common lighting instruments, demonstrates how to imitate natural light entering a room, and how to create depth and contrast with black-out and smoke.
2.1 Scouting & Equipment
- Identifying light sources in the room
- Using apps or a compass to predict how sun will enter through the windows
- The principle of dark-to-light depth
- Using curtains to modify interior light
- Introduction to some common lighting instruments: Dedolights, Kino Flos, an HMI and a Rayzr MC LED panel
2.2 Lighting through a Window
- Observing the blocking with actors Kate and Ivan
- Direct lighting using an HMI
- Controlling contrast with black-out
- Diffusing the light with a trace frame
- Bouncing the light off poly/bead-board
- Bouncing the light off parts of the set
- Use of a light meter and false colours to set the correct exposure
2.3 Atmosphere
- Use of smoke or haze to add atmosphere to the scene
- Reasons to add atmosphere
- The concept of aerial perspective
- Shooting the master shot
- Comparison of the final shot to the other versions demonstrated in 2.2 and 2.3
2.4 Lighting the Reverse
- Use of viewfinder apps to find a frame and select a lens
- Challenges of front-light
- Adjusting the window light to highlight certain areas
- Demonstrating a “window wrap” using a Kino Flo
- Using light readings and ND filters to arrive at the correct exposure
- Shooting the reverse
- Summary
- The final edited scene
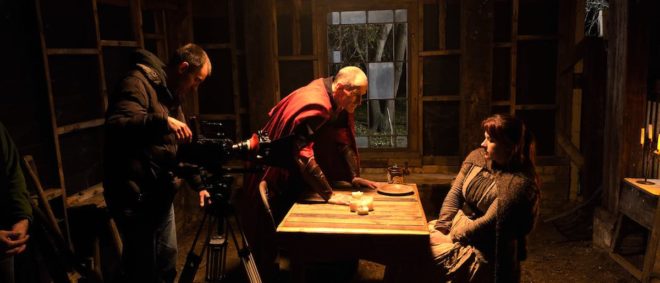
MODULE 3: NIGHT INTERIOR

Create a moody night-time look indoors using practical sources, toplight, and simulated moonlight and firelight.
3.1 Internal vs. External Light
- Observing the blocking with actors Kate and Ivan
- Approaches to lighting a night interior scene
- Lighting from outside with an HMI “moon”
- Working with bounced “moonlight” inside the room
- Choosing an overhead source as the key light
3.2 Working with Toplight
- Time and safety considerations of working with top-light
- Rigging a top-light safely
- Controlling top-light spill on the set walls
- Using unbleached muslin to soften and warm up the light
- The inverse square law
3.3 Firelight & Moonlight
- Working with practical candles
- Reinforcing candles with a hidden LED fixture
- Simulating an off-camera fireplace
- Lighting the view outside the window
- Bringing moonlight into the room to add colour contrast and depth
- Shooting the master shot
3.4 Tweaking for the Coverage
- Checking the blocking for the first single
- Filling in shadows using additional unbleached muslin
- Flagging the top-light to control the background
- Adjusting the external light to maintain colour contrast
- Shooting Kate’s single
- Adjusting the fireplace effect to work for a close-up
- Shooting Ivan’s single
- Summary
- The final edited scene
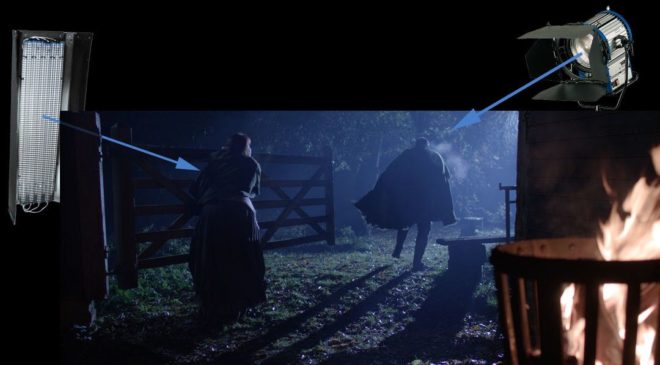
MODULE 4: NIGHT EXTERIOR

Paint with light on the blank canvas of night; set up an artificial moon; create depth, contrast and colour contrast; and use shadows to your advantage.
4.1 Setting the Moon
- Observing the blocking with actors Kate and Ivan
- Principles of night exterior lighting
- Creating believable moonlight
- Features of HMI lighting
- Choosing a position and height for the HMI “moon”
4.2 Finessing the Master
- Use of a practical fire source
- Reinforcing a practical fire with an LED fixture
- Colour contrast
- Using a Kino Flo as an additional soft source
- Tackling a difficult shadow
- Reading and adjusting lighting ratios using an incident meter
- Working with smoke/atmos outdoors
- Shooting the master shot
4.3 Shooting the Singles
- Adjusting the existing sources to work for a close-up
- Shooting Ivan’s single
- Diffusing the HMI
- Monitoring exposure using false colours
- Shooting Kate’s single
4.4 Lighting the Reverse
- The pros and cons of flipping the backlight
- Example of cheating the moonlight around
- Using established sources to your advantage
- Adding diffusion vs. a gobo to the HMI
- Creating a “branch-a-loris”
- Shooting the reverse
- Summary
- The final edited scene
APPENDICES
Useful links, a full kit list and a deleted scene
Get lifetime access to Cinematic Lighting now.