How to Create a Blu-ray Motion Menu in Adobe Encore

Today I thought I’d share the process I figured out for creating looping menus in Encore for DVD and Blu-ray. If, like me, you want to do it all from scratch rather than using any of the built-in templates, the process isn’t particularly intuitive, and was sufficiently different from DVD Studio Pro (the software I’m used to) to leave me scratching my head from time to time, but here’s how I did it in the end. I’ll use Stop/Eject‘s main menu as the example. I’m going to assume you already know the basics of Encore and can find your way around Photoshop.

First of all you have to understand how DVDs and Blu-rays (henceforth collectively referred to simply as “discs”) work. They’re not like websites or Flash movies where you can do anything you want; the specifications are quite narrow. A motion menu consists of two elements:

  1. The background, which is a video (typically with audio) that you can create in Final Cut Pro, Premiere, or whatever.
  2. The button highlights, which show the user which button is currently selected. The user will only ever see one of these at a time.

Hang on – background, button hightlights…. but what about the buttons themselves? These have to be part of the background. Yes, you can import your background movie as a Quicktime into Encore and then add buttons to it within Encore, but when you come to build your disc the software will render those buttons into the background movie. All the disc player can deal with is a background movie and the highlights.

I prefer to build my buttons into the background movie in my editing software (Final Cut) rather than add them in Encore, and that’s the approach I’ll outline here.

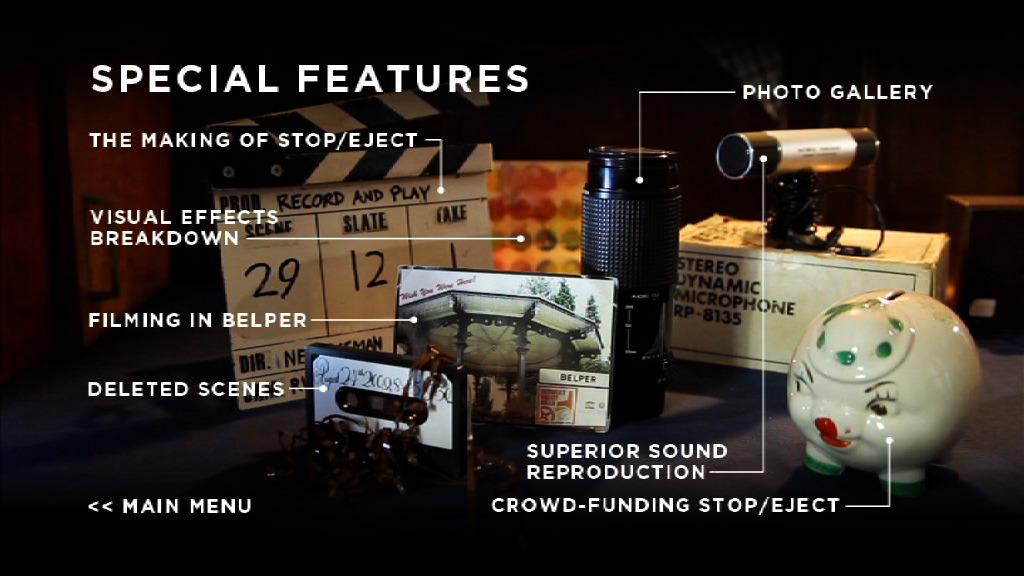
Another crucial point to understand is that each button highlight can only be one colour. So look at the Stop/Eject main menu below. The button highlights are the white rings. They could not be red-and-white striped rings, like life preservers; they can only be one solid colour.

Stop/Eject's main menu with all the button highlights visible
Stop/Eject’s main menu with all the button highlights visible

So, now you appreciate all of the above you can get started on your menu. The first step for me was shooting and editing the background movie, although for most people this will be a computer-generated graphic rather than something shot with a camera. It’s important to think about where your loop point is going to be so that the menu will loop smoothly.

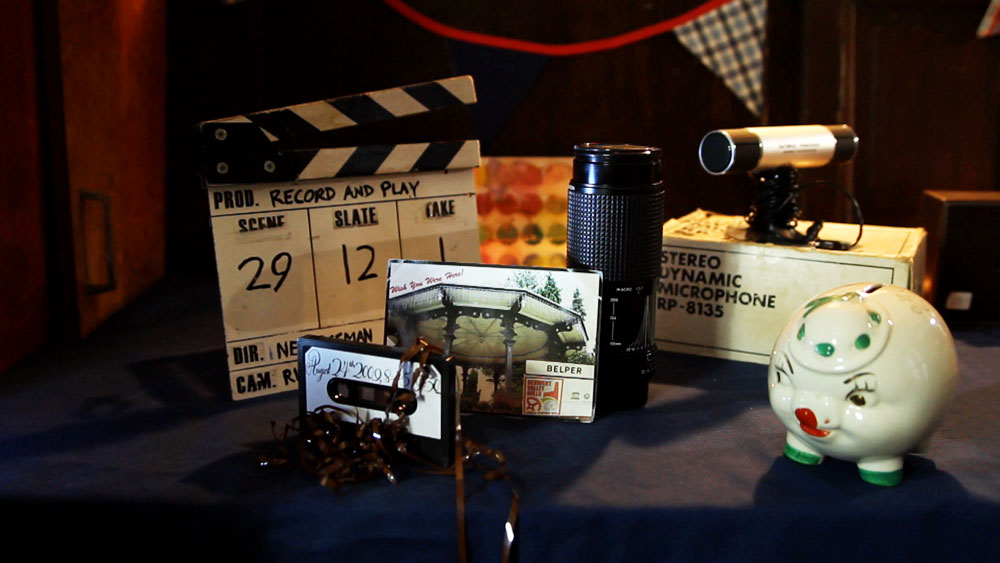
The following video shows my edited background movie. The buttons were created in Photoshop and added to the movie in Final Cut, before exporting as a ProRes Quicktime (with these buttons now baked in) ready to be imported into Encore.

In Encore I can now create a new menu and use the pick-whip in the properties panel to select my Quicktime file as the source for both the video and the audio. I can also set the loop point in the same panel.

I need to make sure that the loop point is at a place in the video where the audio track is silent or at least is playing a constant background noise – e.g. an air conditioning hum – that will not jump unpleasantly when the menu loops. You’ll notice that my menu’s audio track has a beat or two of silence around the loop point. If you’re using music, don’t start it immediately at the loop point as many players take a fraction of a second to kick in the audio after they loop.

I also need to ensure that all of the buttons have appeared before the loop point. This is because the loop point is the place at which the player will start displaying the button highlight. If your menu loops back to a point before the buttons have appeared, the user will momentarily see the highlight without the corresponding button.

To create the button highlights, right-click (or ctrl-click if you’re using a single button mouse) on the menu and choose “edit menu in Photoshop” from the contextual menu. Photoshop will open with a still of your menu as it appears at the loop point. Annoyingly, this still will be in standard definition even if you’re creating a Blu-ray disc, so the first thing you’ll need to do in Photoshop is to change the pixel aspect ratio to square and re-size the image to 1920×1080.

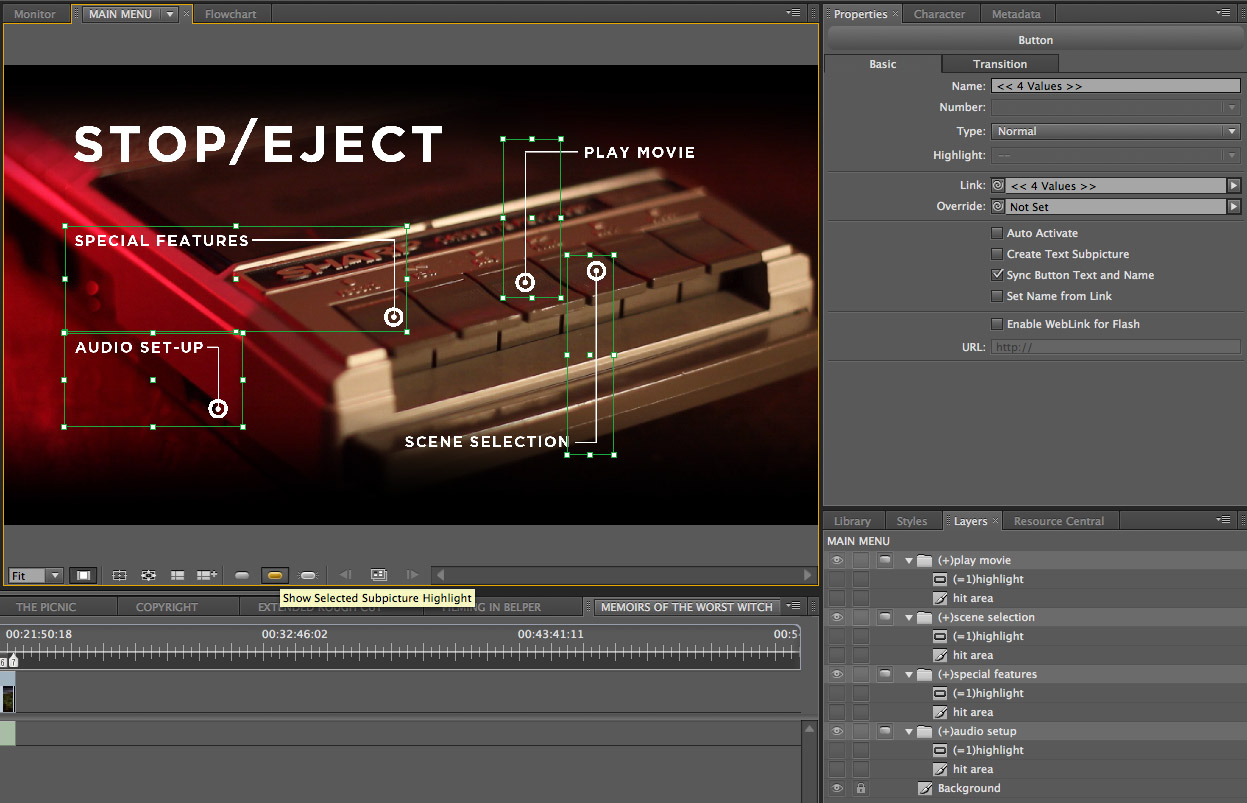
For each button, create a new group in the layers palette and give it a name that starts with (+). When you go back to Encore it will recognise this folder as pertaining to a button. Within the group, make a new layer and call it (=1)highlight. Draw your button highlight on this layer, remembering that it can only be one colour.

Now we need to pause a moment and consider hit areas. When your disc is played in a computer, the user can select buttons with the mouse. The hit area determines what part of the screen the user must hover the mouse pointer over for the button to be considered selected. This area MUST be rectangular. For each button, Encore will look at all the layers within the relevant group and draw the smallest possible rectangle that will completely enclose all those layers; that will be your button’s hit area.

In my case, right now the only layers in my groups are the white rings which are the button highlights themselves. But what if someone hovers the mouse over the words “special features”? I want the button to be selected then too, so in the (+)special features group I’ll create a second layer (critically, it must be below the highlight layer) and draw a rectangle where I want my hit area to be. I can then click the eye icon next to this in the layer palette so it becomes invisible and doesn’t ruin the look of my menu.

The main menu with the hit areas visible

Another restriction of the DVD/Blu-ray specs is that button hit areas can’t overlap. Given the restriction I mentioned earlier, that they must be rectangular, you can see from the layout of my menu that it isn’t possible for the hit areas of Play Movie and Scene Selection to include the text for those buttons without overlapping each other. I choose not to compromise the design of the menu and trust that users will soon find the hit area with a quick sweep of the mouse over the whole image.

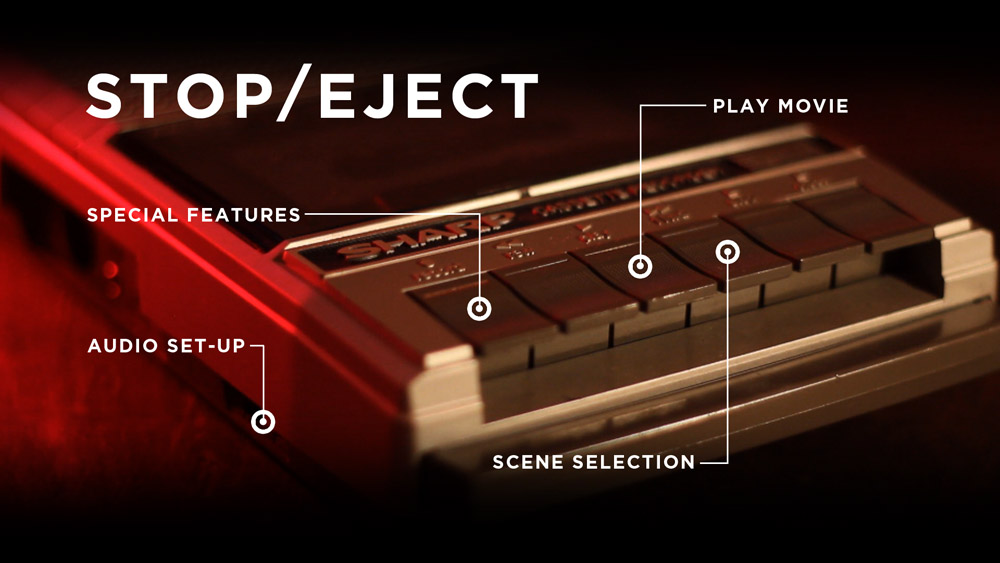
I save the image in Photoshop and return to Encore. I can now see the button hit areas outlined on the menu. If I click the icon for “show selected subpicture highlights” (see below image) I can see the highlights too. It’s now simply a case of setting the target for each button using the pick-whip in the properties panel.

The Encore interface with the button to view the highlights hovered over

When users return to the main menu, after they’ve visited the special features menu, for example, I don’t want them to have to sit through the intro part of the menu again; I want them to go straight to the loop point. So I’ll go to the main menu button in the special features menu and set the target – not using the pick-whip, but through the pull-down menu. I’ll select “specifiy link” and in the dialogue box which appears I make sure to tick the “set to loop point” checkbox.

One final point. The version of Encore I used (CS5.1) has a bug whereby any motion menu longer than 70 seconds will not loop smoothly; a second or so of black will appear each time the player gets to the end of the loop. This issue does not occur in Encore’s preview, only when you’ve burnt the disc. There’s no workaround that I can find other than shortening the menu.

I hope this has been some help to those of you out there who are still burning your films onto physical discs. Let me know if you’d like to hear more about any part of the disc authoring process.

How to Create a Blu-ray Motion Menu in Adobe Encore

Stop/Eject DVD and Blu-ray Features

I can at last reveal the full list of bonus features that will grace the DVD and Blu-ray editions of Stop/Eject. Please note these discs are for sponsors, cast and crew only. It is likely to be 18 months or so before the film is available to the general public, other than at festivals.

DVD Special Features menu

DVD edition

  • The film with Dolby Digital 5.1 surround sound (17 mins)
  • Cast commentary with Georgina Sherrington (Kate), Oliver Park (Dan) and Therese Collins (Alice)
  • Filmmakers commentary with producer Sophie Black and the director, Yours Truly
  • Record & Play: The Making of Stop/Eject – brand new behind-the-scenes documentary featuring interviews with all the cast and crew (30 mins)
  • Crowd-funding Stop/Eject – Sophie and I relate the ups and downs of financing the film, the many ways we promoted the campaign and the lessons we learnt from it all. (10 mins)
  • Filming in Belper – visual essay by Sophie about Stop/Eject’s north Derbyshire locations, featuring clips from other independent productions shot in the town and interviews with Stop/Eject’s cast (5 mins)
  • Superior Sound Reproduction – a unique look at the little-understood area of postproduction sound, from Additional Dialogue Recording (ADR) through sound effects and music to the final mix, featuring interviews with re-recording mixer Jose Pereira, sound designer Henning Knoepfel, composer Scott Benzie, Georgina Sherrington and Oliver Park (10 mins)
  • Deleted scenes (5 mins)
  • Visual effects breakdown – revealing the layers of work that went into Stop/Eject’s visual effects shots (3 mins)
  • Photo gallery
Blu-ray Special Features menu page 2

Blu-ray edition

  • All of the DVD features except for the deleted scenes
  • Extended rough cut with optional director’s commentary – an early edit of the film containing dialogue, moments and entire scenes excised from the final version (22 mins)
  • Memoirs of the Worst Witch – exclusive interview with Georgina Sherrington, looking back on her time playing Mildred Hubble in the popular ITV series (20 mins)
  • Bonus film: The Picnic – starring Therese Collins. When a gentleman arrives for a romantic picnic with his girlfriend, he is enraged to find her in the arms of another man. (2 mins)
  • Bonus film: Ghost-trainspotting –  Norman sets out to spot the fabled Flying Welshman, the spectre of an ill-fated steam train. (2 mins)
  • All content in full HD (1080P)
Stop/Eject DVD and Blu-ray Features

Stop/Eject DVD Sneak Peek

It would be nice to be able to hand out DVDs and Blu-rays to the cast, crew and sponsors at the premiere of Stop/Eject. That means finishing the discs pretty sharpish after the movie is done. I’ve been working on the discs on and off for a while, and yesterday I shot the menus. Yes, you read that right. I shot the menus.

I feel that DVD/BR menus should be an extension of the world of the movie, and I figure: what better way to do that than to use footage from the film combined with new shots that appear to be in the same locations? So, for example, the Special Features menu is a shelf in the charity shop, where each item of junk represents one of the special features. Some of these were found in real charity shops, some of them were made by Sophie, and others were borrowed from friends (thanks to Colin, and Joel at the Rural Media Company). Before long I hope to officially announce the DVD and Blu-ray bonus features, but for now I’ll leave you to guess what each item might represent.

Special Features part 1
Special Features part 2 (Blu-ray only)


Stop/Eject DVD Sneak Peek

Random Events on Stop/Eject

Mystery grave
Mystery grave

Here are some of the assorted things I’ve been doing on Stop/Eject lately.

On Wednesday I returned to the Hereford cemetery where, almost a decade ago, in the small hours of a cold and rainy October night, I shot a scene from Soul Searcher. This time I was just there to photograph gravestones for a VFX shot.

On the same day compositing/rotoscoping artist David Robinson delivered the first offical VFX shot, a run-of-the-mill wire removal but extremely well done.

On Friday I recorded this thank you message for everyone who sponsored the project:

Apologies to anyone whose name I’ve mispronounced.

Yesterday Scott Benzie delivered a demo of his beautiful theme for Kate. Much as I liked the first piece he wrote – listen to it here – I felt it emphasised the film’s fantasy aspects too much, and this new piece instead concentrates solely on drama and emotions.

This morning I filmed the tape recorder for probably the last time – not for Stop/Eject itself, but for the DVD/Bluray menus. Tomorrow the recorder gets sent off to Henning Knoepfel so he can record some new foley effects with it (that’s with it, not on it). Henning and I had a great conversation about the direction the sound should take and I’m very excited about how it will turn out. More on that on this blog in due course.

Random Events on Stop/Eject

Soul Searcher: The Return

As previously mentioned, more money needs to be raised ahead of Stop/Eject‘s shoot – which we hope will be in April or May. I can now reveal one of the ways in which we plan to close this funding gap.

Ray Bullock Jnr. as Joe in Soul Searcher

In 2005 I completed Soul Searcher, described by The Guardian as “a fantasy action movie in the grand style”. With six weeks of night shooting, martial arts fights, 280 FX shots and a climactic chase between a 1973 Ford Mustang and an express train to Hell, Soul Searcher was a tough project to say the least, and I learnt loads from it. It was also my first film to be properly distributed, getting an international DVD release.

So over the next couple of months I’ll be delivering an in-depth lecture about how I financed, shot, post-produced and sold Soul Searcher in various venues around England. There will be lots of clips and behind-the-scenes footage and a Q&A session at the end. These lectures will be FREE to attend, but we will encourage satisfied attendees to contribute a little cash to Stop/Eject at the end.

So far we have the following venues confirmed:

  • Hereford, February 21st, 7pm at The Rural Media Company, Sullivan House, 72-80 Widemarsh Street, HR4 9HG
  • Derby, March 27th, as part of the Five Lamps Film Night at The Quad – details TBC

Details of further venues to follow as they are arranged.

The other big news for Soul Searcher is that, since its distribution contract expires this week, I’ll soon be releasing the film on YouTube. That’s right – it will be FREE to view in full. And there is more news to come regarding the extensive behind-the-scenes material, but I’ll save that for another day.

I’ll leave you with something I came across yesterday while looking through my old hard drive in preparation for this online release: a cheesy music video that was intended to be a DVD extra, but which never made it onto the disc due to lack of space. Enjoy…

Soul Searcher: The Return

The Next Step

Stop/Eject poster
Stop/Eject poster

It’s been a roller coaster two months and a very educational experience, but Stop/Eject‘s official crowd-funding campaign is now over. Thanks once again to everyone who enabled us to hit our target and get this project back off the ground.

But if you still want to donate, don’t worry; you still can. Just click on the Paypal donate button on the right of this page to make your contribution. Although the exclusive signed DVDs and artwork offered during the official campaign are no longer available, you’ll still get your name in the credits, an invitation to the premiere and access to my indie movie-making budget expose How to Make a Fantasy Action Movie for £28,000. If you want to know more about Stop/Eject you can check out the Stop/Eject page on this site or watch the pitch video.

Although I’m delighted that our campaign succeeded (I convinced myself at many times that it wouldn’t) the curse of filmmaking is that whenever you achieve one difficult task instead of feeling relief you just start stressing about the next difficult task. I don’t know if that’s how other filmmakers find it but it’s always been the way for me.

The next difficult task in this case is raising the rest of the money. Sophie and I have a number of ideas about how to do this and these will be revealed in due course on this site.

The Dark Side of the Earth: Making the Pilot - Special Features DVD menu

The other thing you can look forward to in the next few days and weeks on neiloseman.com is an evaluation of the crowd-funding campaign. I was completely new to this method of raising finance and I’ve learnt a lot from it which I want to share with you all.

For now my most pressing task is the production of the rewards that Stop/Eject’s sponsors have so justly earned. Currently I’m working on the DVD authoring for The Dark Side of the Earth: Making the Pilot and then I’ll need to design the DVD cover and label too. I’ll leave you with a glimpse of this DVD’s Special Features menu.

Oh, and check out the Hereford Journal tonight if you’re local for a photo and article about me and Stop/Eject.

The Next Step