Time Up for Tungsten?

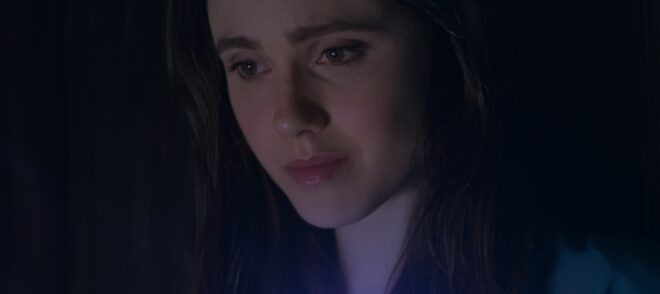
Poppy Drayton, in “The Little Mermaid”, lit by a tungsten 1K bounced off poly

Last October, rental house VMI retired all of its tungsten lighting units as part of its mission to be a Net Zero company by 2030. I know this mainly because I am currently writing an article for British Cinematographer about sustainability in the film and TV industry, and VMI’s managing director Barry Bassett was one of the first people I interviewed.

Barry is very passionate about helping the environment and this is reflected in numerous initiatives he’s pioneered at VMI and elsewhere, but in this post I just want to discuss the tungsten issue.

I love tungsten lighting. There’s no better way to light a human face, in my opinion, than to bounce a tungsten light off a poly-board. (Poly-board is also terrible for the planet, I’ve just learnt, but that’s another story.) The continuous spectrum of light that tungsten gives out is matched only by daylight.

Dana Hajaj lit by another tungsten 1K bounced off poly

Tungsten has other advantages too: it’s cheap to hire, and it’s simple technology that’s reliable and easy to repair if it does go wrong.

But there’s no denying it’s horribly inefficient. “Tungsten lighting fixtures ought to be called lighting heaters, since 96% of the energy used is output as heat, leaving only 4% to produce light,” Barry observed in a British Cinematographer news piece. When you put it that way, it seems like a ridiculous waste of energy.

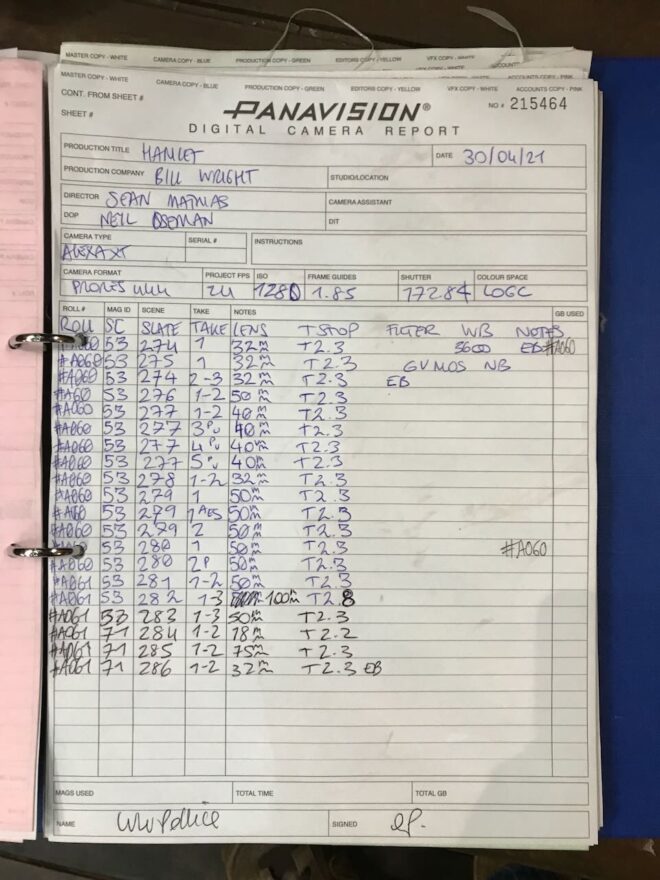
Without meaning to, I have drifted a little away from tungsten in recent years. When I shot Hamlet last year, I went into it telling gaffer Ben Millar that it should be a tungsten heavy show, but we ended up using a mix of real tungsten and tungsten-balanced LED. It’s so much easier to set up a LiteMat 2L on a battery than it is to run mains for a 2K, set up a bounce and flag off all the spill.

Shirley MacLaine lit by a tungsten book-light in “The Little Mermaid”

I admire what VMI have done, and I’ve no doubt that other companies will follow suit. The day is coming – maybe quite soon – when using tungsten is impossible, either because no rental companies stock it any more, or no-one’s making the bulbs, or producers ban it to make their productions sustainable.

Am I ready to give up tungsten completely? Honestly, no, not yet. But it is something I need to start thinking seriously about.

Time Up for Tungsten?

“The Little Mermaid”: Prep Diary Part 2

This is the second part of my flashback to spring 2016 and the pre-production for The Little Mermaid. Part one is here.


Weeks 3 & 4

Nothing much seems to happen the third week of prep. After the Shirley shoot finishes on Monday, I take Tuesday off. I’m so exhausted I can barely move, which bodes ill for the 26-day slog of principal photography that’s coming up! Things are quiet in the office on Wednesday and Thursday, and Friday is Good Friday so it’s a holiday. The three-day weekend is enjoyable but also frustrating given how much prep there is still to do.

Next Monday I go scouting with Anthony, the new locations manager. He takes us to a quarry ten minutes down the road from the office, where we finally find the cliff we’ve been searching for since prep began. The location has a lot of potential for many scenes, so we’re very pleased. (Ultimately it went unused because of safety concerns.)

On Tuesday there’s a page turner, which is like a table read only without the cast. We spend five hours going through the script, asking questions and addressing issues that might come up. I try to clarify certain things in the script and make sure everyone knows how Chris, the director, wants to approach things. (He’s just a talking head on my iPad right now, due to visa delays.)

Gaffer Mike and key grip Jason have arrived in town for the page turner, and on Wednesday morning we get down to the business of writing a lighting list. It’s difficult for me to get my head around the crew structure here in the States. The gaffer is the head of the electrical department, so they only deal with lamps and distro. Flags, cutters, nets, black-out, bounce boards and so on are handled by the grip department, led of course by the key grip… who also handles the camera grip, like cranes and dollies.

Most of the rest of the week is spent visiting locations with Anthony, Mike and Jason, while the latter two finesse the list and get quotes. On Wednesday evening I convene the camera department to debrief from the Shirley shoot and discuss what can be done to improve the crew structure, equipment package and workflow.

By the weekend it stills feel like there is much to figure out, and there is only one week left before principal photography begins. Still, I won’t be sorry to say goodbye to office work and get back on set.


Week 5

It’s the last week of preproduction and we should be spending it doing tech scouts and production meetings. But unfortunately many HoDs have been hired late, and there are lots of locations left to find, so it’s a frustrating week for me, waiting for stuff to happen. I try to nail down the grip and electrical items which are only required on specific dates, but it looks like some of that will have to be done as we go along.

I spend more time location scouting with Anthony, during which I realise just how time-consuming it is to drive around, spot possible places, make friends with the owners and just get to the stage where any of the crew can check it out.

We visit a possible beach location, a nice little spot on the same island we did the Shirley Shoot on. Chris, still unable to enter the US, participates by video call. He wants me to roll up my trousers and test the water, because the principal cast will have to spend hours in it. It’s nice enough for a paddle, but I don’t think I’d want to spend a day up to my waist in it. (Actually, that’s exactly what I and several other cast and crew end up doing.)

As the week goes on I spend less and less time at the office, because there simply isn’t much left I can do. I occupy my evenings swimming in the pool and binge-watching season one of Outlander, which Starz have made free for a couple of weeks here in the US. The cinematography in the first couple of episodes is utterly stunning, in fact it’s the most beautiful cinematography I’ve ever seen. It’s very inspirational, and I have a couple of good ideas for lighting A Little Mermaid as I watch it. (Recently I had the exciting chance to ask David Higgs BSC about lighting the Outlander pilot, for an article in the January issue of British Cinematographer.)

Chris finally arrives on Saturday, two days before the shoot. In the evening there’s a “pre-game” party by the pool. It finally feels like we’re making a movie. The equipment has all arrived, and there are trucks and trailers parked outside the production office.

On Sunday we do the closest we’re going to get to a tech scout. It’s great to be able to walk around a location with the directors at last. (Writer Blake has joined Chris as a co-director.) I try to use Helios, a sun tracker app, to work out when the sun will hit the back of the house, but in the end I trust my own estimation better. I whip out my light meter to check the contrast ratio between sunlight and shade; it’s 8:1 (3 stops), well within the Alexa’s dynamic range, but setting up an ultrabounce to fill in the shadows, as the key grip suggests, will make the image much more pleasing to the eye.

I figure out the broad strokes of the lighting for the interiors and let the G&E (grip and electric) team know the plan. With Larry, the 1st AD, I discuss how we’re going to maximise our two cameras in order to make our day.

I can’t believe we’re about to start principal at last. Five weeks is by far the longest prep time I’ve ever had for a movie. It’s feels like I’ve been here forever! But I’m only halfway through my time in Savannah…
Here are links to my diary entries from the shoot:

The Little Mermaid is currently available on Netflix around the world.

“The Little Mermaid”: Prep Diary Part 2

“The Little Mermaid”: Prep Diary Part 1

I’ll soon be starting five weeks of prep for a feature, and it’s got me thinking about the five weeks I spent in the spring of 2016 prepping The Little Mermaid. I published a number of entries from my production diary when the film was released, but the entries from pre-production have gone unseen… until now…


JANuary 12th, 2016

It is four or five months since Chris, the director, first mentioned the project to me. In that time he has been developing the script with the writer and producers, and I’ve read a draft or two. Last week I was introduced to the producers by email, and today Chris and I get together to start chatting about the film.

It’s just broad strokes today, nothing structured, nothing firm. He talks me through the next round of script changes and we watch some bits of DVDs I’ve brought. I’m not thinking photographically yet, just tone and genre, so we watch parts of The Rocketeer and Big Fish. I start to get some basic ideas of what Chris does and doesn’t like.

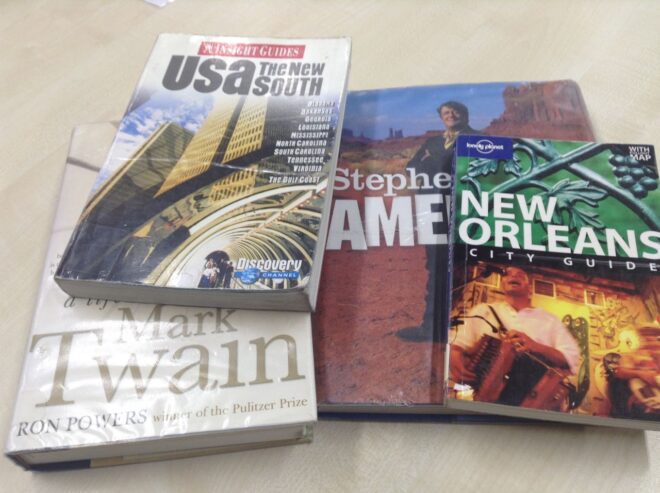
Yesterday I went to the library to get my head around the geography of the state our story is set in, and bit of the history and culture. I found a book called Photographing America and it has some interesting plates from the Deep South in the 30s and 40s. They set the stage for me in terms of architecture, landscape and clothing, but their gritty black and white photography is not appropriate for this film.

Chris and I Skype Fabio, the line producer, and later have a brief conference call with producers Armando and Rob. At this stage it is just about introductions. Chris enthuses about me to them, and curates some stills from Ren: The Girl with the Mark to wow them with. Armando responds positively – it’s just the look he’s after for this. Well, this is the second feature job Ren’s got me. Cheers, Kate!


Week 1

Since that day in London with Chris, I’ve done bits and pieces of prep around finishing up post on Ren. The script went through a few more drafts, I joined in a few conference calls with members of the team, and started a shot list.

But on March 5th I fly into Savannah, Georgia and I’m straight into full-time prep, living and breathing A Little Mermaid.

On Sunday I wake early, my body still five hours ahead of US East Coast Time. After talking to Chris, who’s still in the UK due to visa delays, I take a ten-minute walk through the sunny streets of Savannah to meet David, the storyboard artist. We eat blueberry pancakes with maple syrup and he shows me his boards for the movie’s finale. Chris Skypes in and we discuss the priorities. We need about 15 more sequences boarded – at least key frames – ASAP so that production designer Jay can be sure to accommodate our needs in the sets he is already starting to build.

At noon I head over to an apartment complex where Jay and line producer Fabio are staying. This place has a pool so I’m getting myself moved here as soon as I can. We spend seven or eight hours, with Chris on Skype, going through the schedule line by line, making sure everything is doable and everything is in the most efficient order.

Poppy Drayton is playing our mermaid. Back at the apartment I watch a trailer for The Shannara Chronicles and screen-capture all her close-ups. I analyse the lighting in each one, labelling them accordingly in a folder. Her time on this production is limited so I probably won’t get to camera-test her; I need to figure out how to light her based on what other DPs have done.

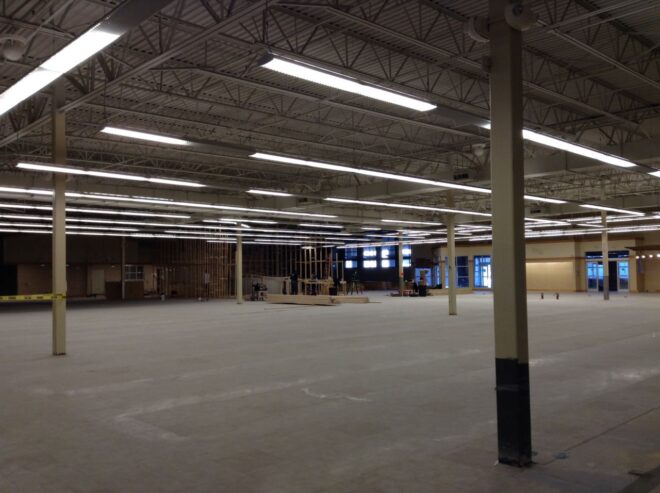
Monday is my first day at the warehouse. It’s an old supermarket that’s been gutted. There are four or five small offices and then a huge open space, part of which is occupied by the bones of the “rocky pool” set.

The week soon settles into a blur of video calls with Chris, interviews with potential camera assistants and gaffers, and lots of discussions about sets and locations. It’s really exciting to be shown around the space by Jay as he describes all the sets he’s going to build. For some scenes there is a lot of back and forth about whether they should be studio or location. We are working with a child actress and Chris is very keen to get the best performances, so the level of control we could get in the studio is very appealing, but that must be balanced against our art department budget.

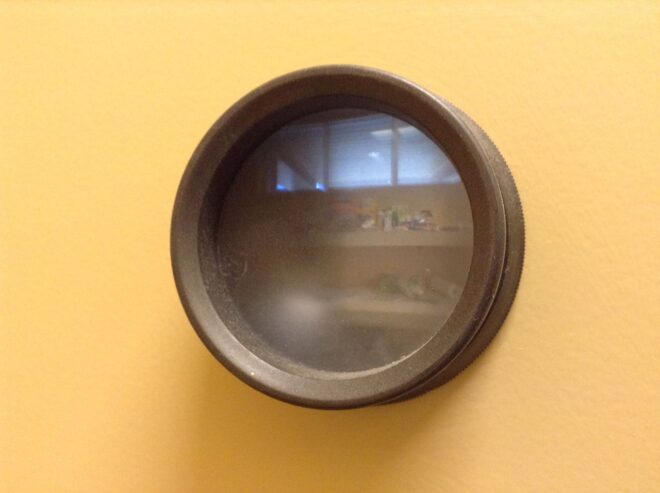
I’m assigned an office that’s just 6ft square but is very cool because it has a sort of camera obscura in the door so I can see a little projection of what’s outside. Of course the door doesn’t really close properly (particularly once I’ve run an extension cable in to compensate for the lack of functioning power sockets in the room) but never mind. By mid-week I have a monitor to hook my Mac Mini up to and I’m properly in business.

I task the PAs with printing out the script and taping it in a long line of pages along a wall along with the corresponding storyboards. Eventually we will add reference images and concept art, if I can ever get access to a functioning colour printer!

A little bit of location scouting takes place during the week. We check out a nice rustic field behind the studio where we’ll set up our circus, we visit a fort in the hope that it might work for a scene near the finale (it doesn’t) and I take a look around the beach house we’ll be shooting the film’s present-day book-ends in on March 20th and 21st. (Principal photography starts April 11th.)

Another issue to be decided is which camera to shoot on. Initially we discussed having lots of cameras, which meant going with Reds for budgetary reasons. The Panasonic Varicam is suggested, and I’m almost flown to Atlanta to test it, but in the end we decide to go with Alexas, thank God. (With hindsight, I really should have gone and tested that Varicam. I was irrationally against all non-Alexa cameras at this time.) We’ll have two bodies, one for me and one for a B camera operator who will sometimes splinter off into a 2nd unit. The glass will be Cooke S4s with a half Soft FX filter, the exact same recipe as Heretiks. I know this will give me the organic, period feel that A Little Mermaid needs, as well as the magical quality. We’ll also have a couple of Optimo zooms in the kit, a luxury we couldn’t afford on Heretiks.

By the end of the week I’ve pretty much locked down the camera kit, finished the shot list for the whole movie, and hired 1st and 2nd ACs and a 2nd Unit DP. We still don’t have a gaffer, which is worrying. The crew pool in Savannah is not huge and we’re struggling to find people with enough experience.

On Saturday, aside from a couple of hours in the studio, I chill out. I’ve now moved to the same apartment complex as the rest of the crew, and I’ve just had a very nice dip in the pool. I think I might just have the best job in the world.


Week 2

At the end of this week we have our two-day “pre-shoot” with Shirley MacLaine, to capture the contemporary bookends to what is otherwise a 1930s story. Peter Falk’s scenes in The Princess Bride are an inevitable reference for these.

Director Chris is still having visa issues, so writer Blake will be on helming duty for the pre-shoot. He gives me Maggie Smith’s storytelling scene in Hook as a reference. I haven’t seen the movie in ages, so I rent it and watch the whole thing, delighting in the beautiful cinematography. I love the candy blues and hot pinks of Wendy’s London home, and will aim to emulate them.

A lot of this week is taken up with locking down equipment and personnel for the pre-shoot. The biggest issue as the week opens is that I still don’t have a gaffer. With my options limited – and despite a brief panic during which flying my UK gaffer out here seems like a very real possibility – I pick someone on a trial basis. If they do a good job for the pre-shoot they’ll get hired for principal.

Because the gaffer is hired so late, putting together a lighting list is my responsibility. I hate doing this, because I always forget stuff and piss everyone off at the last minute by making additions or changes. Like forgetting to check whether the HMIs are pars or fresnels. (I always want fresnels because they produce better shafts of light.)

With equipment and crew in place, my attention turns towards principal for a little while. The VFX supervisor, Rich, has flown in from LA, and together we scout some locations. Unfortunately none of the locations are locked yet and the options we are given to look at are far from ideal. But we have a good session going through the shot list together, checking that there aren’t any VFX requirements that he missed in his breakdown.

We also discuss shooting format, which is generally going to be 2K ProRes 4444. He wants me to shoot green-screen shots in Arri Raw, but after he’s gone I realise that we don’t have the right Codex on our cameras for that. 3.2K ProRes will have to do. Another good tip Rich gave me is to expose the green-screen at key (i.e. the same light reading on the green-screen as on the talent’s face) or up to half a stop over.

I’m glad I invested in a light meter, which arrived at the studio this week. It also comes in handy during another scout of the pre-shoot location. We have some night shots on the beach, which will have to be shot at dusk because it’s too big an area to light artificially. During the scout I take light readings on the beach at dusk, and determine that we have until 7:50pm, 20 minutes after sunset, before it is too dark to shoot.

If you want to follow the chronology, my diary entries about the “pre-shoot” are here.

Tune in next week for my diary entries from the remaining three weeks of prep. The Little Mermaid is still on Netflix if you fancy checking it out.

“The Little Mermaid”: Prep Diary Part 1

5 Ways to Fake Firelight

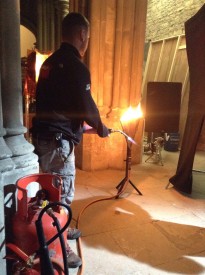
Real SFX run a fishtail on the set of “Heretiks”

Firelight adds colour and dynamism to any lighting set-up, not to mention being essential for period and fantasy films. But often it’s not practical to use real firelight as your source. Even if you could do it safely, continuity could be a problem.

A production that can afford an experienced SFX crew might be able to employ fishtails, V-shaped gas outlets that produce a highly controllable bar of flame, as we did on Heretiks. If such luxuries are beyond your budget, however, you might need to think about simulating firelight. As my gaffer friend Richard Roberts once said while operating an array of flickering tungsten globes (method no. 3), “There’s nothing like a real fire… and this is nothing like a real fire.”


1. Waving Hands

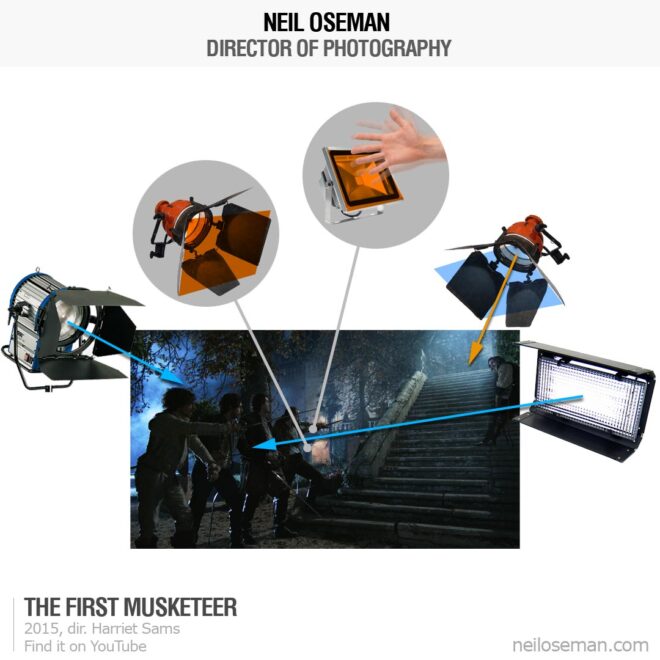
The simplest way to fake firelight is to wave your hands in front of a light source. This will work for any kind of source, hard or soft; just experiment with movements and distances and find out what works best for you. A layer of diffusion on the lamp, another in a frame, and the waving hands in between, perhaps?

Visit my Instagram feed for loads more diagrams like this.

One of my favourite lighting stories involves a big night exterior shot from The First Musketeer which was done at the Chateau de Fumel in the Lot Valley, France. We were just about to turnover when a bunch of automatic floodlights came on, illuminating the front of the chateau and destroying the period illusion of our scene. We all ran around for a while, looking for the off switch, but couldn’t find it. In the end I put orange gel on the floodlights and had someone crouch next to each one, wiggling their hands like a magician, and suddenly the chateau appeared to be lit by burning braziers.


2. Wobbling Reflector

This is my go-to technique – quick, easy and effective. It’s demonstrated in my Cinematic Lighting course on Udemy and also in this episode of Lensing Ren:

All you need is a collapsible reflector with a gold side, and an open-face tungsten fixture. Simply point the latter at the former and wobble the reflector during the take to create the flickering effect.


3. Tungsten Array

If you want to get more sophisticated, you can create a rig of tungsten units hooked up to a dimmer board. Electronic boxes exist to create a flame-like dimming pattern, but you can also just do it by pushing the sliders up and down randomly. I’ve done this a lot with 100W tungsten globes in simple pendant fittings, clipped to parts of the set or to wooden battens. You can add more dynamics by gelling the individual lamps with different colours – yellows, oranges and reds.

John Higgins’ 2MW firelight rig from “1917”

Larger productions tend to use Brutes, a.k.a. Dinos, a.k.a. 9-lights, which are banks of 1K pars. The zenith of this technique is the two megawatt rig built by gaffer John Higgins for Roger Deakins, CBE, BSC, ASC on 1917.


4. Programmed L.E.D.

Technological advances in recent years have provided a couple of new methods of simulating firelight. One of these is the emergence of LED fixtures with built-in effects programmes like police lights, lightning and flames. These units come in all shapes, sizes and price-ranges.

Philip Bloom’s budget fire-effect rig on location for “Filmmaking for Photographers”

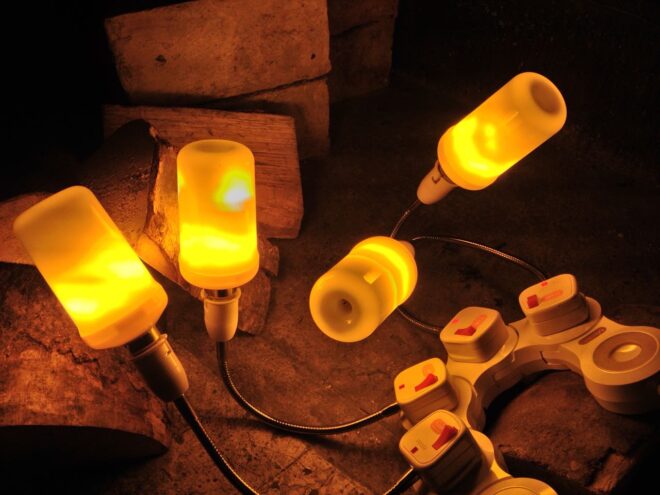
On War of the Worlds: The Attack last year, gaffer Callum Begley introduced me to Astera tubes, and we used their flame effect for a campfire scene in the woods when we were having continuity problems with the real fire. For the more financially challenged, domestic fire-effect LED bulbs are cheap and screw into standard sockets. Philip Bloom had a few of these on goose-neck fittings which we used extensively in the fireplaces of Devizes Castle when shooting a filmmaking course for Mzed.


5. L.e.D. Screen

A logical extension of an LED panel or bulb that crudely represents the pattern of flames is an LED screen that actually plays video footage of a fire. The oil rig disaster docu-drama Deep Horizon and Christoper Nolan’s Dunkirk are just two films that have used giant screens to create the interactive light of off-camera fires. There are many other uses for LED screens in lighting, which I’ve covered in detail before, with the ultimate evolution being Mandalorian-style virtual volumes.

You don’t necessarily need a huge budget to try this technique. What about playing one of those festive YouTube videos of a crackling log fire on your home TV? For certain shots, especially given the high native ISOs of some cameras today, this might make a pretty convincing firelight effect. For a while now I’ve been meaning to try fire footage on an iPad as a surrogate candle. There is much here to explore.

So remember, there may be no smoke without fire, but there can be firelight without fire.

5 Ways to Fake Firelight

Working with White Walls

White walls are the bane of a DP’s existence. They bounce light around everywhere, killing the mood, and they look cheap and boring in the background of your shot. Nonetheless, with so many contemporary buildings decorated this way, it’s a challenge we all have to face. Today I’m going to look back on two short films I’ve photographed, and explain the different approaches I took to get the white-walled locations looking nice.

Finding Hope is a moving drama about a couple grieving for the baby they have lost. It was shot largely at the home of the producer, Jean Maye, on a Sony FS7 with Sigma and Pentax stills glass.

Exit Eve is a non-linear narrative about the dehumanisation of an au pair by her wealthy employers. With a fairly respectable budget for a short, this production shot in a luxurious Battersea townhouse on an Arri Alexa Classic with Ultra Primes.


“Crown”-inspired colour contrast

Cheap 300W dimmers like these are great for practicals.

It was January 2017 when we made Finding Hope, and I’d recently been watching a lot of The Crown. I liked how that series punctuated its daylight interior frames with pools of orange light from practicals. We couldn’t afford much of a lighting package, and I thought that pairing existing pracs with dimmers and tungsten bulbs would be a cheap and easy way to break up the white walls and bring some warmth – perhaps a visual representation of the titular hope – into the heavy story.

I shot all the daylight interiors at 5600K to get that warmth out of the pracs. Meanwhile I shaped the natural light as far as possible with the existing curtains, and beefed it up with a 1.2K HMI where I could. I used no haze or lens diffusion on the film because I felt it needed the unforgiving edges.

For close-ups, I often cheated the pracs a little closer and tweaked the angle, but I chose not to supplement them with movie lamps. The FS7’s native ISO of 2500 helped a lot, especially in a nighttime scene where the grieving parents finally let each other in. Director Krysten Resnick had decided that there would be tea-lights on the kitchen counter, and I asked art director Justine Arbuthnot to increase the number as much as she dared. They became the key-light, and again I tweaked them around for the close-ups.

My favourite scene in Finding Hope is another nighttime one, in which Crystal Leaity sits at a piano while Kevin Leslie watches from the doorway. I continued the theme of warm practicals, bouncing a bare 100W globe off the wall as Crystal’s key, and shaping the existing hall light with some black wrap, but I alternated that with layers of contrasting blue light: the HMI’s “moonlight” coming in through the window, and the flicker of a TV in the deep background. This latter was a blue-gelled 800W tungsten lamp bounced off a wobbling reflector.

When I saw the finished film, I was very pleased that the colourist had leant into the warm/cool contrast throughout the piece, even teasing it out of the daylight exteriors.


Trapped in a stark white townhouse

I took a different approach to colour in Exit Eve. Director Charlie Parham already knew that he wanted strong red lighting in party scenes, and I felt that this would be most effective if I kept colour out of the lighting elsewhere. As the film approaches its climax, I did start to bring in the orange of outside streetlamps, and glimpses of the party’s red, but otherwise I kept the light stark and white.

Converted from a Victorian schoolhouse, the location had high ceilings, huge windows and multiple floors, so I knew that I would mostly have to live with whatever natural light did or didn’t shine in. We were shooting during the heatwave of 2018, with many long handheld takes following lead actor Thalissa Teixeria from room to room and floor to floor, so even the Alexa’s dynamic range struggled to cope with the variations in light level.

For a night scene in the top floor bedroom, I found that the existing practicals were perfectly placed to provide shape and backlight. I white-balanced to 3600K to keep most of the colour out of them, and rigged black solids behind the camera to prevent the white walls from filling in the shadows.

(Incidentally, the night portions of this sequence were shot as one continuous take, despite comprising two different scenes set months apart. The actors did a quick-change and the bed was redressed by the art department while it was out frame, but sadly this tour de force was chopped up in the final cut.)

I had most control over the lighting when it came to the denouement in the ground floor living area. Here I was inspired by the work of Bradford Young, ASC to backlight the closed blinds (with tungsten units gelled to represent streetlights) and allow the actors inside to go a bit dim and murky. For a key moment we put a red gel on one of the existing spotlights in the living room and let the cast step into it.

So there we have it, two different approaches to lighting in a while-walled location: creating colour contrast with dimmed practicals, or embracing the starkness and saving the colour for dramatic moments. How will you tackle your next magnolia-hued background?

For another example of how I’ve tackled white-walled locations, see my Forever Alone blog.

Working with White Walls

“Above the Clouds”: The Spoiler Blogs

During 2016-2017 I blogged about the production of Above the Clouds, a comedy road movie which I shot for director Leon Chambers. It premiered at Raindance in 2018, closely followed by Austin Film Festival, where it won the audience award for Best Narrative Feature, the first of four gongs it would collect.

In two decades of filmmaking, Above the Clouds is easily in the top five productions I’m most proud of. Since this January it has been available on AmazoniTunesGoogle Play and other platforms, and I highly recommend you give it a watch. DO NOT continue reading this blog unless you have, because what follows are two blog entries that I held back due to spoilers.


DAY 14

(from Week 3)

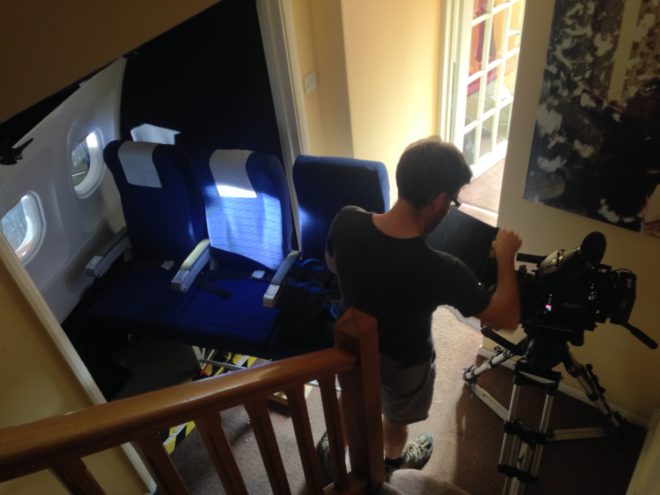
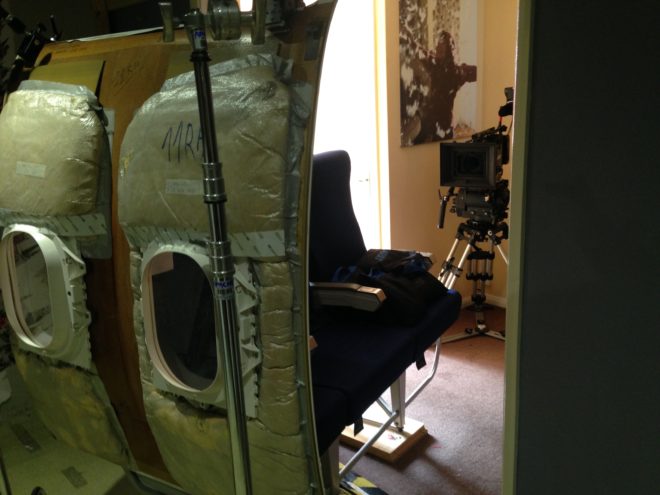
The script calls for Charlie to be seen sitting in the window seat of a plane as it rises quite literally above the clouds. This is another micro-set filmed in Leon’s living room, in fact half in the living room and half in the hall, to leave enough room for the lights beyond.

Although the view out of the window will be added in post, I need to simulate the lighting effect of bursting through the clouds. My plan involves a 1.2K HMI, and a 4×4 poly board held horizontally with a triple layer of 4×4 Opal sheets hanging from one edge.

We start with the HMI pointed straight into the window and the poly board held high up so that the Opal hangs in front of the lamp. As the plane supposedly rises through the cloud layer, Colin lowers the poly until it is below the level of the lamp, while Gary tilts the HMI down so its light skips off the poly (like sun skipping off the top of clouds) and bounces back up into the window. Gary then tilts the HMI back up to point straight into the window, to suggest further banking or climbing of the aircraft. This direct light is so hot that it bounces off the armrest of Charlie’s seat and gives a glow to her cheek which syncs perfectly with a smile she’s doing.


DAY 25

(from February 2017 pick-ups)

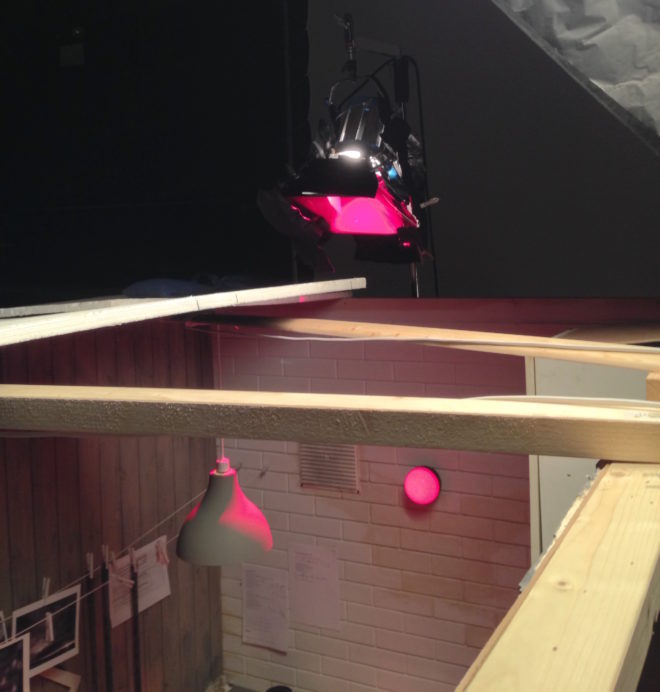
Today’s set is a dark room. A photographer’s dark room, that is. Not just a random dimly-lit room.

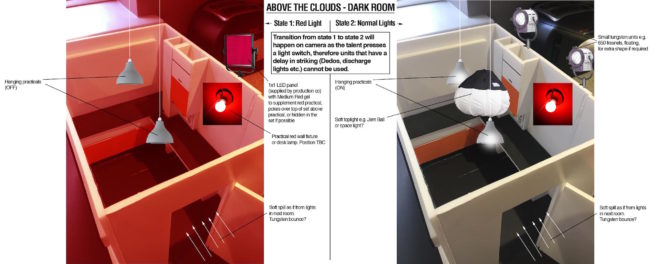
We begin with only the red safe-light in play. The wall-mounted practical has a 15W bulb, so it needs some serious help to illuminate the room. Micky rigs a 1K pup with Medium Red gel and fires it over the top of the set, above the practical. The effect is very convincing. Pure red light can make everything look out of focus on camera, which is why I chose the slightly magenta Medium Red gel, rather than the more realistic Primary Red. The colourist will be able to add some green/yellow to correct this.

During the scene, Naomi pulls a cord and the normal lights come on. These are two hanging practicals, fitted with dimmed 100W tungsten globes. In a very similar set-up to yesterday, we use a 2K with a chimera, poking over the set wall on the camera’s down-side, to enhance and soften the practicals’ light.

To read all the Above the Clouds blogs from the start, click here.

“Above the Clouds”: The Spoiler Blogs

Pick-ups for “Rory’s Way”

In August 2016 I was recommended to a production manager who was crewing up a small pick-ups shoot in London. The pick-ups were for Rory’s Way, or The Etruscan Smile as it was then known, a $12 million feature based on the best-selling novel of the latter name, starring Brian Cox and Thora Birch. Apparently test screenings had shown that the film’s ending wasn’t quite satisfying enough, and parts of it were to be remounted.

I was given a storyboard consisting of actual frame-grabs from the original version of the scene, alongside notes explaining how the action would be different. Not to give too much away, but the scene involves Brian’s character in bed, and a baby in a cot next to him. The changes simply involved Brian giving a different reaction to what the baby is doing. The bed was to be set up on stage against a blue screen, and composited into backgrounds extracted from the principal photography footage. The baby’s performance was not to be changed, so he was to be rotoscoped out of the original footage too.

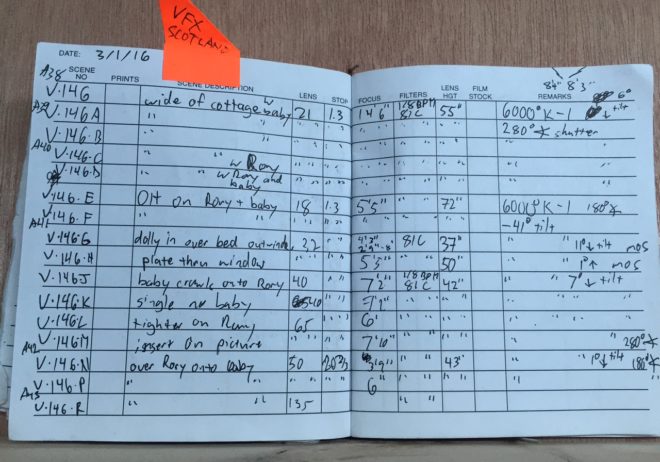
I was sent the camera report, 2nd AC’s notebook and script notes from principal photography. The crew had known that the view out of the bedroom window would be added in post, and that separate takes of the baby and Brian would be digitally combined, so they recorded plenty of information for the VFX team. Between the three documents, I had the focal length, focal distance, aperture, white balance, shutter angle, filters, lens height and tilt of every set-up in the scene.

My next step was to email  the main unit DP, who was none other than Javier Aguirresarobe, ASC, AE – the man behind the lens on Thor: Ragnarok, Nicole Kidman vehicle The Others, two of the Twilight films, and Woody Allen’s Vicky Cristina Barcelona. Needless to say, I was honoured to be recreating the work of such an experienced cinematographer.

Unit still of Javier Aguirresarobe, ASC, AE on location in Scotland for “Rory’s Way”/”The Etruscan Smile”

Javier told me that he had shot with Arri/Zeiss Master Primes, and explained the feel and colour of lighting he had been going for. He had used an 81C (coral) filter to warm up the image a little, and a 1/8th Black Promist for diffusion.

After that, I sat down over coffee with Ben Millar, my gaffer. We analysed the footage from principal photography and reverse-engineered the lighting. I say “we”; it was mostly Ben. This is why a DP hires a good gaffer!

The pick-ups shoot was a single day. The afternoon before, the director and the camera department convened at the studio. The plan was to go through each of the set-ups using a stand-in in the bed. For each set-up, we first used the camera logs and script notes to put on the correct lens and filters, and set the sticks to the right height and tilt. Then, with a print-out of the original shot taped underneath the monitor, we nudged the camera around until we had the closest possible match in framing. This done, ACs Max Quinton and Bex Clives marked the tripod position on the floor with tape, writing the lens length, height, filters etc. on the tape itself to make things super-efficient the next day.

The pick-ups set was nothing more than a bed surrounded by blue screens. The bright gap between the screens represents the window from the original location.

On the morning of the shoot, the lighting department had two or three hours to set up before Brian was called. We used mostly Kinoflos, with a lot of flags to represent window frames through which light sources had been shining on the original set. The VFX supervisor Stephen Coren and I checked the histograms on the monitor to ensure the blue screen was lit evenly and to the level he required.

We were ready to roll in plenty of time, and things went more or less to plan, with the addition of an extra shot or two. The editorial team were in the next room, checking our shots against the original material, and they reported that all was well.

We finished up with a single wide night interior shot for an earlier scene in the movie. This was an interesting one, because we had to extrapolate the lighting for the whole room from a single close-up that had been shot in principal photography. Our wide shot, recorded entirely against blue, would be dropped into a wide shot from principal – a daylight wide shot, that would be digitally painted and retimed for night.

At the time of writing, Rory’s Way has just hit UK cinemas, but I have yet to see it. For all I know it might have been re-edited again, but hopefully my shots are still in there! Either way, it was a fascinating exercise to analyse and reproduce the work of a top cinematographer.

Pick-ups for “Rory’s Way”

How Big a Light do I Need?

Experience goes a long way, but sometimes you need to be more precise about what size of lighting instruments are required for a particular scene. Night exteriors, for example; you don’t want to find out on the day that the HMI you hired as your “moon” backlight isn’t powerful enough to cover the whole of the car park you’re shooting in. How can you prep correctly so that you don’t get egg on your face?

There are two steps: 1. determine the intensity of light you require on the subject, and 2. find a combination of light fixture and fixture-to-subject distance that will provide that intensity.


The Required intensity

The goal here is to arrive at a number of foot-candles (fc). Foot-candles are a unit of light intensity, sometimes more formally called illuminance, and one foot-candle is the illuminance produced by a standard candle one foot away. (Illuminance can also be measured in the SI unit of lux, where 1 fc ≈ 10 lux, but in cinematography foot-candles are more commonly used. It’s important to remember that illuminance is a measure of the light incident to a surface, i.e. the amount of light reaching the subject. It is not to be confused with luminance, which is the amount of light reflected from a surface, or with luminous power, a.k.a. luminous flux, which is the total amount of light emitted from a source.)

Usually you start with a T-stop (or f-stop) that you want to shoot at, based on the depth of field you’d like. You also need to know the ISO and shutter interval (usually 1/48th or 1/50th of a second) you’ll be shooting at. Next you need to convert these facets of exposure into an illuminance value, and there are a few different ways of doing this.

One method is to use a light meter, if you have one, which you enter the ISO and shutter values into. Then you wave it around your office, living room or wherever, pressing the trigger until you happen upon a reading which matches your target f-stop. Then you simply switch your meter into foot-candles mode and read off the number. This method can be a bit of a pain in the neck, especially if – like mine – your meter requires fiddly flipping of dip-switches and additional calculations to get a foot-candles reading out of.

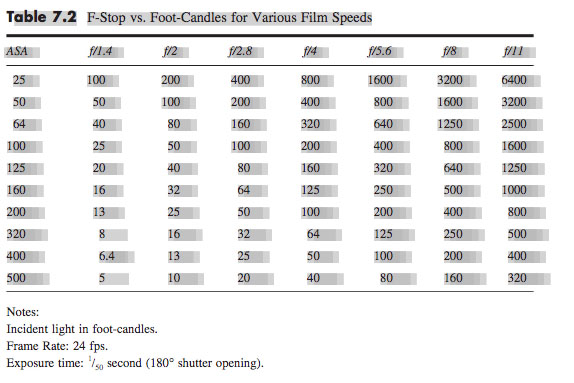
A much simpler method is to consult an exposure table, like the one below, or an exposure calculator, which I’m sure is a thing which must exist, but I’ll be damned if I could find one.

Some cinematographers memorise the fact that 100fc is f/2.8 at ISO 100, and work out other values from that. For example, ISO 400 is four times (two stops) faster than ISO 100, so a quarter of the light is required, i.e. 25fc.

Alternatively, you can use the underlying maths of the above methods. This is unlikely to be necessary in the real world, but for the purposes of this blog it’s instructive to go through the process. The equation is:

where

  • b is the illuminance in fc,
  • f is the f– or T-stop,
  • s is the shutter interval in seconds, and
  • i is the ISO.

Say I’m shooting on an Alexa with a Cooke S4 Mini lens. If I have the lens wide open at T2.8, the camera at its native ISO of 800 and the shutter interval at the UK standard of 1/50th (0.02) of a second…

… so I need about 12fc of light.


The right instrument

In the rare event that you’re actually lighting your set with candles – as covered in my Barry Lyndon and Stasis posts – then an illuminance value in fc is all you need. In every other situation, though, you need to figure out which electric light fixtures are going to give you the illuminance you need.

Manufacturers of professional lighting instruments make this quite easy for you, as they all provide data on the illuminance supplied by their products at various distances. For example, if I visit Mole Richardson’s webpage for their 1K Baby-Baby fresnel, I can click on the Performance Data table to see that this fixture will give me the 12fc (in fact slightly more, 15fc) that I required in my Alexa/Cooke example at a distance of 30ft on full flood.

Other manufacturers provide interactive calculators: on ETC’s site you can drag a virtual Source Four back and forth and watch the illuminance read-out change, while Arri offers a free iOS/Android app with similar functionality.

If you need to calculate an illuminance value for a distance not specified by the manufacturer, you can derive it from distances they do specify, by using the Inverse Square Law. However, as I found in my investigatory post about the law, that could be a whole can of worms.

If illuminance data is not available for your light source, then I’m afraid more maths is involved. For example, the room I’m currently in is lit by a bulb that came in a box marked “1,650 lumens”, which is the luminous power. One lumen is one foot-candle per square foot. To find out the illuminance, i.e. how many square feet those lumens are spread over, we imagine those square feet as the area of a sphere with the lamp at the centre, and where the radius r is the distance from the lamp to the subject. So:

where

  • is again the illuminance in fc,
  • is the luminous power of the souce in lumens, and
  • r is the lamp-to-subject distance in feet.

(I apologise for the mix of Imperial and SI units, but this is the reality in the semi-Americanised world of British film production! Also, please note that this equation is for point sources, rather than beams of light like you get from most professional fixtures. See this article on LED Watcher if you really want to get into the detail of that.)

So if I want to shoot that 12fc scene on my Alexa and Cooke S4 Mini under my 1,650 lumen domestic bulb…

… my subject needs to be 3’4″ from the lamp. I whipped out my light meter to check this, and it gave me the target T2.8 at 3’1″ – pretty close!


Do I have enough light?

If you’re on a tight budget, it may be less a case of, “What T-stop would I like to shoot at, and what fixture does that require?” and more a case of, “Is the fixture which I can afford bright enough?”

Let’s take a real example from Perplexed Music, a short film I lensed last year. We were shooting on an Alexa at ISO 1600, 1/50th sec shutter, and on Arri/Zeiss Ultra Primes, which have a maximum aperture of T1.9. The largest fixture we had was a 2.5K HMI, and I wanted to be sure that we would have enough light for a couple of night exteriors at a house location.

In reality I turned to an exposure table to find the necessary illuminance, but let’s do the maths using the first equation that we met in this post:

Loading up Arri’s photometrics app, I could see that 2.8fc wasn’t going to be a problem at all, with the 2.5K providing 5fc at the app’s maximum distance of 164ft.

That’s enough for today. All that maths may seem bewildering, but most of it is eliminated by apps and other online calculators in most scenarios, and it’s definitely worth going to the trouble of checking you have enough light before you’re on set with everyone ready to roll!

See also: 6 Ways of Judging Exposure

SaveSave

SaveSave

How Big a Light do I Need?

Colour Rendering Index

Many light sources we come across today have a CRI rating. Most of us realise that the higher the number, the better the quality of light, but is it really that simple? What exactly is Colour Rendering Index, how is it measured and can we trust it as cinematographers? Let’s find out.


What is C.R.I.?

CRI was created in 1965 by the CIE – Commission Internationale de l’Eclairage – the same body responsible for the colour-space diagram we met in my post about How Colour Works. The CIE wanted to define a standard method of measuring and rating the colour-rendering properties of light sources, particularly those which don’t emit a full spectrum of light, like fluorescent tubes which were becoming popular in the sixties. The aim was to meet the needs of architects deciding what kind of lighting to install in factories, supermarkets and the like, with little or no thought given to cinematography.

As we saw in How Colour Works, colour is caused by the absorption of certain wavelengths of light by a surface, and the reflection of others. For this to work properly, the light shining on the surface in the first place needs to consist of all the visible wavelengths. The graphs below show that daylight indeed consists of a full spectrum, as does incandescent lighting (e.g. tungsten), although its skew to the red end means that white-balancing is necessary to restore the correct proportions of colours to a photographed image. (See my article on Understanding Colour Temperature.)

Fluorescent and LED sources, however, have huge peaks and troughs in their spectral output, with some wavelengths missing completely. If the wavelengths aren’t there to begin with, they can’t reflect off the subject, so the colour of the subject will look wrong.

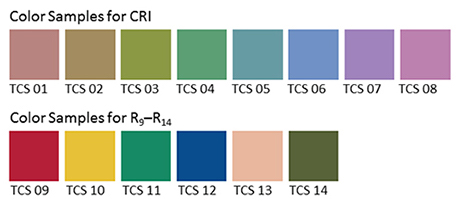
Analysing the spectrum of a light source to produce graphs like this required expensive equipment, so the CIE devised a simpler method of determining CRI, based on how the source reflected off a set of eight colour patches. These patches were murky pastel shades taken from the Munsell colour wheel (see my Colour Schemes post for more on colour wheels). In 2004, six more-saturated patches were added.

The maths which is used to arrive at a CRI value goes right over my head, but the testing process boils down to this:

  1. Illuminate a patch with daylight (if the source being tested has a correlated colour temperature of 5,000K or above) or incandescent light (if below 5,000K).
  2. Compare the colour of the patch to a colour-space CIE diagram and note the coordinates of the corresponding colour on the diagram.
  3. Now illuminate the patch with the source being tested.
  4. Compare the new colour of the patch to the CIE diagram and note the coordinates of the corresponding colour.
  5. Calculate the distance between the two sets of coordinates, i.e. the difference in colour under the two light sources.
  6. Repeat with the remaining patches and calculate the average difference.

Here are a few CRI ratings gleaned from around the web:

Source CRI
Sodium streetlight -44
Standard fluorescent 50-75
Standard LED 83
LitePanels 1×1 LED 90
Arri HMI 90+
Kino Flo 95
Tungsten 100 (maximum)


Problems with C.R.I.

There have been many criticisms of the CRI system. One is that the use of mean averaging results in a lamp with mediocre performance across all the patches scoring the same CRI as a lamp that does terrible rendering of one colour but good rendering of all the others.

Demonstrating the non-continuous spectrum of a fluorescent lamp, versus the continuous spectrum of incandescent, using a prism.

Further criticisms relate to the colour patches themselves. The eight standard patches are low in saturation, making them easier to render accurately than bright colours. An unscrupulous manufacturer could design their lamp to render the test colours well without worrying about the rest of the spectrum.

In practice this all means that CRI ratings sometimes don’t correspond to the evidence of your own eyes. For example, I’d wager that an HMI with a quoted CRI in the low nineties is going to render more natural skin-tones than an LED panel with the same rating.

I prefer to assess the quality of a light source by eye rather than relying on any quoted CRI value. Holding my hand up in front of an LED fixture, I can quickly tell whether the skin tones looks right or not. Unfortunately even this system is flawed.

The fundamental issue is the trichromatic nature of our eyes and of cameras: both work out what colour things are based on sensory input of only red, green and blue. As an analogy, imagine a wall with a number of cracks in it. Imagine that you can only inspect it through an opaque barrier with three slits in it. Through those three slits, the wall may look completely unblemished. The cracks are there, but since they’re not aligned with the slits, you’re not aware of them. And the “slits” of the human eye are not in the same place as the slits of a camera’s sensor, i.e. the respective sensitivities of our long, medium and short cones do not quite match the red, green and blue dyes in the Bayer filters of cameras. Under continuous-spectrum lighting (“smooth wall”) this doesn’t matter, but with non-continuous-spectrum sources (“cracked wall”) it can lead to something looking right to the eye but not on camera, or vice-versa.


Conclusion

Given its age and its intended use, it’s not surprising that CRI is a pretty poor indicator of light quality for a modern DP or gaffer. Various alternative systems exist, including GAI (Gamut Area Index) and TLCI (Television Lighting Consistency Index), the latter similar to CRI but introducing a camera into the process rather than relying solely on human observation. The Academy of Motion Picture Arts and Sciences recently invented a system, Spectral Similarity Index (SSI), which involves measuring the source itself with a spectrometer, rather than reflected light. At the time of writing, however, we are still stuck with CRI as the dominant quantitative measure.

So what is the solution? Test, test, test. Take your chosen camera and lens system and shoot some footage with the fixtures in question. For the moment at least, that is the only way to really know what kind of light you’re getting.

SaveSave

SaveSaveSaveSave

SaveSave

SaveSave

SaveSave

SaveSave

SaveSave

SaveSave

SaveSave

SaveSave

Colour Rendering Index

“The Knowledge”: Lighting a Multi-camera Game Show

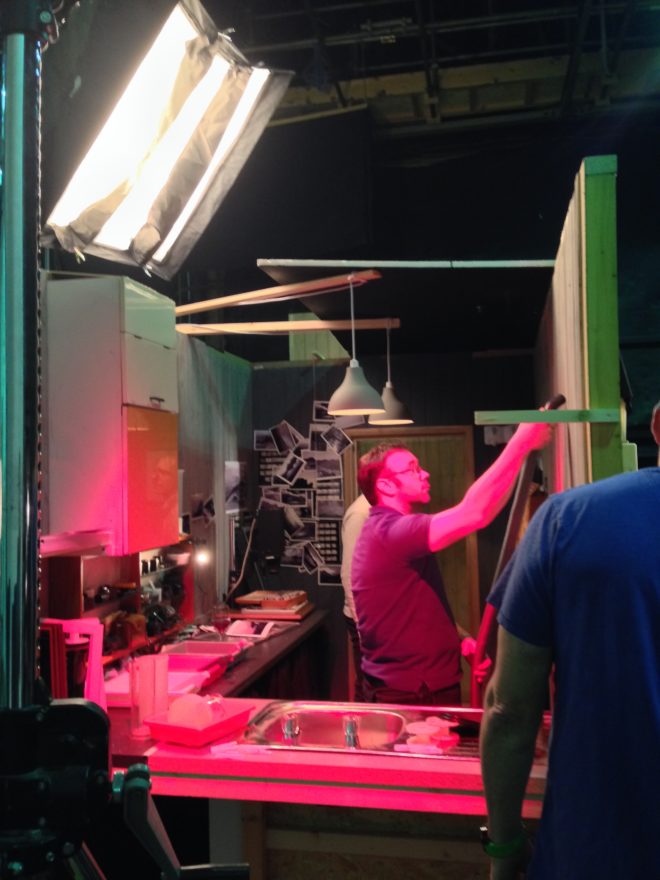
Metering the key-light. Photo: Laura Radford

Last week I discussed the technical and creative decisions that went into the camerawork of The Knowledge, a fake game show for an art installation conceived by Ian Wolter and directed by Jonnie Howard. This week I’ll break down the choices and challenges involved in lighting the film.

The eighties quiz shows which I looked at during prep were all lit with the dullest, flattest light imaginable. It was only when I moved forward to the nineties shows which Jonnie and I grew up on, like Blockbusters and The Generation Game, that I started to see some creativity in the lighting design: strip-lights and glowing panels in the sets, spotlights and gobos on the backgrounds, and moodier lighting states for quick-fire rounds.

Jonnie and I both wanted The Knowledge‘s lighting to be closer to this nineties look. He was keen to give each team a glowing taxi sign on their desks, which would be the only source of illumination on the contestants at certain moments. Designer Amanda Stekly and I came up with plans for additional practicals – ultimately LED string-lights – that would follow the map-like lines in the set’s back walls.

Once the set design had been finalised, I did my own dodgy pencil sketch and Photoshopped it to create two different lighting previsualisations for Jonnie.

He felt that these were a little too sophisticated, so after some discussion I produced a revised previz…

…and a secondary version showing a lighting state with one team in shadow.

These were approved, so now it was a case of turning those images into reality.

We were shooting on a soundstage, but for budget reasons we opted not to use the lighting grid. I must admit that this worried me for a little while. The key-light needed to come from the front, contrary to normal principles of good cinematography, but very much in keeping with how TV game shows are lit. I was concerned that the light stands and the cameras would get in each others’ way, but my gaffer Ben Millar assured me it could be done, and of course he was right.

Ben ordered several five-section Strato Safe stands (or Fuck-offs as they’re charmingly known). These were so high that, even when placed far enough back to leave room for the cameras, we could get the 45° key angle which we needed in order to avoid seeing the contestants’ shadows on the back walls. (A steep key like this is sometimes known as a butterfly key, for the shape of the shadow which the subject’s nose casts on their upper lip.)  Using the barn doors, and double nets on friction arms in front of the lamp-heads, Ben feathered the key-light to hit as little as possible of the back walls and the fronts of the desks. As well as giving the light some shape, this prevented the practical LEDs from getting washed out.

Note the nets mounted below the key-lights (the tallest ones). Photo: Laura Radford

Once those key-lights were established (a 5K fresnel for each team), we set a 2K backlight for each team as well. These were immediately behind the set, their stands wrapped in duvetyne, and the necks well and truly broken to give a very toppy backlight. A third 2K was placed between the staggered central panels of the set, spilling a streak of light out through the gap from which host Robert Jezek would emerge.

A trio of Source Fours with 15-30mm zoom lenses were used for targeted illumination of certain areas. One was aimed at The Knowledge sign, its cutters adjusted to form a rectangle of light around it. Another was focused on the oval map on the floor, which would come into play during the latter part of the show. The last Source Four was used as a follow-spot on Robert. We had to dim it considerably to keep the exposure in range, which conveniently made him look like he had a fake tan! Ben hooked everything, in fact, up to a dimmer board, so that various lighting cues could be accomplished in camera.

The bulk of the film was recorded in a single day, following a day’s set assembly and a day of pre-rigging. A skeleton crew returned the next day to shoot pick-ups and promos, a couple of which you can see on Vimeo here.

I’ll leave you with some frame grabs from the finished film. Find out more about Ian Wolter’s work at ianwolter.com.

SaveSave

SaveSave

SaveSave

“The Knowledge”: Lighting a Multi-camera Game Show