Exposure Part 4: ISO

So far in this series we have seen how we can adjust exposure using aperture, which affects depth of field, ND filters, which can help us retain the depth of field we want, and shutter angle, which affects motion blur and flickering of certain light sources. In this final part we’ll look at ISO, perhaps the most misunderstood element of exposure, if indeed we can technically classify it as part of exposure at all!


What is ISO?

The acronym stands for International Organization for Standardization, the body which in 1974 combined the old ASA (American Standards Association) units of film speed with the German DIN standard. That’s why you’ll often hear the terms ISO and ASA used interchangeably.

Two different cameras filming the same scene with the same filters, aperture and shutter settings will not necessarily produce an image of equal brightness, because the ways that their electronics convert light into video signals are different. That is why we need ISO, which defines the relationship between the amount of light reaching the sensor (or film) and the brightness of the resulting image.

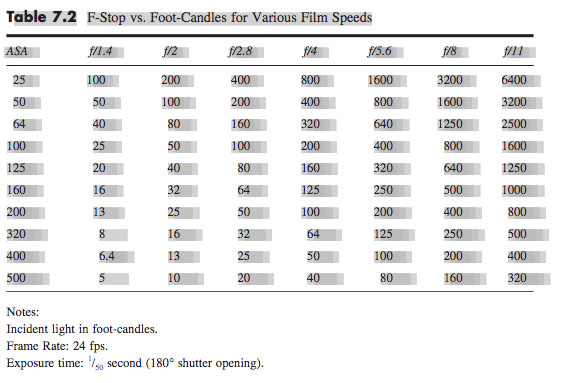
For example, a common ISO to shoot at today is 800. One way of defining ISO 800 is that it’s the setting required to correctly expose a key-light of 12 foot-candles with a lens set to T2.8 and a 180° shutter at 24fps (1/48th of a second).

If we double the ISO we double the effective sensitivity of the camera, or halve the amount of light it requires. So at ISO 1600 we would only need 6 foot-candles of light (all the other settings being the same), and at ISO 3200 we would need just 3 foot-candles. Conversely, at ISO 400 we would need about 25 foot-candles, or 50 at ISO 200.


A Flawed Analogy

Note that I said “effective” sensitivity. This is an important point. In the photochemical world, ISO indeed denotes the light sensitivity of the film stock. It is tempting to see digital ISO as representing the sensitivity of the sensor, and changing the ISO as analogous to loading a different film stock. But in reality the sensitivity of a digital sensor is fixed, and the ISO only determines the amount of gain applied to the sensor data before it is processed (which may happen in camera if you’re shooting linear or log, or in post if you’re shooting RAW).

So a better analogy is that altering the ISO is like altering how long the lab develops the exposed film negative for. This alters the film’s exposure index (EI), hence some digital cameras using the term EI in their menus instead of ISO or ASA.

We can take this analogy further. Film manufacturers specify a recommended development time, an arbitrary period designed to produce the optimal image. If you increase (push) or decrease (pull) the development time you will get a lighter or darker image respectively, but the quality of the image will be reduced in various ways. Similarly, digital camera manufacturers specify a native ISO, which is essentially the recommended amount of gain applied to the sensor data to produce what the manufacturer feels is the best image, and if you move away from that native ISO you’ll get a subjectively “lower quality” image.
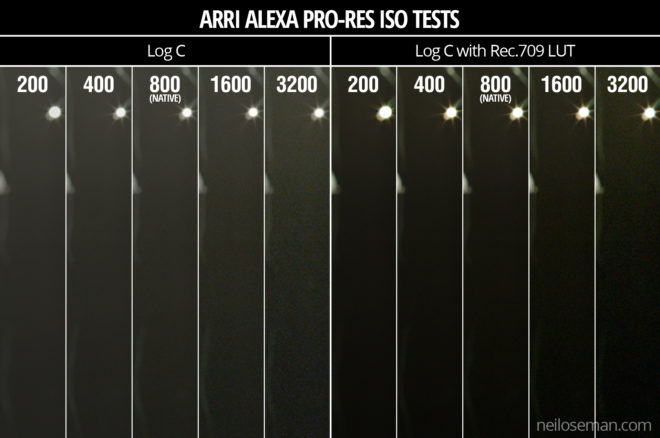
Compare the graininess/smoothness of the blacks in these images from my 2017 tests. Click to enlarge.

The most obvious side effect of increasing the ISO is more noticeable noise in the image. It’s exactly the same as turning up the volume on an amplifier; you hear more hiss because the noise floor is being boosted along with the signal itself.

I remember the days of Mini-DV cameras, which instead of ISO had gain; my Canon XL1 had gain settings of -3dB, +6dB and +12dB. It was the exact same thing, just with a different name. What the XL1 called 0dB of gain was what we call the native ISO today.


ISO and Dynamic range

At this point we need to bring in the concept of dynamic range. Let’s take the Arri Alexa as an example. This camera has a dynamic range of 14 stops. At its native ISO of 800, those 14 stops of dynamic range are equally distributed above and below “correct” exposure (known as middle grey), so you can overexpose by up to seven stops, and underexpose by up to seven stops, without losing detail.

If you change the Alexa’s ISO, those limits of under- and overexposure still apply, but they’re shifted around middle grey. For example, at 400 ISO you have eight stops of detail below middle grey, but only six above it. This means that, assuming you adjust your iris, shutter or filters to compensate for the change in ISO, you can trade-off highlight detail for shadow detail, or vice versa.

Imagine underexposing a shot by one stop and bringing it back up in post. You increase the highlight detail, because you’re letting half the light through to the sensor, reducing the risk of clipped whites, but you also increase the noise when you bring it up in post. This is basically what you’re doing when you increase your ISO, except that if you’re recording in linear or log then the restoration of brightness and increase in gain happen within the camera, rather than in post with RAW.
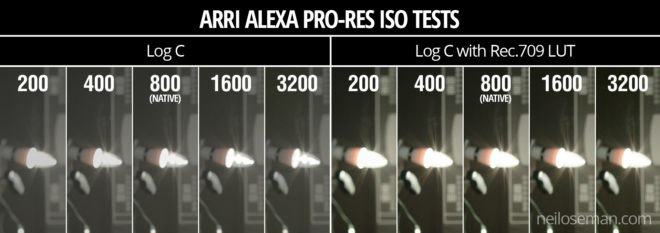
Note the increased detail in the bulb at higher ISOs. Click to enlarge..

We can summarise all this as follows:

Doubling the ISO…

  • increases overall brightness by one stop, and
  • increases picture noise.

Then adjusting the exposure to compensate (e.g. closing the iris one stop)…

  • restores overall brightness to its original value,
  • gives you one more stop of detail in the highlights, and
  • gives you one less stop of detail in the shadows.

Alternatively, halving the ISO…

  • decreases overall brightness by one stop, and
  • decreases picture noise.

Then adjusting the exposure to compensate (e.g. opening the iris one stop)…

  • restores overall brightness to its original value,
  • gives you one less stop of detail in the highlights, and
  • gives you one more stop of detail in the shadows.


Conclusion

This brings me to the end of my exposure series. We’ve seen that choosing the “correct” exposure is a balancing act, taking into account not just the intended brightness of the image but also the desired depth of field, bokeh, lens flares, motion blur, flicker prevention, noise and dynamic range. I hope this series has helped you to make the best creative decisions on your next production.

See also: “6 Ways to Judge Exposure”
Exposure Part 4: ISO

How Colour Works

Colour is a powerful thing. It can identify a brand, imply eco-friendliness, gender a toy, raise our blood pressure, calm us down. But what exactly is colour? How and why do we see it? And how do cameras record it? Let’s find out.


The Meaning of “Light”

One of the many weird and wonderful phenomena of our universe is the electromagnetic wave, an electric and magnetic oscillation which travels at 186,000 miles per second. Like all waves, EM radiation has the inversely-proportional properties of wavelength and frequency, and we humans have devised different names for it based on these properties.

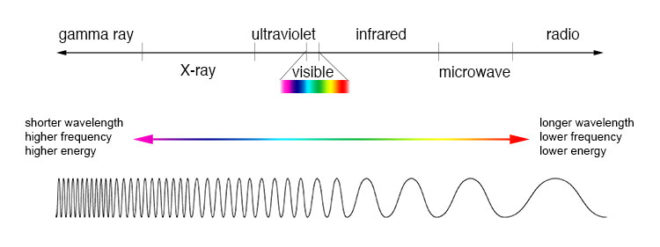
The electromagnetic spectrum

EM waves with a low frequency and therefore a long wavelength are known as radio waves or, slightly higher in frequency, microwaves; we used them to broadcast information and heat ready-meals. EM waves with a high frequency and a short wavelength are known as x-rays and gamma rays; we use them to see inside people and treat cancer.

In the middle of the electromagnetic spectrum, sandwiched between infrared and ultraviolet, is a range of frequencies between 430 and 750 terahertz (wavelengths 400-700 nanometres). We call these frequencies “light”, and they are the frequencies which the receptors in our eyes can detect.

If your retinae were instead sensitive to electromagnetic radiation of between 88 and 91 megahertz, you would be able to see BBC Radio 2. I’m not talking about magically seeing into Ken Bruce’s studio, but perceiving the FM radio waves which are encoded with his silky-smooth Scottish brogue. Since radio waves can pass through solid objects though, perceiving them would not help you to understand your environment much, whereas light waves are absorbed or reflected by most solid objects, and pass through most non-solid objects, making them perfect for building a picture of the world around you.

Within the range of human vision, we have subdivided and named smaller ranges of frequencies. For example, we describe light of about 590-620nm as “orange”, and below about 450nm as “violet”. This is all colour really is: a small range of wavelengths (or frequencies) of electromagnetic radiation, or a combination of them.


In the eye of the beholder

Scanning electron micrograph of a retina

The inside rear surfaces of your eyeballs are coated with light-sensitive cells called rods and cones, named for their shapes.

The human eye has about five or six million cones. They come in three types: short, medium and long, referring to the wavelengths to which they are sensitive. Short cones have peak sensitivity at about 420nm, medium at 530nm and long at 560nm, roughly what we call blue, green and red respectively. The ratios of the three cone types vary from person to person, but short (blue) ones are always in the minority.

Rods are far more numerous – about 90 million per eye – and around a hundred times more sensitive than cones. (You can think of your eyes as having dual native ISOs like a Panasonic Varicam, with your rods having an ISO six or seven stops faster than your cones.) The trade-off is that they are less temporally and spatially accurate than cones, making it harder to see detail and fast movement with rods. However, rods only really come into play in dark conditions. Because there is just one type of rod, we cannot distinguish colours in low light, and because rods are most sensitive to wavelengths of 500nm, cyan shades appear brightest. That’s why cinematographers have been painting night scenes with everything from steel grey to candy blue light since the advent of colour film.

The spectral sensitivity of short (blue), medium (green) and long (red) cones

The three types of cone are what allow us – in well-lit conditions – to have colour vision. This trichromatic vision is not universal, however. Many animals have tetrachromatic (four channel) vision, and research has discovered some rare humans with it too. On the other hand, some animals, and “colour-blind” humans, are dichromats, having only two types of cone in their retinae. But in most people, perceptions of colour result from combinations of red, green and blue. A combination of red and blue light, for example, appears as magenta. All three of the primaries together make white.

Compared with the hair cells in the cochlea of your ears, which are capable of sensing a continuous spectrum of audio frequencies, trichromacy is quite a crude system, and it can be fooled. If your red and green cones are triggered equally, for example, you have no way of telling whether you are seeing a combination of red and green light, or pure yellow light, which falls between red and green in the spectrum. Both will appear yellow to you, but only one really is. That’s like being unable to hear the difference between, say, the note D and a combination of the notes C and E. (For more info on these colour metamers and how they can cause problems with certain types of lighting, check out Phil Rhode’s excellent article on Red Shark News.)


Artificial eye

A Bayer filter

Mimicking your eyes, video sensors also use a trichromatic system. This is convenient because it means that although a camera and TV can’t record or display yellow, for example, they can produce a mix of red and green which, as we’ve just established, is indistinguishable from yellow to the human eye.

Rather than using three different types of receptor, each sensitive to different frequencies of light, electronic sensors all rely on separating different wavelengths of light before they hit the receptors. The most common method is a colour filter array (CFA) placed immediately over the photosites, and the most common type of CFA is the Bayer filter, patented in 1976 by an Eastman Kodak employee named Dr Bryce Bayer.

The Bayer filter is a colour mosaic which allows only green light through to 50% of the photosites, only red light through to 25%, and only blue to the remaining 25%. The logic is that green is the colour your eyes are most sensitive to overall, and that your vision is much more dependent on luminance than chrominance.

A RAW, non-debayered image

The resulting image must be debayered (or more generally, demosaiced) by an algorithm to produce a viewable image. If you’re recording log or linear then this happens in-camera, whereas if you’re shooting RAW it must be done in post.

This system has implications for resolution. Let’s say your sensor is 2880×1620. You might think that’s the number of pixels, but strictly speaking it isn’t. It’s the number of photosites, and due to the Bayer filter no single one of those photosites has more than a third of the necessary colour information to form a pixel of the final image. Calculating that final image – by debayering the RAW data – reduces the real resolution of the image by 20-33%. That’s why cameras like the Arri Alexa or the Blackmagic Cinema Camera shoot at 2.8K or 2.5K, because once it’s debayered you’re left with an image of 2K (cinema standard) resolution.


colour Compression

Your optic nerve can only transmit about one percent of the information captured by the retina, so a huge amount of data compression is carried out within the eye. Similarly, video data from an electronic sensor is usually compressed, be it within the camera or afterwards. Luminance information is often prioritised over chrominance during compression.

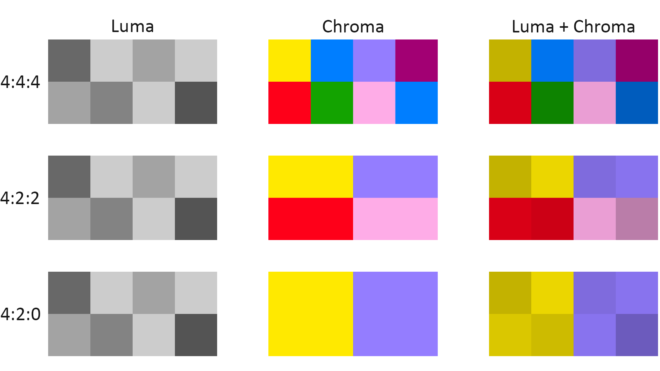
Examples of chroma subsampling ratios

You have probably come across chroma subsampling expressed as, for example, 444 or 422, as in ProRes 4444 (the final 4 being transparency information, only relevant to files generated in postproduction) and ProRes 422. The three digits describe the ratios of colour and luminance information: a file with 444 chroma subsampling has no colour compression; a 422 file retains colour information only in every second pixel; a 420 file, such as those on a DVD or BluRay, contains one pixel of blue info and one of red info (the green being derived from those two and the luminance) to every four pixels of luma.

Whether every pixel, or only a fraction of them, has colour information, the precision of that colour info can vary. This is known as bit depth or colour depth. The more bits allocated to describing the colour of each pixel (or group of pixels), the more precise the colours of the image will be. DSLRs typically record video in 24-bit colour, more commonly described as 8bpc or 8 bits per (colour) channel. Images of this bit depth fall apart pretty quickly when you try to grade them. Professional cinema cameras record 10 or 12 bits per channel, which is much more flexible in postproduction.

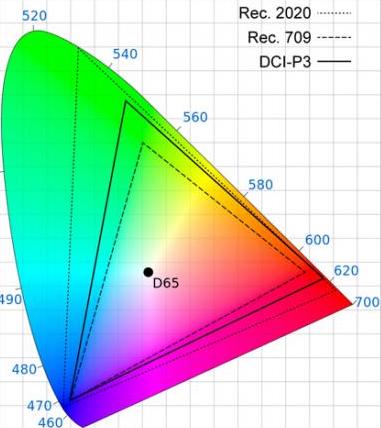
CIE diagram showing the gamuts of three video standards. D65 is the standard for white.

The third attribute of recorded colour is gamut, the breadth of the spectrum of colours. You may have seen a CIE (Commission Internationale de l’Eclairage) diagram, which depicts the range of colours perceptible by human vision. Triangles are often superimposed on this diagram to illustrate the gamut (range of colours) that can be described by various colour spaces. The three colour spaces you are most likely to come across are, in ascending order of gamut size: Rec.709, an old standard that is still used by many monitors; P3, used by digital cinema projectors; and Rec.2020. The latter is the standard for ultra-HD, and Netflix are already requiring that some of their shows are delivered in it, even though monitors capable of displaying Rec.2020 do not yet exist. Most cinema cameras today can record images in Rec.709 (known as “video” mode on Blackmagic cameras) or a proprietary wide gamut (“film” mode on a Blackmagic, or “log” on others) which allows more flexibility in the grading suite. Note that the two modes also alter the recording of luminance and dynamic range.

To summarise as simply as possible: chroma subsampling is the proportion of pixels which have colour information, bit depth is the accuracy of that information and gamut is the limits of that info.

That’s all for today. In future posts I will look at how some of the above science leads to colour theory and how cinematographers can make practical use of it.

SaveSave

How Colour Works