This is a pretty esoteric post, I’ll warn you now.
Some of the Stop/Eject behind-the-scenes footage was shot on a Canon camcorder set to “24P Cinema Mode”. It took me ages to figure out how to convert this material to 25 frames per second without the motion becoming very jerky. So I’m going to set down how I eventually did it, in case it can help any other poor souls in the same situation. I was working on an iMac with Lion and FCP Studio 7.

What is 24P Cinema Mode? It’s aimed at American users, and emulates how “real” movies look when they’re broadcast on US TV. Real movies are shot at 24fps and telecined to 30fps (actually 29.97fps, but we’ll say 30 for simplicity’s sake) which is the standard frame-rate of American TVs, DVD players and so on. 24P Cinema Mode captures 24 frames per second and converts them, as the camera is recording, to 30fps. It essentially does this by duplicating every fifth frame and using interlacing to smooth out the motion. This is known as 2:3 pulldown. More expensive cameras embed metadata in their 2:3 pulldown footage so that software like Final Cut Pro can automatically restore it to genuine 24fps, but the material I was working with had no such metadata. I believe it was shot on a Canon Vixia HF10 or similar.

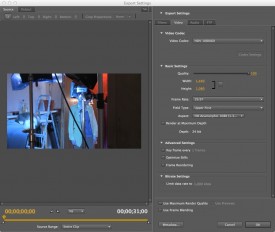
The other problem I had with the footage in question was its format: AVCHD (identified by a .MTS file extension), which Macs don’t really like. Final Cut Pro will convert them via the Log and Transfer window, but only if they’re on an SD card or a disc image of an SD card. But I’d been given the footage on a data DVD, and copying it to an SD card did not fool Final Cut. After much trawling of the magical interweb and trying various free applications that didn’t work very well, I discovered that Adobe Media Encoder accepts MTS files. (If you don’t have the Adobe suite, you can buy an application called VoltaicHD that will apparently do the job.)
So here are the three transcoding stages I went through to convert the material into editable 1080P25:

- I used Adobe Media Encoder to convert the source files to Quicktimes. I chose the HDV 1080i60 codec and retained the interlacing, field order (upper first), frame size (1440×1080 anamorphic) and frame rate (29.97fps) of the original material.
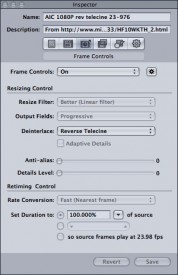
- I followed the method on this web page using Apple Compressor. In a nutshell, you take an existing preset – say one of the ProRes ones, if that’s the format you like to edit footage in – and alter two things: the frame rate, found by clicking the video Settings button in the Encoder tab, and the deinterlace option, found in the Frame Controls tab. Set the former to 23.976 and the latter to Reverse Telecine (after first enabling the Frame Controls by clicking the small gear next to the on/off pulldown menu, and selecting On from said menu). At this stage you can also resize the image to true HD, 1920×1080. The resulting video file should be genuine 24fps with no interlacing.
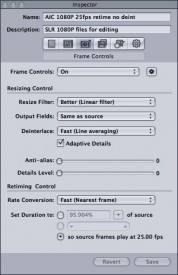
- Next bring your 24fps file back into Compressor and drop another preset onto it. Again, use ProRes or whatever your codec of choice is, but this time make sure the frame rate is set to 25fps, deinterlace is NOT set to Reverse Telecine and, at the bottom of the Frame Controls tab, where it says “Set Duration to”, click the last radio button, “so source frames play at 25.00 fps”. What this does is to speed up your video about 4% so that it runs at 25fps. This is the smoothest way to convert 24fps to 25fps, and the speed difference will not be noticeable on playback. In fact, whenever you watch a movie on UK TV it is sped up like this.

If you’re in any doubt as to whether it’s worked, step through the video frame by frame in Final Cut and see if there are any duplicated, skipped or interlaced frames.
Of course, after all this transcoding, the image quality will have suffered a bit, but at least the motion should be smooth. Has anyone out there found a better method of doing this? I’d love to hear from you if so. Alternatively, if you want any more details on the steps above, just leave a comment and I’ll be happy to share them.
The moral of the story is, if you’re in the UK, don’t use 24P Cine Mode. Just like shooting 24fps on celluloid, it unnecessarily complicates post-production. Stick to 25fps and everything will come up smelling of roses.