Review of the Year: 2013

Stop/Eject
Stop/Eject

Where did the year go? It’s time for me to look at how my cinematic accomplishments in 2013 have measured up against the goals I set myself this time last year – which were:

In 2013 I definitely need to complete Stop/Eject and have a rough cut of my next short film by the end of the year, as well as entering Virgin Media Shorts again. I also want to have the Stop/Eject feature script at second draft stage and the beginnings of a package (actor attachments, outline budget and so on) by this time next year. I’d like to get at least one more feature script worked up as well. I want to get more directing gigs for other people, like SAS Couriers, and do more talks and screenings. It would be great to get Video8 into at least one more festival.

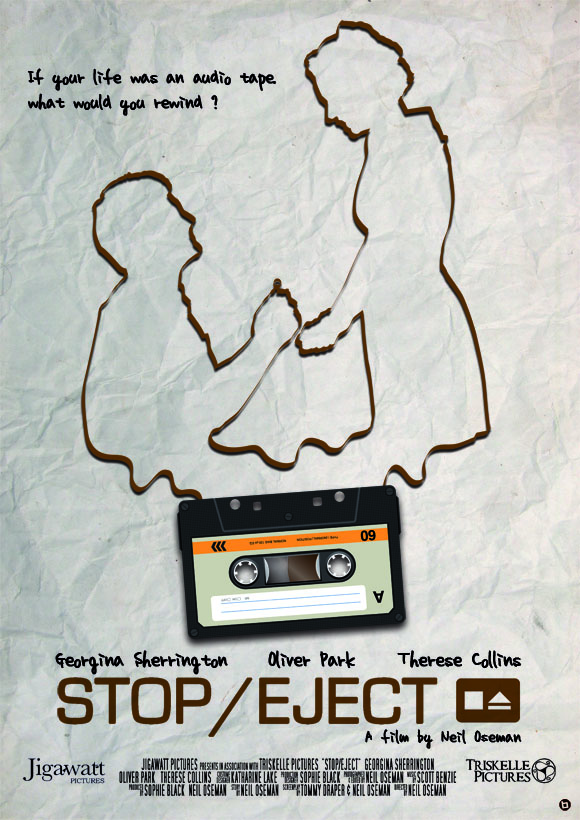
It starts off well. I did indeed complete Stop/Eject in June of this year. So far producer Sophie Black and I have entered it into fifteen of the world’s top film festivals. Four have turned it down, and the rest we wait to hear from. In 2014 I intend to enter it into at least the same number again.

I have long suspected that a much bigger-budget short, shot on 35mm with a name actor in the lead, would stand a far better chance of festival success. That was the “next short film” of which I spoke in my goals above. Accordingly I searched for and found a suitable writer back at the start of this year, and he duly penned a fantastic script. The issue, as always, was financing. At first I tried looking for producers, but no-one seemed to know how to raise serious dosh for an entirely uncommercial project, which is of course what a short film is. I had a faint hope that the BFI Shorts scheme would run again this year – offering up to £50,000 to produce a short – but instead we got iShorts, offering a paltry £5,000. (I teamed up with another writer and entered this scheme with much smaller scale stories, but we didn’t even make it to the first round.)

Henry, the star of the show
Henry Otto, the star of The One That Got Away

So right now I have no idea how to go forward with “the next short film”. A lot of people told me to just make a feature instead. Maybe they’re right.

Stop/Eject’s feature script hasn’t reached first draft stage yet, let alone second. Nor have I worked up another feature script. So a big fail there.

SAS Couriers fell through, but after some delays A Cautionary Tale is heading for a February 2014 shoot. That’s currently the only “directing gig for other people” I’m doing.

This year’s Virgin Media Shorts entry The One That Got Away was my strongest yet, thanks largely to the design and puppetry talents of Katie Lake, though it failed to make the shortlist. Nonetheless it’s screened at Worcestershire Film Festival and Roots to Shoots in Warwick, I’ve entered it into several international festivals, and lots of people have said nice things about it.

The First Musketeer
The First Musketeer

I gave a “making of Stop/Eject” talk at CEMRIAC back in March, and ran a workshop for Hereford’s BFI Film Academy at the Rural Media Company just the other week, but in general it’s been a quiet year for lecturing.

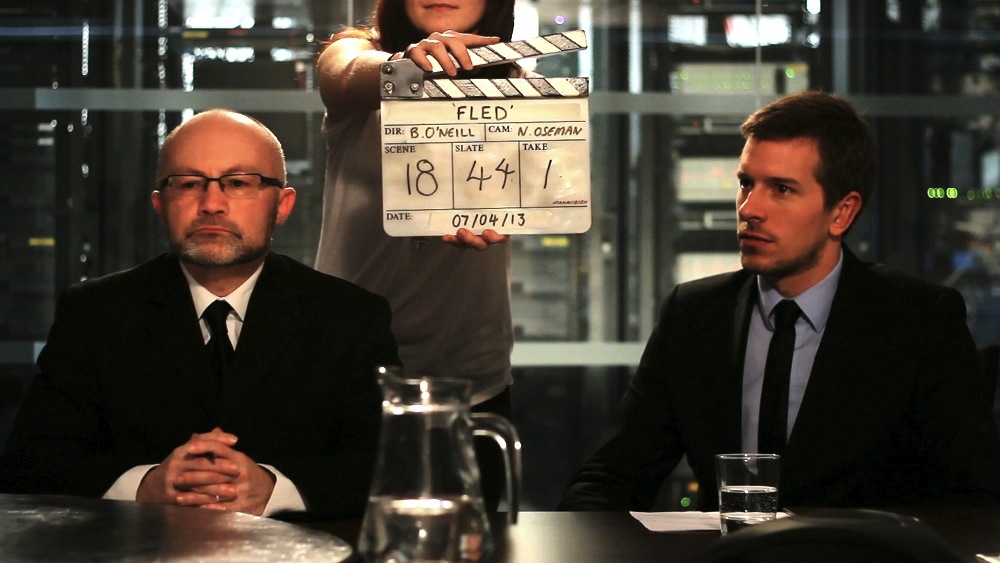
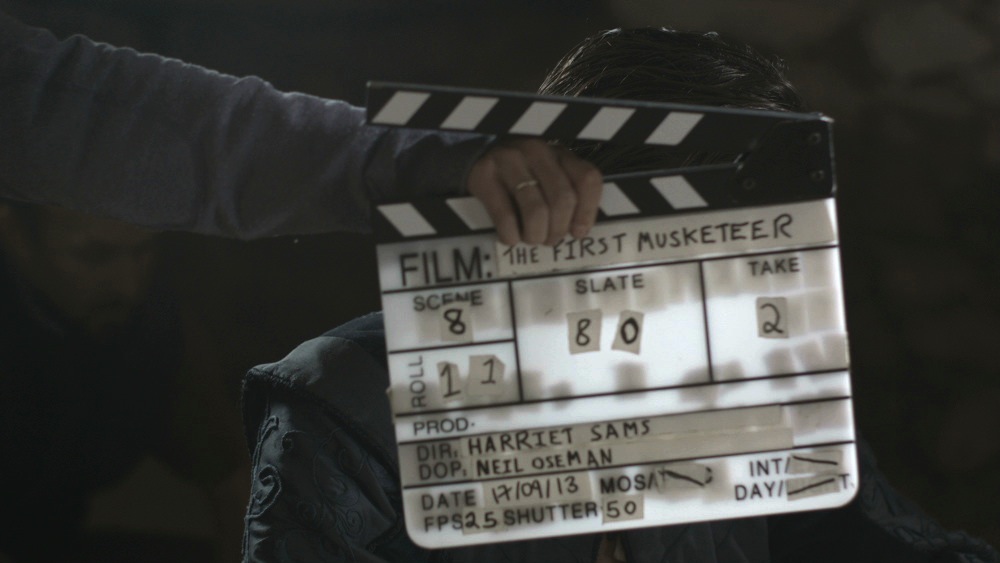
One area where I seem to have made big progress this year, perhaps as much by accident as by design, is in my cinematography work. Since January I’ve served as director on photography on Fled (48hr challenge short, Birmingham, dir. Brendan O’Neill), Girl and a Scar (experimental horror short, Tyne & Wear, dir. Dave Cave), The Deaths of John Smith (black comedy feature pilot, Warwickshire, dir. Roger Harding), 3 Blind Mice (short drama, Newbury, dir. KT Roberts), Droplets (music promo, Nottingham, dir. Tom Walsh) and The First Musketeer (action adventure web series, Lot – France, dir. Harriet Sams). This latter project, as I’ve previously enthused, was the best shoot I’ve ever worked on, was my first experience of DPing a period piece, and has led to some great friendships and professional connections. And I’ve learnt a huge amount too. It’s been great to be able to give so much back to the indie film scene this year. I hope it goes some way to repaying the karma of all the wonderful people who’ve worked for free on my own projects.

So, in 2014 I hope to work as DP for many more great directors, to complete A Cautionary Tale, to see Stop/Eject get into a significant festival, to enter Virgin Media Shorts again.

And beyond that, what do you think I should do? Should I try to get that mystery short off the ground? Push on with the Stop/Eject feature? Resurrect The Dark Side of the Earth? Or something else entirely? I am genuinely interested to know what people think, because I’m not at all sure what the best way to go is. (Please comment on my Facebook page. I’ve had to disable comments on this blog due to an obscene volume of spam.)

I’ll leave you with my top ten posts of the year.

  1. Poor Man’s Process. The really low-tech but incredibly effective way to fake driving scenes.
  2. Top Ten Crowd-funding Tips. The sum total of my experiences financing Stop/Eject condensed into ten invaluable nuggets of advice.
  3. Cannes 2013 Video Blogs. This year I accompanied Cannes virgin Sophie Black to the crazy Cote d’Azur film festival. Find out how the trip went and what her first impressions were.
  4. Making a Digital Cinema Package. Stepping you through the whole process from converting your film to a compliant frame rate and frame size to formatting the hard drive with the correct file system.
  5. How to be a Filmmaker. Ten tips for kickstarting your career in movie making.
  6. How to Speed Up Your Shoot. Single Developing Shots, down-the-line close-ups and deep two shots – do you know all the tricks to slash your re-lighting time?
  7. Depth Cues in Cinematography. Seven ways to make your 2D cinematography more three-dimensional.
  8. Know Your Lights. This video blog introduces some of the toys you get play with when you hire in a proper lighting package – including HMIs, kinoflos and dedos.
  9. Gaffering Basics. 13 amp sockets, 16 amp cabling and fuseboxes are just some of the topics covered in this introduction to the dark art of the lighting technician.
  10. How to Make a Fantasy Action Movie for £28,000. This 20 minute video breaks down how I financed my 2005 feature film Soul Searcher, exactly what the money was spent on and all the details of the distribution deal and revenue.
Review of the Year: 2013

Handheld Thoughts

In the new year I’ll be teaming up with Sophie Black once again to photograph her new short film, Night Owls, a tale of unexpected friendship with echoes of Juno and Lost in Translation. It’s early days yet, but we’ve already discussed a fluid, handheld feel as being the dominant look.

Conveniently I came across this video recently, thanks to nofilmschool.com, in which DP Sean Bobbitt delivers a masterclass in handheld camera operation. He covers it from all angles, from wearing the right clothes and stretching beforehand, to developing a rapport with the actors you’re dancing around.

There are many variations of handheld cinematography. Bobbitt talks about trying to keep the camera as stable as possible, to reduce the shake to the absolute minimum the human body can transmit to an object it’s holding. But, as he also mentions, sometimes directors ask for more energy in the camerawork – they want a lot of sway and “fidgeting”.

Halo Haynes and Mark Drake, the cast of Night Owls

A director may want you the operator to stay rooted to one spot, like a tripod with a bit of wobble, or they may want you to execute a carefully planned move – like a dolly or a steadicam with wobble. Or they might give you freedom to move around the action, framing one actor or another as you see fit. Crash zooms might be part of the agreed look, or they might be banned.

All this needs to be discussed in advance.

And if you’re going to do improvised movements, what does that mean for the lighting? It makes it more difficult. For an interior scene, which most of Night Owls is, it means relying heavily on practicals – light sources that are visible on camers, e.g. table lamps – and throwing light into the room from outside doors and windows. (Incidentally, I was lucky enough to attend a masterclass by DP Chris Menges last week and he spoke of his belief that lights should always be kept outside the room so as not to clutter up the actors’ space and eyelines with equipment.)

So these are some of the things that are swirling around in my head right now as I contemplate the Night Owls shoot on the horizon.

Now for the catch. That shoot can only happen if our crowd-funding campaign reaches its £2,000 total by January 2nd. Please check out Night Owls’ Kickstarter page and put a little bit of money in the pot if you can, or if you can’t, spread the word.

Thank you and merry Christmas!

Handheld Thoughts

Ten Tips for Running Auditions

With the casting for A Cautionary Tale fresh in my mind, here are a few tips on running auditions.

  1. Send all your auditionees the full script and/or audition sides in advance. Whether they read it all and how much they prepare will tell you a lot about their attitude to their craft and their enthusiasm for this particular role.
  2. Bring an assistant. If actor #2 turns up while actor #1 is mid-audition, it helps a lot to have someone to greet them.
  3. Make sure that the venue you’re using has an anteroom or corridor for people to wait in.
  4. Take signs (and Blutak) to direct people to the right room within the building.
  5. There will be no-shows. C’est la vie.
  6. Introduce yourself and the project before the reading, but don’t waffle because the more you keep the actor in suspense, the more nervous they will be when they finally get to read.
  7. If you’re filming the auditions, which I recommend, you should have a separate person doing that, so that you the director can watch and judge the performance with your naked eye.
  8. Check the actor’s ability to take direction by having them read a second time with a different emotional emphasis or motivation.
  9. Use an improv or two to gauge the actor’s creativity and get a sense of what they can do outside the confines of the sides.
  10. Take the time to answer any questions the actor may have about your previous experience. Remember that it’s just as much about whether they want to work with you as it is about whether you want to work with them.

How do you like to run auditions? Any tips you could add to these?

Casting for The Beacon, way back in 2001
Ten Tips for Running Auditions

Slating 101

Slating Brendan O'Neill's Fled. See www.sticklebackproductions.blogspot.co.uk
Slating Brendan O’Neill’s Fled. See www.sticklebackproductions.blogspot.co.uk

With dual system sound now the norm for even micro-budget shoots, a clapperboard (or slate as they call them in the US) is an indispensable bit of kit. It’s always best to keep this under the purview of the clapperloader or 2nd AC, rather than giving it to whichever crew member is free at the time. Otherwise you often end up with the camera operator calling “mark it” followed by an awkward pause because that crew member has left the set to perform some other duty, or has been too busy with other duties and is now scrambling to update the numbers on the slate. Incorrect slates can give the editor headaches down the line, so it’s important to get it right.

Slating Harriet Sams' The First Musketeer. See www.firstmusketeer.com
Slating Harriet Sams’ The First Musketeer. See www.firstmusketeer.com

With that in mind, here are the basic rules of slating.

Labelling the Board

The production name, scene number, DP’s and director’s names and the date are self-explanatory. DAY/NIGHT and INT/EXT (interior/exterior) are intended to ensure the labs process the film footage correctly, but should still be circled appropriately on a digital shoot. Shutter and frame rate information can be obtained from the camera operator or DP. Some slates will have a space for a roll number, and since “rolls” (memory cards) are recycled on a modern shoot, it is best to ask the DIT (Digital Imaging Technician, or data wrangler) how they would like these numbered.

Slates and Takes

The slate number should start at 1 for the first shot of the first day, and increment every time the camera position and/or lens is changed. Sometimes a director will ask instead for the slate number to match the numbers on their shotlist or storyboards, but this is a bad idea because inevitably shots will be dropped or added and it becomes very confusing. Besides, if the slate number simply starts at 1 and goes up, the DIT can easily tell if a shot is missing from their hard drive due to a card being overlooked or some technical fault.

The take number should reset to 1 each time the slate number changes, and increment every time the camera stops rolling, with certain exceptions and variations outlined below.

(The American system differs in that it omits slate numbers. Instead a letter is appended to the scene number, so the first shot filmed of scene 7 would be 7, then 7A, 7B, 7C, etc.)

Procedure

The clapperloader should always have the board up to date and ready to go. He or she should have checked the length of the lens being used and found a position for the slate in which it’s fully in frame and legibile. A torch may be required if the set is moodily lit.

The sound mixer will roll their device and announce “sound speed”.  The camera operator will then roll and ask the clapperloader to mark it. By this point the slate should already be in frame so that the first frame recorded, when the DIT looks at it as a thumbnail on their hard drive, has the slate on it.

Only the slate and take number need be announced, e.g. “30 take 3”. The board should then be clapped nice and cleanly to produce a sharp click on the soundtrack that is easy for the DIT or assistant editor to sync. If it’s necessary to clap a second time, the clapperloader should announce “second clap” or “second sticks” immediately before.

Pick-up
Slating a pick-up for The Deaths of John Smith. See www.thedeathsofjohnsmith.com

PU and AFS

If the director decides to do another take but to begin the action part way through rather than from the top, the take number should still increase but pick-up (PU for short) should be appended to the number. For example: take one, take two, take three pick-up, take four pick-up.

If camera and/or sound roll but cut before the board is clapped, the take number remains the same for the next attempt.

If camera and sound roll, the board is read and clapped, but the crew cuts before action is called, the take number remains the same but AFS (After a False Start) is appended.

If action is called, even if it’s immediately followed by cut, the take number always increases for the next attempt.

A mute slate for The First Musketeer

MOS

Sometimes the camera rolls without sound, if the mixer feels he or she cannot get any useful sound. In these cases the clapperloader should circle MOS (Mute Of Sound) on the slate. They don’t need to clap the board or announce the slate and take number; they simply need to hold the board up long enough for it to be read by the editor. As an additional indicator that there is no accompanying sound file, the clapperloader should hold the board with their fingers between the sticks.

An end board on Fled

End Board

Sometimes it’s impractical or inconvenient to shoot the slate at the start of a take, so instead it’s shot at the end. At the start of the take the camera operator announces “end board” instead of “mark it”. When the action is finished, the director typically forgets that it’s an end board (American term: tail slate) and calls “cut”. Hopefully the sound mixer and camera operator remember not to obey this command, and the latter calls “mark it”. The clapperloader should then mark the take in the usual manner, except that the board should be held upside-down. They should conclude their verbal announcement with “end board” or “on the end”, e.g. “27 take 2 on the end”. Only then can camera and sound cut.

Slating 101

Polymath: Behind the Scenes

I always enjoy a good behind-the-scenes video, and there’s often much to be learnt from them too. My friends at Polymathematics have just released a series of ‘making of’ videos for their recent music promos, all of which are exquisitely designed and shot (my own involvement in Droplets notwithstanding!). Check out Polymath’s Vimeo channel for more behind-the-scenes videos and of course the promos themselves.

Droplets

We Were Here

The Last Human / I Do (Come True)

Hands Up if You’re Lost

And here’s an equally fascinating look at a live puppetry project they did as part of the Olympic Torch Relay celebrations…


Polymath: Behind the Scenes

The DP’s Dilemma

So, you’re in the middle of shooting a scene. You’ve shot everything in one direction and now it’s time to turn around and shoot the reverses. The director of photography must make a decision: do I go for realistic or matching reverses?

Imagine you have a simple scene in which character A stands facing character B and they exchange dialogue. It’s night exterior so you’ve given A a blue backlight and a white frontlight. Realistically then, since B is facing in the opposite direction, he should have a white backlight and a blue frontlight. But do you really want one person’s face to be blue and the other’s to be white? Wouldn’t it be better for B to have a blue backlight and a white frontlight, to match nicely with A? That’s the dilemma.

A matching shot-reverse from Soul Searcher. Both characters have blue backlight, but somehow neither of them have blue frontlight.
A realistic shot-reverse from Stop/Eject. The magenta light strikes Alice (left) from the front but Kate (right) from behind.

TV shows seem to plump mostly for matching reverses, whereas movies tend to be a little more realistic, but this is a very rough generalisation. When deciding which style to go for, here are some things you might consider:

  • Is the overall look of the piece stylised or realistic?
  • Does lighting the characters differently help to underscore the power dynamics in their relationship, or enhance their characters in some way?
  • Will the audience have clearly seen a window or other prominent light source in the scene to show that more light would be coming from one direction than another?
  • Will the light that looks so great as a backlight on character A look unpleasantly harsh as a frontlight on character B? (The answer here is usually yes. That is the whole reason cinematographers have to relight when they do the reverses.)

There is of course middle ground between matching and realistic reverses – tweaking the lighting so that an audience can still buy the continuity of it but it looks good on character B. Usually that is the middle ground we tread, but you will have to decide which style to lean towards.

Incidentally, I believe that a cinematographer should always try to differentiate the status of the characters in a shot-reverse in some way, even if you go for a matching lighting scheme. For example, in the Soul Searcher shots above, Joe’s nervousness is reflected by his close-up being handheld, while Heather’s is locked off. Another example would be a higher angle for one character and lower angle for the other. Best to keep it subtle though!

The DP’s Dilemma

The Miniature Effects of “The Day of the Doctor”

The cannon miniature

The fiftieth anniversary special of Doctor Who has been lauded for its cinema quality FX; indeed, I saw it in a cinema and at no point did I feel like I was just watching a TV show on a big screen. The Time War sequence was particularly impressive, and in amongst the CGI and special effects you may be surprised to learn there were some miniature effects which helped to up the ante. These were created by Mike Tucker and his team at The Model Unit, who a few years back did such a brilliant job of building the Wooden Swordsman for my Dark Side of the Earth pilot. This press release from the Model Unit reveals their contribution and how it was done.

The Model Unit’s involvement in Doctor Who: Day of the Doctor was for the Time War section of this historic episode, providing several cutaways of the Time Lord staser cannon (including its destruction) and a longer sequence showing John Hurt’s TARDIS crashing through a wall and destroying several Daleks that are unlucky enough to be in its path.

Model Unit supervisor Mike Tucker working on the Wooden Swordsman for The Dark Side of the Earth back in 2008

Following an initial discussion with producer Marcus Wilson to establish the sort of shots that might be needed Miniature Effects Supervisor Mike Tucker met up with stereo supervisors Adam Sculthorp and David Wigram to work through the practicalities of shooting high speed miniature effects sequences in 3D – a first for a British television drama production.

A proof of concept test utilising an existing miniature established that the models shouldn’t be smaller than 1/6th scale, and ideally at 1⁄4 scale. Further research established that the miniature effects sequences for the Martin Scorsase movie ‘Hugo’ had been done at 1⁄4 scale and with the same Alexa high speed camera rigs that we were planning to use, and so we were able to proceed with a certain amount of confidence that what we were about to do was realistically achievable.

Blowing up the cannon

With a five-week lead-time and a two-day shoot in Cardiff in April of this year model construction was split between several Model Unit regulars. Alan ‘Rocky’ Marshal was given the task of constructing the staser cannon, Nick Kool took on the TARDIS model and associated rigs and Colin Mapson worked with new recruit Paul Jarvis on the ruined Arcadian buildings and breakaway wall sections.

In a nod to past effects sequences, the Dalek miniatures were achieved in the time honoured way by utilising off-the-shelf toys (in this case the 18 inch voice- interactive toys that had been produced by Character Options a few years back), albeit with a few careful modifications in order to match them more closely to the actual props. Further detail was added to the interiors, including a scaled model of the mutant creature.

Model Unit DoP Peter Tyler worked closely with main unit DoP Neville Kidd to establishing a lighting design for the miniatures as, due to camera rig availability, we were shooting our miniatures in advance of the live action unit – a complete reversal of how things are usually done.

Close collaboration was also needed with the production design team with Mike and assistant art director Richard Hardy constantly swapping notes about the final design details of both Time Lord machinery and architecture to ensure a seamless blend with the location.

Day one of the shoot concentrated on the shooting of the cannon allowing the more complex rig of the TARDIS to be set up and tested, whilst the second day took in several takes of the TARDIS shots. The 1⁄4 scale TARDIS miniature was fixed to a steel rig mounted on a trolley system that allowed us to fire it at the wall using bungee cord.

Filming the Tardis breaking through the wall

Two takes of each set up were shot on two high speed Alexa stereo rigs shooting at 120fps.

Mike and his crew watched the completed episode at the Doctor Who Celebration at Excel with an audience of 2000 fans.

Visit The Model Unit’s website at www.themodelunit.co.uk

The Miniature Effects of “The Day of the Doctor”