Ren: Masculine & Feminine Lighting

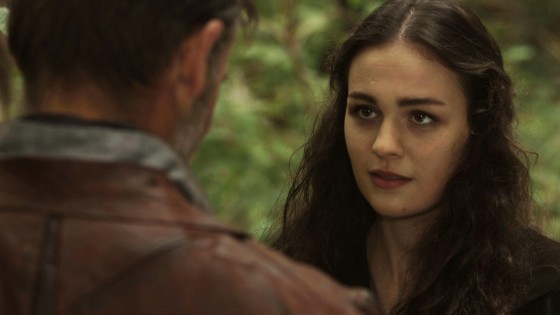
A few days into my tenure as DP on Kate Madison’s ambitious fantasy series, Ren, we filmed a shot/reverse for one of the opening scenes. The scene introduced us to the eponymous Ren (Sophie Skelton) and her friend Karn (Christopher Dane).

Kate described Ren to me as “pure innonence”, while Karn is an older, more worldly character with a difficult past. It seemed to me like classic femine and masculine lighting were called for. Classic feminine lighting is designed to create a soft, flawless, often shadowless face. Classic masculine lighting enhances jaw definition, embraces lines and skin texture and generally creates a rugged look.

Clearly you have to start by casting actors with the right physical characteristics for these roles, which Kate had certainly done, and make-up plays a huge role. The DP is the third part of the triumvirate determining the look of the cast’s faces.

The shot/reverse in question took place under trees in a valley on a cloudy day, so the natural light was very top-lighty (rendering eye sockets dark), with a bit of green bounce here and there.

IMG_1059.JPG

We shot Ren’s close-up first. We had already established in the wide that she was looking towards the sun, albeit a very cloud-obscured one.

There are two ways to create the shadowless look of classic feminine lighting. One is to use a lot of bounce to fill in the shadows. The other is to put the key light directly above the lens, like a flash, so that the shadows are all hidden from the camera’s point of view. Since we’d established Ren was looking in the direction of the sun, I chose the latter method, rigging a small LED panel right above the lens.

Backlighting the hair is another common component of classic feminine lighting, so I had gaffer Richard Roberts hand-bash a second panel as a three-quarter backlight. We had to keep this very subtle since we had established that direct sunlight could not be coming from behind her.

image

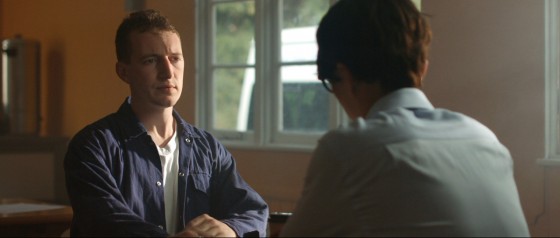
I lit Karn’s close-up very differently. His orientation to the sun justified a strong three-quarter backlight from an LED panel off frame left. This picks out Chris’s stubble and jawline nicely.

I decided that his key would be motivated as sunlight reflecting off the river (off camera right). This could jusifiably be coming in from the side, again adding texture and definition to his face. It was achieved by Richard holding a silver-sided collapsible reflector just out of frame. We initially tried wobbling it to suggest the movement of the water, but ended up shooting a safety take without the wobble in case it proved too distracting.

I know that this degree of manipulation and augmentation of natural light is not to every cinematographer’s taste, but I feel it fits perfectly with the show’s fantasy world. My view is that in this world where magic exists, the light is a little bit magical too. Hopefully it will subconsciously help the audience pick up on Ren and Karn’s essential characteristics in this, their first scene.

Find out more about Ren at facebook.com/rentheseries
 

Ren: Masculine & Feminine Lighting

Lighting Techniques #3: The Window Wrap

So, you’re shooting a daylight interior. You’ve got an HMI as your “sun” blasting in through the window, giving great backlight when characters are faced away from it, and casting some interesting windowframe shadows when they’re faced towards it. But what if they’re side on to the window?

One side of the actor’s face is hotly lit while the other is in complete shadow. Maybe it’s an edgy or scary scene and you want that look. Fine. But maybe not.

You could just use bounce to generally fill in the rest of the actor’s face. Sure, that will work. But The Window Wrap will look sexier.

Take a Kinoflo and set it up inside the room near enough to the window that the audience can buy it as window light but far enough around that it seems to wrap the harsh HMI light softly around the talent’s face. Crucially, as long as the camera is on the opposite side of the actor’s eyeline to the window, you’re still lighting their downside; the nearest part of their face is still the darkest, but now it’s a smoother transition between the bright light of the downside and the darkness of the upside.

Here’s an example from The Gong Fu Connection with writer/director/actor Ted Duran:

original-shotannotated-shot

Sketch 2014-08-15 19_37_08

This technique was inspired by this lighting workshop video with Eric Kress, DP of The Girl with the Dragon Tattoo (original Swedish version).

Lighting Techniques #3: The Window Wrap

Gaffering Tips

I just spent a couple of weeks gaffering for DP Paul Dudbridge on a feature shoot in South Wales. It was pretty much my first time gaffering, and I certainly made some classic mistakes. Here are some tips I’ve compiled as a result of my recent experiences.

  • Make sure cables have slack so the DP can adjust the positions of lamps.
  • Take extra time running cables initially so they are least likely to be in shot and won’t have to be rerouted later.
  • Swap out batteries on LED panels during coffee breaks or other downtime so they don’t go off during takes.
  • Keep track of how much power you’re drawing off each circuit to avoid tripping breakers. See Gaffering Basics for more on this.
  • Make sure you have access to the consumer unit (fuse box) so you can reset a tripped breaker straight away.
  • If drawing a large load off a 13A socket, periodically check the plug isn’t getting too warm – occasionally they can melt.
  • Righty tighty, lefty loosy. Make sure the weight on a C-stand knuckle is pulling it clockwise, i.e. tightening it.
  • Bulbs are most fragile when they’re hot – i.e. when they’re on or have recently been on – so handle them with particular care.
  • Observe the minimum safe distances illustrated on the lampheads. The heat can crack a window or burn a flag if placed too close.
  • When bouncing tungsten lights off the ceiling, black-wrap them straight away to cut out direct spill.
  • Be sure to disable the building’s fire alarm or bag the smoke detectors before switching on a smoke machine.
  • Keep an eye on the smoke level in the room and top it up when necessary.
  • Stay within earshot of the DP so you can respond to requests.
  • Anticipate DP requests: if you look at the monitor and see that the backlight is flaring, get a flag ready; if a lamp looks too hot on camera, break in a dimmer.

IMG_1029-0.JPG
Photo by Sophie Wiggins

Gaffering Tips

Lighting Techniques #2: Cross-backlighting

A common scenario in filmmaking is that you have two characters standing talking to each other and you need to do a two-shot and an over-the-shoulder of each. A quick way to light this kind of scene is cross-lighting: you set up two lamps so that each lamp serves as one character’s backlight and the other’s keylight.

I practice what I like to call cross-backlighting. What I mean by this is that the lamps are both on the opposite side of the actors’ eyeline to the camera. The result is that the downsides of their faces are lit. (Check out this post on key angles if you’re not sure what I mean by downside.)

This old Soul Searcher lighting featurette covers cross-backlighting around the 5:30 mark.

Here’s a super-recent example of cross-backlighting in action, on the set of The Gong Fu Connection. I’ve complicated things a bit though here. I’ve decided I want the characters’ keylights to be softer and cooler in colour than their backlights.

2-shot

So there’s actually a dedo and an LED panel behind each actor. The camera is set to a white balance of 3,200K. Each dedo provides a strong, white backlight, narrowly focused so as not to spill onto the opposite actor’s face. The LED panels, positioned much closer to the talent, provide a slightly softer light with a dialled-in temperature of 4,500K.

Sketch 2014-08-15 07_29_38

Harry

For the close-ups I repurposed the LED panel that wasn’t being used as a background light, dialling it back to 3,200K to match with the location’s existing tungsten lighting that was already doing a lot of the work.

Carmina

When we got to Carmina’s close-up I decided the LED panel alone was still too harsh, so I bounced it off the silver side of a collapsible reflector. I adjusted the panel to an angle where just a little direct light was hitting the side of Carmina’s face, and this kind of blends with the bounced light to provide a gentle wrapping illumination.

Stay tuned for more lighting techniques.

Lighting Techniques #2: Cross-backlighting

Festival Screenings and DCPs

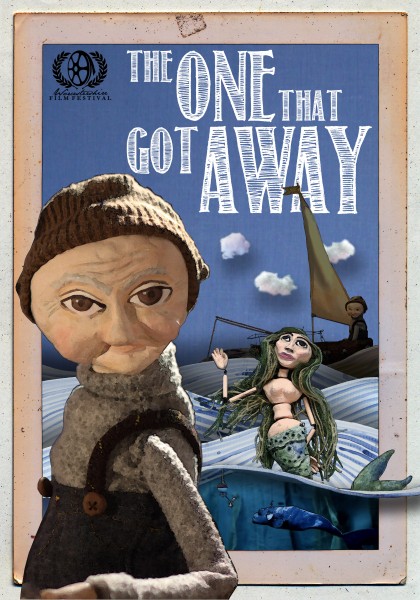
Stop-Eject poster 857x1200Last summer I completed two short films as director, the 17-minute fantasy-drama Stop/Eject and the two-minute  puppet fantasy The One That Got Away. After a year of entering them into festivals around the world without getting anywhere, I was beginning to give up hope of them ever getting selected. But I’m delighted to say that both have been recently accepted for festivals taking place this month.

Stop/Eject will get its world premiere at Raindance Film Festival in London. Raindance is amongst the UK’s most prestigious festivals, counting amongst its previous premieres Memento and The Blair Witch Project.

The One That Got Away will get its first overseas screening at Belo Horizonte International Short Film Festival in Brazil.

The welcome news of these festival selections had me scrambling into the archives of this blog for the post I wrote last year on making a DCP (digital cinema package). Since the decline of film as an exhibition format, DCPs are the new standard for delivering movies to a cinema.

I needed to transcode The One That Got Away’s 1080P ProRes 422 (HQ) master into a DCP. Belo Horizonte accept 25fps DCPs, so I skipped the frame rate conversion. I dropped the ProRes file into a new timeline in Final Cut Pro and set the sequence frame size to 1998×1080, the standard resolution for a non-Cinemascope 2K DCP. I then used the Motion tab to blow up the image slightly to fill the width of the frame, losing a little at the top and bottom of the image in the process.

The_One_That_Got_Away_ posterI used Final Cut Pro’s ‘Export using Quicktime conversion’ to export the ProRes file as two mono WAVs and an 8-bit TIFF sequence. (16-bit is preferable for DCPs, but the film had been edited in Final Cut 7, which only deals with 8-bit colour space.) I then followed OpenDCP‘s straightforward three-step interface to transcode to JPEG-2000, then MXF, then wrap it all up with the XML files. I didn’t need to worry about disc formatting, because the festival accepted an FTP upload of the files.

Before uploading The One That Got Away’s DCP to the festival, I decided to test it at home as best as I could, so I downloaded a free trial of EasyDCP which let me check the first 15 seconds. The colours were screwed up, but that’s normal. Home computers can’t handle the XYZ colour space of DCPs.

Stop/Eject’s DCP was created last year, as documented in the post mentioned above, Making a DCP. I purchased a 500GB Lacie Rugged USB hard drive to put it on, not knowing at the time how big the files would be. I now know that 2K DCPs at a reasonable quality are about 1GB per minute, so Stop/Eject’s is 17GB. A memory stick big enough to put that on would have been expensive last June, perhaps more expensive than the Lacie Rugged. But over a year later, a Corsair 32GB USB 3.0 stick is only £15.45 and there are even cheaper brands on the market too. Plus, of course, a stick is much easier to post to a festival than a hard drive, and far less likely to get damaged on the way.

So I bought the Corsair stick and booted up my Mac in Ubuntu, as detailed in last year’s post. I formatted the stick as EXT-2 rather than 3, as Raindance’s documentation seemed to favour the former. I copied the files across from the Lacie Rugged. Then it was just a case of packaging it up and sending it off with back-up copies on DVD and Blu-ray, and a press kit for good measure.

Incidentally, Stop/Eject’s DCP runs at 24fps for maximum compatibility, extending the running time of the film by about 45 seconds over the original 25fps version. I had wondered for some time if, when the film finally got into a festival, this longer running time would be an issue. After all, at nearly 17 minutes at 25fps, Stop/Eject is quite a long short already. I’m told that Raindance almost decided against selecting it because of its length. And the judging panel had been watching a 25fps screener. How would they feel about screening an even longer version? I contacted the festival, explaining the situation and offering to make a 25fps DCP if need be, but they were fine with it running at 24fps. Apparently they allow for runtime discrepancy when scheduling.

Well, that all got very dry and technical, didn’t it?

Hurray! My films got into festivals!

Festival Screenings and DCPs