Lighting ‘3 Blind Mice’

A cinematographer should always be looking for ways to enhance the story through camerawork and lighting. 18 months ago I lensed a short film called 3 Blind Mice, which sadly seems permanently mired in no-budget postproduction hell. It comprises a trio of vignettes linked by a common theme. Each vignette featured two characters: one real, one supernatural or imaginary. In preproduction, director KT Roberts told me that she wanted the unreal characters to look somehow artificial, so I decided to give these characters each a perfect halo of backlight, whilst simultaneously eliminating all shadows on their faces. By contrast, the real characters would have no backlight and a grittier look to their faces with light and shade.

2-girl 2-monkey

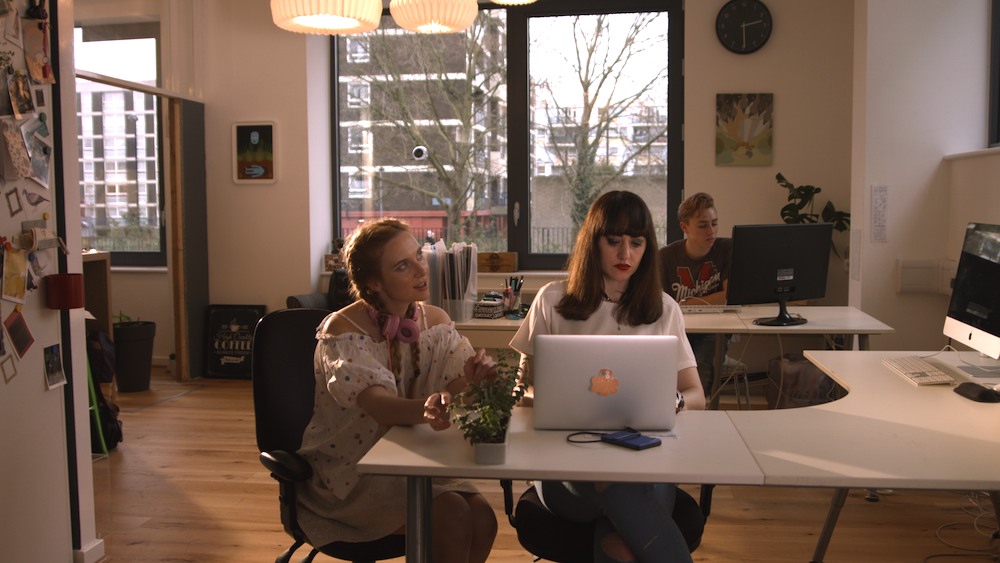
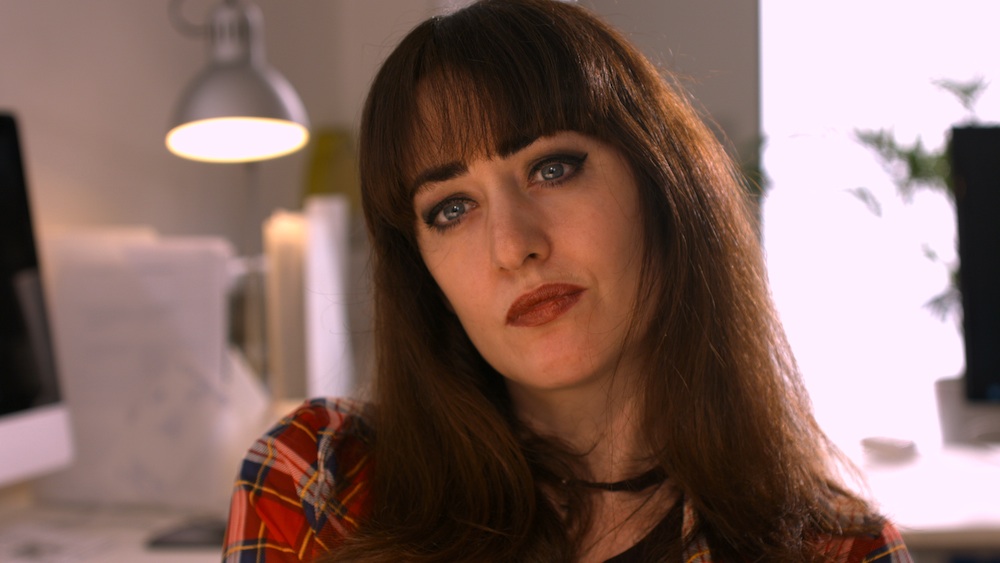
The first vignette to go before the camera was an interior scene, so we sat the unreal character (Charlotte Quinney, above right) in front of the window for backlight, and used a 4 bank 4ft kinoflo and a collapsible reflector to evenly light her face.  The natural daylight was reinforced by a 1.2K HMI outside the window, gelled pink to match the colour scheme of the set dressing and suggest sunset. The real character (Libby Stewart Power, above left) was strongly lit from the right side by the “daylight”, with only a low level of fill from the reflector off left.

3-alive 3-dead

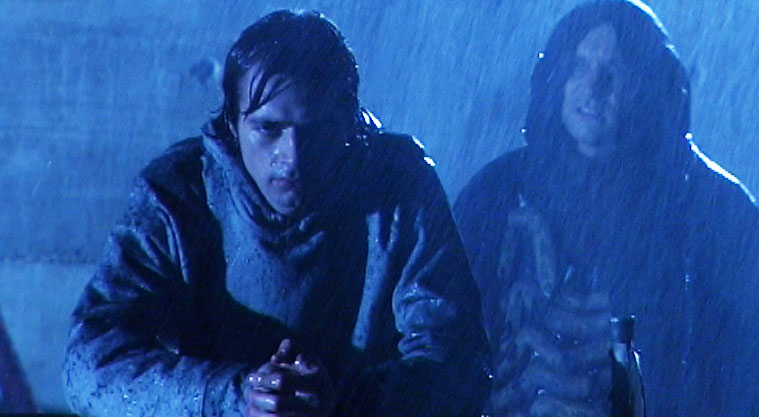
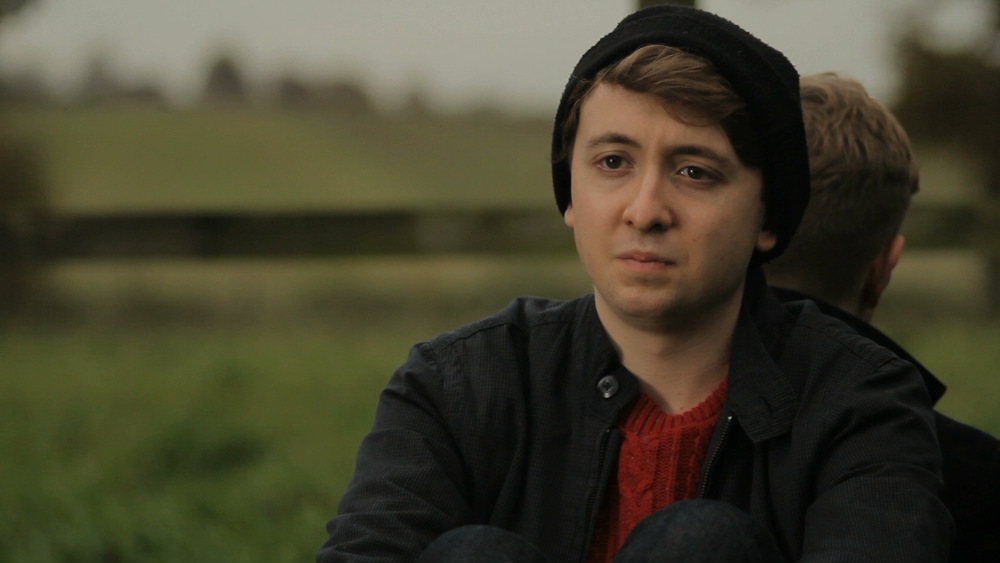
The other two vignettes were daylight exteriors. In both cases the 1.2K was used to halo the unreal character, with a reflector and silver foamcore used to fill in their faces (Will Attenborough, above right – third vignette). The 1.2K was used again when shooting the real characters, this time bouncing it off the reflector onto one side of their face. In the case of the final vignette, the other side of the real character’s face (Jack Mosedale, above left) was filled in by natural light, so we brought in a black drape hung from a flag arm as negative fill to combat this.

Shooting the real character in the final vignette. At left is the reflector bouncing the HMI (right). In the centre can be seen the black drape creating negative fill.
Shooting the unreal character, surrounded by matte silver foamcore (bottom right) and a collapsible reflector (bottom left) to remove shadows from his face. The 1.2K HMI in the background creates a halo of backlight around his head.
Shooting the unreal character, surrounded by silver foamcore (bottom right) and a collapsible reflector (left) to remove shadows from his face. The 1.2K HMI in the background creates a halo of backlight around his head.

How have you used lighting to help tell your stories?

Lighting ‘3 Blind Mice’

How to Make Chase Scenes Look Fast

Sarah on the roof rackThere are many ways to shoot a chase scene, but not all of them will give a sense of speed. Today I’m going to look at the chases in a couple of my old films and see what we can learn from them about enhancing the impression of speed.

First of all, here is the car chase from my silly 2002 action movie, The Beacon. (You may notice I’ve tried to increase the sense of speed through extremely fast editing, with only limited success.)

I think the least successful part of that chase, in terms of conveying speed, is the section between 0:20 and 0:45. Why? Because the cars are driving along open road with little except the occasional telegraph pole passing close to them. Parallax is incredibly important when shooting action – the concept that objects closer to the camera seem to move faster than those further away. So the hills and fields in the background seem to move quite slowly, even though the cars were going at a fair old lick. If there had been bushes or poles in the foreground, zipping past close to camera all the time, the side-on tracking shots would have been much more effective.

The Blackmagic, mounted on the dashboard with an old Hama suction mount, some cardboard, some gaffer tape, a wing and prayer
My Blackmagic, mounted for a driving shot in The Gong Fu Connection last year

The shots where the camera was mounted to the outside of the car look better, because we are close to the surface of the road, which therefore appears to zip by very quickly. Similarly, when the cars enter the narrow, wooded lane at 0:50, there is a great sense of speed because the passing greenery is only a foot or two from the car.

From around 1:20, as the cars cross an open field again, I took a different approach. I shot the vehicles on a very long lens, handheld, panning with them. Because panning – especially on a long lens – is a two-dimensional movement, it completely eliminates parallax. Everything that passes in the background moves at the same speed, determined entirely by the speed of the pan, which is in turn determined by the speed of the person or vehicle you’re panning to follow.

I applied some of these lessons to the foot chase in Soul Searcher, beginning at 1:08:30. Note the use of long lens pans, and tracking through narrow aisles for maximum parallax.

Speed is all relative, so it’s important to cut every now and then to a shot where your camera isn’t moving, giving the maximum relative velocity to your chaser and chasee as they zip past. Actually that’s not the maximum relative velocity; in the Soul Searcher chase you may have noticed  the odd  shot where someone runs towards camera as the camera simultaneously moves towards them.

So, in summary, here are my tips to satisfy your need for speed:

  1. Set the chase in narrow aisles, alleys, country lanes or roads with lots of streetlamps and telegraph poles, to maximise parallax.
  2. For side-on tracking shots, have plenty of foreground.
  3. When mounting a camera on a vehicle, get it as close as safely possible to the road or passing obstacles.
  4. Long lens pans give a great impression of speed, regardless of the setting.
  5. Let the characters pass a static camera occasionally, or counter-track towards them to increase their relative velocity.
  6. And one extra tip: if possible, have small patches of light and shade for the characters or vehicles to pass in and out of; this will further increase the impression of speed.

Want to know more about how The Beacon’s car chase was shot? Read this retrospective blog post.

Need your car chase to end with a crash? Here’s how I staged the car crash in The Beacon.

Want more tips for shooting in a moving car? Here’s how I did it last summer on The Gong Fu Connection.

How to Make Chase Scenes Look Fast

Shooting ‘Self Control’

On location in a cafe-bar in north London

Recently I photographed Self Control, a short film by writer-director Stanislava “Stacey” Buevich. Joanna Kate Rodgers plays Lily, a woman who struggles to control her violent urges when she’s befriended by an extremely annoying colleague.

A read of Stacey’s shotlist revealed a clear Wes Anderson influence, which was great for me because I immediately knew the parameters: flat angles, formal composition, deliberate 90 degree pans and lateral tracks. Stacey also referenced Ida, which led to several wide shots with lots of headroom, like this one…

Chair scene graded copy

Creating interesting shadows by using a partition window at the location.

Lighting wise, it was a limited kit (two tungsten 2Ks and a Dedo kit with only two functioning lamps). Bin bags and some sheets of thin white packing foam were used to eliminate or reduce natural light coming through offscreen windows, to give shape and contrast to the images. For a scene in the office kitchen, I fired one of the 2Ks through a high partition window to create some shadows.

I knew that I wanted to do something with lighting to clue the audience into Lily’s true identity (she’s the devil in human form). By the end of the first morning I’d settled on lighting her from below whenever possible. In this CU from an office scene, a blue-gelled tungsten 2K was fired down onto a white desktop in front of Lily…

A 2K fires down onto a white desktop to uplight Lily (frame grab below).

Lily office CU graded copy

For a yoga/relaxation scene on the second day, production designer Devon Barber conveniently dressed in a row of tealights on the floor in front of Lily, giving me a great excuse for satanic, fiery bottom-light. We set up a Dedo either side of camera, firing down into strips of kitchen foil so that the light would bounce back up onto Lily’s face. The Dedo dimmers were ridden by my ACs during takes to create a flickering effect.

Strips of tinfoil placed on the floor around the dolly track reflect two Dedolites (just out of frame either side) back up onto Lily's face. A 2K hidden behind the wall on the right provides backlight.
Strips of tinfoil placed on the floor around the dolly track reflect two Dedolites (just out of frame either side) back up onto Lily’s face. A 2K hidden behind the wall on the right provides backlight.

Yoga1 graded copy

To find out more about the work of Stacey and her producing partner Lara Myles, visit www.clockpunkfilms.com

Shooting ‘Self Control’

Mini-DV Memories

Goodbye, Mini-DV
Goodbye, Mini-DV

I’m moving soon, to a much smaller place, and lots of my stuff has to go. Amongst the things going into bin bags at the moment is a large number of Mini-DV tapes. Funny to think how ubiquitous they were in the micro-budget movie world just a few years ago, and now they’re a thing of the past.

How could a mere 720 x 576 pixels ever have looked good? (I frequently deinterlaced my DV footage and cropped it to 16:9, which must have reduced the vertical resolution to about 200 lines!) Cathode ray tubes certainly helped. CRT screens have a lovely softness, which I still prefer to LCDs, and that softness blurred the limited number of pixels into one organic image. Bright colours were particularly softened, a fact which Mini-DV compression exploited by devoting little data to chrominance, resulting in blocky saturated colours that looked terrible on your computer, but which blurred magically back into acceptability on your CRT TV.

An example of very blocky saturated colours in Soul Searcher

I don’t know how many stops of dynamic range a typical DV camera had, but it wasn’t many. Shooting in daylight was a nightmare; you could never find an aperture setting where you weren’t losing loads of detail in blown-out whites and/or crushed blacks. I embraced the contrast, lighting everything like film noir, which the format handled pretty well. In this 2005 featurette I outline the lighting techniques I learnt for Mini-DV. While incredibly crude by today’s standards, the underlying principles are still sound.

Shooting Soul Searcher on my XL1

The video bitrate of DV was just 25mbps. By comparison, my Blackmagic Production Camera shoots at 880mbps – that’s 35 times more detail per frame. Despite this, there were a few big theatrical films shot on DV, Lars von Trier’s The Idiots being first. Perhaps the best known is 28 Days Later, shot on a Canon XL1, a camera I owned for several years.

I loved that camera! And in some ways it was better than today’s ultra-HD cinema cameras. It was so light and comfy to put on your shoulder. You didn’t need a rig – it actually had a bloody hand grip next to the lens! And get this – it had a viewfinder! That came with it, no extra charge! There was no DITing, no dual system sound to sync. How easy it all was!

A nice bit of noir lighting from Soul Searcher

After shooting my feature film Soul Searcher and countless other projects I DPed, my XL1 met an ignoble end, its lenses Ebayed and its malfunctioning body Freecycled. I’d foolishly bought a Sony A1, an awful, awful HDV camera that I was stuck with until I joined the DSLR revolution in 2011.

minidvThat A1 will not survive my moving cull either. It’s languished in a drawer for the last few years, my sole remaining means of playing back old DV tapes. Now the tapes are going, so will the camera.

So goodbye, Mini-DV. I cut my teeth on you. Your accessibility allowed me to learn my craft, and your shonky dynamic range forced me to learn to control light. For that I will always be grateful.

Mini-DV Memories

Blogging Tips

wordpress-bloggingI recently passed the milestone of my 1,000th blog post, and many people have asked me how I have the discipline to keep writing posts week in, week out. I think the key is to see it as an opportunity, not an obligation: an opportunity to connect with and help others in your field; an opportunity to promote yourself; an opportunity to marshal your thoughts and solidify things you’ve learnt by communicating them to others. Sometimes I see my blog as a giant virtual notebook – I’m just keeping my notes publicly – and I often refer back to my own posts to remind myself how I did something or what mistakes I need to avoid this time around.

“But I don’t have anything to write about,” is a common refrain. I doubt this is true. I’m constantly surprised that I manage to keep coming up with ideas for posts, but there is nothing special about me. If I can do it, you can do it too.

Here are some suggestions.

  • Whenever you do something you’re at all proud of, or which someone else compliments, or where someone enquires about how you did it, consider this a potential subject for a blog.
  • Read other blogs, not necessarily on the same sort of subject as yours. Look at the types of posts they do and think about how you can apply those formats to your own area of expertise.
  • Posts like this one, which consist largely of a bullet-pointed or numbered list, are easier to write, and more digestible and less daunting for a reader than a big block of solid text. (Here’s another example.)
  • Review books, films or other websites. (Example)
  • ‘Top ten’ posts can be a quick way to generate content, being a sort of cross between brief reviews and a numbered list. (Example)
  • Write about projects you’re working on and what you’re learning from them. (Example)
  • Break down the steps involved in creating something – a lighting set-up, a prop, a poster, whatever it is you do. Illustrate the steps with photos. (Example)
  • Write about trends you have observed in your field, and what readers could do to buck or conform to them. (Example)
  • Discuss your mistakes and how you plan to avoid making them again. (Example)
  • If you witness someone doing something badly, it can be tempting to write a blog about how it should be done. It’s advisable, however, to let some time elapse first, and you should never name names. (There are examples on this site, but I’m not going to point them out!)
  • Be aware of what’s in the news and what’s trending on social media. Could you blog about your take on these issues? (Example)
  • If the written word isn’t your thing, consider video blogging, or podcasting, but be careful not to ramble. (Example)
  • If you’re really convinced you have no useful knowledge to share, that in itself could be the basis for a blog: your quest for knowledge. You could do posts such as:
    • re-blogging material from other sites (but get permission first) (example);
    • interviews (example);
    • guest blogs, where you ask someone else to write a post for you (example);
    • embedding an interesting video you’ve seen, and summarising the tips you gleaned from it. (Here’s an example on NoFilmSchool.com.)
Blogging Tips

Shooting in Rain

Il pleut dans la nuit. Ce n'est pas jolie.
The rain in France falls mostly on the crew of The First Musketeer.

Rain. How we’d love to go inside and have a cup of tea when the old British precipitation interrupts a shoot, but quite often the schedule demands that we carry on regardless. Here are a few tips for filming in the wet stuff.

Cover the Camera

If you don’t have a proper rain cover, a transparent recycling bag with a couple of holes cut in it will usually do the job, but have someone hold an umbrella over the camera at all times as added protection. If you have them, put on a matte box and top flag to keep rain off the lens.

Check the Lens

Condensation may well be an issue. Have an assistant with a ready supply of dry lens tissues (in a ziplock bag), because a cloth will quickly get too damp to be of any use.

In this photo by Miriam Davies from a location shoot on Ren, you can see a bagged LED panel on the left of frame.

Look After the Lighting

Transparent recycling bags are perfect for covering LED panels, which don’t get hot.

Tungsten lamps get so hot that they burn off any water before it can do any damage, so as long as they’re switched on you don’t need to worry about them getting wet, but you should wrap the switch in a plastic bag.

The same goes for HMIs, though you’ll need to put a bin bag over the ballast. Make sure the bag is loose at the top, so that the heat from the ballast can inflate it and then dissipate through the bag; if you wrap the bag on tightly, the ballast will overheat and cut out.

People can be understandably concerned about mixing water with electricity, but honestly, I’ve run tungsten and HMI lamps in the pouring rain for hours without covering them, and never had any problems. If you’re really worried, clip a sheet of gel over the lamphead to make a little hood.

16A cable
16A cable

Use Outdoor Cabling

Ideally you should use only 16A (and above) cabling with C-form sockets (the round blue ones); these are rainproof. If you have to use domestic 13A extensions, wrap all the connections in plastic bags.

Seeing the Rain

The key to making rain show up on camera is backlight. If you want it to look like a real downpour, get your biggest HMI at the back of shot and blast it towards camera. Or maybe you don’t want to see the rain, maybe it’s bad for continuity, in which case you should avoid backlight at all costs.

Ye olde person-talking-to-other-person's-back shot in Soul Searcher, obviating the need for a shot-reverse.
The rain in this shot from Soul Searcher is fake, but it’s backlight that makes it show up.

Need rain for your shoot but the sky is cloudless? Read my post on faking precipitation.

Got precipitation of a more wintry nature? Check out my tips for shooting in snow.

I’ll leave you with the latest Ren behind-the-scenes video, which is all about rain and shooting – or not shooting – in it. Subscribe to get the Mythica Entertainment channel to see all the latest Ren videos as they’re released.

Shooting in Rain