Ren Teaser Trailer Released

The first teaser trailer for Ren has been released today. This is the ambitious fantasy web series I’ve been photographing for the last four weeks. (I also cut this trailer.)

Michael Hudson has produced a series of behind-the-scenes podcasts about Ren. You can listen to me talking about the cinematography, along with all the other talented HoDs talking about the hard work and genius they have brought to bear, at http://www.rentheseries.com/news/ren-podcasts/

Ren Teaser Trailer Released

Working with Other Departments

Art assistant Denise Barry's photo of the cast and crew shortly after arriving in France
The cast and crew of The First Musketeer – one of the best collaborative experiences of my career

Filmmaking is all about teamwork. But sometimes DPs can forget this and ignore the needs of other departments in their quest to get their perfect shot. In recent years I’ve really come to appreciate the importance of forging a good relationship with the other heads of department so as to get the best possible results and foster a good vibe on set.

Take cross-lighting as an example. Cross-light comes in from the side of frame and throws any texture into relief. This might be exactly what you need to show off the detail in a set or a costume and make the art department very happy. Or it might show up things we don’t want to see – the edge of a make-up appliance, or scarring on an actress’s face. In cases like this, a good DP should modify their lighting, no matter how much they love it, so that the make-up or the talent looks their best.

I’d like to collaborate more with make-up artists in the future. I’m sure we’re looking at a lot of the same things when we assess a face and decide how to approach it. Understanding the direction the make-up is going in could spark ideas about how to build on that with light. I once spent a lot of time trying to lighten up the face of an actor who had been made-up very dark; a brief chat with the MUA beforehand could have avoided that wasted time.

Stanley Kubrick’s production designer apparently used to design sets with a master shot in mind. So when you walk onto a set or a dressed location, talk to the designer about where they think it looks best from. They have lived with this set for longer than you have and they may have some great ideas.

It’s also important to respect others’ work. Don’t walk onto a set and start dressing stuff to camera; show the designer the monitor and let them work their magic. And don’t move stuff to get your tripod in without asking permission; they may need to take continuity pictures first so that they can put everything back in the right place later.

The cast and crew of Fled
The cast and crew of Brendan O’Neill’s “Fled”

The same goes for the sound department. If the boom op is struggling with shadows, tweak the lighting to help them out if you can. No film set is complete without a friendly rivalry between the camera and sound departments, but it’s vital this is underpinned by mutual respect. Sometimes there is an attitude on set that the DP outranks the sound recordist; don’t tolerate this. Sound and vision are equally important.

Last but definitely not least is the cinematographer’s relationship with the talent. It’s easy to forget how much important work is going on in an actor’s head. And what are the crew doing while the cast are trying to focus? Cracking jokes, spraying smoke around, turning on dazzling lights, thrusting polyboards in people’s faces, clapping slates and generally being incredibly distracting. Try to be aware of this and minimise it where possible, particularly for very serious or emotional scenes. Explain to the talent why you’re surrounding them with equipment and how it’s making them look good and servicing the story. Foster an environment where they feel they can ask you to move something if it’s distracting. If the acting isn’t good, no-one is going to watch the film long enough to admire the lighting – so do what you can to help the talent.

And remember, when people view your showreel, they’re judging not just the quality of your work, but the overall quality of the films you’ve worked on. In short, help make other people look good and you will look good too.

Working with Other Departments

Ode to Ren

Setting up for one of the crowd scenes

A year after lensing season one of Harriet Sams’ ambitious period web series The First Musketeer, I’ve jumped on board Kate Madison’s equally epic series Ren. Coming from the woman who made Born of the Hope, the incredibly popular Lord of the Rings fan film, it’s no surprise that Ren is a fantasy of Jacksonian proportions. Marked by a powerful ancient spirit and feared by all who see her, the title character starts a journey and discovers that all she thought she knew may have been a lie.

I’ve already posted several blogs about lighting Ren, but now I want to talk more about the project as a whole and the unique experience I’m having on it. Ren is one of those landmark shoots which is so tough but so much fun, where the crew become like family and you hate the idea of it ever ending. As I write this I’m on a train which is taking me away from Cambridgeshire and the drafty studio I’ve come to think of as home, towards a far less exciting shoot. This weekend away on a paid job seems strange and wrong, and I can’t wait to get back to my Ren family on Sunday night.

The studio is an old factory, its workshops filled with sets, props and costumes. For the last three weeks I’ve been sleeping on an air bed in what was probably once a meeting room. Directly above that is the make-up room, and next to that is the production office from which Kate and associate producer Michelle Golder battle daily against a dwindling budget and scheduling headaches to keep this epic web series shooting.

Ronin Traynor choreographs a fight scene with Richard Zeman (left) and Duran Fulton Brown (right)
Ronin Traynor (left) choreographs a fight scene with Richard Zeman (centre) and Duran Fulton Brown (right)

And in the car park is the set, which you may have seen in my video blog. Chris Dane and a team of volunteers spent three months fashioning the medieval village. Miriam Spring Davies has spent countless hours crafting the costumes to beautifully clothe each of the principals, plus a village full of extras and fifteen imposing Kah’nath soldiers. Hans Goosen, who flew over from Germany (I think) to be involved in the project, lived and worked in the studio for weeks while making stunning hero props. And these are just a few of the ridiculously talented and dedicated people who are bringing Ren’s world to life.

Ever since a damp weekend in autumn 2008, which I spent holding an umbrella over a steadicam operator on Born of Hope, I’ve wanted to work properly with Kate. As a maker of ambitious fantasy projects myself, I feel she’s a kindred spirit. When I learnt she was looking for a DP for Ren, I gave her the hard sell, knowing that I couldn’t bear to let anyone else photograph this series. My experiences on The First Musketeer – which shares several cast and crew members with Ren – stood me in excellent stead to approach the fantasy period settings of Kate’s script. I learnt so much on Musketeer about creating texture to sell the period, ageing scenes with smoke, and simulating firelight.

Actor Duran Fulton Brown, director Kate Madison and gaffer Richard Roberts warm their hands over a prop braziere.

When Kate finally picked me, it was too late for me to rearrange other commitments that clashed with the first three days of shooting. I arrived at the studio on a Saturday night with my regular assistant Colin Smith. It was packed with crew and extras who were in the middle of a busy weekend of shooting crowd scenes. The next morning I was launched into Ren, and real life faded like a dream. That was three weeks ago.

Since then the crew has grown and shrunk (mostly shrunk!) with the passing days, as people give up what time they can and then return to their normal lives. For a project so unique and wonderful, we have struggled enormously to attract crew. By the second week I found myself regularly in the production office, gradually taking over scheduling and sometimes attempting to AD the shoot. Lately I’ve been cutting sizzle reels and teaser trailers to help Kate and Michelle sell the project to potential sponsors. It’s a far cry from the promises I made myself earlier this year not to do unpaid work any more, not to edit any more and not to work on anything where I don’t get a proper bed. But somehow Ren has gone beyond being a job, even beyond being an unpaid collaborative project. It’s my life now, and there’s nowhere else I’d rather be. So roll on Monday and the next day of adventure on this crazy, beautiful thing we call Ren: Season One.

Ode to Ren

Lighting Techniques #4: Health Bounce

This is a really simple technique but incredibly effective. All you do is put a reflector or a piece of polyboard under the talent’s face. Here’s an example frame from Ren starring Sophie Skelton. This was shot on an overcast day using a 2.5K HMI as backlight.

image

Sophie is very beautiful and the make-up (by Becca Youngs) is great, but the icing on the cake is a simple piece of polyboard out of the bottom of frame. It subtly lifts the shadows on her face and puts a ‘sparkle’ in her eye. That sparkle is actually the poly’s reflection, but it’s amazing how much life and energy that gives. I’m calling this technique the Health Bounce because it’s used a lot in ads for health and beauty products.

Here’s a side-by-side comparison without (left) and with (right) the poly.

image

The human brow has evolved to protect our eyes from sunlight, amongst other things. In an exterior scene, particularly on an overcast day, the light comes predominantly from above, rendering the forehead and the nose the brightest areas, and throwing the eye sockets into shadow. This is a challenge for cinematographers. So much of an actor’s performance is in the eyes – it’s essential to get light into the eye sockets to capture every nuance of that performance. A bounce board underneath the face helps do that.

Colin Smith holds the polyboard for the above shot of Sophie
Lighting Techniques #4: Health Bounce

Ren: Night for Day

The 2.5K HMI can be seen here in the lower right, and the fake sky on the top right.

It had to happen sooner or later. On an ambitious series like Ren, with a tight schedule, it was inevitable that we would at some point have to shoot a daylight shot after dark. So I’d given it some thought beforehand. It seemed to me like soft toplight, simulating sky, was what was needed. I figured that a 2.5K HMI fired into an overhead 6×6 silk would do the job, and that’s one of the reasons I pushed production to hire a 2.5 despite the very limited budget.

The moment came yesterday when we got into a time crunch with one of our lead actors (Duran Fulton Brown) and had to complete a scene despite the natural light running out. Fortunately the scene was scripted as evening and we had shot coverage at magic hour and in twilight with an HMI “sunset”. So we weren’t trying to match full-on daytime.

Colin (left) helps hold up the roof. Rich (right) does not. Duran Fulton Brown (centre) plays Hunter.

We used a redhead for the direct “setting sun” light. We had a silk but no sturdy stands to rig it on, so we built a quick roof out of poly and Celotex (matte silver bounce), holding it up with lightweight stands and crew members! We put the 2.5K on the floor in the corner and fired it into this ceiling. The final touch was to fire an LED panel at the back wall to fill in the black shadows that the redhead was casting.

Check out the final shot below. It looks a lot less convincing to me now than it did at the time, but I believe the concept was sound. We just needed more stands to rig the poly at a better angle to get the maximum bounce, including some behind Duran to give a general “sky” backlight. Lessons learnt for the next time!

image


Ren: Night for Day

Ren: Shooting the Exterior Set

Here’s a little video blog about the challenges of shooting on the amazing medieval village set that Chris Dane and others have built for Ren.

I’ve been using the Artemis app a lot to test out lens choices and compositions for “seeing off the set” issues. That way if I’m set up for a shot and we’re waiting on costume or an actor, I can preview the next shot on Artemis and warn Chris that he’ll need to move a wall to hide the car park.

More soon from the set of Ren.

image image


Ren: Shooting the Exterior Set

Ren: Masculine & Feminine Lighting

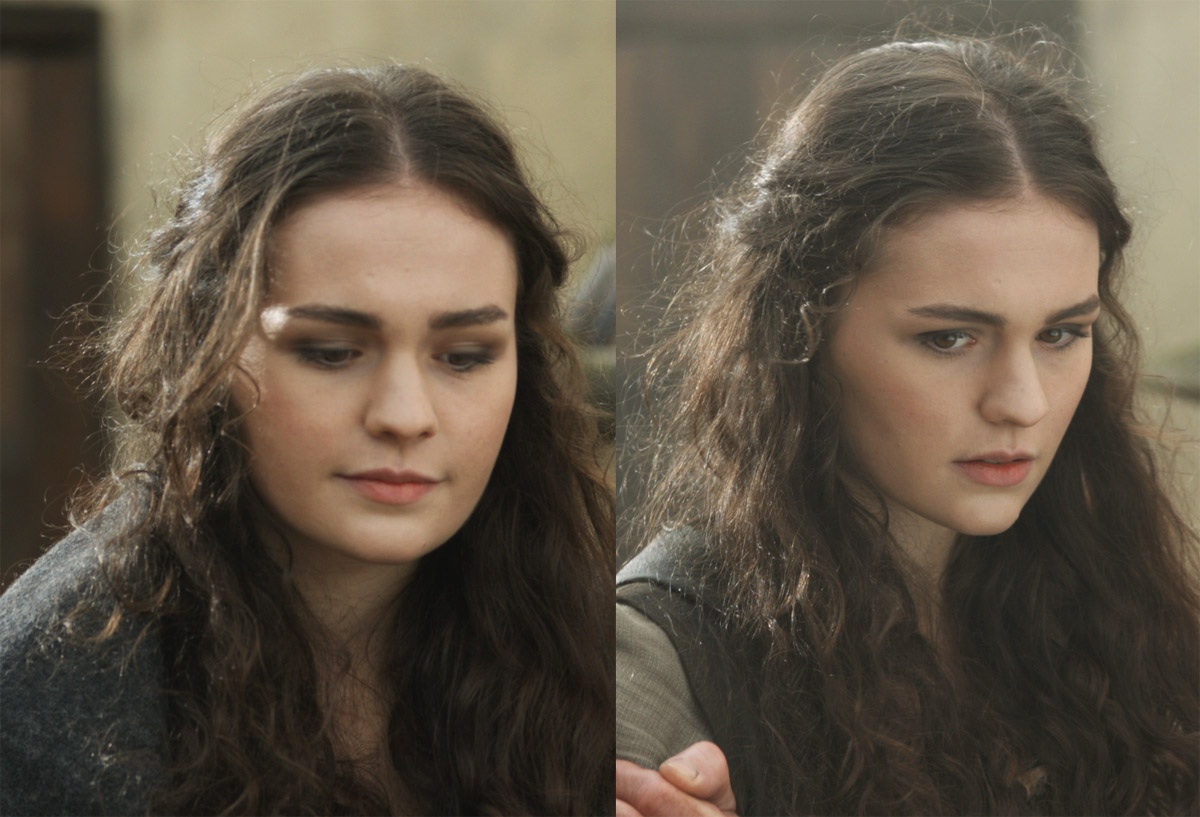
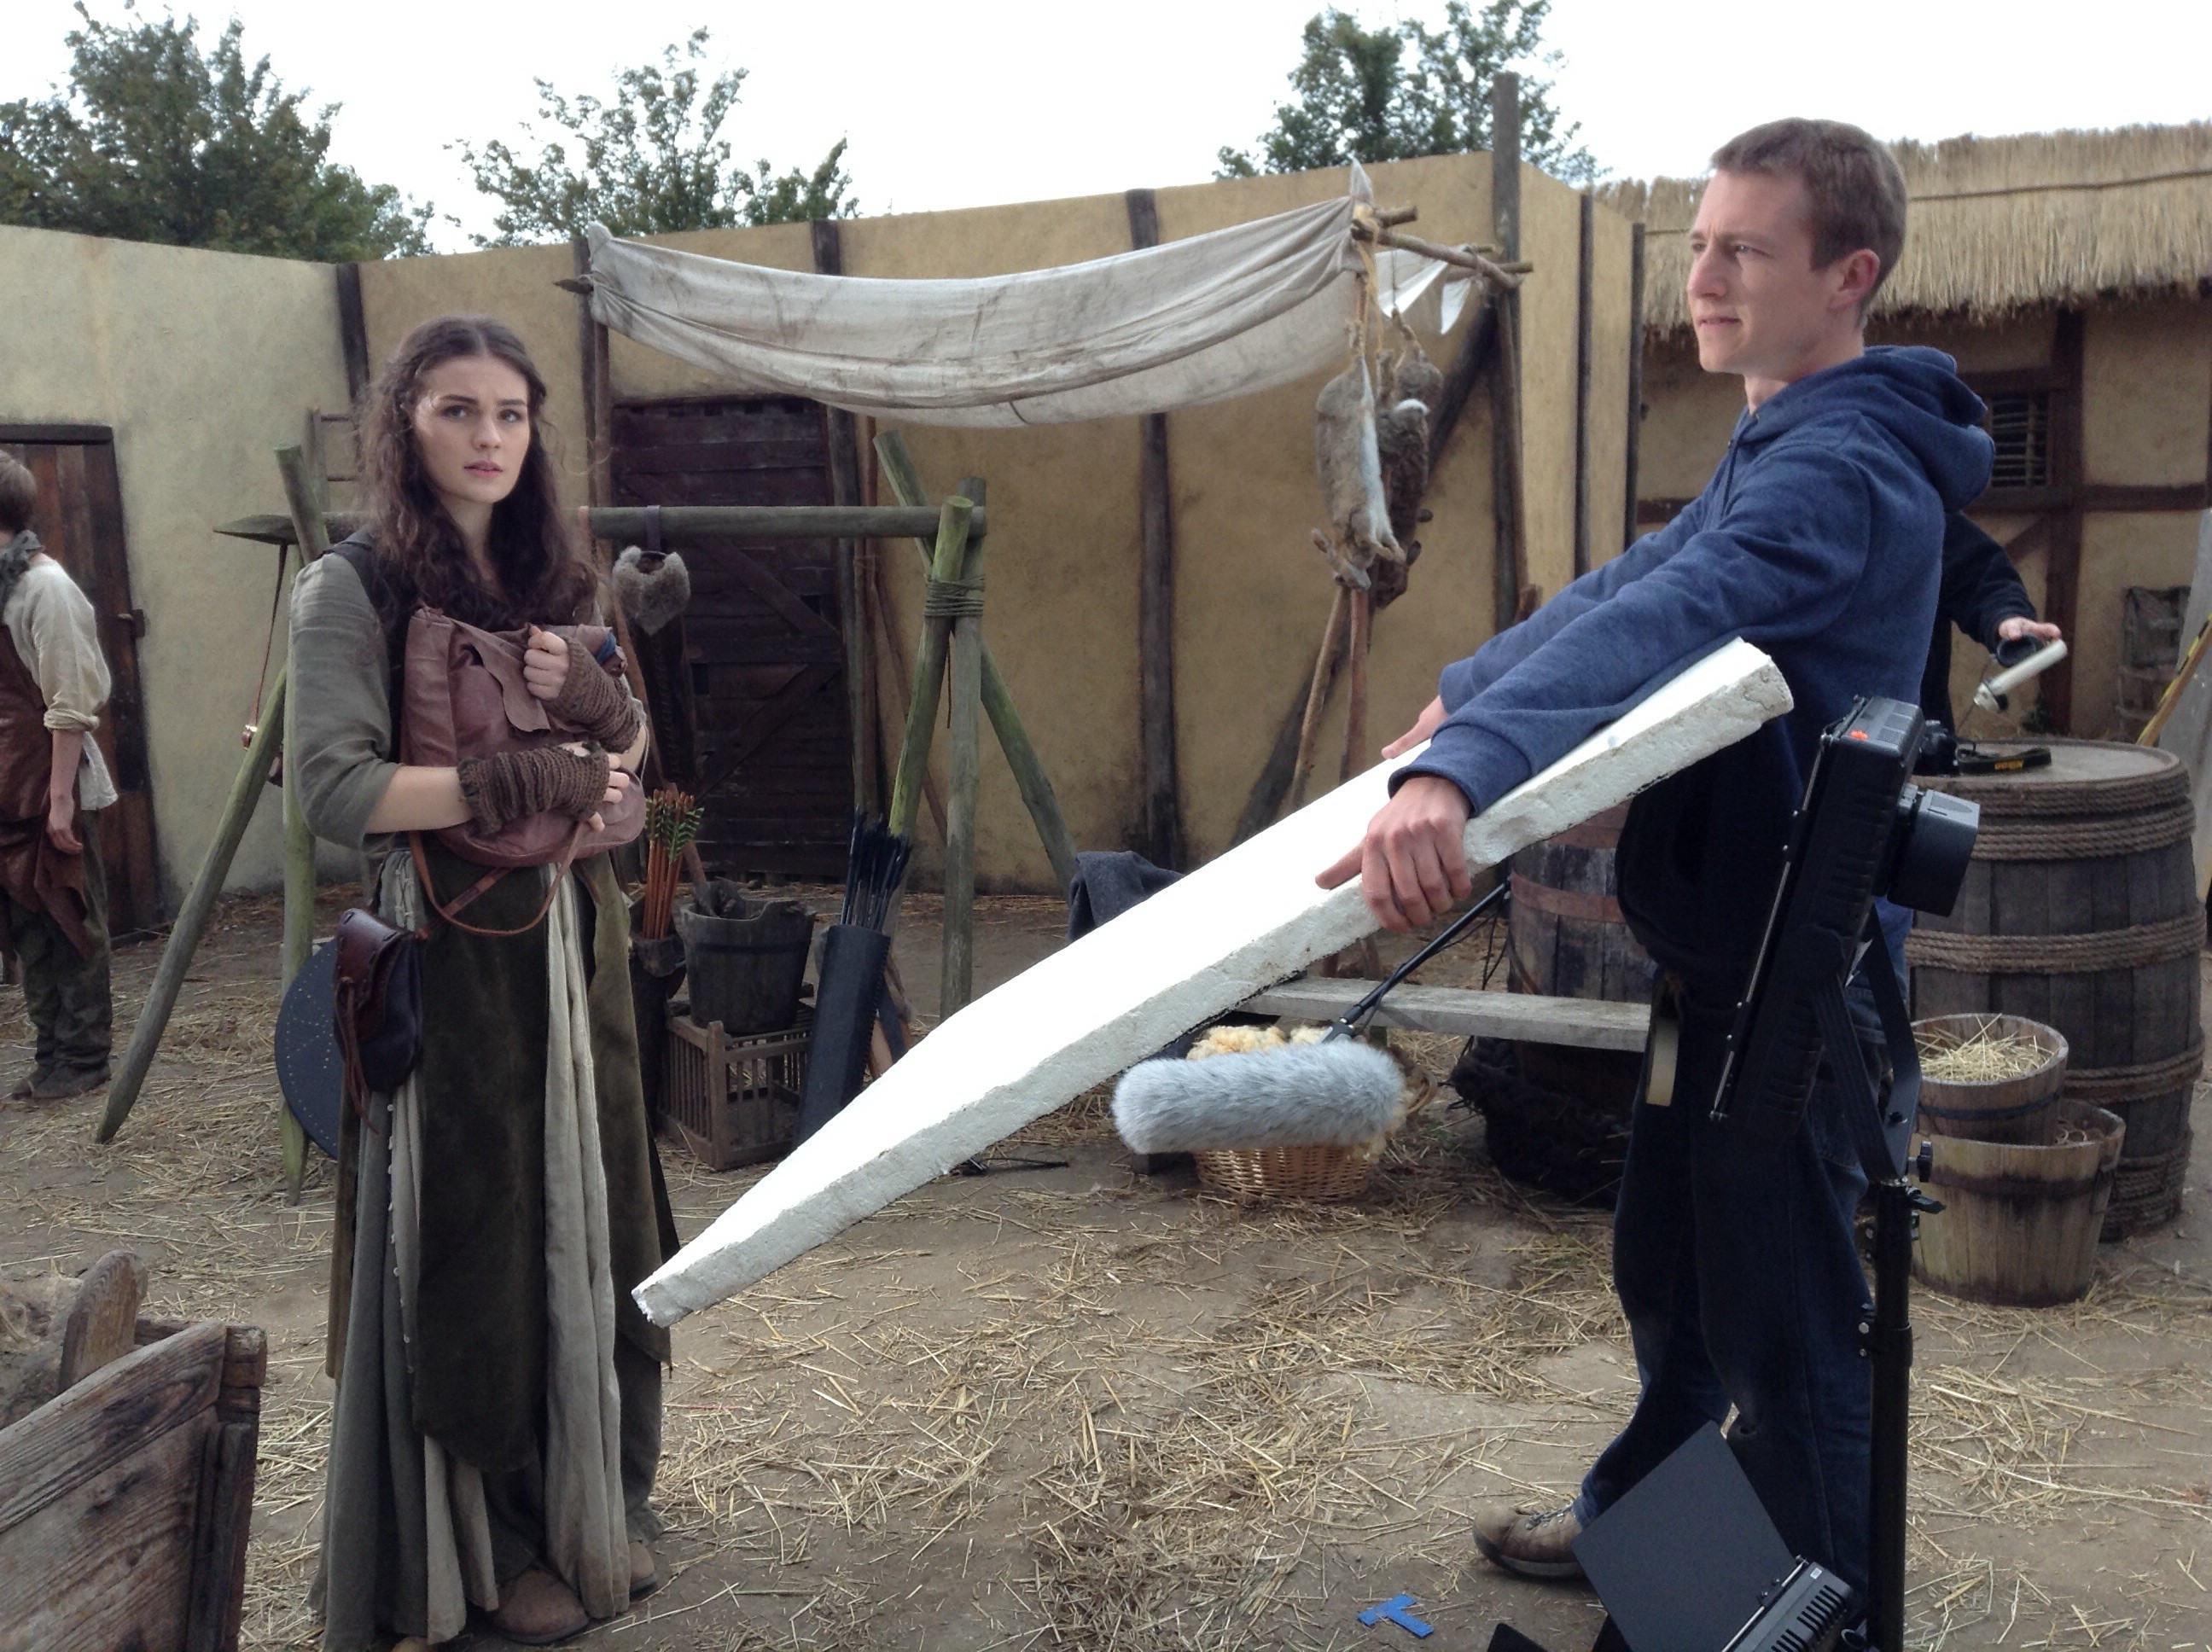
A few days into my tenure as DP on Kate Madison’s ambitious fantasy series, Ren, we filmed a shot/reverse for one of the opening scenes. The scene introduced us to the eponymous Ren (Sophie Skelton) and her friend Karn (Christopher Dane).

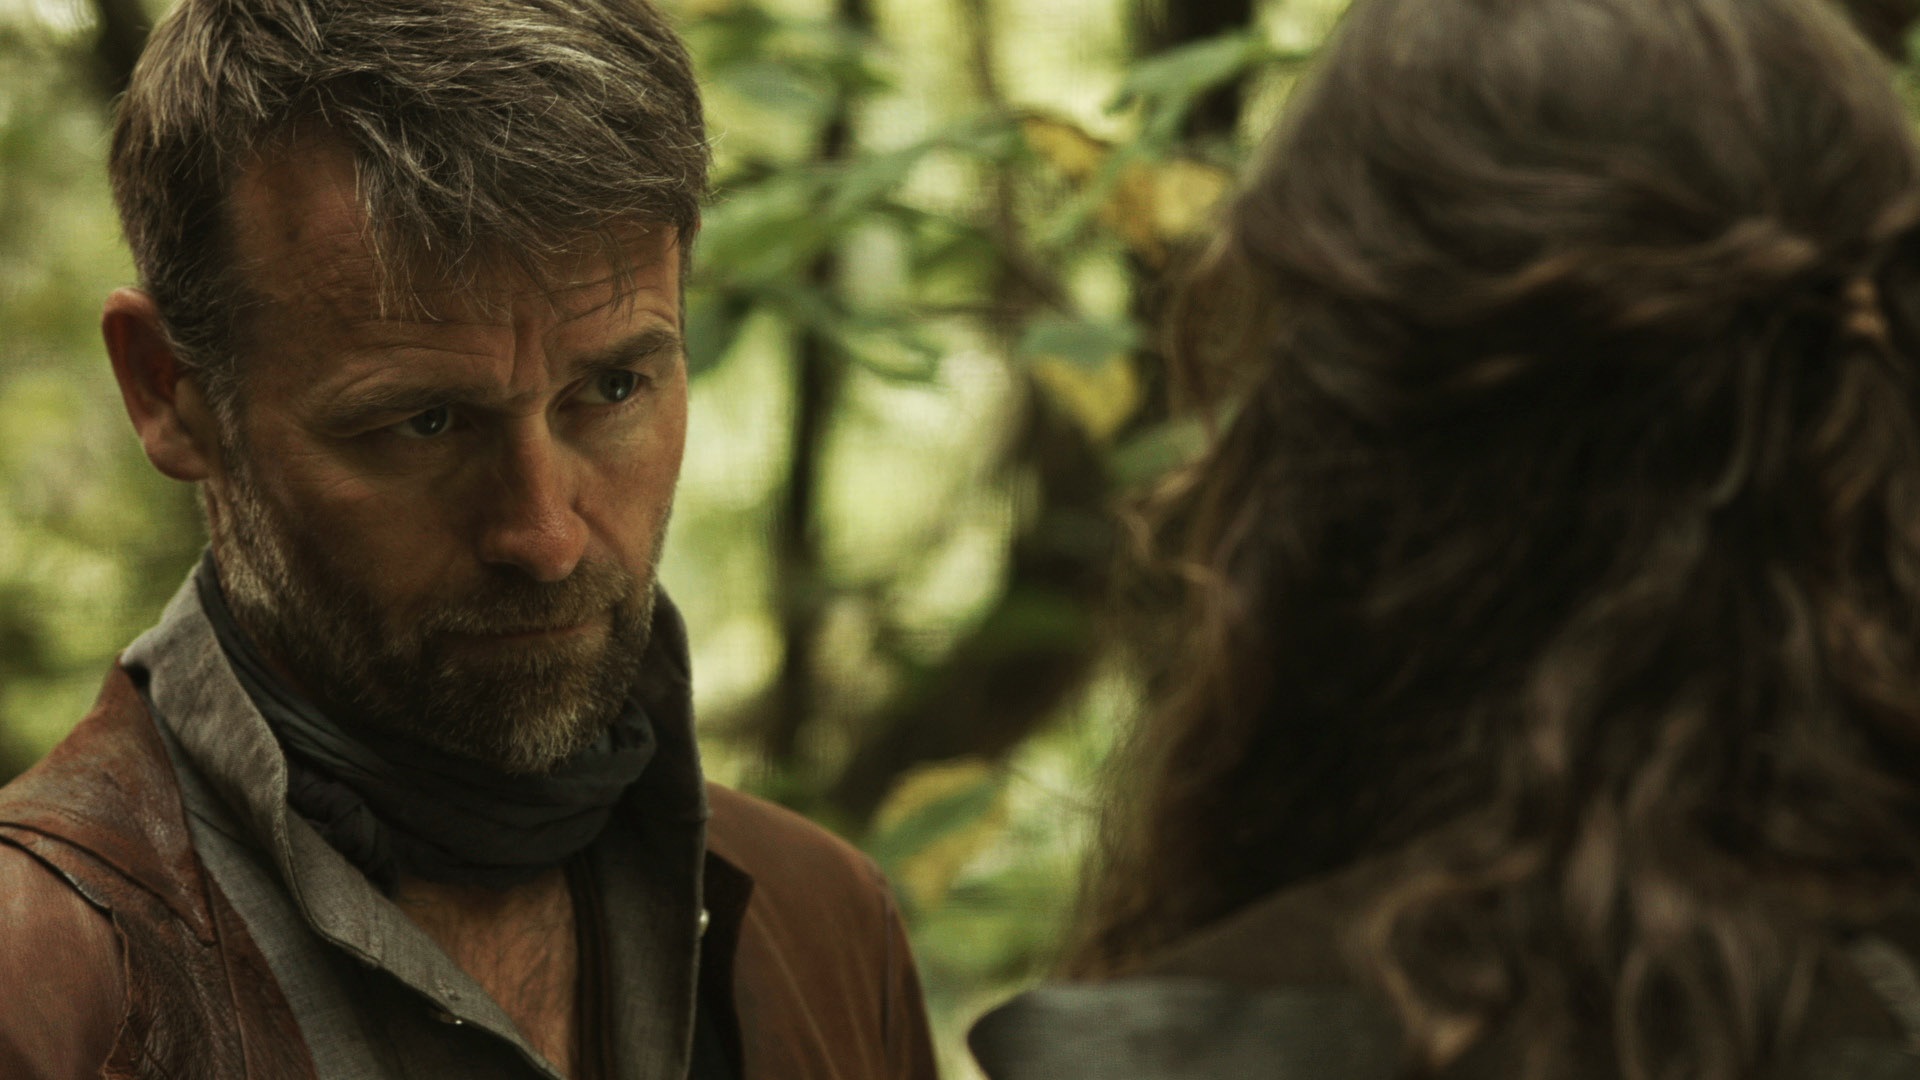
Kate described Ren to me as “pure innonence”, while Karn is an older, more worldly character with a difficult past. It seemed to me like classic femine and masculine lighting were called for. Classic feminine lighting is designed to create a soft, flawless, often shadowless face. Classic masculine lighting enhances jaw definition, embraces lines and skin texture and generally creates a rugged look.

Clearly you have to start by casting actors with the right physical characteristics for these roles, which Kate had certainly done, and make-up plays a huge role. The DP is the third part of the triumvirate determining the look of the cast’s faces.

The shot/reverse in question took place under trees in a valley on a cloudy day, so the natural light was very top-lighty (rendering eye sockets dark), with a bit of green bounce here and there.

IMG_1059.JPG

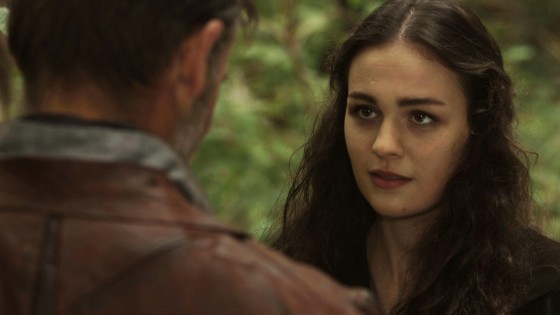
We shot Ren’s close-up first. We had already established in the wide that she was looking towards the sun, albeit a very cloud-obscured one.

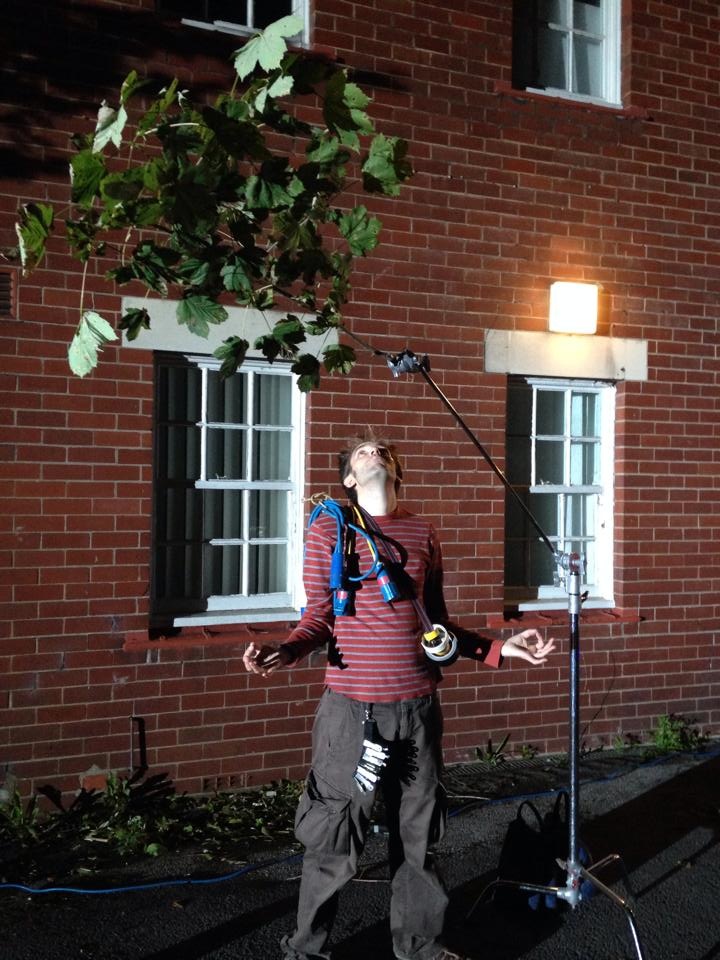
There are two ways to create the shadowless look of classic feminine lighting. One is to use a lot of bounce to fill in the shadows. The other is to put the key light directly above the lens, like a flash, so that the shadows are all hidden from the camera’s point of view. Since we’d established Ren was looking in the direction of the sun, I chose the latter method, rigging a small LED panel right above the lens.

Backlighting the hair is another common component of classic feminine lighting, so I had gaffer Richard Roberts hand-bash a second panel as a three-quarter backlight. We had to keep this very subtle since we had established that direct sunlight could not be coming from behind her.

image

I lit Karn’s close-up very differently. His orientation to the sun justified a strong three-quarter backlight from an LED panel off frame left. This picks out Chris’s stubble and jawline nicely.

I decided that his key would be motivated as sunlight reflecting off the river (off camera right). This could jusifiably be coming in from the side, again adding texture and definition to his face. It was achieved by Richard holding a silver-sided collapsible reflector just out of frame. We initially tried wobbling it to suggest the movement of the water, but ended up shooting a safety take without the wobble in case it proved too distracting.

I know that this degree of manipulation and augmentation of natural light is not to every cinematographer’s taste, but I feel it fits perfectly with the show’s fantasy world. My view is that in this world where magic exists, the light is a little bit magical too. Hopefully it will subconsciously help the audience pick up on Ren and Karn’s essential characteristics in this, their first scene.

Find out more about Ren at facebook.com/rentheseries


Ren: Masculine & Feminine Lighting

Lighting Techniques #3: The Window Wrap

So, you’re shooting a daylight interior. You’ve got an HMI as your “sun” blasting in through the window, giving great backlight when characters are faced away from it, and casting some interesting windowframe shadows when they’re faced towards it. But what if they’re side on to the window?

One side of the actor’s face is hotly lit while the other is in complete shadow. Maybe it’s an edgy or scary scene and you want that look. Fine. But maybe not.

You could just use bounce to generally fill in the rest of the actor’s face. Sure, that will work. But The Window Wrap will look sexier.

Take a Kinoflo and set it up inside the room near enough to the window that the audience can buy it as window light but far enough around that it seems to wrap the harsh HMI light softly around the talent’s face. Crucially, as long as the camera is on the opposite side of the actor’s eyeline to the window, you’re still lighting their downside; the nearest part of their face is still the darkest, but now it’s a smoother transition between the bright light of the downside and the darkness of the upside.

Here’s an example from The Gong Fu Connection with writer/director/actor Ted Duran:

original-shotannotated-shot

Sketch 2014-08-15 19_37_08

This technique was inspired by this lighting workshop video with Eric Kress, DP of The Girl with the Dragon Tattoo (original Swedish version).

Lighting Techniques #3: The Window Wrap

Gaffering Tips

I just spent a couple of weeks gaffering for DP Paul Dudbridge on a feature shoot in South Wales. It was pretty much my first time gaffering, and I certainly made some classic mistakes. Here are some tips I’ve compiled as a result of my recent experiences.

  • Make sure cables have slack so the DP can adjust the positions of lamps.
  • Take extra time running cables initially so they are least likely to be in shot and won’t have to be rerouted later.
  • Swap out batteries on LED panels during coffee breaks or other downtime so they don’t go off during takes.
  • Keep track of how much power you’re drawing off each circuit to avoid tripping breakers. See Gaffering Basics for more on this.
  • Make sure you have access to the consumer unit (fuse box) so you can reset a tripped breaker straight away.
  • If drawing a large load off a 13A socket, periodically check the plug isn’t getting too warm – occasionally they can melt.
  • Righty tighty, lefty loosy. Make sure the weight on a C-stand knuckle is pulling it clockwise, i.e. tightening it.
  • Bulbs are most fragile when they’re hot – i.e. when they’re on or have recently been on – so handle them with particular care.
  • Observe the minimum safe distances illustrated on the lampheads. The heat can crack a window or burn a flag if placed too close.
  • When bouncing tungsten lights off the ceiling, black-wrap them straight away to cut out direct spill.
  • Be sure to disable the building’s fire alarm or bag the smoke detectors before switching on a smoke machine.
  • Keep an eye on the smoke level in the room and top it up when necessary.
  • Stay within earshot of the DP so you can respond to requests.
  • Anticipate DP requests: if you look at the monitor and see that the backlight is flaring, get a flag ready; if a lamp looks too hot on camera, break in a dimmer.

IMG_1029-0.JPG
Photo by Sophie Wiggins

Gaffering Tips

Lighting Techniques #2: Cross-backlighting

A common scenario in filmmaking is that you have two characters standing talking to each other and you need to do a two-shot and an over-the-shoulder of each. A quick way to light this kind of scene is cross-lighting: you set up two lamps so that each lamp serves as one character’s backlight and the other’s keylight.

I practice what I like to call cross-backlighting. What I mean by this is that the lamps are both on the opposite side of the actors’ eyeline to the camera. The result is that the downsides of their faces are lit. (Check out this post on key angles if you’re not sure what I mean by downside.)

This old Soul Searcher lighting featurette covers cross-backlighting around the 5:30 mark.

Here’s a super-recent example of cross-backlighting in action, on the set of The Gong Fu Connection. I’ve complicated things a bit though here. I’ve decided I want the characters’ keylights to be softer and cooler in colour than their backlights.

2-shot

So there’s actually a dedo and an LED panel behind each actor. The camera is set to a white balance of 3,200K. Each dedo provides a strong, white backlight, narrowly focused so as not to spill onto the opposite actor’s face. The LED panels, positioned much closer to the talent, provide a slightly softer light with a dialled-in temperature of 4,500K.

Sketch 2014-08-15 07_29_38

Harry

For the close-ups I repurposed the LED panel that wasn’t being used as a background light, dialling it back to 3,200K to match with the location’s existing tungsten lighting that was already doing a lot of the work.

Carmina

When we got to Carmina’s close-up I decided the LED panel alone was still too harsh, so I bounced it off the silver side of a collapsible reflector. I adjusted the panel to an angle where just a little direct light was hitting the side of Carmina’s face, and this kind of blends with the bounced light to provide a gentle wrapping illumination.

Stay tuned for more lighting techniques.

Lighting Techniques #2: Cross-backlighting