The Second Shepherds’ Play, the medieval comedy which I lensed last week, had several scenes in “the Mak Shack”, the grotty home of the antagonists. The set posed an interesting problem in that – apart from the door, which wouldn’t always be open – it contained no light sources. No windows, no lamps, no candles. Given the wordy script and the tight schedule, I needed to light it in a way that would not need tweaking between set-ups, and which would work for one particular scene that director Doug Morse wanted to film as a single developing shot showing about 180º of the set.
One option would have been to posit a window in the off-screen 180º, but that would have resulted in very flat illumination, all lit from the front like a photo taken with flash.
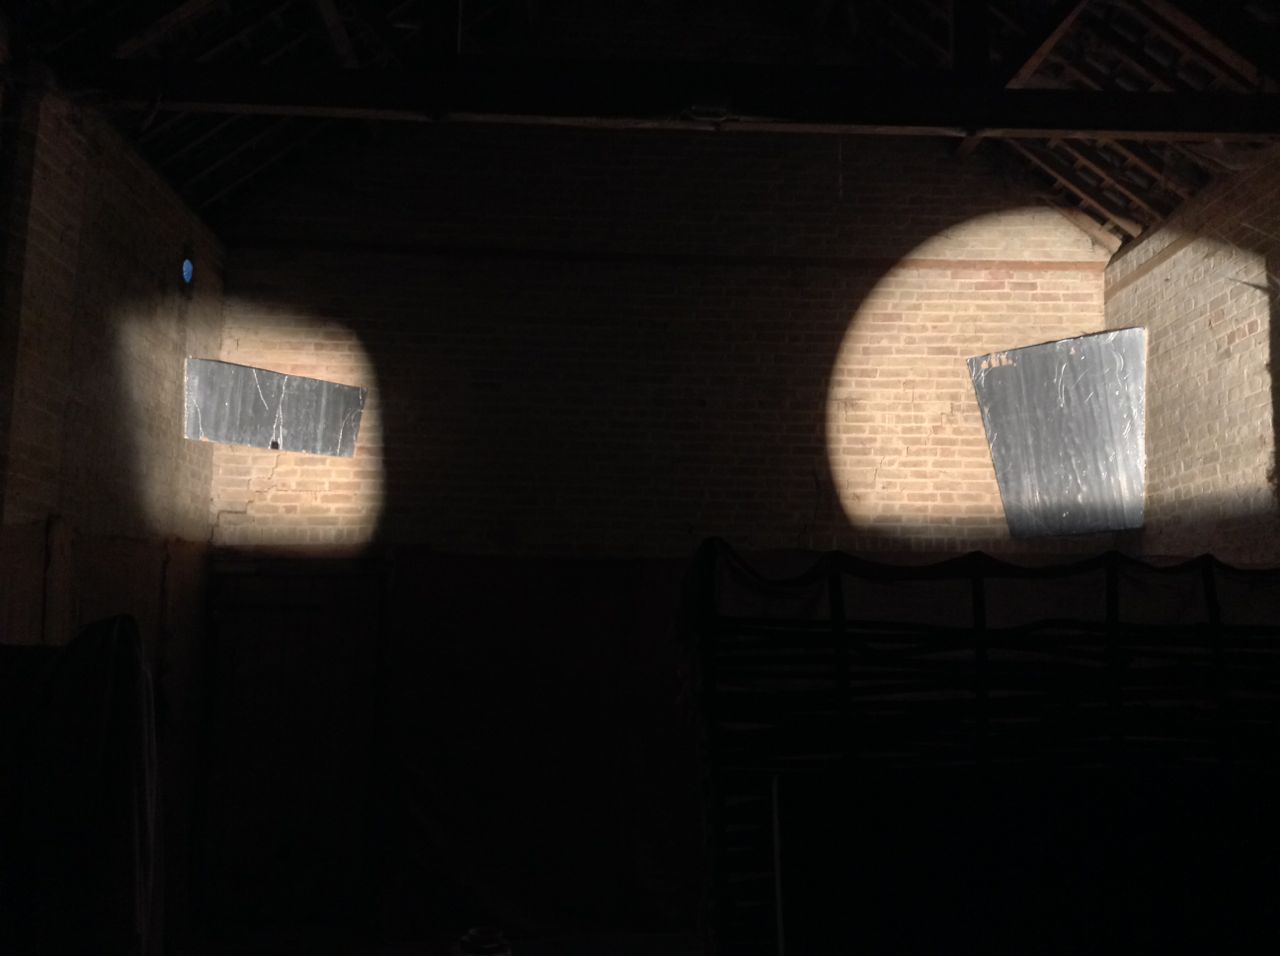
I wanted to create a cross-backlighting set-up (Lighting Technique #2), but it was impossible to hang lamps above the rear of the set without damaging the location’s brickwork. So instead I had Colin rig two pieces of Celotex (matte silver bounce board) above the back two corners. Into these I fired Source Fours, peeking over the front walls of the set. These lamps, designed for theatre use, are relatively cheap to hire and have lenses and cutters which provide a great deal of control over where the light does and doesn’t go, meaning you can ensure it all goes onto a bounce board and nowhere else. Using Source Fours as sources for bounced light is a tip I picked up from David Vollrath‘s talk in the Big League Cine Summit in January.
Here you can see a Source Four Junior peeking over a wall at the front of the set to hit a bounceboard at the back.Viewed from the back of the set, both Source Fours can be seen firing over the front walls. The lamps are high enough that their beams go completely over the heads of the talent.This reverse angle shows the two bounce boards above the back corners of the set, which you’ll have to trust me is directly underneath them in the darkness.
This set-up enabled me to execute the 180º handheld shot without casting any shadows myself, and without the actors casting hard shadows (which would have been inappropriate for a period piece), while still primarily lighting the downsides of their faces to give depth and shape to the image. It also provided backlight to ensure the actors stood out.
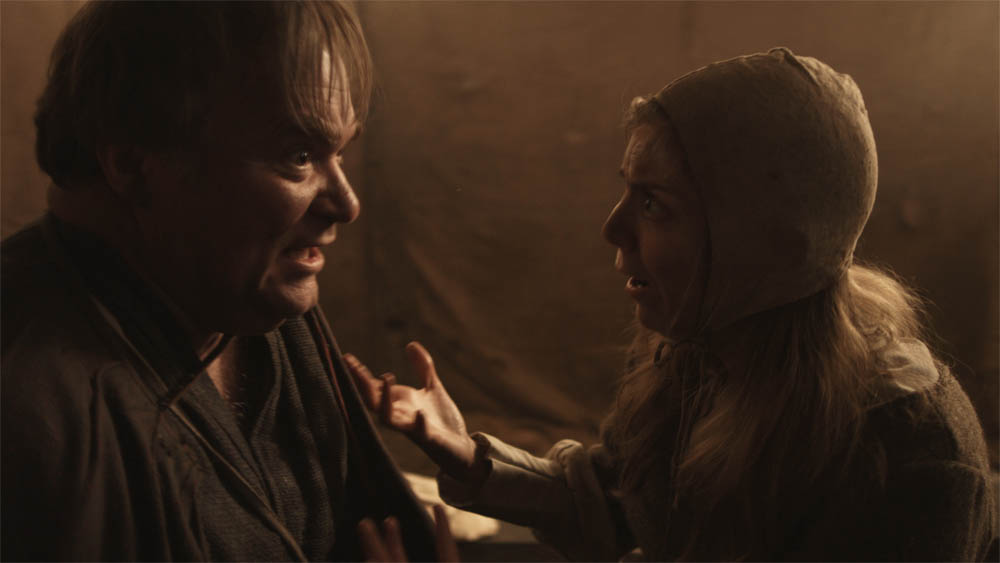
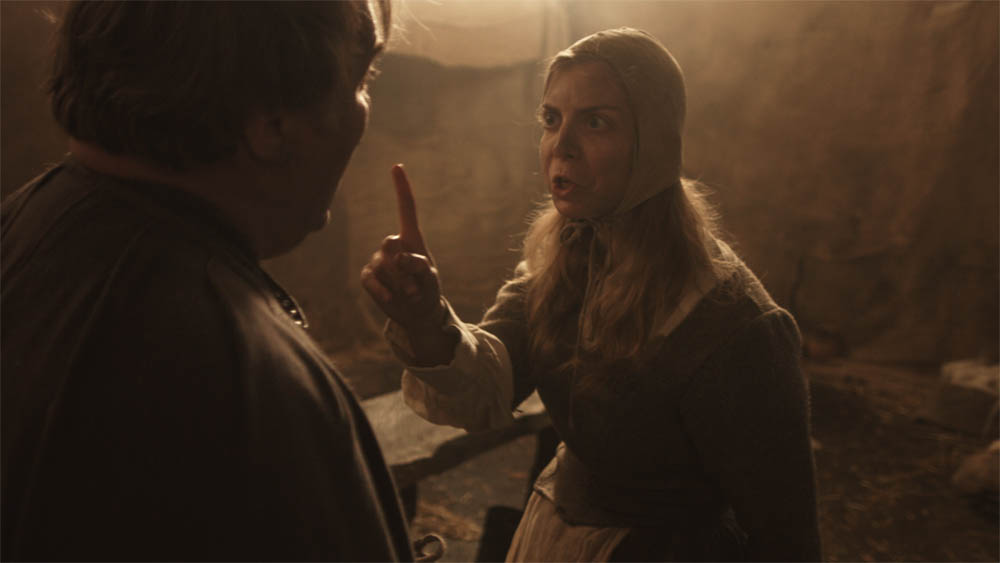
I’ll leave you with some frame grabs (courtesy of Grandfather Films) and a floor plan of the set-up. Visit Grandfather Films on Facebook for more on the Shepherds’ Play.
In September 2013 I was lucky enough to serve as the director of photography on The First Musketeer, an action-adventure web series based on the famous novels of Alexandre Dumas. Telling the story of how Athos, Porthos and Aramis first meet and become the heroes we know and love, the show was shot in castles and chateaus in the Lot and Dordogne regions of southern France.
A web series, more than any other medium, lives and dies by its viewing figures. You can help the show succeed and go forward into future seasons by sharing that link or better still by joining our Thunderclap campaign. Thunderclap is a service which automatically posts a one-off message to your Facebook, Twitter and/or Tumblr accounts at a prearranged time, so at 8pm on June 1st a huge number of people will all hear about The First Musketeer simultaneously. Follow this link to join the Thunderclap.
The other exciting news is that both The First Musketeer and Ren will be part of the New British Web Series panel at London ComicCon tomorrow, Friday May 22nd. I’ll be joining actress Jessica Preddy on the panel to represent The First Musketeer. I hope to see some of you there!
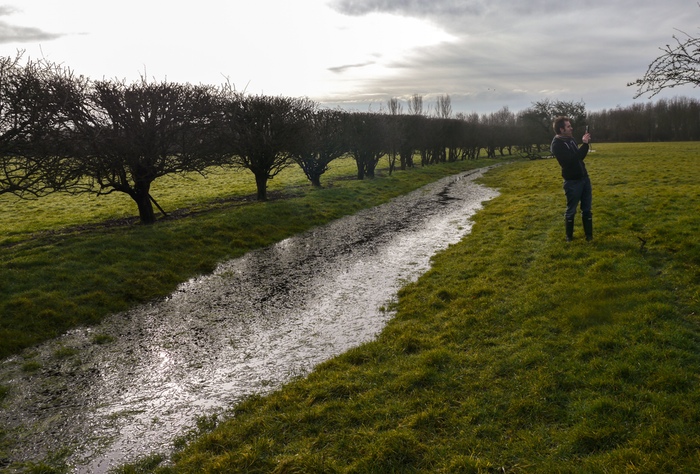
On the recce for The Second Shepherd’s Play. Photo: Douglas Morse
As a cinematographer, it can often be tempting to make your shots look as slick and beautiful as possible. But that’s not always right for the story. And sometimes it can leave you nowhere to go.
Currently I’m shooting The Second Shepherds’ Play, a medieval comedy adaptation, for director Douglas Morse. The story starts in the mud and drizzle of three shepherds’ daily drudge, and in a Python-esque twist ends up in the nativity. The titular trio develop from a base, selfish, almost animalistic state to something much more divine.
So, much as my instincts filming the opening scenes yesterday were to have a shallow depth of field and bounce boards everywhere to put a sparkle in the shepherds’ eyes, this wouldn’t have been right for this stage of the film. We had to have somewhere to go, so I shot at around f9 all day with unmodified natural, overcast light. As we get towards the end of the story – we’re shooting roughly in story order – I’ll start to use eyelight and more sculpted illumination and reduce the depth of field, as well as switching from handheld to sticks.
Grading episode one of Ren
Similarly, grading episode one of Ren the other day, it was important to keep things bright and cheerful, so that later episodes could be colder and darker by comparison when things go wrong for our heroes. And playing the long game, I lit Ren herself with soft, shadowless light for most of the first season, so that as she develops from innocence to more of an action heroine in later seasons, her lighting can get harder and moodier.
Like all heads of department on a production, DPs are storytellers, and it all comes down to doing what’s right for the story, and what’s right for that moment in the story.
Brett Chapman shoots B-roll on Stop/Eject as Hadrian Cawthorne looks on. Photo: Paul Bednall
So here are some tips for editing BTS videos for the web. Many of these apply equally to any talking-head-based documentary.
Plan for it before the shoot by lining up a competent BTS camera crew and being clear about the kind of material you need. Here are some tips for shooting B-roll.
Start the edit by creating a new timeline and putting in some text generators with category headings you think you’ll want to cover, e.g. “plot”, “characters”, “casting”, “action scenes”, “concluding remarks”.
Watch through all the interview material. Every time you hear something you think you can use, dump it on the timeline after the relevant text.
Play back your timeline. You’ll immediately see that some of the material you’ve included is dull or repetitious. Whittle down the material until your timeline is only a little longer than you intend the finished piece to be. (I suggest 2-3 minutes should be your target length for a web piece.)
Pay attention to your in and out points. Don’t cut while someone is drawing breath – cut before or after. Beware of breathing time if you’re hacking someone’s sentences around. If your editing makes a couple of words sound unnaturally close together, interpose a few frames of atmos or silence. If you cut someone off in the middle of a sentence, firstly be sure the intonation doesn’t make it sound cut off, then add in some silence or atmos before the next clip, and paper over the edit with B-roll as the interviewee’s face will often give away that they’re not finished speaking.
Speaking of papering over the talking heads with B-roll, it’s time to do that now. I often start with the obvious stuff. Clearly shots of the fight scenes being rehearsed need to go over the actors talking about fight scenes. Then I’ll move onto the less obvious stuff – an actor talking about their character might go with almost any shot of that actor on set, so I’ll see what’s left at the end.
Avoid cutting in the middle of quick movements – an arm going up, a head turning- unless that action will be continued in the next shot. This goes for the talking heads too – don’t cut on or close to a blink. Also avoid cutting on an emphasised or particularly loud syllable, because this too will jar.
Take out the text generators and replace them with a few seconds of B-roll that doesn’t have any interview sound under it. This gives you dividers between topics without blatantly signposting them, and allows the audience a breather. You could bring up the audio on the B-roll, or put in a bit of music. Usually it’s best for this B-roll to serve as an introduction to the topic that’s up next. For example, if the next topic is “what it was like working with the director”, kick it off with B-roll of the director explaining the next scene to the actors. After hearing him or her talk for a sentence or so, fade down the audio and bring in the interview sound.
Get some music from somewhere like incompetech.com, if your composer hasn’t started work yet, and cut opening and closing montages of B-roll to it.
Put in your lower thirds and opening and closing titles. If the video’s going on You Tube, it’s a good idea to allow for annotations linking viewers to other videos on your channel. Do not put in credits – sorry, but no-one cares who made this.
Watch the whole thing through and try to take out another 10-30 seconds. Remember, pace is everything. Do not give people the slightest excuse to stop watching.
Do a colour correction pass so everything matches.
Go through again balancing the audio. People start their sentences loudly and get quieter as their lungs deflate, so counter this by ramping the audio up over the course of the sentence. Use EQ filters if necessary to counter tinny or boomy sound, or reduce hiss or wind noise. See this Nofilmschool article for some handy audio tips. If any of the audio cuts are popping or clicking, put on a 1 frame cross fade. If you don’t have decent speakers, do this on every cut because you won’t know which ones are dodgy.
If any of the speech is still hard to make out – and remember that your viewers haven’t heard it a million times like you have – then subtitle it.
Watch it one last time to check everything’s smooth, then compress and upload it. You’re done!
If you’ve found this post useful, please consider supporting Ren by purchasing or sharing the trailer for the Daily Diary videos. Buyers get the first 7 videos now and the remaining 29 when the series is released this summer. They’re all different, some following the above pattern and others being much more candid, fly-on-the-wall affairs. There are plenty of bloopers, interviews and filmmaking tips to be enjoyed throughout. Or check out our free behind-the-scenes videos on YouTube.
Every cinematographer needs to make the cast look good. Here are some quick tips for minimising blemishes and undesirable physical attributes. To any readers who have been lit by me, please don’t get a complex! These techniques can also be used to make someone who’s already flawless look even more amazing. Conversely, if you have a bad guy, or a character who needs to look ill, or a prosthetic monster make-up, you might want to do the opposite of what I suggest below.
Thinning hair – Avoid toplight and strong backlight, which will show up the scalp under the hair.
Wrinkles, spots and scars – Avoid lighting that will throw shadows from these features, e.g. cross-light (meaning light from the side). Instead put the key light as close to the camera as possible. Ideally use a soft source. If you’re still seeing shadows, add more fill.
Double chins, bags under the eyes, general appearance of tiredness – Use Health Bounce – a reflector placed under the talent’s face to eliminate shadows cast from above.
Small or deep-set eyes – Again, use Health Bounce. It will help get light into the eye sockets and put a sparkle of reflection in the eyeballs.
Weak jawline – Use three-quarter backlight (a.k.a. “kicker”) to create a rim along the jawline on one side.
Shiny skin – This may be a make-up issue, but you can help by using bounced light. Kinoflos, though they are soft sources, are amongst the worst culprits for creating shine.
Big nose – Keep the key light close to the camera to minimise the shadow the nose casts.
In 2013 Katie Lake and I made a little puppet film for the Virgin Media Shorts competition, called The One That Got Away. Although it failed to make the shortlist, I believed it had legs, so I started entering it into festivals. Today I’m going to talk about how it fared. A little later in the year I’ll do the same thing for my other 2013 short, Stop/Eject, and between the two posts I hope to help you answer the question, “Is it worth entering my film into festivals?”
To start with, here’s the film.
It cost next to nothing to make, so I decided to enter it only into festivals that had no entry fee. I created accounts on the festival submission platforms Short Film Depot and Reel Port. Both sites have systems whereby you purchase credits (known on Short Film Depot as ‘reels’ and on Reel Port as ‘stamps’), which you can then use to pay for submissions. As far as I know, this payment is purely a middleman fee and doesn’t go to the festivals themselves. Both sites allow you to upload your film, which is then sent automatically with your submissions.
Short Film Depot allows you to upload your first film for free, with subsequent uploads costing 3 reels (€3 – currently about £2.15). Each festival submission costs 2 reels(€2 – about £1.45).
Reel Port is free to upload your film to. Each festival submission costs one stamp. Stamps are priced on a sliding scale: buy just one and it will cost you €3 (£2.15), whereas a book of 5 is €12.50 (£9), a book of 20 is €39 (£28) and a book of 50 is €75 (£54). So if you buy in big bulk, you could pay as little as £1.08 per submission, plus currency exchange fees. More likely, you’ll end up with leftover stamps you never use!
I entered The One That Got Away into 36 festivals over the course of about 18 months: 23 entries on Reel Port, 12 on Short Film Depot, and one directly to the Worcestershire Film Festival (which was completely free).
The total cost was €98.95, or about £71 plus currency exchange fees – that’s about twice the film’s budget! I should point out that I made one exception to the ‘no entry fee’ rule: that total cost includes €12.50 I spent on entering the film into Encounters. This was a discount rate because I was entering Stop/Eject at the same time. Why did I pay for Encounters? Because of their Depict Competition (which The One That Got Away didn’t actually qualify for, being over 90 seconds) they seemed to be associated with very short films, and with hand-made animation-type films. Plus I knew the festival director from doing FilmWorks.
How many of those 36 festivals did the film get into?
Two. Worcestershire Film Festival, and Belo Horizonte International Short Film Festival in Brazil. Belo Horizonte’s notification email told me that The One That Got Away “was one of the 12 selected for the Children’s Exhibition, among 2,700 subscribers.” That gives you an idea of the kind of odds you’re up against with a festival submission. Suddenly 2 out of 36 doesn’t seem so bad.
Behind the scenes of The One That Got Away
I have great admiration for what the guys at Worcestershire Film Festival are doing, and it was really great to go along and see the film with an audience, but at the moment it’s quite a new and low-key festival. For all I know, the same is true of Belo Horizonte, though I wasn’t about to fly to Brazil to find out. (They were not offering to pay my travel.) I’d estimate a total audience reach of about 100-150 people for those two screenings. Less, I would guess, than it’s had online. And apart from a little bit of buzz amongst my social media network generated by the announcement of these festival selections, there have been no other benefits.
I leave you to decide for yourself whether you think it was worth all those entries and the cost of £71. A full list of festivals entered follows.
Look out for my future post on Stop/Eject’s festival entries. Since that film was crowd-funded, we were able to take a very different approach and enter a lot of top tier festivals, so it will be an interesting comparison.
The One That Got Away submissions via Reel Port:
Anibar International Animation Festival, Republic of Kosova
12th International Festival Signes de Nuit, France
Kinodot Online Festival of Creatibe Short Film, Russian Federation
The International Bosphorous Film Festival, Turkey
Exground Filmfest, Germany
Encounters Short Film and Animation Festival, UK
9th International Short Film Festival, Lithuania
Cinefiesta, Puerto Rico
Mobile SIFF – Shanghai International Film Festival, China
Odense International Film Festival, Denmark
Concorto Film Festival, Italy
20min|max, Germany
Submissions via Short Film Depot:
Short Shorts Film Festival & Asia
International Short Film Week, Regensburg
Seoil International Extreme-short Image & Film Festival
Curocircuito – Santiago de Compostela International Short Film Festival
Tehran International Short Film Festival
Kaohsiung Film Festival
Asiana International Short Film Festival
Bogota Short Film Festival
Belo Horizonte International Short Film Festival (accepted)
Kuku International Short Film Festival for Children and Youth, Berlin
Off-courts Trouville
Uppsala International Short Film Festival
Shnit International Short Film Festival
Manlleu Short Film Festival
Sapporo International Short Film Festival & Market
Sao Paulo International Short Film Festival
Seicicorto International Film Festival Forli
Festival Silhouette
China International New Media Shorts Festival
Plein la Bobine
Corti da Sogni Antonio Ricci – International Short Film Festival
FEC Festival – European Short Film Festival
Mecal Barcelona International Short Film and Animation Festival
Lately I’ve been working on the electronic press kit for Kate Madison’s web series, Ren. An EPK is a collection of footage that a broadcaster can use to edit their own piece about your film or series. It should contain:
a trailer (optionally with versions without music and without dialogue, so it can be dubbed);
clips from the show (again, versions without dialogue are handy if you’re expecting foreign coverage);
interviews with the director and principal cast;
B-roll, i.e. behind-the-scenes footage.
You may also want to include a short (5 minutes max) ‘making of’ featurette.
The whole thing should be about 20-30 minutes long.
You need to think about your EPK in preproduction. Assign someone with camera and editing experience to film behind-the-scenes material on a few key days of the shoot. This post has lots of tips for shooting good B-roll.
Here’s some B-roll from the Avengers: Age of Ultron EPK.
Personally, I think that putting black slugs between every shot is excessive. With the Ren EPK I loosely edited half a dozen montages and titled them ‘Filming crowd scenes in the village’, ‘Filming fight scenes in Epping Forest’ and so on.
Here’s another example, this time from the Chappie EPK.
When shooting the interviews, encourage people to keep their answers brief. Answers of about 30-45 seconds are ideal. Remember that an EPK is not a finished product: you can’t have jump cuts or paper over edits with B-roll, which means you can’t cut stuff out of the middle of people’s answers; all you can do is trim the beginning and end.
Typical EPK questions are:
What’s the film about?
Who is your character?
What was it like working with the other actors and the director?
What was it like filming the action scenes / scary scenes / romantic scenes / scenes where you had to be painted blue from head to toe?
Why should people go and see this film?
Put a title card before each answer, giving the question (or a brief description of what the person talks about in their answer), the duration of the clip, and the person’s name and role.
Here’s an example, again from Age of Ultron.
See how the picture kicks in before the sound? That’s to give someone editing the clip into their show more flexibility – they could dissolve into the shot, for example.
Here’s another example, this one from Far from the Madding Crowd.
Once upon a time you would deliver an EPK on Beta SP, but clearly those days are gone. For Ren I’ll probably put the clips up on VHX, a VOD platform we’ve been using for our behind-the-scenes Kickstarter rewards. We can create a package of videos which people can be invited to, with a nice, slick interface, and the videos – one for each interview answer and B-roll segment – will all be downloadable by invitees as 1080P H.264 MP4 files. If anyone wants less compressed versions, they can contact us directly.
I thought it was about time my showreel got an update, so here it is:
Please get in touch if you need a DP. I’ll consider most projects as long as they’re creative and not entirely unpaid.
These are the films, series and promos featured on the reel. If you want to find out more about any of these productions, you can find links in the showreel’s YouTube description.
The First Musketeer (dir. Harriet Sams)
The Gong Fu Connection (dir. Ted Duran)
Ren (dir. Kate Madison)
Savage Messiah: Hellblazer (dir. Tom Walsh)
WidthScribe (dir. Neil Oseman)
The One That Got Away (dir. Neil Oseman)
Girl and a Scar (dir. David Cave)
How to be Dead (dir. Lara Greenway)
Revenge of Calculon: X, Y & Z Rays (dir. Tom Walsh)
Self-control (dir. Stanislava Buevich)
Lewis Watson: Droplets feat. Gabrielle Aplin (dir. Tom Walsh)
The Wrong Funeral (dir. Roger Harding)
Stop/Eject (dir. Neil Oseman)
Wasteland trailer (dir. Tom Wadlow) *
See Saw (dir. Tom Muschamp)
Forever Alone (dir. Jordan Morris)
Three Blind Mice (dir. KT Roberts)
* Note: I only worked on the trailer, not the film itself.
One of the big benefits of the Blackmagic cameras is their ability to shoot raw – lossless Cinema DNG files that capture an incredible range of detail. But encoding those files into a useable format for editing can be tricky, especially if your computer won’t run the processor-intensive DaVinci Resolve which ships with the camera.
You can usually turn to the Adobe Creative Suite when faced with intractable transcoding problems, and sure enough After Effects provides one solution for raw to ProRes conversion.
I’ll take you through it, step by step. Let’s assume you’ve been shooting on a Blackmagic Cinema Camera and you have some 2.5K raw shots which you want to drop into your edit timeline alongside 1080P ProRes 422HQ material.
1. In After Effects’ launch window, select New Composition. A dialogue box will appear in which you can spec up your project. For this example, we’re going to choose the standard HDTV resolution of 1920×1080. It’s critical that you get your frame rate right, or your audio won’t sync. Click OK once you’ve set everything to your liking.
2. Now go to the File menu and select Import > File. Navigate to the raw material on your hard drive. The BMCC creates a folder for each raw clip, containing the individual Cinema DNG frames and a WAV audio file. Select the first DNG file in the folder and ensure that Camera Raw Sequence is ticked, then click OK.
3. You’ll then have the chance to do a basic grade on the shot – though with only the first frame to judge it by.
4. Use Import > File again to import the WAV audio file.
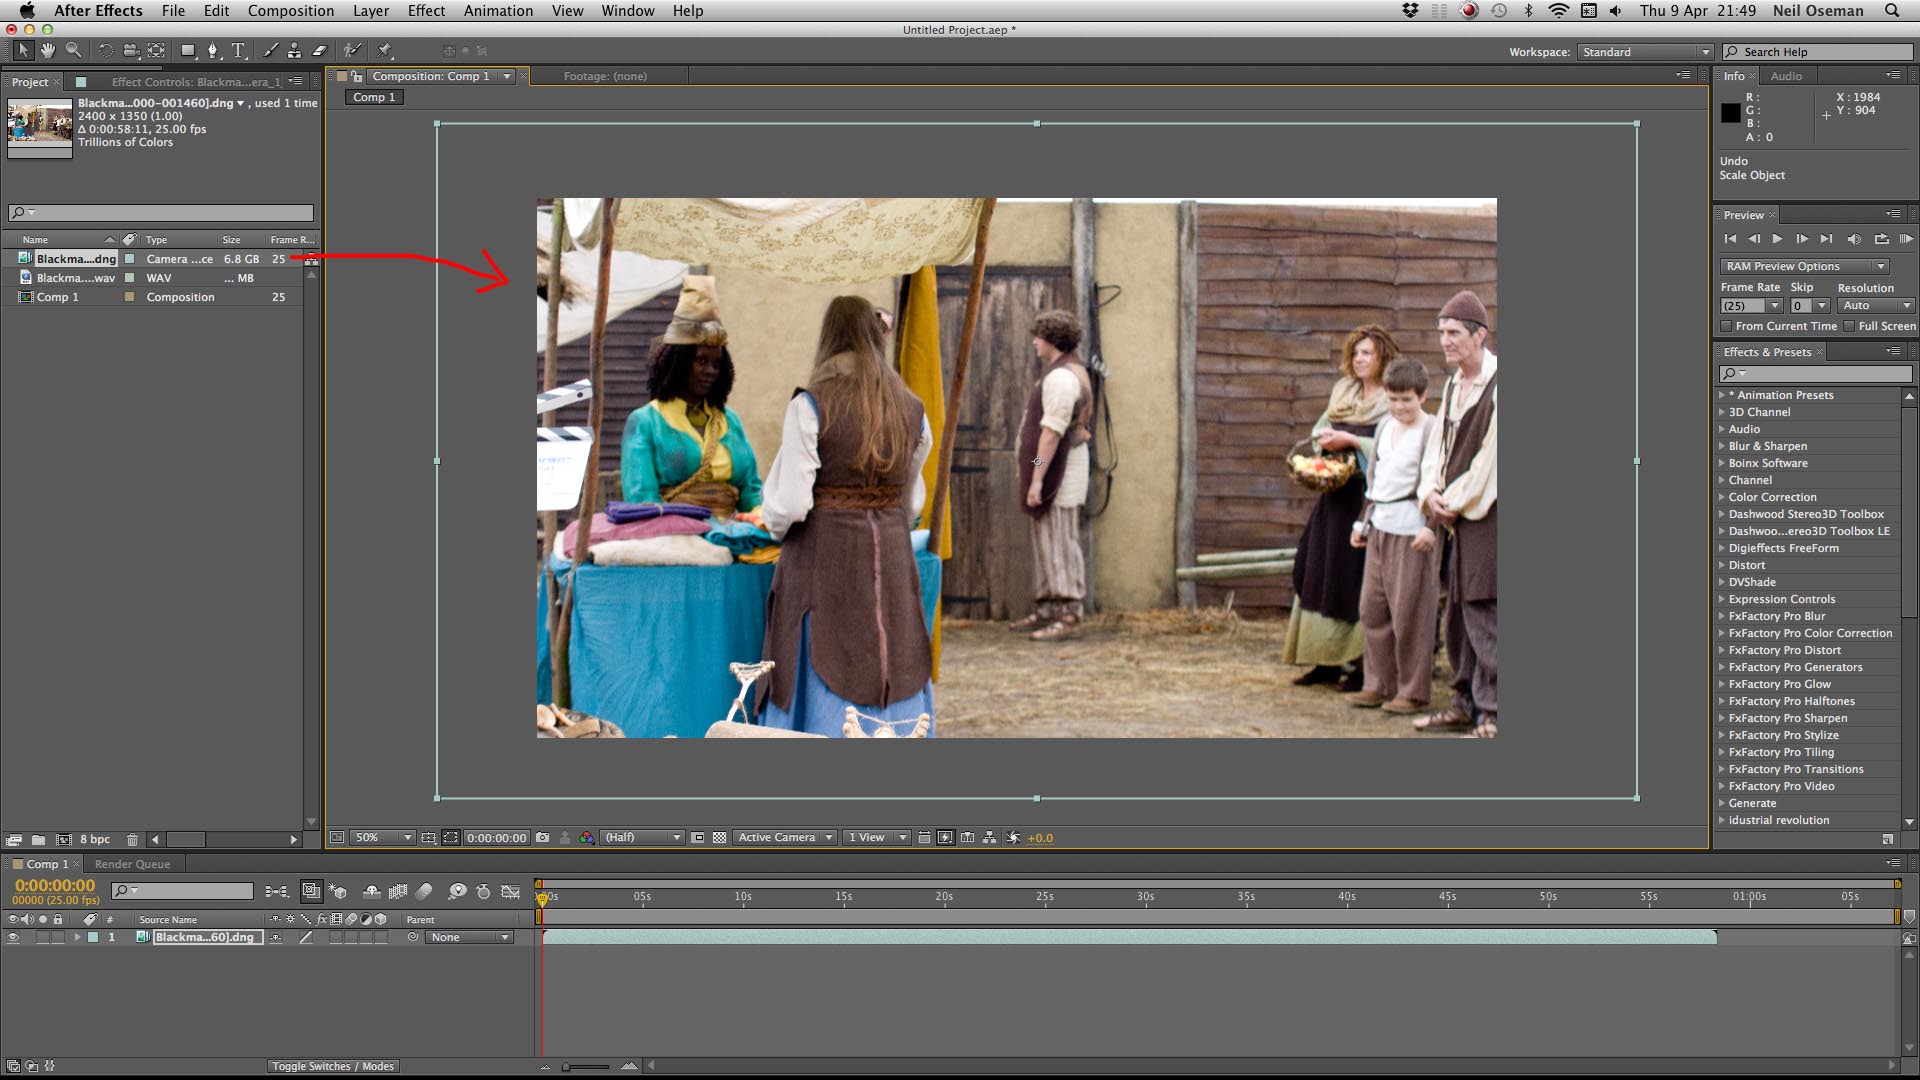
5. Your project bin should now contain the DNG sequence – shown as a single item – along with the WAV audio and the composition. Drag the DNG sequence into the main viewer window. Because the BMCC’s raw mode records at a resolution of 2.5K and you set your composition to 1080P, the image will appear cropped.
6. If necessary, zoom out (using the drop-down menu in the bottom left of the Composition window) so you can see the wireframe of the 2.5K image. Then click and drag the bottom right corner of that wireframe to shrink the image until it fits into the 1080P frame. Hold down shift while dragging to maintain the aspect ratio.
7. Drag the WAV audio onto the timeline, taking care to align it precisely with the video.
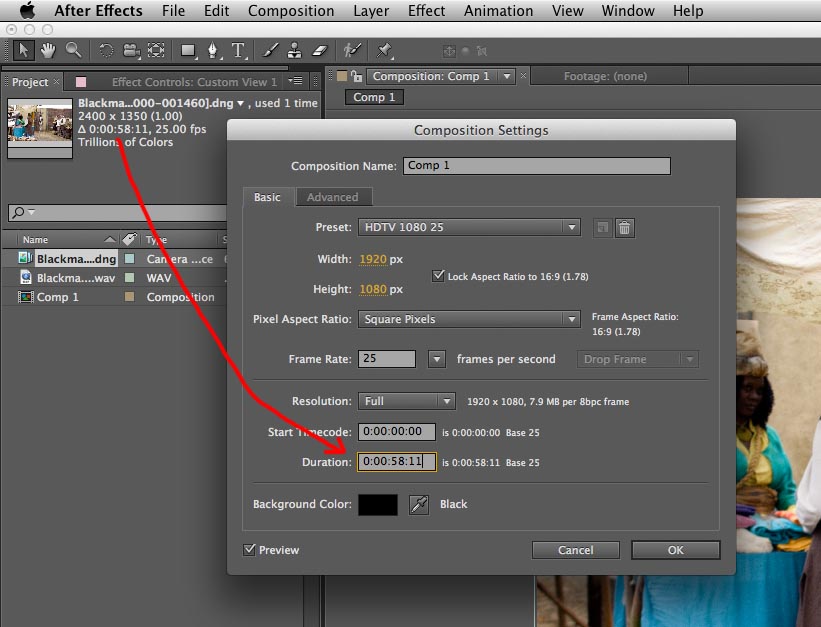
8. Go to Composition Settings in the Composition menu and alter the duration of the composition to match the duration of the clip (which you can see by clicking the DNG sequence in the project bin).
9. Go to the Composition menu again and select Add to Render Queue. The composition timeline will give way to the Render Queue tab.
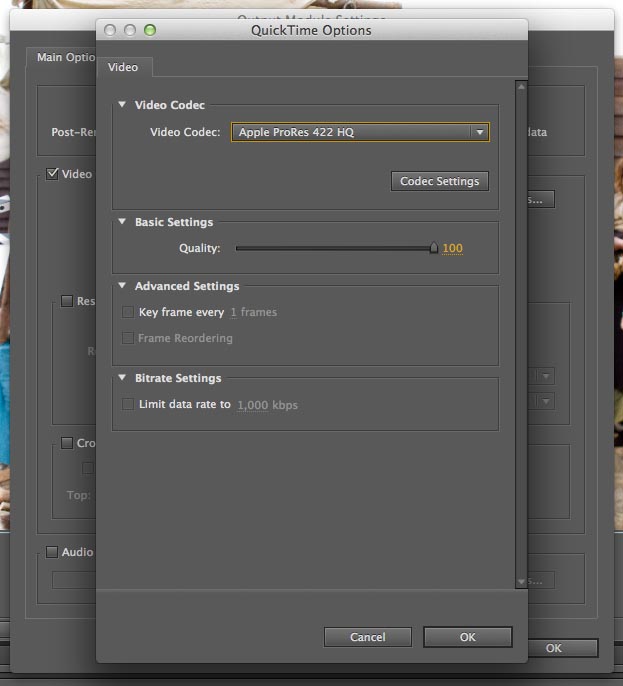
10. Next to the words Output Module in the Render Queue, you’ll see a clickable Lossless setting (yellow and underlined). Click this to open the Output Module Settings.
11. In the Video Output section, click on Format Options… We’re going to pick ProRes 422 HQ, to match with the non-raw shots we hypothetically filmed. Click OK to close the Format Options.
12. You should now be back in Output Module Settings. Before clicking OK to close this, be sure to tick the Audio Output box to make sure you don’t end up with a mute clip. You should not need to change the default output settings of 48kHz 16-bit stereo PCM.
13. In the Render Queue tab, next to the words Output to you’ll see a clickable filename – the default is Comp1.mov. Click on this to bring up a file selector and choose where to save your ProRes file.
14. Click Render (top far right of the Render Queue tab). Now just sit back and wait for your computer to crunch the numbers.
I’ve never used After Effects before, so there are probably ways to streamline this process which I’m unaware of. Can anyone out there suggest any improvements to this workflow? Is it possible to automate a batch?
Part of my DVD collection, packed ready for the move
I blogged recently about my upcoming home move, and how I was throwing out my Mini-DV tapes. Moving to a smaller place forced me to consider what’s important to me and what I can live without, and it’s interesting how the march of technology affects those decisions.
A few years back I got rid of my CD collection, choosing to use just iTunes for listening to music. More recently I considered doing the same with my DVDs. After all, how could I justify having 100-odd DVDs on my shelves, when they could all fit onto a hard drive the size of just one of those cases? If I could just import my DVDs into my iTunes library like I did my CDs, I would have done it. Movies on physical media would be no more for me. But of course you can’t do that. You have to buy all your films again as downloads. Or rip them all using Handbrake, which is clumsy, tedious, and unreliable, but nonetheless maybe I’ll do that some day soon.
The decision is harder with films than music, because – to be perfectly honest – I was always a bit embarrassed of my CD collection. I had no regrets about losing their physical presence from the shelves where all could see them. Ironically, in recent months I’ve acquired a turntable and a small vinyl collection, which I’m quite proud of.
All hail the Boss
There is definitely something, then, about physical media and its packaging that appeals to me. As a kid I would always make packaging for stuff – drawing covers for my amateur films, making boxes for Lego kits of my own creation. Packaging, that physical presence, is deeply engrained in me, and perhaps my whole generation. It’s telling that, when I first considered dumping my DVDs, I planned to have a noticeboard onto which I would pin a postcard or magazine cutting image of each film I owned as a download, to proudly display my virtual movie collection.
And then there are books. I love books, and my personal library constituted a significant proportion of my stuff on moving day. A small memory stick, at an infinitessimal fraction of the size and weight, could store all of these tomes; many of them would be free to acquire digitally, as they’re out-of-copyright classics; and many of them, in all likelihood, I will never read again. Yet still I can’t part with them. Perhaps because the book is a centuries-old invention, that does not rely on a compatible device to play it, that never runs out of batteries, that shows its history in every crease and grubby fingerprint. Particularly with those classics, I feel connected to everyone who has ever read that story down the years, even if the copy I’m reading is brand new.
One thing that did go, however, was my TV. Again, a deeply engrained part of my life, but one which no longer feels necessary or relevant. (Conversely, radio increasingly connects with me, but that’s probably just because I’m getting old. Ken Bruce rules.) There is rarely anything I really want to watch on, and if there is then the best use of my time is to save it for my next train journey and download it to watch on my iPad. So both of my TVs and DVD players departed, along with my TV license.
I also said goodbye to my printer, which I pretty much ceased to use once I got my iPad – my new means of taking documents out into the wild. And my landline, which saw most use recently as a means to contact BT telling them I no longer need their services. If only Alanis Morrissette understood irony this well. (And now you start to see why I was embarrassed by my CD collection.)
Just before the removal van arrived
Phone, printer, TV, CDs. Not so long ago, life without those things seemed unimaginable. Who could have predicted I would ditch these things, yet retain records and books? Vinyl sales are on the increase – is this a sign of a wider backlash against the intangible realm of the digital? Will 35mm projectors make a comeback in the homes of movie connoisseurs? OK, probably not.
And this is the final paragraph, where I wrap these musings up into a nice, tidy point. Sorry, there isn’t one. I just wanted to put down some of the thoughts about the transience of media and technology I’ve been having. What media is important to you? Is the medium itself important, or is it only the content that matters?