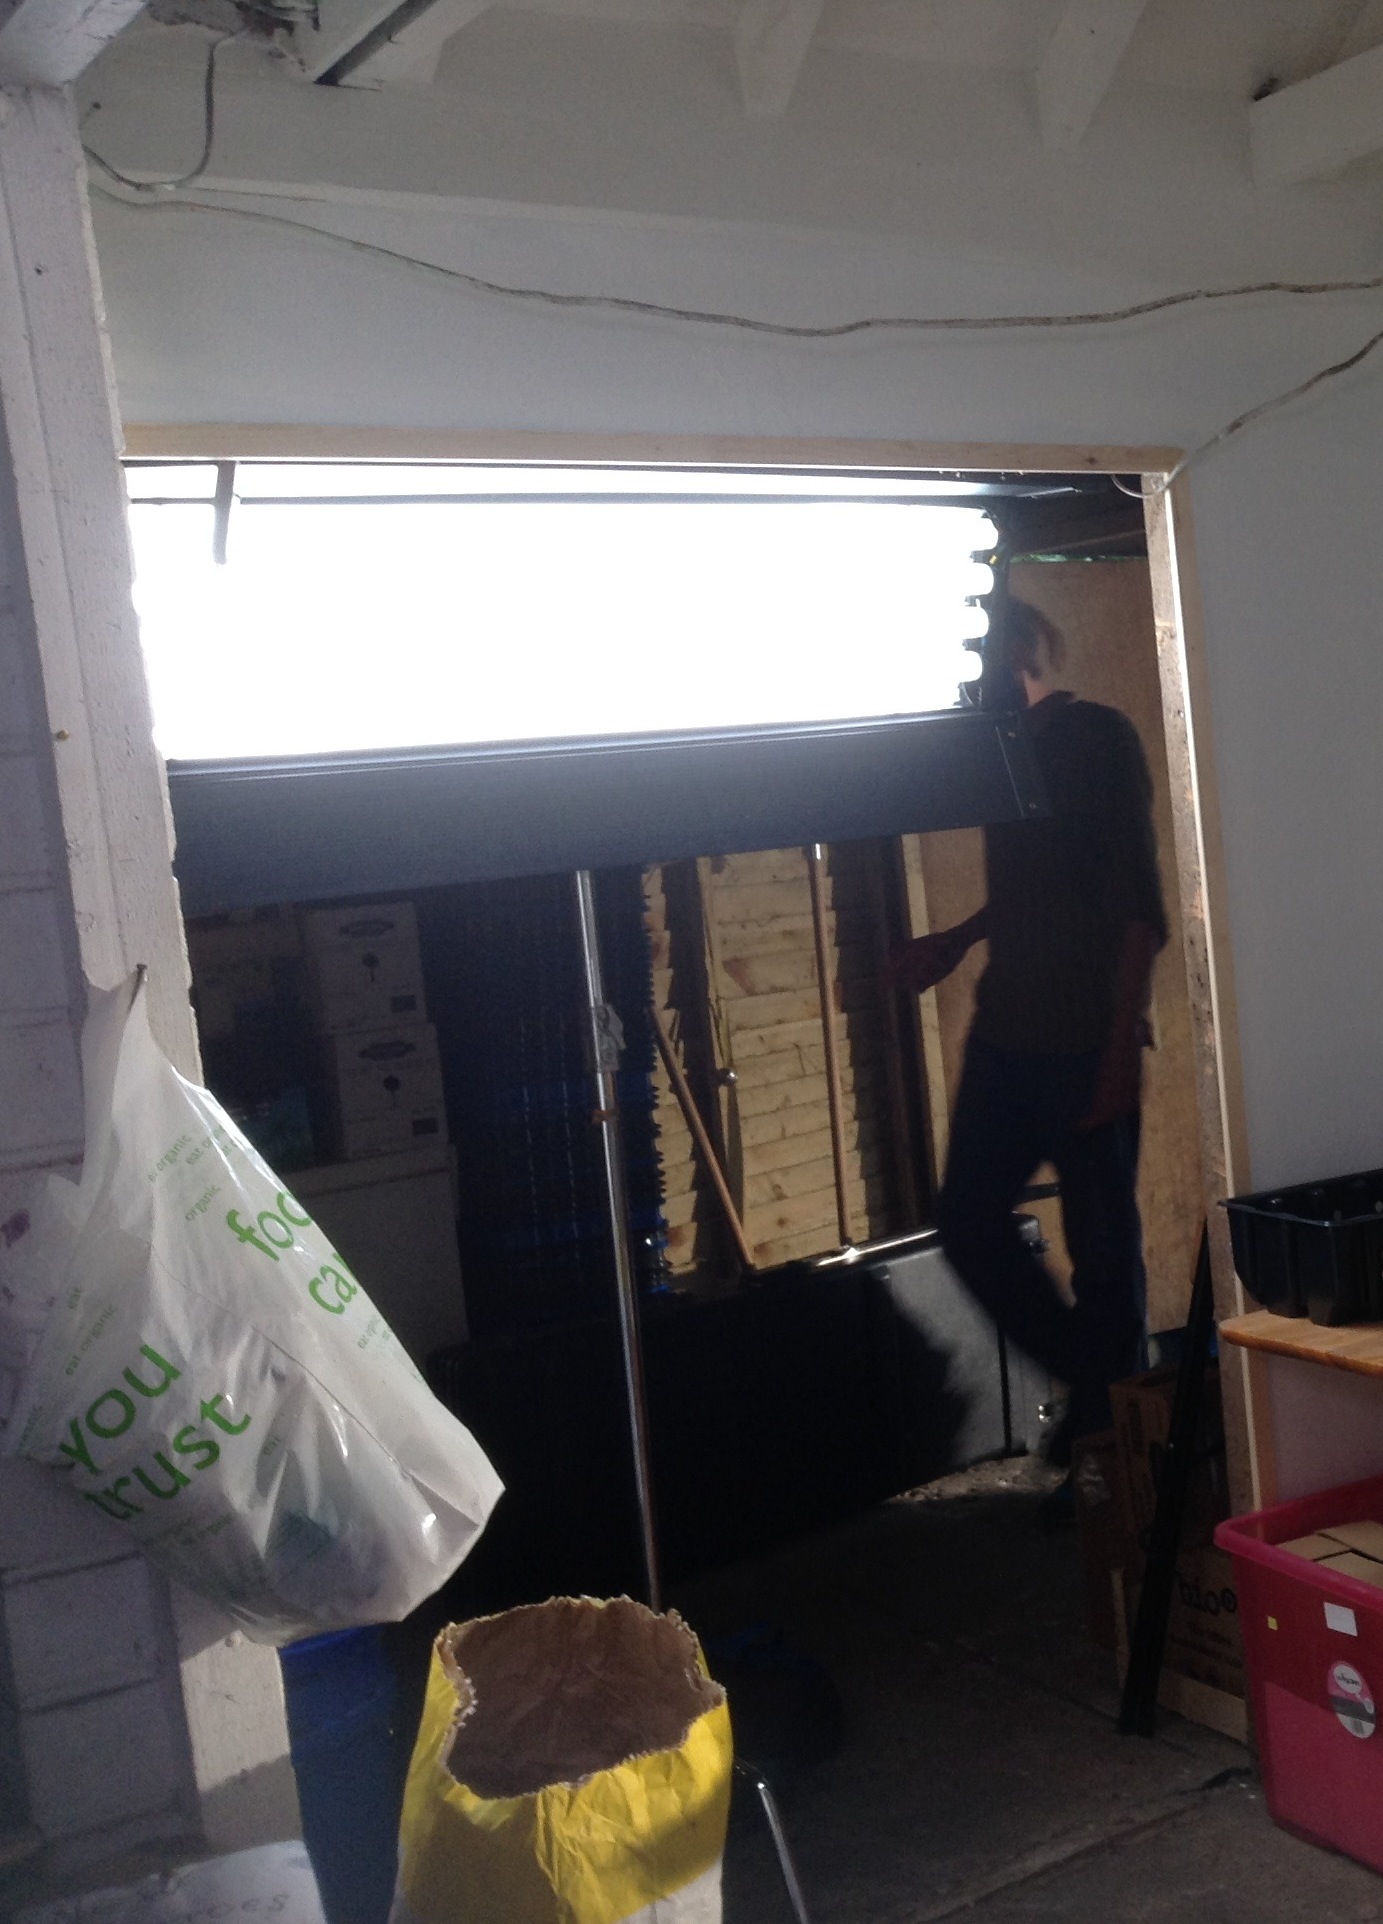
The 2.5K HMI can be seen here in the lower right, and the fake sky on the top right.
It had to happen sooner or later. On an ambitious series like Ren, with a tight schedule, it was inevitable that we would at some point have to shoot a daylight shot after dark. So I’d given it some thought beforehand. It seemed to me like soft toplight, simulating sky, was what was needed. I figured that a 2.5K HMI fired into an overhead 6×6 silk would do the job, and that’s one of the reasons I pushed production to hire a 2.5 despite the very limited budget.
The moment came yesterday when we got into a time crunch with one of our lead actors (Duran Fulton Brown) and had to complete a scene despite the natural light running out. Fortunately the scene was scripted as evening and we had shot coverage at magic hour and in twilight with an HMI “sunset”. So we weren’t trying to match full-on daytime.
Colin (left) helps hold up the roof. Rich (right) does not. Duran Fulton Brown (centre) plays Hunter.
We used a redhead for the direct “setting sun” light. We had a silk but no sturdy stands to rig it on, so we built a quick roof out of poly and Celotex (matte silver bounce), holding it up with lightweight stands and crew members! We put the 2.5K on the floor in the corner and fired it into this ceiling. The final touch was to fire an LED panel at the back wall to fill in the black shadows that the redhead was casting.
Check out the final shot below. It looks a lot less convincing to me now than it did at the time, but I believe the concept was sound. We just needed more stands to rig the poly at a better angle to get the maximum bounce, including some behind Duran to give a general “sky” backlight. Lessons learnt for the next time!
Here’s a little video blog about the challenges of shooting on the amazing medieval village set that Chris Dane and others have built for Ren.
I’ve been using the Artemis app a lot to test out lens choices and compositions for “seeing off the set” issues. That way if I’m set up for a shot and we’re waiting on costume or an actor, I can preview the next shot on Artemis and warn Chris that he’ll need to move a wall to hide the car park.
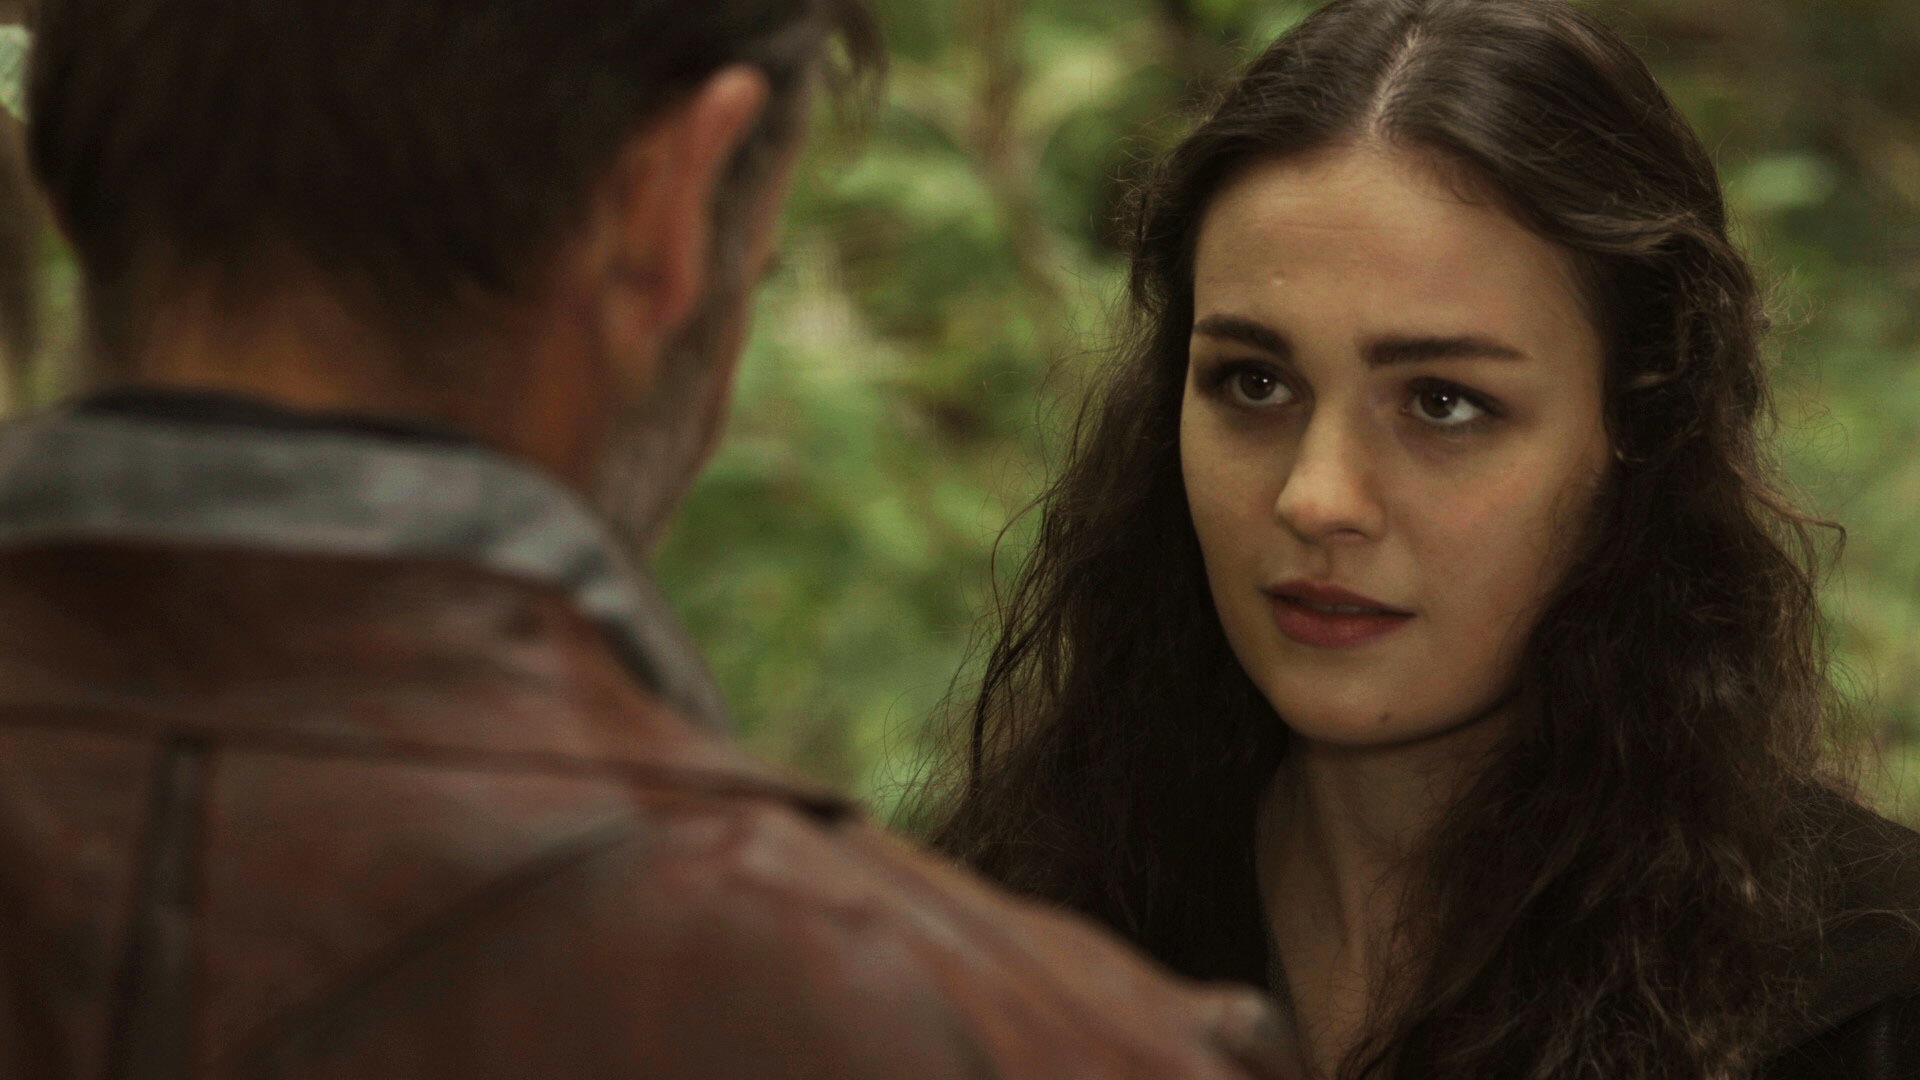
A few days into my tenure as DP on Kate Madison’s ambitious fantasy series, Ren, we filmed a shot/reverse for one of the opening scenes. The scene introduced us to the eponymous Ren (Sophie Skelton) and her friend Karn (Christopher Dane).
Kate described Ren to me as “pure innonence”, while Karn is an older, more worldly character with a difficult past. It seemed to me like classic femine and masculine lighting were called for. Classic feminine lighting is designed to create a soft, flawless, often shadowless face. Classic masculine lighting enhances jaw definition, embraces lines and skin texture and generally creates a rugged look.
Clearly you have to start by casting actors with the right physical characteristics for these roles, which Kate had certainly done, and make-up plays a huge role. The DP is the third part of the triumvirate determining the look of the cast’s faces.
The shot/reverse in question took place under trees in a valley on a cloudy day, so the natural light was very top-lighty (rendering eye sockets dark), with a bit of green bounce here and there.
We shot Ren’s close-up first. We had already established in the wide that she was looking towards the sun, albeit a very cloud-obscured one.
There are two ways to create the shadowless look of classic feminine lighting. One is to use a lot of bounce to fill in the shadows. The other is to put the key light directly above the lens, like a flash, so that the shadows are all hidden from the camera’s point of view. Since we’d established Ren was looking in the direction of the sun, I chose the latter method, rigging a small LED panel right above the lens.
Backlighting the hair is another common component of classic feminine lighting, so I had gaffer Richard Roberts hand-bash a second panel as a three-quarter backlight. We had to keep this very subtle since we had established that direct sunlight could not be coming from behind her.
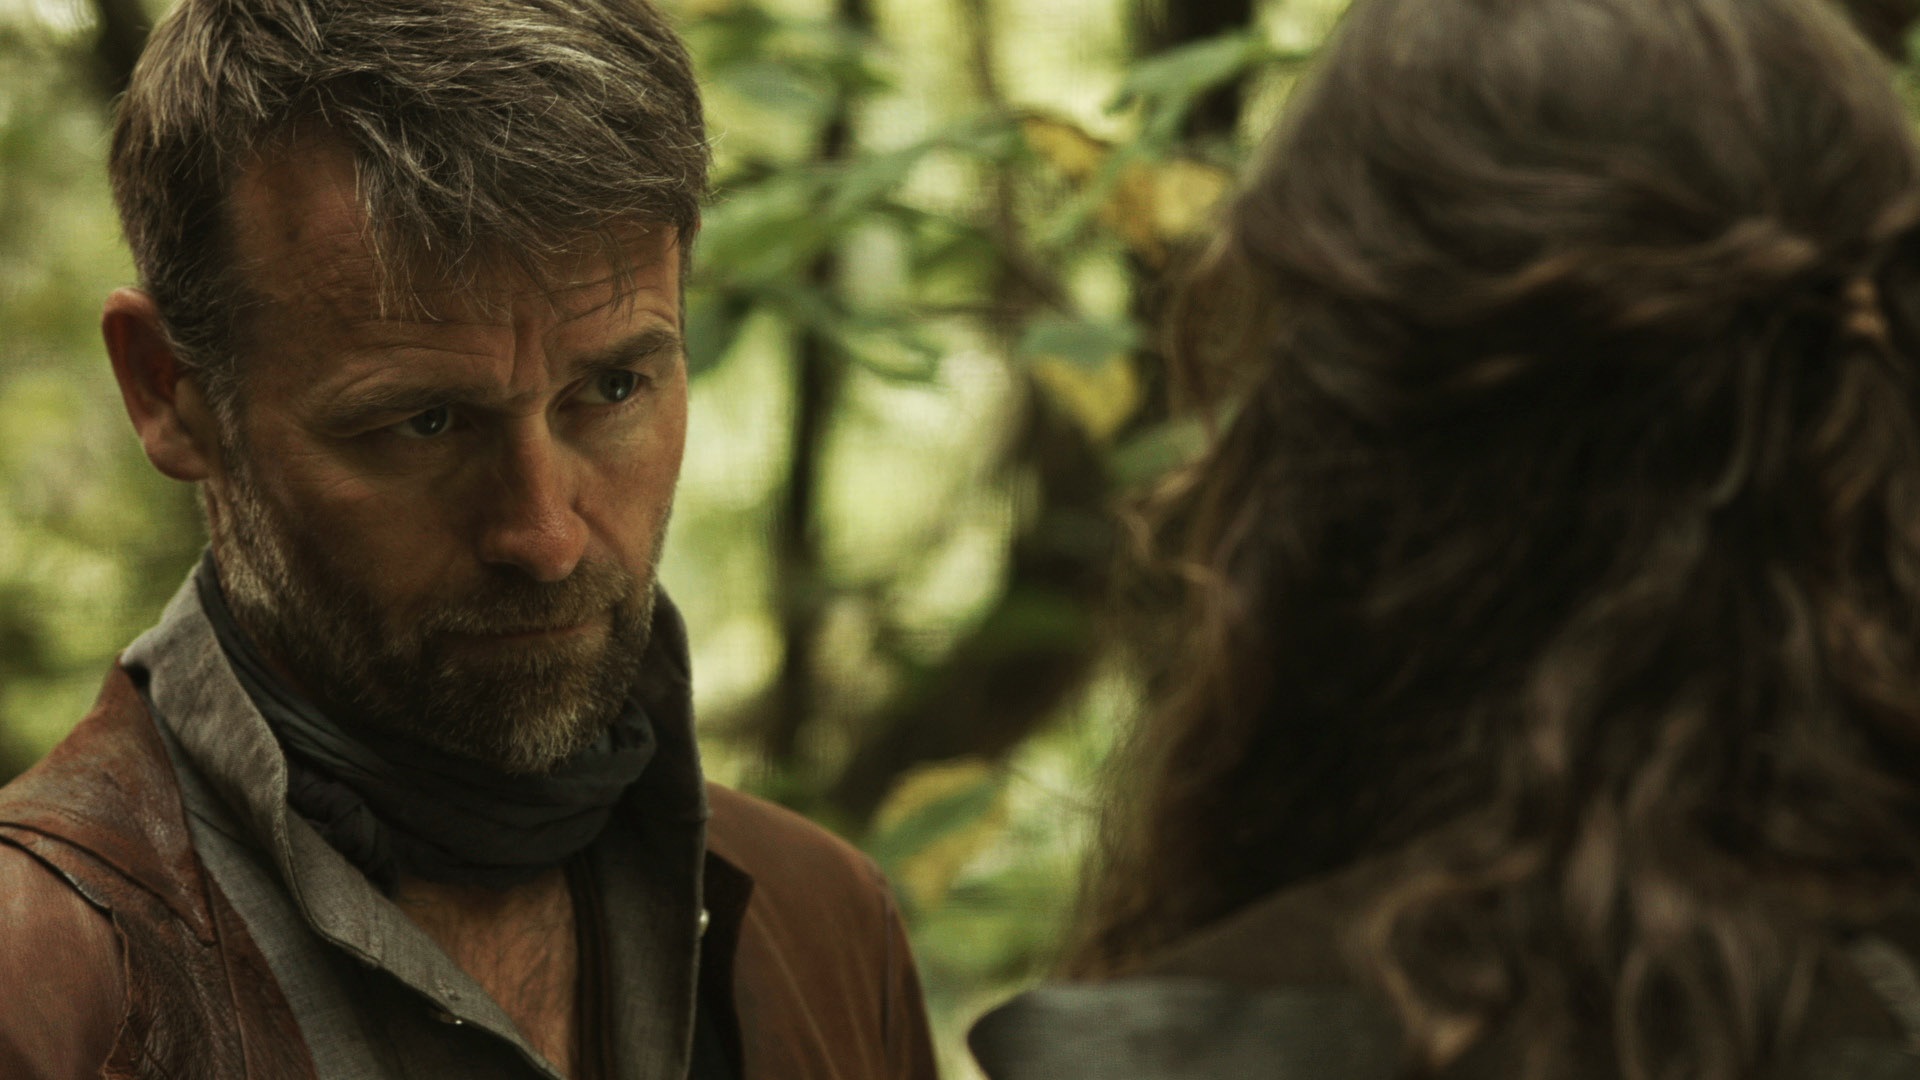
I lit Karn’s close-up very differently. His orientation to the sun justified a strong three-quarter backlight from an LED panel off frame left. This picks out Chris’s stubble and jawline nicely.
I decided that his key would be motivated as sunlight reflecting off the river (off camera right). This could jusifiably be coming in from the side, again adding texture and definition to his face. It was achieved by Richard holding a silver-sided collapsible reflector just out of frame. We initially tried wobbling it to suggest the movement of the water, but ended up shooting a safety take without the wobble in case it proved too distracting.
I know that this degree of manipulation and augmentation of natural light is not to every cinematographer’s taste, but I feel it fits perfectly with the show’s fantasy world. My view is that in this world where magic exists, the light is a little bit magical too. Hopefully it will subconsciously help the audience pick up on Ren and Karn’s essential characteristics in this, their first scene.
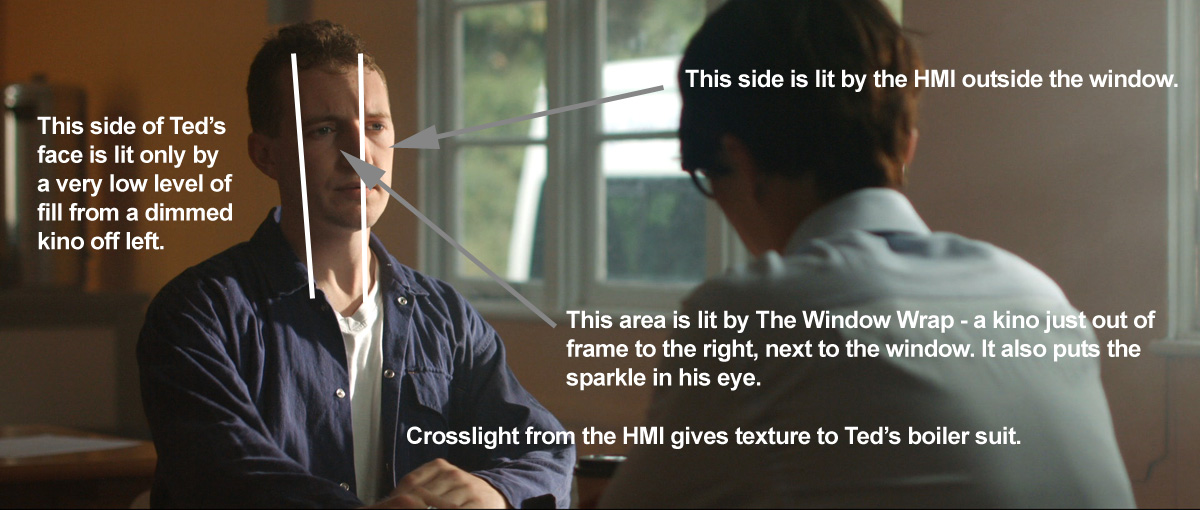
So, you’re shooting a daylight interior. You’ve got an HMI as your “sun” blasting in through the window, giving great backlight when characters are faced away from it, and casting some interesting windowframe shadows when they’re faced towards it. But what if they’re side on to the window?
One side of the actor’s face is hotly lit while the other is in complete shadow. Maybe it’s an edgy or scary scene and you want that look. Fine. But maybe not.
You could just use bounce to generally fill in the rest of the actor’s face. Sure, that will work. But The Window Wrap will look sexier.
Take a Kinoflo and set it up inside the room near enough to the window that the audience can buy it as window light but far enough around that it seems to wrap the harsh HMI light softly around the talent’s face. Crucially, as long as the camera is on the opposite side of the actor’s eyeline to the window, you’re still lighting their downside; the nearest part of their face is still the darkest, but now it’s a smoother transition between the bright light of the downside and the darkness of the upside.
I just spent a couple of weeks gaffering for DP Paul Dudbridge on a feature shoot in South Wales. It was pretty much my first time gaffering, and I certainly made some classic mistakes. Here are some tips I’ve compiled as a result of my recent experiences.
Make sure cables have slack so the DP can adjust the positions of lamps.
Take extra time running cables initially so they are least likely to be in shot and won’t have to be rerouted later.
Swap out batteries on LED panels during coffee breaks or other downtime so they don’t go off during takes.
Keep track of how much power you’re drawing off each circuit to avoid tripping breakers. See Gaffering Basics for more on this.
Make sure you have access to the consumer unit (fuse box) so you can reset a tripped breaker straight away.
If drawing a large load off a 13A socket, periodically check the plug isn’t getting too warm – occasionally they can melt.
Righty tighty, lefty loosy. Make sure the weight on a C-stand knuckle is pulling it clockwise, i.e. tightening it.
Bulbs are most fragile when they’re hot – i.e. when they’re on or have recently been on – so handle them with particular care.
Observe the minimum safe distances illustrated on the lampheads. The heat can crack a window or burn a flag if placed too close.
When bouncing tungsten lights off the ceiling, black-wrap them straight away to cut out direct spill.
Be sure to disable the building’s fire alarm or bag the smoke detectors before switching on a smoke machine.
Keep an eye on the smoke level in the room and top it up when necessary.
Stay within earshot of the DP so you can respond to requests.
Anticipate DP requests: if you look at the monitor and see that the backlight is flaring, get a flag ready; if a lamp looks too hot on camera, break in a dimmer.
A common scenario in filmmaking is that you have two characters standing talking to each other and you need to do a two-shot and an over-the-shoulder of each. A quick way to light this kind of scene is cross-lighting: you set up two lamps so that each lamp serves as one character’s backlight and the other’s keylight.
I practice what I like to call cross-backlighting. What I mean by this is that the lamps are both on the opposite side of the actors’ eyeline to the camera. The result is that the downsides of their faces are lit. (Check out this post on key angles if you’re not sure what I mean by downside.)
This old Soul Searcher lighting featurette covers cross-backlighting around the 5:30 mark.
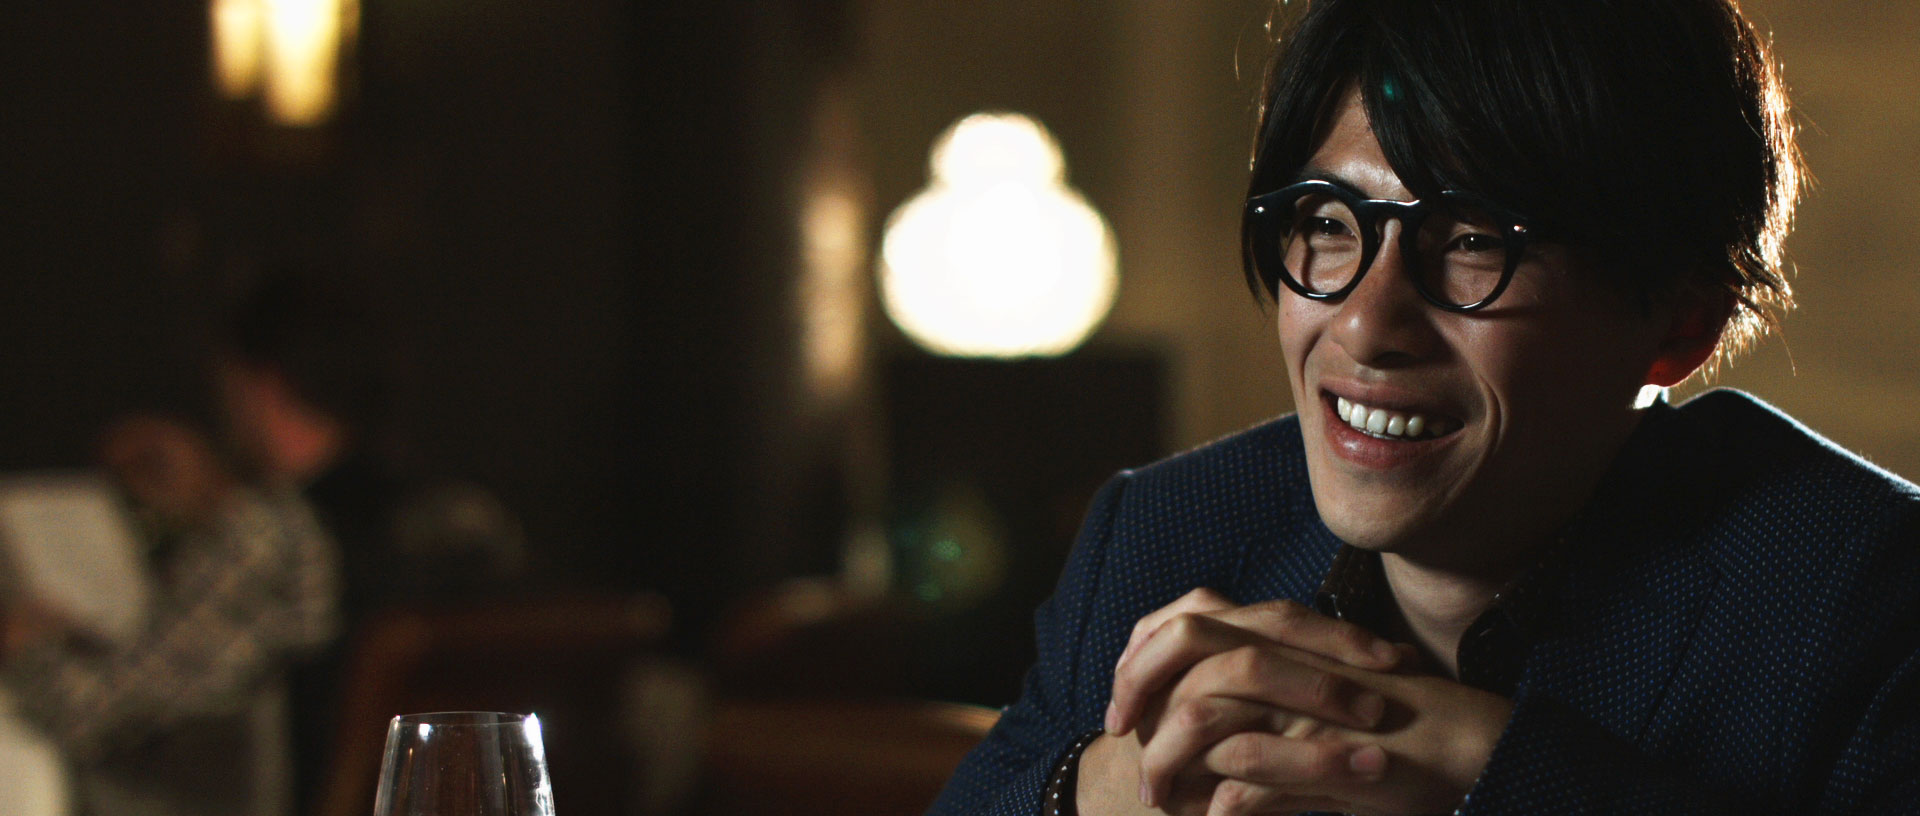
Here’s a super-recent example of cross-backlighting in action, on the set of The Gong Fu Connection. I’ve complicated things a bit though here. I’ve decided I want the characters’ keylights to be softer and cooler in colour than their backlights.
So there’s actually a dedo and an LED panel behind each actor. The camera is set to a white balance of 3,200K. Each dedo provides a strong, white backlight, narrowly focused so as not to spill onto the opposite actor’s face. The LED panels, positioned much closer to the talent, provide a slightly softer light with a dialled-in temperature of 4,500K.
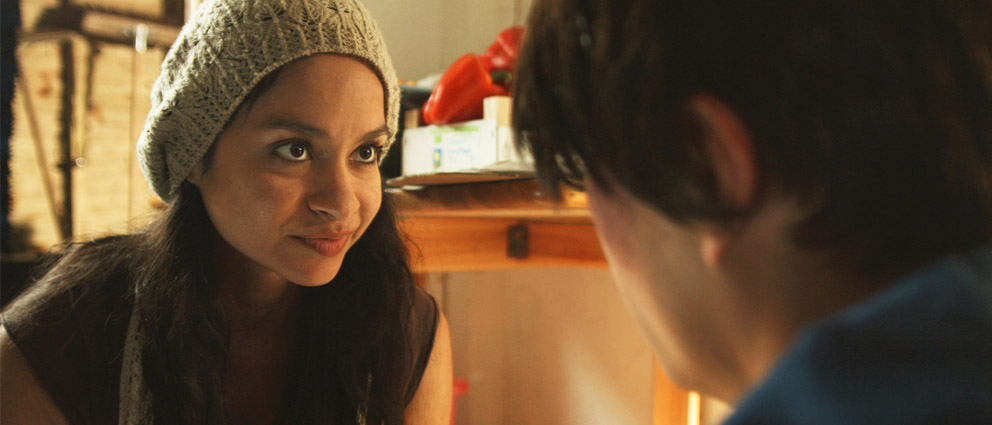
For the close-ups I repurposed the LED panel that wasn’t being used as a background light, dialling it back to 3,200K to match with the location’s existing tungsten lighting that was already doing a lot of the work.
When we got to Carmina’s close-up I decided the LED panel alone was still too harsh, so I bounced it off the silver side of a collapsible reflector. I adjusted the panel to an angle where just a little direct light was hitting the side of Carmina’s face, and this kind of blends with the bounced light to provide a gentle wrapping illumination.
This is the first in what I plan to be an ongoing series of quick techniques you can apply to your own cinematography. The first few are going to be from The Gong Fu Connection. If you find this post useful, please consider supporting the film over at www.indiegogo.com/projects/the-gong-fu-connection or even just sharing the link.
Let’s start at the beginning with three point lighting. The idea is that you should light a person using three sources:
The KEY light models the face. What does that mean? Well, a face is a weird, lumpy object with lots of sticky-out bits and inny bits, and as a result it looks very different depending on where the main light is coming from. Light it from the front and it will seem flat – noses seem smaller, wrinkles and spots are reduced. Light it from the side and the nose will cast a huge shadow, as will every pimple. See my blog post on key light angles for more on this.
The FILL light prevents the shadows cast by the key light from being completely black. Ideally the fill should be a soft, directionless light so it doesn’t cast its own shadows. The dimmer the fill light (i.e. the greater the key-to-fill ratio), the moodier your scene will look. Sometimes I like to not use any fill at all.
The BACKLIGHT creates a rim of illumination around your subject, cutting them out from the background. It makes the whole image look slick and sparkly.
That’s all very well in theory, but here’s a practical example. This is a close-up of actress Marién Enid in The Gong Fu Connection.
Marién’s keylight is an Arrimax M18 – a super-efficient 1.8KW HMI. It has a Straw gel (Lee no. 103) to warm it up a bit. Why such a powerful lamp? I was using it as backlight on the wide. For this CU it needs to be much softer, so I intercept it a couple of metres from Marién with some tough-spun diffuser (no. 214). I have a roll of the stuff which I carry around. Frequently I slide it like a giant toilet roll onto a C-stand arm, unroll it to the desired length and peg the other end on another stand.
The Kinoflo Tegralite that provides the backlight
You can see that the keylight hits all of the lefthand side of her face (known as the downside, because it’s the side away from camera) but pretty much just her cheek on the righthand side. For my money, this is the optimal key position because it gives the most shape to the face.
The backlight comes from a Kinoflo Tegralite (a 4ft 4-bank kino with a built-in ballast) shining through the doorway behind her. Again, this is a source that had been previously established on the wide shot. You have to think through your set-ups before you set your lamps for your wide, so that they will work for your other angles without so much cheating that everything looks completely different.
Fill is provided by a silver reflector out the bottom left of frame, bouncing the kino back onto the upside of Marién’s face. The ungelled kino gives a nice bit of colour contrast with the straw-gelled M18.
Look out for more lighting techniques coming soon.
Inside a moving car – an everyday setting, but amongst the more challenging ones for a film crew. You can tackle it with greenscreen, or with front projection, or with Poor Man’s Process. Or you can do it for real.
On The Gong Fu Connection we did it for real. If you’re going to attempt this you’ll need three things:
A very wide lens, if you want to get both the driver and the front passenger in frame. I used the wide end of a Tokina 11-16mm zoom, kindly lent to us by DIT Rob McKenzie.
An LED panel to ensure the cast are sufficiently illuminated when the vehicle passes through dark areas.
Some kind of suction mount.
I still had a Hama car mount I’d bought back in 2000 to do car chases like this with my Canon XM1.
I can’t believe I used to rely entirely on that mount to hold the camera, with no safety rope. I’d never do that now.
Of course, this mount wouldn’t support the weight of the Blackmagic. It was just to provide an extra anchor point. Most of the camera’s weight was actually rested on the dashboard, as you can see below. Cardboard and gaffer tape were used to secure it firmly, and the V-lock battery was placed in the open glove box underneath.
The Blackmagic, mounted on the dashboard with an old Hama suction mount, some cardboard, some gaffer tape, a wing and prayer
We ruled out mounting the camera on the bonnet partly for safety and partly because windscreen reflections can be a real nightmare. But we did mount the LED panel on the bonnet, or rather in the gap between the back end of the bonnet and the windscreen, nestled on the wipers. Its yoke rested against the windscreen, maintaining the panel at the right angle. Bungee cords and gaffer tape held it firmly and a bin bag protected it from the spitting rain.
Under the black bag is an LED panel to keep some consistency to the light on the actors as the car moves.
Baldur, the character in the front passenger seat, was supposed to have a laptop on his lap. Since it was out of frame, I gave him another LED panel instead to represent the light coming from the screen. With hindsight I wish I’d gelled it cooler, but never mind. I gaffer-taped over the brightness and colour temperature dials on the back of the panel to stop them getting accidentally knocked out of position.
Exposing for these shots is tricky, particularly when you’re driving on country lanes where a dark, tree-lined avenue can suddenly give way to a bright, open field. If you turn up the LED panels too bright, the dark sections look fake, but if you don’t turn them up bright enough then the dark sections look too dark. I made a guess and it turned out to be pretty bang on.
When we shot, only the three actors and the sound recordist were able to be in the car. Before it drove off, I started the camera rolling and Colin popped in with the slate. Then it was all down to the actors. They did a series of takes and came back to show us the results. Everyone was happy, and that was that.
Here’s a brief video blog from the set of Handmade Theatre‘s The Flying Machine, explaining how spacelights are used to create an even light for multi-camera shooting.
When I read a script that I’m going to shoot, there are a number of things I’m looking out for. I want to identify the themes and the character arcs, so that I can come up with ways of reflecting these in the cinematography (see my previous blog post for examples). And on a more mundane practical level, I’m figuring out what equipment is required, and which scenes or sequences might be difficult photographically.
To demonstrate my thought process in planning a project, I thought I would share with you today the things I highlighted in a particular script and why. The script in question is The Gong Fu Connection, written by Ted Duran, and we start shooting it this Friday. It’s an action-comedy drama in which a young Chinese businessman learns a life lesson via his connection with an Englishman who has introduced Kung Fu in a farm community in Sussex. You can help us make the film by going to www.indiegogo.com/projects/the-gong-fu-connection and contributing, or by spreading the word on your social media networks.
Throughout the script I’ve highlighted the time of day in the slug lines. One of the first things I need to know as a DP is, “Are there are night scenes?” because that will have a big effect on the lighting equipment needed. Ted’s script is nice and specific, not just DAY or NIGHT, but DAWN, MORNING, AFTERNOON, EVENING and DUSK. This is a really helpful starting point in considering the light. In general I see that there are a lot of daylight exteriors, so bounce and negative fill are going to be my two chief weapons.
The very first slug line is:
1. INT. VICTORIA STATION – MORNING
Day or night?
Immediately I’m wondering, “Is this going to be a guerilla shoot or are we going to have permission?” Clearly we will never be allowed large lighting set-ups and we will always be working around the general public. Battery-powered LED panels will come in handy here.
A little lower down the page is:
3. INT. RESTAURANT – DAY
Straight away I’m thinking, “Should it be night instead?” Even though in summer you may go to a restaurant in daylight, somehow it feels like it wouldn’t look right on camera. I make a note to discuss this with Ted on the recce, and indeed we end up deciding to shoot it after dark.
The next scene features a phone conversation. I make a note to ask if the person on the other end of the line will be seen.
Another station scene contains the direction:
He gets on the train… The train whizzes past an urban landscape…
I highlight this, to remind myself that this is a hidden extra scene – on board the train, as opposed to at the station. Again I’m wondering what the extent of permissions will be and what restrictions there may be on equipment. I also highlight other hidden extra scenes later on – an interior bedroom scene in which a character sees another character outside through the window, and a montage set in a variety of different places and times.
I highlight the following in a café scene:
Time passes, we see the clock tick past… Half an hour and two coffees later…
Maybe there are jump cuts here to show the passing of time? I’ll want to adjust the keylight outside the window to simulate the progress of the sun.
A violent flashback takes place in an apartment. Although the script specifies DAY, the content makes me imagine the look a little differently. I write the following notes: “Dingy look? TV light? Maybe night. Rough, handheld fight. No finesse or control.” Ultimately Ted and I do decide to set the scene at night. The flickering TV set will be a key light source. The handheld look will contrast with the more slick steadicam and tripod work which will characterise the Kung Fu fights later on in the film.
A more pastoral scene features two characters walking and talking beside a lake. I write: “Watery reflections? Bounce M18 off surface of water?” I’m thinking to enhance the beauty of the setting by using the rippling water surface to bounce an ArriMax M18 onto the characters’ faces.
A direction later on reads, “He is lost in his own world.” I write “push in?” beside this as a shot suggestion. Then I read:
Startled, he turns around to see a man towering over him in his dressing gown with a long plaited beard, who looks at him with a frown on his face.
This character, Mandragor, clearly has a special signficance, a mystical presence. I write “special lighting for Mandragor?” next to this passage. This will probably be stronger backlight or perhaps an unusual eyelight of some kind. I highlight his other appearances in the film too.
A dark room in a grungy pub
A dawn scene specifies that “the sun has just risen”, which I highlight. If it’s a cloudy day, or we’re unable to shoot at dawn, I may need to fake this with an orange-gelled HMI.
Later on, a direction reads:
RICKY smiles, then looks at AERONA dreamily.
I highlight this and write “classic beauty shot” above. I won’t go as far as a soft-focus filter, but the lighting needs to be particularly flattering here to represent Ricky’s enamoured POV.
A flashback in a pub has a nice clear description which is a great springboard for the cinematography:
… Playing pool in a dark room in a grungy pub…
I’m immediately thinking smoke, shadows, pools of light from the over-table fixtures. I also highlight the word “laptop” since the screen will be a light source which I may want to use or beef up with a hidden LED panel perhaps.
Scenes in moving cars are always tricky
Later on I’ve highlighted a dialogue scene in a moving car. I need to talk to Ted about how he wants to shoot it, and to think about how the camera can be rigged to get those shots.
The only time a specific shot is mentioned in the script is here:
Ricky is running as fast as he can. We see a close up on his face as he thinks.
I highlight this, knowing that it will be tricky to accomplish and hoping that Colin Smith, our steadicam operator, will be up to the challenge!
Having read the script a couple of times, I go back and make some notes on the cover page about the general photographic approach:
City – dark, dingy, oppressive, handheld, little/no eyelight – handheld?
Country – light, backlit, bounce-from-below
Characters with no connection – Lucia, the bad guys, Ricky to begin with – are framed in clean singles. Handheld or stiff tripod.
Characters with connection – Matthew, his posse, Ricky as the film goes on – are framed in 2- shots and dirty singles. There are more fluid shots with pans or tracks.
And that’s all. Some of these notes are just for me to think about, while others raised questions I needed to ask the director and producer about. Preparation is key in filmmaking, and in the heat and stress of the shoot I’ll be glad I gave some consideration to these issues in advance.