Synced: The Japan Shoot – Part 4

Setting up in front of Himeji Castle

This is the final instalment looking back at the whirlwind shoot I DPed in Japan at the start of this month. Part 1 looked at the equipment package, Part 2 covered an interior scene, and Part 3 covered night exteriors.

By the time we wrapped those night exteriors it was about 4:30am and starting to get light. After some well-earned sleep, we reconvened at 3pm to shoot the daylight exterior scene in front of Himeji Castle – featured in You Only Live Twice as a Ninja training school.

The first shot had to start with a picture postcard composition of the castle and a martial artist, then pan to reveal Daisy and a crowd watching her, while still keeping the castle in. This took some considerable time to set up, carefully placing all the extras. To balance the opening composition, I framed it with a tree in the foreground. This is the kind of thing you have to look out for as cinematographer, because simply shooting your cast in front of a landmark can result in a very flat image if there aren’t other elements in the frame to add depth.

Yurijo shades the actors between takes. You can see the bounce board being held by another crew member on frame  right, and how effectively this is filling in everyone's faces.
Yurijo shades the actors between takes. You can see the bounce board being held by another crew member on frame right, and how effectively this is filling in everyone’s faces.

After watching the initial blocking, I requested that everything be flopped in order to place Sydney in direct sunlight and Daisy in backlight. I knew that the backlight would look fantastic on Daisy’s hair – especially as the sun was very low by the time we got to her CU – and we could fill in her face with flattering bounce from a big white sign that the ever-resourceful Keisuke had brought along.
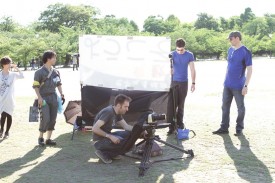
Ollie and the crew very kindly built me a sunshade.

Masculine facial features tend to look better in harder, direct light, which is why I was happy to face Sydney into the sun. (There’s more to it than that though, and I’ll be debating the ethics of lighting men and women differently in an upcoming post.) However, for the first take of Sydney’s CU, worried about shine and squinting, I chickened out of the hardlight and put up a sheet of Full Frost to soften it. For the second take I got rid of it, which made for better lighting continuity with the wider shots, but left Sydney looking very shiny. There’s only so much powder can do when someone’s looking straight into the setting sun. I’ll be interested to see which one Devon prefers in the edit, although his decision will likely be based on performance rather than light and shine! A good colourist can probably reduce the shine anyway. If only I’d had 1/4 or 1/2 Frost to get the best of both worlds.

Judging when to shoot the various angles in your scene is an important part of a DP’s job for day exterior work, and especially so at Golden Hour. Devon wanted to shoot Sydney’s CU before Daisy’s, his logic being that if we lost the sun before we shot Daisy then it wouldn’t matter because her face was in shadow anyway. Knowing that I was probably going to diffuse Sydney’s light, I felt the greater priority was capturing the lovely backlight on Daisy, and so asked to shoot her first.

Anyway, when the sun went down, that was a wrap for the brief but intense Japan shoot. Many thanks to Devon and co for bringing me along, and to the people of Himeji for welcoming us so warmly.

Synced: The Japan Shoot – Part 4

Synced: The Japan Shoot – Part 3

Shooting tracking shots from the back of a pick-up. Above me is camera assistant Yujiro Matsumoto with a diffused LitePanel which provides fill during the move.

Continuing the story of lensing the sci-fi feature Synced’s Japanese scenes earlier this month. In part 1 I looked at the prep, and part 2 covered an interior scene.

Next up, after dark, was a street scene with the beautiful Himeji Castle visible in the distance. The castle was already lit up by spotlights, but while the street had a fair bit of existing lighting, that wasn’t bright enough to shoot under. The scene was a slow chase in which the trio of heroes, one of them wounded, is slowly but menacingly pursued by the limping villain. This would be captured primarily in tracking shots, filmed from the back of a small pick-up truck pushed by the crew to avoid engine noise spoiling the soundtrack.

Wide-street
The set-up for the street scene
Exisiting practical lighting around the doorway the characters enter at the end of the scene

Employing my standard approach to night exteriors, I had the crew set up the 575W HMI as backlight, tucked around a corner. When we came to do the reverse shot, the HMI was moved to the opposite end of the street. It glared horrendously off some windows and shiny tiling, but with the time and equipment available I could see no way to remedy this. The lamp really needed more height, but I hadn’t hired a double wind-up stand because it wouldn’t have fitted in the car.

Three of the LitePanels were spaced along the street as sidelights, suggesting additional off-camera streetlamps. The furthest one, illuminating the villain on his first appearance, I gelled with Light Straw to separate him from the heroes.

The fourth LitePanel, with diffusion and egg crate fitted, was mounted on the pick-up truck behind the camera, providing a constant low level of fill.

Keisuke’s little LED panel was gelled red and wedged into a shop doorway to lend a sinister tone to a key moment in the scene.

The scene ends with two of the heroes entering a building. There was some existing practical lighting around this doorway which I asked to be turned on, and this proved sufficient to illuminate the characters as they approached and entered the door.

The set-up for the alley scene

The final scene of the night took place in a quaint little alleyway. Cool blue streetlamps contrasted nicely with a halogen security light, but the former were too frontal and flat, while the latter was triggered by an infrared sensor – meaning it could go on and off annoyingly during takes.

So we flagged the main streetlamp and disabled the security light by gaffering the sensor, and I recreated the colour contrast of that lighting using our own lamps.

The houses on either side had convenient ledges above the windows, perfect for placing LitePanels on. So two panels became 3/4 quarter backlights from either side, set to 5,600K.

The third panel, set to 3,200K, was hidden behind a gate to light some of the background and edge the actors a little before they got in front of the other backlights. (I left the existing practicals to light the deep background.)

The fourth and final panel, set to 4,500K and gelled with Light Straw, blasted out of the door the actors came out of, matching to the light in the last part of the kitchen scene.

Near the end of the scene, the master shot becomes a two-shot of Ollie and Daisy, and the two 3/4 quarter backlights serve as a classic cross-backlighting set-up.

For Daisy’s close-up, since she was quite close to the wall and therefore quite dark, I tweaked the lights heavily. I brought one of the backlight panels much closer, bouncing it off the cream-coloured wall next to Ollie to serve as her key, and switched the second backlight to the opposite side of camera to balance it out. I also added a ‘health bounce’ reflector, ensuring she had a nice big eyelight to underline her vulnerability in the scene.

In the fourth and final part I’ll be looking at the day exterior scene we shot in the grounds of Himeji Castle.

Synced: The Japan Shoot – Part 3

Synced: The Japan Shoot – Part 2

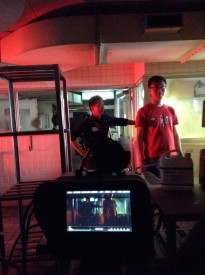
Setting up for the kitchen shoot

In part 1 I described how we arrived at a lighting package and monitoring solution for the Japanese leg of this sci-fi feature shoot.

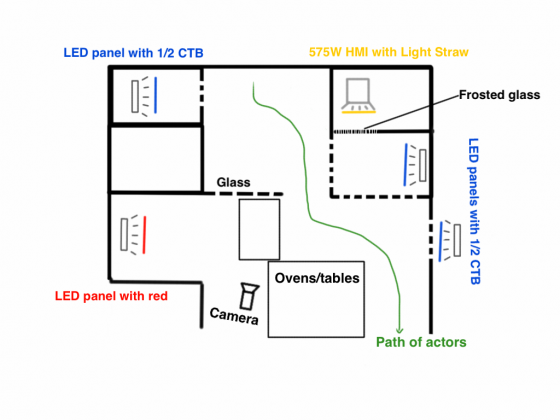
The first scene to go before the camera was the night interior, set in a hospital kitchen. The location was blacked out by the Japanese crew with incredible efficiency, so we could shoot it in the afternoon. Unable to light through the windows, I hid LitePanels in alcoves and around corners. They were all set to 5,600K and most were gelled with half CTB to appear very cool when shot with a white balance of 4,500K. The idea was to give the impression of streetlights – many of which are cool blue in Himeji – spilling into the dark, abandoned kitchen.

But Japan is a colourful place, and at night all hues of lighting are seen from signs and shopfronts as well as streetlamps. So, behind the frosted glass door of a locker room at the back of the master shot, I set up the HMI, gelled with Light Straw to suggest an older sodium vapour streetlight.

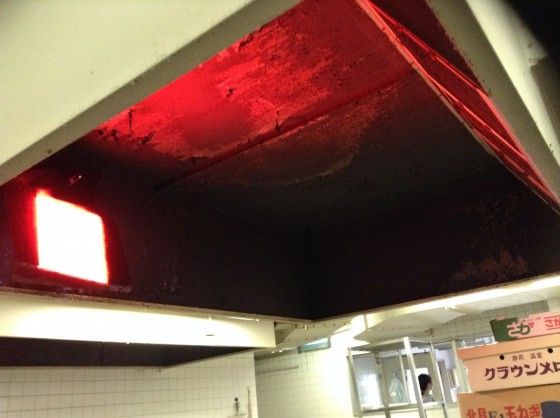
For a third layer of colour, I gelled one of the LitePanels red.

The kitchen had big hooded vents above the cookers, and for certain shots I was able to clamp the red panel inside one of these using a C-stand knuckle.

Sketch 2015-06-06 11_02_46

As the action progressed around the room, shot by shot, I moved the panels to new areas when the old areas ceased to be in frame, always taking care that the light was hitting the actors from the sides or from behind, never from the direction of the camera. (This would have made for flat lighting, a massive no-no in cinematography.) At one point I needed one more lamp than we had, and Keisuke saved the day with a small but very bright LED panel of his own.

This iPad photo gives a rough idea of how the lighting in the above diagram will appear in the movie.

In part 3 I’ll be breaking down the night exterior scenes.

Synced: The Japan Shoot – Part 2

Synced: The Japan Shoot – Part 1

cast-and-crew
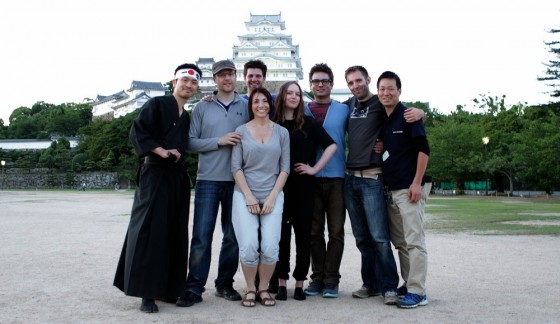
Actor Shigeki Maegawa, director Devon Avery, actor Oliver Park with Justine Avery in front of him, actress Daisy Hainsworth, actor Sydney Jay, me and gaffer Keisuke Ueda, at Himeji Castle
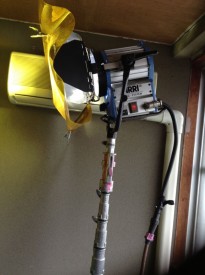
575W HMI
575W HMI

On Wednesday May 27th I got a call from my friend and actor Oliver Park, saying he was flying to Japan on Sunday for a shoot and did I want to come as DP? He was playing the leading man in Synced, a sci-fi feature film directed and co-written by Devon Avery, and after a month of shooting in Glasgow, the existing DP had opted not to take part in the Asian shoot.

On Friday night my plane ticket came through, at midnight on Sunday I was changing planes in Qatar, and on Monday afternoon (local time) I was in Osaka. The following morning saw me at Arc System, a very helpful lighting rental house, with Devon, his wife/multi-talented assistant Justine and a couple of the Japanese crew. With two night exteriors and a night interior as well as a day exterior scene, a reasonable amount of kit was needed.

The mains electricity in Japan is 100V, 60Hz, so very similar to the US – and indeed the plugs and sockets are identical. But the killer is that you can only draw 7A per socket. That’s a maximum of 700W, as opposed to over 3,000W from a UK socket.

Canon Ultrasonic 24-70mm f2.8

So the biggest lamp we could hire without needing a generator was a 575W HMI. With one of those in the bag, I figured it was best to fill out the package with battery-powered lamps, and so hired four 1’x1′ Bi-Color LitePanels. Although I’m still not 100% sold on the colour rendition of any LED panels (even LitePanels, which are amongst the best), there’s no denying they’re incredibly handy and quick to set up.

Pentax 50mm f1.4
Pentax 50mm f1.4

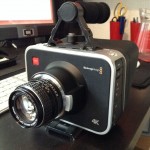
I would be shooting in 4K ProRes 422 HQ on my Blackmagic Production Camera, at 23.976fps. I initially stuck to two Canon L series lenses for continuity: Devon’s 24-70mm f2.8 and crew member Keisuke Ueda’s Canon L 50mm f1.4. Since I was constantly struggling to expose an image at the BMPC’s native 400 ISO, I later employed my Sigma 20mm f1.8 for faster wide shots, and I couldn’t resist trying my new Pentax 50mm f1.4, which performed beautifully at f1.7 and above, but did seem a touch soft when wide open.

Thunderbolt
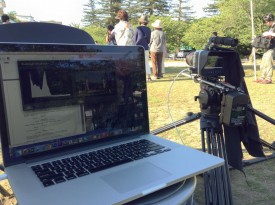
Monitoring via Thunderbolt cable to Blackmagic Ultrascopes on a Powerbook

Regular readers will know of the trials and tribulations I’ve experienced getting a monitor signal out of my BMPC, with the result that I bought a 17″ Blackmagic SDI monitor last year. It was impossible to bring this to Japan, so instead – for the first time – I experimented with Thunderbolt monitoring. A runner was dispatched to buy a cable, and Devon installed the Blackmagic Camera package on his Macbook. This package includes Ultrascopes, which provides a live video view amongst other things, though annoyingly only in a pretty small window.

Whenever I turned the camera off or played anything back, the signal would be lost. To get it back, Devon would have to quit Ultrascopes and I’d have to switch to 25fps before he re-opened it. Only once it was re-opened could I switch back to 23.976fps. Please sort out that little bug, Blackmagic Design!

With the kit and workflow sorted, we travelled to Himeji (by bullet train, no less) ready to start shooting on Wednesday. Watch this space for part 2: shooting the kitchen scene.

Synced is copyright 2015 Empty Box Productions LLC.

Synced: The Japan Shoot – Part 1