How to Light a Church

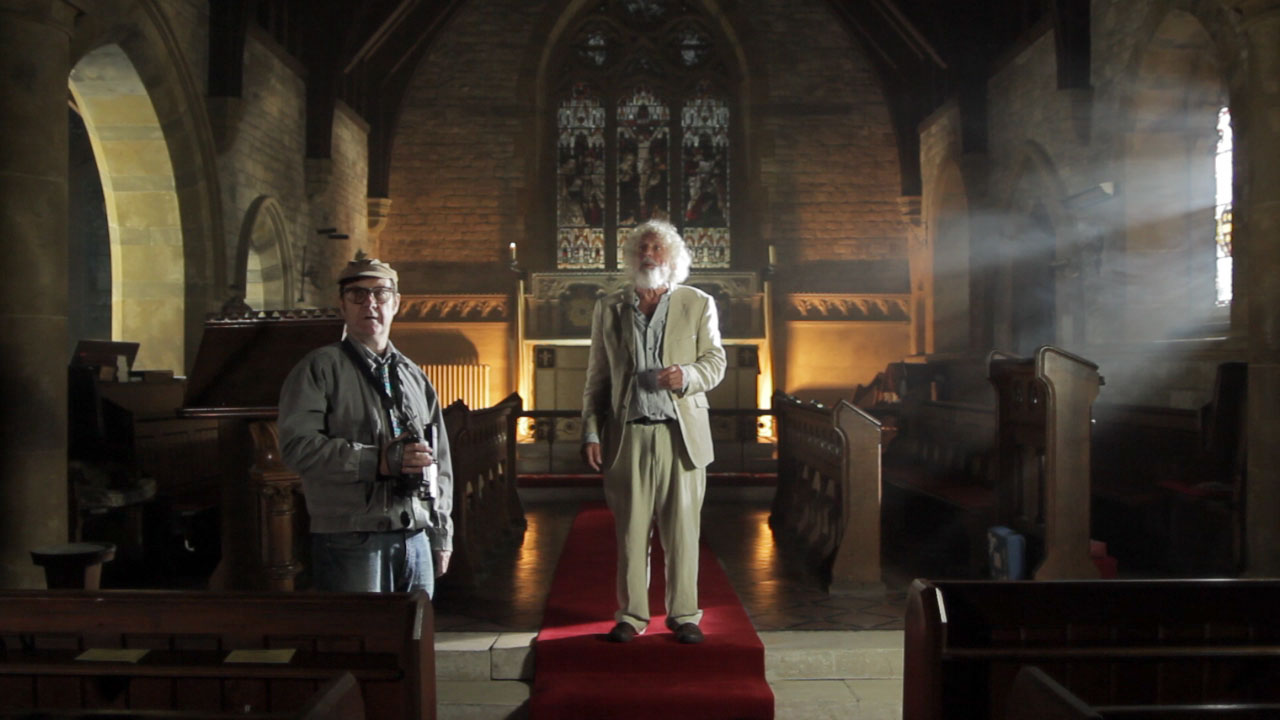
Roger Harding (left) and Jeremy Heynes in The Deaths of John Smith.
Roger Harding (left) and Jeremy Heynes in The Deaths of John Smith. A 1.2K HMI punches through the window on the right, while a fluorescent softbox illuiminates the arches on the left. Background light comes from two 500W halogen work-lights rigged to a dimmer, while fill (given that it was getting dark outside at this point) comes from a blue-gelled 1K Arrilite behind and to the left of camera.

This weekend shooting began on Roger Harding and Darren Scott’s feature-length comedy The Deaths of John Smith. As director of photography I was called on to light a beautiful rural church on a limited budget. Here are some tips for ecclesial cinematography:

  • Hire HMIs – powerful, daylight-balanced lamps. Without at least one you will never have enough light to illuminate anything but the tiniest of churches. As a backlight on a mezzanine level, a 2.5K HMI will illuminate most churches. Better still, put them outside the windows and create artificial sunbeams. (A blue-gelled blonde or redhead outside a stained glass window is pretty much useless; those windows cut out so much light.)
  • Use smoke. A £50 disco smoke machine is perfectly sufficient – use it to volumize the light and emphasise the depth and scale of the building. If you’re struggling to expose a bright enough image, smoke helps there too – because it catches the backlight and lightens up the shadows.
  • Candlelight is a good way to introduce colour contrast into your scene. Dedos are the best lamps to fake candelight with, as they can produce a small circular pool of light. Failing that, any tungsten source will do, ideally rigged to a dimmer board for a bit of flickering.
  • Assuming you’ve got your HMIs punching directly in through all the windows on one side of your church (that’s the side the “sun” is on), you now need soft light coming in through the opposite windows. Ideally these would be larger HMIs playing off bounce boards, but you might get away with soft boxes or bounced tungsten sources (gelled blue, of course) hidden behind pillars inside the building.
  • Sellotape together some old bits of coloured gel and rig them in front of a fresnel to simulate daylight through a stained glass window. Note that this doesn’t really work with unfocused lamps like redheads.
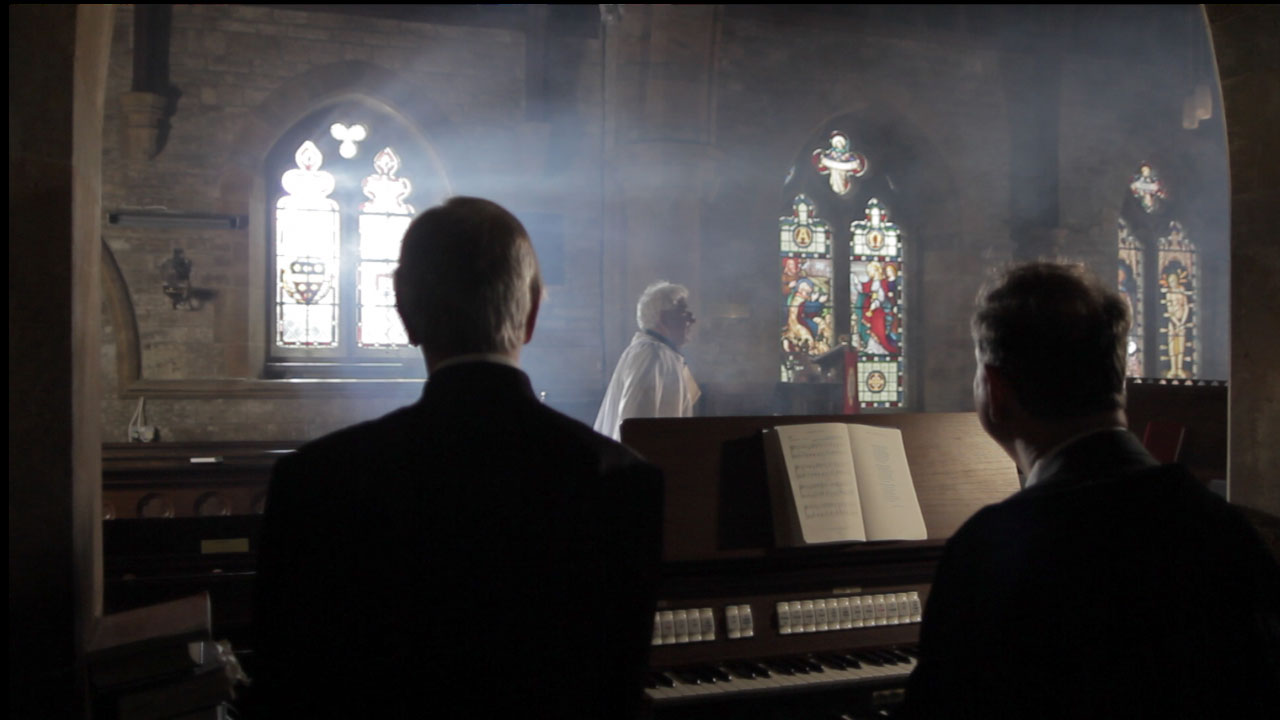
Left to right: David Draper, Bryan Ferriman and Adrian Moore.
Left to right: David Draper, Bryan Ferriman and Adrian Moore. Our single HMI shines through the lefthand window, suitably volumized with smoke, leaving natural light to deal with the other two. A blue-gelled 1K Arrilite off to the right of frame creates the edge-light on the righthand side of each character. An existing halogen spotlight over the organ was gelled with half CTB to cool it down a little. I chose to leave the nearside of the characters dark to contrast the foreground with the brighter background.

On The Deaths of John Smith I only had access to one HMI, so for every shot I needed to carefully choose which window to put it outside of for the maximum impact. I relied on natural light as well as blue-gelled redheads and fluorescent softboxes just out of frame for fill light. Nonetheless, I’m very pleased with the results. Next weekend we have to repeat the performance with a large congregation….

All images copyright 2013 Two Hats Films. Visit the Facebook page or the official website for more info on The Deaths of John Smith.
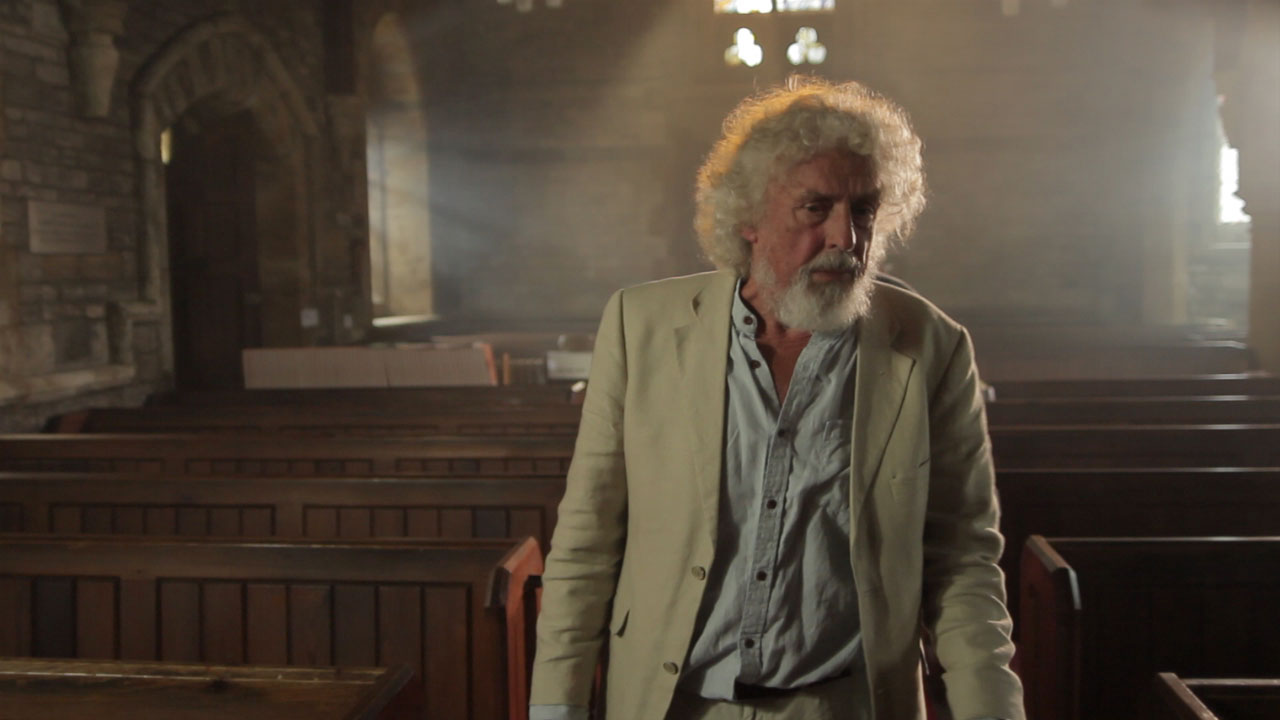
Here the "sun" (HMI) is outside of the lefthand background window.
Here the “sun” (HMI) is outside of the lefthand background window, but I couldn’t resist cheating a little and pushing a 1K Arrilite through a nice yellow stained glass window in the top centre background. Additional backlight comes from a blue-gelled Arrilite off frame right, while a softbox behind and to the left of camera illuminates the actor’s face.
How to Light a Church

Lighting The One That Got Away

Lighting plan for the daylight scenes

Here’s a breakdown of the lighting choices made on my little puppet film, The One That Got Away. You can watch the film over at the Virgin Media Shorts website. If you enjoy it, please use the tweet button to register your vote and help us get a place on the shortlist.

Conventional wisdom with marionettes is probably to go for very flat lighting with no backlight, to make it as difficult as possible to see the strings. But on TOTGA I wanted to embrace and celebrate the tactile, handmade look of the puppets and sets, so I chose a traditional three-point lighting scheme that imparted depth and made no effort to hide the strings.

Normally I shoot wide open – typically f1.8 – on my DSLR, but as the puppets were small the depth of field would have been ridiculously shallow at that aperture. Instead I lit the set very brightly (about 3KW of tungsten horsepower in our cramped living room – not very pleasant during a heatwave!) and stopped down to around f4.

Daylight

The clouds cast shadows on the sky, but I think that adds to the charm.

For the daylight scenes I used my three open-face tungsten Arrilites: a 1K poking over the top of the backdrop for backlight, another 1K with tough-spun diffuser off camera left for key, and an 800W bouncing off the ceiling for fill. This last lamp was gelled blue to suggest ambient skylight.

I tried to simulate the camerawork that would have been used had this been shot at sea with real actors, so:

  • the camera bobs up and down in wide shots, as if Henry’s boat is being shot from another vessel;
  • the camera and boat are fixed in close-ups, with the background bobbing up and down, as if we’re now shooting on a tripod in Henry’s boat.

Underwater

A cool white balance and blue gels help to give an underwater look.

The underwater dream sequence was all shot dry-for-wet at 50fps for a watery slow motion. Using Magic Lantern I dialled in a cool white balance of around 2500K, and pumped in smoke to add diffusion and suggest currents. (I wished I’d use a lot more smoke, but we would have all choked to death.)

I used just two light sources: the 1K backlight, now gelled blue, and the other 1K, bounced off sheets of silver wrapping paper tacked loosely to the ceiling. This is exactly the same method I used for a scene in Ashes – flapping a piece of card at the wrapping paper makes the light ripple in a very watery way.

Shallow depth of field working nicely in the romantic underwater dream sequence

The underwater lighting scheme was a lot darker than the daylight one, so I opened up to around f2, giving a crazily shallow depth of field that worked nicely for this dream sequence. The mermaid’s close-ups were all shot through a CD case for an old-school soft-focus look.

I would have liked to have shot this sequence handheld, but a lack of crew meant I had to lock the camera off so I could operate the smoke machine, fan the wrapping paper and move little fish through frame.

Sunset

When Henry awakens from his dream, the fish escapes and he gives chase. Orange gels and lens flare were used to suggest the sun getting lower in the sky, until finally Henry and his quarry are silhouetted against the solar disc itself. This is a domestic 100W tungsten bulb peeking over the back wave. The only other light source is a row of six more such bulbs under a sheet of orange gel, just behind and below the first one.

The sun is an ordinary 100W tungsten lightbulb.

As the scene moves into twilight, the first bulb is removed and the orange gel over the other six is replaced with a purple one. The 1K backlight is turned back on (possibly it would have been more realistic without, but I’m just a sucker for backlight) and some pink fill is provided by placing a sheet of Minus Green gel on the other 1K and bouncing it off a reflector.

Pink and purple gels are used to give a post-sunset tinge to the final scene.

That’s all folks. Please do tweet about the film (being sure to include the title The One That Got Away and the hashtag #VMShortsVote for it to count as a vote) and click here to watch the behind-the-scenes featurette if you missed it.

Lighting The One That Got Away