Lighting in Traditional Art

IMG_0879
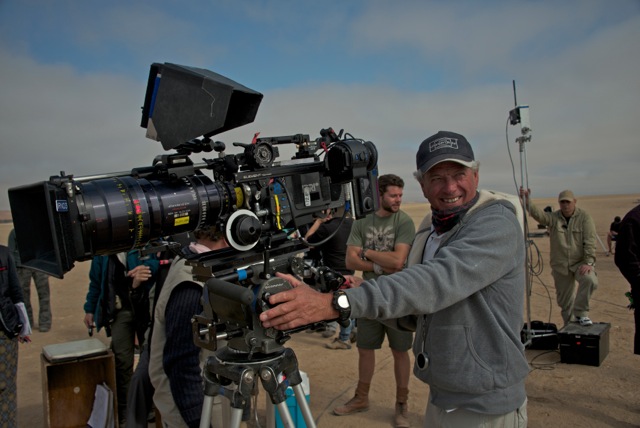
As I dig deeper into the craft of cinematography I feel the need to consume more references and inspiration than cinema itself can provide. To that end, I took a trip this week to the National Portrait Gallery in Trafalgar Square to see a little of  how light has been used in painting and photography over the last few centuries.

The light in many of the portraits is strikingly similar, with the subjects positioned near an unseen window in such a way as to light their up-side, the side of their face closest to the artist or viewer. This is known as a broad key, and in modern cinematography you don’t see it very often; a short key (‘lighting the down-side’) is almost universally favoured. The only convincing explanation I can offer for this is changing fashions.

The paintings that caught my eye were the ones that try something a little different with their lighting. I found it an interesting exercise to work out where the natural light was coming from and how I would recreate it with modern equipment. Here are three of my favourites…


Frederick, Duke of York and Albany by Sir David Wilkie (1823)

by Sir David Wilkie, oil on panel, 1822-1823, dated 1823

Rather than using the daylight to illuminate his subject’s face, Wilkie seats the duke with his back to the window, which cross-lights his sword nicely. The paper in his hand acts as a bounce board, throwing light back onto his face and shirt buttons. It’s great fun doing this in cinematography – firing a hot source in through a window and then seeing it bounce unpredictably off the set and costumes. If I was recreating this painting, the source might be a 6K HMI through a diffusion frame.


Thomas Henry Huxley by John Collier (1883)

NPG 3168; Thomas Henry Huxley by John Collier

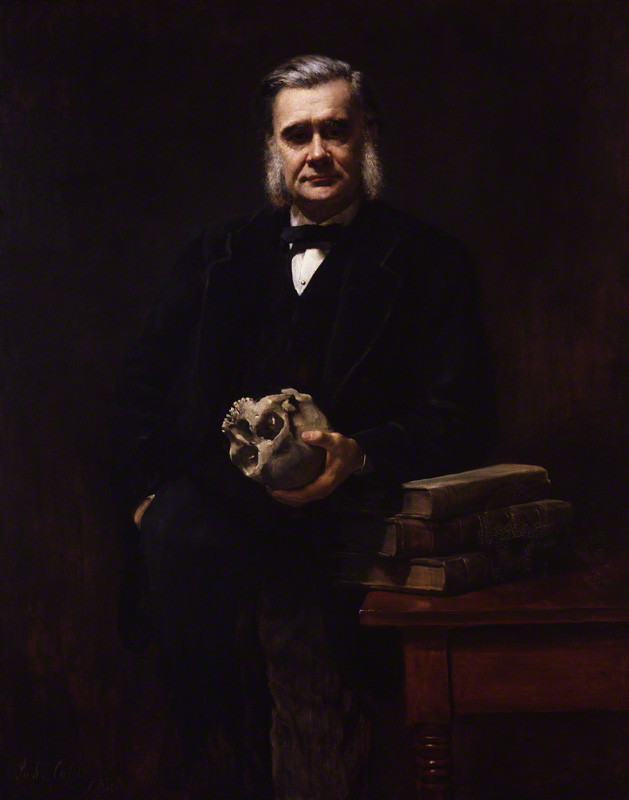
I love how the top-light in this painting throws Huxley’s eye sockets into shadow, making him resemble the skull he’s holding. I’m guessing Collier didn’t pitch the portrait that way though! I might recreate this using a lightly diffused Joker Bug rigged to the ceiling, or a Source 4 Leiko fired up into an overhead bounce board.


The Mission of Mercy: Florence Nightingale Receiving the Wounded at Scutari by Jerry Barrett (1857)

NPG 6202; The Mission of Mercy: Florence Nightingale receiving the Wounded at Scutari by Jerry Barrett

The key light here is coming from the left – perhaps a 12K through a 12×12 full grid – but there’s a hotter shaft picking out Flo in the centre. For that I might use a 2.5K just out of frame, flagged to hit only her. At her feet there would have to be a silver reflector to kick that up-light onto the face of the kneeling woman. The characters on the right of frame are edged quite strongly by the light from the archway. (We know from looking at the shadows on the background buildings that it can’t be direct sunlight, so there must be a window or a very bright wall which that edge light is bouncing off.) I would use an 8×4 matte silver bounce board or maybe even a mirror board to recreate that.

That’s all for now, but look out for more art posts in the near future.

Lighting in Traditional Art

Learning from the Masters: “Raiders of the Lost Ark”

I’m doing a project right now that has a scene where three characters board a boat, and due to the tight schedule we want to cover it in a single shot. A reference that immediately came to mind is the shot at the end of Raiders of the Lost Ark’s second act (1hr30) in which Indy and Marion say goodbye Sallah and board the ship.

The more I studied this shot, the more I realised how utterly masterful its direction and cinematography are, so much so that I felt compelled to write this blog post about it.

Raiders_boat_scene small

It was initially memorable for me because of the skill with which the talent and camera were blocked to pull off the scene in one shot. The camerawork is fairly simple: it dollies left with the characters, settles for most of the scene, then dollies back to the right at the end as Sallah walks off. The varied blocking of the actors keeps the shot interesting during the middle section. I love how Sallah’s delighted reaction at the end is captured in the same shot, by the simple expedient of having him turn to camera. Doing this must have saved hours on lighting a reverse shot that a lesser director might have insisted on.

But what I love most about the shot now is the elegance, simplicity and beauty of the lighting, which demonstrates a number of key cinematography principals:

  1. Using brightness to delineate depth – i.e. a bright background and a darker foreground.
  2. Colour contrast – a cool moonlight from one side and a warm source (presumably representing a streetlamp) from the other.
  3. Cross-backlighting – both sources are on the opposite side of the talent to the camera, giving the maximum shape to their faces, giving them beautiful profiles and retaining depth by keeping the camera side in darkness.

And all of this is achieved by two lamps:

  1. A large daylight source way in the background, off frame right, lighting up the smoke (to supply the bright background), raking the side of the ship and edging the camera-right side of the talent.
  2. A smaller tungsten source off frame left, edging the camera-left side of the talent.

Douglas_Slocombe_BSCineThere are some practicals in the background too, but 99% of the work is done by those two sources. To me, that’s absolute bloody genius.

Sadly Raiders’ DP, the legendary Douglas Slocombe OBE, BSC, ASC, passed away in February, but his exquisite work lives on.

Learning from the Masters: “Raiders of the Lost Ark”

Classic Single Developing Shot in Back to the Future: Part II

“What the hell’s going on, Doc? Where are we? When are we?”

“We’re descending towards Hill Valley, California, on Wednesday, October 21st, 2015.”

“2015? You mean we’re in the future?”

Yep, we’re all in the future now.

The Back to the Future trilogy are the films that made me want to be a filmmaker, and 30 years has not dulled their appeal one bit. In a moment I’ll give a single example of the brilliance with which Robert Zemeckis directed the trilogy, but first a reminder…

If you’re in the Cambridge area, you can see Back to the Future along with my short film Stop/Eject at the Arts Picturehouse next Monday, Oct 26th, 9pm. You need to book in advance here.

If you can’t make it, I’m pleased to announce that Stop/Eject will be released free on YouTube on November 1st.

Stop-Eject release poster RGBAnyway, back to Back to the Future. Robert Zemeckis is a major proponent of the Single Developing Shot – master shots that use blocking and camera movement to form multiple framings within a single take. Halfway through BTTF: Part II comes a brilliant example of this technique. Doc has found Marty at his father’s graveside, the pair having returned from 2015 to a nightmarish alternate 1985. In an exposition-heavy scene, Doc explains how history has been altered and what they must do to put it right.

It could have been very dull if covered from a lot of separate angles (and not acted by geniuses). Instead Zemeckis combines many of the necessary angles into a single fluid take, cutting only when absolutely necessary to inserts, reverses and a wide. Here are the main framings the shot moves through.

It starts on a CU of the newspaper…

Screen Shot 2015-10-19 at 21.30.42

…then pulls out to a 2-shot…Screen Shot 2015-10-19 at 21.31.22

…which becomes a deep 2 as Doc walks away…Screen Shot 2015-10-19 at 21.31.47

…before pushing in to Doc at the blackboard…Screen Shot 2015-10-19 at 21.32.07

…and panning with him to the DeLorean…Screen Shot 2015-10-19 at 21.32.25

…then pulls back out to include Marty again…Screen Shot 2015-10-19 at 21.32.41

…rests briefly on another 2-shot…Screen Shot 2015-10-19 at 21.32.46

…then becomes a deep 2 once more as Doc moves away…Screen Shot 2015-10-19 at 21.32.55

…then a flat 2 again…Screen Shot 2015-10-19 at 21.33.16

…then a deep 2 again…Screen Shot 2015-10-19 at 21.33.33

…then pushes in to a tighter 2 as Marty realises it’s all his fault…Screen Shot 2015-10-19 at 21.33.40

…then it becomes an over-the-shoulder as Marty turns to Doc at the DeLorean…Screen Shot 2015-10-19 at 21.33.49

…then a 50/50 as they face each other…Screen Shot 2015-10-19 at 21.33.59

…then it tracks back to the blackboard…Screen Shot 2015-10-19 at 21.34.03

…and tracks in further to emphasise the reveal of the second newspaper…Screen Shot 2015-10-19 at 21.34.16

…then dollies back with Marty as he takes it into the foreground…Screen Shot 2015-10-19 at 21.34.26

…then dollies into a tight 2 to end.Screen Shot 2015-10-19 at 21.34.41I wonder how many takes they did of this, and how many different takes are used in the edit. Just after the reveal of the second paper there’s a cut to Einstein the dog, and when we come back to the developing shot the framing is slightly different, suggesting the dog shot is there to allow a splicing of takes more than anything else. All the other cuts in the scene are strongly motivated though, and seem to be there for narrative reasons rather than take-hopping.

Given the shortness of the lens – not more than a 35mm, I reckon – it’s likely that Michael J. Fox had to deliberately move out of the camera’s way at certain points, and the table seen in the opening frame may have been slid out by grips early on in the take to facilitate camera movement. I’d love to see some behind-the-scenes footage from this day on set, but none seems to exist.

So there you have it, one small example of the inventiveness which makes these films so enduring. Now stop reading this and get back to your trilogy marathon!

Classic Single Developing Shot in Back to the Future: Part II

4 Cunning Substitution Effects in Labyrinth

After countless viewings on VHS and DVD over my lifetime, I finally got to see Labyrinth on the big screen today. The imagination and detail in this film are just astonishing. Every scene has little puppet creatures wandering or flying about in the background to bring the sets to life. In today’s screening I noticed, for the first time, that there are two bottles of milk – presumably delivered by the Goblin Milkman – outside the door of Jareth’s castle. How brilliant is that?

"Where did she learn that rubbish? It doesn't even start with 'I wish'!"
“Where did she learn that rubbish? It doesn’t even start with ‘I wish’!”

Anyway, while there are many awesome things about Labyrinth, one of the techniques that I think is put to particularly good effect in the film is in-camera substitution. Typically this involves one type of puppet leaving frame briefly, and a second puppet – of the same character – reappearing in its place. Puppets are often limited in the actions that they can perform, and while scenes will commonly use different versions of the puppet in different shots to cover the full range of actions, Henson sometimes uses different versions of the puppet in the same shot to sell the illusion of a single, living creature. And though many of these effects are fairly obvious to a modern audience, you can still admire their ingenious design and perfect timing.

Skip through the movie to the timecodes listed below to see some of the best substitution effects.

1. Goblin Under the Bedclothes – 11:40

In the film’s first puppet scene, Sarah’s parent’s bedroom becomes infested with goblins, building up to David Bowie’s big oh-so-eighties entrance. One goblin crawls along the bed, under the sheets, before emerging. It looks like the initial crawling is achieved by pulling a rough goblin shape along on a wire under the sheets. The shape then drops out of the end of the bedclothes, behind a chest, and a moment later a puppet pops up from behind the same chest. This substitution effect obviates the need for a custom-built or chopped-up bed, which would have been necessary to permit the passage of the proper puppet and its puppeteer under the bedclothes.

Sirdidymus
Sir Didymus

2. Sir Didymus’ Acrobatics – 58:35

This shot appears to employ three different models of Sir Didymus, the honourable but fighting-crazed guardian of the bridge over the Bog of Eternal Stench. The first is a floppy version which is thrown behind some rocks by Ludo. After a practical puff of dusk, a second Sir Didymus – this one in a more rigid, leaping position – is launched from some kind of catapult hidden behind the rocks. He flies out of frame, to be replaced a moment later by the Muppet-style hand- and rod-puppet which is used for the majority of Sir Didymus’ shots.

3. Cowardly Ambrosius – 1:16:25

To his infinite chagrin, Sir Didymus’ bravery is not matched by that of his canine steed, Ambrosius. During the battle with Humongous, the petrified pooch rears up, throwing off his valiant rider, and retires shamelessly into hiding. The rearing up is accomplished with a rather unconvincing puppet dog. After he drops back down out of frame (aided by a slight zoom in to help lose him), a real dog enters in the background, running into hiding.

"I can't live within you." Not at all creepy, Dave.
“I can’t live within you.” Not at all creepy, Dave.

4. Double David – 1:27:53

In the film’s finale number, “Within You”, David Bowie’s Goblin King messes with our sense of direction as he jumps and flips around the disorientating Escher artwork brought to life. Early in the sequence he jumps off a ledge, only to reappear simultaneously in a background doorway, now seemingly obeying a pull of gravity at 90° to that which acted on his leap. A shot of Bowie jumping off the ledge cuts to another of him coming through the doorway. The doorway is filmed with the camera on its side, and to finish the action of the first Bowie’s leap, a body double is pulled across frame on a dolly. This can be seen at 25:36 in the behind-the-scenes documentary:

This kind of low-tech but ingenious filmmaking is in danger of dying, as CGI is perceived as the only tool to create illusions. But with a little thought, a little planning, cunning framing, and a knowledge of how to use editing (or lack thereof) to your advantage, very effective illusions can still be created in camera.

If you enjoyed this post, you may also like:

The 10 Greatest Movie Puppets of All Time – including the aforementioned Humongous

Double Vision – five ways of having one actor play two characters in the same scene

Top Five Low Tech Effects – tipping my hat to the cheekiest in-camera effects used in big Hollywood movies

Five Simple But Effective Camera Tricks – revealing some simple camera tricks I’ve used in my own films

4 Cunning Substitution Effects in Labyrinth

20 Facts About the Cinematography of Mad Max: Fury Road

cars

The Australian Cinematographers’ Society has released a video of a two hour talk by Fury Road DP John Seale, ACS, ASC. It’s a fascinating watch, with lots of interesting info and some dry Aussie wit; more than once Seale talks about “taking to the drink” when things got tricky!

Watch the video here. (Embedding is disabled.)

John Seale, ACS, ASC

Here are the most interesting points I took from it, with a few extra details added from American Cinematographer’s article on Fury Road:

  1. The team spent years developing a new 3D camera based on a sensor built for the US military. Director George Miller wanted something rugged enough to survive dusty desert work and small enough to fit into the truck cabs. Camera tests revealed it had only five stops of dynamic range, nowhere near enough to capture detail both outside and inside the cabs in the same frame.
  2. The film was ultimately shot on Arri Alexas (four Ms and six Pluses) and converted to 3D in post. Absolutely no consideration to the 3D format was given during shooting.
  3. When early footage failed to please DIT Marc Jason Maier and his meters, Seale agreed to downrate the Alexa from its published 800 ASA to 400 ASA. The subsequent footage was deemed technically correct by Maier and made Seale much more comfortable that he was recording what he thought he was recording in terms of exposure.
  4. Dailies were rendered with two different LUTs: the standard Rec 709 and a custom one designed to emulate a one-light celluloid work-print. This was for the benefit of Seale, for whom Fury Road was his first digital movie.
  5. Canon 5D Mark IIs with the Technicolor CineStyle profile were used as crash cams. Sky replacement had to be executed on many of the 5D shots to remove banding, presumably caused by the small colour space.
  6. Olympus and Nikon DSLRs were used a little as well.
  7. For close-ups of Max escaping the Citadel early in the film, a Blackmagic Cinema Camera with a Tokina 11-16mm zoom (a combination I used frequently on The First Musketeer!) was rigged on a Movi.
  8. The film was lensed predominantly on zooms, with a few Super Speed primes kept on standby for when the daylight was running out.
  9. Custom-built 15mm and 16mm primes were used inside the cab of the War Rig. The lenses’ hyperfocal distance had been adjusted so that everything from 0′ to 9′ (i.e. everything inside the cab) would be in focus.
  10. Lighting and camera rigs hung from the roofs of the vehicles had to be stripped back because of the shadows they cast. Instead, platforms were rigged on the sides of the trucks, and a track-and-pulley system was built into the War Rig’s cab’s ceiling from which cameras could be suspended.bts
  11. Scenes in the cab were shot at T5.6, with strips of LEDs mounted on the ceiling and on the pillars between the front and rear doors to bring up the actors inside.
  12. Day-for-night scenes were overexposed by two stops so that characters in the shadows could be lifted in the grade, if necessary, without noise.
  13. The film was storyboarded early on, but a script was only written when the studio demanded it!
  14. Miller wanted to shoot everything single-camera, including action, but Seale began sneaking in with extra cameras and soon convinced his director of the efficacy of this method.
  15. Much of the film was shot as Poor Man’s Process, or “Sim Trav” as Seale calls it.
  16. In post, Miller chose shots with camera shake that he liked and had that shake digitally applied to other shots.
  17. Miller decreed that the subject of the shot should always be framed centrally. This allowed him to edit faster, because time wouldn’t be lost on each cut as the viewer searched the width of the anamorphic frame for the subject.
  18. Extensive use was made of two Edge Arms. An evolutionary step up from Russian Arms, these are cameras mounted on robotic arms which are in turn mounted on pick-up trucks.
  19. Other vehicle rigs included custom-built buggies with Alexa Pluses mounted front and rear, and a “Ledge” mount which was a 30′ truss tower built on the back of a truck, allowing high angles without the need for drones or helicopters.
  20. Leaf blowers were used, via flexible pipes, to keep sand off the lenses in moving shots.

It’s interesting to hear how laid-back Seale is. He gave his focus puller a great degree of leeway in choosing the lens package, and let his DIT, gaffer and operator handle the technical side of recording and exposing the image. This level of trust in his team must give him tremendous capacity to focus (pardon the pun) on the creative side of his job without worrying about the details.

I’ll leave you with the EPK B-roll from Fury Road…

20 Facts About the Cinematography of Mad Max: Fury Road

Top Tips from Day Two of the Big League Cine Summit 2015

blcs-blue-on-whiteLast week I published the best tips I culled from day one of the 2015 Big League Cine Summit. To complete the set, here are the top tips from day two, starting with that legendary teacher of cinematography, Shane Hurlbut, ASC. Since Shane is so good at sharing his knowledge on the Hurlblog, I’ve only listed a few tips from him; I strongly recommend you check out his site for many, many more gems.

Shane Hurlbut – “Delivering Storytelling Impact with Light, Lens and Camera”

  • On the visual grammar of Crazy/Beautiful: controlled camera moves represent Jay’s controlling mother.
  • Shane likes to use the work of stills photographers as inspiration.
  • He added extra 400W sodium vapour fixtures to the existing 100W sodium vapour streetlights for night exteriors in Crazy/Beautiful.
  • He used a “damaged key” in Crazy/Beautiful to represent Kirsten Dunst’s flustered state. It’s messy, doesn’t quite reach both eyes.

David Vollrath – “Motivated Lighting”

  • “I don’t want to light their faces and bodies specifically. I like to light the space.” – Harris Savides
  • Stand where your subject will be to see what reflective objects are affecting your lighting.
  • Tabletops can be great bounce-boards for toplight. Maybe put muslim or paper on the table to enhance it.
  • Look for things to motivate light: windows, practicals, overhead fixtures, sconces, etc.
  • Once you’ve lit the space, it will become clearer how to light the faces.
  • Work with the art department in preproduction to make sure you get the practicals you need.
  • Flag your other sources off your practical so that excess light isn’t falling on them and washing them out.
  • You can use the reflection of a softbox to create a nice shine on a dark surface or even on a face.
  • A roll of duvetyne armed off a C-stand makes a fair stand-in for a 4×4 floppy flag.
  • “Beadboard” is just another name for polyboard. (I genuinely didn’t know that!)
  • Other bounceboards include foamcore and showcard.
  • Use Source 4 Leikos to fire into your bounce, because they’re easily cut and focused. They’re cheap to rent too.
  • It’s easier to rig a bounce card overhead than a softbox or a kinoflo.
  • Plus Green and Minus Green gels – to match or correct fluorescents – are useful in subtle 1/8th flavours.
  • “Lighting is in the gripping.” Taking away light can be more effective than adding it.
  • A “cocktail” is a layering of multiple gels.
  • A simple black card over a shiny piece of furniture can cut bounce and bring back contrast.
  • Hazers add great atmosphere, but they raise the fill level. To see shafts of light, use a dark background.

Caleb Pike – “Everything You Need to Know About Lenses”

  • A good set of primes will last you decades.
  • Lens choice affects: 1. Field of view, 2. Depth of field, 3. Compression (amount of perspective).
  • Use compression to isolate a subject, or to crop out equipment.
  • Use wide lenses to open up a space, exaggerate expressions or get the most out of camera moves.
  • Longer lenses are more flattering for close-ups. Short lenses can distort the face unpleasantly.
  • Don’t always shoot with your aperture wide open. Choose an appropriate depth of field for your story.
  • Generally it’s best to keep your aperture the same throughout a scene.
  • Avoid non-constant aperture zoom lenses for video work.
  • Primes (fixed focal length lenses) are generally faster, cheaper, lighter and sharper than zooms.
  • Cine lenses are heavier than stills lenses, do not breathe (zoom slightly when focusing), and have fixed filter rings.
  • Cine lenses have hard stops on the focus rings, so you can set focus marks on the lens.
  • Cine lenses have longer throws on the focus rings, so that follow focusing can be more precise.
  • Wide cine lenses have less distortion than their stills counterparts.
  • Passive lens adapters are cheap and simple; smart adapters maintain the electronic connection for autofocus etc.
  • Lens boosters can solve cropping problems caused by using a lens with a sensor size it’s not designed for.
  • Throttle adapters are passive adapters with neutral density fader filters built in.
  • Caleb’s budget lens recommendations:
    1. Nikon 35-70mm f3.5 macro
    2. Olympus 50mm zuiko f1.4 and 1.8 versions – sharp, with long focus throw – around $30
    3. Canon 40mm f2.8 pancake prime
    4. Nikon 100mm F2.8 E series – around $99
    5. Canon 28-80mm F2.8-4.0 L series – well built, very sharp – around $500

Matt Workman – “Camera Moves That Matter”

  • A camera “hand off” is a move that starts focused on one thing and then transitions to focus on another.
  • A classic establisher might start on a mysterious insert then pull back – “hand off” – to reveal the scene.
  • Spielberg, Scorsese, Luhrmann, Singer and Bay all use camera hand-offs frequently.
  • Camera moves increase production value and can cover multiple story beats in one shot.
  • Doing the same thing in cuts reduces your audience’s understanding of the scene’s geography.
  • Crane-ups give you a privileged view, a sense of power.
  • Write down the beats of the scene, then storyboard or previz. All departments can benefit from the previz.
  • Beware of boring bits in the middle of camera moves. Is it better to do it in cuts so you can speed it up?
  • Use Autodesk Maya for previz. Build a library of accurate grip equipment models.
  • Check out Matt’s other site which uses previz tools to illustrate other DPs’ set-ups.
Top Tips from Day Two of the Big League Cine Summit 2015

Top Tips from Day One of the Big League Cine Summit 2015

blcs-blue-on-whiteThis week the third annual Big League Cine Summit is taking place: two days of online masterclasses with top commercial, TV and feature film cinematographers. If you missed this educational and inspirational free event, here are the best tips I culled from day one’s sessions:

Frankie DeMarco – “Composition and Camera Operating for the Big Screen”

  • The advantage for a DP of working with a separate camera op is that you have a second opinion.
  • Try to think like an editor. What specific shots do you need to tell the story? Can you do it in a “oner”?
  • Lots of angles/coverage can kill performances and make the audience overly aware of the camera.
  • If you need to shift position for comfort, do it during a part of the take that the editor is unlikely to use.
  • You can sometimes get away with crossing the line if your singles are dirty.
  • Use clean singles to show that characters are not connecting with each other.
  • Single point perspective, a.k.a. formal composition (framing the subject centrally) can be very powerful.
  • Lighting for silhouette can make a simple moment highly evocative.
  • The best composition reflects character relationships, perhaps using layers and depth.
  • Good composition should draw the eye to the right part of the screen and not distract the audience.
  • Good cinematography should tap into the emotion of the scene and the character whose eyes we’re seeing it through.
  • When watching the blocking, think about the emotions. Let the scene tell you how it should be shot.
  • Let the lens talk to you. Try watching the blocking through different lenses and see what feels right.
  • A great static frame that the actor can move around in trumps panning around with the actor.
  • Use a dolly-in for an emotional moment, but a zoom-in to show a character having a thought or idea.
  • Check out Stanley Kubrick and William Friedkin films to see excellent use of zooms.
  • Use a long lens to disconnect your subject from their surroundings.
  • Play the first take safe, and then you can try tagging hand-props or pulling focus to background characters on later takes.
  • “When in doubt, turn it out.” i.e. beware of over-lighting!
  • Don’t be afraid of changing f-stops from angle to angle to maintain a consistent softness of background when your background is different distances away from different subjects.
  • Don’t worry about continuity too much. “The set is made of rubber.”
  • Try unusual compositions. Be willing to fail.

Kevin Shahinian – “Story Telling Techniques: Adding Massive Production Value”

  • In high-end events shooting, try to get the organisers to pick rooms that will work for sun orientation.
  • Use a long lens to create a potentially unsettling sense of voyeurism.
  • To build tension and unsettle the audience, short-side your subject and show lots of empty background.
  • In an over-the-shoulder shot, add power to the foreground character by having them dominate the frame.
  • With non-actors, shoot candid footage; you may capture genuinely great moments. Use action verbs to direct them, rather than talking in terms of emotions.

Rasmus Heise – “Extraordinary Cinematography with Minimal Lighting”

  • Design lighting that works from all directions, to minimise set-up times.
  • Use more than one colour to add depth.
  • Dot practicals around where possible, to give you sources that will work for different angles.
  • Focus on one key light source in a scene. Everything else is just a bonus.
  • Fluorescent tubes and sodium vapour lamps can be great low budget, low wattage solutions.
  • Philips makes fluorescent tubes with high CRI.
  • Wet down your exterior sets to add contrast and nice reflections.
  • Silhouette shots are quick, cheap and look great.

Matthew Santo – “Commercial Lighting: How to Light Fashion vs. Action”

  • Photographing commercials is all about heightened reality, perfect sunsets, perfect skin, etc.
  • It requires a lot of passive lighting: bounce cards, negative fill, contrast control.
  • On beauty and fashion commercials:
    • Your background can set a darker mood even if the talent has to be lit flatly for beauty.
    • Know your talent’s face in advance – e.g. do they have soft or hard features? Deep-set eyes?
    • What side is the talent’s hair parted on? This could affect your decision on which side to key from.
    • Try to make sure the make-up room’s lighting matches the colour of your lighting on set, so the MUA doesn’t get any nasty surprises on set.
    • Use Briese lights for beauty. They have hard- and softlight qualities.
    • Chimeras may be better for talent with less defined features.
    • Reduce skin texture by pushing fill through large frames or bounce, e.g. 12×12 frames.
    • Hard backlight looks great but beware of fly-away hair.
    • Combine hard and soft sources for backlight that has punch but wraps and doesn’t create shadow issues.
    • There’s a range of Cosmetic lighting gels that add a little warmth and diffusion.
    • Use a low overall light level for talent comfort and less squinting!
  • On sport and action commercials:
    • It’s about movement and body definition. Backlight and sidelight are most important.
    • Edgelight defines the talent’s body shape. Toplight adds muscle definition.
    • Lens flares add dynamism but reduce contrast, so light high-key.
    • Use higher light levels for highspeed shooting and to maintain focus as people move.

Stefan V. Borbely – “Deconstructing High End Car Commercials”

  • Rather than lighting the car, light the environment and the car will reflect that environment.
  • For exteriors, wait for dramatic skies because the car will reflect these.
  • Silver cars are the easiest to light.
  • Use long fluorescent tubes or long reflectors to make seamless long highlights on the bodywork.
  • Use Cinema 4D to test your lighting set-ups for reflections.
  • For night exteriors, take stills on the recce and note your exposure settings.
  • Bagolights are great for creating streaks of light on cars.
  • Fisherlights are a good substitute for the sky.
  • If you can’t afford Fisherlights overhead, put lamps on the floor and shoot them up into big polyboards.
  • Schedule your exterior shots for sunrise and sunset, and shoot inside the car in the middle of the day.

There is still time to get free access to the summit at bigleaguecinesummit.com Stay tuned to neiloseman.com for top tips from day two.


Top Tips from Day One of the Big League Cine Summit 2015

2.39:1 Composition

In the days of 4:3 cameras, many filmmakers chose to mask off their viewfinders and shoot in 16:9 widescreen. Now that 16:9 is ubiquitous, those of us wanting something more cinematic turn to the glorious 2.39:1, a.k.a. Scope. Choose your aspect ratio carefully though, not just because it “looks cooler”. 2.39 works well if you have lots of landscapes, lots of extras or a wide set. It’s not so great if one of your main sets is a tall, narrow booth, as I found out the hard way on Stop/Eject.

I love composing for the 2.39 ratio. You have so much flexibility on where to put your subject in the frame. The rule of thirds is obsolete here. You can put someone almost anywhere in the 2.39 frame and have it look good. They can be short-sided (placed on the “wrong” side of frame) but still have looking space. They can be just off centre, or they can be squeezed right to the edge. And if it’s a two-shot or a dirty single, you can illustrate the closeness of the characters’ relationship by choosing the distance between them in the frame – anywhere from overlapping (a couple madly in love?) to facing each other across the full width of the widescreen frame (enemies with no common ground?).

Here are some of my favourite examples of 2.39 composition. First up, The Matrix, lensed by Bill Bope. Look at how he uses black space to create a stark minimalism. One of the most powerful things you can do with all that horizontal space is to not use half of it!

Matrix-black1

Matrix-door

Matrix-Morpheus

In this close-up (below), Morpheus starts off conventionally framed on the left, but leans forward at a key point, crossing the width of the frame to become short-sided, as pictured. It really makes it feel like he’s getting in your face.

Matrix-Morpheus-shortside

Symmetrical shots become more powerful in 2.39. These ones really help reinforce the rigid, computer-generated nature of the matrix.

Matrix-chairs-symmetry

Matrix-agents-symmetry

In Donnie Darko (DP: Steven Poster), formal composition (framing characters centrally) is used as a stylistic device in the dream sequences. Again, a powerful symmetry in this wide format.

Donnie1 Donnie2

I love the composition of this shot from Armaggedon (DP: John Schwartzman). He’s on the “wrong” side of frame and he’s barely off centre, but somehow it works beautifully. It almost looks like he’s surging forwards with the flag, rather than seeming dominated by it, like he would if he was on the right of frame.

Armageddon

Jan de Bont’s cinematography in Die Hard is a masterclass in 2.39 composition. Check out the depth in these raking shots.

DieHard-Bonnie

DieHard-mirror

Below, De Bont uses the doorway as a symmetrical frame for the composition, which gives Willis license to be anywhere within it.

DieHard-CU-shortside

Here’s an interesting lesson in shooting over-the-shoulders in 2.39. Put the foreground actor on the edge of frame and you’ll find it very hard to keep a sense of depth if you put the background actor over on the other side of frame. You need them nearer so the perspective can continue off into the other side of frame, perhaps with other characters (or a statue, in this case) in the deep background or just the set.

DieHard-overshoulder

Here’s a nice bit of short-siding, balanced out by the car.

DieHard-shortside-ext

And finally, I utterly adore this shot/reverse from Alien (DP: Derek Vanlint). If ever a director tells you that shot/reverses have to match, show them this scene. Every rule in the book is broken. He’s shot from a low angle, she’s shot from head height. He’s in a mid, she’s in an MCU. His single is dirty, hers is clean. He’s on the left of frame, and so’s she! But isn’t it gorgeous? Both characters are given power through composition, but in different ways. His power comes from the low angle of the camera. Hers comes from her being placed towards the closer end of the horizontal lines in the set. If she’d been placed on the tapering end, on the right of frame, she would have no power in this scene at all, compositionally. I can’t say whether it’s intentional, but the fact that this compositional power – equal but different – matches the power the characters have in the dialogue and performance, is just exquisite.

Alien-HurtAlien-Weaver

What are your favourite 2.39 movies, and how do they use the frame to help tell the story?

2.39:1 Composition

Cinematography Learning Resources

Now is a great time to be learning or honing your craft as a director of photography. Today I want to flag up just three of the great resources that are out there at the moment.

418.peopleShane’s Inner Circle

Shane Hurlbut, cinematographer of Terminator: Salvation, Need for Speed and Act of Valour, has been publishing brilliantly informative blogs for a long time now. But for those who want even more, he’s recently launched Shane’s Inner Circle, which you can join for the bargain price of about £4 a month. As well as special blogs called ‘Power Posts’, each month you get two detailed reports called ‘On Set With Shane’. In these, Shane takes you through a day of shooting – currently on the Amanda Seyfried-starrer Fathers and Daughters – and breaks down every creative decision he made. Recce photos, frame grabs, lighting diagrams and links for all the equipment used make this an essential and unparalleled resource. You also get to join a Facebook page where you can discuss your cinematography issues with other members, and you can submit questions for Shane himself, which he answers in a monthly podcast. Incredible value for money from one of the most generous men in Hollywood.

ac_cover_med_201408@2xAmerican Cinematographer

From the American Society of Cinematographers, this magazine tells you how the DPs at the top of their game are doing their thing. Each month they interview the cinematographers behind three or four of the month’s biggest movie releases, discussing shooting format, stock and lens choices, visual grammar, and lighting. Many of the lighting diagrams boggle my mind, showing huge soundstages rigged with 60 space lights and 40 2Ks, or nighttime exteriors lit with mutiple 12Ks and massive cranes flying 40×40′ diffusion frames overhead. But despite the… shall we say… aspirational level of resources being used by these cinematographers, the principles are entirely scaleable. It’s also very heartening to discover that there’s never enough money, as top DPs speak of being forced into choosing digital over celluloid by penny-pinching studio execs. And it’s fascinating to learn of the range of cameras that are being used. Captain Philips, for example, used Super-16, 35mm and digital for various creative and practical reasons. Buying imports of American Cinematographer can get expensive, but you can get a year’s digital subscription plus two free issues for just £19.

biddle_samplepage02DOP Documents

Stephen Murphy is an accomplished cinematographer, whose work I first noticed in the beautifully shot feature pilot Mrs. Peppercorn’s Magical Reading Room. For the last couple of years he has been publishing occasional ‘DOP Documents’ – PDF scrapbooks showcasing the work of cinematographers Stephen admires. These documents are laid out with elegant simplicity, allowing the reader to admire the frame grabs, interspersed with relevant quotations from the DP in question. Light-meisters covered so far include Adrian Biddle (Aliens), Jan de Bont (Die Hard), Douglas Slocombe (Indiana Jones trilogy) and Alex Thompson (Legend), so there’s plenty of gorgeous eighties lighting on display, but not exclusively so. They would work beautifully as a big coffee table book, but for now we must be content with PDFs. Which are absolutely free. Stephen’s other blog posts, covering his lensing of various productions, and sharing results of stock and filter tests, are also well worth checking out.

Cinematography Learning Resources

Shane Hurlbut on Available Light

Col recently put me on to this fascinating blog by DP Shane Hurlbut. His most recent post looks at how he lit eight city blocks in Puerto Rico using minimal equipment. This was possible due to the low-light capabilities of modern DSLRs and high-end HD cameras. Apart from a couple of rented HMIs lighting background buildings, his gear mostly came from Home Depot (America’s equivalent of B&Q).

Lighting courtesy of Homebase

I remember arriving in upstate New York in 2002 to begin shooting Tom Muschamp’s first feature Beyond Recognition and being horrified by the suggestion from someone on the production team that I could get all the lighting kit I needed from Home Depot. That was a Mini-DV shoot and I did eventually get provided with some Arri lamps, but it just goes to show how times have changed.

Crucially what Shane’s blog illustrates is that even if you’re going with existing light sources, your job as DP is not over. You still have to mould them using flags, gels, black wrap or whatever. Just because you can physically expose a picture, that doesn’t mean it’s “lit” in the artistic sense of the word.

Read Shane’s blog here.

Shane Hurlbut on Available Light