Lighting Techniques #5: Smoke

Smoke looks cool, I think we can all agree, but why? What are we trying to achieve when we spray a set with smoke?

In the famous cinematography manual Painting with Light, John Alton says of the cinema experience: “We sit in the dark looking at a light screen; this gives a definite feeling of depth. In order to continue this depth on the screen, the progression from dark to light must be followed up. The spot which should appear to be the most distant should be the lightest, and vice versa…”

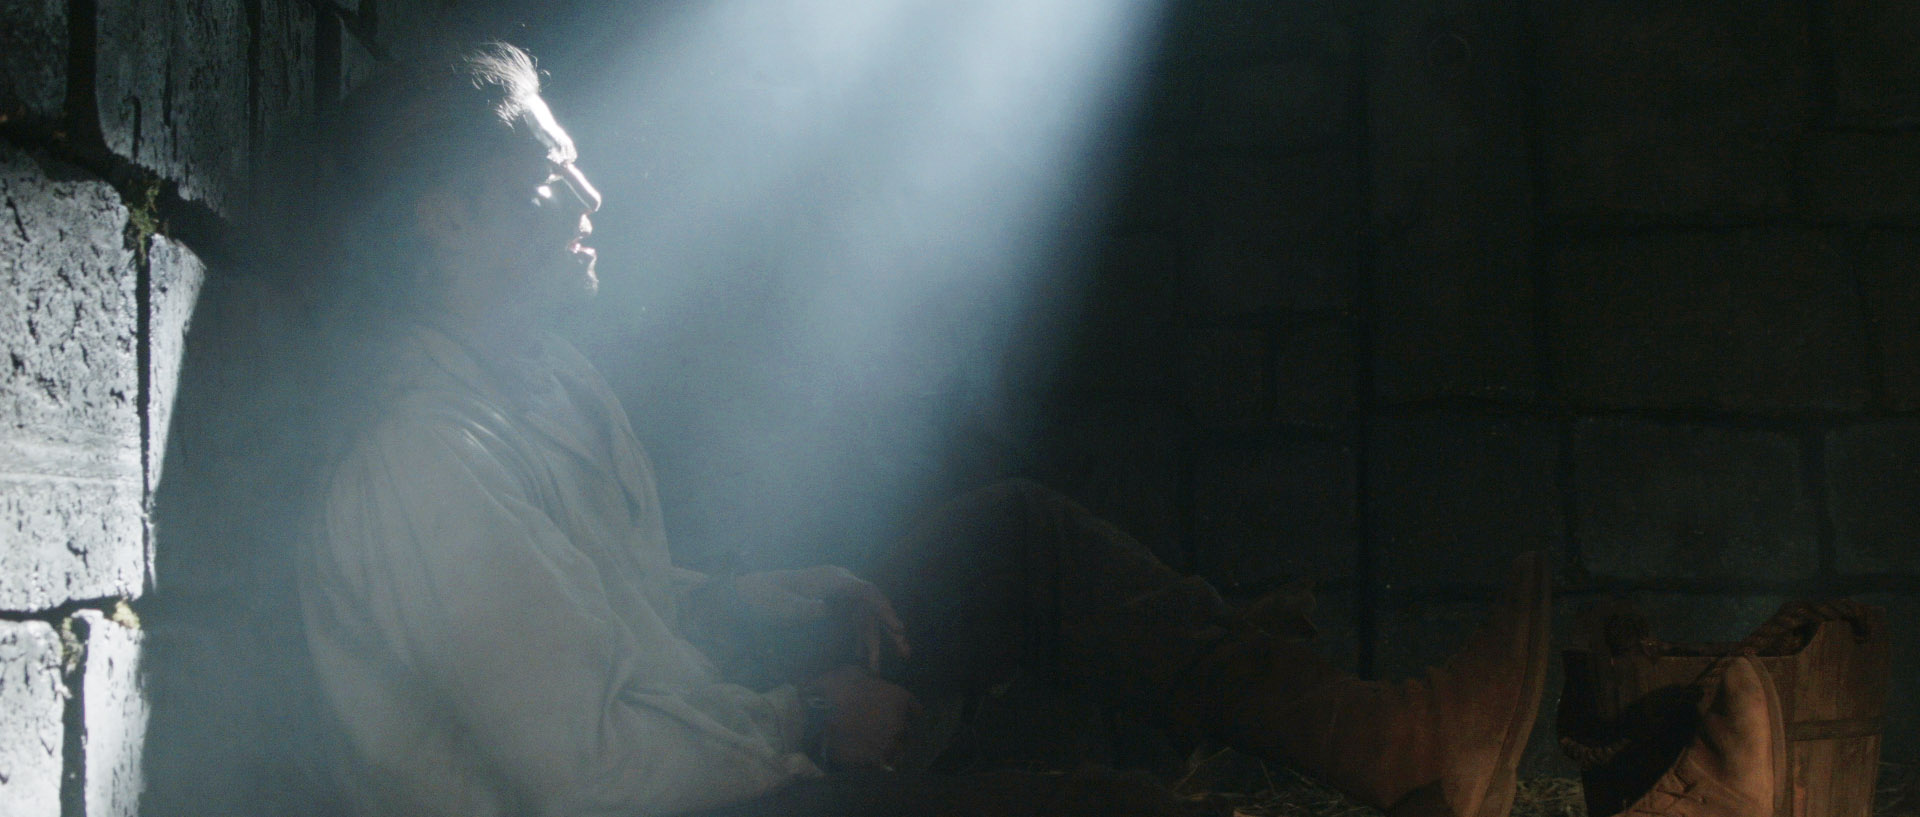
Smoke can help you accomplish this dark-to-light depth. Because it’s white, if you spray it in the background then the background will get lighter, while the foreground will remain crisp and contrasty. It’s like standing on top of a hill and looking at more hills receding into the distance. The more distant ones are lighter, less saturated, less contrasty because of the atmospheric haze.

Smoke helps darkly-clad characters stand out from a dark background in The Deaths of John Smith (dir. Roger Harding)
Smoke machine
The Magnum 550: the most powerful smoke machine in the world. Are you feeling lucky, punk?

There are a number of ways to produce smoke. I own a Magnum 550, a small electric machine designed for DJs but perfectly useable on set. The smoke fluid is electrically heated until it turns to gas. On Ren we have an Artem smoke gun which uses propane gas cans to heat the smoke. This is handy on location because it doesn’t need a power supply, and it can produce thick clouds of smoke much more quickly than the Magnum.

An Artem smoke gun
An Artem smoke gun

You have to wait for both of these types of machine to heat up before you can use them. Ideally you need a dedicated crew member who is predicting when you might be ready to shoot and heating up the machine in readiness. If you’re outdoors, they also need to stay on top of the wind direction. You may think this would stay fairly constant, but trust me, it doesn’t.

Both types of machine produce wreaths of smoke which usually needs wafting in order to look like general atmosphere. And consistency is a challenge. It’s tricky not to have long takes that start with a lot of smoke and end with none. Both types of machine are too noisy to run during a take, though the sound recordist may agree to let you run an electric machine during pauses in dialogue, and an Artem can continue producing smoke for a little while after the gas is turned off.

A hazer
A hazer

If you’re indoors, a hazer may be more appropriate. This is an electric machine that uses compression rather than heat to vapourise the fluid, then blows it out continuously through a fan. The effect is much more subtle and constant than that produced by a smoke machine.

However you’re generating your smoke, remember to keep it in the background as much as possible. It’s all about making your subject stand out from the background.

You can find out more about smoke and why I use it in my Ren podcast at www.rentheseries.com/news/ren-podcasts.

Smoke used to volumise a shaft of light in Ren (copyright 2014 Mythica Entertainment)
Lighting Techniques #5: Smoke

Lighting Techniques #4: Health Bounce

This is a really simple technique but incredibly effective. All you do is put a reflector or a piece of polyboard under the talent’s face. Here’s an example frame from Ren starring Sophie Skelton. This was shot on an overcast day using a 2.5K HMI as backlight.

image

Sophie is very beautiful and the make-up (by Becca Youngs) is great, but the icing on the cake is a simple piece of polyboard out of the bottom of frame. It subtly lifts the shadows on her face and puts a ‘sparkle’ in her eye. That sparkle is actually the poly’s reflection, but it’s amazing how much life and energy that gives. I’m calling this technique the Health Bounce because it’s used a lot in ads for health and beauty products.

Here’s a side-by-side comparison without (left) and with (right) the poly.

image

The human brow has evolved to protect our eyes from sunlight, amongst other things. In an exterior scene, particularly on an overcast day, the light comes predominantly from above, rendering the forehead and the nose the brightest areas, and throwing the eye sockets into shadow. This is a challenge for cinematographers. So much of an actor’s performance is in the eyes – it’s essential to get light into the eye sockets to capture every nuance of that performance. A bounce board underneath the face helps do that.

Colin Smith holds the polyboard for the above shot of Sophie
Lighting Techniques #4: Health Bounce

Ren: Masculine & Feminine Lighting

A few days into my tenure as DP on Kate Madison’s ambitious fantasy series, Ren, we filmed a shot/reverse for one of the opening scenes. The scene introduced us to the eponymous Ren (Sophie Skelton) and her friend Karn (Christopher Dane).

Kate described Ren to me as “pure innonence”, while Karn is an older, more worldly character with a difficult past. It seemed to me like classic femine and masculine lighting were called for. Classic feminine lighting is designed to create a soft, flawless, often shadowless face. Classic masculine lighting enhances jaw definition, embraces lines and skin texture and generally creates a rugged look.

Clearly you have to start by casting actors with the right physical characteristics for these roles, which Kate had certainly done, and make-up plays a huge role. The DP is the third part of the triumvirate determining the look of the cast’s faces.

The shot/reverse in question took place under trees in a valley on a cloudy day, so the natural light was very top-lighty (rendering eye sockets dark), with a bit of green bounce here and there.

IMG_1059.JPG

We shot Ren’s close-up first. We had already established in the wide that she was looking towards the sun, albeit a very cloud-obscured one.

There are two ways to create the shadowless look of classic feminine lighting. One is to use a lot of bounce to fill in the shadows. The other is to put the key light directly above the lens, like a flash, so that the shadows are all hidden from the camera’s point of view. Since we’d established Ren was looking in the direction of the sun, I chose the latter method, rigging a small LED panel right above the lens.

Backlighting the hair is another common component of classic feminine lighting, so I had gaffer Richard Roberts hand-bash a second panel as a three-quarter backlight. We had to keep this very subtle since we had established that direct sunlight could not be coming from behind her.

image

I lit Karn’s close-up very differently. His orientation to the sun justified a strong three-quarter backlight from an LED panel off frame left. This picks out Chris’s stubble and jawline nicely.

I decided that his key would be motivated as sunlight reflecting off the river (off camera right). This could jusifiably be coming in from the side, again adding texture and definition to his face. It was achieved by Richard holding a silver-sided collapsible reflector just out of frame. We initially tried wobbling it to suggest the movement of the water, but ended up shooting a safety take without the wobble in case it proved too distracting.

I know that this degree of manipulation and augmentation of natural light is not to every cinematographer’s taste, but I feel it fits perfectly with the show’s fantasy world. My view is that in this world where magic exists, the light is a little bit magical too. Hopefully it will subconsciously help the audience pick up on Ren and Karn’s essential characteristics in this, their first scene.

Find out more about Ren at facebook.com/rentheseries


Ren: Masculine & Feminine Lighting

Lighting Techniques #3: The Window Wrap

So, you’re shooting a daylight interior. You’ve got an HMI as your “sun” blasting in through the window, giving great backlight when characters are faced away from it, and casting some interesting windowframe shadows when they’re faced towards it. But what if they’re side on to the window?

One side of the actor’s face is hotly lit while the other is in complete shadow. Maybe it’s an edgy or scary scene and you want that look. Fine. But maybe not.

You could just use bounce to generally fill in the rest of the actor’s face. Sure, that will work. But The Window Wrap will look sexier.

Take a Kinoflo and set it up inside the room near enough to the window that the audience can buy it as window light but far enough around that it seems to wrap the harsh HMI light softly around the talent’s face. Crucially, as long as the camera is on the opposite side of the actor’s eyeline to the window, you’re still lighting their downside; the nearest part of their face is still the darkest, but now it’s a smoother transition between the bright light of the downside and the darkness of the upside.

Here’s an example from The Gong Fu Connection with writer/director/actor Ted Duran:

original-shotannotated-shot

Sketch 2014-08-15 19_37_08

This technique was inspired by this lighting workshop video with Eric Kress, DP of The Girl with the Dragon Tattoo (original Swedish version).

Lighting Techniques #3: The Window Wrap

Lighting Techniques #2: Cross-backlighting

A common scenario in filmmaking is that you have two characters standing talking to each other and you need to do a two-shot and an over-the-shoulder of each. A quick way to light this kind of scene is cross-lighting: you set up two lamps so that each lamp serves as one character’s backlight and the other’s keylight.

I practice what I like to call cross-backlighting. What I mean by this is that the lamps are both on the opposite side of the actors’ eyeline to the camera. The result is that the downsides of their faces are lit. (Check out this post on key angles if you’re not sure what I mean by downside.)

This old Soul Searcher lighting featurette covers cross-backlighting around the 5:30 mark.

Here’s a super-recent example of cross-backlighting in action, on the set of The Gong Fu Connection. I’ve complicated things a bit though here. I’ve decided I want the characters’ keylights to be softer and cooler in colour than their backlights.

2-shot

So there’s actually a dedo and an LED panel behind each actor. The camera is set to a white balance of 3,200K. Each dedo provides a strong, white backlight, narrowly focused so as not to spill onto the opposite actor’s face. The LED panels, positioned much closer to the talent, provide a slightly softer light with a dialled-in temperature of 4,500K.

Sketch 2014-08-15 07_29_38

Harry

For the close-ups I repurposed the LED panel that wasn’t being used as a background light, dialling it back to 3,200K to match with the location’s existing tungsten lighting that was already doing a lot of the work.

Carmina

When we got to Carmina’s close-up I decided the LED panel alone was still too harsh, so I bounced it off the silver side of a collapsible reflector. I adjusted the panel to an angle where just a little direct light was hitting the side of Carmina’s face, and this kind of blends with the bounced light to provide a gentle wrapping illumination.

Stay tuned for more lighting techniques.

Lighting Techniques #2: Cross-backlighting

Lighting Techniques #1: Three Point Lighting

This is the first in what I plan to be an ongoing series of quick techniques you can apply to your own cinematography. The first few are going to be from The Gong Fu Connection. If you find this post useful, please consider supporting the film over at www.indiegogo.com/projects/the-gong-fu-connection or even just sharing the link.

Let’s start at the beginning with three point lighting. The idea is that you should light a person using three sources:

  1. The KEY light models the face. What does that mean? Well, a face is a weird, lumpy object with lots of sticky-out bits and inny bits, and as a result it looks very different depending on where the main light is coming from. Light it from the front and it will seem flat – noses seem smaller, wrinkles and spots are reduced. Light it from the side and the nose will cast a huge shadow, as will every pimple. See my blog post on key light angles for more on this.
  2. The FILL light prevents the shadows cast by the key light from being completely black. Ideally the fill should be a soft, directionless light so it doesn’t cast its own shadows. The dimmer the fill light (i.e. the greater the key-to-fill ratio), the moodier your scene will look. Sometimes I like to not use any fill at all.
  3. The BACKLIGHT creates a rim of illumination around your subject, cutting them out from the background. It makes the whole image look slick and sparkly.

That’s all very well in theory, but here’s a practical example. This is a close-up of actress Marién Enid in The Gong Fu Connection.

Marien2

Marién’s keylight is an Arrimax M18 – a super-efficient 1.8KW HMI. It has a Straw gel (Lee no. 103)  to warm it up a bit. Why such a powerful lamp? I was using it as backlight on the wide. For this CU it needs to be much softer, so I intercept it a couple of metres from Marién with some tough-spun diffuser (no. 214). I have a roll of the stuff which I carry around. Frequently I slide it like a giant toilet roll onto a C-stand arm, unroll it to the desired length and peg the other end on another stand.

The Kinoflo Tegralite that provides the backlight

You can see that the keylight hits all of the lefthand side of her face (known as the downside, because it’s the side away from camera) but pretty much just her cheek on the righthand side. For my money, this is the optimal key position because it gives the most shape to the face.

The backlight comes from a Kinoflo Tegralite (a 4ft 4-bank kino with a built-in ballast) shining through the doorway behind her. Again, this is a source that had been previously established on the wide shot. You have to think through your set-ups before you set your lamps for your wide, so that they will work for your other angles without so much cheating that everything looks completely different.

Fill is provided by a silver reflector out the bottom left of frame, bouncing the kino back onto the upside of Marién’s face. The ungelled kino gives a nice bit of colour contrast with the straw-gelled M18.

Look out for more lighting techniques coming soon.

Sketch 2014-08-15 07_07_38

Lighting Techniques #1: Three Point Lighting

Int. Car – Moving

Hama suction mount
Hama suction mount

Inside a moving car – an everyday setting, but amongst the more challenging ones for a film crew. You can tackle it with greenscreen, or with front projection, or with Poor Man’s Process. Or you can do it for real.

On The Gong Fu Connection we did it for real. If you’re going to attempt this you’ll need three things:

  1. A very wide lens, if you want to get both the driver and the front passenger in frame. I used the wide end of a Tokina 11-16mm zoom, kindly lent to us by DIT Rob McKenzie.
  2. An LED panel to ensure the cast are sufficiently illuminated when the vehicle passes through dark areas.
  3. Some kind of suction mount.

I still had a Hama car mount I’d bought back in 2000 to do car chases like this with my Canon XM1.

I can’t believe I used to rely entirely on that mount to hold the camera, with no safety rope. I’d never do that now.

Of course, this mount wouldn’t support the weight of the Blackmagic. It was just to provide an extra anchor point. Most of the camera’s weight was actually rested on the dashboard, as you can see below. Cardboard and gaffer tape were used to secure it firmly, and the V-lock battery was placed in the open glove box underneath.

The Blackmagic, mounted on the dashboard with an old Hama suction mount, some cardboard, some gaffer tape, a wing and prayer

We ruled out mounting the camera on the bonnet partly for safety and partly because windscreen reflections can be a real nightmare. But we did mount the LED panel on the bonnet, or rather in the gap between the back end of the bonnet and the windscreen, nestled on the wipers. Its yoke rested against the windscreen, maintaining the panel at the right angle. Bungee cords and gaffer tape held it firmly and a bin bag protected it from the spitting rain.

Under the black bag is an LED panel to keep some consistency to the light on the actors as the car moves.

Baldur, the character in the front passenger seat, was supposed to have a laptop on his lap. Since it was out of frame, I gave him another LED panel instead to represent the light coming from the screen. With hindsight I wish I’d gelled it cooler, but never mind. I gaffer-taped over the brightness and colour temperature dials on the back of the panel to stop them getting accidentally knocked out of position.

Exposing for these shots is tricky, particularly when you’re driving on country lanes where a dark, tree-lined avenue can suddenly give way to a bright, open field. If you turn up the LED panels too bright, the dark sections look fake, but if you don’t turn them up bright enough then the dark sections look too dark. I made a guess and it turned out to be pretty bang on.

When we shot, only the three actors and the sound recordist were able to be in the car. Before it drove off, I started the camera rolling and Colin popped in with the slate. Then it was all down to the actors. They did a series of takes and came back to show us the results. Everyone was happy, and that was that.

Support The Gong Fu Connection at www.indiegogo.com/projects/the-gong-fu-connection

Int. Car – Moving

Sun Paths

Checking my compass at the stone circle

I’ve spent the last three days in Sussex, scouting locations for a short film called The Gong Fu Connection. Written and directed by Ted Duran, the film follows a young man as he learns Kung Fu, not just the fighting but the whole lifestyle. Themes of sustainability and connection to nature are woven throughout.

The script is predominantly daylight exterior, with many picturesque rural settings including a number of farms. As director of photography, my main concern during the recce was to make the best use of the natural light. That meant checking the orientation of each location to the sun path.

Apps like Helios exist to show you the sun path on your iPhone or iPad wherever you are, but I find that for most locations such precision is unnecessary. A simple compass and a bit of guesswork based on the time of year can tell you what you need to know.

The best direction to shoot is usually towards the sun. This gives everything a lovely halo of backlight, while illuminating it softly from the front with “north light”. If north light isn’t enough, you can choose your reflectors at will – soft or hard, white or silver or gold – to mould the frontlight. For more on this, see my blog entry on moulding natural light. (One exception to this rule of thumb is establishing shots of buildings, which look best in crosslight.)

The shooting schedule is still in flux, so I was able to give the Gong Fu Connection’s production team my recommendations about when scenes should be shot for the best light.

An Artemis screengrab showing various focal lengths and the compass bearing at the lower centre

One app I did use extensively on the recce was Artemis, the virtual director’s viewfinder. Although Ted and I didn’t use it for picking lenses at this stage, it was useful to take screengrabs so I could get a sense of how the location would look with different focal lengths. Artemis also handily displays the compass bearing at the bottom of the screen – something I only noticed after I’d spent the whole three days photographing my pocket compass!

Of course there are plenty of other things to look out for on a location recce – check out my post on Ten Questions to Ask on a Recce. And if you’re scouting locations without your DP, read my earlier post about what you can look out for on their behalf.

Support The Gong Fu Connection and get access to exclusive rewards on Indiegogo.

Sun Paths

Firelight: Revenge of the Cyclotron

Back in early 2012, gaffer Colin Smith and I built a wagon light – or Cyclotron, as it was soon dubbed. Alright, Colin did most… all of the building, despite what this video may appear to show.

The dimmer board controlling the Cyclotron sits on the arm of the sofa next to the tungsten avenger itself.

Somehow, the Cyclotron never got used. The 100W bulbs and clip-on fixtures that comprised it did get used, however. They were scattered throughout the shop in Stop/Eject, hidden behind a bed in Ashes, and used to create a sunset in The One That Got Away. And last weekend, they got turned into something which the moniker “Cyclotron” seems to fit even better.

Shooting Coffin Grabber, directed by Claire Elizabeth Alberie, we needed firelight to play on the face of a character called Phil. I asked Col to rig up a bank of eight 100W bulbs, running two of them into each of the four channels on his dimmer board. During the takes he would oscillate the faders in random patterns to suggest the flicker of flames.

In front of the bulbs I hung a sheet of Urban Sodium gel. Given Phil’s character, I didn’t want the sunny feel of a straw colour or the homely orange of CTO (Colour Temperature Orange). I happened to have some Urban Sodium in my gels bin and I felt that had just the right dirty, gritty and a little bit hell-ish look for Phil.

There are many ways to simulate firelight. Check out this blog by Shane Hurlbut about how he built an elaborate rig using gooseneck microphone mounts for The Greatest Game Ever Played. And look out for a forthcoming post from me on simulating candlelight when The First Musketeer is released.

Phil (Ross O'Hennessy) basks in the warm glow of the Cyclotron.
Phil (Ross O’Hennessy) basks in the warm glow of the Cyclotron.
Firelight: Revenge of the Cyclotron

How to Soften Harsh Sunlight with Tinfoil and a Bedsheet

On a pick-up shoot a couple of months back I found myself in the position of needing to mould the natural light without any equipment whatsoever. The sun was shining brightly with no clouds in sight, and we needed to shoot a close-up that would match an existing overcast wide shot. Fortunately there was a B&M just around the corner. Unfortunately no-one took any pictures of the ridiculous set-up that ensued, hence the comedy illustration.

Here’s how to do it:

  1. Get yourself round to B&M. (Other depressing discount stores are available.)
  2. Purchase a white bedsheet (£3.99) and a roll of foil (79p).
  3. The sheet is going to be your “silk”. First of all, cut the elastic corners to make it easier to wrangle.
  4. Assign Unfortunate Crewmember #1 to hold up the sheet so that it casts a shadow on the talent. It will soften the direct sunlight falling on the them, but there will probably still be darker shadows on their face than you want, so…
  5. Unroll a couple of feet of the foil. This is going to be your bounce card.
  6. Assign Unfortunate Crewmember #2 to stand on the shade side of the talent and use the foil to reflect some direct sunlight into that side their face.
  7. Hope that this is not the day the photographer from the local paper visits the set.

Even if you’re not matching to overcast shots, this softening of harsh sunlight is usually desirable to some degree when shooting CUs. Click here for more on moulding natural light.

How to Soften Harsh Sunlight with Tinfoil and a Bedsheet