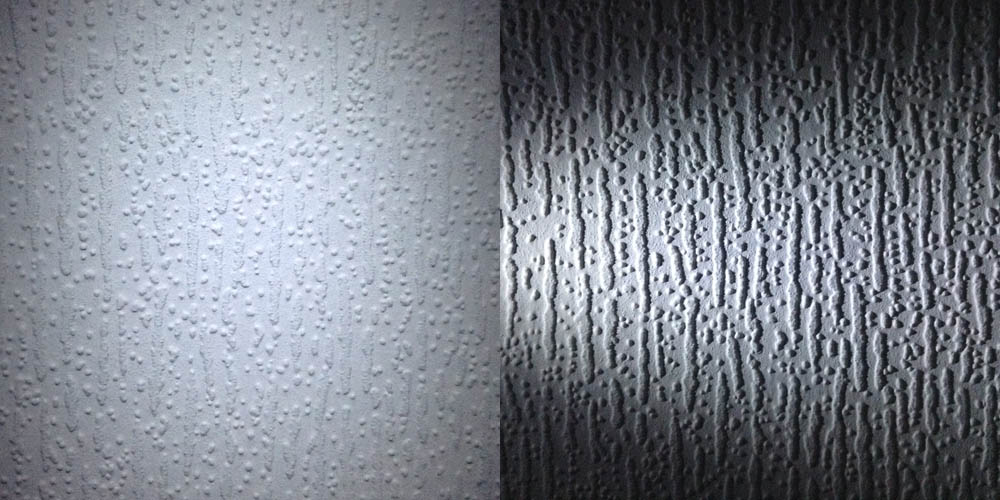
Cross-light is illumination which comes in from the side, raking across a surface. At this angle, every last bump and imperfection in a surface will cast a big shadow. Terrible for beauty lighting, but brilliant for emphasising textures.
The same wallpaper lit by front-light (left) and cross-light (right).
And emphasising textures is a key part of photographing period pieces, as I learnt on The First Musketeer. In this post I’ll highlight a few examples of this technique throughout the show. (The whole series is on YouTube now so you can enjoy all six action-packed episodes at your leisure.)
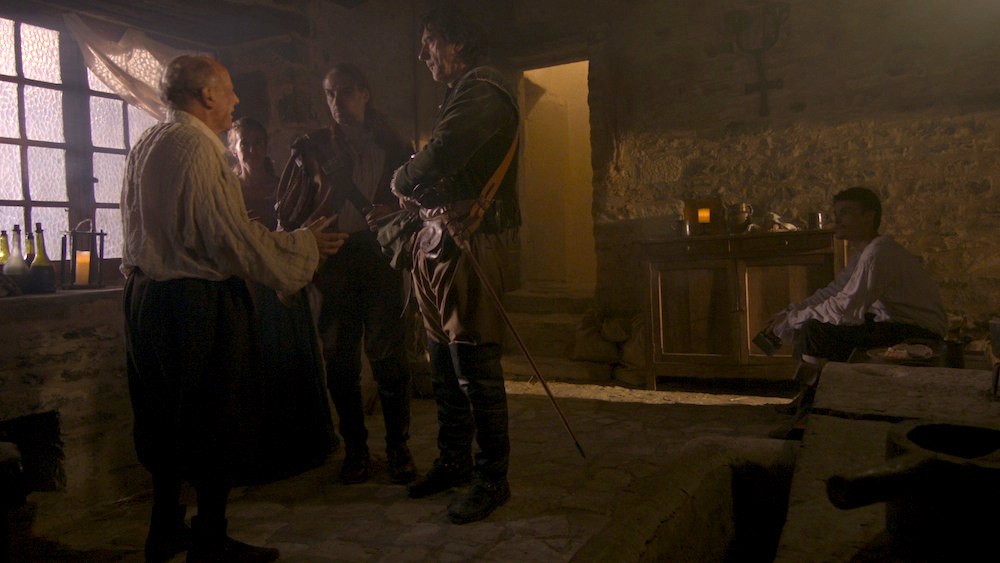
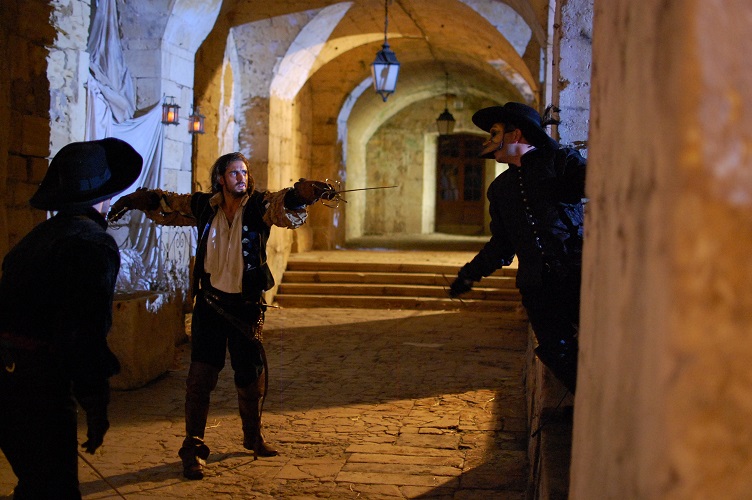
At 2:27 in episode 1, Lazare and Ghislain enter an inn. Most of the scene is lit very simply with two cross-lights. One is an open-face 800W tungsten lamp coming in through a doorway off camera right; this bring outs all the texture in the back wall. The other is a 2.5K HMI coming in through the beautiful purple-tinted window on camera left; this also brings out texture – in the men’s faces! Cross-lighting is well suited to these characters, who (I hope they won’t mind me saying) are grizzled old soldiers.
A 2.5 HMI comes in through the window at left, while an 800W open-face tungsten rakes in through a doorway just off frame right. A second 800 lights the hall in the background.
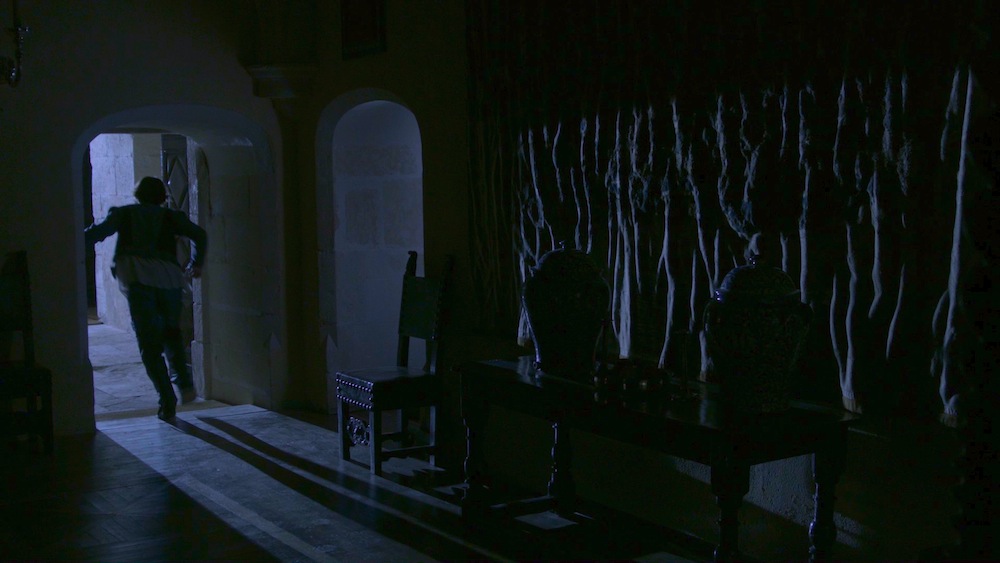
(At 8:20 in episode 1 you can see what can happen when you don’t cross-light. Part of the reason that the location here looks like a flat, painted set is that the lighting is all frontal.)
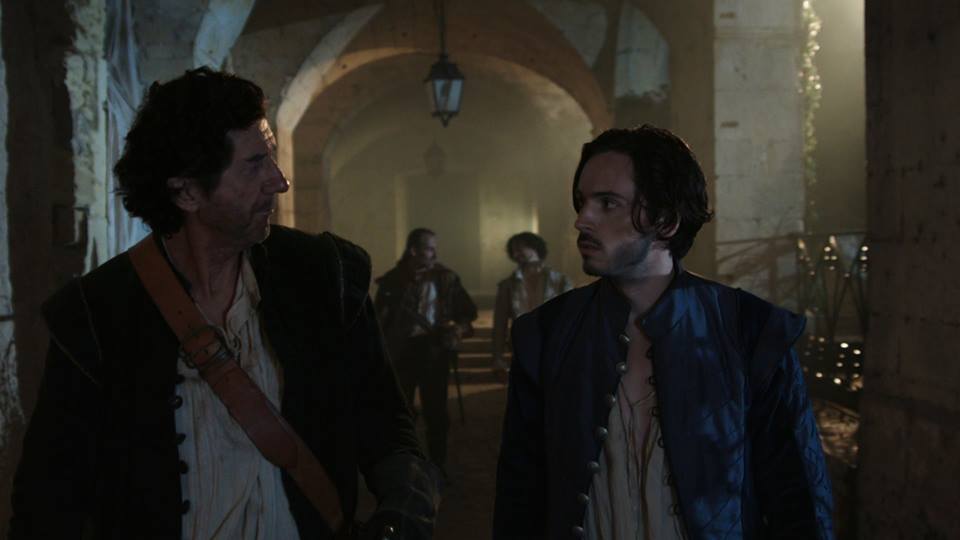
The first scene of episode 3, at 0:33, is one of my favourites for lighting. The angle on Ghislain and Porthos practicing is lit by just two Kinoflo Barflies hung from the ceiling at the back of shot. These backlight the characters while also cross-lighting (vertically rather than horizontally) the stonework nicely.
A 1.2K HMI outside the door cross-lights the stonework, while smoke volumizes this light, resulting in a very satisfying depth and texture. The only other light sources are two kinoflo Barflies hanging from polecats above the bench at the back of shot. This backlight is reflected back at the foreground characters by a sheet of silver foamcore beneath the camera.
In the reverse (above) a 1.2K HMI outside the door rakes across the wall. A little smoke adds additional texture, while the Barflies (now above Athos and Lazare) provide backlight again.
There’s a shot at 5:12 in episode 5 where, again, a 1.2K HMI outside the door rakes across a wall, showing up the folds in an old tapestry.
This scene is lit purely by a 1.2K HMI out in the corridor.
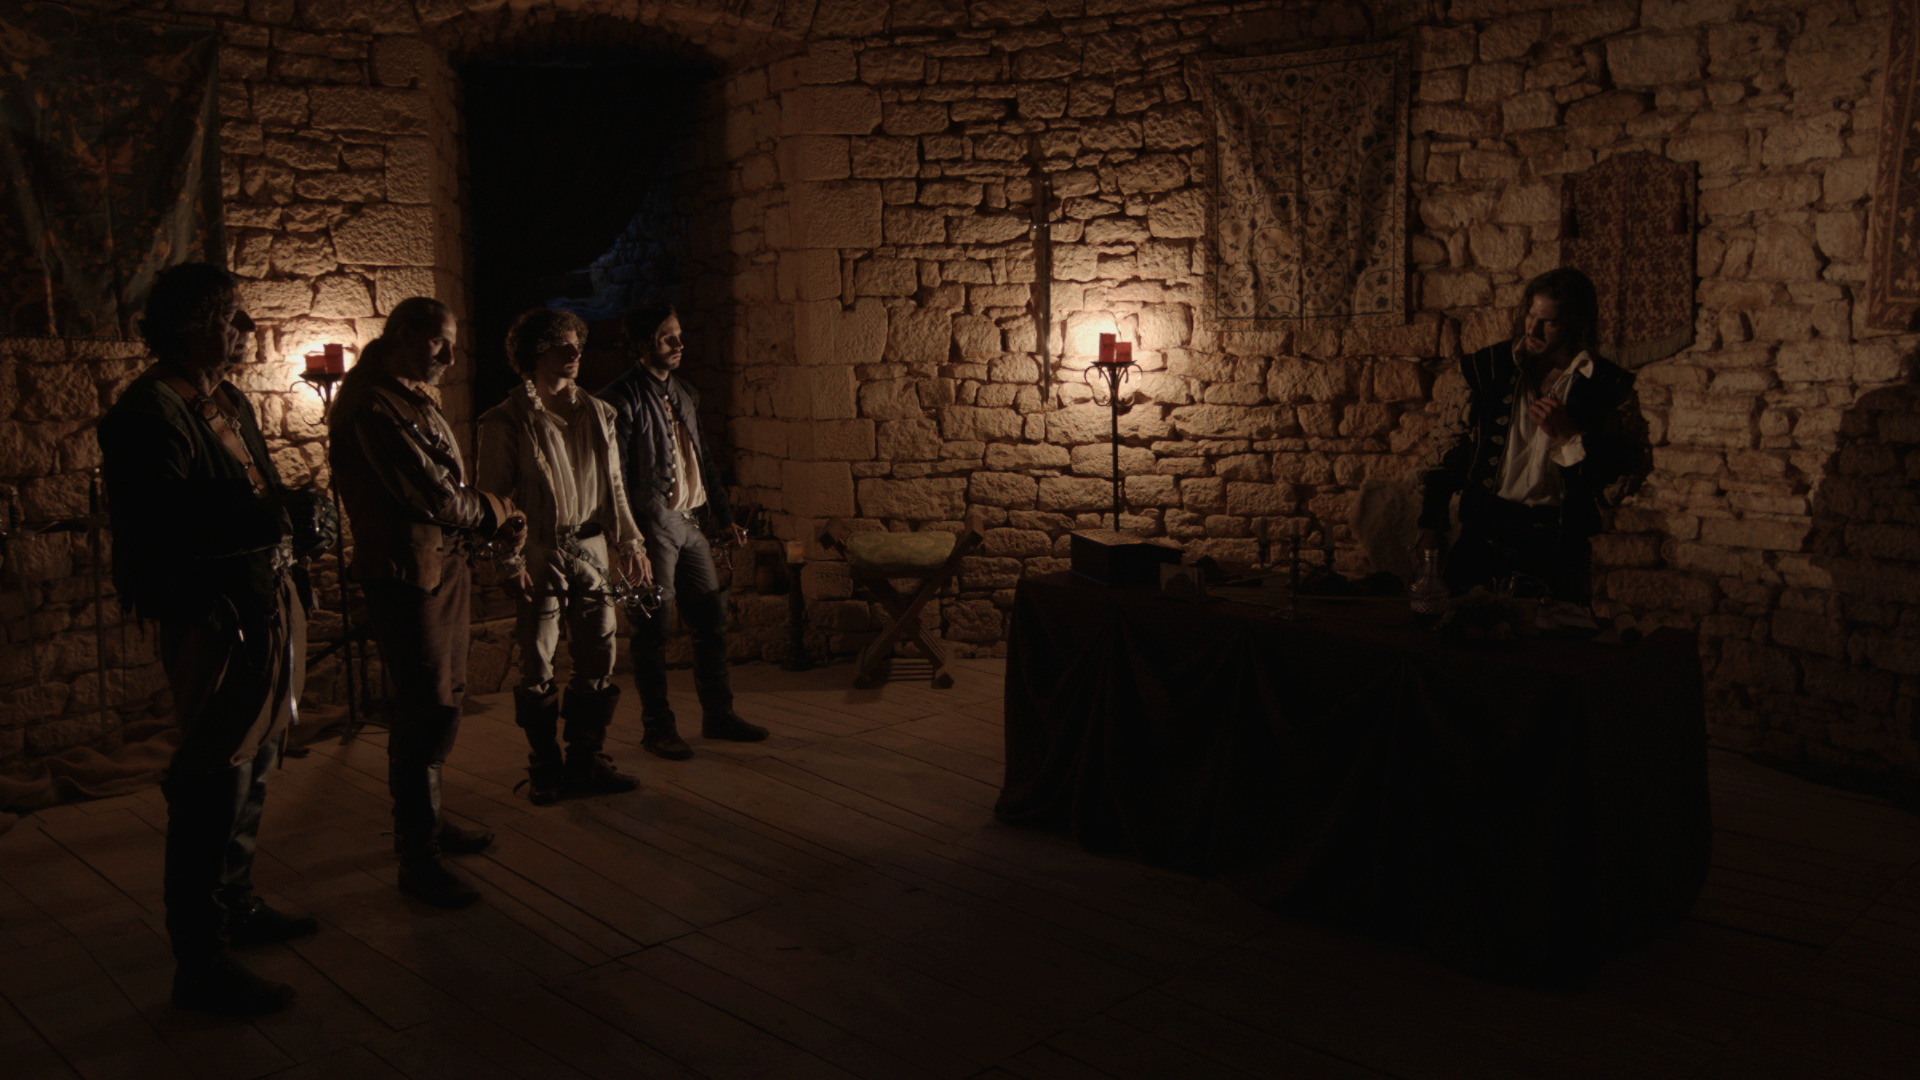
Finally, in the secret room, seen in episodes 4 and 6 (at 6:41), 100W bulbs hidden behind the candles cross-light the surrounding stonework.
The two candle stands in the background have 100W bulbs hidden behind them. 40W bulbs would have been more suitable, but unfortunately we didn’t have any. The light supposedly cast by these candles actually comes from two dedos. The first is at ceiling height off frame left, aimed at the Duke de Luyne (Toby Lorde) on frame right. The second is hidden behind the duke’s desk and lights the heroes on frame left
The First Musketeer (C) 2014 First Musketeer Ltd. Written, directed & produced by Harriet Sams.
Creator Harriet Sams and some of The First Musketeer cast presented a panel at ExiliCon, a gaming and genre convention, last weekend, and their discussion of the Fumel scenes brought back some memories of lighting it which I’d like to share. The Chateau de Fumel stood in for the musketeers’ barracks, appearing most prominently at the end of episode three from 8:32 onwards. (Click here for a playlist of the whole season.)
The walkway by day
Set at night, like most of the show, the scene involved two major steadicam shots tracking up and down a covered walkway. This walkway was essentially a corridor which, save for pillars, was open along one side.
One of the steadicam shots was a walk-and-talk dialogue scene, the other an epic single shot fight scene. Tracking shots in corridors are always a pain to light because there’s never anywhere to put backlight without it coming into frame. Ideally you use practicals in the ceiling, but despite scratching our heads over it for a while, gaffer (and Steadicam op) Richard “Squish” Roberts and I couldn’t figure out any way to rig lights to the ceiling without damaging the historical building or getting some part of the rigging in shot.
In fact, the only possible place to hide lights – except behind camera, which would have made for a flat, boring image – was in the garden outside the walkway. So all the light would be side-light, broken up the pillars and the bushes between those pillars.
Here’s the lighting scheme I arrived at:
I decided to fire in “moonlight” from our 2.5K HMI, positioned on the far side of the garden. Shooting at a white balance of 3,200K, this would appear blue on camera. (We were shooting on Squish’s Blackmagic Cinema Camera, using a Tokina 11-16mm f2.8 zoom or a Sigma 20mm f1.8 for wide shots.)
The 2.5K HMI on the far side of the garden
Then I had Squish set up two or three 800W open-face tungsten lamps as 3/4 backlights, spaced evenly along the run. We gelled these with CTO so that they’d appear orange on camera, suggesting firelight sources of some kind. (The First Musketeer is full of implied firelight sources, because we were never able to have naked flames in the locations!)
The 800W tungsten lamps hidden behind the pillars
The final touch was to light the far end of the corridor, to give the shot some deep background. We tucked a 2′ 4-bank Kinoflo (with tungsten tubes) into a little alcove and shone it at the back wall. To provide a third layer of colour to the image, while still staying within the palette of firelight, I gelled this with Straw. When the smoke catches the light, it gives a nice bright patch in the background which is great for the depth of the image.
The walkway, lit for shooting. Photo: Jessica OzloA frame grab from the walk-and-talk sceneToby Lord (the Duke de Luynes) on the steps, backlit by a half-CTB-gelled 800 and keyed by the 2.5K HMI, way off left. A Kino off right provides fill. Photo: Jessica Ozlo
Later in the scene we moved out to the far side of the garden, shooting back towards the building as the Duke de Luynes thanks Athos and friends for their help.
The 2.5K stayed in the the same place, 3/4 backlighting the heroes, side-lighting the duke and 3/4 front-lighting the building. The 800s were moved inside the walkway and hidden behind pillars.
Another source was required to rake the heroes’ profiles and backlight the duke. This was another 800, gelled with half CTB for a vaguely starlight look, placed at the top of the steps. When I have stairs in a shot I always like to put a lamp at the top and fire it down so that it catches the top of every step, as it does here.
We were all set up and ready to turn over on this wide shot, when suddenly the building’s automatic floodlights came on. We hunted high and low, but couldn’t find the switch to turn them off. Instead, I placed a piece of CTO over each of the floodlights and assigned members of the crew to hold their hands over the lights, wiggling their fingers. The result is that the front of the building appears to be uplit by brazieres. It works beautifully and adds another layer of depth which we couldn’t have created otherwise, because all our film lamps were already in use.
You should always be ready to improvise like this when shoots throw you a curve ball.
This illustrates the directions the various lamps were coming in from. Click the image to enlarge.
Strap on your scabbard and saddle your horse – The First Musketeer has arrived! After 21 months in postproduction, the action-adventure web series shot in the south of France is finally out on YouTube. I served as director of photography on the show, written and directed by Harriet Sams. Watch all six episodes now!
I’ve written several blog posts about lighting and shooting the show, and there are more to come. Here are the best of the ones currently available:
Know Your Lights – a video blog in which I show you the lamps in our lighting package and explain the advantages of each.
In September 2013 I was lucky enough to serve as the director of photography on The First Musketeer, an action-adventure web series based on the famous novels of Alexandre Dumas. Telling the story of how Athos, Porthos and Aramis first meet and become the heroes we know and love, the show was shot in castles and chateaus in the Lot and Dordogne regions of southern France.
A web series, more than any other medium, lives and dies by its viewing figures. You can help the show succeed and go forward into future seasons by sharing that link or better still by joining our Thunderclap campaign. Thunderclap is a service which automatically posts a one-off message to your Facebook, Twitter and/or Tumblr accounts at a prearranged time, so at 8pm on June 1st a huge number of people will all hear about The First Musketeer simultaneously. Follow this link to join the Thunderclap.
The other exciting news is that both The First Musketeer and Ren will be part of the New British Web Series panel at London ComicCon tomorrow, Friday May 22nd. I’ll be joining actress Jessica Preddy on the panel to represent The First Musketeer. I hope to see some of you there!
The First Musketeer – the period web series I DPed in France last September – is edging closer to completion. One of the biggest challenges of the shoot for me was simulating candlelight. Almost every scene had candles in it (albeit fake, yet very convincing, LED ones) and it was always a struggle to make them appear to be shedding authentic light.
The main tavern set was dotted with large barrels topped with candles, so it was quick and easy to gaffer-tape pendant fittings with 100W bulbs onto the backs of these barrels. (A piece of blackwrap was interposed to stop the bulbs singeing the barrels.) The advantage of a bare bulb over a fresnel or par fixture is that it sheds light in all directions, just like a candle. So when three people were stood around a barrel, as long as the two at the sides were cheated slightly back out of the barrel’s shadow, it lit them all up fairly convincingly.
A single 100W bulb hidden behind the barrel lights the three Huguenots in the background. A blue-gelled HMI provides backlight, while two dedos off the sides of frame cross-light the foreground characters.Dedo, de-e-edo. Dedo come and me want to go home.
This method doesn’t always work though, and it relies on the candle being sat on something a bulb can be hidden behind.
A dedo creates the pool of light around the background candle here.
Dedolights are great for creating circles of light to surround candles, and their built-in dimmers make it easy to flicker the light for added realism. But this method has serious drawbacks. Firstly, it lights the candle itself as well as the surroundings, often rendering the flame (or LEDs) almost invisible. Secondly, anyone passing between the dedo and the candle will pass through the beam of light, destroying the illusion. In an ideal world you would rig the dedo to the ceiling and set up a little thin flag to prevent the light hitting the candle itself, but in practice this would usually be difficult and time-consuming to set up.
More recently I’ve tackled the candelight problem again on Ren. The difference was that we were able to use real candles, often double-wicked for enhanced light output. Real candles take care of their own immediate pool of light, so then you only have to worry about beefing up the amount of lighting hitting the talent and the surrounding set.
Again, bare bulbs can be useful for this, but dedos are often best. It’s possible to cheat the dedo positions quite heavily and still get away with it, because they produce such a narrow, controllable beam of light.
The two candle stands in the background have 100W bulbs hidden behind them. 40W bulbs would have been more suitable, but unfortunately we didn’t have any. The light supposedly cast by these candles actually comes from two dedos. The first is at ceiling height off frame left, aimed at the Duke de Luyne (Toby Lord) on frame right. The second is hidden behind the duke’s desk and lights the heroes on frame left.
What methods have you used to simulate candlelight? Comment on Facebook or tweet me – I’m intrigued to hear.
All images copyright 2014 The First Musketeer. Find out more about the series at www.firstmusketeer.com
A clip from The First Musketeer has been released. Taken from episode three, it shows the first meeting between Athos and the mysterious Marion.
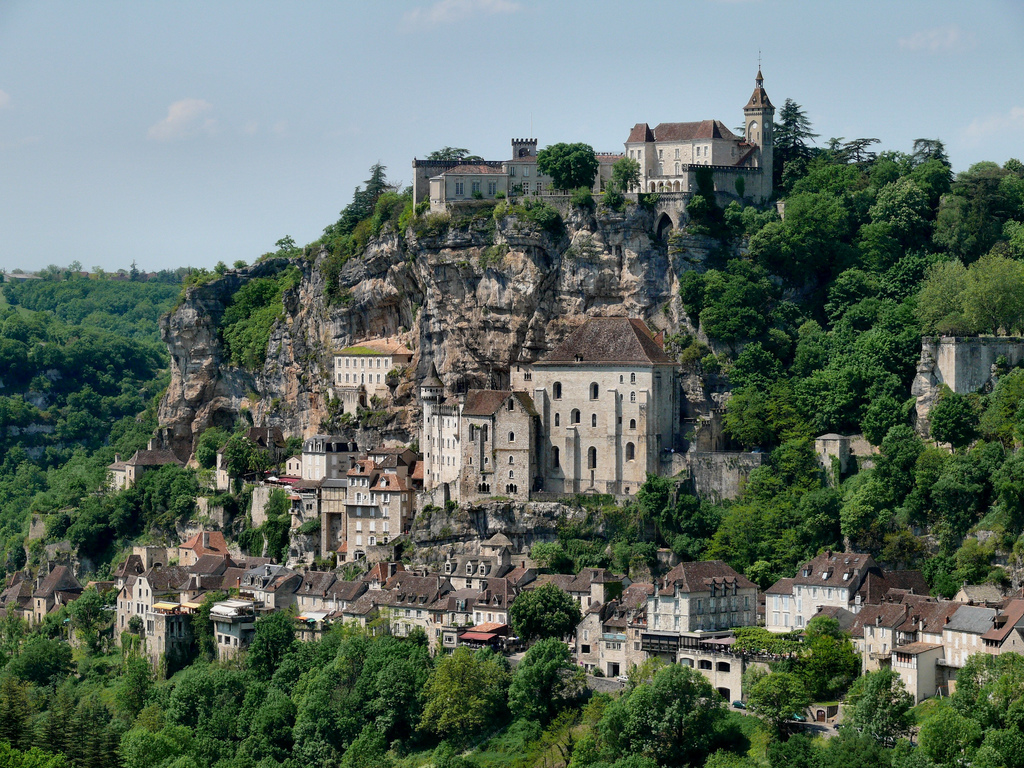
Rocamadour. Crazy, huh?
This was shot at Rocamadour, a medieval town carved into the side of a gorge. (Read director Harriet Sams’ blog for more on the locations of The First Musketeer.) And I think this may have been the night when gaffer Richard Roberts quite literally got a shock as the 1.2K HMI ballast packed up. His arm was numb for 20 minutes. Fortunately this happened after he had executed some nice steadicam work for the early part of this scene.
Come to think of it, it was probably also the night he knackered “the donkey”. Take a moment to come up with your own jokes. Done? Okay, so the donkey was his van. Yeah, not so funny, but at least I let you dream for a bit. Anyway, you can imagine how steep the road was to get down to this place. Now imagine it’s also incredibly narrow. And that the van is quite small but loaded full of generators and other heavy kit. Like I say, Richard knackered his donkey.
Richard avec le steadicam. Photo: Jessica Ozlo
My recollection is that this was our first big night exterior, and I remember being shocked at how long it took just to cable everything. Often we were throwing cables over balconies to someone else below – to avoid running the cable through shot. When it was unavoidable, the wonderful art department – Amy Nicholson and her assistant Denise Barry – would come in and hide the cables with straw. It really felt like 30% of the set-up time was planting the lights, and the other 70% was running the cables, hiding the cables, siting the generators, checking we weren’t overloading either of them, discovering we were even though the generators were rated a full kilowatt above what we were drawing, deciding to run some stuff off the mains, blowing a fuse because the electrics are old, failing to find the fusebox, etc, etc.
When lighting night exteriors, I tend to start from the back and work my way forwards. Backlight lets you see everything without really seeing it, and then you can add in pools of light from the sides when you need to see more. So for the wide shot at the start of the scene, the first lamp to go up was a 1.2K HMI (before it died), right at the back. There was some debate about whether we could site it there, because it was on some steps which were used occasionally during the night by the resident monks. Yep, monks. In the end we said “screw it” and put it there, leaving as much room as possible for the monks to get past it. Once smoke was pumped in, that HMI gave us the nice blue ambience in the background.
Nicole O’Neill as Marion De Lorme. Photo: Jessica Ozlo
Opposite the door of the tavern were a couple of Dedos creating pools of light around the candles – more on that in a future post. In the foreground I placed a Kinoflo on the floor to the left of frame, dimmed right down and diffused, just so characters wouldn’t be complete silhouettes going under the arch.
The conversation between Athos and Marion is backlit by a Dedo boomed over their heads, behind them (from the camera’s point of view). It wraps around Marion’s face enough to make out her profile, which is about all you want in a mysterious scene like this. There’s some bounce on Athos which I think was just coming off the surrounding stone. The only other lamp was a 2.5K HMI, lighting the background. For Marion’s close-up, I aimed the Dedo at Athos and let the bounce off his shirt and jacket light her face.
If you want me to rationalise it now, I’d have to say that this Dedo represents a particularly bright moon, and the HMI represents starlight. Frankly this was one of those cases where making it look good seemed more important than making it look realistic.
The trailer for The First Musketeer has been released at last. I was the cinematographer on this action adventure web series, which is a prequel to the novels by Alexandre Dumas. Enjoy….
White “daylight” (a 2.5K HMI outside the window and a Kinolfo Barfly behind the actor) and warm “candlelight” (a Dedolight off camera right)
The First Musketeer was my first period production as DP. It’s a genre that brings its own set of challenges and opportunities, most obviously for sets and costumes, and also sound (we spent a lot of time waiting for cars and planes to pass by), but for cinematography too. The first thing that hit me was the restrictiveness of it. Back in the day there were only three sources of light: the sun, the moon and fire. And maybe, at a pinch, starlight.
Paul McMaster as Ghislain. Blue “moonlight” and orange “firelight” – in this case both created by gelled Dedolights
I kept colour temperatures simple by deciding that daylight would always appear white, moonlight would be +2,400K (blue) and firelight would be -2,400K (orange). In practice this meant that daylight scenes were white-balanced at 5,600K using natural light, HMIs and kinoflos, with ungelled redheads or dedos for candlelight, while night scenes were typically white-balanced at 3,200K which turned HMIs and kinos blue for moonlight/starlight, with redheads or dedos gelled with full CTO to turn them orange on camera.
This night exterior shot of Lazare (Tony Sams) and Athos (Edward Mitchell) was shot with a white balance of 3,200K, turning the HMI backlight blue, while the warm light around the tavern entrance was provided by CTO-gelled dedos and redheads.
Occasionally I used straw gels to give “firelight” more of a yellow hue than an orange one, and in one scene involving a church I introduced strongly yellow light and some pink backlight, the theory being that stained glass windows could be held accountable.
A 2.5K provides the frontal keylight here, while a redhead sporting Minus Green gel provides the pink backlight. A second redhead double-gelled with Light Straw uplights the figure of Christ on the back wall, and finally a 1.2K HMI at the rear of the building illuminates the stained glass window.
I think it’s very important to soften the images when shooting a period piece digitally. Initially we hoped to do this by using Cooke lenses, but they proved unobtainable on our budget. It was too late to look into filters by this point, so instead I relied on smoke in most scenes to diffuse and age the image.
Like everyone, I continue to learn with every project that I do. Reviewing the rushes towards the end of the shoot, I realised (a little too late) that texture was the key to making the period convincing. There was bags of it in front of me – in the stone walls of the locations, in the beautifully-aged costumes, in the detailed set dressing. It was an era before smooth surfaces. I can now see that my cinematography was most successful when the lighting brought the textures out.
A 1.2K HMI outside the door cross-lights the stonework, while smoke volumizes this light, resulting in a very satisfying depth and texture. The only other light sources are two Kinoflo Barflies hanging from polecats above the bench at the back of shot. This backlight is reflected back at the foreground characters by a sheet of silver foamcore beneath the camera.
Contrast the shot above with the one below. This location had equally nice stonework, but because I didn’t cross-light it it looks flat and artificial, like a cheap panto set.
A 2.5K HMI supplies the backlight here, while a blue-gelled redhead out of the top right of frame is aimed down the steps to pick out the characters as they descend. An orange-gelled Dedo creates a pool of light around the candle, and everything else is natural bounce off the surrounding walls. A second blue-gelled redhead at the foot of the stairs firing across the stonework would have made all the difference to the believability of the environment, but hindsight is 20/20.
So that’s an important lesson I’ve learnt to take forward to the next season. Next time around I also want to play more with different colours of daylight, using more straw, amber and pink gels to stretch out the colour palette and suggest different times of day.
And then there’s the whole candlelight thing – but I’ll save that for my next post.
All images copyright 2013 The First Musketeer. Find out more about the series at www.firstmusketeer.com
Throughout September I got a crash-course introduction to the Blackmagic Cinema Camera as I used it to shoot Harriet Sams’ period action adventure web series The First Musketeer. The camera was kindly lent to us by our gaffer, Richard Roberts. Part-way through the shoot I recorded my initial thoughts on the camera in this video blog:
Here’s a summary of the key differences between the Blackmagic and a Canon DSLR.
Canon DSLR
Blackmagic Cinema Camera
Rolling shutter (causes picture distortion during fast movement)
Rolling shutter (though not as bad as DSLRs)
Pixels thrown away to achieve downscaling to 1080P video resolution, results in distracting moiré patterns on fabrics, bricks walls and other grid-like patterns
Pixels smoothly downscaled from 2.5K to 1080P to eliminate moiré. Raw 2.5K recording also available
On-board screen shuts off when external monitor is connected
On-board screen remains on when external monitor is connected
Some models have flip-out screens which can be adjusted to any viewing angle and easily converted into viewfinders with a cheap loupe attachment
On-board screen is fixed and highly reflective so hard to see in all but the darkest of environments
Maximum frame rate: 60fps at 720P
Maximum frame rate: 30fps at 1080P
50mm lens is equivalent to 50mm (5D) or 72mm (other models) full-frame lens
50mm lens is equivalent to 115mm full-frame lens
10-11 stops of dynamic range
13 stops of dynamic range
Recording format: highly compressed H.264, although Magic Lantern now allows for limited raw recording
Recording format: uncompressed raw, ProRes or DNXHD
Battery life: about 2 hours from the 600D’s bundled battery in movie mode
Battery life: about 1 hour from the non-removable internal battery
Weight: 570g (600D)
Weight: 1,700g
Audio: stereo minijack input, no headphone socket
Audio: dual quarter-inch jacks for input, headphone socket
Having now come to the end of the project, I stand by the key message of my video blog above: if you already own a DSLR, it’s not worth upgrading to a Blackmagic. You’d just be swapping one set of problems (rolling shutter, external monitoring difficulties, aliasing) for another (hard-to-see on-board screen, weight, large depth of field).
The BMCC rigged with a lock-it box for timecode sync with the audio recorder, on a Cinecity Pro-Aim shoulder mount
The depth of field was really the killer for me. Having shot on the 600D for three years I’m used to its lovely shallow depth of field. With the Blackmagic’s smaller 16mm sensor it was much harder to throw backgrounds of focus, particularly on wide shots. At times I felt like some of the material I was shooting looked a bit “TV” as a result.
The small sensor also creates new demands on your set of lenses; they all become more telephoto than they used to be. A 50mm lens used on a crop-chip DSLR like the 600D is equivalent to about an 72mm lens on a full-frame camera like the 5D Mark III or a traditional 35mm SLR. That same 50mm lens used on the Blackmagic is equivalent to 115mm! It was lucky that data wrangler Rob McKenzie was able to lend us his Tokina 11-16mm f2.8 otherwise we would not have been able to get useful wide shots in some of the more cramped locations.
As for the Blackmagic’s ability to shoot raw, it sounds great, but will you use it? I suggest the images you get in ProRes mode are good enough for anything bar a theatrical release, and are of a far more manageable data size. You still get the high dynamic range in ProRes mode (although it’s optional), and that takes a little getting used to for everyone. More than once the director asked me to make stuff moodier, more shadowy; the answer was it is shadowy, you just won’t be able to see it like that until it’s graded.
The colour saturation is also very low, again to give maximum flexibility in the grade, but it makes it very hard for the crew huddled around the monitor to get a sense of what the finished thing is going to look like. As a cinematographer I pride myself on delivering images that looked graded before they actually are, but I couldn’t do that with the Blackmagic. But maybe that’s just a different workflow I’d need to adapt to.
The biggest plus to the BMCC is the lovely organic images it produces, as a result of both the down-sampling from 2.5K and the high dynamic range. This was well suited to The First Musketeer’s period setting. However, I think next season I’ll be pushing for a Canon C300 to get back the depth of field.
I’ll leave you with a few frame grabs from The First Musketeer.
Note: I have amended this post as I originally stated, incorrectly, that the BMCC has a global shutter. The new 4K Blackmagic Production Camera does have a global shutter though.
The calm before the storm of the last day of shooting
Eleven years ago, on returning home from a three week feature film shoot in New York, I wrote this on my blog: “Whenever you do a big shoot, you spend several weeks working intensively with a bunch of people who you end up utterly adoring, then the shoot ends and you NEVER see them again. Which is horrible, totally horrible.”
This week I’m going through the same depressing experience again, having returned home from the month-long French shoot for season one of The First Musketeer, a project which has knocked the New York feature off the top spot and now ranks as The Best Shoot I’ve Ever Been On.
It was a tough, tough shoot, make no mistake: lots of night shooting (for which I’m entirely to blame), long hours, rain, insufficient food, fatigue and – given the ambitious nature of the show – a miniscule budget and a tiny crew. Only one day off was scheduled, although two others emerged out of last-minute necessity.
But how often do you get to shoot in castles? At night? With sword-fighting actors in stunning period costumes? How often do you get to work with horses, or film in a medieval city carved into the cliff-face of a huge gorge? It was an awesome experience.
Art assistant Denise Barry’s photo of the cast and crew shortly after arriving in France
What really made it though was the people. I’ve never met such a lovely bunch or bonded so strongly with a group. We went into a bubble, seeing no-one else but our fellow cast and crew, day in day out, staying in the same chalets as them, enduring the same hardships, developing private jokes (Gerard Depardieu), rocking out to the same eighties tunes on RFM as we drove the long, windy roads to location, cooking for each other, drinking with each other, helping each other through the cold nights on set with chocolate, sweets, coffee and hugs. Departmental barriers quickly broke down, with the sound recordist driving the lighting-camera van, he and his boom op helping us every day with our lighting set-ups and our tear-downs, and all the tech crew pitching in to help the art department reinstate locations after wrapping.
I hope this time that I will see everyone again, not just for a wrap party but for further seasons of the show as well. I doubt we will ever recreate the magic of this year’s experience, but we’ll always have Gerard Depardieu.


 and Athos (Edward Mitchell) was shot with a white balance of 3,200K, turning the HMI backlight blue, while the warm light around the taven entrance was provided by CTO-gelled Dedos and redheads.")


