Taking Decisions Lightly: Part 2

Lighting concept #1 for the basement

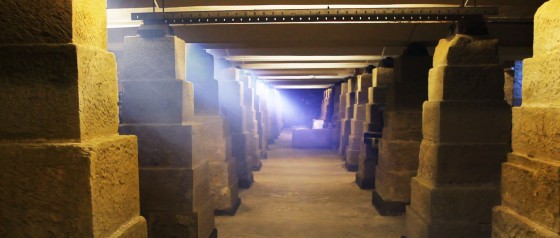
Following on from my last post, here’s what I was going for when I created the above lighting previz image for the basement scene in Stop/Eject.

As DoP Eve Hazelton lucidly explains in this video blog, one of the keys to great cinematography is creating depth, even (and especially) when you’re shooting in 2D. The basement location already has great depth with all those pillars tapering into the distance, but how can that be maximised on camera?

  • I’ve added smoke. Smoke creates depth because there will be more of it between the camera and a distant subject than between the camera and a close subject.
  • The light illuminating the smoke gets bluer as it gets further from camera. (This will be achieved by layering increasing numbers of blue gels on the lights.) This simulates the effect you can see when you look at the view from the top of a hill, whereby other hills in the distance seem bluer due to atmospheric haze.
  • I’ve thrown alternating pillars into shadow. This makes each “layer” of pillars contrast with the ones behind and in front of it, highlighting the depth. (We can achieve this on the day by simply turning off or removing the tubes in every other fluorescent light.)
Colour wheel
Colour wheel

As the characters walk through this shot towards us, they will go in and out of smoke and shadow, and become clearer through the smoke. That gives us dynamics, which are also important in good cinematography.

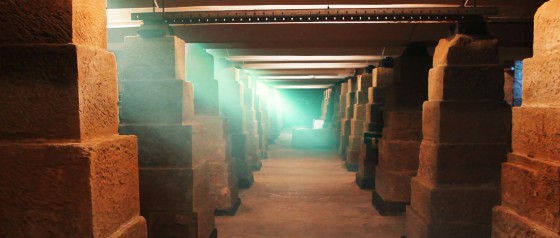
Now let’s look at the issue of colour contrast, something which I must admit I’ve only got to grips with quite recently. To cut a long story short, images look more interesting if they contain contrasting colours. Typically this means choosing two colours on opposite sides of the colour wheel, like blue and yellow as in the above previz. Or I could have gone with orange/red and green…
Lighting concept #2
Lighting concept #2

… though green daylight is hard to justify! It does fit nicely with the colour palette we’ve already established for the costume and production design though.

I also tried orange daylight and green fluorescent light, but since the scene doesn’t take place at sunrise or sunset that’s hard to justify too.

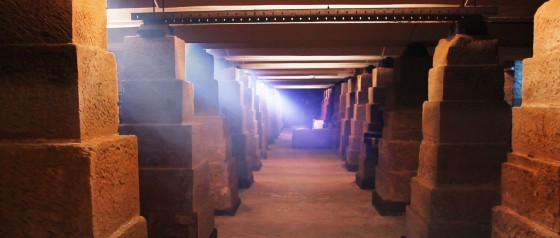
Finally I tried orange and blue. One is a warm colour and the other is a cool colour – another classic way of creating colour contrast.
Lighting concept #3
Lighting concept #3

The jury’s still out on this one. A lot will depend on what colour I’m able to make the fluorescent light appear through white balancing, since we’re unlikely to have time to gel all of them to my desired hue, and also what colour costumes Katie puts the characters in for that scene.

Okay, that’s all for today. Once the film’s in the can, there will be lots more about how the scenes were lit. In the meantime, perhaps I’ll share some of my lighting plans in a future post.
Taking Decisions Lightly: Part 2

Taking Decisions Lightly

I’m DOPing Stop/Eject as well as directing it, which means I have to be well prepared. I’m not going to have time to stand around on location figuring out how I want to light it. I need to do that in advance.

Last year I drew up some lighting plans, and thanks to the postponement of the shoot I have more time to work on these and get them just right. And recently I had a previsualisation idea: to take recce shots of the location and photoshop them to show the lighting I want to achieve.

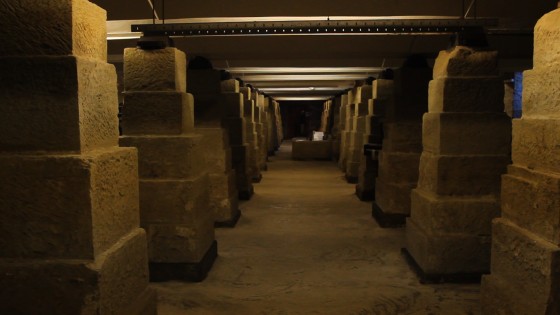
So here’s the image I decided to work with, from the basement at Strutt’s North Mill in Belper:

Raw frame grab from the basement recce
Ceiling fluorescents

So, how do I want to light the basement? How does a DOP decide how to light anything? For me it always starts with three questions:

  1. Realistically, where would light be coming from?
  2. Creatively, where do I want to put the lightst?
  3. Practically, where can I put the lights?

Let’s try to answer these for the basement scene…

  1. The basement is only partially underground, so it does have some windows, but I don’t ever have to show them if I don’t want to (an advantage of being director too). A room like this would have regularly spaced ceiling lights, probably fluorescent. Perhaps the characters would have a torch or lamp of some kind too.
  2. Soul Searcher's car park scene, lit almost entirely by the existing overhead fluorescents
    Soul Searcher’s car park scene, lit almost entirely by the existing overhead fluorescents

    I’m going to choose to include the daylight, to provide some contrast with the ceiling lights. This is our most impressive location and perhaps the scene where the film’s fantasy side is most apparent, so I want it to look magical and cinematic. More on the creative side later.

  3. We would have access to the areas outside the windows, so I could light through them if I wanted. (In practice I’ll probably never show the windows, and the lamps representing the daylight will actually be inside the building, just out of frame.) Our time at this location is likely to be extremely limited, so although the ceiling is suitable for hanging lamps from, I’ll probably just have to go with the existing fluorescents. I’ve done this before – the multi-storey car park in Soul Searcher – and it looked good.

So with all that in mind, here’s what I came up with in Photoshop:

Lighting concept #1 for the basement

In my next post I’ll explain what I’ve done and why, particularly with reference to creating depth, and show you some alternate versions of the above image which will demonstrate some of the basics of colour theory. Sounds intriguing, huh? Better not miss it.

Taking Decisions Lightly

Tape Recorder

Mmm, the eighties.
Mmm, the eighties.
Eject
Eject

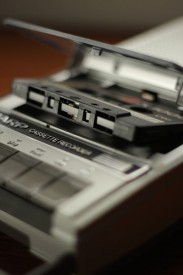
Thanks to David Bidwell of The Monster Company, we now have our hero tape recorder prop for Stop/Eject. It’s a classic eighties model, very similar to the one I had as a kid, which I had in mind when writing the script.

Last year we bought 400 empty cassette cases for a crucial scene in the film, but we still need more. Do you have some old cassette cases kicking around? Would you be kind enough to donate or lend these cases to the production? If so, please get in touch with me: neiloseman [at] googlemail.com.

Elsewhere in art department land, Sophie tells me that work is underway on the wooden carving for the top of the alcove set. And Katie keeps shopping for the Shopkeeper’s costume, so to speak. And you can’t get quicker than a Kwikfit fitter. And she sells seashells on the seashore. And so on.

Tape Recorder

Soul Searcher Lecture in Derby Coming Up

Just under four weeks now until the next Soul Searcher lecture in aid of Stop/Eject. This one is part of Five Lamps’ March Film Night on the 27th. If you’re in Derbyshire, come along and see some great short films and hear about how Soul Searcher was financed, made and distributed, all for just £2. (Entry to the event is £2, that is. Soul Searcher cost more than that. But only a bit.) Donations to the Stop/Eject cause will be welcomed at the end of the evening.

Soul Searcher Lecture in Derby Coming Up

Soul Searcher: Blooper Reel

Since the dawn of time, watching people screw up has been a guilty pleasure. And so when Man invented the motion picture camera, it wasn’t long before he also invented the blooper reel. Here’s Soul Searcher’s.

Not quite as good as Michael J. Fox accidentally yelling “Doc!!!” in The Frighteners’ outtakes, but still fairly chucklesome.

Remember that you can watch Soul Searcher in full completely free at neiloseman.com/soulsearcher Spread the word!

Soul Searcher: Blooper Reel

Bag a Sandbag – or a DVD

There’s been quite a bit of interest in the lighting sandbags Katie made in the last Stop/Eject podcast. Some people who have not mastered the art of sewing have nonetheless expressed an interest in getting their hands on such a sandbag.

Simultaneously, I find myself with a number of unclaimed DVD copies of The Dark Side of the Earth: Making the Pilot sitting on my shelf. (That’s another thing I’ve learnt about crowd-funding which I forgot to put in my evaluation blogs: lots of sponsors don’t claim their rewards.)

So I thought, why not offer these two lovely items to the general public? Note: the following offer is no longer available.

Donate £10 and choose one of these free gifts

For a limited time only, donate £10 to Stop/Eject using the Paypal button below or in the righthand sidebar and you’ll receive either a sandbag or a Making the Pilot DVD – your choice. (Note: these items will ONLY be sent to a mainland UK address.) You’ll also get the usual rewards: a thank you in the credits, an invite to the premiere, and a download of my unprecedented indie budget exposé, How to Make a Fantasy Action Movie for £28,000. All for just ten squid!

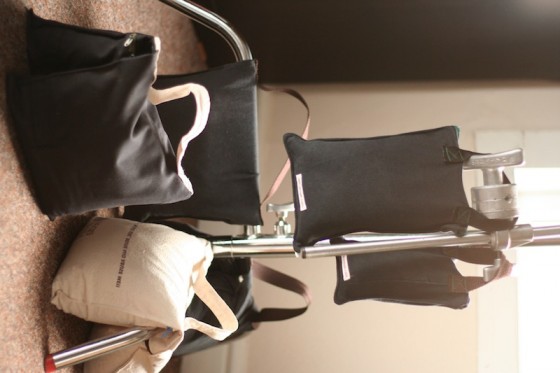
The sandbags are saddle style, consisting of two zipped pouches, each capable of holding around half a stone (3.18kg) of sand (not included), and a sturdy handle. They’re handmade, upcycled and eco-friendly. Zip and handle colours may vary.

Making the Pilot
Making the Pilot

Making the Pilot is a 23 minute documentary going behind the scenes of the demo sequence I shot for The Dark Side of the Earth in 2008 with Benedict Cumberbatch and Kate Burdette. All aspects of the production are covered, from building the puppet, costumes and set, through casting, swordfight choreography and 35mm cinematography to miniature effects and digital rotoscoping. Bonus features include a guided tour of the art department workshop, nine video blogs from the Cannes Film Festival, several videomatics providing low-tech glimpses of some of The Dark Side of the Earth’s biggest sequences, and extensive galleries of storyboards and concept art. This will probably be your last opportunity to get your hands on this rare DVD. Only a few copies remain and when they’re gone they’re gone.

Note: the offers outlined this post are no longer available.


Bag a Sandbag – or a DVD

Wheels Within Wheels

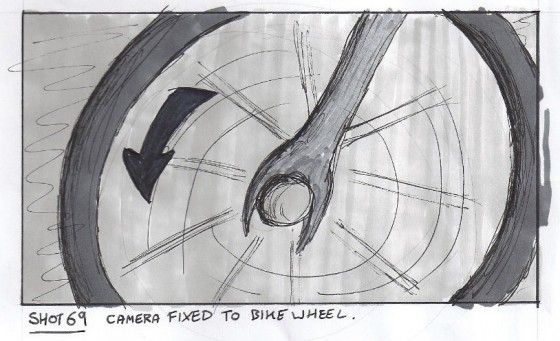
One of the great things about DSLRs is that, being so small, you can put them in all kinds of unusual places and, being so light, you can rig them to things with relatively little hassle. Stop/Eject is not the sort of film where we’ll being doing a lot of this (unlike Act of Valor, which I strongly suggest you check out), but there is one shot that needs a custom rig…

Shot 69, as drawn by Sophie Black

In this shot, the camera needs to be attached to the bike in some way so it moves with it, maintaining the same framing on the wheel throughout. This is part of the film’s visual theme of circles, which I discussed earlier this year on the blog.

Rigged for the rear wheel

If the shoot had gone ahead last October as originally planned, this shot would probably have got dropped or replaced with a similar but less effective version achieved by simply steadicamming along next to the bike. But one great advantage of a shoot being postponed is the opportunity to prepare so much better.

To that end, Colin and I borrowed his mum’s bike this morning to test the shot. Under the pressure of a low budget filming schedule, you can’t mess around trying to figure out a rig like this. You have to work it out in advance.

My plan was to use a C-stand arm and a cheap tripod to get the camera in the right place. First of all we tried clamping the arm to the frame of the bike, but it was too thick. So then we clamped it to the pedal (which meant roping or clamping the pedal to another part of the bike so it wouldn’t turn). The bottom of the tripod was clamped in turn to this arm. The handy thing about using a tripod, of course, is that you have a pan-and-tilt head for easy adjustments and a quick-release plate too.

Rear wheel shot
Rear wheel shot

Initially we filmed the rear wheel, but then I realised filming the front wheel would allow us to get a wider frame, since the pedals (which had to be framed out because the arm was clamped to one of them) were further away from the front wheel.

The rig worked out really well. We had to use a lens with an image stabiliser, and when we shoot it for real we’ll put someone on the bike to weigh it down and reduce the bumps further. I’d imagined we’d have to use a second clamp and bungee cords to keep the camera in place, but the sturdiness of the C-stand arm and the low weight of the camera made this unnecessary.

Yeah, we got a bit of the pedal in shot, not to mention Col’s feet. But those things are easily fixed.

Just before I sign off, I have to give you a link to Tony Hill Films, a site I came across while researching bike rigs. He’s built a number of unique and fascinating camera rigs which you can see in action on the site: http://www.tonyhillfilms.com/rigs

Front wheel rig
Front wheel rig
Wheels Within Wheels

Advance Preparations for Stop/Eject

Alright, so you’ve seen the podcasts on making a wagon light and sandbags, but what else are we doing to specifically prepare for Stop/Eject, now that most of our funding is in place?

Firstly, we’ve pencilled in some shooting dates: April 21st-25th. Hopefully by then the weather will be nice and the trees will have leaves on.

We’ve also been sorting out cast and crew, as much as is practical this far in advance. For the most part this is the same line-up as last year, but the crowd-funding campaign did bring a few extra people to our attention.

(As time slips away and you hurtle towards production on a low budget project, you often wish you had had more time to prepare. But the reality is that when you’re not paying people, you can’t plan too far ahead, because a key person might suddenly get some paying work that clashes with your dates, and then everything’s thrown out of whack. It’s just the nature of the beast.)

Sophie Black's alcove design

Colin has priced up the alcove set which needs to be built. It’s a fairly simple piece, not much bigger than a portaloo, but hopefully more enticing. But it does raise further issues of where to build, who can build, how to transport and where to shoot, all of which we’ll gradually be addressing over the coming weeks.

We’ve already started weighing up the costs of hiring a van, to get the equipment and set around.

Sophie has written off to local food businesses in the hope of getting sponsorship to help feed the cast and crew.

And finally, as the podcasts make clear, I’ve been thinking about the equipment we’ll need. I have some, Colin has some, we’ve built some, we’ll borrow some, and if we can afford it we’ll hire some.

As things progress, there will be detailed blog entries about many of these topics. For example, I’m planning a run-through of all of my equipment and what it does, a look at the ins and outs of scheduling a shoot, spotlights on some of the crew and their roles (if they let me!) and a blow-by-blow account of the set build. And I expect there will be some more podcasts too.

So stay tuned.

Advance Preparations for Stop/Eject

Homemade Sandbags

Recently Colin suggested I talk my wife Katie into making some sandbags to weigh down lighting stands on set. One of us also had the idea of making them out of canvas shopping bags. Like me, I think Colin envisaged Katie simply filling a canvas bag with sand and sewing up the top.

As you can see, she went to a lot more trouble than that…

Some of my new sandbag collection

Considering that you’ll pay the best part of £20 on eBay for one of those, I think £3.55 is a pretty good deal.

Once Katie had started making them, she couldn’t stop. I ended up with five of the one stone saddle bag kind shown in the video, and three smaller ones for counterweighting arms. Thanks Katie!

If you want to see some prettier things Katie has made, be sure to visit her shop at Katiedidonline.

And once again, if you’ve enjoyed this post or found it useful, please do consider clicking the Donate button in the righthand column. All the money goes into making Stop/Eject and you’ll get a credit on the film, an invite to the premiere and access to my super-useful indie film budget exposé How to Make a Fantasy Action Movie for £28,000. (UPDATE: PLEASE NOTE THIS OFFER IS NO LONGER AVAILABLE.)

Homemade Sandbags

Setback

This blog is intended to be an honest and (as far as reasonably possible) transparent record of the high and lows of filmmaking. This entry is unfortunately about a low.

Sometimes stuff doesn’t work out, despite your best efforts. This photo shows how many people turned up for Tuesday night’s Soul Searcher lecture in aid of Stop/Eject:

Hereford lecture
Hereford lecture

Yep, none.

Empty
Empty

Was it not promoted well enough? Did the fact that it was free make people think it would be rubbish? Are there just not enough filmmakers in Hereford? Was Pancake Day a bad choice of date? Did everyone stay home to watch the Brit Awards? Who knows?

Whatever the reason, the donations bucket remained empty.

Okay, technically a couple of people did turn up. Nathan, the Rural Media employee who was responsible for the projector and other equipment, and my friend Johnny from The Picnic. So we went back to our flat for coffee and a chat about Soul Searcher.

The Derby lecture, as part of Five Lamps’ Film Night on March 27th, is still going ahead, and should have no trouble attracting an audience as Five Lamps is well established.

But it’s back to the drawing board for fundraising ideas to close the gap of a few hundred pounds that will remain before we can shoot.

Setback