Stop/Eject: Script to Screen

Following my personal observations on the shot planning process the other day, here’s a look at that process in action and a record of some of the thoughts that go through my head as a director when I’m choosing camera angles.

Everything begins with the script, and here is the extract for the Stop/Eject sequence I’m going to break down:

14. INT. ALCOVE/EXT. RIVER GARDENS – DAY – INTERCUT
KATE stands behind the alcove’s curtain with an armful of tapes.
She pushes one into the recorder – “JULY 16th 2007, 5-6:30pm” - 
and hits PLAY. Warm summer sunshine steals in through the crack
in the curtain. She pulls it back to reveal the river, sunlight
dancing and sparkling in the water of the weir.
COPY-KATE cycles through the gardens on a creaky old bicycle
with a custom paint job and various doodads hanging off,
oblivious to her other self and the alcove stood in the middle
of a Victorian bandstand.
Copy-Kate spots a strange figure on the riverbank, wearing
closed-back headphones and waving a big, fluffy microphone at
the running water.  She looks ahead – she’s about to run over
TWO YOUNG GIRLS.  She grips the brakes tightly and the bike
screeches to a stop with a noise like a small army of warring
cats.  She catches her breath as the older girl scowls and drags
her sister away.

Sophie drew the following storyboards for this sequence, based on my rough sketches:
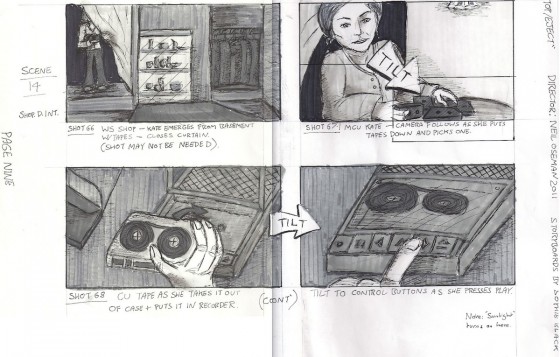
I don’t like starting scenes with establishing shots; I prefer to reveal them gradually. So when I conceived the first shot (top left) – setting up Kate in the alcove in the shop – I suspected I would probably end up cutting it, and sure enough I never even filmed it. The audience would know by now where the tape recorder alcove was, I figured.

The next shot (top right) follows Kate as she puts down the stack of tapes. This is fairly basic visual storytelling. The audience already knows that the tapes contain recordings of Kate’s life. When we see her come in with an armful of cassettes, we anticipate her nostalgia trip.

As this was the first time Kate was to travel back in time more than a few hours, I felt it important to show the action of the tape going into the recorder in close-up (bottom), to ensure the audience understood the connection between the tapes, the machine and the time travelling.
storyboards_scan10

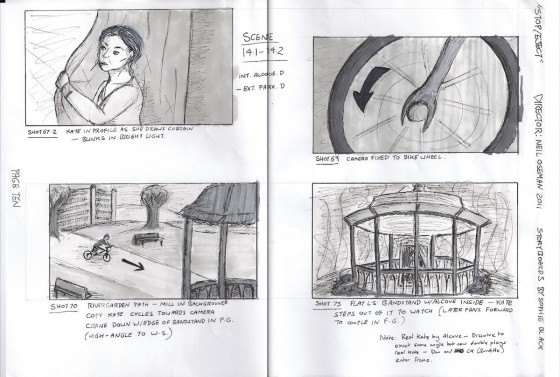
We then return (top left) to the previous angle, following Kate as she stands back up and opens the curtain. One of my regrets with Stop/Eject was that I never shot over Kate’s shoulder as she looked out of the alcove. I can only think this is because I was trying to avoid doing “the obvious thing”. In this scene I chose instead to tease what she’s seeing, revealing first the sunlight on her face, and then (top right) an abstract close-up of a spinning bike wheel, part of the visual theme of circles I had smart-arsedly developed for the film. My thinking was that time travel was a big and unbelievable concept for Kate to take in, so it needed to be broken to her (and therefore us) gradually.

Finally the scene is revealed (bottom left) in a high wide shot to establish the geography, which then cranes down to draw us into the action. On the day, there was a bush in the foreground, which began to obscure the action as we craned down, so we decided to crane up instead, rising up over the bush to reveal the action.

Next it was necessary to show the place of Kate and the alcove in the geography. I wanted to echo the formality and symmetry of the bandstand’s architecture by framing it flat-on, dead centre (bottom right).

storyboards_scan11Then Copy-Kate sees Dan, her future husband, for the very first time. I wanted to show an immediate connection using an over-the-shoulder shot-reverse. Since Copy-Kate was on a moving bike, this meant panning with her for her angle (top) and then tracking with her for Dan’s angle (bottom) in order to keep her shoulder in frame. I left Dan’s shoulder out of Kate’s shot since he hasn’t seen her yet and so hasn’t made a connection.

The editing podcast below from summer 2012 explains the various iterations I went through with this sequence. (I later brought Miguel Ferros on board to re-edit the film, and his final version is far superior to all of my attempts.) You can see in the podcast some of the problems that my linear shot planning approach caused, notably my failure to cover the whole scene in the crane shot, and the restrictions which that placed on me in the edit.

Despite these minor quibbles, I’m very proud of Stop/Eject and its visual storytelling. It’s recently received a couple of glowing reviews on Unsung Films and The London Film Review, the latter praising its visuals, and both quite rightly lauding Georgina Sherrington’s brilliant lead performance.


Stop/Eject: Script to Screen

Back to the Future

The first day of shooting on Stop/Eject. Photo: Paul Bednall

Like Janus I’m looking forwards and backwards today, the first anniversary of Stop/Eject‘s shoot beginning. First of all, here are a few key things I’ve learnt from making Stop/Eject:

With the project drawing near to completion, my thoughts are turning towards my next films. As regular readers will know, writer Tommy Draper has been working on a feature-length version of Stop/Eject for some time.

However, I feel that trying to get a feature financed with me as director right now wouldn’t be much easier than it was a couple of years ago when I was trying to get The Dark Side of the Earth made. So I intend to make another short film first. It’s too early to reveal any details, but I can tell you that after advertising on Shooting People I’ve teamed up with a writer called Kevin O’Connor who is currently working on a third draft script based on a one-line idea of mine.

I’ll also be entering Virgin Media Shorts again this year, and my wife Katie is hard at work on a puppet for that. Intrigued? You ought to be.

Stay tuned for the latest news on all of these projects, and I’ll leave you with a reminder of what we were up to this time last year.

Back to the Future

Stop/Eject: Shoot Day 4 Podcast

A behind-the-scenes look at the fourth day of shooting, finishing up in the shop and moving onto a pressurised shoot in the mill basement. As usual, big thanks to Sophie for editing this.

Better late than never – this is the £1,000 public reward in our crowd-funding campaign. We’re just £22 away from the £1,100 Mystery Reward. Stay tuned to find out what that will be.

Stop/Eject: Shoot Day 4 Podcast

Inside the Director’s Folder

A camera operator needs batteries, lenses, cards, filters. A wardrobe supervisor has racks of costumes. A sound recordist carries a dead cat on a stick. But a director needs only his folder. Like Her Majesty’s handbag, the contents of this hallowed portfolio have forever been a mystery. Until now.

Here’s what I kept in my Stop/Eject folder while shooting the film:

To-do list
To-do list

The first thing I see on opening the folder is a to-do list. These are all things that need doing the day before the shoot begins, including things that I need to pack in the van for the journey up to Derbyshire.

Budget
Budget

A copy of the production budget comes next, with highlighted figures like catering and travel being the ones that are still available to spend.

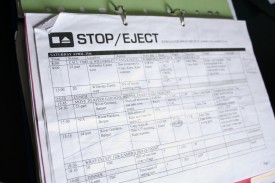
Schedule
Schedule

Next up is the schedule, one of several documents I can satisfyingly cross parts off as the shoot progresses. You can download the schedule here.

Contacts
Contacts

A list of contact details for the cast, crew, locations and people we’re borrowing props and equipment from.

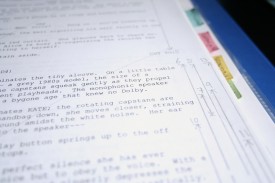
Script
Script

Then we come to the script. The fact that it’s this far back in the folder tells you how many other things a director who is also co-producing and has no AD has on his mind. Ideally the script and the storyboards would be the only things in my folder. You can see that I’ve drawn tram lines. Normally a script supervisor does this during shooting to indicate which part of the scene a shot covers, but I’ve drawn them in advance to remind me which part of the scene I want each shot to cover.

Storyboards
Storyboards

The largest section of my folder is the storyboards. The ones with the pink highlights are shots I felt would make good production photos, the idea being that we would switch the camera to stills mode after the take and snap a few – but we usually forgot.

Lighting plans
Lighting plans

Next are the lighting plans for each location. I covered these in detail in my lighting breakdown posts.

Artwork
Artwork

Sophie’s concept art is next. Not much use by the time you’re in production, since it’s all been built and dressed already, but nice to look at.

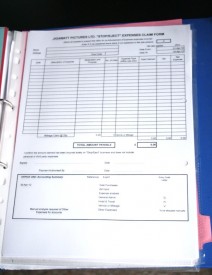
Expenses forms
Expenses forms

Then comes a wallet of expenses forms for the cast and crew to fill in. This is based on a template from Terry Cartwright’s DIY Accounting package.

Insurance policy
Insurance policy

Finally, I carry a copy of the public and employer’s liability insurance documents in case any location owners ask to see it.

Inside the Director’s Folder

Living in Magpie

This image of the stairs gives you a flavour of Magpie's building-site-ness. Photo: Colin Smith
This image of the stairs gives you a flavour of Magpie’s building-site-ness. Photo: Colin Smith

Stop/Eject‘s post-production crowd-funding campaign has been stuck at £440 for a little while now. As gentle encouragement to anyone out there who hasn’t contributed yet, or intended to but has forgotten or just not got around to it yet, here’s a taste of what we went through to make this film. What follows is a record of what it was like to stay and work in Magpie, Stop/Eject’s main location. Lest we forget.

First off, let me say thank you once again to Matt Hibbs, who was extremely kind in letting us use his premises not only as a location but as crew accommodation too. I don’t think I’ve ever met such a helpful and laid-back location owner, and without his positive attitude the shoot would have been much more challenging. So nothing that follows should be construed as a complaint. We knew what we were getting into, and we certainly got far more from Matt & co. than we had any right to expect.

Magpie once occupied just the ground floor of a four storey Victorian building. At the time of our shoot (late April), Matt had just purchased the upper floors, formerly a B&B, and was in the process of expanding his shop into them. So while the ground floor remained a working shop (and our key location), the rest of the place was a building site. Most of the refurbishment was taking place on the first floor, with the second and third storeys being used, prior to our arrival, for storage of tools and stock.

Katie loads the van at the back of Magpie. Photo: Colin Smith

The first thing I noticed when we arrived there the day before the shoot was that it was a lot dustier than I remembered from the recce. Everything was coated in brick dust, which made noses itch, throats dry and eyes water throughout the shoot. Sleeping in the building probably wasn’t very wise from a health point of view, even after Katie had hoovered.

Besides Katie and I, Col, Rick and Johnny were staying there too – four nights for most of us. We set up airbeds and sleeping bags in some of the second floor rooms. The first couple of nights there was loud music pumping out of the bar next door. And it was cold. The only radiator we ever found working was on the ground floor, at the back of the shop. Everywhere else was damn chilly by 3am.

Not to mention dark. Many of the light fittings had no bulbs in, and torchlight was usually required to find your way around at night.

Ablutions were another issue. Matt and his builders had kindly reconnected the plumbing in the second floor bathroom, so in theory we could shower, although stepping out of it into the freezing bathroom was not fun. But after the first night the hot water was found to be leaking into the shop, so Matt had to disconnect it. So it was cold showers, strip-washes or trips to Sophie’s place after that.

Deborah Bennett makes up Libby Wattis in our kitchen-cum-HMUW-cum-Colin's-bedroom. Photo: Katie Lake
Deborah Bennett makes up Libby Wattis in our kitchen-cum-HMUW-cum-Colin’s-bedroom. Photo: Katie Lake

We brought a fridge with us, lent by Nic Millington, and a microwave and toaster, and Col’s hot plate, so we were able to make rudimentary meals. There was no potable water in the building, so we had to use bottled stuff from Sainsbury’s.

We were all very glad when Tuesday arrived and we could shift camp to Sophie’s house. Apart from Johnny, who claimed he got a better night’s sleep at Magpie. There’s no pleasing some people.

I encourage you to see our sadomasochistic sojourn at Magpie as a sponsored suffering. For example, you could sponsor us £5 a night for living in the conditions I’ve just described – that’s £20 total – and you’d get a digital download and an invite to the premiere. Sound like a good deal? Head on over to stopejectmovie.com and make your donation so we can complete Stop/Eject and make living in Magpie worthwhile.

Magpie's upper floors (formerly a B&B) extended above the neighbouring bar, Twenty Ten. Photo: Colin Smith
Magpie’s upper floors (formerly a B&B) extended above the neighbouring bar, Twenty Ten. Photo: Colin Smith
Living in Magpie

Moulding Natural Light

Today I’m going to take a brief look at what you can do to shape natural light when you’re filming outside and you don’t have the budget for big HMIs or massive silks hanging from cranes.

Firstly, choose the right direction to shoot in. Work out where the sun is going to be at the time you need to film the scene and decide whether you want to shoot into the light, with your back to it or at an angle. There are iPhone apps that will tell you where the sun’s going to be if you’re too lazy to figure it out for yourself. Remember the sun moves left to right across the sky in the northern hemisphere.

Amateur photographers are often told not to shoot towards the sun. This is simply because amateurs will be using auto-exposure, which will close the iris right up as soon as the sun flares into the lens and leave you with a silhouette. As a professional, you’ll be setting your camera manually, so you can expose for the shadows and let the backlight from the sun blow out beautifully.

Here’s a shot from Stop/Eject where we made the most of this effect, and really lucked out with the reflections in the water:

All the evidence you need that shooting towards the sun is good.
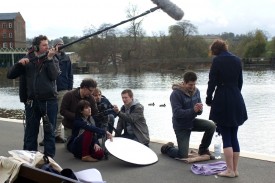
Using a reflector on the banks of the Derwent. Photo: Paul Bednall

Out the bottom of frame is a reflector, bouncing some of the sunlight back at the actors – and it’s being wiggled by a crew member to suggest it’s a watery reflection.

Collapsible reflector

If you don’t have a reflector you should drop what you’re doing and order one now off Amazon. They’re less than £10 and have a reversible zip-off cover giving the options of white, silver or gold surfaces to reflect off, or black to block light. If you remove the cover entirely you’re left with a translucent white disc which can be used to diffuse light, as we’ll see shortly.

If you choose to shoot with your back to the sun, you won’t be able to affect the light in your wide shots without big-budget gear, but you can transform your close-ups.

Let’s look at another example from Stop/Eject, before we did anything to the light:

Before
Before

Georgina Sherrington (“Kate”) is facing directly towards the sun, which is behind and above camera. As you can see, the light is incredibly harsh and the shadows are so dark that you can’t see her eyes; an effect that would only have got worse had I stopped down to prevent the highlights blowing out.

Two reflectors were required to sort this out. The first, with cover removed, was held over her head so that the sunlight hitting her face would have to pass through the translucent material and be diffused. (The diffusion is actually less significant than the amount of light the material blocks.) A second reflector was held out of the bottom of frame, bouncing sunlight back into the shadows on her face and putting a sparkle in her eyes.

After
After

A much nicer image.

If it’s a cloudy day – and let’s face it, this is the overwhelming likelihood here in the UK – the above techniques will still work, but much more subtly. If you have access to a power supply, try to set up a lamp to get some eye-sparkle and fill in your actors’ faces.

In 2008 I DPed a short set entirely in a forest: Into the Woods, directed by Matt Taabu. I knew that getting light into people’s eye sockets was going to be a major challenge, so I insisted on hiring a battery-powered 200W daylight par. We put a layer of tough-spun diffuser on this and the gaffer hand-held it for most shots, aiming it into the talent’s face. You can see the eye-sparkle it produced in this production still:

Branko Tomovic in Into the Woods (2008, dir. Matt Taabu). Photo: Alex Bender

So if you’re DPing a daylight exterior, don’t think that means you can rest on your laurels. It’s still up to you to create the right mood and make the talent look their best.

Moulding Natural Light