Unaccustomed as I am

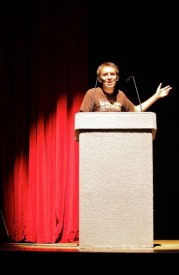
In the spotlight. Photo by Light Films

This Sunday I’ve been invited to give a talk on the making of Stop/Eject for the Institute of Amateur Cinematographers. Tickets are also available to the general public for £6.50, and the event takes place at Perdiswell Young Peoples’ Club in Worcester from 9:30am. The other speakers are producer/director Ben Lewis discussing documentaries and the internet, and award-winning fimmaker Howard-Smith Laci on working with actors.

My talk will cover the whole process of making Stop/Eject to date, covering crowd-funding, casting and crewing, finding locations, scheduling, design and visual themes, storyboarding, the budget, the challenges of the shoot, lighting, the evolution of the edit, and visual effects. There will be plenty of clips throughout, including excerpts from the forthcoming DVD documentary Record & Play, and specially prepared material illustrating the evolution of a scene from the script through shooting to various iterations of the edit. My presentation will end with an exclusive screening of the first five minutes of Stop/Eject in rough cut form.

You can book tickets on the CEMRIAC website.

Giving talks is a great way to raise the profile of both yourself and your projects, and I’d advise any filmmaker to do it if they can. Here are some tips:

  1. They’re here to listen to you. Many filmmakers are shy and don’t like to speak publicly, but if you’ve been asked to give a talk that’s because people believe you have something worthwhile to say, so there’s no need to be nervous. Audiences will be inspired simply by the fact that you got out there and made your film – that’s something to be proud of – so talk with confidence.
  2. Don’t read word for word. There is nothing less engaging than listening to someone read a speech. Yes, I know news anchors and politicians read off autocues, but they have had lots of training and you haven’t. I suggest that if you can’t remember at least 90% of what you’re going to talk about, you’re not qualified to be giving the talk in the first place. (If that’s the case, don’t be afraid to suggest to the event organiser that you change the focus of your talk to something you’re more comfortable with.) Certainly you should have notes to structure your talk and make sure you don’t miss anything significant, but you should speak from the heart, making eye contact with all areas of your audience. People will prefer a bit of rambling over monotonous reading any day.
  3. Show clips. Filmmaking is one of the best professions to be in when it comes to giving a talk; you already know how to entertain an audience, and you have a lots of moving image material at your disposal to show them. I suggest you should never talk for more than ten minutes straight (ideally more like five) before showing another clip. You may want to talk live over some mute clips – behind-the-scenes footage, for example – to keep things immediate.
  4. Rehearse the length. Give your talk to your empty living room with a stopwatch on hand, to ensure that it’s the right length for the slot you’ve been assigned. Remember to allow Q&A time at the end. I’d advise against taking questions as and when they arise during the talk, because it spoils the flow and can drag you behind schedule.
  5. Stick around afterwards. If there are other talks at the event, always attend these if you can. You might learn something from the content of the other talks, or from the way those talks are delivered, not to mention the fact that you would want those other speakers to stay and listen to your talk. And in the breaks and mingling sessions between and afterwards you will get to meet satisfied audience members who may want to work on your future projects (that’s how I met Sophie) or give a talk at another event (that’s how I got this weekend’s gig).
Unaccustomed as I am

Shadows and Ashes

Colin Smith lines up the Super-8 camera as director Sophie Black pans the mirror.

After an unseemly delay, here’s the third and final part of my series about lighting Ashes, Sophie Black‘s dark fantasy drama. Read part one here and part two here.

For the fantasy world dubbed “Toybox” by the production team, Sophie wanted a gritty, grainy, comfortable look. She was keen to shoot the scene on Super-8 and wanted to make full use of that high contrast celluloid look with harsh spotlighting, deep shadows and vignetting.

The biggest problem for me was how to get a spotlight effect in a fairly small room with an ordinary daylight fresnel. To get a circle of light small enough to fit entirely within the camera’s frame required the lamp to be much further from the subject than was possible within the space. I suggested shooting at night and putting the light outside the window, but the schedule couldn’t accommodate that.

The problem was solved by bouncing the light off a circular mirror. This masked the light into a relatively sharp circle, because the lamp was the entire length of the room away from the mirror. (The closer a mask is placed to a lamp, the fuzzier the edge of the mask will appear when thrown on the subject, so simply cutting a circle out of cardboard and placing it in front of the lamp would have given us a blob of light instead of a defined circle, because there wouldn’t have been enough space to put the cardboard far enough away from the lamp.)

Bouncing a redhead off a circular mirror. Photo: Sophie Black
Bouncing a redhead off a circular mirror for the sweeping light effect. Photo: Sophie Black

Not only did the mirror allow us to achieve a key shadow puppet shot which Sophie had conceived, it also enabled us to create a sweeping light effect for other parts of the sequence. Inspired by one of Lana del Rey’s music videos, Sophie wanted the effect of headlights passing by outside a window. We were able to do this simply by panning a redhead across the mirror.

The Toybox scene was shot both on Super-8 (by Col) and on my Canon 600D as a back-up. I set the ISO to 1600 on the DSLR to bake in a grainy look. I won’t do this again, however, because I failed to take into account the effect of the camera’s H.264 compression. The grain looked fine on the viewfinder, but once compressed and recorded there were lots of blocky artifacts. I hoped that the Super-8 film would come out well so this sub-standard digital material wouldn’t have to be used, but alas there were some focus issues and several of the shots were inexplicably missing from the reels when they came back from the lab. Fortunately the day was saved by a talented VFX artist who applied a very convincing Super-8 look to the 600D footage, which hides the compression artifacts.

Ashes is nearly finished now and we’re all very excited to see how it’s turned out. Meanwhile, here’s the trailer:

Shadows and Ashes

Practical Rain Effect

How do you create nice, thick, artificial rain for a dramatic fight scene, with no budget to speak of? Here’s how we did it on Soul Searcher.

This is a clip from the feature-length documentary Going to Hell: The Making of Soul Searcher. You can rent the whole doc digitally from the Distrify player below for a small charge, and you can watch Soul Searcher itself for free at neiloseman.com/soulsearcher

The clip shows how we created a fake downpour for a fight between the outgoing Grim Reaper, Ezekiel (Jonny Lewis, doubled by Simon Wyndham), and his replacement, Joe (Ray Bullock Jnr.). Ironically it was actually raining for real, but not heavily enough to show up on camera with the impact we needed. We’d had some rain bars made (lengths of hosepipe with holes drilled in them, strapped to bamboo canes) but we found the water squirted out in unrealistic jets. Luckily the location – Westons Cider in Much Marcle, Herefordshire – had a high pressure hose and we found that by pointing it upwards the water back down looking like rain.

See last week’s post for how to add rain (and snow) onto scenes after the fact.

Practical Rain Effect

Stop/Eject Illustrated Script Books

With Stop/Eject now fully financed, we’re working to create the rewards for the many sponsors who contributed to the project. Most of these rewards – invites to the premiere, DVD copies and so on – can only be completed when Stop/Eject itself is finished, but not all of them.

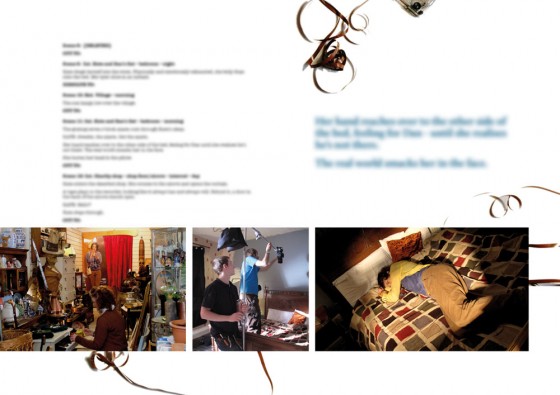
Sponsors who picked the Unit Publicist reward will receive, among other things, a very nice hardback book of the script with production notes and a full credits list, all lavishly illustrated with photographs from the shoot. This book has been beautifully designed by Worcester-based Andy Roberts of Speakersfive – check out his website at www.speakersfive.co.uk

When your crowd-funding campaign is over, it’s important to show your appreciation to your sponsors by making sure the rewards you create for them are really high quality. And if you ever need to raise money for another project, people will know that they can contribute with confidence that they’ll get something special in return. Here are some sample pages from the book:

Production notes
Production notes introduce the book
Many of the photos haven't been seen anywhere else before.
Some of the photos haven’t been seen anywhere else before.
Andy shot some twisted cassette tape as a motif to tie everything together.
Stop/Eject Illustrated Script Books

Falsification of Precipitation

Yesterday I had to shoot some fake snow. Ironic, I know, given the weather lately, but it had to be composited over a pre-existing shot. Various software plug-ins are available to add snow to a shot, but I’m of the school of thought that says it’s always better to use a real thing. Even if it’s a fake real thing.

A few years back, Col sent off for some free samples of artificial snow from a weather effects company called Snow Business. (Eternal winter in Narnia? That was them.) When Miguel pointed out that a snow-covered shot of Belper’s bandstand in Stop/Eject looked like a still photograph in the edit, I saw a way to make use of these samples to bring some movement into the frame.

From the box of samples we picked one that appeared to be made of shredded carrier bags, because it floated the most realistically as it fell. I suspect you could make some of this yourself with a lot of patience and a few trips to Tesco. I set up black drapes with a redhead poking over the top to ensure that the snowflakes would be backlit without any direct light falling on the drapes. Then we rolled the camera and started sprinkling.

Afterwards it was a simple case of using screen mode (or ‘Add’ in Final Cut Pro) to combine the footage with the background shot. This mode gives exactly the same results as double-exposing a traditional photograph would: the black areas naturally become transparent because they have no brightness.

Must resist temptation to use snow-based puns...
Must resist temptation to use snow-based puns…

Several years ago, Col and I did exactly the same thing with rain, filming water from a hosepipe in his back garden against a black night sky, then layering it on top of scenes from Soul Searcher.

Must also refrain from rain puns. Uh-oh, I said "refRAIN"...
Must also refrain from rain puns. Uh-oh, I said “refRAIN”…

We also shot one scene for Soul Searcher in “real” rain – real in so far as it was actually there falling on the actors, but not in so far as it actually came from clouds. Perhaps I’ll upload a behind-the-scenes clip of that for my next post.

Meanwhile, if you’re going out to shoot in real snow, check out the tips I posted a couple of weeks ago.

Falsification of Precipitation

Random Events on Stop/Eject

Mystery grave
Mystery grave

Here are some of the assorted things I’ve been doing on Stop/Eject lately.

On Wednesday I returned to the Hereford cemetery where, almost a decade ago, in the small hours of a cold and rainy October night, I shot a scene from Soul Searcher. This time I was just there to photograph gravestones for a VFX shot.

On the same day compositing/rotoscoping artist David Robinson delivered the first offical VFX shot, a run-of-the-mill wire removal but extremely well done.

On Friday I recorded this thank you message for everyone who sponsored the project:

Apologies to anyone whose name I’ve mispronounced.

Yesterday Scott Benzie delivered a demo of his beautiful theme for Kate. Much as I liked the first piece he wrote – listen to it here – I felt it emphasised the film’s fantasy aspects too much, and this new piece instead concentrates solely on drama and emotions.

This morning I filmed the tape recorder for probably the last time – not for Stop/Eject itself, but for the DVD/Bluray menus. Tomorrow the recorder gets sent off to Henning Knoepfel so he can record some new foley effects with it (that’s with it, not on it). Henning and I had a great conversation about the direction the sound should take and I’m very excited about how it will turn out. More on that on this blog in due course.

Random Events on Stop/Eject

Poor Man’s Process

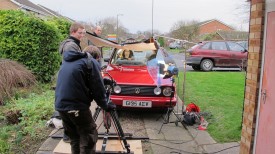
The WidthScribe promotional video I recently completed for Astute Graphics involved the actress driving a car – except we ended up casting an actress who can’t drive. We got around this in a few different ways, including the obvious substitution of a qualified driver in the wide shots, complete with appropriate wig.

Perhaps the most interesting technique we used, and one which I might well have used even if she could drive, was Poor Man’s Process. Nowadays, most fake driving shots in films and TV shows are achieved by shooting against a greenscreen and replacing that screen in post with a moving background plate. A more traditional technique is to film against a rear projection screen – a screen onto which previously-shot footage of a moving background is projected in real time behind the actors. This was known as Process Photography.

Poor Man’s Process leaves out the screen altogether, shooting against a plain, ambiguous background that doesn’t reveal the lack of movement – typically empty sky. Careful use of camera movement and dynamic lighting create the illusion of movement.

Here is the set-up we used on the WidthScribe promo.

Making the magic
Making the magic

The car is parked on Nick’s drive, which is conveniently sloped so that – from the camera’s point of view – only sky and a bit of a distant tree are visible in the background.

A light behind the car represents the sun, and Nick chops a piece of cardboard up and down in front of it to represent the shadows of passing trees.

Low budget wind machine

Sophie operates a hairdryer to blow Laura’s hair around.

Col shines a reporter light into the lens, moving it around to create the impression of the sun changing position relative to the camera.

And I dolly the camera side-to-side while vibrating it ever so slightly.

When intercut with wide shots of Nick’s wife driving the car for real, you’d never know the close-ups were cheated. (An additional trick we employed was to sit Laura in the passenger seat of the moving car then flop the image in post, for the over-the-shoulder shot of the pylon passing by.)

The drapes are to cut out the reflections in the windscreen.

Poor Man’s Process works best at night, but with the shallow depth of field provided by DSLRs it’s now possible to get away with it in daylight too, so long as the shot is kept fairly tight and the road you’re meant to be driving on is fairly open.

You’ll want to vary the lighting effects you use according to the surroundings the car is supposed to be in. You can use spinning mirrors to sweep “headlights” or “streetlights” over your actors, or move a keylight representing the sun or moon slowly side-to-side, or even place two out-of-focus bulbs in the background of your shot to represent another car behind.

I’ll leave you with an example of Poor Man’s Process in use on a big-budget Hollywood film, Michael Bay’s 1997 Alcatraz actioner, The Rock. All the close-ups in the cars were shot static in a car park.

Poor Man’s Process

Picture Lock on Stop/Eject

Last week Miguel Ferros and I locked the edit of my short fantasy-drama Stop/Eject. This project represents the first time in seventeen years of filmmaking that I’ve worked with an editor, rather than doing it myself. I found it an extremely positive experience and I wonder why I’ve never done it before.

Georgina Sherrington as Kate

Miguel’s cut makes the story clearer, the characters more consistent and the emotions more real. Not to mention the fact that it’s paced much better, coming in a good minute shorter than my tightest cut.

Filmmakers are always told that they shouldn’t edit their own material. I liked to think I was an exception to the rule, that I could put the baggage of preproduction and production aside and cut with fresh eyes. Perhaps you’re thinking the same as you read this, just like I did when I read things like this in the past. Then like me you’ll only discover how wrong you are when you finally try working with an editor.

If I was to compare my cut to Miguel’s side by side, I have no doubt that where he has made a different decision to me, in most cases I made my decision at least in part because it looked pretty, or it was a shot I had had in my head since I first started writing the script, or it was a shot that had been particularly difficult or time-consuming to get, or because I somehow felt like it had to be that way because it had always been that way. Miguel simply chose the best material to advance the plot and characters.

It was a real joy to finally see some of the film’s key moments working in a way they never quite have before. I now look forward to what I’m sure will be equally positive experiences as the film splits off in three directions:

  • Composer Scott Benzie, profiled in a recent post, begins writing the score.
  • Sound designer Henning Knoepfel begins creating and layering the sound effects.
  • Half a dozen rotoscoping and compositing artists begin work on a variety of visual effects shots.
As always, you can follow Stop/Eject’s progress here on my blog, on the Facebook page or on Twitter.
Shooting more pick-ups in my living room.
Shooting more pick-ups in my living room for incorporation into Miguel’s edit. The entrance of the alcove – a set which is long gone – is represented by the curtain and a shelf clamped to a C-stand.
Picture Lock on Stop/Eject