I’ve been thinking lately that I should learn more about what goes on inside a lens, so I looked around online and found this great series of YouTube videos. Warning: there’s a fair amount of maths!
Month: May 2022
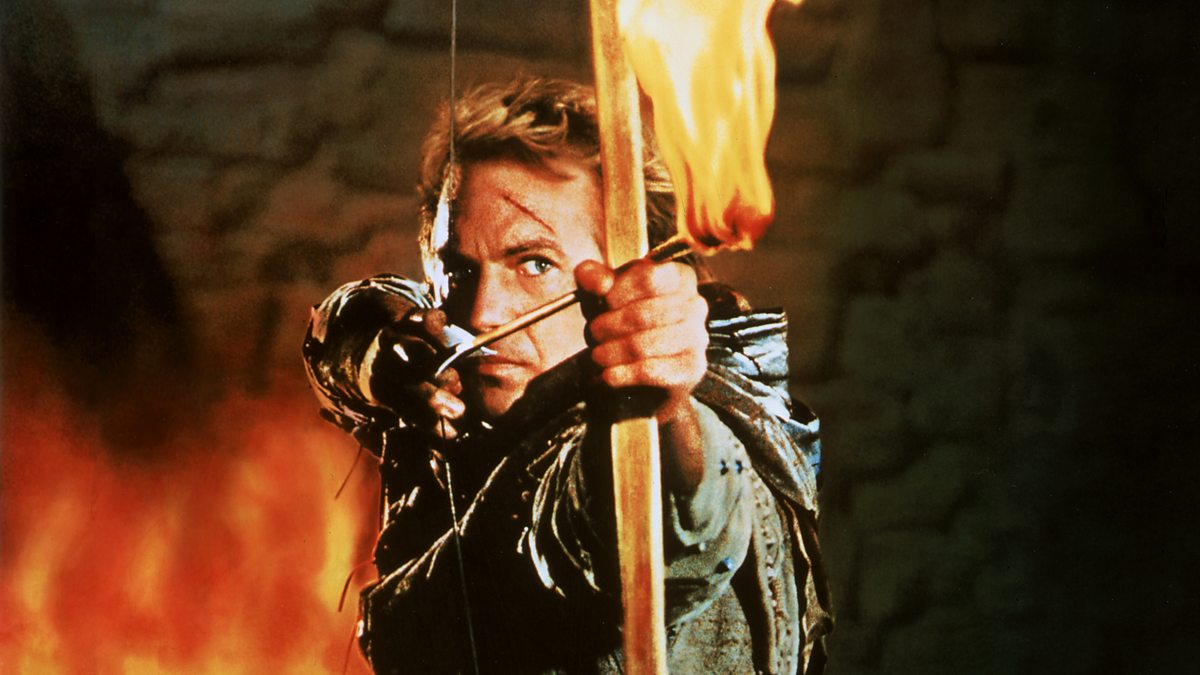
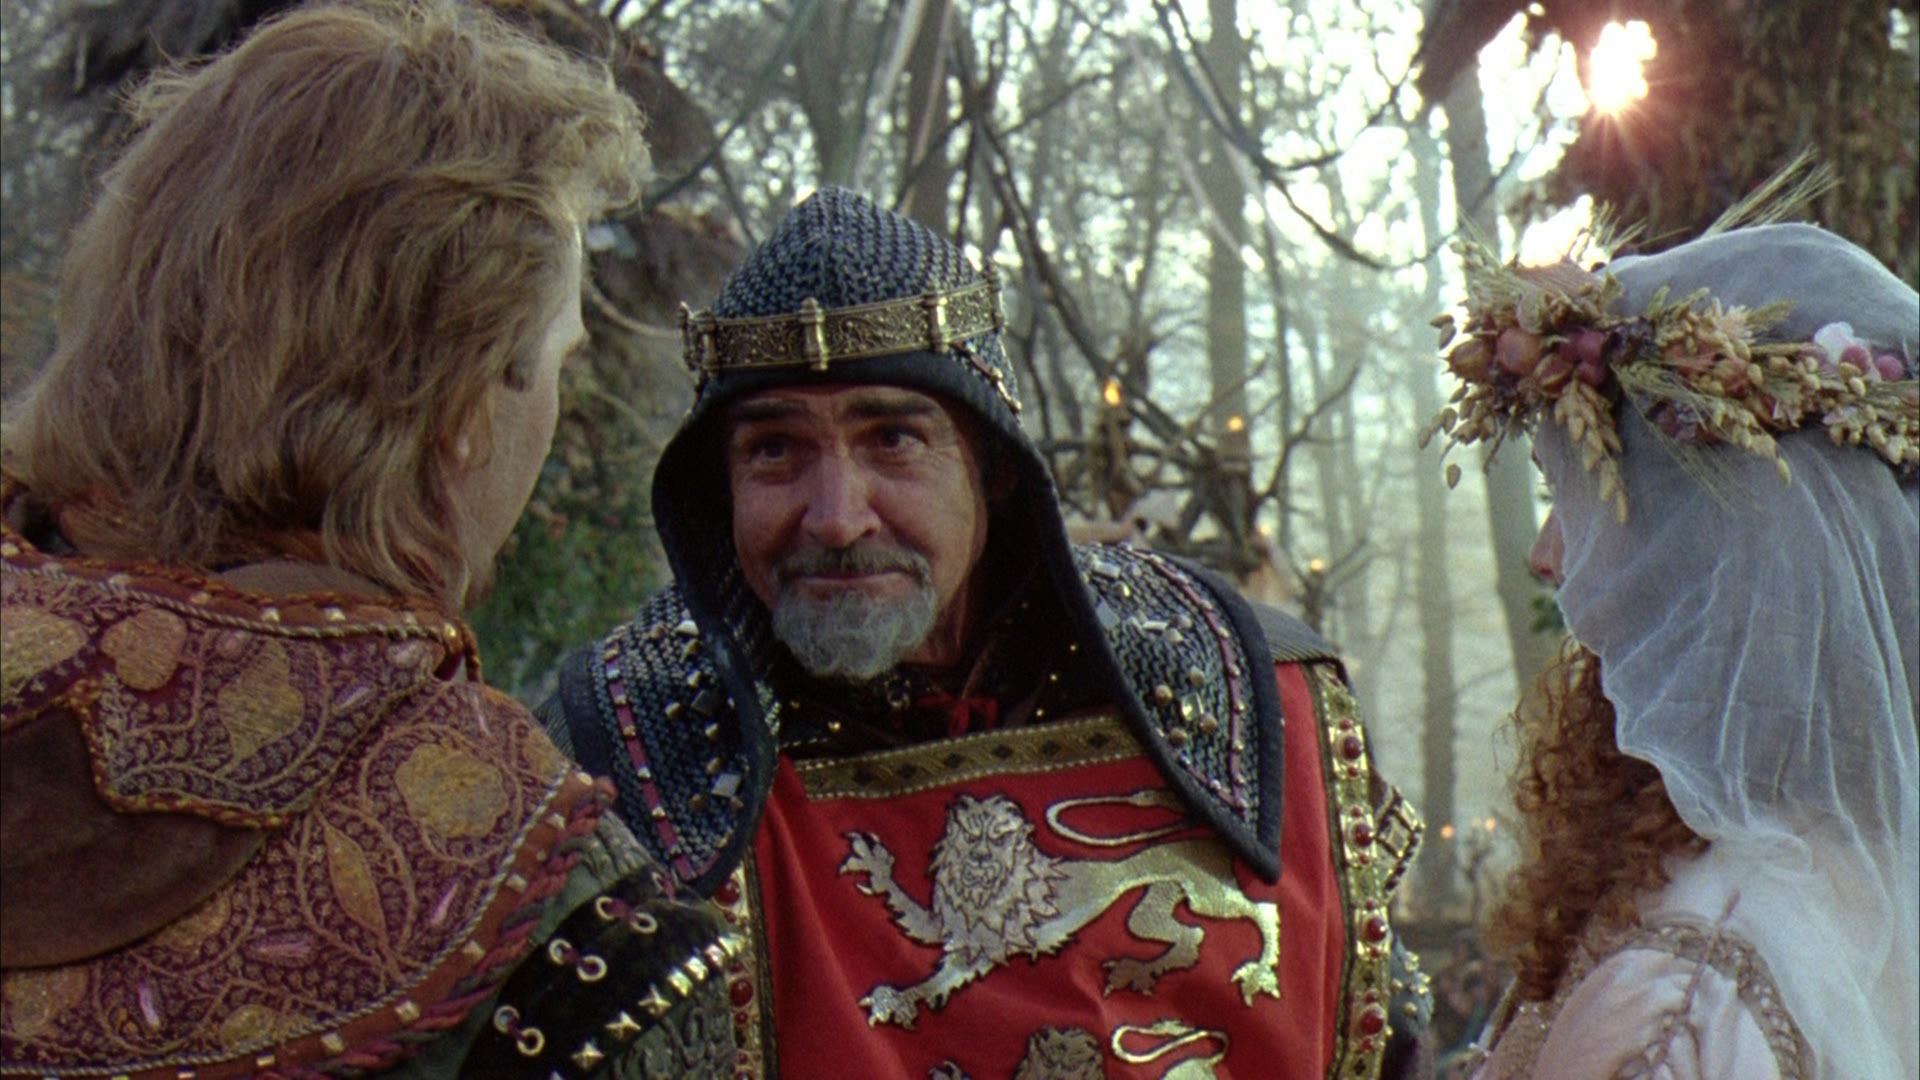
“Robin Hood: Prince of Thieves” Retrospective
“I’m going to carve your heart out with a spoon!”
“Why a spoon, cousin? Why not an ax or a…?”
“Because it’s dull, you twit! It’ll hurt more!”
Alan Rickman’s scenery-chomping Sheriff of Nottingham may be widely considered the best thing in Robin Hood: Prince of Thieves, but there is plenty more to enjoy in this classic action romp even now, 31 years on from its release.
“There was gold on the page,” claimed executive producer David Nicksay of the screenplay by Pen Densham and John Watson, which he read in early 1990. Both Fox and Tri-Star were working on their own Robin Hood movies, so Nicksay’s comparatively small company, Morgan Creek Productions, had to move fast to avoid being buried at the box office.
Director Kevin Reynolds was hired for his previous collaborations with Kevin Costner, having given the star his big break on 1988’s Fandango as well as directing part of Dances With Wolves. Following a scant ten weeks of prep, Reynolds launched into shooting Prince of Thieves against the ticking clock of the approaching winter.
The English weather was as cooperative as you might imagine, but no-one could have predicted that unusual winds would cause Heathrow to divert all its flights over the Buckinghamshire forest standing in for Sherwood, playing havoc with the sound.
Kevin Costner – who had coincidentally been offered and turned down Fox’s Robin Hood – arrived from the Dances With Wolves editing room just three days before filming began. His very first scene required him to jump out of a rowboat on the Sussex coast and wade to shore, even as his woollen cloak soaked up half his bodyweight in water. Later he spent four days immersed in the freezing waters of Aysgarth Falls, North Yorkshire, for the sequence in which his character battles Little John.
The crew also shot in Wiltshire, Northumberland and even Carcassonne in France, but never set foot in Nottinghamshire. The film’s most derided geographical anomaly is the stop-off at Hadrian’s Wall, which somehow falls on Robin’s route from Dover to Nottingham.

The character’s accent is also geographically challenged, partly due to a disagreement between the two Kevins about whether an English Costner would be distracting for audiences. The result is best summed up by the man himself on the DVD commentary: “Well, there’s my dumb-ass accent. It was something I wanted to do, and I wasn’t very good at it.”
Test screenings were positive but showed that Rickman’s sheriff – whose part had been beefed up by Reynolds in last-minute rewrites – was more popular than Costner’s hero. The producers insisted on redressing the balance in the edit, leading to Reynolds storming out and a 2009 director’s cut that reinstated Rickman’s extra material. (The two Kevins got over their differences in time for 1995’s Waterworld… and I’m sure they’re both very glad about that.)
Legendary cinematographer Doug Milsome ensured that Prince of Thieves’ visuals were beyond reproach. To capture sweeping views of the forest hideout he mounted a Wescam – a camera stabiliser typically used for helicopter shots – to a truss erected between the trees.
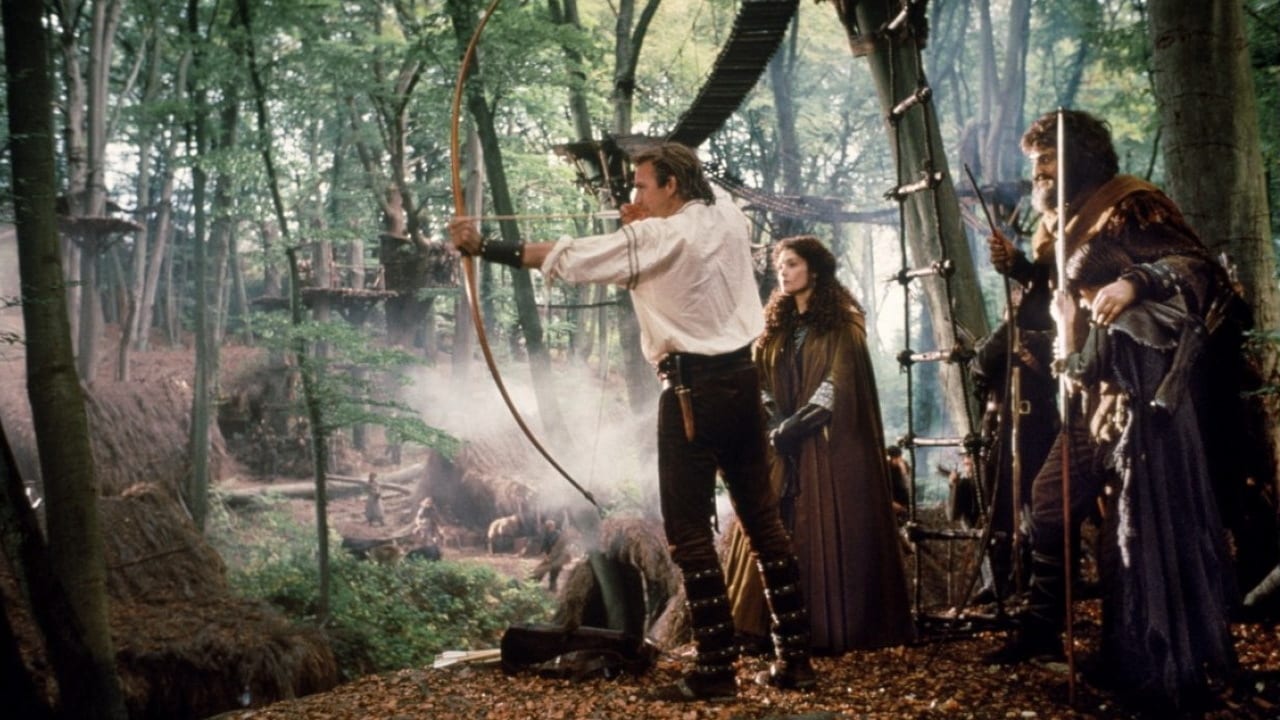
The famous arrow POV shot, hurtling through the woods, took a week to plan and execute. A static arrow was blue-screened over a travelling forest plate photographed at a stately one frame per second. Originally intended just for the trailer, the shot caused such a buzz amongst the public that it was written into the film itself.
Another highlight is the score by Michael Kamen, who based his love theme on an actual medieval tune. For the tie-in single, Bryan Adams and his keyboardist Mutt Lange took that same theme and added lyrics, turning it into the power ballad “(Everything I Do) I Do It For You”. The track garnered an Oscar nomination and won a Grammy, and spent 16 weeks at the top of the UK charts, a run still unbeaten today.
The achievements of the film itself were more mixed. Alan Rickman bagged a Bafta for his spirited turn as the Sheriff of Nottingham, while Kevin Costner won a Golden Raspberry for Worst Actor, and Christian Slater was nominated for Worst Supporting Actor. The lacklustre reviews did no harm to the box office though; Robin Hood: Prince of Thieves was the second-highest grossing film of 1991, surpassed only by Terminator 2: Judgment Day.
And what about the other Robin Hood films that Reynolds and co had raced to beat? Tri-star’s project never left the starting blocks, while Fox’s effort, starring Patrick Bergin and Uma Thurman and exec-produced by Die Hard’s John McTiernan, went straight to television. In fact the only film to challenge Prince of Thieves for many years was the Mel Brooks comedy, Robin Hood: Men in Tights. This parody is surely the ultimate evidence of Prince of Thieves’ cultural impact.

How Does a DP Choose Lenses?

There is a huge range of glass available to filmmakers today – everything from vintage cinema lenses from the 60s to modern stills glass made for DSLRs. How can a DP choose which is right for their production?
Mount
The first thing to take into account is the lens mount on your camera. If it is PL mount you will have access to a huge range of cinema lenses, some of them with decades of movie history. Other mounts such as Canon EF also provide plenty of choice, but mainly glass aimed at stills rather than cinematography. Some lenses can be mount-converted, some cameras can switch mounts, and adapters are available too, but it’s important to know upfront which lenses are going to be ruled out by your camera choice and which aren’t.
Spherical or Anamorphic

Anamorphic lenses squeeze the image horizontally, to be unsqueezed in post-production. The results are a wider picture, distinctive oval bokeh (out of focus areas) and often lens flares with horizontal streaks in them. This look is very cinematic, but anamorphic lenses tend to be bigger, heavier, more expensive, need more light than and don’t focus as close as their spherical counterparts, so think carefully before you choose them.
Speed
The speed of a lens – i.e. its maximum aperture – is one of its most important characteristics. A fast prime lens might open to T1.4, while a zoom or anamorphic prime might only go to T4. That’s three stops’ difference, equating to eight times more light required by the T4 lens. That can have a big impact on the size and number of lights you need. The ISO you plan to shoot at will also factor into this, of course.
Also consider how deep or shallow a depth of field you want. If you’re after super-blurry backgrounds, only a fast lens will give you those (though shooting on a large-format camera will help). This brings us to…
Bokeh

Bokeh is the appearance of out-of-focus areas in your image. It is most noticeable in small highlights such as fairy lights, which generally turn into big circles when they’re out of focus. Just how big and how smoothly circular depends on the lens and the aperture settings. Some lenses will have more geometric bokeh, octagons for example, which is a result of the shape and number of iris blades within. The bokeh may look rounder when the lens is wide open and more geometric when it is stopped down, or vice versa. It will also have a different shape at the edges of frame. What this comes down to is what look you feel is most aesthetically pleasing or appropriate for your story.
Lens Flares

Another aesthetic choice. How much does the lens flare when light shines straight into it? What about when the light is just out of frame? Is there much veiling flare – an overall milkiness to the image? Do you like the colours and shapes of the flare? Do they feel natural or intrusive, and which is most fitting for the tone of your piece?
Sharpness
This is an important factor with the resolutions of cameras ever increasing. Any decent lens will be sharp at T5.6, but the more you open the iris the more you might start to see the image softening, especially when it is wide open (or conversely when it is stopped down to its minimum aperture). Check also the edges of frame, which may be less sharp than the centre, especially on a vintage or anamorphic lens. If you plan to do a lot of central framing then soft edges may not matter, or may even help to draw the viewer’s eye to the subject, but if you plan to put your subjects at the extreme sides of the frame then you should be careful what lenses you select.
Breathing
A lens is said to breathe when pulling the focus makes the image zoom in or out slightly. It is most noticeable with zoom lenses, some stills lenses and older glass. If you are racking back and forth between the characters in a deep two-shot, lens breathing can become very distracting.
Other Considerations
Other things to look out for are diffraction spikes, the star effect that happens around bright light sources, and colour rendition, which can vary slightly from lens to lens. If you expect to be physically close to your subject you should note the minimum focus distance of the lenses, which will be different for each length in the series. Also consider what focal lengths your chosen lens series contains – are there enough different lengths to cover everything you hope to shoot, especially at the shortest and longest ends of the range?
If you’re still not sure where to start, test footage and comparison videos of different lenses can be found online, like this one I made in 2017:
Better still, ask a rental house if you can come in for a day and shoot your own tests.
See also:
How a Film’s Budget Affects the Role of the DP

I recently read a document – I think it was published by the BFI – that gave some definitions of the different scales of feature film productions: low-, micro- and no-budget. While admitting that there is no universal agreement on figures for these categories, the document suggested the following:
- No budget: up to £50,000
- Micro budget: up to £250,000
- Low budget: up to £1,000,000
I have shot features in all three of these categories (and at least one above them, presumably ranking as a medium-budget film) so I thought it would be interesting to look at the differences between them as experienced by the director of photography. I’m going to focus mainly on the contrast between no- and low-budget, because micro-budget is often very similar to no-budget in every respect except that the cast and crew are paid.
Prep
The biggest difference is in pre-production. On a low budget the DP tends to get a period of paid prep time equal to the number of shooting days, so if there are five weeks of filming, you get five weeks of prep beforehand. On a no-budget film you are likely to get a single day of location recces and nothing else.
Some of the things you’d do during your low-budget prep period will have to get done in your spare time on no budget: lining up your crew, watching any reference films the director suggests, making an equipment list. You won’t be conducting any camera tests (but you probably won’t get much of a choice about the camera anyway – see below). The chances are that you will not be reading and breaking down the script as carefully. You may cobble a few images together as references, but you will not be creating an extensive mood board. You might read through a shot list which the director sends you, but you won’t be giving a great deal of advance thought to shot ideas of your own. Inevitably a no-budget project will be less of a collaboration between director and DP than a low-budget one.
Your relationship with the gaffer will also be different. On a low budget you can expect to have at least one good recce of every location with them, maybe two, and lengthy meetings where you can really hash out how each scene will be lit. On no-budget films they might never be able to attend a recce, and all you get is a Zoom call where you screen-share your location photos and talk in general terms about the look. Lighting has to be much more improvised on the day.
Crew

This brings us onto crew. Most no-budget producers plan for a single camera assistant and a one-person lighting team, and don’t really think about who is going to back up the footage. On a low budget you can expect to get a 1st AC, 2nd AC, camera trainee, data wrangler, grip, gaffer, best boy or girl, and spark, though you may have to push the line producer for one or two of these. There is usually some allowance for spark dailies too when bigger scenes are shot.
When we wrap for the day on a low-budget film, I have no problem walking straight off set because I know there is a full camera and lighting crew to take care of packing away the gear. I can spend what remains of my energy reviewing the dailies, meeting with the director and planning for upcoming scenes. On a micro-budget film I will help pack up because the small crew needs all the hands it can get, but then I probably won’t get to the other stuff. So I might not spot the things in the rushes that I could improve on, or be as well prepared for the next day as I could have been.
Equipment
Equipment, of course, is hugely budget-dependent. Many no-budget films are unable to hire anything at all, relying on gear owned by the director and/or DP, and other bits begged, borrowed or scrounged. Emphasis is often placed on having a decent camera, with everything else neglected – cheap lenses, no filters, few of the accessories that make the camera dept run smoothly, and very limited lighting.
Getting kit around is often very challenging for no-budget producers. Just hiring a van and finding someone to drive it are big deals when you have no money. Sending someone to a rental house in London to collect the gear – even if renting can be afforded – is a logistical headache which a low-budget production doesn’t think twice about. This is why gear owned by crew members is so attractive to no-budget producers, because they don’t have to worry about how it gets to set, or the insurance.
On a low-budget production you will draw up your camera list maybe a couple of weeks into prep, with the assistance of the 1st AC, and the gaffer will handle the lighting list. Usually the first drafts of these lists will prove too expensive when the line producer has got the quotes back from the rental house, and you’ll have to cut a few things, but you’ll get most of what you wanted.
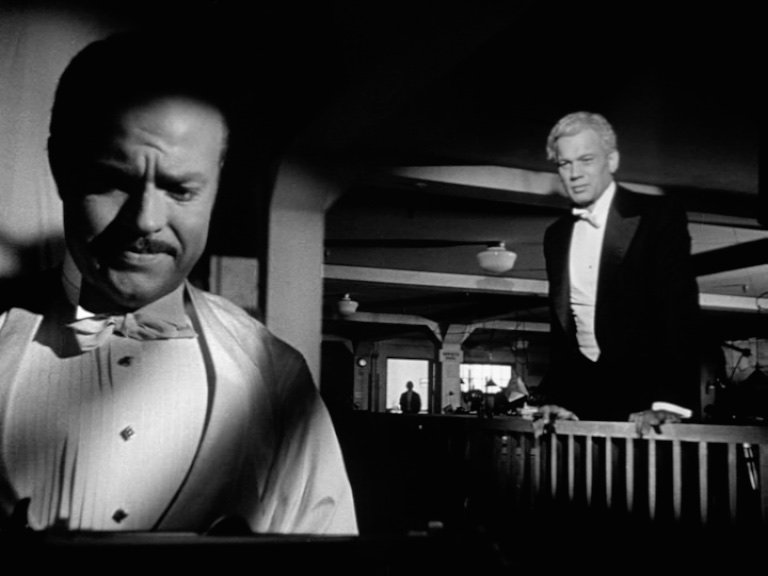
“Citizen Kane” Retrospective

For five decades in a row, Citizen Kane was voted the greatest film of all time in Sight & Sound’s International Critic’s Choice poll. Although pipped to the top spot by Vertigo in the latest poll, there are still plenty of filmmakers, academics and fans who consider actor-director Orson Welles’ 1941 debut the very pinnacle of cinematic accomplishment.
The spoilt son of a hotelier and a concert pianist, Orson Welles found fame in 1938 when he directed and starred in a radio adaptation of The War of the Worlds which was so convincing that thousands thought it was real and fled their homes. Not long afterwards, RKO, one of the five big studios of Hollywood’s Golden Age, offered a generous two-picture deal to the 24-year-old who had never made a film before and didn’t much want to.
12 months and two abandoned concepts later, Welles teamed with screenplay-fixer Herman J. Mankiewicz, whose past projects included The Wizard of Oz, to script the rise and fall of a powerful newspaper magnate based on William Randolph Hearst. The pair went through five drafts, making changes for creative, financial and legal reasons (hoping to avoid a lawsuit from Hearst).
The story’s fictionalised press baron, Charles Foster Kane, dies in the opening scene, but his mysterious last word – “Rosebud” – spurs a journalist to investigate his life. The journalist’s interviews with Kane’s friends and associates lead the viewer into extended flashbacks, an innovative structure for the time.
Welles himself took the title role, spending many hours in the make-up chair to portray Kane from youth to old age. Inventive, non-union make-up artist Maurice Seiderman developed new techniques to create convincing wrinkles that would not restrict the actor’s facial expressions. Sometimes Welles would be called as early as 2:30am, holding production meetings while Seiderman worked on him.
“I was just as made-up as a young man as an old man,” Welles said later, noting that he wore a prosthetic nose, face-lifting tape and a corset to satisfy both his own vanity and the demands of the studio for a handsome leading man.
The young auteur – who directed part of the film from a wheelchair after fracturing his ankle – was not easy to work with. Editor Robert Wise said: “He could one moment be guilty of a piece of behaviour that was so outrageous it would make you want to tell him to go to Hell and walk off the picture. Before you could do it he’d come up with some idea that was so brilliant that it would literally have your mouth gaping open, so you never walked. You stayed.”
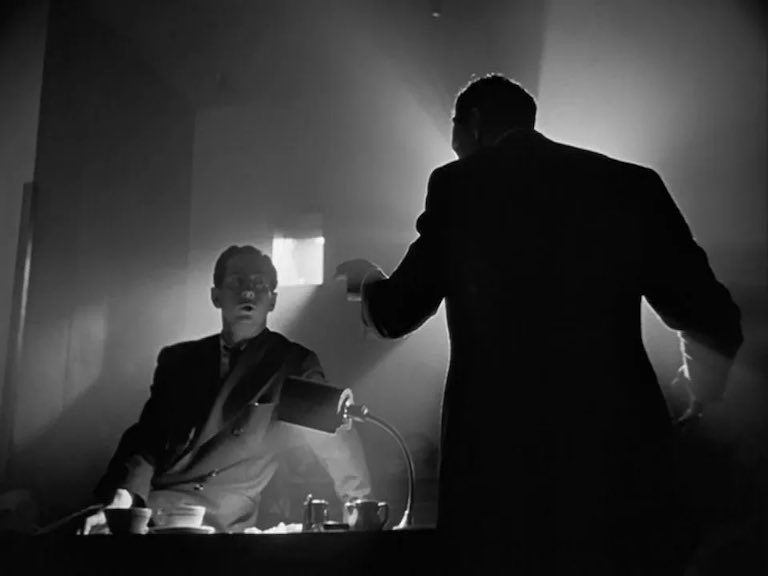
Welles was keen for his film to look different from others, drawing on his experience of directing theatre. The leading DP of the time, Gregg Toland, jumped at the chance to break the rules. Influenced by German Expressionism, he was not afraid of silhouettes and bright shafts of light.
Welles cast many of his Mercury Players – a theatre repertory company he had set up himself – who he knew could handle long takes. He insisted on a large depth of field and often shot from low angles to mimic the experience of a theatre-goer, specifically someone in the front row looking up at the cast. This required many of the sets to have ceilings, unconventionally, and these were made of fabric in some cases so that the boom mic could record through them.

Special effects were used extensively to reduce set-building costs and avoid location shooting wherever possible. One example is a crane-up from a theatre’s stage to a pair of technicians watching from the flies above; the middle part of the shot is a matte painting, bridging the two live-action set pieces. In another scene, the camera travels through a neon sign on the roof of a building and down through the skylight; the rooftop is a miniature, the sign is rigged to split apart as the camera moves through it, and a flash of lightning eases the transition into the live-action set.
“We were under schedule and under budget,” Welles proudly stated in a 1982 interview. He cheated though, because he asked the studio for ten days of camera tests, citing his inexperience behind the lens, and used those ten days to start shooting the movie!
When Citizen Kane was premiered in May 1941, William Randolph Hearst was not fooled by the script tweaks and took the title character as an unflattering portrayal of himself. While he was unable to suppress the film’s release – though not for the want of trying – a smear campaign in his publications ensured it only enjoyed moderate success and that Welles would never have the filmmaking career that such a startling debut should have sparked. It wasn’t until the 1950s that Citizen Kane received the critical acclaim which it still holds today, 81 years on.