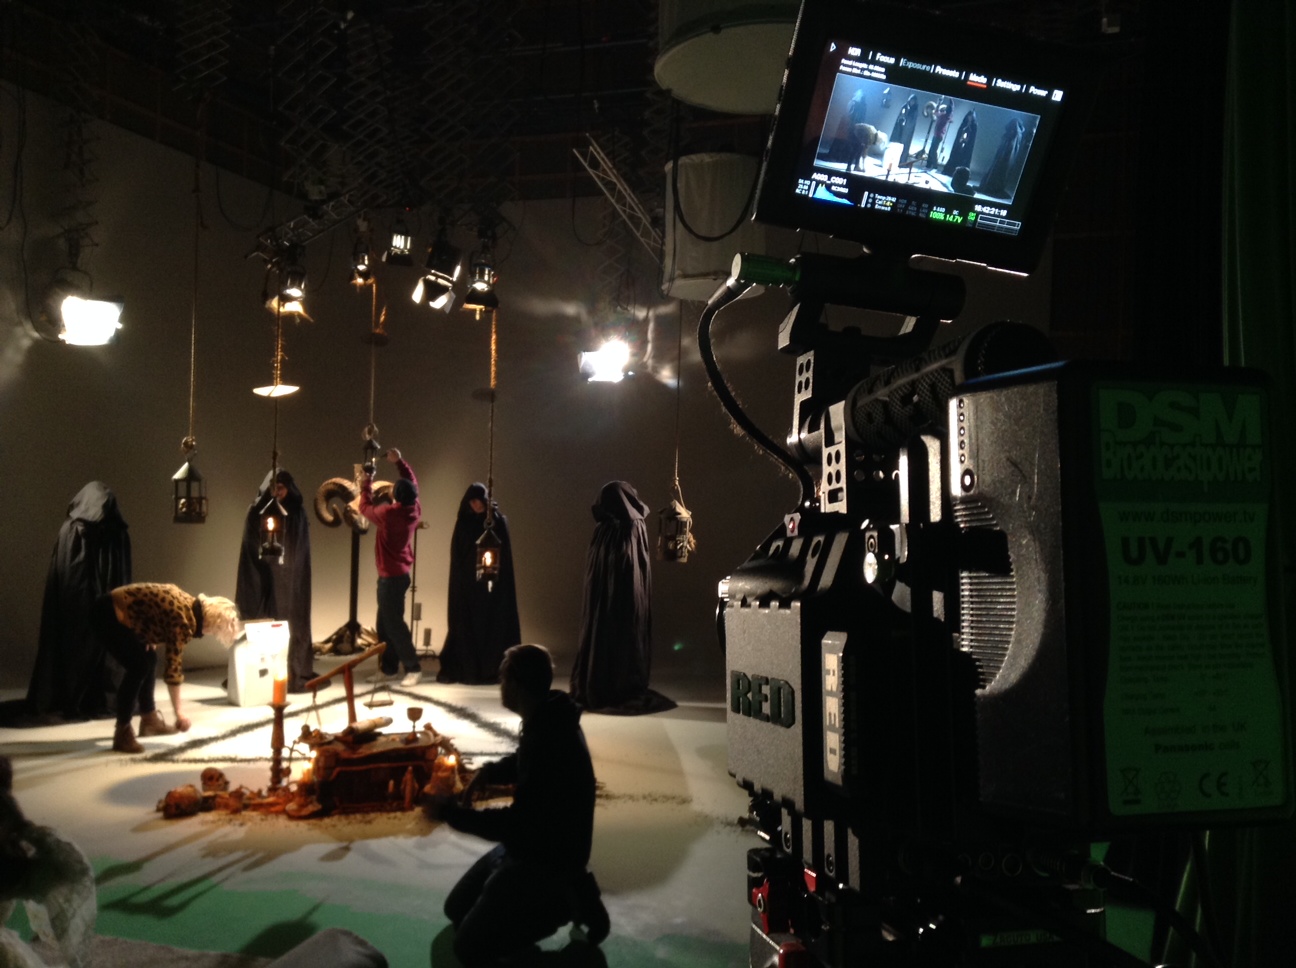
Day two saw us shooting a big scene in the dining room. Since the location was only available to us during daylight hours, the windows had to be blacked out with bin bags. Ideally for night interiors, I would put an HMI outside to shine “moonlight” in through the windows, and perhaps use halogen floodlights to create depth and interest in the deep background. This can bother some directors, however, because it means leaving the curtains open – hardly realistic. I figured that if I could create an interesting night interior look on Forever Alone without the crux of open curtains and deep background, it would give me a lot of confidence in the future when working with those restrictions.
An LED panel hidden behind the wall that Charlotte is leaning on supplements the ceiling light from a more flattering angle. A CTB-gelled Kinoflo Divalite provides the blue wash in the foreground. Image courtesy of Jordan Morris
I began by turning on the ceiling light, something I almost never do. I’m not a big fan of toplight, but it seemed appropriate given the interrogative nature of the scene, and I knew I could add bounced light off the table-top if the look was too harsh. Also, the shadow of the lightshade added some interest to the room’s blank white walls. I used the 60W tungsten bulb, and placed black-wrap across the top of the shade to prevent bounce off the ceiling from raising the ambient light level.
Cardboard barn doors. This kind of DIY solution is so much easier with sources that don’t get hot.
I clamped the Dedo to the top of a mirror directly behind Faith, which allowed me to give her a dedicated backlight. I gelled this pink, foreshadowing her eyes glowing this colour at the end of the script.
Other Faith, a visual representation of the heroine’s darker side, was keyed by another dedicated source, this time gelled with Medium Blue/Green again. Ideally this source would have been a Dedo, to achieve fine control, but only an LED panel remained available. So to reduce the panel’s spill onto other characters, I fashioned makeshift barn doors out of a cardboard box.
To light the living room – visible in the background on reverses – I employed the Divalight. This was gelled blue to suggest moonlight and create some depth and separation – a proxy, I suppose, for those deep backgrounds I couldn’t have outside the windows.
Much has been made in recent years of the low-light sensitivity of modern digital cameras, and the attendant reduction in required lighting power. When competing with natural light, larger instruments are still necessary, but Forever Alone really helped me to see what can be achieved with minimal gear. This weekend I get to see how much I can push this in a night exterior scene, as we complete principal photography. Stay tuned.
Working from the foreground back, an LED panel to the right provides the key on Charlotte (centre), with fill supplied by the ceiling light. Other Faith (right) is keyed by a second panel, gelled with Medium Blue/Green. A Dedo provides backlight, while a blue-gelled Divalite illuminates the background. Image courtesy of Jordan Morris
Haruka Abe as Faith in Forever Alone. She is side-lit by an LED panel and 3/4 backlit by a Dedo, while a Kinoflo Divalite illuminates the background. Image courtesy of Jordan Morris
When I was offered the role of DP on sci-fi short Forever Alone, I must confess that I had pause for thought. It was a student production, and the lighting package available from the university was much smaller than I’m used to. But I figured it would be a good challenge for me, to see if I could deliver a slick sci-fi look for a script set entirely at night, using only a handful of small instruments.
Creating darkness around the garage door meant making good use of the garage’s random contents.
The package consisted of a Dedo kit, a Kinoflo Divalite, two 12×12″ LED panels, a collapsible reflector, a single C-stand (with an arm but no knuckle) and one flag. And we quickly discovered that the Dedo kit contained only one in-tact bubble. On arriving at the house location, I checked out all the ceiling lights and, amongst the energy saver bulbs, found a single 60W tungsten globe. I immediately added that to my modest arsenal, along with my trusty £2 LED camping light which I’d brought along. Additionally, at my request, director Jordan Morris purchased a powerful LED torch for a key sequence. Dynamic practical lighting always looks good, and I thought it might help fill in any areas which our other sources couldn’t reach.
£2 LED camping light
We were shooting on the Blackmagic Cinema Camera with three Canon primes, the slowest of which was f2.8. Regular shots would be recorded in 1080P ProRes, while VFX plates would be captured in the 2.5K CinemaDNG Raw format. I feared I would be struggling to light to f2.8 without raising the camera’s ISO above its native 800, but in fact only one scene felt underexposed.
Interactive light, the low-tech way: a 60W bulb on a stick
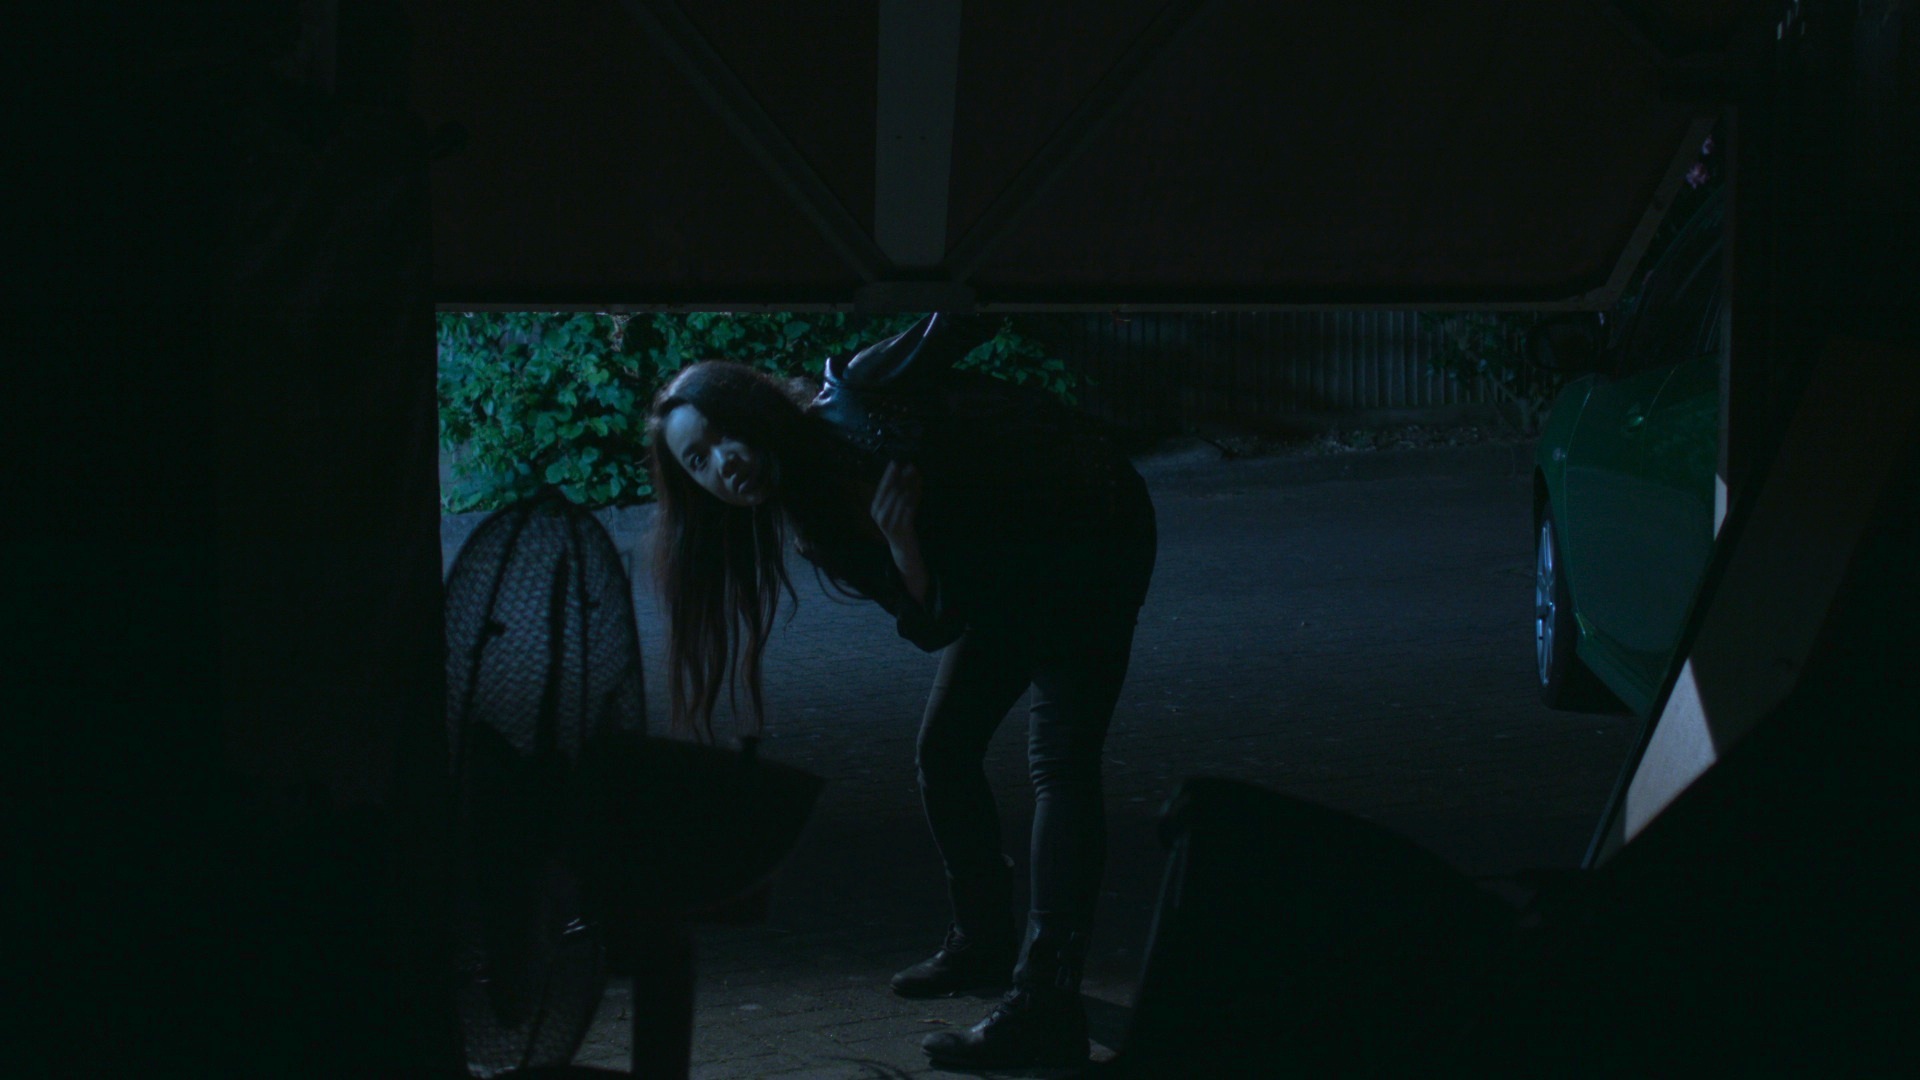
This scene took place in the garage, where the lead character, Faith, uses her superhuman abilities to generate a glowing light source above her head. To create the requisite interactive light, I borrowed the pendant fitting from the ceiling of the garage, removed the fluorescent bulb, put in the 60W tungsten globe and taped it to the end of a broomstick. I had chosen Medium Blue/Green as Faith’s “special powers” colour, but this is a very dark gel. With only a 60W bulb inside, even boomed above Faith’s head, it didn’t shed quite as much light as I wanted. Hopefully these shots, recorded in Raw, can be brought up in the VFX/grading process without too much noise creeping in.
Other sources used in the garage included the two LED panels, colour-balanced to 5600K so as to show up blue on the tungsten-balanced camera. These were positioned in the rafters at either end of the space and dimmed right down, to give a hint of backlight to scenes supposedly taking place in pitch blackness.
The garage’s ceiling light, turned on by the characters of Mitchell and Charlotte when they enter, was represented by our only functioning Dedo. I chose the Dedo for its focus; I didn’t want the room awash with light, just a pool of illumination that would still have shape and mysterious shadows.
Stella Taylor and Oliver Park, as Charlotte and Mitchell, are keyed here by a Dedo in the rafters. A foreground glow is created by an LED panel. Image courtesy of Jordan Morris
For several shots I used my LED camping light as a key, believe it or not, even going so far as to rig it on a stand for certain close-ups. The distances involved were small, so it was quite effective. In one shot (not the one pictured below) I bounced it off the floor AND covered it in tough-spun diffuser, to get an ultra-sublte eyelight.
Haruka Abe as Other Faith, keyed by the LED camping light shown above. Image courtesy of Jordan Morris
Stay tuned for my report from day two of the shoot.
I was recently the cinematographer on Sophie Black’s Night Owls, my second shoot with my new Blackmagic Production Camera, and the first one to be shot in 4K. I’m loving the rich, detailed and organic images it’s producing. Click on this screen grab to see it at full 4K resolution and witness the crazy amount of detail the BMPC records…
Jonny McPherson in Night Owls
Images from Night Owls courtesy of Triskelle Pictures, Stella Vision and Team Chameleon. Produced by Sophia Ramcharan and Lauren Parker. Starring Jonny McPherson and Holly Rushbrooke.
It’s been documented that the Blackmagics, in common with the early Red Ones, suffer from the CMOS sensor “black sun effect”. As the name suggests, this means that if you get the sun in shot, it’s so bright that it turns black on camera.
On Night Owls I discovered that this also happens with filaments in bulbs. This is unfortunate, since the film features a lot of practicals with bare bulbs.
The coil of the filament appears purple on the BMPC’s CMOS sensor
The issue can be fixed in post – apparently Da Vinci Resolve’s tracker feature will do it, or failing that some Quickpainting in Shake would certainly get rid of it – but a firmware update from Blackmagic Design to address the issue in-camera would be very welcome. Since they’ve already issued a firmware fix for this problem on the Pocket Cinema Camera, I’m surprised they even started shipping the Production Camera without this fix.
And while we’re on the subject of firmware updates, how about an option to display 2.35:1 guides? Surely in this day and age I shouldn’t be having to do this…
Taping off the camera screen and monitor for a 2.35:1 aspect ratioThe HDMI convertor on the back of my shoulder rig, powered by the V-lock battery
Some issues with my accessories also became apparent during the shoot. Firstly, 2 x 120GB SSDs are not enough. They last about 21 minutes each at 4K. Since we were doing a lot of long takes, we occasionally found the shoot grinding to a halt because the second card card was full and the first card hadn’t finished copying to the DIT’s laptop. Yes, crazy as it sounds, it takes about three times longer to copy the contents of the card – by USB, at least – than it does to record onto that card in the first place.
Secondly, I’ve purchased two different SDI to HDMI convertors from eBay – this one and this one – and I’ve found them both awful. They’re really designed for use in CCTV systems. The frame rate is jerky and the colours are so wildly inaccurate that I had to switch the monitor to black and white. It looks like I’ll have to buy an SDI monitor. If I can get one with 2.35:1 overlays, that will solve another of my problems at the same time.
So all of these problems can be fixed, either by investing in a little more kit, or by firmware updates which I hope Blackmagic Design will soon issue.
Finally, a word on the aftersales service: my camera turned out to have a faulty speaker; I sent it back and a week later a brand new one arrived. That’s pretty good service in my book.
Overall, I’m very happy that I bought the camera, and so is Sophie. The images look fantastic and I’m sure Night Owls will go far.
Jonny McPherson and Holly Rushbrooke in a screen grab from Night Owls
The trailer for The First Musketeer has been released at last. I was the cinematographer on this action adventure web series, which is a prequel to the novels by Alexandre Dumas. Enjoy….
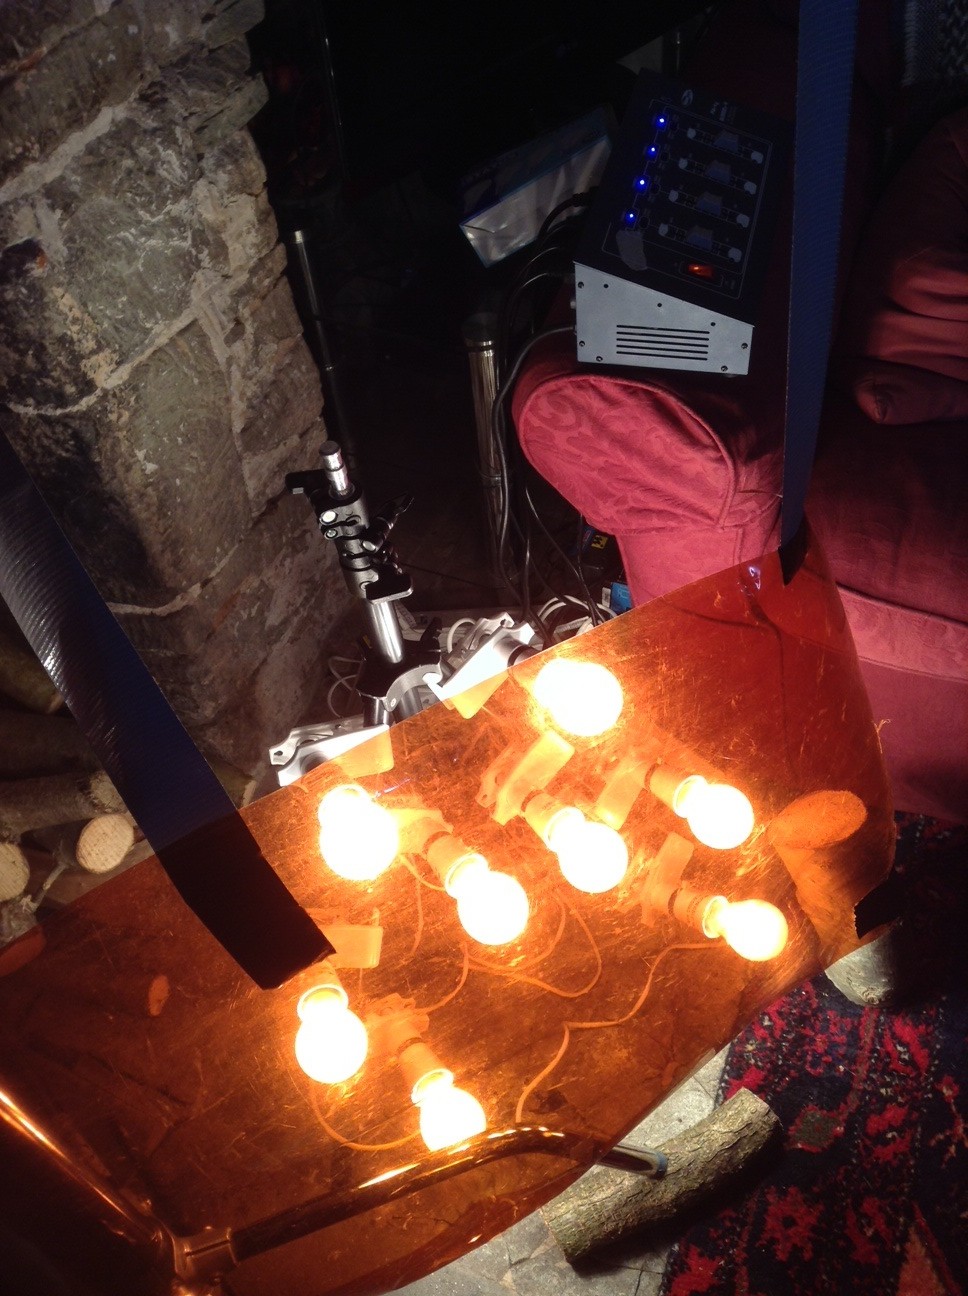
Back in early 2012, gaffer Colin Smith and I built a wagon light – or Cyclotron, as it was soon dubbed. Alright, Colin did most… all of the building, despite what this video may appear to show.
The dimmer board controlling the Cyclotron sits on the arm of the sofa next to the tungsten avenger itself.
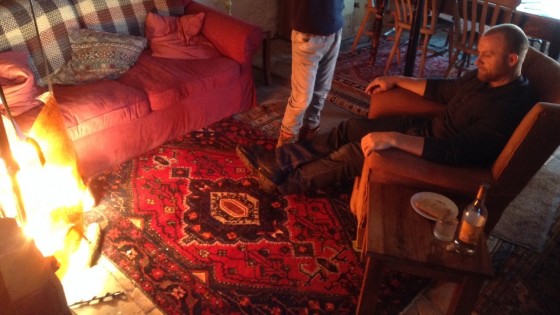
Shooting Coffin Grabber, directed by Claire Elizabeth Alberie, we needed firelight to play on the face of a character called Phil. I asked Col to rig up a bank of eight 100W bulbs, running two of them into each of the four channels on his dimmer board. During the takes he would oscillate the faders in random patterns to suggest the flicker of flames.
In front of the bulbs I hung a sheet of Urban Sodium gel. Given Phil’s character, I didn’t want the sunny feel of a straw colour or the homely orange of CTO (Colour Temperature Orange). I happened to have some Urban Sodium in my gels bin and I felt that had just the right dirty, gritty and a little bit hell-ish look for Phil.
There are many ways to simulate firelight. Check out this blog by Shane Hurlbut about how he built an elaborate rig using gooseneck microphone mounts for The Greatest Game Ever Played. And look out for a forthcoming post from me on simulating candlelight when The First Musketeer is released.
Phil (Ross O’Hennessy) basks in the warm glow of the Cyclotron.
A couple of weeks back, I served as director of photography on a music promo for heavy metal band Savage Messiah. Directed by Tom Walsh of Polymath Pictures, the video was released yesterday by Earache Records.
This shoot represented a number of firsts for me: first time operating a Red Epic, first time using a tilt-shift lens, and first time shooting more than 50 frames per second.
Red
While preparing for the shoot, I found this video tutorial from the oddly-named Embassies of Cinema was very helpful in demonstrating the basics of operating the Reds. As Tom said to me, a camera’s a camera, and if you know how to operate one then you can probably find your way around any other, but no-one wants to look like an idiot when they show up on set and start tentatively pressing buttons on an unfamiliar piece of kit.
If there’s one thing I learnt about the Red that I’d like to flag up to other first-time users, it’s the crop factors. The Epic has a Super-35mm sensor, but it only uses all of that sensor when in 5K mode. If you shoot at a lower resolution, the camera simply ignores the outer edges of the sensor, rather than scaling the image to that smaller size,. The result is that your lenses appear to get more telephoto as you decrease the resolution. So watch out for that.
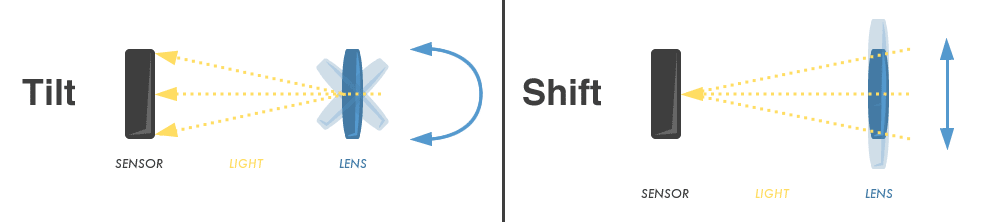
Tilt-shift
The tilt-shift lens
A tilt-shift lens is one which allows you to move the lens elements around relative to the focal plane. The shift mechanism is primarily of interest to stills photographers who want to capture skyscrapers without them appearing to taper towards the top. The tilt is the fun part.
A classic tilt-shift photograph
Normally, the glass elements in a lens are parallel to the focal plane (the camera’s sensor). Imagine a shot of three apples lined up next to each other on a table. They’re all the same distance away, so when you focus on one, the other two are in focus as well. But if you tilt the lens, only one apple might be in focus, and part of the background might be in focus too. This effect is often used to make cityscapes and landscapes look like miniatures, but it’s also useful for general weirdness. If you can’t afford to buy or hire a tilt-shift lens, a technique called “lens whacking” offers a low-tech alternative.
Highspeed Cinematography
Regarding highspeed photography, the only thing I have to say is, “Eh?” Can anyone out there explain why tungsten lights would flicker when shot at 300fps? Everything I’ve read says that only discharge lighting (HMIs, kinoflos) and very small tungsten bulbs should flicker at high frame rates. Surely the filament in a blonde shouldn’t be cooling enough between peaks in the AC power supply to register a flicker in a 600th of a second? I certainly can’t think of any other explanation.
You can see the flickering at around 2:24 in the video if you’re looking for it, but there’s enough dynamic lighting, smoke, lens flares and tilt-shifting that it all just seems part of the deliberate effect.
Setting up to shoot the narrative portions of the promo. Director Tom Walsh kneels in midground.
Thanks to Tom and designer Amy Nicholson for another great shoot. I look forward to working with them again next week on A Cautionary Tale.
On a pick-up shoot a couple of months back I found myself in the position of needing to mould the natural light without any equipment whatsoever. The sun was shining brightly with no clouds in sight, and we needed to shoot a close-up that would match an existing overcast wide shot. Fortunately there was a B&M just around the corner. Unfortunately no-one took any pictures of the ridiculous set-up that ensued, hence the comedy illustration.
Here’s how to do it:
Get yourself round to B&M. (Other depressing discount stores are available.)
The sheet is going to be your “silk”. First of all, cut the elastic corners to make it easier to wrangle.
Assign Unfortunate Crewmember #1 to hold up the sheet so that it casts a shadow on the talent. It will soften the direct sunlight falling on the them, but there will probably still be darker shadows on their face than you want, so…
Unroll a couple of feet of the foil. This is going to be your bounce card.
Assign Unfortunate Crewmember #2 to stand on the shade side of the talent and use the foil to reflect some direct sunlight into that side their face.
Hope that this is not the day the photographer from the local paper visits the set.
In the new year I’ll be teaming up with Sophie Black once again to photograph her new short film, Night Owls, a tale of unexpected friendship with echoes of Juno and Lost in Translation. It’s early days yet, but we’ve already discussed a fluid, handheld feel as being the dominant look.
Conveniently I came across this video recently, thanks to nofilmschool.com, in which DP Sean Bobbitt delivers a masterclass in handheld camera operation. He covers it from all angles, from wearing the right clothes and stretching beforehand, to developing a rapport with the actors you’re dancing around.
There are many variations of handheld cinematography. Bobbitt talks about trying to keep the camera as stable as possible, to reduce the shake to the absolute minimum the human body can transmit to an object it’s holding. But, as he also mentions, sometimes directors ask for more energy in the camerawork – they want a lot of sway and “fidgeting”.
Halo Haynes and Mark Drake, the cast of Night Owls
A director may want you the operator to stay rooted to one spot, like a tripod with a bit of wobble, or they may want you to execute a carefully planned move – like a dolly or a steadicam with wobble. Or they might give you freedom to move around the action, framing one actor or another as you see fit. Crash zooms might be part of the agreed look, or they might be banned.
All this needs to be discussed in advance.
And if you’re going to do improvised movements, what does that mean for the lighting? It makes it more difficult. For an interior scene, which most of Night Owls is, it means relying heavily on practicals – light sources that are visible on camers, e.g. table lamps – and throwing light into the room from outside doors and windows. (Incidentally, I was lucky enough to attend a masterclass by DP Chris Menges last week and he spoke of his belief that lights should always be kept outside the room so as not to clutter up the actors’ space and eyelines with equipment.)
So these are some of the things that are swirling around in my head right now as I contemplate the Night Owls shoot on the horizon.
Now for the catch. That shoot can only happen if our crowd-funding campaign reaches its £2,000 total by January 2nd. Please check out Night Owls’ Kickstarter page and put a little bit of money in the pot if you can, or if you can’t, spread the word.
I always enjoy a good behind-the-scenes video, and there’s often much to be learnt from them too. My friends at Polymathematics have just released a series of ‘making of’ videos for their recent music promos, all of which are exquisitely designed and shot (my own involvement in Droplets notwithstanding!). Check out Polymath’s Vimeo channel for more behind-the-scenes videos and of course the promos themselves.
Droplets
We Were Here
The Last Human / I Do (Come True)
Hands Up if You’re Lost
And here’s an equally fascinating look at a live puppetry project they did as part of the Olympic Torch Relay celebrations…
Lighting in the controlled environment of a studio should theoretically be much easier than lighting a location, but I found recently that it doesn’t come without its challenges.
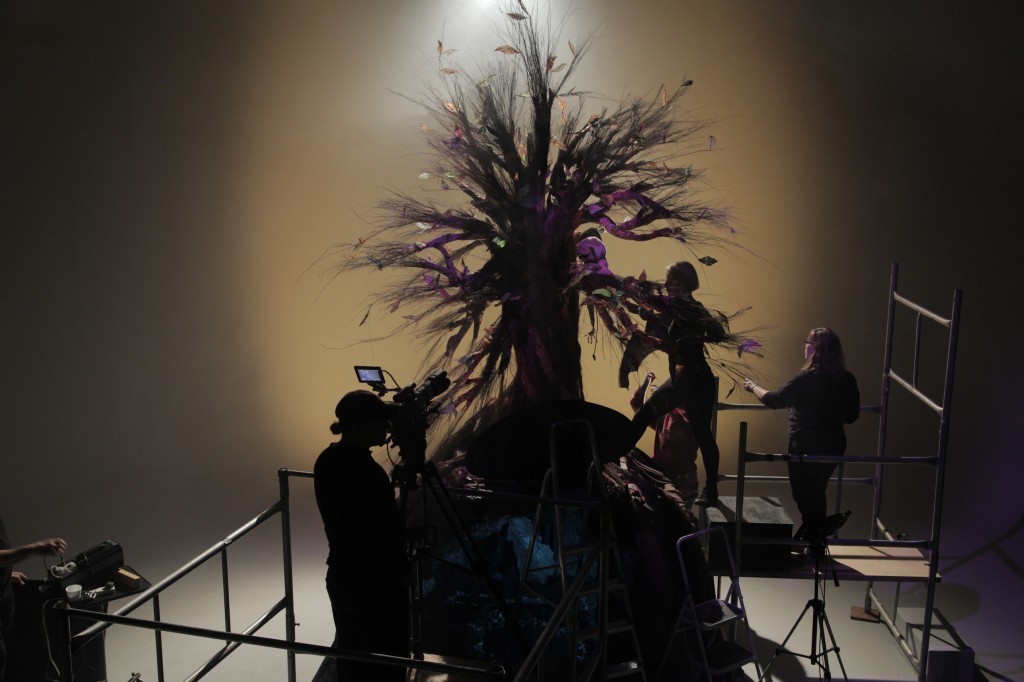
Last month I had the pleasure of working on a music promo for Droplets by Lewis Watson and Gabrielle Aplin. Directed by Tom Walsh and designed by First Musketeer veteran Amy Nicholson, this magical, handmade puppet fest was only the second or third studio-bound production of my career. Tom had secured the use of Giltbrook Studios, an impressively equipped 1,300 sq ft soundstage in Nottingham, complete with manager Andy Swain as gaffer.
Apart from the exclusion of pesky natural light, the biggest advantage offered by a stage over a location is the lighting grid; no more wondering if that polecat or K-clamp will take the paint off the wall, and no more compromising your backlight position to keep the stand out of frame. The downside of the grid is the time it takes to rig or adjust a light, particularly if the grid, like Giltbrook’s, has no catwalks, and every adjustment must be made by bringing in and scaling a huge ladder. In fact it may be impossible to rig or adjust lights once there is a finished set underneath. All of which means you’re going to need a pre-rig day.
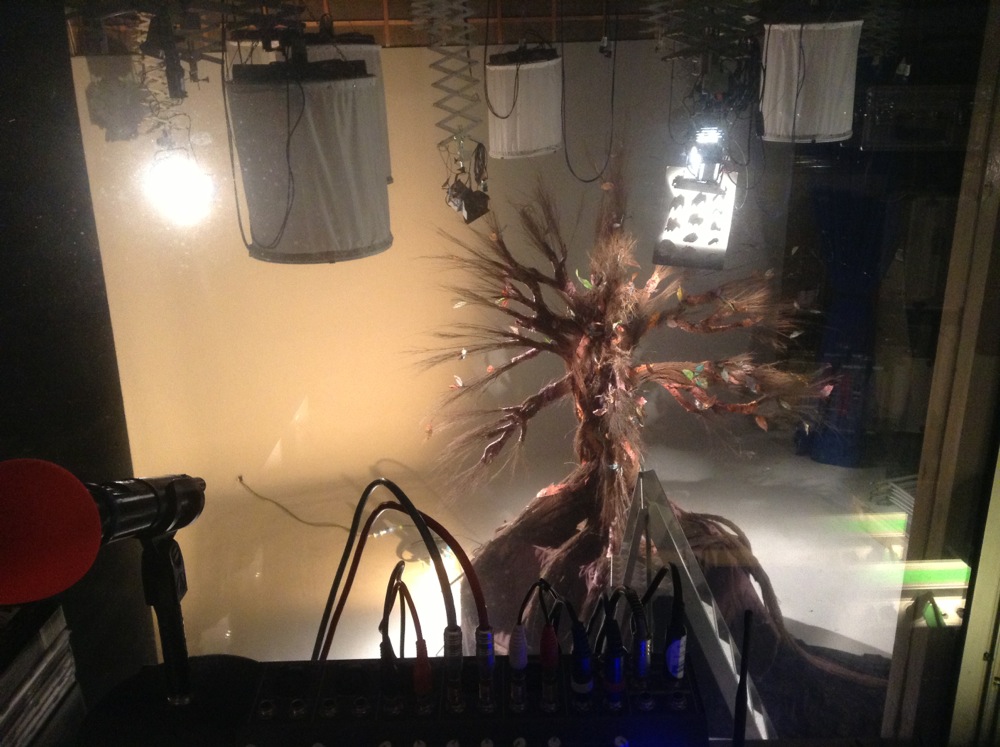
Some of the ill-fated space lights can be seen here, as well as the cucoloris rigged beneath the 650W fresnel key light. At the top left is the 2K fresnel backlight.
In the case of Droplets, the pre-rig day was also used to assemble the set, a tree on top of a cave, which must have measured about fifteen feet in height. As soon as it had been erected we realised that the six space lights Andy had spent all morning rigging were going to be in frame, as the top of the tree reached above the bottoms of these lights. (A space light is a circular arrangement of six tungsten tubes inside a cylinder of white diffusion cloth. They’re typically used in large numbers to simulate daylight in a studio.)
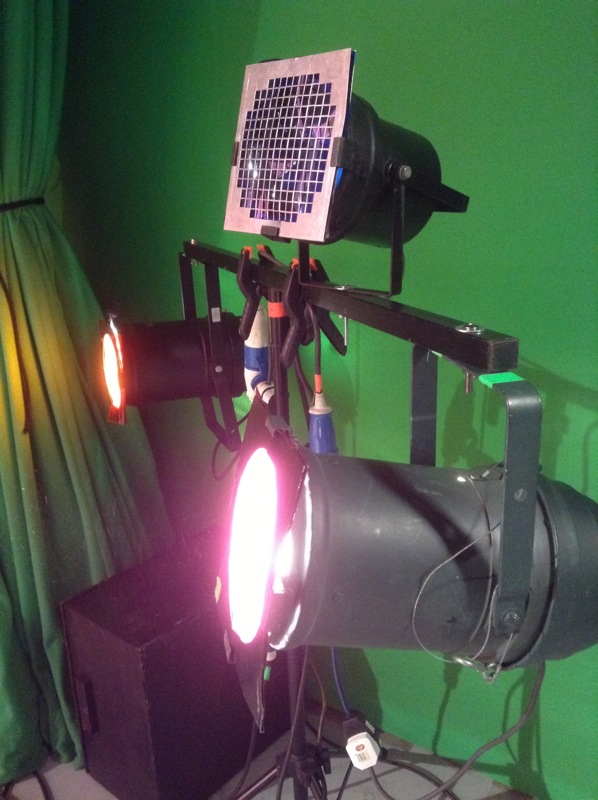
Some of the par cans that supplied the colour wash on the backdrop.
In fact my options on where I could put lights were very narrow, because of the lack of space around the set, both vertically and horizontally. We shot against the studio’s white infinity cove, and Tom wanted colour washes over this to suggest various times of day. Andy achieved this with gelled par cans off to either side of the set, but then it was crucial that no other light spilled onto the backdrop or it would ruin the effect.
We rigged a 2K tungsten fresnel immediately behind and above the set, for backlight, but it was hard to put anything in from the sides or the front without contaminating the backdrop. The 650W key light had to be rigged almost directly above the set, and even then its shadow can be seen on the floor in the wide shots if you look carefully. We hung a cucoloris (sheet of wood with random shapes cut in it) below the 650 to created the dappled effect of woodland light, taking care that a patch of light fell on the tarsier puppet’s main position.
For fill I used an LED panel off to the right of the set, dimming it to find a balance between its light being barely visible on the backdrop while still lifting the set and the puppets enough. I placed a smaller LED panel inside the cave, with a turquoise gel to suggest phosphorescence.
The final day/sunset look. From each side an orange-gelled and a pink-gelled par can light the backdrop. A 2K tungsten fresnel provides backlight, while a 650W fresnel with a cucoloris provides dappled light on the tree and tarsier. An LED panel off right supplies fill, and a second panel is inside the cave with a turquoise gel.For closer shots, a reflector below frame and/or a Dedolight behind camera were used to fill in unwanted shadows.
Another advantage of a studio is that you can easily run all the lamps into a dimmer board. This was very handy for Droplets because in addition to the day/sunset look, we had nighttime scenes and a storm to light for, and some on-screen transitions between the states. We were able to set these all up in advance and switch between them pretty much by just pushing a few sliders up and a few others down.
The night state involved a yellow-gelled redhead on the floor behind the cave, pointed straight at the backdrop. With its barn doors removed, this created a circle of light which reminded me strongly of the huge yellow moon in the posters for The Nightmare Before Christmas. I hadn’t been intending to create such a defined circle, but when I saw it I immediately loved its stylised look.
A second 650W fresnel was rigged, close to the first, and with ulcered black wrap in front of it to again created a dappled look, but with a purple gel on it. This took us away from the more traditional blue of nighttime scenes, adding to the stylised look again, and contrasting nicely in colour with the yellow “moon”.
The 2K backlight remained on for the night scenes, but the sunset colour wash on the backdrop was switched off, as was the fill.
Nighttime in puppet land: the 2K backlight remains on, a yellow-gelled redhead lights the backdrop from behind the set, and a purple-gelled 650W fresnel in the grid pushes through a cucoloris to highlight the tarsier.
For the storm scene we experimented with strobes, but they caused unpleasant rolling shutter artefacts. Instead I used the flash button on the 2K’s dimmer box to create lightning. Both 650W fresnels were turned off for this state, but the fill was turned back on. While the pink colour wash remained off, we brought up the orange wash just a little bit to suggest an angry sky in the background.
Stormy weather. The orange colour wash coming from the par cans, originally set up for the sunset look, is used here much more dimly to suggest an angry sky. The LED panel off right supplies fill while the 2K backlight is flashed periodically.
Copious smoke was used throughout (another advantage of studios – your smoke stays put!) to generate god rays as the backlight streamed through the tree. It also helped soften the backdrop and render the colour washes more convincing as a sky.
Watch the video here. Shot on a Red Epic operated by Chris Wetton. Big thanks to Andy and Giltbrook Studios for all their help. Visit www.polymathematics.co.uk to find out more about the amazing work of Tom Walsh and Amy Nicholson.