The Sunny 16 Rule in Cinematography

If you’ve done much still photography, particularly on celluloid, you will probably have heard of the Sunny 16 Rule. It’s a useful shortcut for correctly exposing bright day exteriors without needing a light meter. Is it of any use in digital cinematography though? Yes, and I’ll explain how.


How the rule Works

Sunny 16 is very simple: if the sun is out, set your aperture to f/16 and your shutter speed denominator to the same as your ISO. For example, at ISO 100 set the shutter to 1/100th of a second. At ISO 400 set the shutter to 1/400th of a second – or 1/500th of a second, if that’s the closest option the camera permits – and so on.

You can use the rule to work out other combinations from there. Say your ISO is 100 but you want the sharper, less motion-blurred look of a 1/400th shutter. That’s two stops slower, so open the aperture from f/16 to f/8. (Check out my exposure series if this is all Dutch to you.)

The Sunny 16 Rule works because the sun outputs a constant amount of light and is a constant distance from the earth – at least constant enough to make no significant difference. The sun’s illuminance at the earth’s surface is about 10,000 foot-candles. The following formula relates illuminance (b) to f-stop (f), shutter speed (s) and ISO (i):

Using Sunny 16 in the case of ISO 100 and a shutter speed of 1/100th of a second, this formula gives us…

… 6,400 foot-candles. Less than 10,000fc, certainly, but remember this is only a rule of thumb – and one designed for film, which isn’t hurt at all by a little over-exposure. The rule probably accounts for the fact that you may want to see into the shadows a bit too. (See my article “How Big a Light Do I Need?” for explanations of illuminance and foot-candles and more on the above formula.)

Anyway, you can see from the equation why the shutter speed denominator and ISO cancel each other out if they’re the same.


Using the rule in cinematography

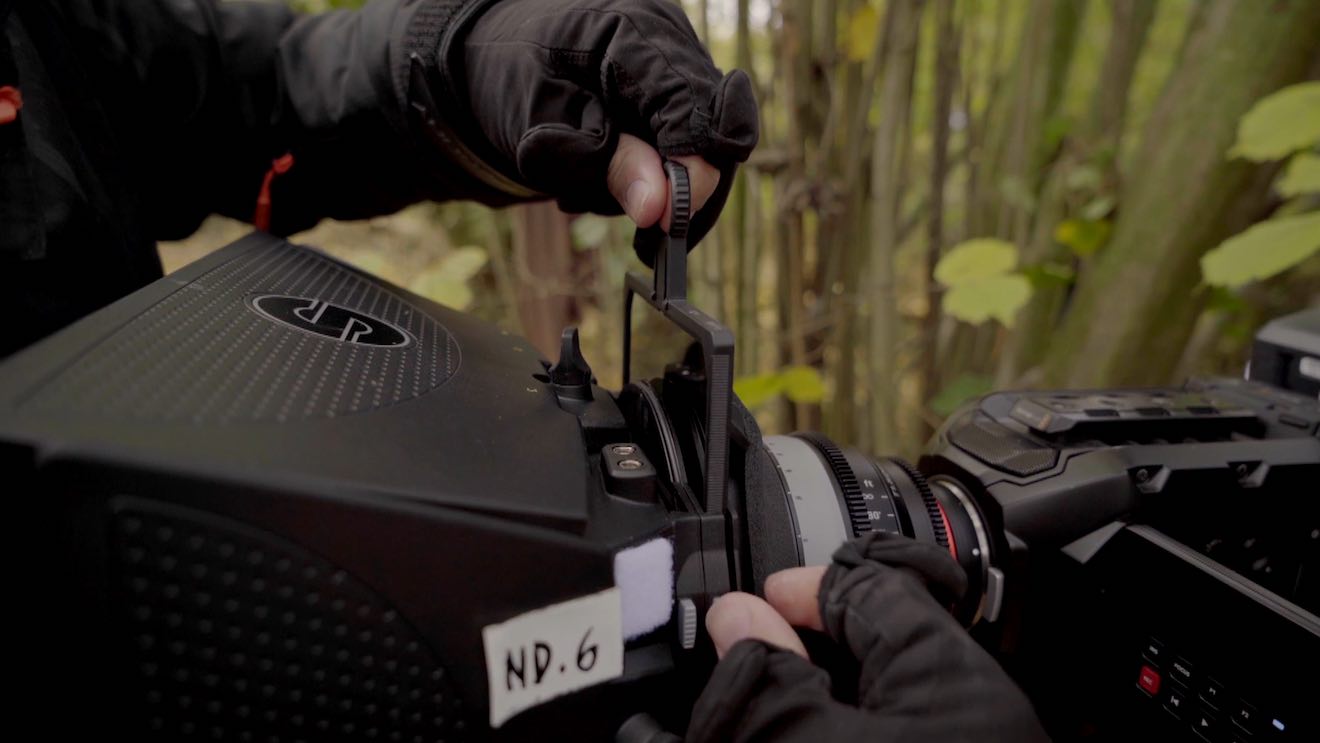
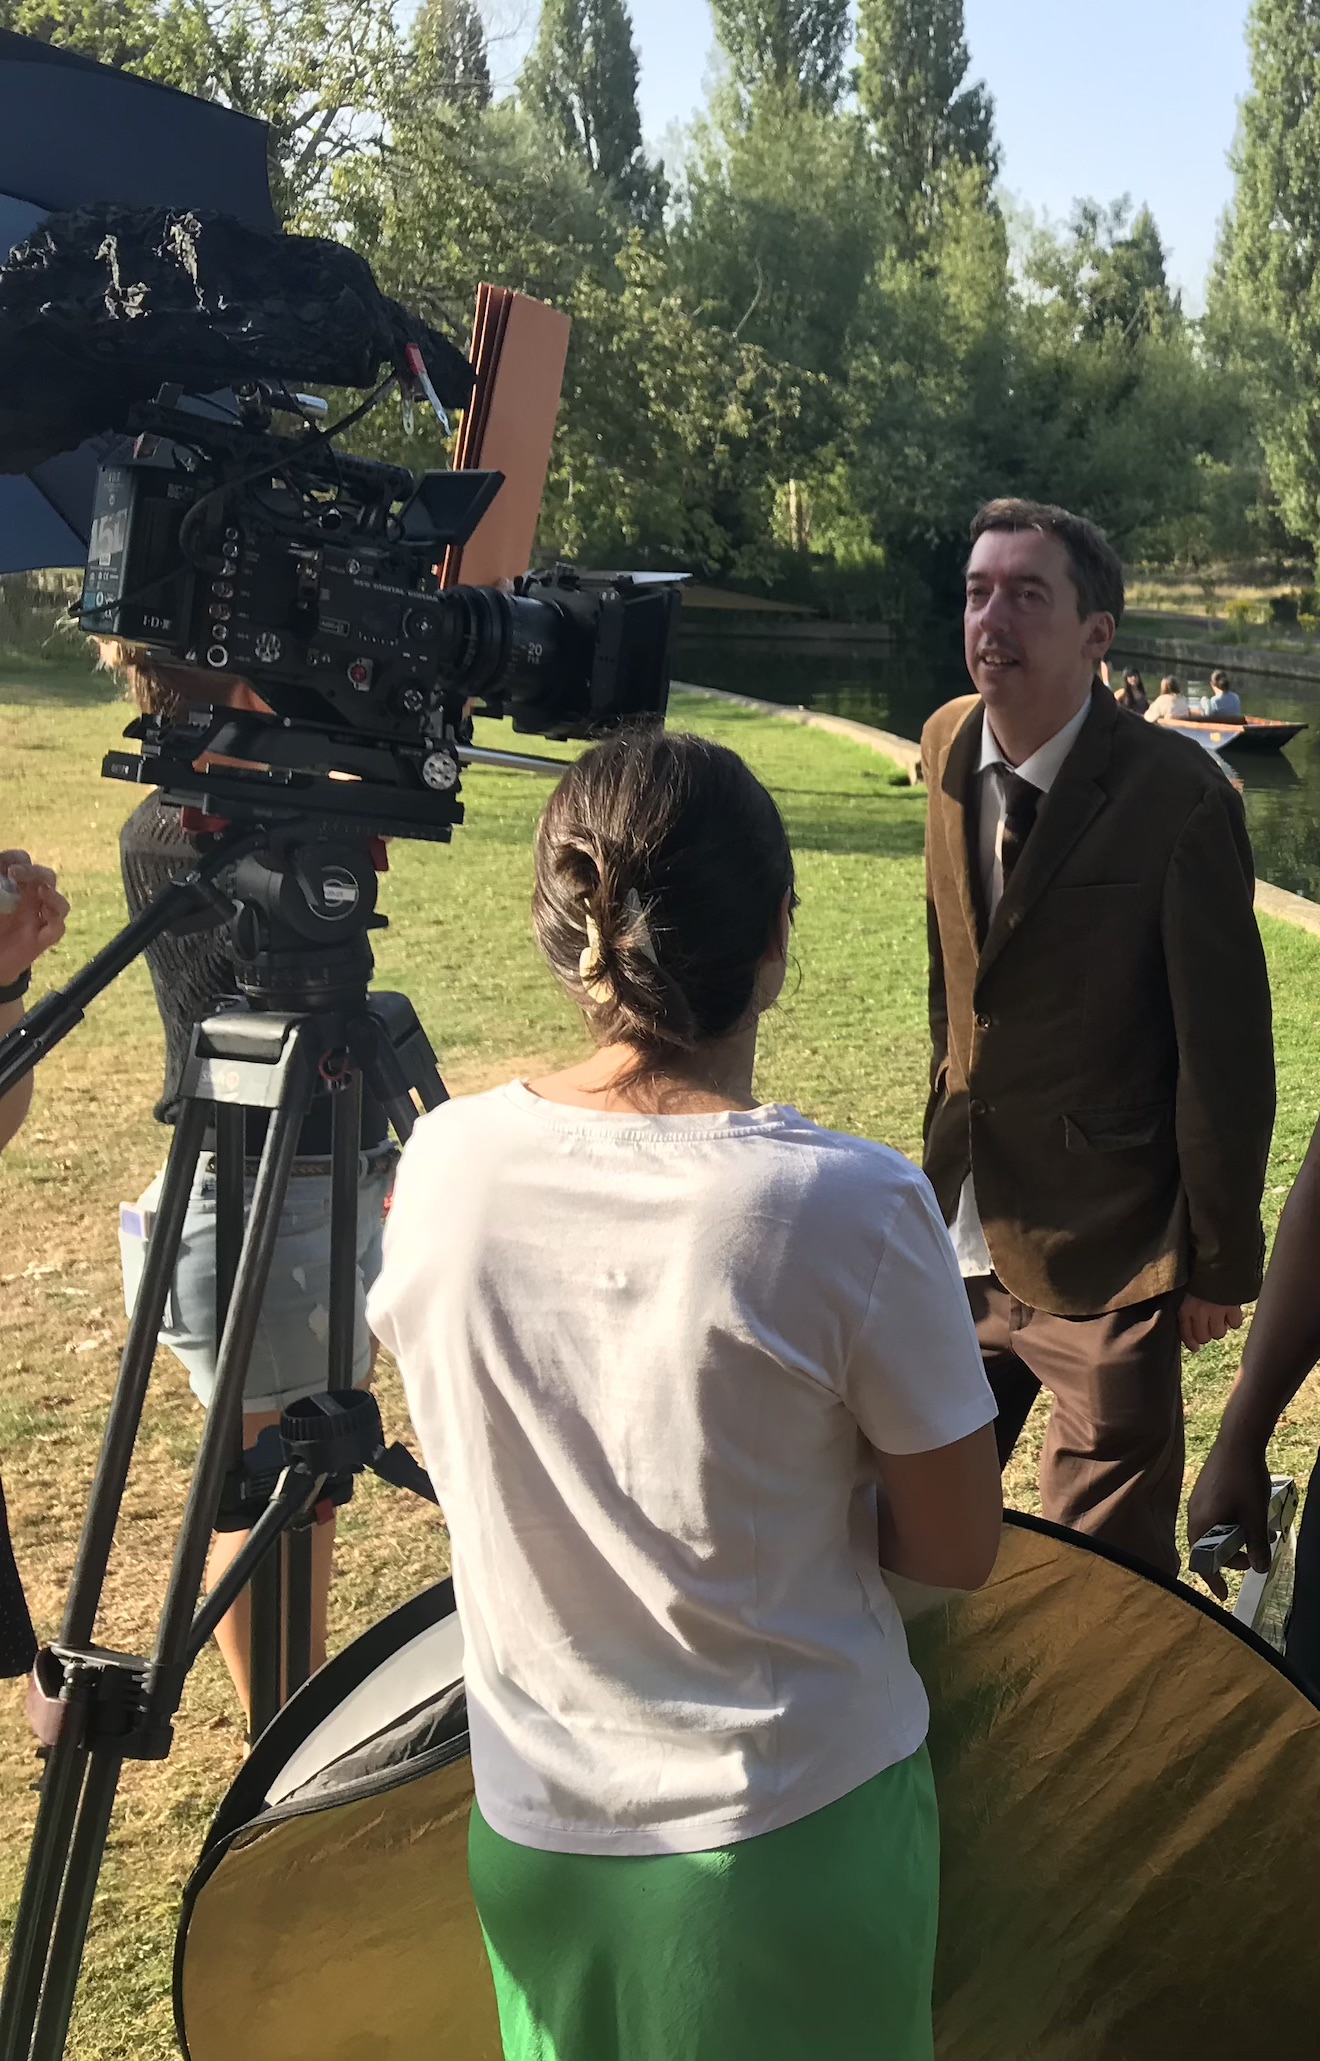
A few weeks ago when I was on the banks of the River Cam setting up for a scene in Harvey Greenfield is Running Late, my 1st AC Hamish Nichols asked which ND filter I wanted in the matte box. It was 5:30am; the sun had barely risen and certainly wasn’t high enough yet to reach me and my light meter over the trees and buildings on the horizon. But I knew that it would be hitting us by the time we turned over, and that the weather forecast was for a completely cloudless day, indeed the hottest day of the year at that time. So I was able to predict that we’d need the 2.1 ND.

How did I work this out? From the Sunny 16 Rule as follows:

  • I was shooting with a 1/50th of a second shutter interval (a 172.8° shutter angle at 24fps), so the Rule told me that f/16 (or T16) at ISO 50 would be the right exposure.
  • I was actually at ISO 800, which is four stops faster than ISO 50. (Doubling 50 four times gives you 800.)
  • I wanted to shoot at T5.6, which is three stops faster than T16.
  • That’s a total of seven stops too much light. To find the right optical density of ND filter you multiply that by 0.3, so 0.3 x 7 = 2.1. (More on this in my ND filters post.)

Everything on a film set sucks up time, so the more you know in advance, the more efficient you can be. Little tricks like this mean you don’t have to do a last-minute filter swing and waste five minutes that the director could have used for another take.

The Sunny 16 Rule in Cinematography

Exposure Part 2: Neutral Density (ND) Filters

In the first part of this series, I explained the concepts of f-stops and T-stops, and looked at how aperture can be used to control exposure. We saw that changing the aperture causes side effects, most noticeably altering the depth of field.

How can we set the correct exposure without compromising our depth of field? Well, as we’ll see later in this series, we can adjust the shutter angle and/or ISO, but both of those have their own side effects. More commonly a DP will use neutral density (ND) filters to control the amount of light reaching the lens. These filters get their name from the fact that they block all wavelengths of light equally, so they darken the image without affecting the colour.


When to use an ND Filter

Let’s look at an example. Imagine that I want to shoot at T4; this aperture gives a nice depth of field, on the shallow side but not excessively so. My subject is very close to a bright window and my incident light meter is giving me a reading of f/11. (Although I’m aiming for a T-stop rather an f-stop, I can still use the f-number my meter gives me; in fact if my lens were marked in f-stops then my exposure would be slightly off because the meter does not know the transmission efficiency of my lens.) Let’s remind ourselves of the f-stop/T-stop series before we go any further:

1      1.4      2      2.8      4      5.6      8      11      16      22     32

By looking at this series, which can be found printed on any lens barrel or permanently displayed on a light meter’s screen, I can see that f/11 (or T11) is three stops down from f/4 (or T4) – because 11 is three numbers to the right of 4 in the series. To achieve correct exposure at T4 I’ll need to cut three stops of light. I can often be seen on set counting the stops like this on my light meter or on my fingers. It is of course possible to work it out mathematically or with an app, but that’s not usually necessary. You quickly memorise the series of stops with practice.


What Strength of filter to choose

Some ND filters are marked in stops, so I could simply select a 3-stop ND and slide it into my matte box or screw it onto my lens. Other times – the built-in ND filters on the Sony FS7, for example – they’re defined by the fraction of light they let through. So the FS7’s 1/4 ND cuts two stops; the first stop halves the light – as we saw in part of one of this series – and the second stop halves it again, leaving us a quarter of the original amount. The 1/16 setting cuts four stops.

However, most commonly, ND filters are labelled in optical density. A popular range of ND filters amongst professional cinematographers are those made by Tiffen, and a typical set might be labelled as follows:

.3      .6      .9      1.2

That’s the optical density, a property defined as the natural logarithm of the ratio of the quantity of light entering the filter to the quantity of light exiting it on the other side. A .3 ND reduces the light by half because 10 raised to the power of -0.3 is about 0.5, and reducing light by half, as we’ve previously established, means dropping one stop.

If that maths is a bit much for you, don’t worry. All you really need to do is multiply the number of stops you want to cut by 0.3 to find the filter you need. So, going back to my example with the bright window, to get from T11 to T4, i.e. to cut three stops, I’ll pick the .9 ND.

It’s far from intuitive at first, but once you get your head around it, and memorise the f-stops, it’s not too difficult. Trust me!

Here are a couple more examples:

  • Light meter reads f/8 and you want to shoot at T5.6. That’s a one stop difference. (5.6 and 8 are right next to each other in the stop series, as you’ll see if you scroll back to the top.) 1 x 0.3 = 0.3 so you should use the .3 ND.
  • Light meter reads f/22 and you want to shoot at T2.8. That’s a six stop difference (scroll back up and count them), and 6 x 0.3 = 1.8, so you need a 1.8 ND filter. If you don’t have one, you need to stack two NDs in your matte box that add up to 1.8, e.g. a 1.2 and a .6.


Variations on a Theme

Variable ND filters are also available. These consist of two polarising filters which can be rotated against each other to progressively lighten or darken the image. They’re great for shooting guerilla-style with a small crew. You can set your iris where you want it for depth of field, then expose the image by eye simply by turning the filter. On the down side, they’re hard to use with a light meter because there is often little correspondence between the markings on the filter and stops. They can also have a subtle adverse effect on skin tones, draining a person’s apparent vitality, as some of the light which reflects off human skin is polarised.

IR pollution increases with successively stronger ND filters (left to right) used on a Blackmagic Micro Cinema Camera. The blue dyes in this costume evidently reflect a large amount of IR.

Another issue to look out for with ND filters is infra-red (IR). Some filters cut only the visible wavelengths of light, allowing IR to pass through. Some digital sensors will interpret this IR as visible red, resulting in an image with a red colour cast which can be hard to grade out because different materials will be affected to different degrees. Special IR ND filters are available to eliminate this problem.

These caveats aside, ND filters are the best way to adjust exposure (downwards at least) without affecting the image in any other way.

In the next part of this series I’ll look at shutter angles, what they mean, how they affect exposure and what the side effects are.

Learn how to use ND filters practically with my Cinematic Lighting online couse. Enter voucher code INSTA90 for an amazing 90% off.

Exposure Part 2: Neutral Density (ND) Filters

5 Tips for Shooting Water

As well as the general principles of cinematography like three-point lighting, short key and so on, there are specific principles that apply to certain situations only. Since these situations don’t always come up, it can take a little longer to develop a mental toolkit to get the best out of them. One such situation is shooting water – scenes by riversides, on beaches, beside swimming pools or in bathrooms. What are the tricks you can use to get the most cinematic look?


1. Use a circular polarising filter

4952a23d13929fe1903f601843a9ef4d
Without (left) and with (right) a polarising filter

A polarising filter cuts out all light waves except those travelling in a certain plane. Since reflections are usually only in a single plane, by rotating a circular polariser filter until you hit the right angle, you should be able to reduce the reflections you’re seeing. This can have an impact on how water appears on camera. On an overcast day, a CP will allow you to reduce the reflections of the grey sky, making the water look clearer and bluer.


2. Get sparkly

All the evidence you need that shooting towards the sun is good.
Shooting towards the sun provides both lovely backlight and sparkles on the river in this shot from Stop/Eject.

Water will always look prettier, particularly large bodies of it, if the sun is sparkling on it. How do you capture this on camera? Use the principle that the angle of incidence equals the angle of reflection, the same principle you use when positioning a bounce board. As with all day exteriors, shooting at the correct time of day is critical. You want the sun to bounce off the surface of the water and into your lens, which means being on the opposite side of the water to the sun, with the camera facing the sun. Use a top flag on your matte box (a.k.a. “top chop” or “eyebrow”) to prevent lens flare if you so wish.

img_1527


3. Get rippling light

Using a paddling pool and a par can to create a rippling light effect on The Little Mermaid. Note the black fabric as per tip 4 below.
Using a paddling pool and a par can to create a rippling light effect for close-ups on The Little Mermaid.  Note the black fabric as per tip 4 below. At the white end of the paddling pool you can see the stool where the talent sat.

The same principle can be applied to capture rippling light effects on walls, faces, etc. This time you want the sun, or artificial light source, to bounce off the surface of the water and hit your subject. You can suggest an off-camera body of water when there is none by carefully positioning a fish tank, paddling pool or similar in relation to the light and your subject.


4. Kill the bottom bounce

img_1529

Beware that not all the light will bounce off the surface of the water. Some will pass through it, bounce off the bottom of the pool and then hit your subject. If the bottom of the pool isn’t a dark colour, this unmoving bounce light will overpower the rippling light coming off the surface. Lay duvetyne or other black fabric on the bottom of the pool so that the only bounce is from the surface.


5. Fake it

A grip standing by to fake rippling watery light on The Little Mermaid
Grip Sawyer Oubre standing by to fake rippling watery light on The Little Mermaid

If you need to create a rippling light effect without using water, you can fake it with a sheet of blue gel on a frame in place of the water surface. Wobble the frame slightly (only slightly, or the sound department will start to yell at you) and the gel will ripple in the frame, creating a similar effect to water. Thanks to my key grip on The Little Mermaid, Jason Batey, for introducing me to this technique.

Another way to simulate watery light is to bounce a lamp off silver paper or fabric which is being rippled by a fan. More on this technique here.

What about shooting UNDER water? Just one tip for that: hire an underwater DP.

5 Tips for Shooting Water

“Above the Clouds”: October Pick-ups

Day 21 / Friday

My wallet plays a vital part in adjusting the tilt of the camera.

Two and a half months on, and most of the team are back for three days of pick-ups on this comedy road movie. (Read my blog from principal photography here.) Director Leon Chambers showed me some of the rough cut last night, and it’s shaping up to be a really warm, charming film.

Principal was photographed on an Alexa Mini in Pro Res 4444, with Zeiss Ultra Primes and a half Soft FX to take off the digital edge. Since the pick-ups consist largely of scenes in a moving hatchback – the film’s signature Fiat 500 “Yellow Peril” – Leon has invested in a Blackmagic Micro Cinema Camera. Designed for remote applications like drone use, the BMMCC is less than 9cm (3.5″) square, meaning it can capture dashboard angles which no other camera can, except a Go Pro. Unlike a Go Pro, the BMMCC can record Cinema DNG raw files with a claimed 13 stops of dynamic range.

Leon has fitted the camera with a Metabones Speed Booster, converting the BMMCC’s Super 16 sensor to almost a Super 35 equivalent and increasing image brightness by one and two-thirds stops. The Speed Booster also allows us to mount Nikon-fit Zeiss stills lenses – a 50mm Planar, and 25mm and 35mm Distagons – to which I add a half Soft FX filter again. A disadvantage of the Speed Booster is the looseness it introduces between lens and camera; when the focus ring is turned, the whole lens shifts slightly.

Filtration causes the first pick-ups hiccup when we realise that leading man Andy’s blue jacket is reading pink on camera.  This turns out to be an effect of infra-red pollution coming through our .6 and 1.2 ND filters. Yes, whoops, we forgot to order IR NDs. Fortunately we also have a variable ND filter, which doesn’t suffer from IR issues, so we switch to that.

img_1282
Left to right: variable ND, .6 ND, 1.2 ND. As you can see, there is a pronounced magenta shift on the non-variable filters.

Lighting follows a similar pattern to principal, with a little bounce and negative fill outside the car, and Rosco 12″x3″ LitePads on the dashboard for eye light inside. On the move, Rupert and I monitor and pull focus wirelessly from a chase car. Referring to the false colours on an Atomos Ninja, I radio Leon to tweak the variable ND between takes when necessary. I miss the generous dynamic range of the Alexa Mini, which so rarely clipped the sky – and I do not buy the manufacturer claims that the BMMCC has only one stop less, but it still does an amazing job for its size and price.


Day 22 / Saturday

I start the day by reviewing some of yesterday’s footage side-by-side with Alexa Mini material from principal. They are very comparable indeed. The only differences I can detect are a slightly sharper, more “video” look from the BMMCC, and a nasty sort of blooming effect in the stills lenses’ focus roll-off, which reminds me of the cheap Canon f1.8/50mm “Nifty Fifty” I used to own.

A couple of quick shots at Leon’s, then we move to his friend Penny’s house, where a donkey and a horse look on as we set up around the Peril in Penny’s paddock. There are some inserts to do which must cut in with scenes where the car is moving, but since we don’t see any windows in these inserts, the car remains parked. Two people stand, one on either side of the car, each sweeping a 4’x4′ polyboard repeatedly over the windscreen and sunroof. With heavy cloud cover softening the shadows of these boards, the result is an effective illusion that the car is moving.

img_1300

After lunch we have to capture additional angles for the traffic jam scene originally staged on day 14. By an amazing stroke of luck, the sun comes out, shining from almost exactly the same direction (relative to the car) as Colin bounced it in from with Celotex during principal. To begin with we are shooting through the windscreen, with a filter cocktail of half Soft FX, .6 ND and circular polariser. Since Andy is no longer wearing the blue jacket, I decided to risk the .6 ND rather than stacking multiple polarisers (the variable ND consists of two polarising filters). The next shot requires the camera to be rigged outside the driver’s window as the car drives away (pictured right).

Then we set up for night scenes to cut with day 11, which, like the inserts earlier today, we achieve using Poor Man’s Process. Instead of polyboards, Gary sweeps a 1’x1′ LED panel gelled with Urban Sodium over the passenger side of the car to represent streetlights. Rueben walks past the driver’s side with another 1’x1′ panel, representing the headlights of a passing car. I’ve clamped a pair of Dedos to Rupert’s Magliner, and Andrew dollies this side-to-side behind the Peril, representing the headlights of a car behind; these develop and flare very nicely during the scene. For fill, the usual two 12″x3″ LitePads are taped to the dashboard and dimmed to 10%.

For a later stretch of road with no streetlamps or passing cars, I use a low level of static backlight, and a static sidelight with a branch being swept in front of it to suggest moonlight through trees.


Day 23 / Sunday

After a brief scene against a tiny little micro set, we have more scenes to shoot around the parked Peril – and it’s supposed to be parked this time, no movement to fake. Unfortunately it’s raining, which doesn’t work for continuity. Although I’m worried it will block too much light, the crew erect a gazebo over the car to keep the rain off, and in fact it really helps to shape the light. I even add a black drape to increase the effect. Basically, when shooting through the driver’s window, it looks best if most of the light is coming through the windscreen and the passenger’s window, and when we shoot through the windscreen it looks best if most of the light is coming through the side and rear windows; it’s the usual cinematographic principle of not lighting from the front.

img_1304
Shooting through the driver’s window

After another driving scene using car rigs, we move to our final location, a designer bungalow near Seven Oaks. Here we are shooting day-for-dusk, though it’s more like dusk-for-dusk by the time the camera rolls. I set the white balance to 3,200K to add to the dusky feel, increasing it to 4,500K as the daylight gets bluer for real. The extra one and two-thirds stops which the Speed Booster provides are very useful, allowing us to capture all four steadicam shots before the light fades completely.

And with that we are wrapped for the second, but not final, time. Crucial scenes involving a yet-to-be-cast character remain for some future shoot.

Keep up to date with Above the Clouds on the official Facebook page or Instagram account.

“Above the Clouds”: October Pick-ups

Cinemasogyny?

Carole Landis
Carole Landis

We’ve all seen old movies in which the ladies’ close-ups are shot through a soft focus filter. What may surprise you is that many DPs still do this, only the filters are much subtler. And even if they don’t do this, almost all DPs will light women differently to men. Softer light sources, more flattering key angles and higher levels of fill are some of the typical differences employed in order to beautify an actress. I’ve done it myself.

The question is: is it misogynous?

Women tend to have softer facial features than men. So I could argue that by giving an actress softer lighting than an actor, I’m simply playing to the strengths of their respective physical features. And after all, it’s my job to make everyone look good, male or female. But I know that I’ve often spent longer lighting the leading lady’s CU than the leading man’s, because I’m trying to make it as flattering as possible, and I know that many other DPs do the same. There seems to be a consensus amongst cinematographers that men can be lit more for character, lit appropriately for who they are within the story, whereas women have to be lit primarily for beauty.

John Schwartzman, ASC on the cast of Armageddon: “They’re easy to shoot, easy to light. They’re mainly men. Men, you’re not worried about, ‘Is there a bag or a shadow here?'”

Liv Tyler in Armageddon (DP: John Schwartzman)

There was understandable outrage about Frozen when head of animation Lino DiSalvo was quoted as saying that the female characters’ facial expressions were more restricted than the men’s because of the need to “keep them pretty”. It’s the same kind of thing. The message here seems to be that it’s more important for women to look good than to have character. Undoubtedly this contributes on some level to the general lack of substance that female characters have in cinema.

This issue must also be seen in the context of the punishing beauty standards which women are held to in our society. Most moviegoers will not think about the lighting and filters that may have been employed to make actresses look better. Many women watching will simply see an image of beauty which society tells them they must aspire to. But they can never reach it, not without a DP following them around everywhere, any more than they can reach the standards of beauty set by Photoshopped magazine covers.

Douglas Slocombe, BSC: “Cameramen have always been obliged to make the leads as beautiful as possible. This can create problems because sometimes the ideal lighting for the actress might mean spilling unwanted light over other parts of the set, compromising the mood you are trying to create. I generally favour mood over actors in wider shots, and then concentrate on the face in the close-ups.”

Allison Doody in Indiana Jones and the Last Crusade (DP: Douglas Slocombe)

The standards cut both ways. If all women are pressurised to look beautiful, actresses are doubly so. You have only to look at the casting breakdowns, one of which Rose McGowan called out recently, to see that.

So let’s imagine I ignored beauty concerns and lit an actress purely for character. What might happen? The director and producer, whether male or female, might not be happy. (“Her face is one of our biggest selling points,” I once heard a producer say of her lead actress.) The actress herself may not be happy. Her agent may not be happy. An actress who does not look good onscreen may well find it harder to get work. I don’t think I have the right to subject the actress to these possible negative consequences.

And what about the make-up artist, who probably spent much longer making up the actresses than the actors, and may not get hired again if the actresses don’t look beautiful on camera? Or the colourist, who could track a softening filter to the actress’s face in post without my knowledge or consent? Is there any point in me bucking the system if they don’t too? Would I find it harder to get hired if the women on my showreel didn’t look beautiful?

M. David Mullen, ASC: “The sad truth is that most (not all) women look good with a flat, frontal key light – sometimes soft, sometimes hard. Look at most head shots that actresses carry around – they all look like they have no nose, only two eyes and a smile… There is usually a happy medium where the lighting can look good and dramatically correct and the actress looks good as well – but sometimes I get asked to ‘cross the line’ and glamourize a close-up beyond what is correct for the scene.”

Amanda Seyfried in Jennifer's Body (DP: M. David Mullen)
Amanda Seyfried in Jennifer’s Body (DP: M. David Mullen)

Maybe it’s not my problem? It’s my job to make people look good, but it’s society that tells me what constitutes looking good for a man and for a woman. But of course I’m part of society, and if we all shirk responsibility like that, nothing will ever change. And any situation where a man (92% of DPs are men) has control of how a woman looks is a potential arena for misogyny.

Undoubtedly it’s a grey area, walking the line between character and beauty which no metric can ever define, and perhaps I’m worried about nothing. But since this issue is rarely discussed, I’m very interested to know what people think.

Your thoughts please (via Twitter or Facebook).

Cinemasogyny?