Making an Analogue Print

This is the latest in my series about analogue photography. Previously, I’ve covered the science behind film capture, and how to develop your own black-and-white film. Now we’ll proceed to the next step: taking your negative and producing a print from it. Along the way we’ll discover the analogue origins of Photoshop’s dodge and burn tools.


Contact printing
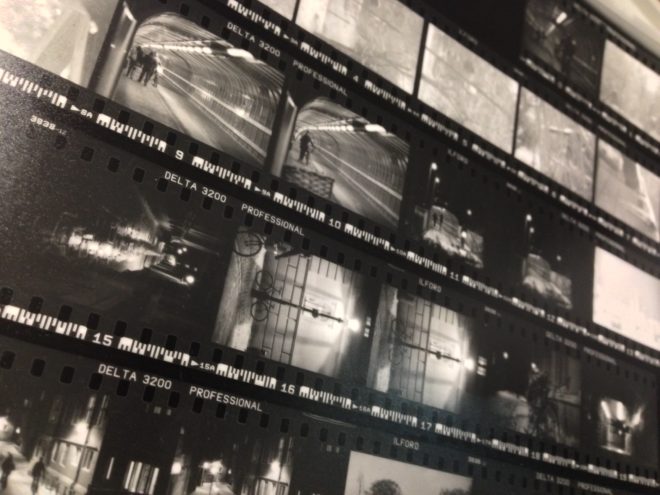
35mm contact sheet

To briefly summarise my earlier posts, we’ve seen that photographic emulsion – with the exception of colour slide film – turns black when exposed to light, and remains transparent when not. This is how we end up with a negative, in which dark areas correspond to the highlights in the scene, and light areas correspond with the shadows.

The simplest way to make a positive print from a negative is contact-printing, so called because the negative is placed in direct contact with the photographic printing paper. This is typically done in a spring-loaded contact printing frame, the top of which is made of glass. You shine light through the glass, usually from an enlarger – see below – for a measured period of time, determined by trial and error. Where the negative is dark (highlights) the light can’t get through, and the photographic emulsion on the paper remains transparent, allowing the white paper base to show through. Where the negative is transparent (shadows) the light passes through, and the emulsion – once developed and fixed in the same way as the original film – turns black. Thus a positive image is produced.

Normally you would contact-print multiple strips of negative at the same time, perhaps an entire roll of film’s worth, if your paper is large enough to fit them all. Then you can examine them through a loupe to decide which ones are worth enlarging. You have probably seen contact sheets, complete with circled images, stars and arrows indicating which frames the photographer or picture editor likes, where they might crop it, and which areas need doctoring. In fact, contact sheets are so aesthetically pleasing that it’s not uncommon these days for graphic designers to create fake digital ones.

The correct exposure time for a contact print can be found by exposing the whole sheet for, say, ten seconds, then covering a third of it with a piece of card, exposing it for another ten seconds, then covering that same third plus another third and exposing it for ten seconds more. Once developed, you can decide which exposure you like best, or try another set of timings.

120 contact sheet


Making an enlargement

Contact prints are all well and good, but they’re always the same size as the camera negative, which usually isn’t big enough for a finished product, especially with 35mm. This is where an enlarger comes in.

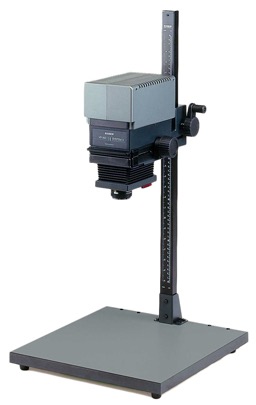
An enlarger is essentially a projector mounted on a stand. You place the negative of your chosen image into a drawer called the negative carrier. Above this is a bulb, and below it is a lens. When the bulb is turned on, light shines through the negative, and the lens focuses the image (upside-down of course) onto the paper below. By adjusting the height of the enlarger’s stand, you can alter the size of the projected image.

Just like a camera lens, an enlarger’s lens has adjustable focus and aperture. You can scrutinise the projected image using a loupe; if you can see the grain of the film, you know that the image is sharply focused.

The aperture is marked in f-stops as you would expect, and just like when shooting, you can trade off the iris size against the exposure time. For example, a print exposed for 30 seconds at f/8 will have the same brightness as one exposed for 15 seconds at f/5.6. (Opening from f/8 to f/5.6 doubles the light, or increases exposure by one stop, while halving the time cuts the light back to its original value.)


Dodging and burning

As with contact-printing, the optimum exposure for an enlargement can be found by test-printing strips for different lengths of time. This brings us to dodging and burning, which are respectively methods of decreasing or increasing the exposure time of specific parts of the image.

Remember that the printing paper starts off bright white, and turns black with exposure, so to brighten part of the image you need to reduce its exposure. This can be achieved by placing anything opaque between the projector lens and the paper for part of the exposure time. Typically a circle of cardboard on a piece of wire is used; this is known as a dodger. That’s the “lollipop” you see in the Photoshop icon. It’s important to keep the dodger moving during the exposure, otherwise you’ll end up with a sharply-defined bright area (not to mention a visible line where the wire handle was) rather than something subtle.

I dodged the robin in this image, to help him stand out.

Let me just say that dodging is a joyful thing to do. It’s such a primitive-looking tool, but you feel like a child with a magic wand when you’re using it, and it can improve an image no end. It’s common practice today for digital colourists to power-window a face and increase its luminance to draw the eye to it; photographers have been doing this for decades and decades.

Burning is of couse the opposite of dodging, i.e. increasing the exposure time of part of the picture to make it darker. One common application is to bring back detail in a bright sky. To do this you would first of all expose the entire image in such a way that the land will look good. Then, before developing, you would use a piece of card to cover the land, and expose the sky for maybe five or ten seconds more. Again, you would keep the card in constant motion to blend the edges of the effect.

To burn a smaller area, you would cut a hole in a piece of card, or simply form your hands into a rough hole, as depicted in the Photoshop icon.


Requirements of a darkroom

The crucial thing which I haven’t yet mentioned is that all of the above needs to take place in near-darkness. Black-and-white photographic paper is less sensitive to the red end of the spectrum, so a dim red lamp known as a safe-light can be used to see what you’re doing. Anything brighter – even your phone’s screen – will fog your photographic paper as soon as you take it out of its lightproof box.

Once your print is exposed, you need to agitate it in a tray of diluted developer for a couple of minutes, then dip it in a tray of water, then place it in a tray of diluted fixer. Only then can you turn on the main lights, but you must still fix the image for five minutes, then leave it in running water for ten minutes before drying it. (This all assumes you’re using resin-coated paper.)

Because you need an enlarger, which is fairly bulky, and space for the trays of chemicals, and running water, all in a room that is one hundred per cent lightproof, printing is a difficult thing to do at home. Fortunately there are a number of darkrooms available for hire around the country, so why not search for a local one and give analogue printing a go?
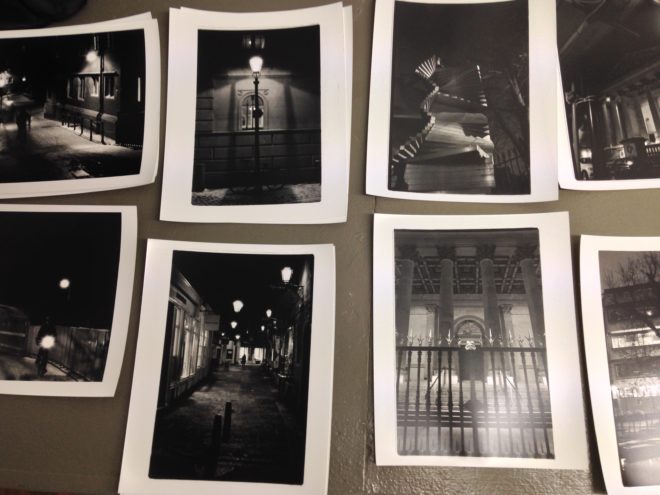
Some enlargements from 35mm on 8×10″ paper


Making an Analogue Print

How to Create a Blu-ray Motion Menu in Adobe Encore

Today I thought I’d share the process I figured out for creating looping menus in Encore for DVD and Blu-ray. If, like me, you want to do it all from scratch rather than using any of the built-in templates, the process isn’t particularly intuitive, and was sufficiently different from DVD Studio Pro (the software I’m used to) to leave me scratching my head from time to time, but here’s how I did it in the end. I’ll use Stop/Eject‘s main menu as the example. I’m going to assume you already know the basics of Encore and can find your way around Photoshop.

First of all you have to understand how DVDs and Blu-rays (henceforth collectively referred to simply as “discs”) work. They’re not like websites or Flash movies where you can do anything you want; the specifications are quite narrow. A motion menu consists of two elements:

  1. The background, which is a video (typically with audio) that you can create in Final Cut Pro, Premiere, or whatever.
  2. The button highlights, which show the user which button is currently selected. The user will only ever see one of these at a time.

Hang on – background, button hightlights…. but what about the buttons themselves? These have to be part of the background. Yes, you can import your background movie as a Quicktime into Encore and then add buttons to it within Encore, but when you come to build your disc the software will render those buttons into the background movie. All the disc player can deal with is a background movie and the highlights.

I prefer to build my buttons into the background movie in my editing software (Final Cut) rather than add them in Encore, and that’s the approach I’ll outline here.

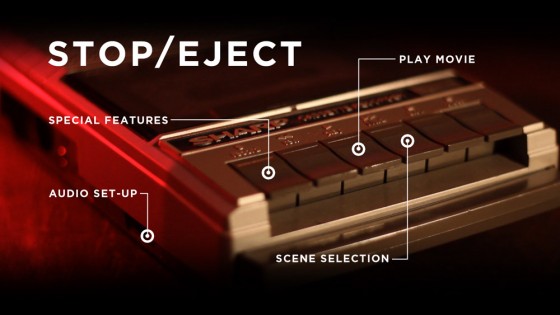
Another crucial point to understand is that each button highlight can only be one colour. So look at the Stop/Eject main menu below. The button highlights are the white rings. They could not be red-and-white striped rings, like life preservers; they can only be one solid colour.

Stop/Eject's main menu with all the button highlights visible
Stop/Eject’s main menu with all the button highlights visible

So, now you appreciate all of the above you can get started on your menu. The first step for me was shooting and editing the background movie, although for most people this will be a computer-generated graphic rather than something shot with a camera. It’s important to think about where your loop point is going to be so that the menu will loop smoothly.

The following video shows my edited background movie. The buttons were created in Photoshop and added to the movie in Final Cut, before exporting as a ProRes Quicktime (with these buttons now baked in) ready to be imported into Encore.

In Encore I can now create a new menu and use the pick-whip in the properties panel to select my Quicktime file as the source for both the video and the audio. I can also set the loop point in the same panel.

I need to make sure that the loop point is at a place in the video where the audio track is silent or at least is playing a constant background noise – e.g. an air conditioning hum – that will not jump unpleasantly when the menu loops. You’ll notice that my menu’s audio track has a beat or two of silence around the loop point. If you’re using music, don’t start it immediately at the loop point as many players take a fraction of a second to kick in the audio after they loop.

I also need to ensure that all of the buttons have appeared before the loop point. This is because the loop point is the place at which the player will start displaying the button highlight. If your menu loops back to a point before the buttons have appeared, the user will momentarily see the highlight without the corresponding button.

To create the button highlights, right-click (or ctrl-click if you’re using a single button mouse) on the menu and choose “edit menu in Photoshop” from the contextual menu. Photoshop will open with a still of your menu as it appears at the loop point. Annoyingly, this still will be in standard definition even if you’re creating a Blu-ray disc, so the first thing you’ll need to do in Photoshop is to change the pixel aspect ratio to square and re-size the image to 1920×1080.

For each button, create a new group in the layers palette and give it a name that starts with (+). When you go back to Encore it will recognise this folder as pertaining to a button. Within the group, make a new layer and call it (=1)highlight. Draw your button highlight on this layer, remembering that it can only be one colour.

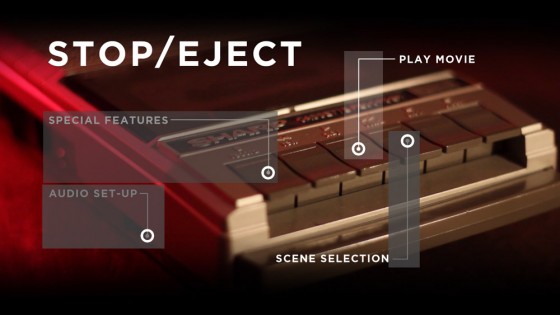
Now we need to pause a moment and consider hit areas. When your disc is played in a computer, the user can select buttons with the mouse. The hit area determines what part of the screen the user must hover the mouse pointer over for the button to be considered selected. This area MUST be rectangular. For each button, Encore will look at all the layers within the relevant group and draw the smallest possible rectangle that will completely enclose all those layers; that will be your button’s hit area.

In my case, right now the only layers in my groups are the white rings which are the button highlights themselves. But what if someone hovers the mouse over the words “special features”? I want the button to be selected then too, so in the (+)special features group I’ll create a second layer (critically, it must be below the highlight layer) and draw a rectangle where I want my hit area to be. I can then click the eye icon next to this in the layer palette so it becomes invisible and doesn’t ruin the look of my menu.

The main menu with the hit areas visible

Another restriction of the DVD/Blu-ray specs is that button hit areas can’t overlap. Given the restriction I mentioned earlier, that they must be rectangular, you can see from the layout of my menu that it isn’t possible for the hit areas of Play Movie and Scene Selection to include the text for those buttons without overlapping each other. I choose not to compromise the design of the menu and trust that users will soon find the hit area with a quick sweep of the mouse over the whole image.

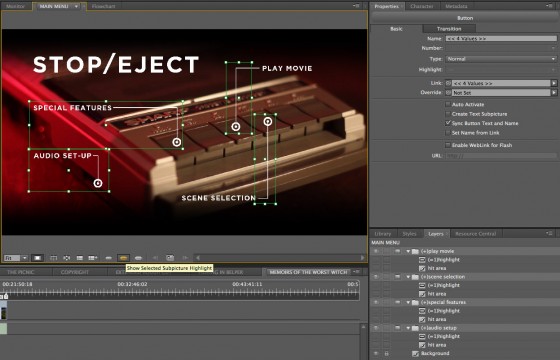
I save the image in Photoshop and return to Encore. I can now see the button hit areas outlined on the menu. If I click the icon for “show selected subpicture highlights” (see below image) I can see the highlights too. It’s now simply a case of setting the target for each button using the pick-whip in the properties panel.

The Encore interface with the button to view the highlights hovered over

When users return to the main menu, after they’ve visited the special features menu, for example, I don’t want them to have to sit through the intro part of the menu again; I want them to go straight to the loop point. So I’ll go to the main menu button in the special features menu and set the target – not using the pick-whip, but through the pull-down menu. I’ll select “specifiy link” and in the dialogue box which appears I make sure to tick the “set to loop point” checkbox.

One final point. The version of Encore I used (CS5.1) has a bug whereby any motion menu longer than 70 seconds will not loop smoothly; a second or so of black will appear each time the player gets to the end of the loop. This issue does not occur in Encore’s preview, only when you’ve burnt the disc. There’s no workaround that I can find other than shortening the menu.

I hope this has been some help to those of you out there who are still burning your films onto physical discs. Let me know if you’d like to hear more about any part of the disc authoring process.

How to Create a Blu-ray Motion Menu in Adobe Encore