“Above the Clouds”: October Pick-ups

Day 21 / Friday

My wallet plays a vital part in adjusting the tilt of the camera.

Two and a half months on, and most of the team are back for three days of pick-ups on this comedy road movie. (Read my blog from principal photography here.) Director Leon Chambers showed me some of the rough cut last night, and it’s shaping up to be a really warm, charming film.

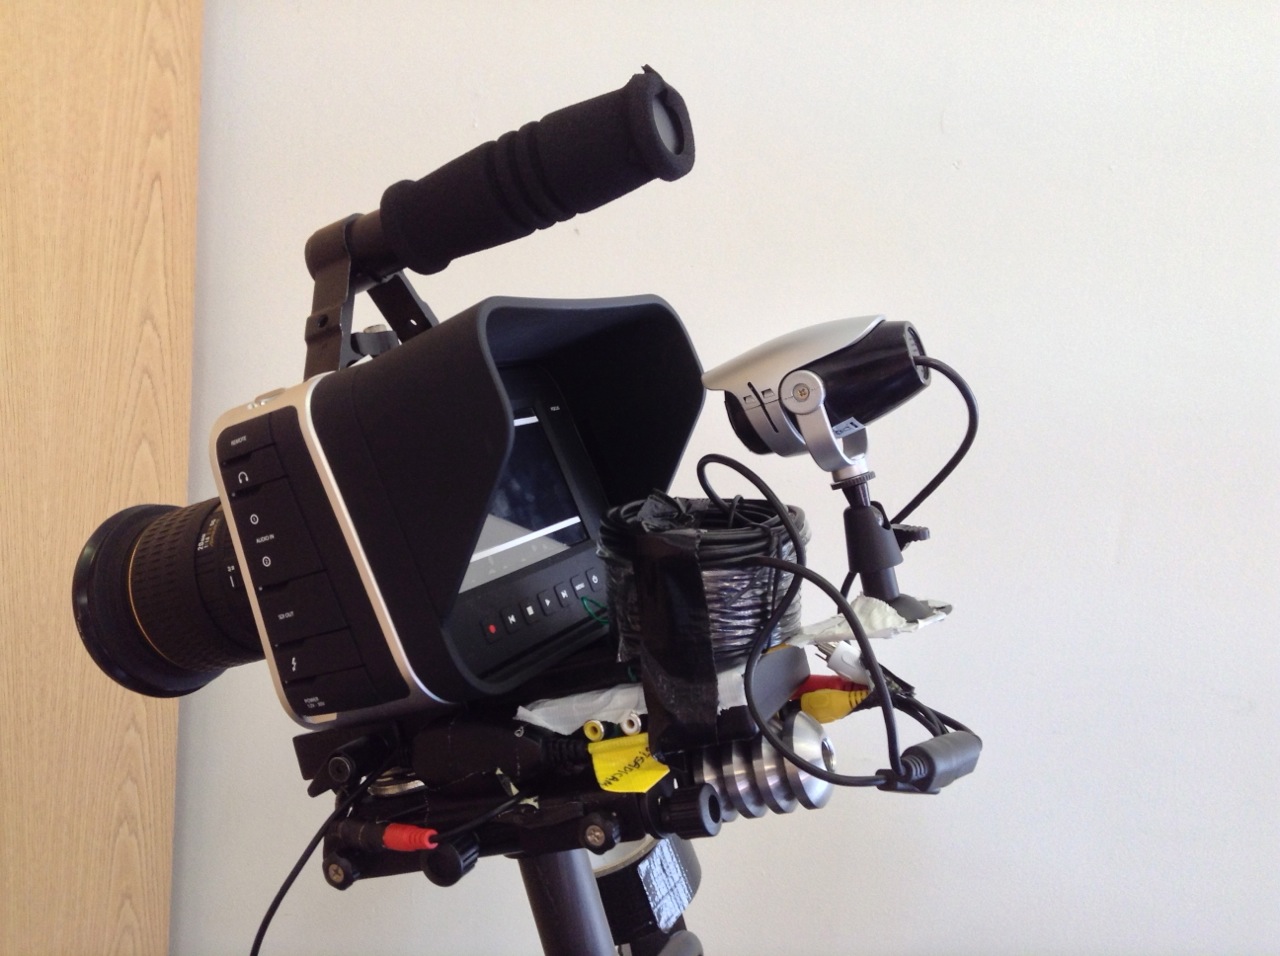
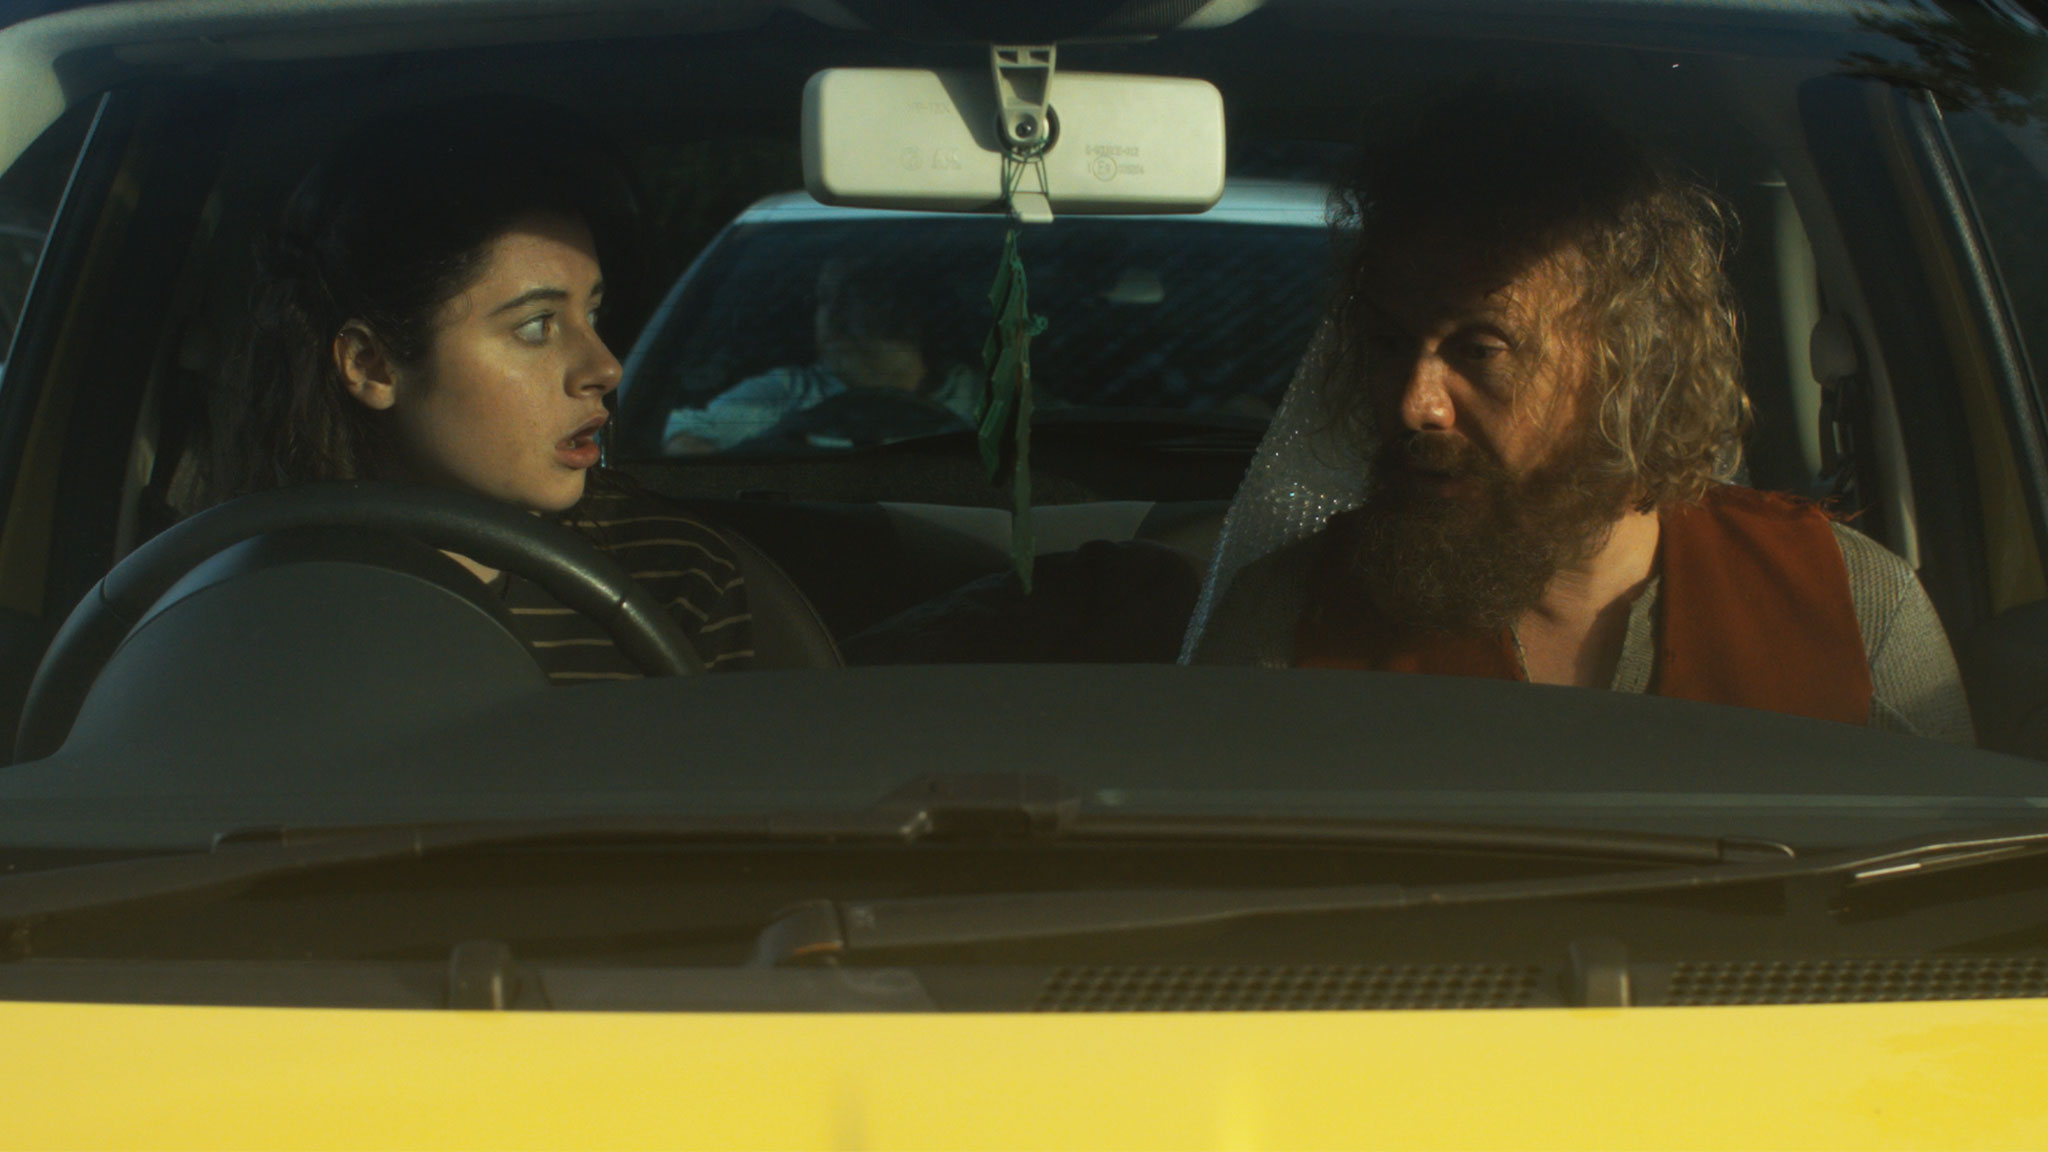
Principal was photographed on an Alexa Mini in Pro Res 4444, with Zeiss Ultra Primes and a half Soft FX to take off the digital edge. Since the pick-ups consist largely of scenes in a moving hatchback – the film’s signature Fiat 500 “Yellow Peril” – Leon has invested in a Blackmagic Micro Cinema Camera. Designed for remote applications like drone use, the BMMCC is less than 9cm (3.5″) square, meaning it can capture dashboard angles which no other camera can, except a Go Pro. Unlike a Go Pro, the BMMCC can record Cinema DNG raw files with a claimed 13 stops of dynamic range.

Leon has fitted the camera with a Metabones Speed Booster, converting the BMMCC’s Super 16 sensor to almost a Super 35 equivalent and increasing image brightness by one and two-thirds stops. The Speed Booster also allows us to mount Nikon-fit Zeiss stills lenses – a 50mm Planar, and 25mm and 35mm Distagons – to which I add a half Soft FX filter again. A disadvantage of the Speed Booster is the looseness it introduces between lens and camera; when the focus ring is turned, the whole lens shifts slightly.

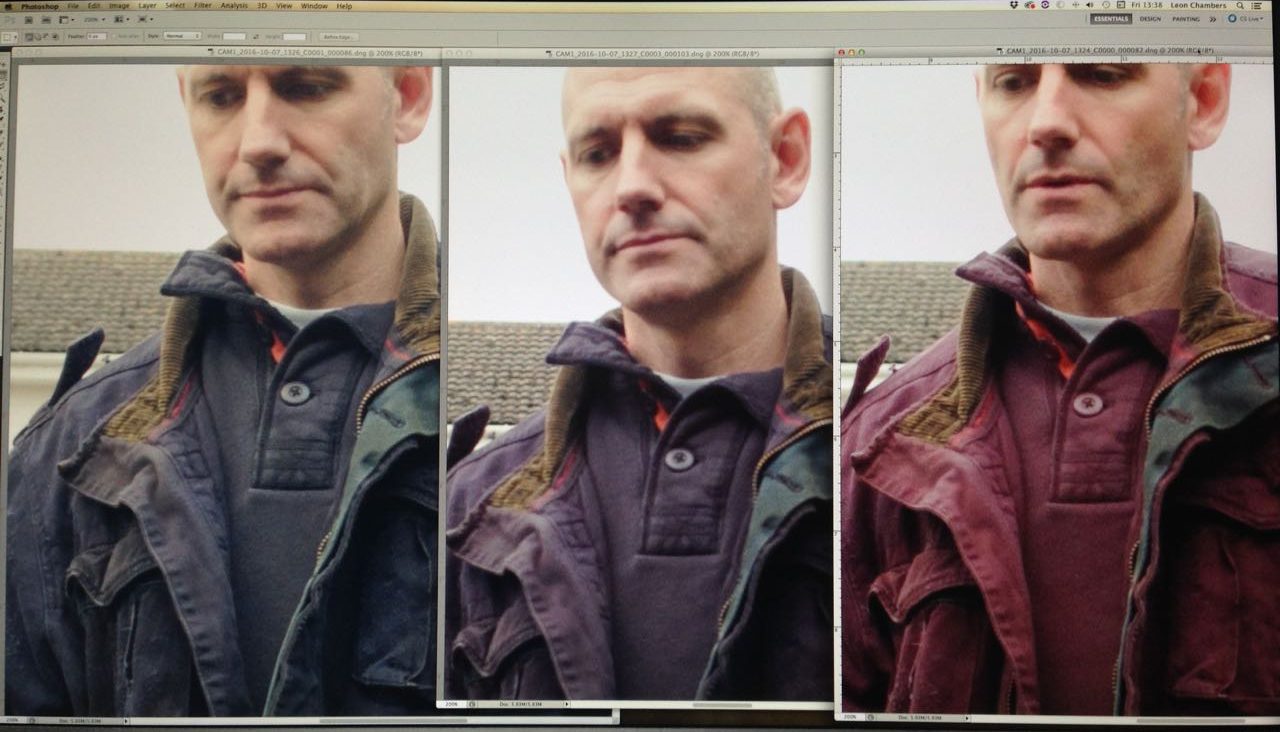
Filtration causes the first pick-ups hiccup when we realise that leading man Andy’s blue jacket is reading pink on camera.  This turns out to be an effect of infra-red pollution coming through our .6 and 1.2 ND filters. Yes, whoops, we forgot to order IR NDs. Fortunately we also have a variable ND filter, which doesn’t suffer from IR issues, so we switch to that.

img_1282
Left to right: variable ND, .6 ND, 1.2 ND. As you can see, there is a pronounced magenta shift on the non-variable filters.

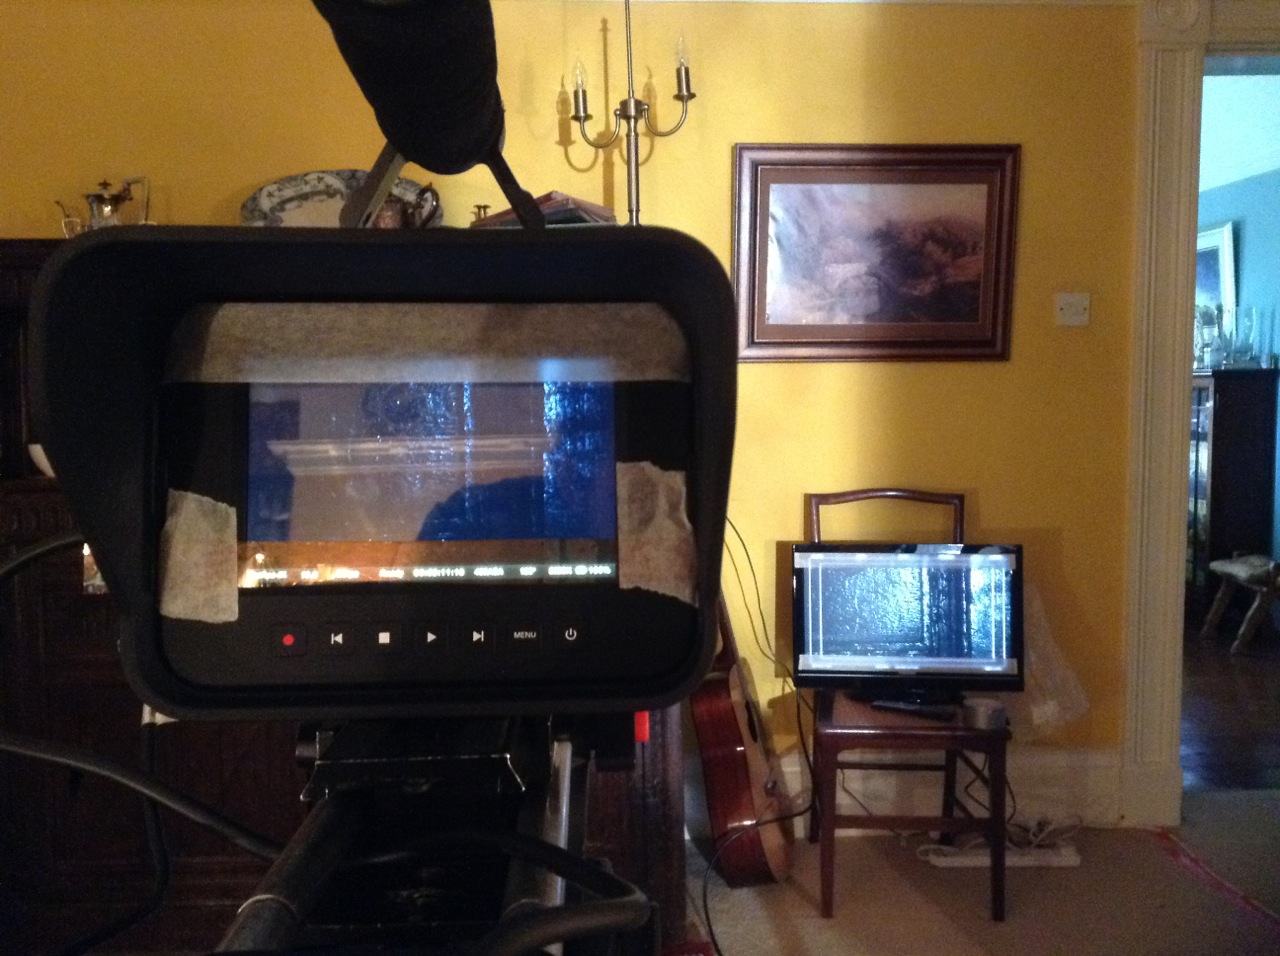
Lighting follows a similar pattern to principal, with a little bounce and negative fill outside the car, and Rosco 12″x3″ LitePads on the dashboard for eye light inside. On the move, Rupert and I monitor and pull focus wirelessly from a chase car. Referring to the false colours on an Atomos Ninja, I radio Leon to tweak the variable ND between takes when necessary. I miss the generous dynamic range of the Alexa Mini, which so rarely clipped the sky – and I do not buy the manufacturer claims that the BMMCC has only one stop less, but it still does an amazing job for its size and price.


Day 22 / Saturday

I start the day by reviewing some of yesterday’s footage side-by-side with Alexa Mini material from principal. They are very comparable indeed. The only differences I can detect are a slightly sharper, more “video” look from the BMMCC, and a nasty sort of blooming effect in the stills lenses’ focus roll-off, which reminds me of the cheap Canon f1.8/50mm “Nifty Fifty” I used to own.

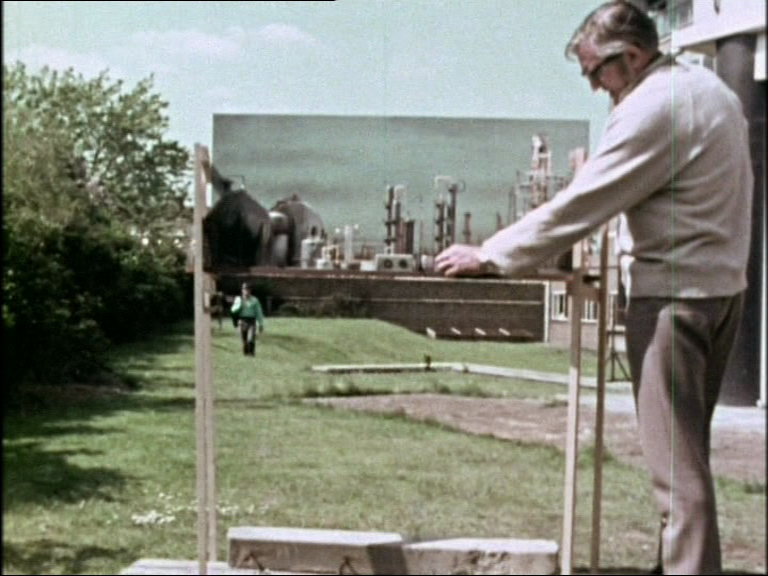
A couple of quick shots at Leon’s, then we move to his friend Penny’s house, where a donkey and a horse look on as we set up around the Peril in Penny’s paddock. There are some inserts to do which must cut in with scenes where the car is moving, but since we don’t see any windows in these inserts, the car remains parked. Two people stand, one on either side of the car, each sweeping a 4’x4′ polyboard repeatedly over the windscreen and sunroof. With heavy cloud cover softening the shadows of these boards, the result is an effective illusion that the car is moving.

img_1300

After lunch we have to capture additional angles for the traffic jam scene originally staged on day 14. By an amazing stroke of luck, the sun comes out, shining from almost exactly the same direction (relative to the car) as Colin bounced it in from with Celotex during principal. To begin with we are shooting through the windscreen, with a filter cocktail of half Soft FX, .6 ND and circular polariser. Since Andy is no longer wearing the blue jacket, I decided to risk the .6 ND rather than stacking multiple polarisers (the variable ND consists of two polarising filters). The next shot requires the camera to be rigged outside the driver’s window as the car drives away (pictured right).

Then we set up for night scenes to cut with day 11, which, like the inserts earlier today, we achieve using Poor Man’s Process. Instead of polyboards, Gary sweeps a 1’x1′ LED panel gelled with Urban Sodium over the passenger side of the car to represent streetlights. Rueben walks past the driver’s side with another 1’x1′ panel, representing the headlights of a passing car. I’ve clamped a pair of Dedos to Rupert’s Magliner, and Andrew dollies this side-to-side behind the Peril, representing the headlights of a car behind; these develop and flare very nicely during the scene. For fill, the usual two 12″x3″ LitePads are taped to the dashboard and dimmed to 10%.

For a later stretch of road with no streetlamps or passing cars, I use a low level of static backlight, and a static sidelight with a branch being swept in front of it to suggest moonlight through trees.


Day 23 / Sunday

After a brief scene against a tiny little micro set, we have more scenes to shoot around the parked Peril – and it’s supposed to be parked this time, no movement to fake. Unfortunately it’s raining, which doesn’t work for continuity. Although I’m worried it will block too much light, the crew erect a gazebo over the car to keep the rain off, and in fact it really helps to shape the light. I even add a black drape to increase the effect. Basically, when shooting through the driver’s window, it looks best if most of the light is coming through the windscreen and the passenger’s window, and when we shoot through the windscreen it looks best if most of the light is coming through the side and rear windows; it’s the usual cinematographic principle of not lighting from the front.

img_1304
Shooting through the driver’s window

After another driving scene using car rigs, we move to our final location, a designer bungalow near Seven Oaks. Here we are shooting day-for-dusk, though it’s more like dusk-for-dusk by the time the camera rolls. I set the white balance to 3,200K to add to the dusky feel, increasing it to 4,500K as the daylight gets bluer for real. The extra one and two-thirds stops which the Speed Booster provides are very useful, allowing us to capture all four steadicam shots before the light fades completely.

And with that we are wrapped for the second, but not final, time. Crucial scenes involving a yet-to-be-cast character remain for some future shoot.

Keep up to date with Above the Clouds on the official Facebook page or Instagram account.

“Above the Clouds”: October Pick-ups

Cinematography: My Process

Consulting director Sophie Black's storyboards on Night Owls. Photo: Dimitri Yiallourou
Consulting director Sophie Black’s storyboards on Night Owls. Photo: Dimitri Yiallourou

I thought it might be of interest to describe my typical working process as a director of photography on a shooting day. Different directors and ADs will run their sets different ways, so this is a generalisation.

I like to start the day by reading some of Stephen Murphy’s DOP Documents over breakfast. These elegantly-laid-out collections of screen grabs from top cinematographers are fantastic inspiration.

On some productions I’ve had long talks with the director, I’ve seen storyboards or shotlists and I’ve been on the location scouts or walked the sets already. On others I’m a last minute hire and I know nothing beyond what it says in the script. (And this should go without saying, but you need to read the script. Apparently some DPs don’t. WTF?)

Whenever I see the set for the first time, be that in preproduction or on the day, I start to think about light sources. If it’s outdoors, what is the sun orientation? If it’s indoors, where are the windows? If it’s night, what practical sources are there and do I need to add or remove some?

Ideally the next thing that happens is that the actors arrive, still in their street clothes, and the director blocks the scene with them. If I see anything that can be tweaked to orientate the talent better towards the light sources, or to provide more interesting framing, I’ll suggest it.

During the blocking I’ll wander around with Artemis (a virtual director’s viewfinder app on my iPad). If there’s a shotlist or storyboard, I’ll find the angles described and check they work. If not, I’ll find the angles I think will work well. I’ll screen-grab all of these and show them to the director when they’re done blocking. There may then be some give-and-take, perhaps adjusting the actors in situ through the viewfinder, until the director is happy.

Before the actors depart to get into costume and make-up, I’ll have my assistant put down marks for their key positions. Then the cast can leave and I can get down to the business of lighting the scene. Here’s broadly what I’m thinking about, in roughly the order I tend to think about it:

  1. Realistically, where would light be coming from?
  2. How should the scene be lit to create an appropriate mood?
  3. How should the cast be lit to look their best and enhance their characters?
  4. Aesthetically, what lighting will look the most pleasing?
  5. Practically, where can I put lights with the grip equipment I have, without any of it coming into shot?
Lensing Three Blind Mice

Once I’ve taken a few minutes to figure that out, I’ll start issuing instructions to my gaffer. I might walk around planting lamps, or just stands, and let the gaffer finish the job by cabling them, or I may let him set some lamps up while I puzzle over whether I’ll need other lamps elsewhere. Meanwhile the camera is being set up with my chosen lens on, either by an assistant or me, if we’re short on crew. (Most directors leave lens choices to me.)

When most of the lamps are set, I’ll fire everything up and draft in whoever’s around to stand in for the actors so I can see if it’s working as planned. I don’t use a light meter, so everything is judged by eye on the monitor, perhaps with the aid of a histogram. Some tweaking usually ensues.

By this point hopefully the cast are back on set and we can start camera rehearsals. Although these are useful to the cast and director, they’re invaluable for me so that I can practice the camera move and see how the light works on the actual actors and costumes. Usually there’ll be a little more tweaking of lights before we shoot. With any luck this doesn’t hold up the director because they’re busy giving last minute direction to the cast.

After we shoot I’ll tell the director whether the take was any good from a camera and lighting standpoint. I generally don’t request retakes unless I’ve screwed something up pretty badly. Long experience has taught me that the editor will always choose the best take for performance, regardless of any minor camera wobbles or dodgy lighting, so I’m not going to waste time insisting on another take which won’t get used. The important thing is for the director to get the performance they want. Having said that, it’s my job to flag up any cinematography fluffs so that it’s the director’s decision whether to go again or not.

Once the first shot is in the can, lighting for the coverage should be fairly straightforward. I’ll have my assistant change the lens, then I’ll move the camera to the new position myself and see how the existing lighting works. Then I can tweak things accordingly.

And so it goes on until the scene is wrapped.

OK, enough from me for a minute. Want to see a legendary cinematographer’s process as he lights a scene? Check out this unique and fascinating video.

I’ll leave you with the latest Ren production diary, which asks (and fails to answer) the question: “What is a DoP anyway?”

Cinematography: My Process

The Steadicam, the Blackmagic and the Troublesome Converters

I spent last week in rural Sussex DPing Ted Duran’s 30 minute action-comedy, The Gong Fu Connection. It was a great shoot with a real community atmosphere, excellent food and beautiful weather. I’ve just been looking through the rushes and I’m blown away by the amazing images that my Blackmagic Production Camera has produced. They are very filmic with an incredible amount of detail, even though we only shot in 1080P.

Colin operates the Canon C300 on his Steadicam Pilot
Colin Smith operates the Canon C300 on his Steadicam Pilot

Not everything went to plan though. The aim was to capture the fights using fluid Steadicam photography, and since I hadn’t used a Blackmagic with Colin’s Steadicam Pilot before, he and I met up the weekend before to test the set-up.

The chief difficulty was that the rig’s built-in monitor accepts only a composite video input, while the Blackmagic outputs only an SDI signal. I searched online for a portable SDI to composite converter, but no such thing seemed to exist. I already had an SDI to HDMI converter, so the obvious solution was to buy an HDMI to composite converter. But the more links a chain has, the more opportunity for weakness.

I made the purchase and Colin sorted out power adapters so that both converters could run off the same battery as the Steadicam monitor. We tested it at my flat and it worked perfectly.

Flash-forward a week and we’re on set preparing the Steadicam for The Gong Fu Connection’s first martial arts sequence. All we’re getting on the Steadicam’s monitor are colour bars, which are output by the HDMI to composite converter when it’s receiving no input signal. The other converter, the SDI to HDMI one, has packed up.

Without a working monitor on the bottom of the rig, Colin can’t watch his step and frame the shot at the same time. The Steadicam is essentially useless.

There is a Canon C300 on set, being used for behind-the-scenes shooting. Although Ted and I are both keen to shoot the main film exclusively on the Blackmagic, to avoid severely disrupting the schedule we decide to shoot the day’s Steadicam material on the C300. (The C300 has SDI, HDMI and composite outputs. Blackmagic Design take note.)

DO NOT BUY THIS CONVERTER.

At lunchtime I get on the wifi and see if I can order a replacement SDI to HDMI converter. The only one that can be delivered the next day (a Sunday) is the same model as the one that packed up. Having little choice, I order it. Amazingly it is indeed delivered on the Sunday. Nice one, Amazon.

Unfortunately it doesn’t work. I was at least hoping for the paltry month of service I got from the previous one. But no, this one is dead on arrival.

By a process of elimination we check that the converter is indeed the piece at fault. We swap cables and cameras and the results are the same.

We continue to shoot the Steadicam material on the C300.

But I have one last desperate idea to get the Blackmagic working on the rig.

The CCTV camera set up to film the Blackmagic's screen
The CCTV camera, set up to film the Blackmagic’s screen

On Monday morning I send our driver, Lucky, to the nearest Maplin. I’ve given him instructions to buy a small CCTV camera. When he gets back with it I have Colin attach it to the rig behind the Blackmagic, filming the Blackmagic’s screen. The CCTV camera outputs a composite signal directly to the Steadicam’s monitor.

Incredibly, this works. But it does mean enclosing the Blackmagic and the CCTV camera in black wrap to eliminate reflections on the former’s screen. Which means we can’t get to the iris controls, and we’re relying on the distances marked on the lens barrel to focus. And to make matters worse, the Steadicam Pilot can’t take the weight of a V-lock battery, so the Blackmagic must run off its short-lived internal battery. Between takes we have to plug it into a handheld V-lock to top up the charge.

After capturing two or three successful set-ups with this ludicrous rig, we decide it’s slowing us down too much. I finally abandon all hope of using the Blackmagic on the Steadicam.

For those interested in how the C300 and Blackmagic stack up against each other, the Canon has a sharper, more video look compared with the Blackmagic’s filmic images. The Canon also has more compression artefacts due to its lower bitrate. But they seem to cut together alright once graded.

The lack of an HDMI output on the Blackmagic has been the one thing that’s really caused me problems since buying the camera. I’d be tempted to go for a Kinefinity mod if it wasn’t so expensive…

Of course, the camera is still incredible value for money. Personally I think the only competitors in terms of image quality are the Reds. (The Alexa and film are in a whole other league.) But it is strange that Blackmagic Design claim to have built the camera for people working in the low budget world, but apparently didn’t consider that such people rarely have access to SDI monitors.

Stay tuned for more on The Gong Fu Connection shoot. There is still time to contribute to the project’s crowdfunding campaign over at Indiegogo.

The Steadicam, the Blackmagic and the Troublesome Converters

Blackmagic Production Camera Field Report

I was recently the cinematographer on Sophie Black’s Night Owls, my second shoot with my new Blackmagic Production Camera, and the first one to be shot in 4K. I’m loving the rich, detailed and organic images it’s producing. Click on this screen grab to see it at full 4K resolution and witness the crazy amount of detail the BMPC records…

Click on this screen grab to see it at full 4K resolution and witness the crazy amount of detail the BMPC records.
Jonny McPherson in Night Owls

Images from Night Owls courtesy of Triskelle Pictures, Stella Vision and Team Chameleon. Produced by Sophia Ramcharan and Lauren Parker. Starring Jonny McPherson and Holly Rushbrooke.

It’s been documented that the Blackmagics, in common with the early Red Ones, suffer from the CMOS sensor “black sun effect”. As the name suggests, this means that if you get the sun in shot, it’s so bright that it turns black on camera.

On Night Owls I discovered that this also happens with filaments in bulbs. This is unfortunate, since the film features a lot of practicals with bare bulbs.

The coil of the filament appears black on the BMPC's CMOS sensor
The coil of the filament appears purple on the BMPC’s CMOS sensor

The issue can be fixed in post – apparently Da Vinci Resolve’s tracker feature will do it, or failing that some Quickpainting in Shake would certainly get rid of it – but a firmware update from Blackmagic Design to address the issue in-camera would be very welcome. Since they’ve already issued a firmware fix for this problem on the Pocket Cinema Camera, I’m surprised they even started shipping the Production Camera without this fix.

And while we’re on the subject of firmware updates, how about an option to display 2.35:1 guides? Surely in this day and age I shouldn’t be having to do this…

Taping off the camera screen and monitor for a 2.35:1 aspect ratio
The HDMI convertor on the back of my shoulder rig, powered by the V-lock battery

Some issues with my accessories also became apparent during the shoot. Firstly, 2 x 120GB SSDs are not enough. They last about 21 minutes each at 4K. Since we were doing a lot of long takes, we occasionally found the shoot grinding to a halt because the second card card was full and the first card hadn’t finished copying to the DIT’s laptop. Yes, crazy as it sounds, it takes about three times longer to copy the contents of the card – by USB, at least –  than it does to record onto that card in the first place.

Secondly, I’ve purchased two different SDI to HDMI convertors from eBay – this one and this one – and I’ve found them both awful. They’re really designed for use in CCTV systems. The frame rate is jerky and the colours are so wildly inaccurate that I had to switch the monitor to black and white. It looks like I’ll have to buy an SDI monitor. If I can get one with 2.35:1 overlays, that will solve another of my problems at the same time.

So all of these problems can be fixed, either by investing in a little more kit, or by firmware updates which I hope Blackmagic Design will soon issue.

Finally, a word on the aftersales service: my camera turned out to have a faulty speaker; I sent it back and a week later a brand new one arrived. That’s pretty good service in my book.

Overall, I’m very happy that I bought the camera, and so is Sophie. The images look fantastic and I’m sure Night Owls will go far.

Jonny McPherson and Holly Rushbrooke in a screen grab from Night Owls
Blackmagic Production Camera Field Report

Shooting A Cautionary Tale

On Saturday, production wrapped on A Cautionary Tale after three days of shooting at Newstead Abbey Historic House and Park in Nottinghamshire. I had vaguely hoped to make a video diary of the whole thing, but in practice I only managed to grab a few bits on the first day:

Focus puller John Tween, director of photography Alex Nevill and actor Frank Simms in a present day cottage scene

The second day saw us filming in the bone-chilling wind blowing over the lake all morning, while 1939 was re-dressed to 1969 inside the cottage. After filming 1969 through the afternoon, we wrapped when the light fell, postponing a few cottage exterior shots until the next day.

After picking up those shots on Saturday, we moved inside for the present day interiors and the meatiest scenes in the film. As anticipated, we found ourselves faking daylight through the windows as shooting continued after dark, though we wrapped only half an hour later than planned.

I’d like to thank all of the cast and crew once again for their hard work, plus everyone who supplied equipment and props, and the lovely staff at Newstead Abbey.

A project like this leaves me with very mixed feelings about unpaid filmmaking. On the one hand I hate the stress of trying to find last-minute replacements for drop-outs, I hate how much I have to ask of people, and I hate that I cannot acknowledge people’s hard work with the renumeration it richly deserves. But I also come away with a strong feeling that this is it, this is what matters, this is all that matters – making truly creative work and having fun doing it – and despite fifteen of years of plugging away, I still have no idea how to do that while paying people. Should I therefore stop? I really don’t know.

Shooting A Cautionary Tale

Five Simple But Effective Camera Tricks

Today I’m running down the five simplest yet most effective camera tricks I’ve used in my films. These are all techniques that have been used on the biggest Hollywood productions as well.

1. Looming Hollywood Sign (The Beacon)

Building Moon's forced perspective corridor
Building Moon’s forced perspective corridor

In amongst all the terrible CGI, The Beacon did feature the odd moment of low-tech triumph. As a damaged helicopter dives towards the Hollywood hills, the famous sign is reflected in the sunglasses of the injured pilot, played by my friend and fellow filmmaker Rick Goldsmith. The letters were actually 2″ high cardboard cut-outs stuck to a black piece of card, and Rick himself is holding it at arm’s length and moving it slowly towards his face.

This is a type of forced perspective shot, which I covered in my previous post. Die Hard 2’s airport control tower set was surrounded by a forced perspective miniature of the runways, complete with model planes, and more recently Duncan Jones and his team used the technique to create an endless corridor of clone drawers in Moon.

Colin Smith readies the watering can for Jonny Lewis's close-up, while Chris Mayall steadies the ladder.
Colin Smith readies the watering can for Jonny Lewis’s close-up, while Chris Mayall steadies the ladder. Photo: Simon Ball

2. Rain Fight Close-ups (Soul Searcher)

While most of this fight sequence was shot under the downpour created by an industrial hosepipe fired into the air, this wasn’t available when extra close-ups were required later. Instead a watering can was used.

It’s not uncommon for close-ups in a scene to be achieved much more simply than their corresponding wide shots. NASA allowed Bruce Willis and Ben Affleck to be filmed in their training tank for Michael Bay’s Armageddon, but CUs of the other actors had to be shot dry-for-wet with a fishtank in front of the lens and someone blowing bubbles through it.

3. The Wooden Swordsman Catches His Sword (The Dark Side of the Earth)

Getting the puppet to genuinely catch his sword was likely to require a prohibitive number of takes. (We were shooting on 35mm short ends.) So instead we ran the action in reverse, ending with with the sword being pulled up out of the puppet’s hand. When the film is run backwards, he appears to be catching it.

Backwards shots have been used throughout the history of cinema for all kinds of reasons. Examples can be seen in the Face Hugger sequence in Aliens (the creature’s leaps are actually falls in reverse) and in John Carpenter’s The Thing (tentacles grabbing their victims). At the climax of Back to the Future Part III, the insurers refused to allow Michael J. Fox to sit in the DeLorean while it was pushed by the train, in case it crushed him, so instead the train pulled the car backwards and the film was reversed.

4. Distortion of Tape and Time (Stop/Eject)

A classic Who extermination

At a crucial point in this fantasy-drama about a tape recorder that can stop and rewind time, I needed to show the tape getting worn out and images of the past distorting. I combined two techniques to create a distorted image of Dan (Oliver Park) without any manipulation in post. One was lens whacking, whereby the lens is detached from the camera and held in front of it, moving it around slightly to distort the focal plane. (See this episode of Indy Mogul and this article by Philip Bloom for more on lens whacking.) The other was to shake the camera (and lens) rapidly, to deliberately enhance the rolling shutter “jello” effect which DSLRs suffer from.

Flaws in camera technology can often lead to interesting effects if used appropriately. Let’s not forget that lens flares, which many filmmakers love the look of, are actually side-effects of the optics which lens manufacturers have worked for decades to try to reduce or eliminate. And in the early days of Doctor Who, the crew realised that greatly over-exposing their Marconi TV cameras caused the image to become a negative, and they put this effect to use on the victims of Dalek extermination.

Shooting The One That Got Away. A row of 100W bulbs can be seen on the right.

5. Sunset (The One That Got Away)

A painted sunset would have been in keeping with the style of this puppet fairy tale, but it was quicker and more effective to peek an ordinary 100W tungsten bulb above the background waves. Click here for a complete breakdown of the lighting in The One That Got Away.

Using an artificial light to represent the sun is extremely common in cinematography, but showing that lamp in shot is less common. For another example, see the opening Arctic sequence of Captain America: The First Avenger, in which a large HMI stands in for a low sun at the back of the mist-shrouded set.

Click here for my rundown of the top five low-tech effects in Hollywood blockbusters.

Five Simple But Effective Camera Tricks

Forced Perspective

The Ark
The Ark

The other day I watched a 1966 Doctor Who story called The Ark. It’s easy to look at a TV show that old and laugh at the stilted acting, rubber monsters and crude effects. But given the archaic and draconian conditions the series was made under back then, I can only admire the creativity displayed by the director and his team in visualising a script which was scarcely less demanding than a contemporary Who story.

Studio floor plan from the very first episode of Doctor Who, showing camera positions (coloured circles)

In the sixties, each Doctor Who episode was recorded virtually as live on a Friday evening, following a week of rehearsals. BBC rules strictly limited the number of times the crew could stop taping during the 90 minute recording session, which was to produce a 22 minute episode. Five cameras would glide around the tightly-packed sets in a carefully choroegraphed dance, with the vision mixer cutting between them in real-time as per the director’s shooting script. (Interesting side note: some of Terminator 2 was shot in a very similar fashion to maximise the number of angles captured in a day.) It’s no wonder that fluffed lines and camera wobbles occasionally marred the show, as there was rarely time for re-takes.

But what’s really hard for anyone with a basic knowledge of visual effects to get their head around today is that, until the Jon Pertwee era began in 1970, there was no chromakey (a.ka. blue- or green-screening) in Doctor Who. Just think about that for a moment: you have to make a science fiction programme without any electronic means of merging two images together, simple dissolves excepted.

Setting up a foreground miniature for a later Who story, Inferno (1970)

So the pioneers behind those early years of Doctor Who had to be particularly creative when when they wanted to combine miniatures with live action. One of the ways they did this in The Ark was through forced perspective.

Forced perspective is an optical illusion, a trick of scale. We’ve all seen holiday photos where a friend or relative appears to be holding up the Eiffel Tower or the Leaning Tower of Pisa. The exact same technique can be used to put miniature spaceships into a full-scale live action scene.

In these frames from The Ark, two miniature landing craft are lowered into the background before the camera pans to a full-size craft in the foreground:

The camera pans from a miniature descending in the background to a full-scale craft in the foreground.

And in these later frames, another miniature craft is placed much closer to the camera than the Monoid (a.k.a. a man in a rubber suit). The miniature craft takes off, pulled up on a wire I presume – a feat which time, money and safety would have rendered impossible with the full-size prop:

The camera pulls focus from a foreground miniature taking off to an actor in the background. A greater depth of field would have made the shot more convincing, but  the principle is sound.
The camera pulls focus from a foreground miniature taking off to an actor in the background. A greater depth of field would have made the shot more convincing, but the principle is sound.

Of course, Doctor Who was not by any means the first show to use forced perspective, nor was it the last. This nineties documentary provides a fascinating look at the forced perspective work in the Christopher Guest remake of Attack of the 50 Ft. Woman, and other films…

And Peter Jackson famously re-invented forced perspective cinematography for the Lord of the Rings trilogy, when his VFX team figured out a way to maintain the illusion during camera moves, by sliding one of the actors around on a motion control platform…

So remember to consider all your options, even the oldest tricks in the book, when you’re planning the VFX for your next movie.

Forced Perspective

Polymath: Behind the Scenes

I always enjoy a good behind-the-scenes video, and there’s often much to be learnt from them too. My friends at Polymathematics have just released a series of ‘making of’ videos for their recent music promos, all of which are exquisitely designed and shot (my own involvement in Droplets notwithstanding!). Check out Polymath’s Vimeo channel for more behind-the-scenes videos and of course the promos themselves.

Droplets

We Were Here

The Last Human / I Do (Come True)

Hands Up if You’re Lost

And here’s an equally fascinating look at a live puppetry project they did as part of the Olympic Torch Relay celebrations…


Polymath: Behind the Scenes

Stop/Eject: Shoot Day 4 Podcast

A behind-the-scenes look at the fourth day of shooting, finishing up in the shop and moving onto a pressurised shoot in the mill basement. As usual, big thanks to Sophie for editing this.

Better late than never – this is the £1,000 public reward in our crowd-funding campaign. We’re just £22 away from the £1,100 Mystery Reward. Stay tuned to find out what that will be.

Stop/Eject: Shoot Day 4 Podcast