“The Little Mermaid”: Boats, Trains and Automobiles

One of the biggest challenges on The Little Mermaid was the amount of material set in moving vehicles at night. Over the course of the story, the heroes travel in two different trains, a pick-up truck and a riverboat, and I knew that lighting large stretches of railway, road or river wasn’t going to be practical on our budget. Ultimately much of it ended up being done against green screen, with the notable exception of the riverboat, the first mode of transport to go before the cameras. Here are the relevant extracts from my diary.


Day 14

Today’s a big day because we’re shooting on a riverboat which has been hired at great expense. We have a huge amount of material to cover and there’s no way we can come back to the boat later if we don’t get it all. Chris and I make a game plan in the afternoon and arrive at the dock in good time.

It feels a lot like a micro-budget movie, shooting on a location that perhaps should have been a set (once we set sail you can’t see anything in the background because it’s night) with a tiny lighting package running off a little genny: some Kinos, two LED panels, and a 1K baby. Out there in the dark river, it is eery watching unfathomably huge container ships pass 50ft from us. We leave ‘B’ camera on the shore and try to co-ordinate with them by walkie as they shoot wide shots of the boat and we try to hide!


Day 16

Night driving scenes in a pick-up truck today. Poor Man’s Process was considered for these, then doing it for real with a low loader (called a process trailer here in the States). But at last green screen was chosen as the way to go.

The period vehicle is wheeled into our studio and parked in front of two 12×12 green screens, which VFX supervisor Rich dots with red tape crosses for tracking markers. Throughout the night he moves them around to make sure there are always a couple in shot. We light the green screen with two Image 80s (4ft 8-bank Kino Flos with integral ballasts) fitted with special chroma green tubes. Rich tells me to expose the screen at key, which in this case is T4.

Captain Dan Xeller, best boy electric, has lit car stuff before, so I give him free reign to establish the ambient level. He does it with 1Ks fired into 8×4 bounce boards, so that any reflections in the car’s bodywork will be large and sky-like, not strips like Kino Flos or points like pars or fresnels.

For shape we add a 5K with a chimera at a three-quarter angle, and a side-on par can with a “branch-a-loris” in front of it. Key grip Jason Batey designs this rig, consisting of two branches on a pivot like a Catherine Wheel, which can be spun at any speed by one of the grips, to simulate movement of the car.

Finally I add a 2K poking over the top of the green screen with Steel Blue gel, as a gratuitous hair-light.

Most of the night’s work is handheld, often with two cameras, but we also get some dolly shots, moving towards or away from the car, again to simulate movement.


Day 17

More green screen work today. At the end of the night we recreate one of the scenes from the boat with a piece of railing against the green screen. I do exactly the same lighting as before – Steel Blue three-quarter backlight, and a tungsten key bounced off polyboard. I love the way the actors’ skin looks under this light. Tungsten bounced off polyboard may just be the best light source ever.


Day 18

Stage scenes on real sets today, one of which is meant to be on the riverboat. The grips come up with a gag where we shine moonlight through an off-camera window gobo, which they handbash back and forth to simulate the boat rocking. We end up dialling it down so it’s very subtle, but still adds a hint of movement.

We move to the caboose (guard’s van), one of the train carriage sets. A second branch-a-loris is constructed so that both windows on one side of the carriage can have the passing trees effect cutting up the hard fresnel “moonlight”. We light from the other side with Kinos, and add a 1K baby bounced off foamcore to represent light from a practical oil lamp. Later the dialogue transitions to a fight scene, and we replace the bounced baby with an LED panel so it’s a little easier to move around and keep out of shot. I get to do some energetic handheld camerawork following the action, which is always fun.


View this post on Instagram


A post shared by Neil Oseman (@neiloseman) on


Day 27

Interiors on stage, followed by night exteriors out the back of the studio. One of these is a shot of the heroes running, supposedly towards the train. It’s shot from the back of the 1st AD’s pick-up truck as we drive next to them. We have no condor today so the 12K backlight is just on a roadrunner stand, flooding out across the marsh between the lamp and the talent. With smoke it looks great, but lens flare keeps creeping in because the lamp’s not high enough.

We also shoot some Poor Man’s Process around a small set of the rear of a train car. Two lamps with branch-a-lorises in front of them, wind, smoke and shaky cameras help sell the movement.

A post shared by Neil Oseman (@neiloseman) on

Later we have a POV shot of a train screeching to a stop in front of the villain. The camera is on a dolly and the G&E team mount a 2K on there as well, to represent the train’s headlight.

Next week I’ll turn my attention to The Little Mermaid‘s smaller scenes, and discuss how the principle of lighting from the back was applied to them. Meanwhile, if you’re interested in some techniques for shooting in genuinely-moving vehicles, check out my blog from week three of Above the Clouds where we shot on Longcross Studios’ test track, and my article “Int. Car – Moving”.

“The Little Mermaid”: Boats, Trains and Automobiles

How to do Scenes on a Moving Train

Behind the scenes of “Last Passenger”

The publicity machine is ramping up for Kenneth Branagh’s Murder on the Orient Express remake, and it’s got me thinking about the challenges of a script set largely on a moving train. There are a number of ways of realising such scenes, and today I’m going to look at five movies that demonstrate different techniques. All of these methods are equally applicable to scenes in cars or any other moving vehicle.

1. For Real: “The Darjeeling limited”

Wes Anderson’s 2007 film The Darjeeling Limited sees three brothers embarking on a spiritual railway journey across India. Many of the usual Anderson tropes are present and correct – linear tracking shots, comical headgear, Jason Schwartzman – but surprisingly the moving train wasn’t done with some kind of cutesy stop-motion. Production designer Mark Friedberg explains:

The big creative decision Wes made was that we were going to shoot this movie on a moving train. And all that does is complicate life. It makes it more expensive, it makes the logistics impossible. It made it incredibly difficult to figure out how many crew, what crew, what gear… but what it did do is it made it real.

Kenneth Branagh has stated that at least some of Murder on the Orient Express was shot on a real moving train too:

They painstakingly built a fully functioning period authentic locomotive and carriages from the Orient Express during the golden, glamorous age of travel. It was a train that moved… All of our actors were passengers on the train down the leafy lanes of Surrey, pretending to be the former Yugoslavia.


2. Poor Man’s Process: “The Double”

Director Richard Ayoade

Although best known as The IT Crowd‘s Moss and the new host of the Crystal Maze, Richard Ayoade is also an accomplished director. His last feature was a darkly beautiful adaptation of Dostoyevsky’s classic identity-crisis novella The Double. 

Unlike the other movies on this list, The Double only has short sequences on a train, and that’s a key point. So named because it’s a cheap alternative to rear projection (a.k.a. process photography), Poor Man’s Process is a big cheat. In order to hide the lack of motion, you keep the view outside your vehicle’s windows blank and featureless – typically a night sky, but a black subway tunnel or a grey daytime sky can also work. Then you create the illusion of motion with dynamic lighting, a shaky camera, and grips rocking the carriage on its suspension. Used judiciously, this technique can be very convincing, but you would never get away with it for a whole movie.

Poor Man’s works particularly well in The Double, the black void outside the subway car playing into the oppressive and nightmarish tone of the whole film. In an interview with Pushing Pixels, production designer David Crank explains how the subway carriage set was built out of an old bus. He goes on to describe how the appearance of movement was created:

We put the forks of a forklift under the front of the bus, and shook it… For the effect of moving lights outside the train, it was a combination of some spinning lights on stands, as well as lights on small rolling platforms which tracked back and forth down the outside of the bus.

Part 2 of the Darjeeling Limited featurette above reveals that Poor Man’s Process was also used occasionally on that film, when the train was stuck in a siding due to heavy rail traffic. I used Poor Man’s myself for night-time train sequences in two no-budget features that I made in the early noughties – see the BTS clip below – and I’ve also written a couple of blog posts in the past about my use of the same technique on a promotional video and in a fantasy web series.


3. Green screen: “Source Code”

Duncan “Zowie Bowie” Jones followed up his low-budget masterpiece Moon with Hollywood sci-fi thriller Source Code, a sort of mash-up of Quantum Leap and Groundhog Day with a chilling twist. It takes place predominantly on a Chicago-bound commuter train, in reality a set surrounded by green screen. In the featurette above, Jones mentions that shooting on a real moving train was considered, but ultimately rejected in favour of the flexibility of working on stage:

Because we revisit an event multiple times, it was absolutely integral to making it work, and for the audience not to get bored, that we were able to vary the visuals. And in order to do that we had to be able to build platforms outside of the train and be able to really vary the camera angles.

In the DVD commentary, Jones also notes that the background plates were shot in post from a real train “loaded up with cameras”.

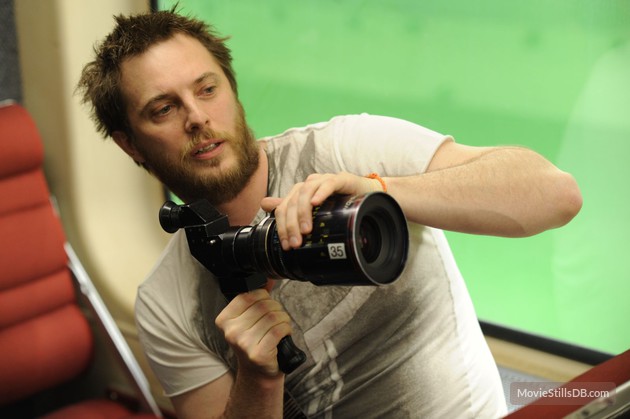
Director Duncan Jones on the set of “Source Code”

Cinematographer Don Burgess, ASC discusses lighting the fake train in a Panavision article:

It’s difficult to make it feel like natural light is coming in and still get the sense of movement on a train… We worked with computer programs where we actually move the light itself, and brighten and dim the lights so it feels as if you are travelling… The lights are never 100% constant.

When I shot The Little Mermaid last year we did some train material against green screen. To make the lighting dynamic, the grips built “branch-a-loris” rigs: windmills of tree branches which they would spin in front of the lamps to create passing shadows.


4. Rear projection: “Last Passenger”

Perhaps the most low-budget film on this list, Last Passenger is a 2013 independent thriller set aboard a runaway train. Director Omid Nooshin and DP Angus Hudson wanted a vintage look, choosing Cooke Xtal anamorphic lenses and a visual effects technique that had long since fallen out of favour: rear projection.

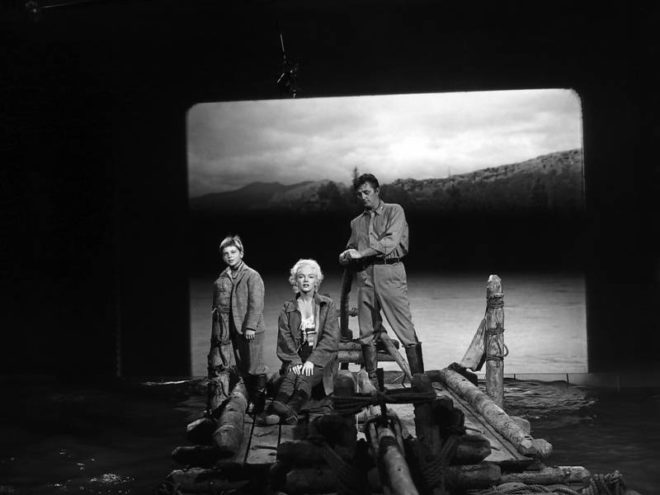
Before the advent of optical – and later digital – compositing, rear projection was commonly used to provide moving backgrounds for scenes in vehicles. The principle is simple: the pre-recorded backgrounds are projected onto a screen like this…

Rear projection in use on “River of no Return” (1954)

Hudson goes into further detail on the technique as used for the Last Passenger:

To capture [the backgrounds] within our limited means, we ended up shooting from a real train using six Canon 5D cameras, rigged in such a way that we got forward, sideways and rear-facing views out of the train at the same time. We captured a huge amount of footage, hours and hours of footage. That allowed us to essentially have 270 degrees of travelling shots, all of which were interlinked.

Because rear projection is an in-camera technique, Nooshin and Hudson were able to have dirt and water droplets on the windows without worrying about creating a compositing nightmare in postproduction. Hudson also notes that the cast loved being able to see the backgrounds and react to them in real time.


5. L.E.D. Panels: “Train to Busan”

Enabling the actors to see the background plates was also a concern for Yeon Sang-ho, director of the hit Korean zombie movie Train to Busan. He felt that green screen would make it “difficult to portray the reality”, so he turned to the latest technology: LED screens. This must have made life easier not just for the cast, but for the cinematographer as well.

You see, when you travel by train in the daytime, most of the light inside the carriage comes from outside. Some of it is toplight from the big, flat sky, and some of it is hard light from the sun – both of these can be faked, as we’ve seen – but a lot of the light is reflected, bouncing off trees, houses, fields and all the other things that are zipping by. This is very difficult to simulate with traditional means, but with big, bright LED screens you get this interactive lighting for free. Because of this, and the lack of postproduction work required, this technique is becoming very popular for car and train scenes throughout the film and TV industry.

This brings us back to Murder on the Orient Express, for which 2,000 LED screens were reportedly employed. In a Digital Spy article, Branagh notes that this simulated motion had an unintended side effect:

It was curious that on the first day we used our gimballed train sets and our LED screens with footage that we’d gone to great trouble to shoot for the various environments – the lowlands and then the Alps, etc… people really did feel quite sick.

I’ll leave you with one final point of interest: some of the above films designed custom camera tracks into their train carriage sets. On Last Passenger, for example, the camera hung from a dolly which straddled the overhead luggage racks, while The Darjeeling Limited had an I-beam track designed into the centre of the ceiling. Non-train movies like Speed have used the same technique to capture dolly shots in the confines of a moving vehicle.

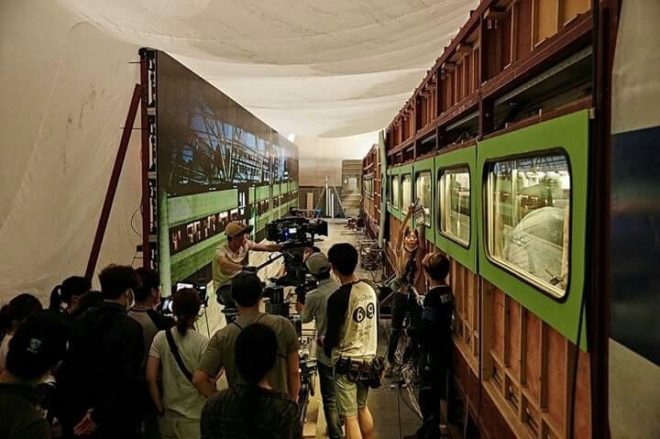
“Last Passenger”s luggage rack dolly
How to do Scenes on a Moving Train

“Above the Clouds”: October Pick-ups

Day 21 / Friday

My wallet plays a vital part in adjusting the tilt of the camera.

Two and a half months on, and most of the team are back for three days of pick-ups on this comedy road movie. (Read my blog from principal photography here.) Director Leon Chambers showed me some of the rough cut last night, and it’s shaping up to be a really warm, charming film.

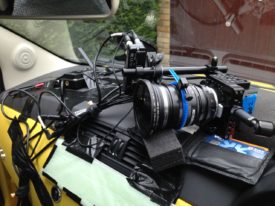
Principal was photographed on an Alexa Mini in Pro Res 4444, with Zeiss Ultra Primes and a half Soft FX to take off the digital edge. Since the pick-ups consist largely of scenes in a moving hatchback – the film’s signature Fiat 500 “Yellow Peril” – Leon has invested in a Blackmagic Micro Cinema Camera. Designed for remote applications like drone use, the BMMCC is less than 9cm (3.5″) square, meaning it can capture dashboard angles which no other camera can, except a Go Pro. Unlike a Go Pro, the BMMCC can record Cinema DNG raw files with a claimed 13 stops of dynamic range.

Leon has fitted the camera with a Metabones Speed Booster, converting the BMMCC’s Super 16 sensor to almost a Super 35 equivalent and increasing image brightness by one and two-thirds stops. The Speed Booster also allows us to mount Nikon-fit Zeiss stills lenses – a 50mm Planar, and 25mm and 35mm Distagons – to which I add a half Soft FX filter again. A disadvantage of the Speed Booster is the looseness it introduces between lens and camera; when the focus ring is turned, the whole lens shifts slightly.

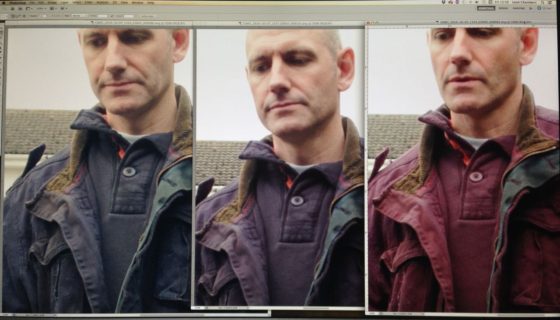
Filtration causes the first pick-ups hiccup when we realise that leading man Andy’s blue jacket is reading pink on camera.  This turns out to be an effect of infra-red pollution coming through our .6 and 1.2 ND filters. Yes, whoops, we forgot to order IR NDs. Fortunately we also have a variable ND filter, which doesn’t suffer from IR issues, so we switch to that.

img_1282
Left to right: variable ND, .6 ND, 1.2 ND. As you can see, there is a pronounced magenta shift on the non-variable filters.

Lighting follows a similar pattern to principal, with a little bounce and negative fill outside the car, and Rosco 12″x3″ LitePads on the dashboard for eye light inside. On the move, Rupert and I monitor and pull focus wirelessly from a chase car. Referring to the false colours on an Atomos Ninja, I radio Leon to tweak the variable ND between takes when necessary. I miss the generous dynamic range of the Alexa Mini, which so rarely clipped the sky – and I do not buy the manufacturer claims that the BMMCC has only one stop less, but it still does an amazing job for its size and price.


Day 22 / Saturday

I start the day by reviewing some of yesterday’s footage side-by-side with Alexa Mini material from principal. They are very comparable indeed. The only differences I can detect are a slightly sharper, more “video” look from the BMMCC, and a nasty sort of blooming effect in the stills lenses’ focus roll-off, which reminds me of the cheap Canon f1.8/50mm “Nifty Fifty” I used to own.

A couple of quick shots at Leon’s, then we move to his friend Penny’s house, where a donkey and a horse look on as we set up around the Peril in Penny’s paddock. There are some inserts to do which must cut in with scenes where the car is moving, but since we don’t see any windows in these inserts, the car remains parked. Two people stand, one on either side of the car, each sweeping a 4’x4′ polyboard repeatedly over the windscreen and sunroof. With heavy cloud cover softening the shadows of these boards, the result is an effective illusion that the car is moving.

img_1300

After lunch we have to capture additional angles for the traffic jam scene originally staged on day 14. By an amazing stroke of luck, the sun comes out, shining from almost exactly the same direction (relative to the car) as Colin bounced it in from with Celotex during principal. To begin with we are shooting through the windscreen, with a filter cocktail of half Soft FX, .6 ND and circular polariser. Since Andy is no longer wearing the blue jacket, I decided to risk the .6 ND rather than stacking multiple polarisers (the variable ND consists of two polarising filters). The next shot requires the camera to be rigged outside the driver’s window as the car drives away (pictured right).

Then we set up for night scenes to cut with day 11, which, like the inserts earlier today, we achieve using Poor Man’s Process. Instead of polyboards, Gary sweeps a 1’x1′ LED panel gelled with Urban Sodium over the passenger side of the car to represent streetlights. Rueben walks past the driver’s side with another 1’x1′ panel, representing the headlights of a passing car. I’ve clamped a pair of Dedos to Rupert’s Magliner, and Andrew dollies this side-to-side behind the Peril, representing the headlights of a car behind; these develop and flare very nicely during the scene. For fill, the usual two 12″x3″ LitePads are taped to the dashboard and dimmed to 10%.

For a later stretch of road with no streetlamps or passing cars, I use a low level of static backlight, and a static sidelight with a branch being swept in front of it to suggest moonlight through trees.


Day 23 / Sunday

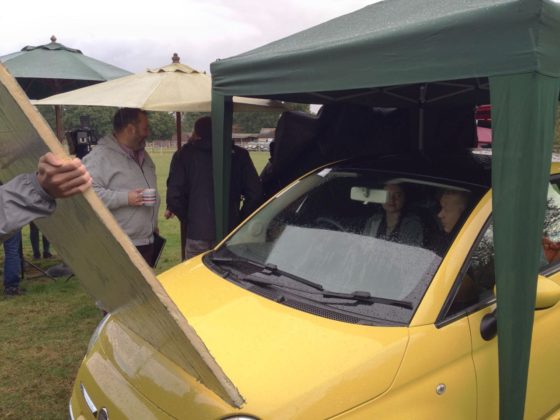
After a brief scene against a tiny little micro set, we have more scenes to shoot around the parked Peril – and it’s supposed to be parked this time, no movement to fake. Unfortunately it’s raining, which doesn’t work for continuity. Although I’m worried it will block too much light, the crew erect a gazebo over the car to keep the rain off, and in fact it really helps to shape the light. I even add a black drape to increase the effect. Basically, when shooting through the driver’s window, it looks best if most of the light is coming through the windscreen and the passenger’s window, and when we shoot through the windscreen it looks best if most of the light is coming through the side and rear windows; it’s the usual cinematographic principle of not lighting from the front.

img_1304
Shooting through the driver’s window

After another driving scene using car rigs, we move to our final location, a designer bungalow near Seven Oaks. Here we are shooting day-for-dusk, though it’s more like dusk-for-dusk by the time the camera rolls. I set the white balance to 3,200K to add to the dusky feel, increasing it to 4,500K as the daylight gets bluer for real. The extra one and two-thirds stops which the Speed Booster provides are very useful, allowing us to capture all four steadicam shots before the light fades completely.

And with that we are wrapped for the second, but not final, time. Crucial scenes involving a yet-to-be-cast character remain for some future shoot.

Keep up to date with Above the Clouds on the official Facebook page or Instagram account.

“Above the Clouds”: October Pick-ups

Poor Man’s Process II

Back in 2013 I wrote a blog about Poor Man’s Process, a low-tech method of faking shots inside a supposedly moving car, using lighting gags and camera movement to sell the illusion. But Poor Man’s Process doesn’t have to be limited to cars.

While gaffering for DP Paul Dudbridge on By Any Name, we had to tackle a nighttime scene in which the hero flees through a forest. Rather than trying to get close-ups with any kind of tracking rig, Paul decided to use a technique apparently favoured on Lost, whereby the actor and camera are stationary, and lights and branches are moved around them to create the impression of movement.

It worked a treat, so when faced with a very similar scene on Ren, I shamelessly ripped Paul off. The actors weren’t sure; they felt pretty silly running on the spot, but we persevered. My lighting set-up used the 2.5K HMI, already rigged for earlier shots, as a side key, and an LED panel as three-quarter backlight. Branches were waved in front of both to throw shadows, and I shook the camera a lot.

Poor Man’s Process was required a second time on the series, in the very last scene, on the very last day of the shoot.

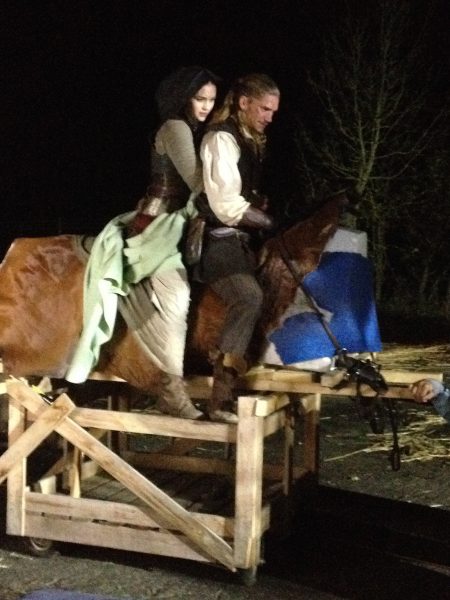
Sophie Skelton (Ren) and Duran Fulton Brown (Hunter) ride Tony the Phony Pony. Photo: Miriam Spring Davies

By this time we were one big happy family and we were all having far too much fun. Gaffer Squish was singing “One Day More” from Les Miserables, actor Duran was riding Tony The Phony Pony like a rodeo champ, candy was being freely imbibed and marshmallows were being toasted. The Poor Man’s shot seemed more like an extension of us all just larking about than anything else.

Ren and Hunter were required to ride off into the moonlight on a single horse, but the horse in question was quite jumpy and not safe for the actors to ride. Designer Chris and production assistant Claire knocked up the highly impressive phony pony, which was used extensively, but moving it fast enough for the final shot was out of the question.

Claire Finn prepares for some arboreal lighting action. Photos: Miriam Spring Davies
Claire Finn prepares for some arboreal lighting action.

So Tony remained stationary while Claire, her sister Alex and producer Michelle threw dignity to the wind and ran around with bits of trees.

I was using the 2.5K HMI as backlight, and a 1.2K HMI bounced off Celotex as a side key. Claire, I think, was on the 2.5K, jiggling a branch about to create some nice dynamism cutting up the hard backlight. Alex, if I recall rightly, was doing a windmill action with her branch in front of the Celotex. Michelle, meanwhile, stood ready with her branch until director Kate called “Tree!”, at which point Michelle would run past at full pelt and Sophie (Ren) would duck under the branch she was supposedly riding by.

You can see some behind-the-scenes footage in Lensing Ren episode 5.

Aided by smoke, a wind machine and the obligatory camera shake, the whole thing was quite effective. Less so the Epping Forest shots, which didn’t make the final cut. Somehow the running-on-the-spot was never quite convincing. Not enough choppy shadows, maybe?

My last project was a $4 million feature, but even that called for Poor Man’s in one instance. A small train carriage set piece had to appear to be moving as our heroes jumped onto it, so in front of each light we placed a ‘branch-a-loris’, a kind of man-powered windmill made from scaff tube and branches. Again lots of smoke, wind and camera shake were employed to sell the illusion.

I think Poor Man’s Process is one of my favourite techniques. It doesn’t always work, but if there’s enough movement in the camera and the lighting, and it’s cut in with genuine wide shots, it can often be extremely effective.

If you’ve enjoyed this post, please do me a little favour and vote for Ren: The Girl with the Mark in the Melbourne Web Fest Audience Award Poll (find us in the drama section). It only takes a moment!

Poor Man’s Process II