Secondary Grades are Nothing New

Last week I posted an article I wrote a while back (originally for RedShark News), entitled “Why You Can’t Relight Footage in Post”. You may detect that this article comes from a slightly anti-colourist place. I have been, for most of my career, afraid of grading – afraid of colourists ruining my images, indignant that my amazing material should even need grading. Arrogance? Ego? Delusion? Perhaps, but I suspect all DPs have felt this way from time to time.

I think I have finally started to let go of this fear and to understand the symbiotic relationship betwixt DP and colourist. As I mentioned a couple of weeks ago, one of the things I’ve been doing to keep myself occupied during the Covid-19 lockdown is learning to grade. This is so that I can grade the dramatic scenes in my upcoming lighting course, but also an attempt to understand a colourist’s job better. The course I’m taking is this one by Matthew Falconer on Udemy. At 31 hours, it takes some serious commitment to complete, commitment I fear I lack. But I’ve got through enough to have learnt the ins and outs of Davinci Resolve, where to start when correcting an image, the techniques of primary and secondary grades, and how to use the scopes and waveforms. I would certainly recommend the course if you want to learn the craft.

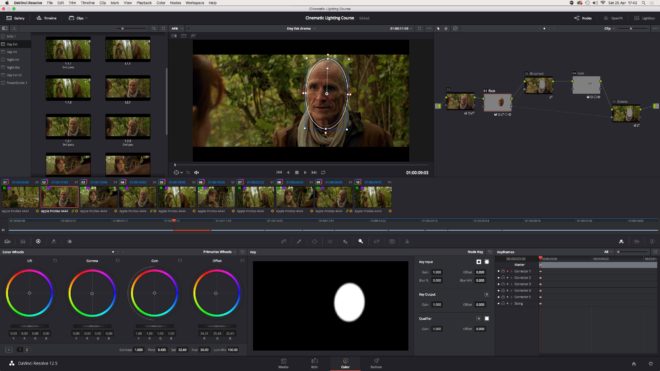
As I worked my way through grading the supplied demo footage, I was struck by two similarities. Firstly, as I tracked an actor’s face and brightened it up, I felt like I was in the darkroom dodging a print. (Dodging involves blocking some of the light reaching a certain part of the image when making an enlargement from a film negative, resulting in a brighter patch.) Subtly lifting the brightness and contrast of your subject’s face can really help draw the viewer’s eye to the right part of the image, but digital colourists were hardly the first people to recognise this. Photographers have been dodging – and the opposite, burning – prints pretty much since the invention of the negative process almost 200 years ago.

The second similarity struck me when I was drawing a power curve around an actor’s shirt in order to adjust its colour separately from the rest of the image. I was reminded of this image from Painting with Light, John Alton’s seminal 1949 work on cinematography…


The chin scrim is a U-shaped scrim… used to cut the light off hot white collars worn with black dinner jackets.

It’s hard for a modern cinematographer to imagine blocking static enough for such a scrim to be useful, or indeed a schedule generous enough to permit the setting-up of such an esoteric tool. But this was how you did a power window in 1949: in camera.

Sometimes I’ve thought that modern grading, particularly secondaries (which target only specific areas of the image) are unnecessary; after all, we got through a century of cinema just fine without them. But in a world where DPs don’t have the time to set up chin scrims, and can’t possibly expect a spark to follow an actor around with one, adding one in post is a great solution. Our cameras might have more dynamic range than 1940s film stock, meaning that that white collar probably won’t blow out, but we certainly don’t want it distracting the eye in the final grade.

Like I said in my previous post, what digital grading does so well are adjustments of emphasis. This is not to belittle the process at all. Those adjustments of emphasis make a huge difference. And while the laws of physics mean that a scene can’t feasibly be relit in post, they also mean that a chin scrim can’t feasibly follow an actor around a set, and you can’t realistically brighten an actor’s face with a follow spot.

What I’m trying to say is, do what’s possible on set, and do what’s impossible in post. This is how lighting and grading work in harmony.

Secondary Grades are Nothing New

Why You Can’t Re-light Footage in Post

The concept of “re-lighting in post” is one that has enjoyed a popularity amongst some no-budget filmmakers, and which sometimes gets bandied around on much bigger sets as well. If there isn’t the time, the money or perhaps simply the will to light a scene well on the day, the flexibility of RAW recording and the power of modern grading software mean that the lighting can be completely changed in postproduction, so the idea goes.

I can understand why it’s attractive. Lighting equipment can be expensive, and setting it up and finessing it is one of the biggest consumers of time on any set. The time of a single wizard colourist can seem appealingly cost-effective – especially on an unpaid, no-budget production! – compared with the money pit that is a crew, cast, location, catering, etc, etc. Delaying the pain until a little further down the line can seem like a no-brainer.

There’s just one problem: re-lighting footage is fundamentally impossible. To even talk about “re-lighting” footage demonstrates a complete misunderstanding of what photographing a film actually is.

This video, captured at a trillion frames per second, shows the tranmission and reflection of light.

The word “photography” comes from Greek, meaning “drawing with light”. This is not just an excuse for pompous DPs to compare themselves with the great artists of the past as they “paint with light”; it is a concise explanation of what a camera does.

A camera can’t record a face. It can’t record a room, or a landscape, or an animal, or objects of any kind. The only thing a camera can record is light. All photographs and videos are patterns of light which the viewer’s brain reverse-engineers into a three-dimensional scene, just as our brains reverse-engineer the patterns of light on the retinae every moment of every day, to make sense of our surroundings.

The light from this object gets gradually brighter then gradually darker again – therefore it is a curved surface. There is light on the top of that nose but not on the underneath, so it must be sticking out. These oval surfaces are absorbing all the red and blue light and reflecting only green, so it must be plant life. Such are the deductions made continuously by the brain’s visual centre.

A compound lens for a prototype light-field camera by Adobe

To suggest that footage can be re-lit is to suggest that recorded light can somehow be separated from the underlying physical objects off which that light reflected. Now of course that is within the realms of today’s technology; you could analyse a filmed scene and build a virtual 3D model of it to match the footage. Then you could “re-light” this recreated scene, but it would be a hell of a lot of work and would, at best, occupy the Uncanny Valley.

Some day, perhaps some day quite soon, artificial intelligence will be clever enough to do this for us. Feed in a 2D video and the computer will analyse the parallax and light shading to build a moving 3D model to match it, allowing a complete change of lighting and indeed composition.

Volumetric capture is already a functioning technology, currently using a mix of infrared and visible-light cameras in an environment lit as flatly as possible for maximum information – like log footage pushed to its inevitable conclusion. By surrounding the subject with cameras, a moving 3D image results.

Sir David Attenborough getting his volume captured by Microsoft

Such rigs are a type of light-field imaging, a technology that reared its head a few years ago in the form of Lytro, with viral videos showing how depth of field and even camera angle (to a limited extent) could be altered with this seemingly magical system. But even Lytro was capturing light, albeit it in a way that allowed for much more digital manipulation.

Perhaps movies will eventually be captured with some kind of Radar-type technology, bouncing electromagnetic waves outside the visible spectrum off the sets and actors to build a moving 3D model. At that point the need for light will have been completely eliminated from the production process, and the job of the director of photography will be purely a postproduction one.

While I suspect most DPs would prefer to be on a physical set than hunched over a computer, we would certainly make the transition if that was the only way to retain meaningful authorship of the image. After all, most of us are already keen to attend grading sessions to ensure our vision survives postproduction.

The Lytro Illum 2015 CP+ by Morio – own work, CC BY-SA 3.0, https://commons.wikimedia.org/w/index.php?curid=38422894

But for the moment at least, lighting must be done on set; re-lighting after the fact is just not possible in any practical way. This is not to take away from the amazing things that a skilled colourist can do, but the vignettes, the split-toning, the power windows, the masking and the tracking – these are adjustments of emphasis.

A soft shadow can be added, but without 3D modelling it can never fall and move as a real shadow would. A face can be brightened, but the quality of light falling on it can’t be changed from soft to hard. The angle of that light can’t be altered. Cinematographers refer to a key-light as the “modelling” light for a reason: because it defines the 3D model which your brain reverse-engineers when it sees the image.

So if you’re ever tempted to leave the job of lighting to postproduction, remember that your footage is literally made of light. If you don’t take the time to get your lighting right, you might as well not have any footage at all.

Why You Can’t Re-light Footage in Post

Shooting a Time-lapse for a Zoetrope

Two years ago I made Stasis, a series of photographs that explored the confluence of time, space and light. Ever since then I’ve been meaning to follow it up with another photography project along similar lines, but haven’t got around to it. Well, with Covid-19 there’s not much excuse for not getting around to things any more.

Example of a zoetrope

So I’ve decided to make a zoetrope – a Victorian optical device which produces animation inside a spinning drum. The user looks through slits in the side of the drum to one of a series of images around the inside. When the drum is set spinning – usually by hand – the images appear to become one single moving picture. The slits passing rapidly through the user’s vision serve the same purpose as a shutter in a film projector, intermittently blanking out the image so that the persistence of vision effect kicks in.

Typically zoetropes contain drawn images, but they have been known to contain photographed images too. Eadward Muybridge, the father of cinema, reanimated some of his groundbreaking image series using zoetropes (though he favoured his proprietary zoopraxiscope) in the late nineteenth century. The device is thus rich with history and a direct antecedent of all movie projectors and the myriad devices capable of displaying moving images today.

This history, its relevance to my profession, and the looping nature of the animation all struck a chord with me. Stasis was to some extent about history repeating, so a zoetrope project seemed like it would sit well alongside it. Here though, history would repeat on a very small scale. Such a time loop, in which nothing can ever progress, feels very relevant under Covid-19 lockdown!

With that in mind, I decided that the first sequence I would shoot for the zoetrope would be a time-lapse of the cherry tree outside my window.  I chose a camera position at the opposite end of the garden, looking back at my window and front door – my lockdown “prison” – through the branches of the tree. (The tree was just about to start blooming.)

The plan is to shoot one exposure every day for at least the next 18 days, maybe more if necessary to capture the full life of the blossom. Ideally I want to record the blossom falling so that my sequence will loop neatly, although the emergence of leaves may interfere with that.

To make the whole thing a little more fun and primitive, I decided to shoot using the pinhole I made a couple of years ago. Since I plan to mount contact prints inside the zoetrope rather than enlargements, that’ll mean I’ve created and exhibited a motion picture without ever once putting the image through a lens.

I’m shooting on Ilford HP5+, a black-and-white stock with a published ISO of 400. My girlfriend bought me five roles for Christmas, which means I can potentially make ten 18-frame zoetrope inserts. I won’t be able to develop or print any of them until the lockdown ends, but that’s okay.

My first image was shot last Wednesday, a sunny day. The Sunny 16 rule tells me that at f/16 on a sunny day, my exposure should be equal to my ISO, i.e. 1/400th of a second for ISO 400. My pinhole has an aperture of f/365, which I calculated when I made it, so it’s about nine stops slower than f/16. Therefore I need to multiply that 1/400th of a second exposure time by two to the power of nine, which is 1.28 – call it one second for simplicity. ( I used my Sekonic incidence/reflectance meter to check the exposure, because it’s always wise to be sure when you haven’t got the fall-back of a digital monitor.)

One second is the longest exposure my Pentax P30t can shoot without switching to Bulb mode and timing it manually. It’s also about the longest exposure that HP5+ can do without the dreaded reciprocity failure kicking in. So all round, one second was a good exposure time to aim for.

The camera is facing roughly south, meaning that the tree is backlit and the wall of the house (which fills the background) is in shadow. This should make the tree stand out nicely. Every day may not be as sunny as today, so the light will inevitably change from frame to frame of the animation. I figured that maintaining a consistent exposure on the background wall would make the changes less jarring than trying to keep the tree’s exposure consistent.

I’ve been taking spot readings every day, and keeping the wall three-and-a-half stops under key, while the blossoms are about one stop over. I may well push the film – i.e. give it extra development time – if I end up with a lot of cloudy days where the blossoms are under key, but so far I’ve managed to catch the sun every time.

All this exposure stuff is great practice for the day when I finally get to shoot real motion picture film, should that day ever come, and it’s pretty useful for digital cinematography too.

Meanwhile, I’ve also made a rough prototype of the zoetrope itself, but more on that in a future post. Watch this space.

Shooting a Time-lapse for a Zoetrope

Cinematic Lighting Course: Coming Soon

I’m using my time in Covid-19 lockdown for a few different things, some more worthy than others. Lying-in is a big one. Watching all of Lost again. Exercising more. But also I’ve got a big editing project to complete, a project of my own, the perfect task to get me through the long days at home.

Last November I shot Cinematic Lighting, a four-hour online course. It’s something I’d been thinking about for a while, especially over the last year or so as my Instagram following has sky-rocketed (about 33,000 at the time of writing). DPs and cinematography students follow my feed for the lighting diagrams I post every Friday, showing exactly how a lighting set-up was achieved, but some commenters had started to ask why I made certain creative decisions. So the idea for the course was born.

Lighting diagram for the Night Exterior module’s master shot

Cinematic Lighting consists of four modules: day exterior, day interior, night interior and night exterior. In each module I light and shoot a half-page scene with two actors, Kate Madison and Ivan Moy, with behind-the-scenes cameras following my every move. As I do it – with the assistance of gaffer Jeremy Dawson and spark Gareth Neal – I explain how and why I’m doing it. Sometimes I demonstrate alternative options I could have chosen. I talk about characterisation and how to match it with lighting. I quote John Alton and Christopher Nolan. I show clips from other productions I’ve shot and tell the stories behind them. I explain how to use a light meter and get your head around f-stops, T-stops and ND filters. I demonstrate the power of smoke. But most importantly I lay my creative process bare as I work.

Setting up a single in the Night Interior module. Photo: Ashram Maharaj

The original intention was for the course to be a reward on the Kickstarter campaign for Ren: The Girl with the Mark‘s second season, but sadly that campaign was unsuccessful. Over the next couple of months I’ll be investigating my options for releasing this course, and rest assured that I’ll let you know as soon as it’s available.

Meanwhile, postproduction work continues on it. The main thing left to do is the grading of the finished dramatic scenes; each module concludes with a polished edit of the scene which I’ve shot. Rather than hire a colourist, I’ve decided it’s time to finally learn a few things about grading myself. To that end, I’ve purchased a Udemy course and am currently learning how to do fancy secondaries in Davinci Resolve – another good use of my lockdown time, I feel. More on this in a future post.

Meanwhile, stay safe and REMAIN INDOORS.

Filming the introduction to the Day Exterior module. Photo: Colin Ramsay
Cinematic Lighting Course: Coming Soon