The Visual Effects of The Abyss

It’s time for one of my occasional asides celebrating the world of traditional visual effects – miniatures, matte paintings, rear projection, stop motion and the like. For a film using all of those techniques, look no further than The Abyss (1989). Arguably James Cameron’s most underrated film, it can also be considered his most ambitious. Whereas Terminator 2 had bigger action scenes, Titanic had a bigger set and Avatar had more cutting edge technology, these concerns all pale in comparison to the sheer difficulty of shooting so much material underwater.

The hour-long documentary Under Pressure makes the risks and challenges faced by Cameron and his crew very clear.

The Abyss won an Oscar for Best Visual Effects, and is remembered chiefly for the then-cutting-edge CG water tentacle. But it also ran the gamut of traditional effects techniques.

The film follows the crew of an experimental underwater drilling platform, led by Bud (Ed Harris), as they are roped into helping a team of navy divers, led by Lt. Coffey (Michael Biehn), investigate the sinking of a submarine. Underwater-dwelling aliens and cold war tensions become involved, and soon an unhinged Coffey is setting off in a submersible to dispatch a nuke to the bottom of the Cayman Trench and blow up the extra-terrestrials.

When Bud and his wife Lindsey (Mary Elizabeth Mastrantonio) give chase in a second submersible, a visual effects tour de force ensues. The following methods were used to build the sequence:

abyss1

  • Medium-wide shots of the actors in real submersibles shot in an abandoned power station that had been converted by the production into the world’s largest fresh-water filtered tank, equal in capacity to about eleven Olympic swimming pools.

abyss2

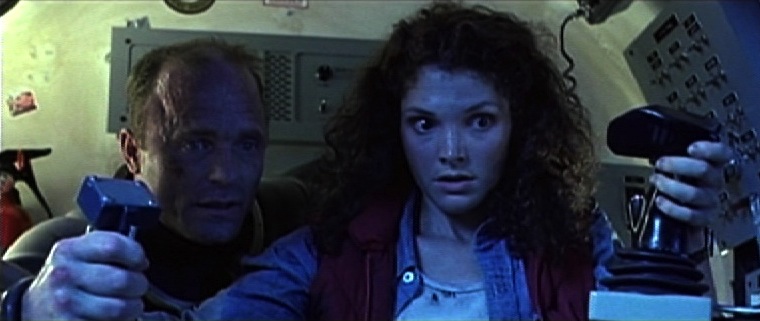
  • Close-ups of the actors in a submersible mock-up on stage.

abyss3

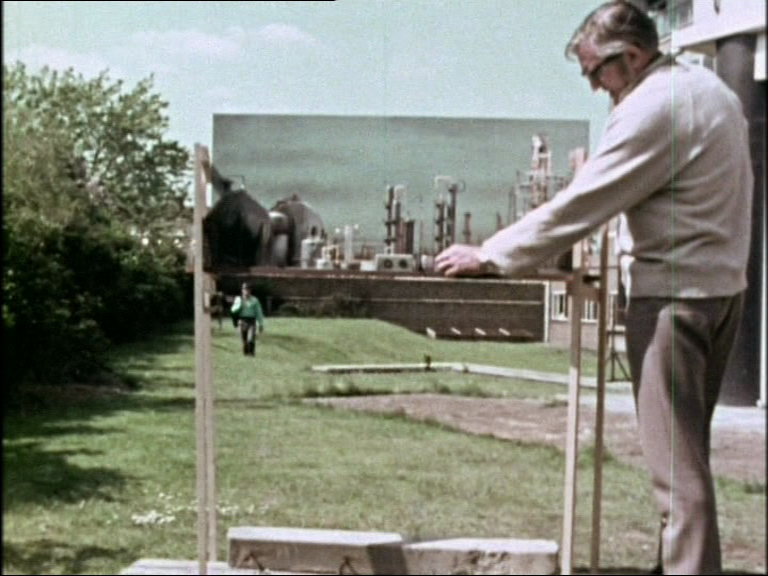
  • Over-the-shoulder shots of the actors in the submersible mock-up, with a rear projection screen  outside the craft’s dome, showing miniature footage accomplished with….

abyss4

  • Quarter-scale radio-controlled submarines, shot in a smaller tank. These miniatures were remarkably powerful and, due to the lights and batteries on board, weighed around 450lb (204kg). In order to see what they were doing, the operators were underwater as well, using sealed waterproof joysticks to direct the craft. The RC miniatures were used when the craft needed to collide with each other, or with the underwater landscape, and whenever the audience was not going to get a good look at the domes on the front of the submersibles and notice the lack of actors within.

abyss5

  • One of the custom film projectors inserted into the miniature subs
    One of the custom film projectors inserted into the miniature subs

    Where a more controlled camera move was required, or the actors needed to be visible inside the subs, but it was not practical to shoot full-scale, motion control was used. This is the same technique used to shoot spaceships in, for example, the original Star Wars trilogy. A computer-controlled camera moves around a static model (or vice versa), exposing film very slowly in order to maintain a large depth of field. The move is repeated several times for each different vehicle under different lighting conditions, before compositing all of the “passes” together on the optical printer in the desired ratios, to achieve the final look. For The Abyss’s motion control work, the illusion of being underwater was created with smoke. In shots featuring the submersibles’ robot arms, stop motion was employed to animate these appendages. But perhaps the neatest trick was in making the miniature subs appear to be inhabited; the models were fitted with tiny projectors which would throw pre-filmed footage of the actors onto a circular screen behind the dome.

The sub chase demonstrates perfectly how visual effects should work: mixing a range of techniques so that the audience never has time to figure out how each one is done, and using an appropriate technique for each individual shot so that you’re making things no more and no less complicated than necessary to tell that little piece of the story.

My favourite effect in the sequence is near the end, when the dome of Coffey’s sub cracks under the water pressure. This was filmed over-the-shoulder using rear projection for the view outside of the dome. But the dome was taken from a real submersible, and as such was too thick and too valuable to be genuinely cracked. So someone, and whoever he or she is is an absolute genius, came up with the idea of using an arrangement of backlit sellotape on the dome to create the appearance of a crack. A flag was then set in front of the backlight, rendering the sellotape invisible. On cue, the flag was slid aside, gradually illuminating the “crack”.

crack

Now that, my friends, is thinking outside the box.

The Visual Effects of The Abyss

The Advantages of Regional Filmmaking

guardianSeveral years ago The Guardian wrote a lovely big article about me under the headline “The Spielberg of Hereford”. I had just completed Soul Searcher, a feature-length fantasy-action movie shot in this sleepy backwater of the rural West Midlands. The project had not been without its challenges – from a malfunctioning camera to a striking stunt team – but shooting in the provinces wasn’t one of them.

Yes, on the face of it, basing yourself away from the vast majority of actors, crew and facilities is inconvenient. I have long since accepted that my casting calls mentioning a shoot far outside the M25 will get a limited response, and that I will have to travel to London to hold auditions.

Crewing can seem similarly problematic, but in fact there are many excellent TV and film technicians hidden away in rural areas, constantly driving to London to work, but keen to be involved in anything more local if they get half a chance. It’s a novelty, and that’s an advantage.

Some of the cast of The Beacon atop the titular Worcestershire hill during filming in 2001

Londoners can often be cynical about filming; it’s a business like any other. Most locations in the capital will whip out a rate card at the first whiff of a scouting crew. But out in the sticks, many property owners will let you shoot on their premises free of charge for the rare glamour of a brush with the film business. On Soul Searcher I only had to pay for a single location. At least two others told me they would charge me, but never did. Their accounts departments presumably had no procedure or precedent for raising an invoice for location fees, and so overlooked it.

The savings a regional producer makes on locations are often countered by an increased travel and accommodation budget. But there are benefits to this accommodation that, to my mind, outweigh the financial burden. A cast and crew staying away from home together will bond far more than one that scatters to the four corners of the tube map every night. This means improved morale and more realistic on-screen relationships between actors.

Stop/Eject on BBC East Midlands Today

Regional filmmaking has more potential now than it’s ever had. Established networks like Talent Circle may remain London-centric, but social media enables us to connect quickly with others in our area – Shooting People’s regional “Shooters in the Pub” Facebook pages, for example, or Herefordshire Media Network, through which I found the editor for my last short film, Stop/Eject. And in an age when everyone’s looking for a hook for their crowdfunding campaign, the declaration “shooting in YOUR home town” can help you connect to potential sponsors.

Finally, regional press will often jump on local film projects, providing great free advertising for your crowdfunding campaign, cast/crew call or screening. I’ve appeared on BBC Midlands Today on three separate occasions, but I can’t imagine BBC London News covering yet another struggling filmmaker. And would “The Spielberg of Hackney” have been so newsworthy to The Guardian? I suspect not.

If you’re interested in the potential of regional film and TV production, the Herefordshire Media Network will be hosting a panel discussion on this subject at the Borderlines Film Festival next month.

The Advantages of Regional Filmmaking

Ten Questions to Ask on a Recce (Location Scout)

Scouting a weir for Stop/Eject. We didn't count on heavy rains turning it into a raging torrent though.  Photo: Sophie Black
Scouting a weir for Stop/Eject. We didn’t count on heavy rains turning it into a raging torrent though. Photo: Sophie Black

Tomorrow I’m off to Nottingham to recce for A Cautionary Tale, so I thought now would be a good time to list the questions that a filmmaker and their team should be asking when they check out a location.

  1. Is the mains supply beefy enough for your lighting package? Check the fuse box to see how many circuits there are for sockets and what amperage each is fused at.
  2. Can you access the land outside the windows to set up lights shining in?
  3. If you intend to use a smoke machine or hazer, can any smoke alarms be disabled?
  4. Is it noisy? Just because it isn’t noisy when you scout, it doesn’t mean it won’t be when you shoot. Might that road be busier the day you shoot? Are there any matches scheduled for that playing field next door? Will people be trampling around in the room upstairs? Is there a market, festival or other occasional event on? Is it on a flight path? Can any humming electrical devices be turned off? Some modern buildings have their aircon controlled remotely from other sites.
  5. How might weather affect the location? For example: river levels change; fields can flood; mud can make moving equipment difficult; attractive green grass can turn yellow in a drought. Don’t forget to consider tides if you’re on the coast.
  6. To what extent can you modify the location? Can you screw into or paint the walls? For a period piece – are there anachronisms? Can they be removed or covered?
  7. If outdoors, is there a toilet that everyone can use? What about somewhere to get warm at lunchtime?
  8. Is there space for a green room and HMUW (Hair, Make-Up and Wardrobe)? If not, is a separate base camp required and where will that be?
  9. Is there sufficient parking?
  10. Is the owner willing to sign a location release? If not, this may come back to bite you, particularly if you’re entering your film into Virgin Media Shorts or selling it to a distributor. Get them to sign before you start filming; you don’t want them to pull out when you’ve shot two of the four scenes set there.

Can you think of anything I’ve missed?

UPDATE: Leslie Lowes adds:

  • Is there mobile phone coverage? Which networks?
Ten Questions to Ask on a Recce (Location Scout)

Plan for Cannes

A Cannes photo I did not take.

Considering a trip to the Cannes Film Festival this year? Well, now is the time to start planning and booking. Here are links to the most useful Cannes-related blogs I’ve posted over the last few years.

First up, if you’re thinking about entering your movie into Cannes’ Short Film Corner, this guest blog by Sophie Black explains exactly what you can expect to get from your entry fee and how you can make the best use of your time at the festival.

There are some things you don’t want to leave home without – read Packing for Cannes to find out the essentials.

Attending Cannes can be expensive if you’re not careful. Have a look at a breakdown of my Cannes spending in 2011, and check out Five Tips for Doing Cannes on a Budget for hints and tricks to conserve your cash on the Côte d’Azur.

Things I’ve Learnt in Cannes and Things I Learnt (Again) from Cannes 2013 lay out some of the important truths about the film industry that my trips to Cannes have hammered home to me.

If you want to find out how Sophie and I got on at the festival last year, watch our 2013 video blogs.

To get a sense of the madness of my very first trip to the festival as I attempted to sell my indie feature Soul Searcher, read my 2005 Cannes blog.

And finally, not particularly useful but quite amusing, here is the account of my travel woes on my way to Cannes in 2010.

Plan for Cannes

Five Simple But Effective Camera Tricks

Today I’m running down the five simplest yet most effective camera tricks I’ve used in my films. These are all techniques that have been used on the biggest Hollywood productions as well.

1. Looming Hollywood Sign (The Beacon)

Building Moon's forced perspective corridor
Building Moon’s forced perspective corridor

In amongst all the terrible CGI, The Beacon did feature the odd moment of low-tech triumph. As a damaged helicopter dives towards the Hollywood hills, the famous sign is reflected in the sunglasses of the injured pilot, played by my friend and fellow filmmaker Rick Goldsmith. The letters were actually 2″ high cardboard cut-outs stuck to a black piece of card, and Rick himself is holding it at arm’s length and moving it slowly towards his face.

This is a type of forced perspective shot, which I covered in my previous post. Die Hard 2’s airport control tower set was surrounded by a forced perspective miniature of the runways, complete with model planes, and more recently Duncan Jones and his team used the technique to create an endless corridor of clone drawers in Moon.

Colin Smith readies the watering can for Jonny Lewis's close-up, while Chris Mayall steadies the ladder.
Colin Smith readies the watering can for Jonny Lewis’s close-up, while Chris Mayall steadies the ladder. Photo: Simon Ball

2. Rain Fight Close-ups (Soul Searcher)

While most of this fight sequence was shot under the downpour created by an industrial hosepipe fired into the air, this wasn’t available when extra close-ups were required later. Instead a watering can was used.

It’s not uncommon for close-ups in a scene to be achieved much more simply than their corresponding wide shots. NASA allowed Bruce Willis and Ben Affleck to be filmed in their training tank for Michael Bay’s Armageddon, but CUs of the other actors had to be shot dry-for-wet with a fishtank in front of the lens and someone blowing bubbles through it.

3. The Wooden Swordsman Catches His Sword (The Dark Side of the Earth)

Getting the puppet to genuinely catch his sword was likely to require a prohibitive number of takes. (We were shooting on 35mm short ends.) So instead we ran the action in reverse, ending with with the sword being pulled up out of the puppet’s hand. When the film is run backwards, he appears to be catching it.

Backwards shots have been used throughout the history of cinema for all kinds of reasons. Examples can be seen in the Face Hugger sequence in Aliens (the creature’s leaps are actually falls in reverse) and in John Carpenter’s The Thing (tentacles grabbing their victims). At the climax of Back to the Future Part III, the insurers refused to allow Michael J. Fox to sit in the DeLorean while it was pushed by the train, in case it crushed him, so instead the train pulled the car backwards and the film was reversed.

4. Distortion of Tape and Time (Stop/Eject)

A classic Who extermination

At a crucial point in this fantasy-drama about a tape recorder that can stop and rewind time, I needed to show the tape getting worn out and images of the past distorting. I combined two techniques to create a distorted image of Dan (Oliver Park) without any manipulation in post. One was lens whacking, whereby the lens is detached from the camera and held in front of it, moving it around slightly to distort the focal plane. (See this episode of Indy Mogul and this article by Philip Bloom for more on lens whacking.) The other was to shake the camera (and lens) rapidly, to deliberately enhance the rolling shutter “jello” effect which DSLRs suffer from.

Flaws in camera technology can often lead to interesting effects if used appropriately. Let’s not forget that lens flares, which many filmmakers love the look of, are actually side-effects of the optics which lens manufacturers have worked for decades to try to reduce or eliminate. And in the early days of Doctor Who, the crew realised that greatly over-exposing their Marconi TV cameras caused the image to become a negative, and they put this effect to use on the victims of Dalek extermination.

Shooting The One That Got Away. A row of 100W bulbs can be seen on the right.

5. Sunset (The One That Got Away)

A painted sunset would have been in keeping with the style of this puppet fairy tale, but it was quicker and more effective to peek an ordinary 100W tungsten bulb above the background waves. Click here for a complete breakdown of the lighting in The One That Got Away.

Using an artificial light to represent the sun is extremely common in cinematography, but showing that lamp in shot is less common. For another example, see the opening Arctic sequence of Captain America: The First Avenger, in which a large HMI stands in for a low sun at the back of the mist-shrouded set.

Click here for my rundown of the top five low-tech effects in Hollywood blockbusters.

Five Simple But Effective Camera Tricks

Forced Perspective

The Ark
The Ark

The other day I watched a 1966 Doctor Who story called The Ark. It’s easy to look at a TV show that old and laugh at the stilted acting, rubber monsters and crude effects. But given the archaic and draconian conditions the series was made under back then, I can only admire the creativity displayed by the director and his team in visualising a script which was scarcely less demanding than a contemporary Who story.

Studio floor plan from the very first episode of Doctor Who, showing camera positions (coloured circles)

In the sixties, each Doctor Who episode was recorded virtually as live on a Friday evening, following a week of rehearsals. BBC rules strictly limited the number of times the crew could stop taping during the 90 minute recording session, which was to produce a 22 minute episode. Five cameras would glide around the tightly-packed sets in a carefully choroegraphed dance, with the vision mixer cutting between them in real-time as per the director’s shooting script. (Interesting side note: some of Terminator 2 was shot in a very similar fashion to maximise the number of angles captured in a day.) It’s no wonder that fluffed lines and camera wobbles occasionally marred the show, as there was rarely time for re-takes.

But what’s really hard for anyone with a basic knowledge of visual effects to get their head around today is that, until the Jon Pertwee era began in 1970, there was no chromakey (a.ka. blue- or green-screening) in Doctor Who. Just think about that for a moment: you have to make a science fiction programme without any electronic means of merging two images together, simple dissolves excepted.

Setting up a foreground miniature for a later Who story, Inferno (1970)

So the pioneers behind those early years of Doctor Who had to be particularly creative when when they wanted to combine miniatures with live action. One of the ways they did this in The Ark was through forced perspective.

Forced perspective is an optical illusion, a trick of scale. We’ve all seen holiday photos where a friend or relative appears to be holding up the Eiffel Tower or the Leaning Tower of Pisa. The exact same technique can be used to put miniature spaceships into a full-scale live action scene.

In these frames from The Ark, two miniature landing craft are lowered into the background before the camera pans to a full-size craft in the foreground:

The camera pans from a miniature descending in the background to a full-scale craft in the foreground.

And in these later frames, another miniature craft is placed much closer to the camera than the Monoid (a.k.a. a man in a rubber suit). The miniature craft takes off, pulled up on a wire I presume – a feat which time, money and safety would have rendered impossible with the full-size prop:

The camera pulls focus from a foreground miniature taking off to an actor in the background. A greater depth of field would have made the shot more convincing, but  the principle is sound.
The camera pulls focus from a foreground miniature taking off to an actor in the background. A greater depth of field would have made the shot more convincing, but the principle is sound.

Of course, Doctor Who was not by any means the first show to use forced perspective, nor was it the last. This nineties documentary provides a fascinating look at the forced perspective work in the Christopher Guest remake of Attack of the 50 Ft. Woman, and other films…

And Peter Jackson famously re-invented forced perspective cinematography for the Lord of the Rings trilogy, when his VFX team figured out a way to maintain the illusion during camera moves, by sliding one of the actors around on a motion control platform…

So remember to consider all your options, even the oldest tricks in the book, when you’re planning the VFX for your next movie.

Forced Perspective

Ten Tips for Running Auditions

With the casting for A Cautionary Tale fresh in my mind, here are a few tips on running auditions.

  1. Send all your auditionees the full script and/or audition sides in advance. Whether they read it all and how much they prepare will tell you a lot about their attitude to their craft and their enthusiasm for this particular role.
  2. Bring an assistant. If actor #2 turns up while actor #1 is mid-audition, it helps a lot to have someone to greet them.
  3. Make sure that the venue you’re using has an anteroom or corridor for people to wait in.
  4. Take signs (and Blutak) to direct people to the right room within the building.
  5. There will be no-shows. C’est la vie.
  6. Introduce yourself and the project before the reading, but don’t waffle because the more you keep the actor in suspense, the more nervous they will be when they finally get to read.
  7. If you’re filming the auditions, which I recommend, you should have a separate person doing that, so that you the director can watch and judge the performance with your naked eye.
  8. Check the actor’s ability to take direction by having them read a second time with a different emotional emphasis or motivation.
  9. Use an improv or two to gauge the actor’s creativity and get a sense of what they can do outside the confines of the sides.
  10. Take the time to answer any questions the actor may have about your previous experience. Remember that it’s just as much about whether they want to work with you as it is about whether you want to work with them.

How do you like to run auditions? Any tips you could add to these?

Casting for The Beacon, way back in 2001
Ten Tips for Running Auditions

Slating 101

Slating Brendan O'Neill's Fled. See www.sticklebackproductions.blogspot.co.uk
Slating Brendan O’Neill’s Fled. See www.sticklebackproductions.blogspot.co.uk

With dual system sound now the norm for even micro-budget shoots, a clapperboard (or slate as they call them in the US) is an indispensable bit of kit. It’s always best to keep this under the purview of the clapperloader or 2nd AC, rather than giving it to whichever crew member is free at the time. Otherwise you often end up with the camera operator calling “mark it” followed by an awkward pause because that crew member has left the set to perform some other duty, or has been too busy with other duties and is now scrambling to update the numbers on the slate. Incorrect slates can give the editor headaches down the line, so it’s important to get it right.

Slating Harriet Sams' The First Musketeer. See www.firstmusketeer.com
Slating Harriet Sams’ The First Musketeer. See www.firstmusketeer.com

With that in mind, here are the basic rules of slating.

Labelling the Board

The production name, scene number, DP’s and director’s names and the date are self-explanatory. DAY/NIGHT and INT/EXT (interior/exterior) are intended to ensure the labs process the film footage correctly, but should still be circled appropriately on a digital shoot. Shutter and frame rate information can be obtained from the camera operator or DP. Some slates will have a space for a roll number, and since “rolls” (memory cards) are recycled on a modern shoot, it is best to ask the DIT (Digital Imaging Technician, or data wrangler) how they would like these numbered.

Slates and Takes

The slate number should start at 1 for the first shot of the first day, and increment every time the camera position and/or lens is changed. Sometimes a director will ask instead for the slate number to match the numbers on their shotlist or storyboards, but this is a bad idea because inevitably shots will be dropped or added and it becomes very confusing. Besides, if the slate number simply starts at 1 and goes up, the DIT can easily tell if a shot is missing from their hard drive due to a card being overlooked or some technical fault.

The take number should reset to 1 each time the slate number changes, and increment every time the camera stops rolling, with certain exceptions and variations outlined below.

(The American system differs in that it omits slate numbers. Instead a letter is appended to the scene number, so the first shot filmed of scene 7 would be 7, then 7A, 7B, 7C, etc.)

Procedure

The clapperloader should always have the board up to date and ready to go. He or she should have checked the length of the lens being used and found a position for the slate in which it’s fully in frame and legibile. A torch may be required if the set is moodily lit.

The sound mixer will roll their device and announce “sound speed”.  The camera operator will then roll and ask the clapperloader to mark it. By this point the slate should already be in frame so that the first frame recorded, when the DIT looks at it as a thumbnail on their hard drive, has the slate on it.

Only the slate and take number need be announced, e.g. “30 take 3”. The board should then be clapped nice and cleanly to produce a sharp click on the soundtrack that is easy for the DIT or assistant editor to sync. If it’s necessary to clap a second time, the clapperloader should announce “second clap” or “second sticks” immediately before.

Pick-up
Slating a pick-up for The Deaths of John Smith. See www.thedeathsofjohnsmith.com

PU and AFS

If the director decides to do another take but to begin the action part way through rather than from the top, the take number should still increase but pick-up (PU for short) should be appended to the number. For example: take one, take two, take three pick-up, take four pick-up.

If camera and/or sound roll but cut before the board is clapped, the take number remains the same for the next attempt.

If camera and sound roll, the board is read and clapped, but the crew cuts before action is called, the take number remains the same but AFS (After a False Start) is appended.

If action is called, even if it’s immediately followed by cut, the take number always increases for the next attempt.

A mute slate for The First Musketeer

MOS

Sometimes the camera rolls without sound, if the mixer feels he or she cannot get any useful sound. In these cases the clapperloader should circle MOS (Mute Of Sound) on the slate. They don’t need to clap the board or announce the slate and take number; they simply need to hold the board up long enough for it to be read by the editor. As an additional indicator that there is no accompanying sound file, the clapperloader should hold the board with their fingers between the sticks.

An end board on Fled

End Board

Sometimes it’s impractical or inconvenient to shoot the slate at the start of a take, so instead it’s shot at the end. At the start of the take the camera operator announces “end board” instead of “mark it”. When the action is finished, the director typically forgets that it’s an end board (American term: tail slate) and calls “cut”. Hopefully the sound mixer and camera operator remember not to obey this command, and the latter calls “mark it”. The clapperloader should then mark the take in the usual manner, except that the board should be held upside-down. They should conclude their verbal announcement with “end board” or “on the end”, e.g. “27 take 2 on the end”. Only then can camera and sound cut.

Slating 101

Polymath: Behind the Scenes

I always enjoy a good behind-the-scenes video, and there’s often much to be learnt from them too. My friends at Polymathematics have just released a series of ‘making of’ videos for their recent music promos, all of which are exquisitely designed and shot (my own involvement in Droplets notwithstanding!). Check out Polymath’s Vimeo channel for more behind-the-scenes videos and of course the promos themselves.

Droplets

We Were Here

The Last Human / I Do (Come True)

Hands Up if You’re Lost

And here’s an equally fascinating look at a live puppetry project they did as part of the Olympic Torch Relay celebrations…


Polymath: Behind the Scenes

The Miniature Effects of “The Day of the Doctor”

The cannon miniature

The fiftieth anniversary special of Doctor Who has been lauded for its cinema quality FX; indeed, I saw it in a cinema and at no point did I feel like I was just watching a TV show on a big screen. The Time War sequence was particularly impressive, and in amongst the CGI and special effects you may be surprised to learn there were some miniature effects which helped to up the ante. These were created by Mike Tucker and his team at The Model Unit, who a few years back did such a brilliant job of building the Wooden Swordsman for my Dark Side of the Earth pilot. This press release from the Model Unit reveals their contribution and how it was done.

The Model Unit’s involvement in Doctor Who: Day of the Doctor was for the Time War section of this historic episode, providing several cutaways of the Time Lord staser cannon (including its destruction) and a longer sequence showing John Hurt’s TARDIS crashing through a wall and destroying several Daleks that are unlucky enough to be in its path.

Model Unit supervisor Mike Tucker working on the Wooden Swordsman for The Dark Side of the Earth back in 2008

Following an initial discussion with producer Marcus Wilson to establish the sort of shots that might be needed Miniature Effects Supervisor Mike Tucker met up with stereo supervisors Adam Sculthorp and David Wigram to work through the practicalities of shooting high speed miniature effects sequences in 3D – a first for a British television drama production.

A proof of concept test utilising an existing miniature established that the models shouldn’t be smaller than 1/6th scale, and ideally at 1⁄4 scale. Further research established that the miniature effects sequences for the Martin Scorsase movie ‘Hugo’ had been done at 1⁄4 scale and with the same Alexa high speed camera rigs that we were planning to use, and so we were able to proceed with a certain amount of confidence that what we were about to do was realistically achievable.

Blowing up the cannon

With a five-week lead-time and a two-day shoot in Cardiff in April of this year model construction was split between several Model Unit regulars. Alan ‘Rocky’ Marshal was given the task of constructing the staser cannon, Nick Kool took on the TARDIS model and associated rigs and Colin Mapson worked with new recruit Paul Jarvis on the ruined Arcadian buildings and breakaway wall sections.

In a nod to past effects sequences, the Dalek miniatures were achieved in the time honoured way by utilising off-the-shelf toys (in this case the 18 inch voice- interactive toys that had been produced by Character Options a few years back), albeit with a few careful modifications in order to match them more closely to the actual props. Further detail was added to the interiors, including a scaled model of the mutant creature.

Model Unit DoP Peter Tyler worked closely with main unit DoP Neville Kidd to establishing a lighting design for the miniatures as, due to camera rig availability, we were shooting our miniatures in advance of the live action unit – a complete reversal of how things are usually done.

Close collaboration was also needed with the production design team with Mike and assistant art director Richard Hardy constantly swapping notes about the final design details of both Time Lord machinery and architecture to ensure a seamless blend with the location.

Day one of the shoot concentrated on the shooting of the cannon allowing the more complex rig of the TARDIS to be set up and tested, whilst the second day took in several takes of the TARDIS shots. The 1⁄4 scale TARDIS miniature was fixed to a steel rig mounted on a trolley system that allowed us to fire it at the wall using bungee cord.

Filming the Tardis breaking through the wall

Two takes of each set up were shot on two high speed Alexa stereo rigs shooting at 120fps.

Mike and his crew watched the completed episode at the Doctor Who Celebration at Excel with an audience of 2000 fans.

Visit The Model Unit’s website at www.themodelunit.co.uk

The Miniature Effects of “The Day of the Doctor”