DIY Interview Lighting for the Ren EPK

Left to right: the flipchart holding up the key bounce reflector, the halogen key source with the flagging reflector immediately to the right of it, the hair-light LED panel peeking over the backdrop above the hot seat, the LED panel acting as a flag, and the halogen 3/4 backlight.

Shooting interviews is a great way for a cinematographer to learn to light. I figured out loads about how human faces react to light of different kinds from years of experimenting on the talking heads in corporate videos. And because those interviews were often long and dull, there was plenty of opportunity to evaluate my lighting as I relaxed behind my locked-off camera.

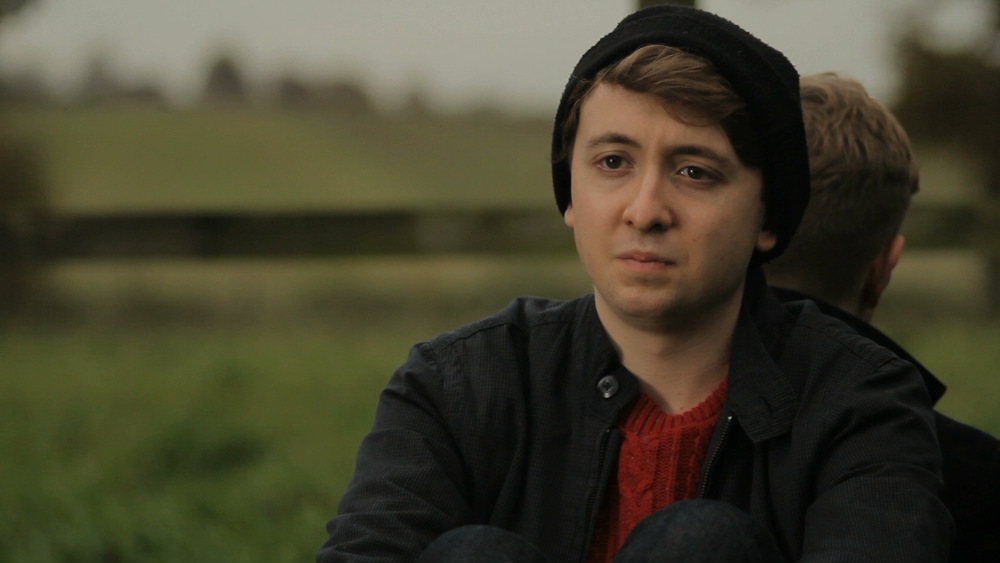
At the weekend a “promo day” was held for Ren, the fantasy-action web series which you must all have heard of by now. The goal was to shoot publicity stills of the lead actors, and to shoot interviews for the EPK (Electronic Press Kit). We decided to stage these against a black backdrop.

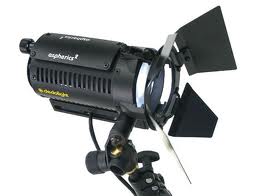
Our venue was the office-cum-studio of the nascent Cambridge TV station, kindly lent to us for the day, but the only lighting kit we had were two Chinese LED panels, two halogen worklights and a couple of collapsible reflectors. I knew from the start that I wanted to use the worklights to key the talent, because halogen bulbs put out a much fuller spectrum of light than budget LEDs. Without a full spectrum you can’t capture all the skintones, and your subject will lack life.

SB8opNy

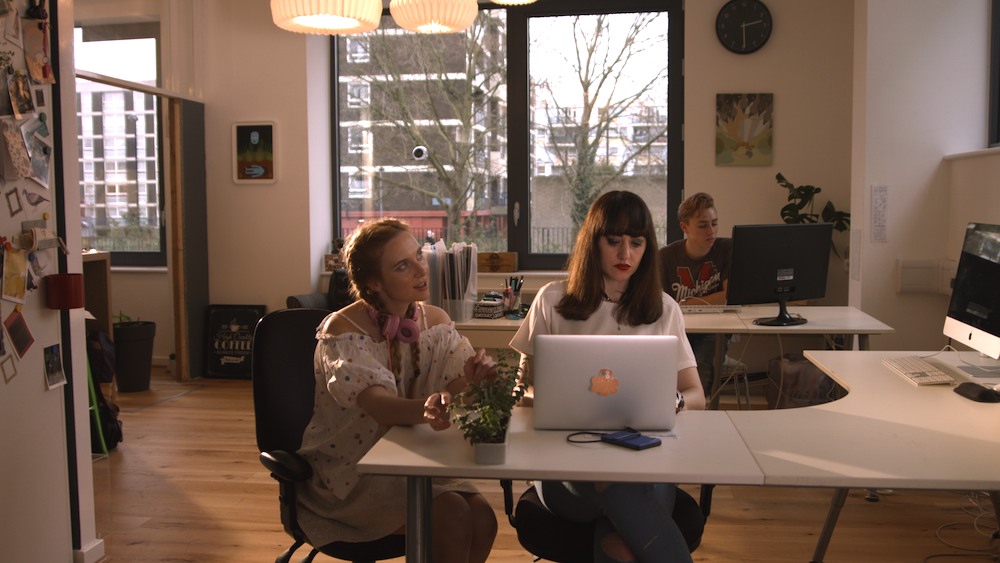
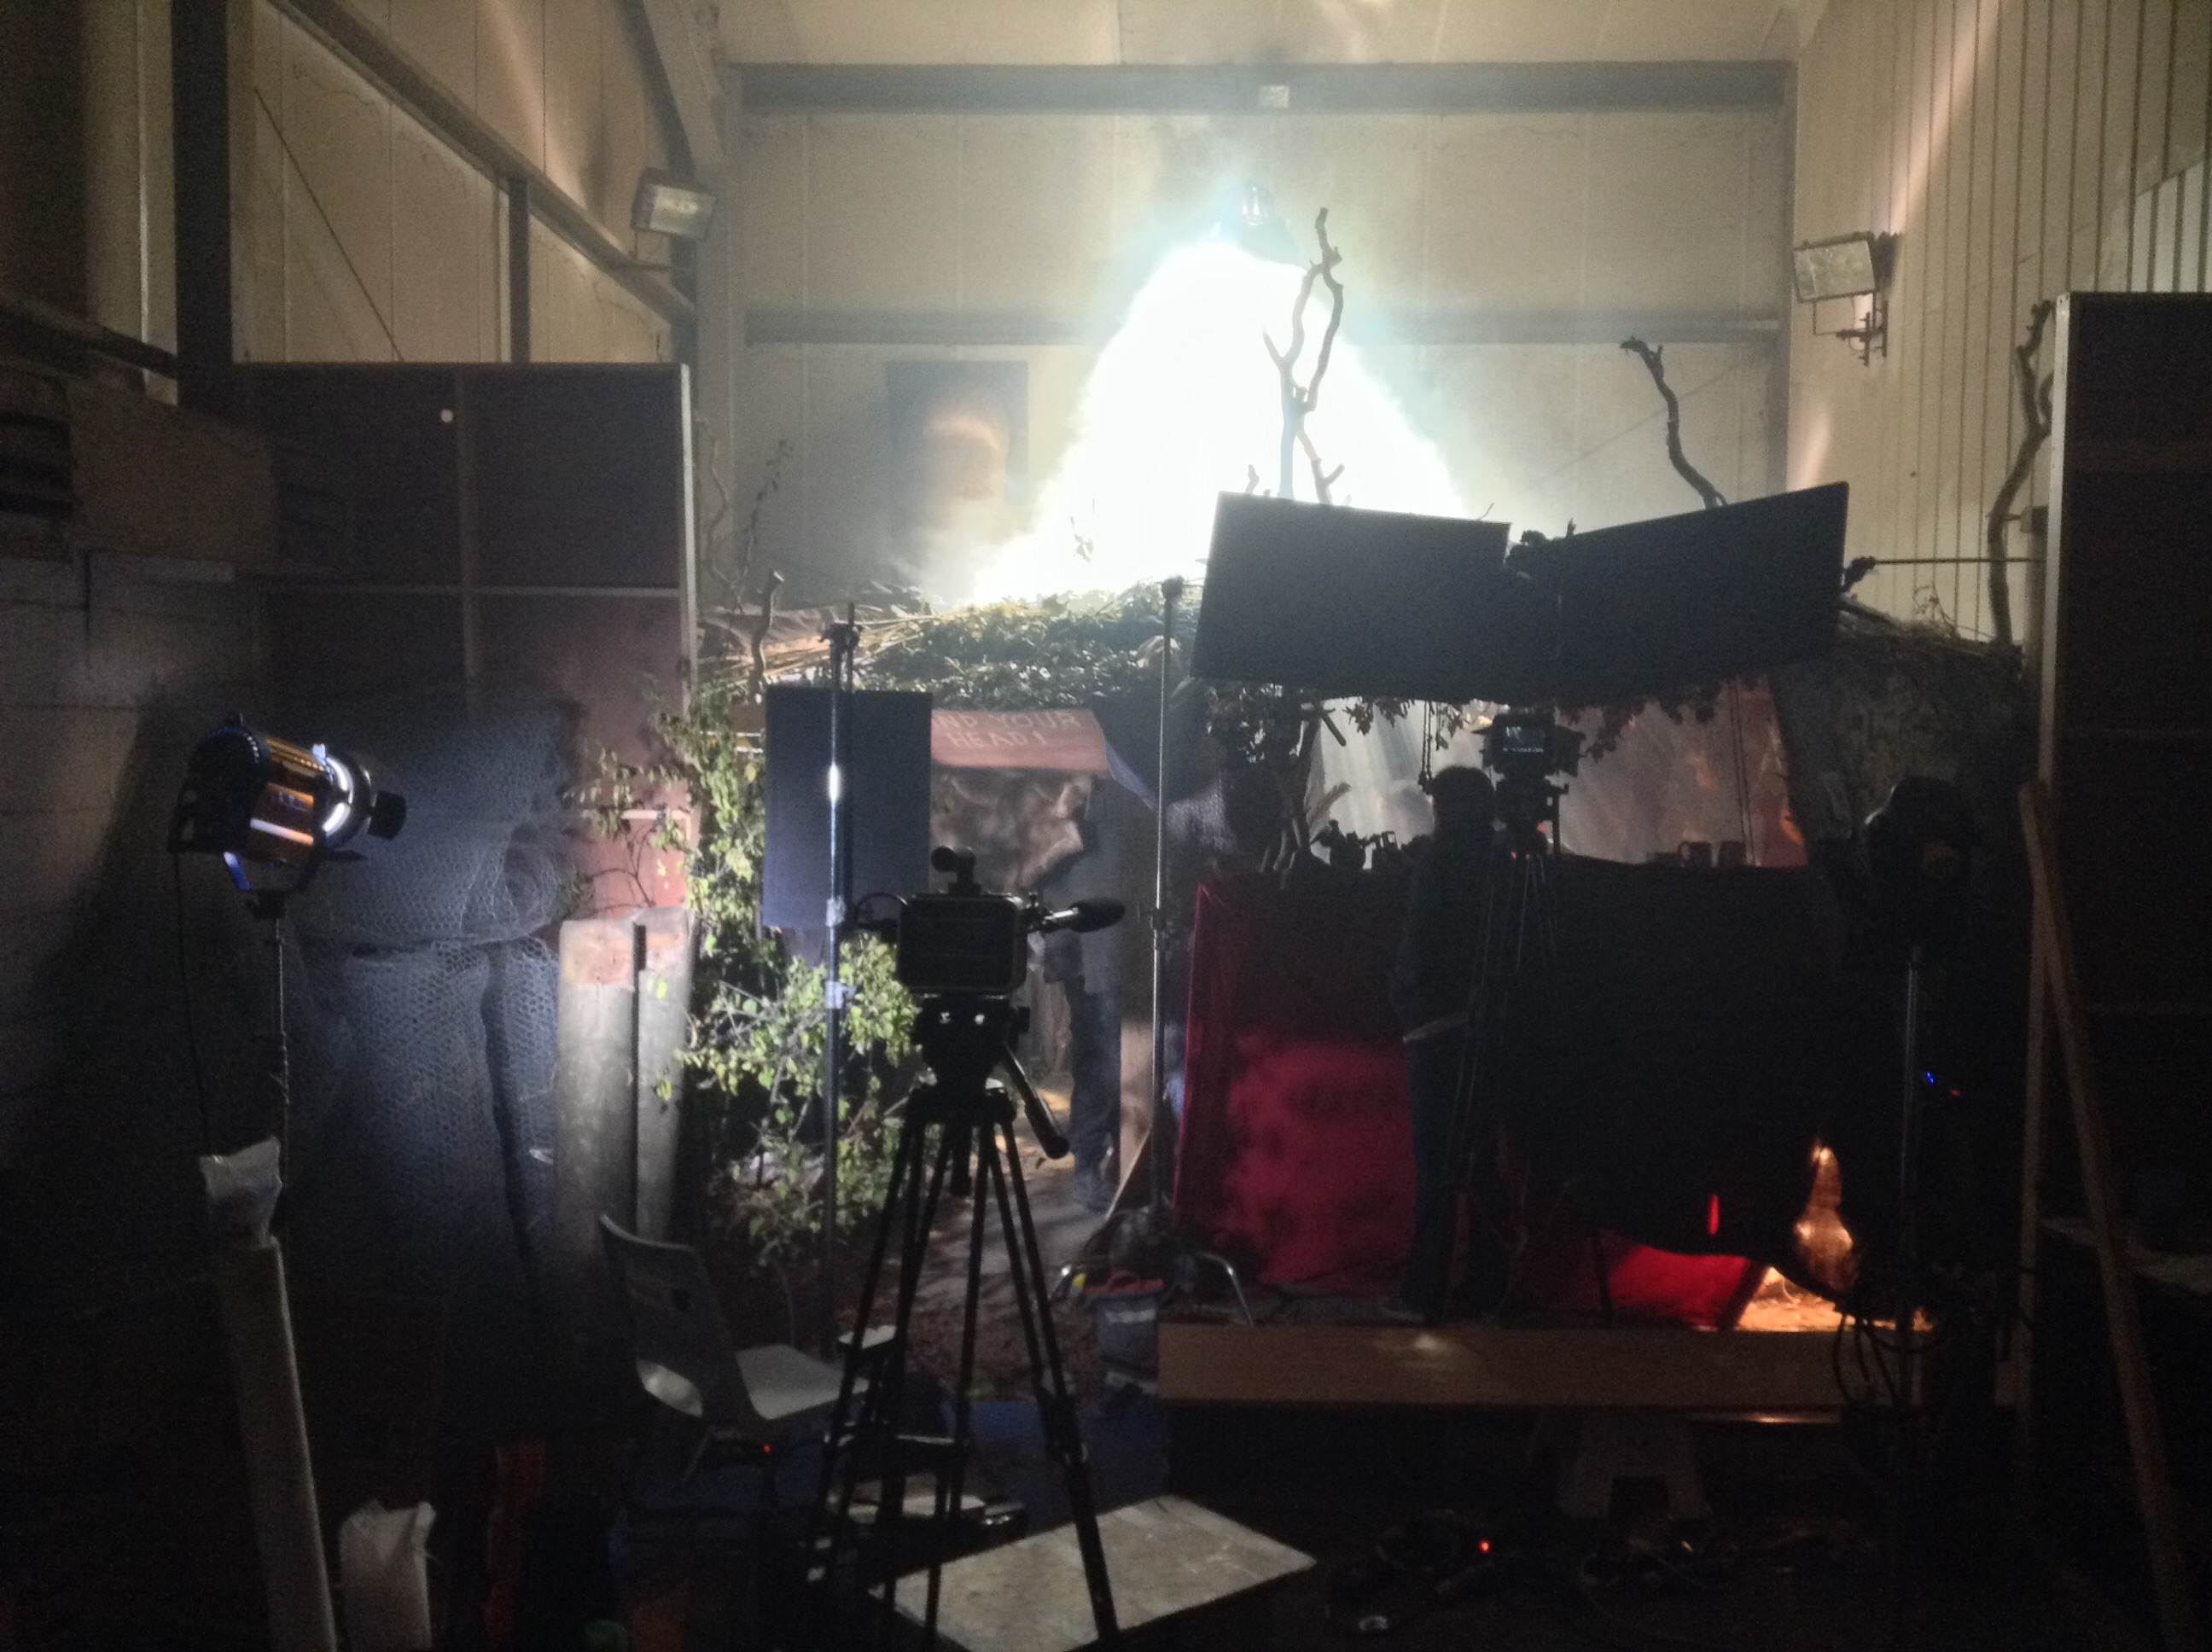
Here’s the lighting set-up I arrived at.

Sketch 2015-03-30 12_59_18

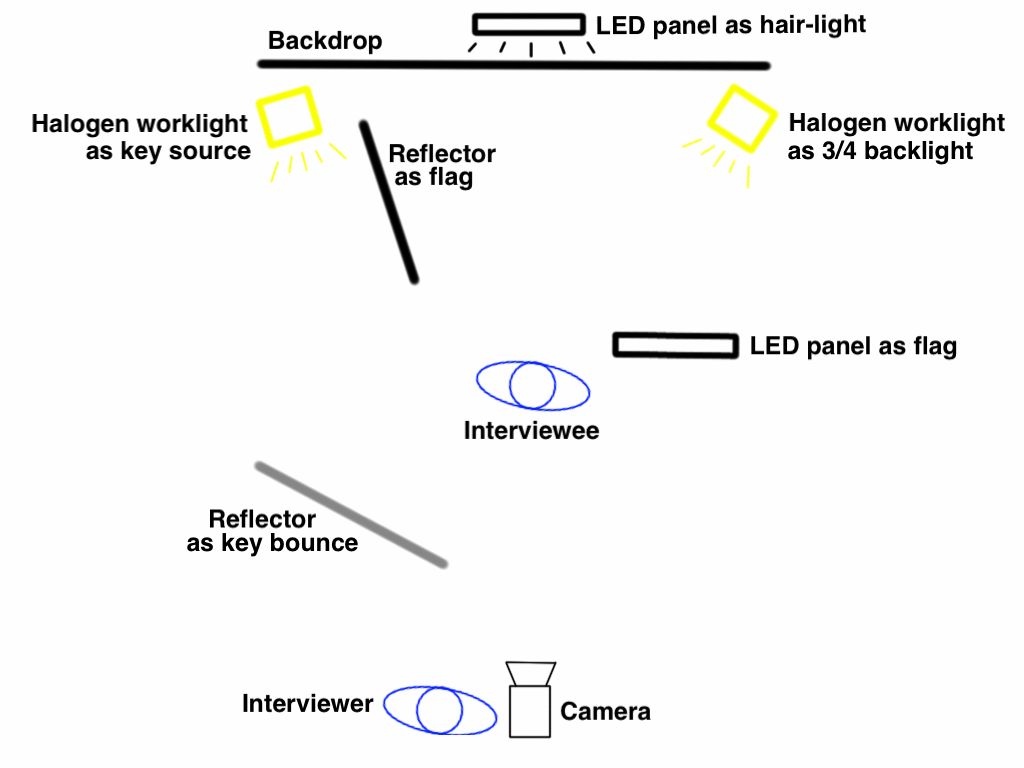
I’ll talk you through it.

The keylight (halogen, top left) bounces off the silver side of a reflector (resting on a convenient flipchart) to give a nice, soft source. The second reflector is used as a flag to stop direct light from reaching the talent.

The second halogen (top right) serves as a hot three-quarter backlight. One of the LED panels is used as a flag (!) to stop this backlight flaring into the lens.

The other LED panel pokes over the top of the backdrop to provide hair-light.

The white walls of the studio provide sufficient bounce to render a fill light unnecessary.

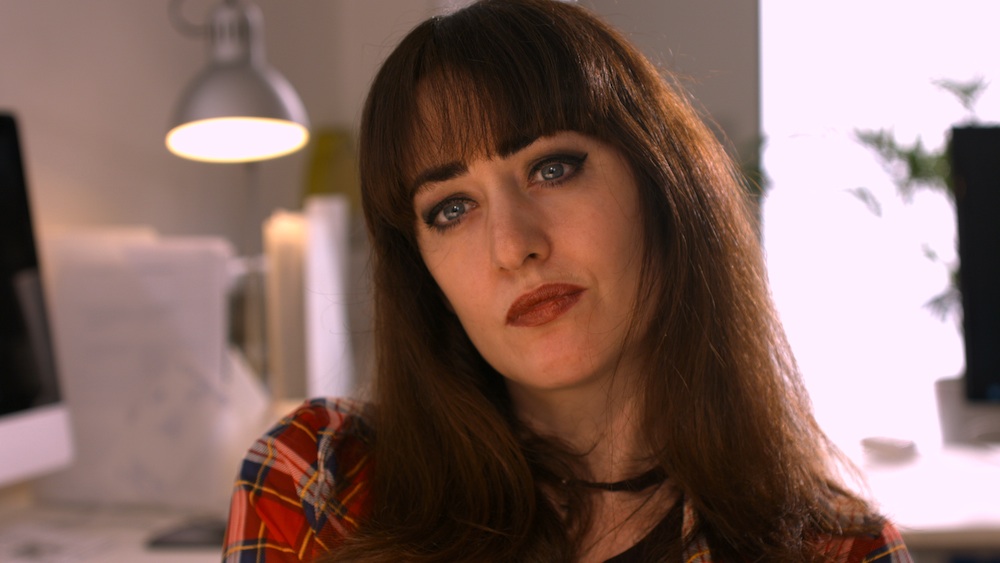
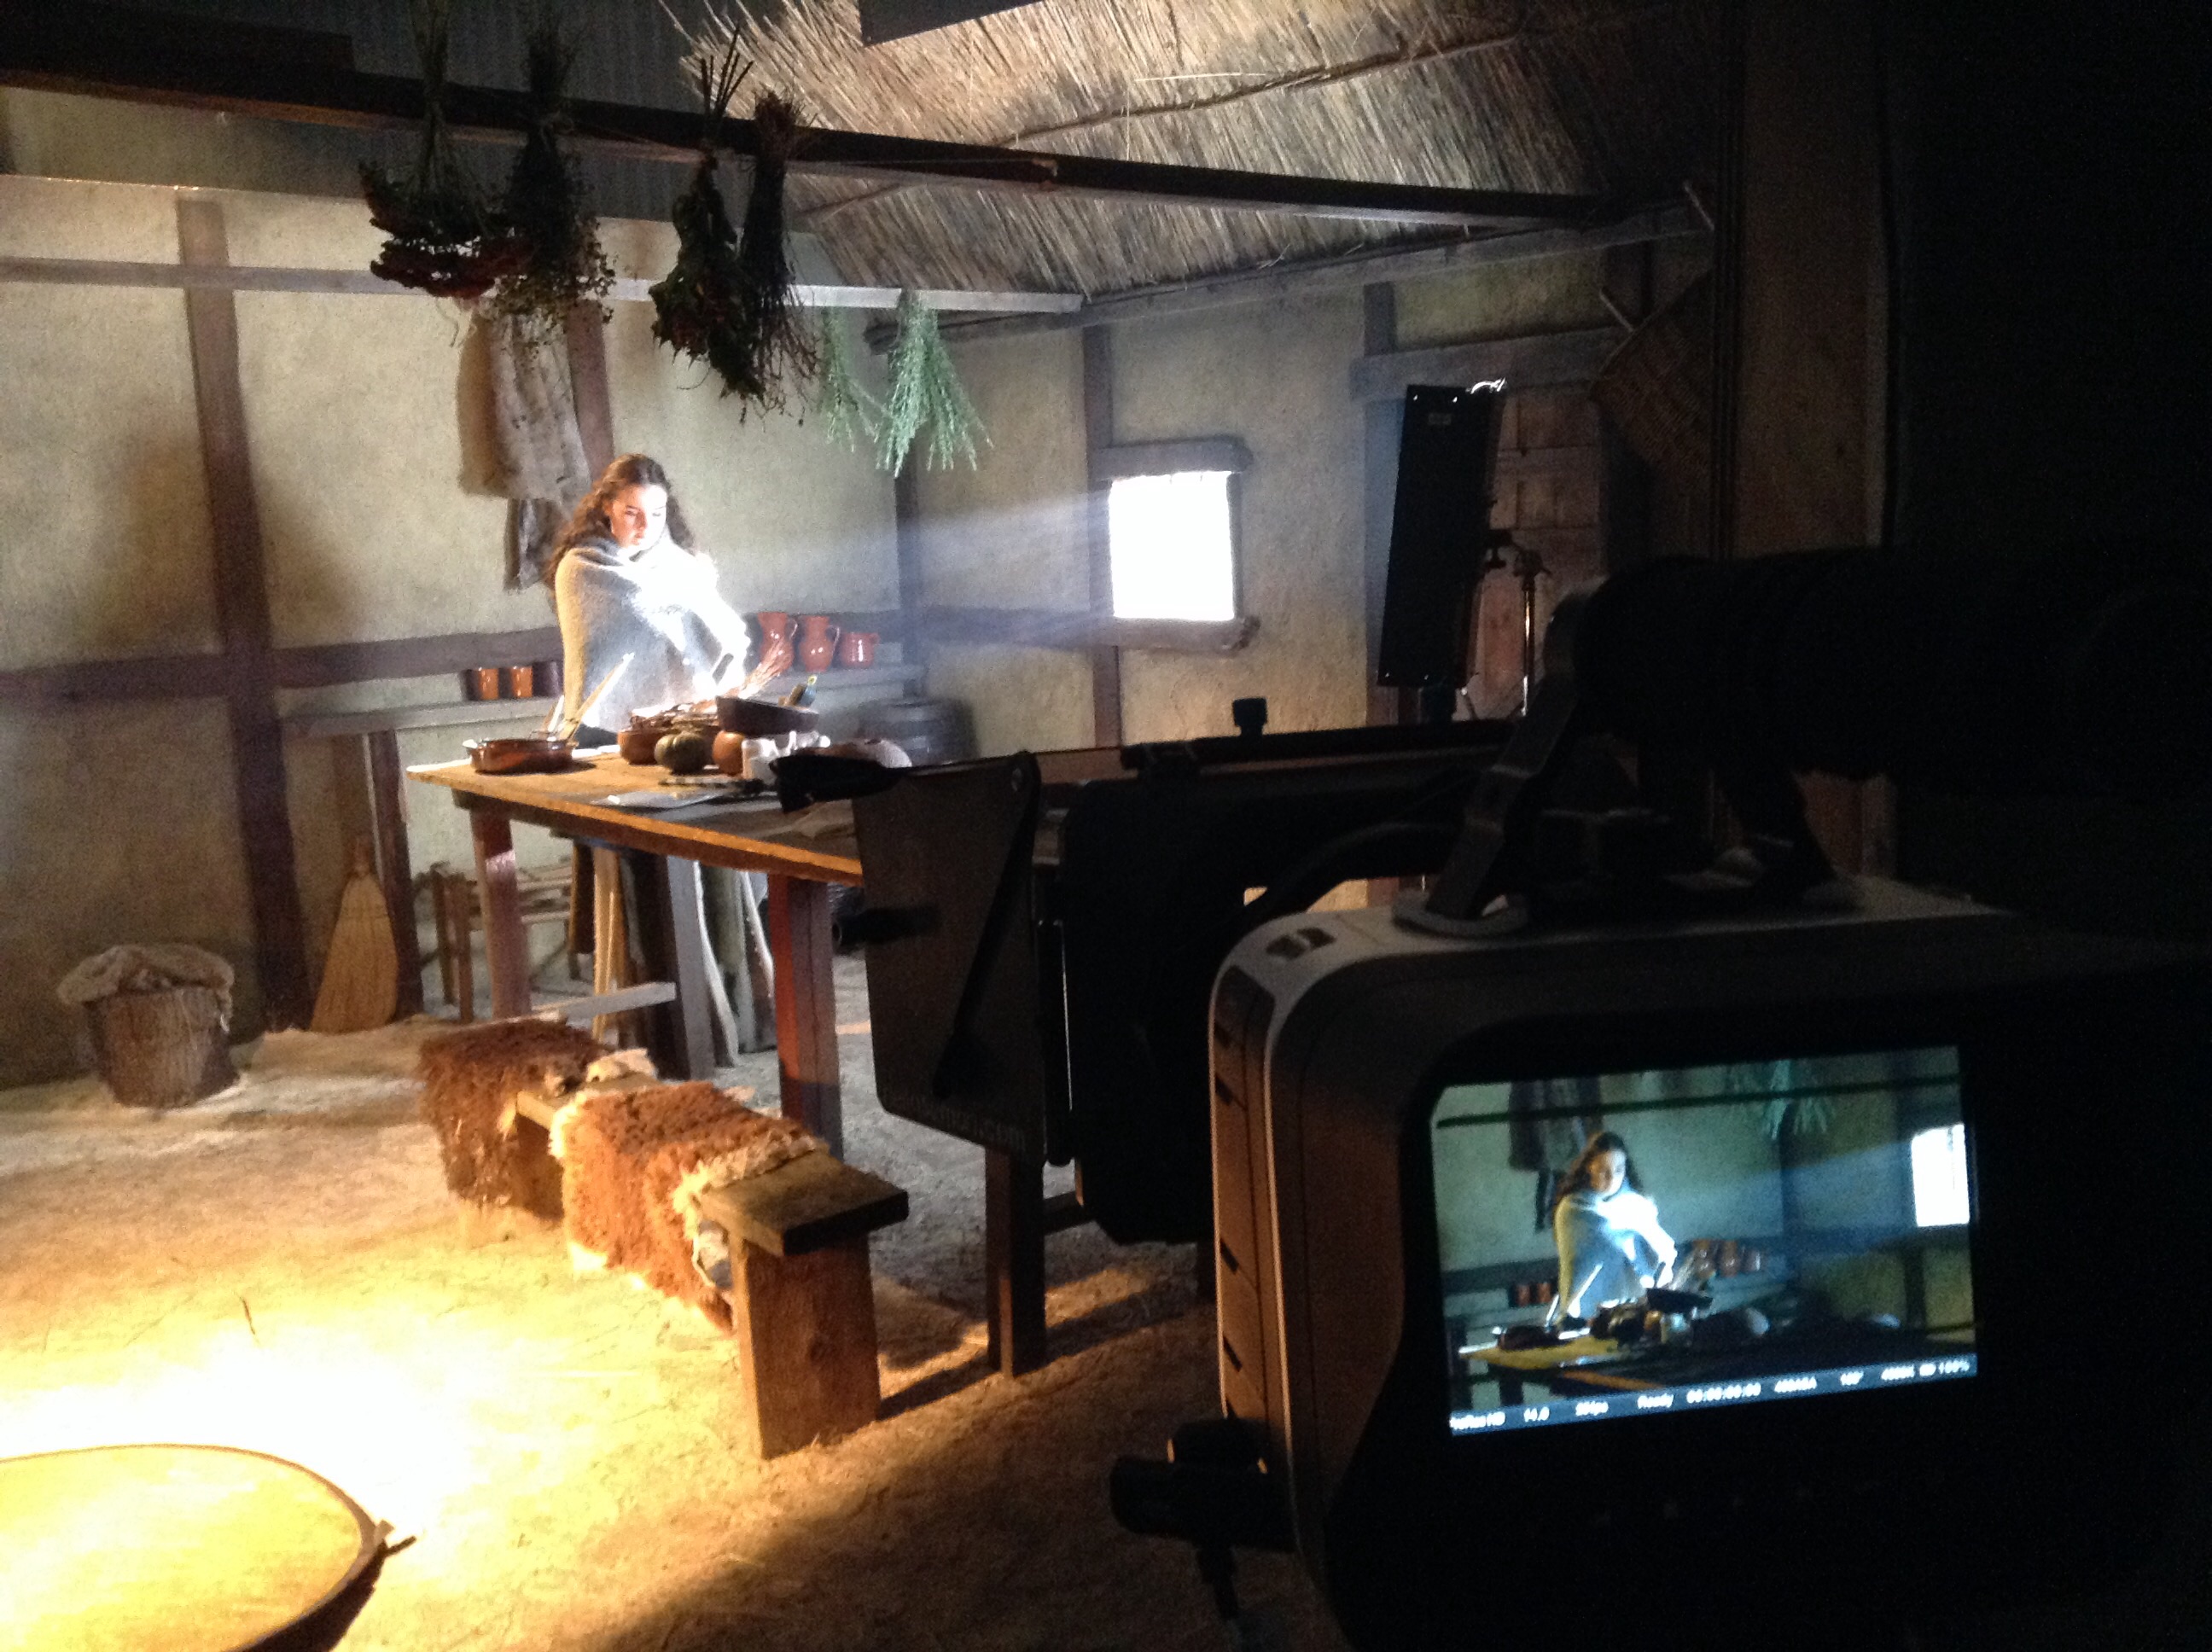
The result is a nice, slick, minimal look. The two backlights stop dark hair or clothes from disappearing into the background, and the soft key is flattering to all yet is at enough of an angle to provide shape and contrast – see how it outlines Sophie’s left cheek and jaw.

Blackmagic Production Camera 4K_1_2015-03-22_0220_C0002

Incidentally, we considered using a white backdrop for a little while. Had we gone with this, how would I have changed the lighting? I would have had to lose the backlights, because white rim-light will only make your subject bleed into a white background. The lamps thus freed could have been trained on the backdrop in an attempt to blow it out, but it’s questionable whether that would have been achievable with the Blackmagic’s dynamic range. Finally, I expect I would have introduced negative fill to get rich, black shadows on the talent’s up-side, in order to get some contrast into the image. More on lighting for a white backdrop here.

After the publicity shoot, we repaired to Kate’s place for a Q&A livestream. Here it is if you missed it. Subscribe to Mythica Entertainment’s YouTube Channel to make sure you never miss our behind-the-scenes videos and trailers.

www.rentheseries.com

DIY Interview Lighting for the Ren EPK

Lighting ‘3 Blind Mice’

A cinematographer should always be looking for ways to enhance the story through camerawork and lighting. 18 months ago I lensed a short film called 3 Blind Mice, which sadly seems permanently mired in no-budget postproduction hell. It comprises a trio of vignettes linked by a common theme. Each vignette featured two characters: one real, one supernatural or imaginary. In preproduction, director KT Roberts told me that she wanted the unreal characters to look somehow artificial, so I decided to give these characters each a perfect halo of backlight, whilst simultaneously eliminating all shadows on their faces. By contrast, the real characters would have no backlight and a grittier look to their faces with light and shade.

2-girl 2-monkey

The first vignette to go before the camera was an interior scene, so we sat the unreal character (Charlotte Quinney, above right) in front of the window for backlight, and used a 4 bank 4ft kinoflo and a collapsible reflector to evenly light her face.  The natural daylight was reinforced by a 1.2K HMI outside the window, gelled pink to match the colour scheme of the set dressing and suggest sunset. The real character (Libby Stewart Power, above left) was strongly lit from the right side by the “daylight”, with only a low level of fill from the reflector off left.

3-alive 3-dead

The other two vignettes were daylight exteriors. In both cases the 1.2K was used to halo the unreal character, with a reflector and silver foamcore used to fill in their faces (Will Attenborough, above right – third vignette). The 1.2K was used again when shooting the real characters, this time bouncing it off the reflector onto one side of their face. In the case of the final vignette, the other side of the real character’s face (Jack Mosedale, above left) was filled in by natural light, so we brought in a black drape hung from a flag arm as negative fill to combat this.

Shooting the real character in the final vignette. At left is the reflector bouncing the HMI (right). In the centre can be seen the black drape creating negative fill.
Shooting the unreal character, surrounded by matte silver foamcore (bottom right) and a collapsible reflector (bottom left) to remove shadows from his face. The 1.2K HMI in the background creates a halo of backlight around his head.
Shooting the unreal character, surrounded by silver foamcore (bottom right) and a collapsible reflector (left) to remove shadows from his face. The 1.2K HMI in the background creates a halo of backlight around his head.

How have you used lighting to help tell your stories?

Lighting ‘3 Blind Mice’

Shooting ‘Self Control’

On location in a cafe-bar in north London

Recently I photographed Self Control, a short film by writer-director Stanislava “Stacey” Buevich. Joanna Kate Rodgers plays Lily, a woman who struggles to control her violent urges when she’s befriended by an extremely annoying colleague.

A read of Stacey’s shotlist revealed a clear Wes Anderson influence, which was great for me because I immediately knew the parameters: flat angles, formal composition, deliberate 90 degree pans and lateral tracks. Stacey also referenced Ida, which led to several wide shots with lots of headroom, like this one…

Chair scene graded copy

Creating interesting shadows by using a partition window at the location.

Lighting wise, it was a limited kit (two tungsten 2Ks and a Dedo kit with only two functioning lamps). Bin bags and some sheets of thin white packing foam were used to eliminate or reduce natural light coming through offscreen windows, to give shape and contrast to the images. For a scene in the office kitchen, I fired one of the 2Ks through a high partition window to create some shadows.

I knew that I wanted to do something with lighting to clue the audience into Lily’s true identity (she’s the devil in human form). By the end of the first morning I’d settled on lighting her from below whenever possible. In this CU from an office scene, a blue-gelled tungsten 2K was fired down onto a white desktop in front of Lily…

A 2K fires down onto a white desktop to uplight Lily (frame grab below).

Lily office CU graded copy

For a yoga/relaxation scene on the second day, production designer Devon Barber conveniently dressed in a row of tealights on the floor in front of Lily, giving me a great excuse for satanic, fiery bottom-light. We set up a Dedo either side of camera, firing down into strips of kitchen foil so that the light would bounce back up onto Lily’s face. The Dedo dimmers were ridden by my ACs during takes to create a flickering effect.

Strips of tinfoil placed on the floor around the dolly track reflect two Dedolites (just out of frame either side) back up onto Lily's face. A 2K hidden behind the wall on the right provides backlight.
Strips of tinfoil placed on the floor around the dolly track reflect two Dedolites (just out of frame either side) back up onto Lily’s face. A 2K hidden behind the wall on the right provides backlight.

Yoga1 graded copy

To find out more about the work of Stacey and her producing partner Lara Myles, visit www.clockpunkfilms.com

Shooting ‘Self Control’

Lighting ‘X, Y & Z Rays’ by Revenge of Calculon

Stage-bound music promos can be an interesting challenge for a cinematographer. Often there is no set that has any basis in reality, no windows, no starting point for lighting. This should be very freeing but is actually pretty scary. Where to start?

This is X, Y & Z Rays by Revenge of Calculon, my latest music video for director Tom Walsh of Polymath Pictures

Nick Pylypiuk did an awesome job of building and programming the LED panels, and Amy Nicholson did a great job of dressing the gadgets and cables. How did I go about lighting it?

2 of the 800W tungsten Arrilites hidden behind the big LED panels
2 of the 800W tungsten lamps hidden behind the big LED panels

Well, cinematography isn’t just about mimicking natural light. It’s about depth and contrast, to name just two things. And depth was where I started. If I didn’t want the LEDs to float in a black background, then it was necessary to light the cyclorama to reveal it as a separate layer behind the LED panels. But leaving the cyc dark would give the image more contrast. I wanted to have my cake and eat it. So the lamps I lit the cyc with had to be dimmable so that they could be off at some points during the track and on at others.

I placed 800W tungsten lamps on the floor behind the central and outermost LED panels, uplighting the cyc. Poor Emma, the art assistant and the smallest member of the crew, was assigned to hide behind one of the panels, pulsing the 800s on a dimmer board in time with the music.

Next I needed to light the musicians. We didn’t have access to the studio grid, the LED panels were providing plenty of light from behind, and any light from the front would have polluted the panels, so my only option was to light from the sides. I placed a Dedolite off to each side, gelled with different varieties of blue/green gel to make this layer of the image stand out from the warm, ungelled tungsten of the 800s.

The 4 Dedolites can be seen here, gelled blue-green, blue-green, purple and yellow.

This was all very well, but it left a lot of the art department’s nice foreground dressing in complete darkness. So I set up a second Dedolite on each side, crosslighting the amps and other gubbins. I gelled one of these yellow and the other pinky-purple. Normally I prefer to use a narrower palette of colours, but since the patterns programmed into the LED panels used all the colours of the rainbow, I felt I had license to do the same.

After a couple of run-throughs, I decided on an alternating, pulsing pattern for the four Dedolites at half the speed of the 800s. My initial instinct had been towards something more sophisticated, but there was plenty going on on the LED panels without needing to make the foreground too manic.

Clockwise from top right: a blue-green-gelled LED panel, a tungsten-tubed Kinoflo and a daylight-tubed Kinoflo Divalite amongst the set dressing

Amy was still looking to add to the set dressing, so I suggested putting our battered old Kinoflo into shot for a bit of extra interest. This left only a Kinoflo Divalite and a 1×1′ LED panel in my arsenal. “What the hell,” I thought, and hid them behind a couple of the amps to pick out some more of the set dressing.

Despite all this, I still think the strongest bits of the video are those where all my lights are off, leaving just the patterns on the large LED panels. With a bit of dispersed smoke in the studio, the LEDs give off a lovely glow, and the dynamic wrapping backlight they shed on the performers is really beautiful.

And we quickly found that they looked great out of focus, and went with that for a few set-ups. In fact, much of the single day of shooting was spent experimenting and going with the flow. Tom trusted me to get interesting coverage while he helped operate the LED panels, and I found the electronic music guiding me into Wes Anderson-style camera moves: lateral tracks, and bold, simple pans and tilts.

Find out more about Polymath Pictures at www.polymathematics.co.uk.

Photo by Amy Nicholson


Lighting ‘X, Y & Z Rays’ by Revenge of Calculon

What I Learnt from Ren

This coming week the core team from Ren, the fantasy adventure web series I lensed last autumn, will meet for a de-brief. We’ll discuss the challenges of season one and how we can meet those going forward to season two and beyond. And we’ll probably drink wine.

So I thought now would be a good time to reflect on what I personally learnt from Ren: Season One, and where I’d like to improve for season two.

“People talk about lighting, but the hardest thing to do [for a cinematographer] is to shoot a day exterior over an extended period… especially in England.” – Roger Deakins

The biggest challenge I was plunged straight into was the fact that most of the season was set outdoors on a single day. How could I maintain a consistency of lighting without huge cranes, silks and big HMIs, or without demanding the production grind to a halt whenever the light didn’t match (something the schedule couldn’t accommodate)? Quite simple, I couldn’t. Perhaps if I’d been involved in preproduction, I could have helped shaped the schedule so that certain scenes were only being shot at certain times of day, but given how much the schedule changed during shooting, this probably wouldn’t have helped.

Colin Smith slates a shot of RIchard Zeman as the Kah'nath Commander
Colin Smith slates a shot of Richard Zeman as the Kah’nath Commander

But being forced to leave lighting the set to Mother Nature had its advantages. Whereas indoors, or at night, the cinematographer must light the set and the actors, for daylight exteriors the only thing you have the ability to light is the actors. That really focused my attention on the faces and telling the story through the way light hit them.

I was able to compile a mental dossier of what works well for each actor – and each character. So I knew that Ren (Sophie Skelton) looked best with a soft front- or side-on key, but not three-quarter, that Hunter (Duran Fulton Brown) looked best in toplight, that Karn (Christopher Dane), the Commander (Richard Zeman) and Lyanna (Dita Tantang) all looked great with a hard side key. I knew that Baynon’s (James Malpas) eyes looked extra expressive with a large bounce board under his face, whereas Hunter only needed a little dot of an eyelight. And so on, and so forth. In the future I want to get better and faster at compiling these ‘dossiers’.

Setting an eyelight under the camera
Setting an eyelight under the camera. Photo: Richard Roberts

Despite gathering all this info during the exterior shoots, it was a still a bit of a shock when week six hit and I suddenly had to light these familiar faces entirely artificially. In the past I’ve often seen natural light as more of a hindrance than a help, but working with it for five weeks solid gave me a new respect for it, and I found myself more critical of my own lighting than ever.

The main challenge indoors was achieving the soft, innocent look I’d established for the title character without a skyfull of natural light to bounce around. The kinoflos I used to key Sophie often made her look very shiny, much to the exasperation of make-up artist Becca Youngs, who had to keep slathering more powder on her. (Which is one of many reasons why camera and make-up tests in pre-production would be beneficial for future seasons.)

In fact it wasn’t until the very last day of the shoot when I discovered that the best soft sources were actually hard sources – like 800W tungsten lamps or even the 2.5K HMI – bounced off Celotex (matte silver bounce board). If you read things like American Cinematographer you start to realise that most DPs create soft sources this way, bouncing par or fresnel fixtures off poly, foamcore, Ultrabounce or the like and often pushing it through diffuser of some kind as well. Stephen Murphy and Ed Moore conducted a great test of various bounce and diffusion materials on their blog recently. The problem with this kind of lighting for a low budget DP is that you need to hire larger lamps, because bouncing and diffusing really dilute a lamp’s power. Though in last month’s Cine Summit, DP David Vollrath recommended cheap-to-hire Source 4 Leikos as bounce sources, so that’s worth looking into.

Shooting on my Sigma 50mm f1.4 from under my signature Stealth Cloth, to keep sunlight off the Blackmagic's screen
Shooting on my Sigma 50mm f1.4 from under my signature Stealth Cloth, to keep sunlight off the Blackmagic’s screen

The other thing I’d love to spend money on next time, if at all possible, is a set of cine lenses. Season one was shot with my three Sigma DSLR primes and some legacy Pentax primes belonging to gaffer Richard Roberts. While the Pentax glass looks great, and the Sigma glass is fine at f4 – the stop I shot most of the show at – when it starts to get wide open it goes a bit soft (not that the average viewer would notice). Inevitably some of the night and interior scenes had to be shot wider than f4, and everything shot on the B camera – Richard’s Blackmagic Cinema Camera, with its smaller 16mm sensor – was exposed at f2.8 to match the depth of field. Plus I deliberately used an ultra-shallow depth of field for certain scenes in which Ren is feeling the effects of the spirit within her. So lenses that hold their sharpness better at wide apertures, and which are easier to pull focus on, would be great for season two.

Whatever level of resources we can get for future seasons, I know it will be a fantastic experience and I’ll learn a whole lot more, so bring it on!

Filming Ren's death scene. Just kidding…. or am I? Photo: Michael Hudson
Filming Ren’s death scene. Just kidding…. or am I? Photo: Michael Hudson
What I Learnt from Ren

Candlelight

The First Musketeer – the period web series I DPed in France last September – is edging closer to completion. One of the biggest challenges of the shoot for me was simulating candlelight. Almost every scene had candles in it (albeit fake, yet very convincing, LED ones) and it was always a struggle to make them appear to be shedding authentic light.

A couple of years back I blogged about how I created candlelight for the Wasteland trailer, by hiding ordinary 100W tungsten bulbs behind the set-pieces the candles were standing on. I did this again on The First Musketeer, and it can be very effective.

The main tavern set was dotted with large barrels topped with candles, so it was quick and easy to gaffer-tape pendant fittings with 100W bulbs onto the backs of these barrels. (A piece of blackwrap was interposed to stop the bulbs singeing the barrels.) The advantage of a bare bulb over a fresnel or par fixture is that it sheds light in all directions, just like a candle. So when three people were stood around a barrel, as long as the two at the sides were cheated slightly back out of the barrel’s shadow, it lit them all up fairly convincingly.

A single 100W bulb hidden behind the barrel lights the three Huguenots in the background. A blue-gelled HMI provides backlight.
A single 100W bulb hidden behind the barrel lights the three Huguenots in the background. A blue-gelled HMI provides backlight, while two dedos off the sides of frame cross-light the foreground characters.
Dedo, de-e-edo. Dedo come and me want go home.
Dedo, de-e-edo. Dedo come and me want to go home.

This method doesn’t always work though, and it relies on the candle being sat on something a bulb can be hidden behind.

A dedo creates the pool of light around the background candle here.

Dedolights are great for creating circles of light to surround candles, and their built-in dimmers make it easy to flicker the light for added realism. But this method has serious drawbacks. Firstly, it lights the candle itself as well as the surroundings, often rendering the flame (or LEDs) almost invisible. Secondly, anyone passing between the dedo and the candle will pass through the beam of light, destroying the illusion. In an ideal world you would rig the dedo to the ceiling and set up a little thin flag to prevent the light hitting the candle itself, but in practice this would usually be difficult and time-consuming to set up.

More recently I’ve tackled the candelight problem again on Ren. The difference was that we were able to use real candles, often double-wicked for enhanced light output. Real candles take care of their own immediate pool of light, so then you only have to worry about beefing up the amount of lighting hitting the talent and the surrounding set.

Again, bare bulbs can be useful for this, but dedos are often best. It’s possible to cheat the dedo positions quite heavily and still get away with it, because they produce such a narrow, controllable beam of light.

The two candle stands in the background have 100W bulbs hidden behind them. 40W bulbs would have been more suitable, but unfortunately we didn't have any. The light supposedly cast by these candles actually comes from two dedos. The first is at ceiling height off frame left, aimed at the Duke de Luyne (Toby Lorde) on frame right. The second is hidden behind the duke's desk and lights the heroes on frame left
The two candle stands in the background have 100W bulbs hidden behind them. 40W bulbs would have been more suitable, but unfortunately we didn’t have any. The light supposedly cast by these candles actually comes from two dedos. The first is at ceiling height off frame left, aimed at the Duke de Luyne (Toby Lord) on frame right. The second is hidden behind the duke’s desk and lights the heroes on frame left.

What methods have you used to simulate candlelight? Comment on Facebook or tweet me – I’m intrigued to hear.

All images copyright 2014 The First Musketeer. Find out more about the series at www.firstmusketeer.com

Candlelight

Goodbye to Ren

Some of the key cast and crew at the awesome wrap party. Photo by Allison Reid

Seasone one of Ren wrapped last week, and after a few days of tidying up and recovering, it was time for an epic wrap party – actually, two of them. And then came the heartbreaking process of saying goodbye to all the wonderful people I had lived and worked with for the past two months. We’d had all the time in the world and suddenly we had none.

What I said to those people as we parted seemed woefully inadequate as soon as they had walked out of the door. How could I put into words how unique and incredible this project, this experience had been? So to my Ren family, particularly that core group who were there day in, day out, here’s what I should have said…

Thank you. Thank you for the tea, the Thai curries, the Tech Biscuits and the jelly beans. Thank you for the joy of Tony the Phony Pony, for Spongebob Squarepants, for the movie quotes, the nonsense French and the inappropriate remarks. Thanks for the Nerf gun battles, the movie nights, the slumber parties and the Costa runs. Thanks for doing my laundry, for cleaning the toilets and for washing up.

Thank you for being so complimentary about my work, and for going the extra mile to make sure I had the kit I needed to do it. Thank you for your patience, for not compromising and for keeping cool when everything was broken. Thanks for waiting for the smoke.

Thank you for helping me grow as a DP and as a person. Thanks for not judging. Thanks for believing in me when I suggested outlandish things like the fake running shots. Thanks for listening, for being there for me and letting me be there for you.

Thanks for the BEST WRAP PARTY EVER. Thanks for sharing your karaoke with us, and doing it really well. Thanks for putting up with my playlist several times through, and helping me rediscover my love of music.

Thank you for the incredible hard work you put in before I even showed up. I have never met a kinder, more generous and more talented group of people. It has been the absolute highlight of my career to get up every morning and photograph the beautiful things you made. I am humbled to have earnt your respect and your friendship.

Thanks especially to Kate for bringing this amazing group together, and for setting the atmosphere that made this project unparalleled in my experience. Everything is awesome when you’re part of a team, and what a team to be part of. I love you all. I wish you every success and happiness in whatever you do next, and – if not before – I’ll see you all for season two.

Goodbye to Ren

Lighting Techniques #5: Smoke

Smoke looks cool, I think we can all agree, but why? What are we trying to achieve when we spray a set with smoke?

In the famous cinematography manual Painting with Light, John Alton says of the cinema experience: “We sit in the dark looking at a light screen; this gives a definite feeling of depth. In order to continue this depth on the screen, the progression from dark to light must be followed up. The spot which should appear to be the most distant should be the lightest, and vice versa…”

Smoke can help you accomplish this dark-to-light depth. Because it’s white, if you spray it in the background then the background will get lighter, while the foreground will remain crisp and contrasty. It’s like standing on top of a hill and looking at more hills receding into the distance. The more distant ones are lighter, less saturated, less contrasty because of the atmospheric haze.

Smoke helps darkly-clad characters stand out from a dark background in The Deaths of John Smith (dir. Roger Harding)
Smoke machine
The Magnum 550: the most powerful smoke machine in the world. Are you feeling lucky, punk?

There are a number of ways to produce smoke. I own a Magnum 550, a small electric machine designed for DJs but perfectly useable on set. The smoke fluid is electrically heated until it turns to gas. On Ren we have an Artem smoke gun which uses propane gas cans to heat the smoke. This is handy on location because it doesn’t need a power supply, and it can produce thick clouds of smoke much more quickly than the Magnum.

An Artem smoke gun
An Artem smoke gun

You have to wait for both of these types of machine to heat up before you can use them. Ideally you need a dedicated crew member who is predicting when you might be ready to shoot and heating up the machine in readiness. If you’re outdoors, they also need to stay on top of the wind direction. You may think this would stay fairly constant, but trust me, it doesn’t.

Both types of machine produce wreaths of smoke which usually needs wafting in order to look like general atmosphere. And consistency is a challenge. It’s tricky not to have long takes that start with a lot of smoke and end with none. Both types of machine are too noisy to run during a take, though the sound recordist may agree to let you run an electric machine during pauses in dialogue, and an Artem can continue producing smoke for a little while after the gas is turned off.

A hazer
A hazer

If you’re indoors, a hazer may be more appropriate. This is an electric machine that uses compression rather than heat to vapourise the fluid, then blows it out continuously through a fan. The effect is much more subtle and constant than that produced by a smoke machine.

However you’re generating your smoke, remember to keep it in the background as much as possible. It’s all about making your subject stand out from the background.

You can find out more about smoke and why I use it in my Ren podcast at www.rentheseries.com/news/ren-podcasts.

Smoke used to volumise a shaft of light in Ren (copyright 2014 Mythica Entertainment)
Lighting Techniques #5: Smoke

Ren: Lighting Karn’s House

Karn’s house is an awesome set which I had been walking past at Ren Studios for six weeks before I finally got to light it. It didn’t disappoint.

Behind all that smoke at the top is the HMI

In the words of my camera assistant Andy Roughan, I had to John McClane it to get the HMI up on the metal tank behind the set. After climbing onto the tank via a stepladder, I had to shimmy around an incredibly dusty pipe to get to the spot where the lamp needed to be. Getting the lamphead, the low boy stand and sandbags up there was fun. At one point I lost my balance and fell backwards, towards the roof of the set. I shouted a naughty word at the top of my voice, thinking that not only was I going to injure myself quite badly, but I was going to destroy everyone’s favourite set before we’d shot a single thing on it. Fortunately it was so well-built that it took my weight, or at least the part of my weight that I was forced to put on it, and no harm was done. Except that me shouting the naughty word in such a tone of utter panic had given everyone within earshot a minor heart attack.

Squish's cyclotron
Squish’s cyclotron

Why was it so important to get light up behind the set, rather than shining it down through the roof from in front? The answer is smoke. You can’t really see smoke unless it’s backlit, so in order to get those magical shafts of light coming through the set, the HMI had to be at the back.

After shooting the video blog, Andy and gaffer Richard “Squish” Roberts finished building the cyclotron for the firelight effect. This consisted of three 100W bulbs behind a red gel, and two behind an orange gel. I don’t want to give away screengrabs yet,  but you can see the fire effect at work on set dresser Amanda Stekly in this ropey iPad photo:

Set dresser Amanda Stekly, lit by the fake firelight

This fire effect served to light Ren (Sophie Skelton) in the foreground of the master shot very nicely, and separate her from the background through colour contrast. It rendered the 2ft kinoflo shown in the video blog unnecessary.

When we came in for the close-ups I continued to differentiate the characters of Ren and Karn (Christopher Dane) through light quality, as I had in Wales. I brought in an LED fresnel for Karn’s close-up, to get a hard sidelight, then for Ren’s close-up I used the 2ft kino to get a much softer look and from a less severe angle.

It’s a shame there was only one scene to film in this set; it would have been great to use it more. But it will certainly add a lot of production value to the opening episode of the series.

Ren is copyright 2014 Mythica Entertainment. Visit www.rentheseries.com to find out more.

Ren: Lighting Karn’s House

Ren: Lighting Dagron’s House

This is our big interiors week on Ren. The main set is the inside of Ren’s house, which was assembled in a mere three days by Chris Dane and his team, cannibalising the village exterior set. In this video blog I explain how I lit the set.

This set-up worked pretty much as-is for the first big scene in the house, shot on Monday. It was all handheld, so I needed the flexibility to move around with the camera and not worry about lamps on the floor getting in shot. The way I’d lit the set meant that the cast could stand pretty much anywhere and look good, especially since whoever was wiggling the “firelight” reflector could tweak the angle of it to follow any actor threatening to go a bit dark.

100W bulbs hidden behind the dresser for "candlelight"
100W bulbs hidden behind the dresser for “candlelight”

As the bedroom was visible in the background of many shots, I rigged a rough version of the candelight effect I knew I would be using when we got to the bedroom scenes proper. I clipped four 100W tungsten bulbs behind pieces of furniture and cabled them into two channels of the dimmer board Colin kindly lent us. These were then flickered to suggest flames.

image
The dimmer station

The dedo over the table proved to be superfluous. When I saw Claire making candles for the set, I asked her to double-wick them. I’d read in American Cinematographer that they’d done that on Pirates of the Caribbean to boost the light output, and sure enough, once those candles were lit, the dedo wasn’t needed.

The following day I played around with the lighting a bit more. When we came in for close-ups – this time on sticks – I turned off the overhead 4ft kino and brought in a 2ft kino on the floor for Window Wrap (Lighting Technique Number #3). That way the light got into the talent’s eye sockets and was generally more flattering.

The kinoflo on the right acts as Window Wrap

For another scene I decided the fire had gone out, allowing our bad guys to be bathed in cool daylight while the good guys stayed near the candlelight by the bedroom door. It’s nice when you have motivated colour contrast like this in a set and you can play around with which characters are in which colour of light. I look forward to shooting the remaining house scenes and developing some nice candlelight in the bedroom.

Find out more about Ren at www.rentheseries or on Facebook or Twitter.

Ren: Lighting Dagron’s House