Making a Digital Cinema Package

The finished Stop/Eject DCP. Not as cool as a roll of 35mm.

Now that huge reels of 35mm film are all but obsolete, Digital Cinema Packages (DCPs) are the new means of getting a film to a cinema. Many top film festivals will only screen off a DCP or 35mm print, and in terms of picture and sound quality and compatibility it is your best option for screening at theatrical venues in general. Much has been written about how you can make a DCP at home for nothing, but having just gone through the process myself for Stop/Eject I’m going to round up some of the best sources of information I came across and enlarge on the area of disc formatting which hasn’t been too well covered elsewhere.

To ensure maximum compatibility of your DCP you need to:

  • convert your film to 24fps if it isn’t already at that frame rate
  • use a standard 2K aspect ratio, 2048×1080 or 2048×858
  • put it on a disc that is EXT3 formatted
  • supply that disc in a Cru Dataport DX-115

I’ve spoken to filmmakers who have ignored many or all of the above and still run their DCPs successfully in cinemas, but I decided to play it safe and do all of the above, except the Cru Dataport, which was a little too expensive. Instead I bought a 500GB LaCie Rugged USB drive and put my DCP on there. Read Knut Erik Evensen’s excellent blog post on DCP delivery for more info on Dataports and USB compatibility.

The formatted drive as seen in Ubuntu, with the DCP files copied over
Step 5: the formatted drive as seen in Ubuntu, with the DCP files copied over

So, here is the process I went through. I was starting out with 25,409 uncompressed 16-bit TIFF files representing each individual frame of Stop/Eject, and six mono 24-bit linear PCM WAV files for the 5.1 surround soundtrack. The TIFFs were in 1080P (1920×1080) letterboxed to an aspect ratio of 2.35:1.

  1. First of all I used Photoshop to batch convert all the TIFFs to the 2048×858 aspect ratio. This is actually 2.39:1 rather than the 2.35:1, so it meant cropping a sliver of the actual picture off the top and bottom, not just the black bars, as well as enlarging the picture slightly. It took my poor iMac about 12 hours to convert the 25,409 frames. I’m sure there’s quicker batch conversion software out there than Photoshop if you hunt around though.
  2. Next I used a free piece of audio software called Audacity to slow down each of the six audio files by 4% so that they will match the images when they run at 24fps. (Stop/Eject was shot and edited at 25fps.) Thanks to Matt Cameron’s blog for this tip.
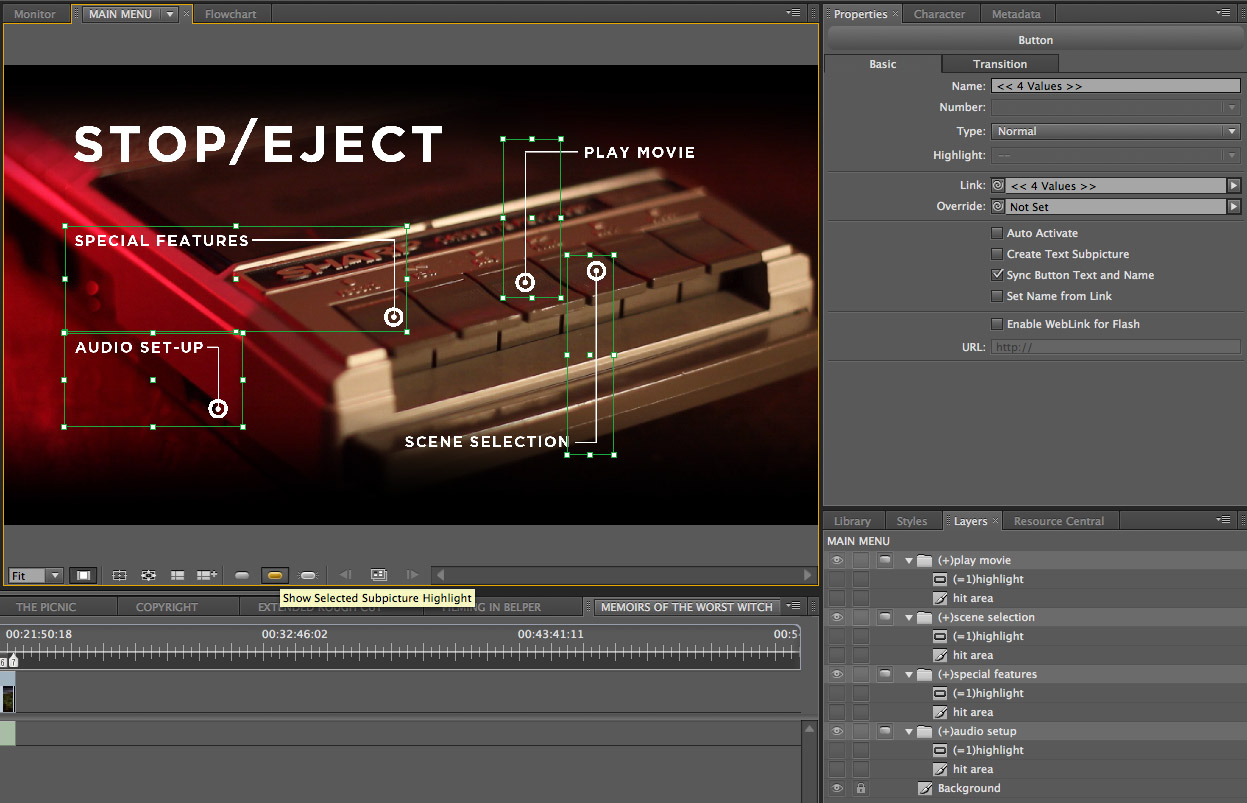
  3. Then I downloaded and ran OpenDCP, the brilliant free software that actually creates the Digital Cinema Package for you. It’s very simple to use, but check out the help Wiki and Danny Lacey’s seminal blog post to guide you through it. The end result was six files: four XML files and two MXF files, one for sound and one for picture. Encoding at the default bitrate of 125mb/s, which the Wiki says is more than good enough for 2K at 24fps, Stop/Eject’s DCP was just under 17GB, so about 1GB per minute.
  4. Now the tricky bit – copying those six files onto an EXT3 formatted drive. EXT3 is a Linux file system, and is not supported by MacOS. So I downloaded Ubuntu, a free operating system which does support it. (Choose the 64-bit download unless you have quite an old computer.) The downloaded file is a disc image (.ISO) which you can burn to DVD using Disk Utlity (found in the utilities sub-folder of MacOS’s Applications folder). Then restart your Mac, with the DVD still in the drive, and hold down C when you hear the chimes. This will boot up your Mac in the Ubuntu operating system. (You can release C when you see the black screen and Ubuntu logo.)
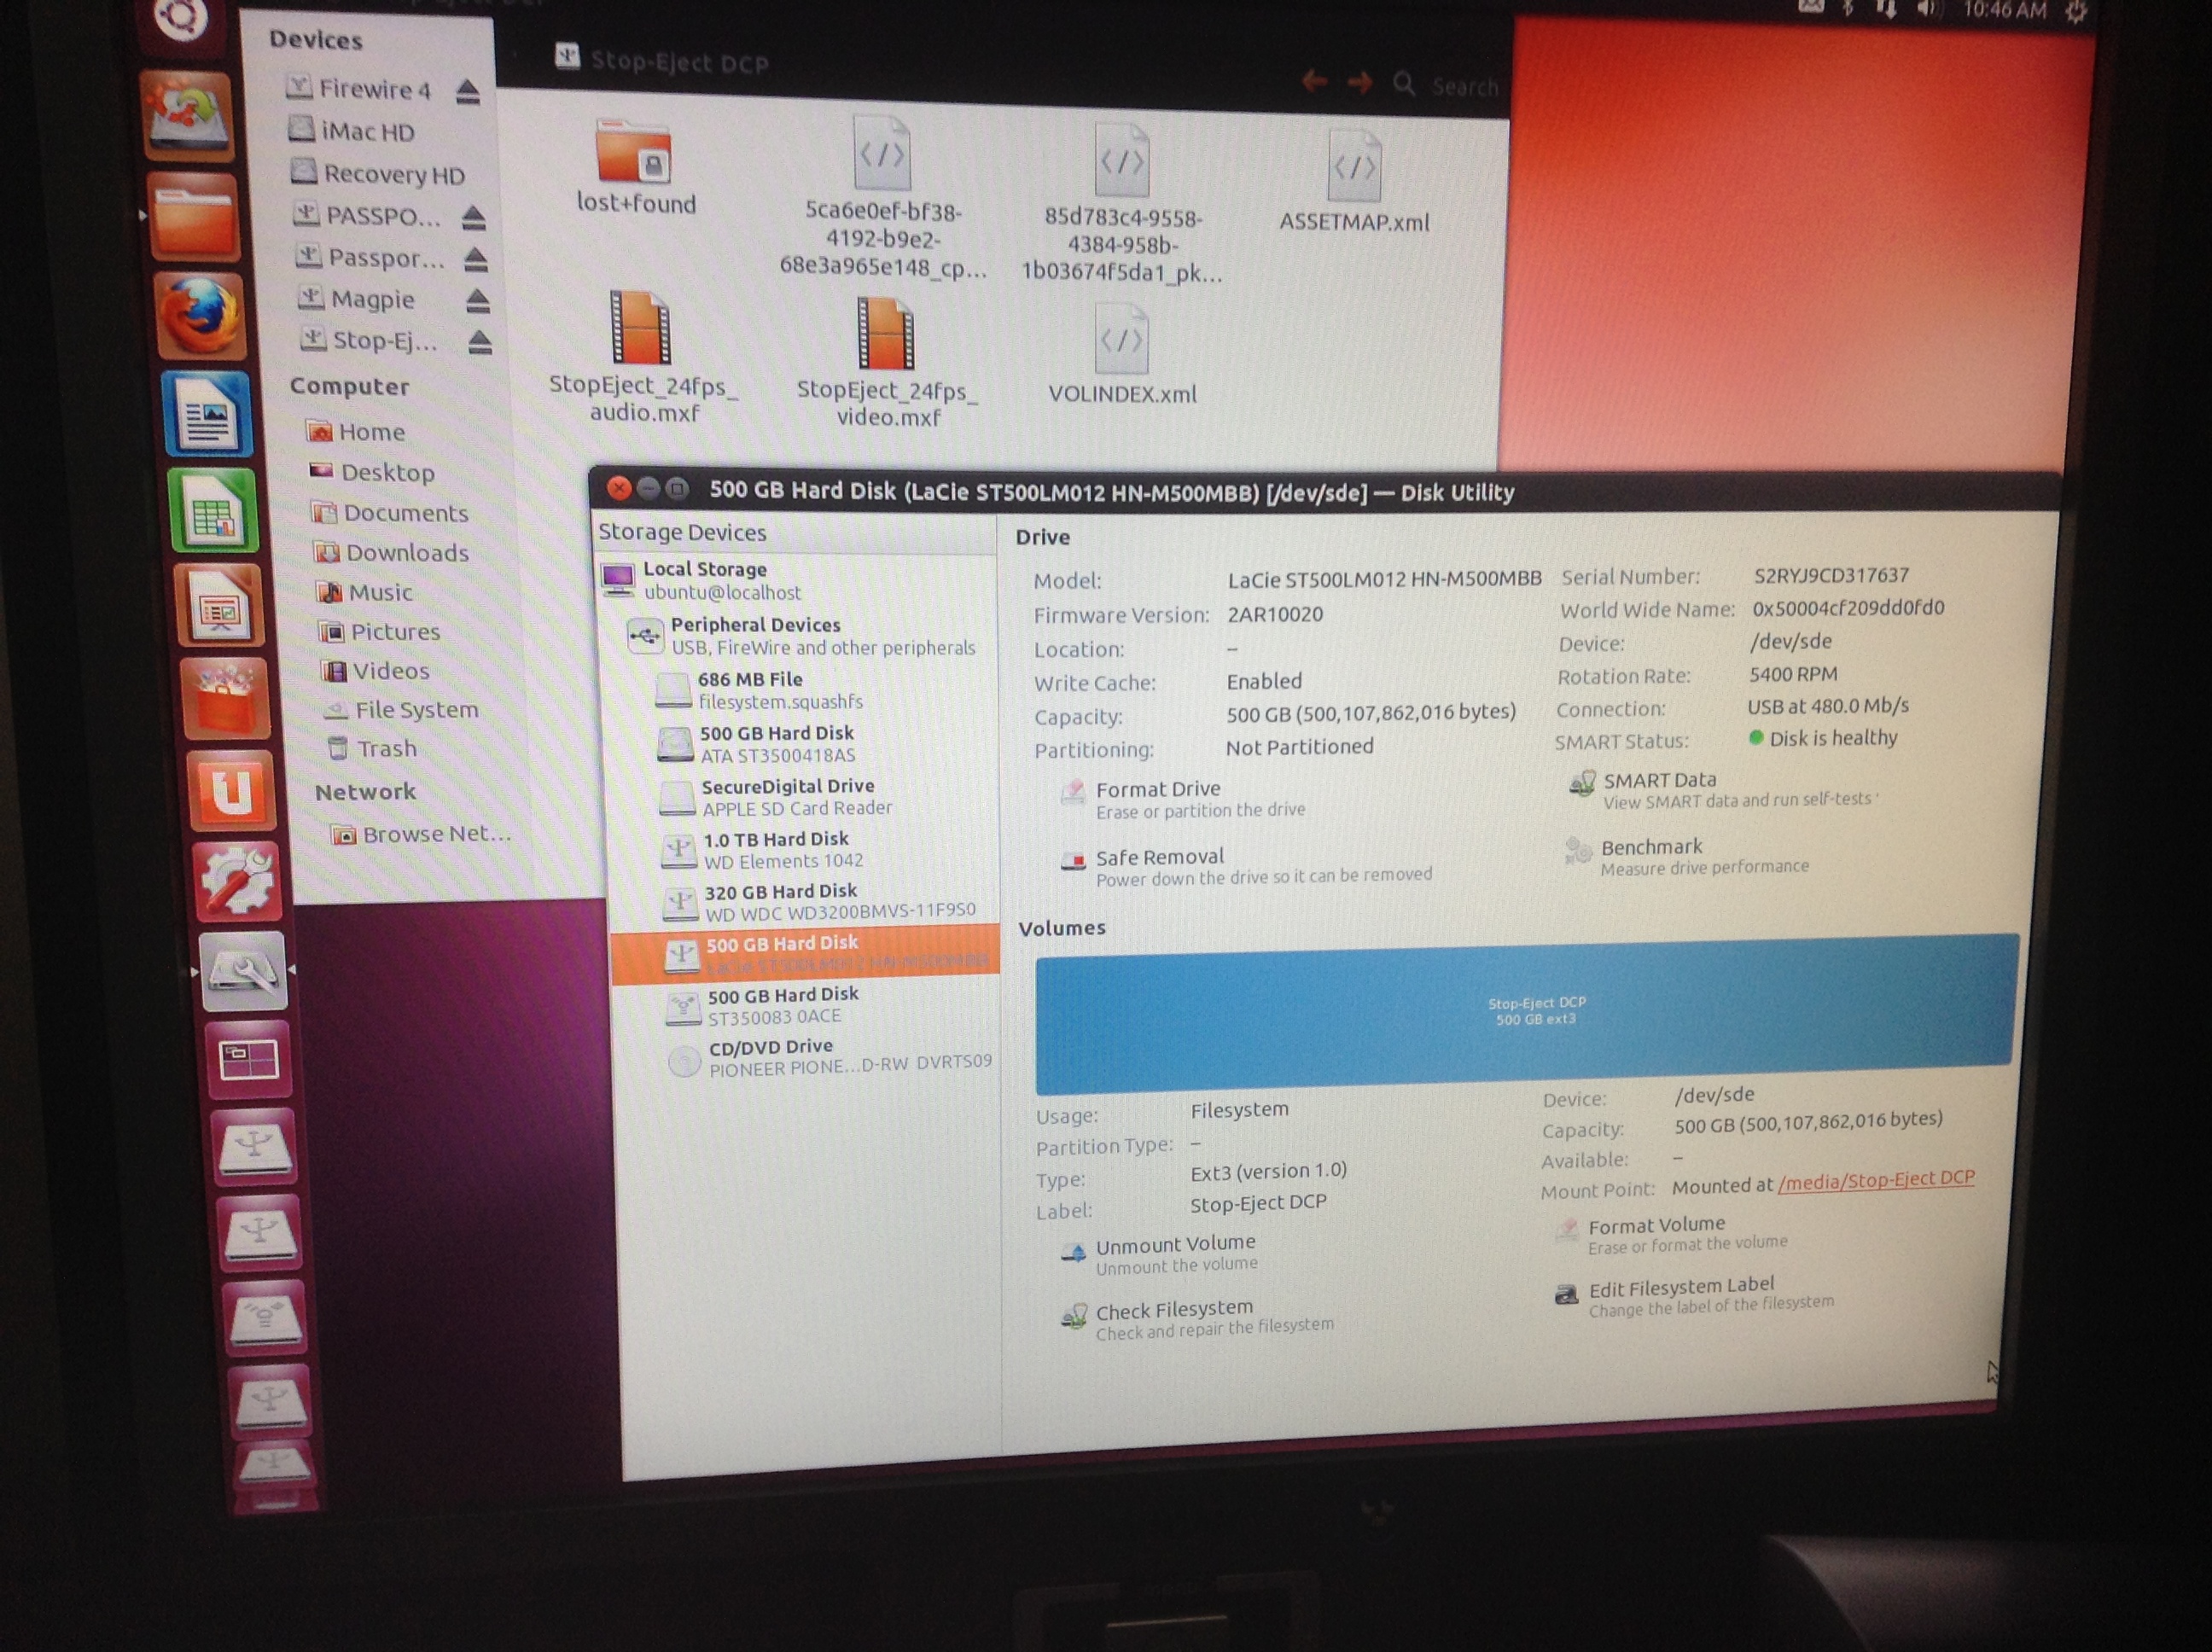
  5. Once Ubuntu was running, I right-clicked the LaCie Rugged in the list of drives in the lower left of the desktop and chose format from the contextual menu. To get more than the default options, I clicked Disk Utility in the dialogue box that came up. I could now select EXT3 as the file system (leaving the other settings at their default values). When I clicked format, Ubuntu didn’t seem to be doing anything, but after a few minutes the Disk Utility showed that the volume had been created. I could then close the Disk Utility, and drag and drop the six DCP files from another hard drive (MacOS formatted) onto my newly EXT3 formatted LaCie. Apparently you can put these files inside a folder if you want, but again to be extra safe I put them in the root directory.

After completing the DCP I took it to the Courtyard, my local arts centre, where head projectionist Simon Nicholls was kind enough to let me test it. To my very pleasant surprise it worked perfectly, uploading at about real time via the Doremi server’s USB 2 socket and playing shortly afterwards with superb sound and picture quality. Much as I love celluloid, the ease and cheapness of this process are breathtaking, the purchase of the hard drive being the only cost. I’ll let you know how I get on running it at other cinemas.

Making a Digital Cinema Package

How to Create a Blu-ray Motion Menu in Adobe Encore

Today I thought I’d share the process I figured out for creating looping menus in Encore for DVD and Blu-ray. If, like me, you want to do it all from scratch rather than using any of the built-in templates, the process isn’t particularly intuitive, and was sufficiently different from DVD Studio Pro (the software I’m used to) to leave me scratching my head from time to time, but here’s how I did it in the end. I’ll use Stop/Eject‘s main menu as the example. I’m going to assume you already know the basics of Encore and can find your way around Photoshop.

First of all you have to understand how DVDs and Blu-rays (henceforth collectively referred to simply as “discs”) work. They’re not like websites or Flash movies where you can do anything you want; the specifications are quite narrow. A motion menu consists of two elements:

  1. The background, which is a video (typically with audio) that you can create in Final Cut Pro, Premiere, or whatever.
  2. The button highlights, which show the user which button is currently selected. The user will only ever see one of these at a time.

Hang on – background, button hightlights…. but what about the buttons themselves? These have to be part of the background. Yes, you can import your background movie as a Quicktime into Encore and then add buttons to it within Encore, but when you come to build your disc the software will render those buttons into the background movie. All the disc player can deal with is a background movie and the highlights.

I prefer to build my buttons into the background movie in my editing software (Final Cut) rather than add them in Encore, and that’s the approach I’ll outline here.

Another crucial point to understand is that each button highlight can only be one colour. So look at the Stop/Eject main menu below. The button highlights are the white rings. They could not be red-and-white striped rings, like life preservers; they can only be one solid colour.

Stop/Eject's main menu with all the button highlights visible
Stop/Eject’s main menu with all the button highlights visible

So, now you appreciate all of the above you can get started on your menu. The first step for me was shooting and editing the background movie, although for most people this will be a computer-generated graphic rather than something shot with a camera. It’s important to think about where your loop point is going to be so that the menu will loop smoothly.

The following video shows my edited background movie. The buttons were created in Photoshop and added to the movie in Final Cut, before exporting as a ProRes Quicktime (with these buttons now baked in) ready to be imported into Encore.

In Encore I can now create a new menu and use the pick-whip in the properties panel to select my Quicktime file as the source for both the video and the audio. I can also set the loop point in the same panel.

I need to make sure that the loop point is at a place in the video where the audio track is silent or at least is playing a constant background noise – e.g. an air conditioning hum – that will not jump unpleasantly when the menu loops. You’ll notice that my menu’s audio track has a beat or two of silence around the loop point. If you’re using music, don’t start it immediately at the loop point as many players take a fraction of a second to kick in the audio after they loop.

I also need to ensure that all of the buttons have appeared before the loop point. This is because the loop point is the place at which the player will start displaying the button highlight. If your menu loops back to a point before the buttons have appeared, the user will momentarily see the highlight without the corresponding button.

To create the button highlights, right-click (or ctrl-click if you’re using a single button mouse) on the menu and choose “edit menu in Photoshop” from the contextual menu. Photoshop will open with a still of your menu as it appears at the loop point. Annoyingly, this still will be in standard definition even if you’re creating a Blu-ray disc, so the first thing you’ll need to do in Photoshop is to change the pixel aspect ratio to square and re-size the image to 1920×1080.

For each button, create a new group in the layers palette and give it a name that starts with (+). When you go back to Encore it will recognise this folder as pertaining to a button. Within the group, make a new layer and call it (=1)highlight. Draw your button highlight on this layer, remembering that it can only be one colour.

Now we need to pause a moment and consider hit areas. When your disc is played in a computer, the user can select buttons with the mouse. The hit area determines what part of the screen the user must hover the mouse pointer over for the button to be considered selected. This area MUST be rectangular. For each button, Encore will look at all the layers within the relevant group and draw the smallest possible rectangle that will completely enclose all those layers; that will be your button’s hit area.

In my case, right now the only layers in my groups are the white rings which are the button highlights themselves. But what if someone hovers the mouse over the words “special features”? I want the button to be selected then too, so in the (+)special features group I’ll create a second layer (critically, it must be below the highlight layer) and draw a rectangle where I want my hit area to be. I can then click the eye icon next to this in the layer palette so it becomes invisible and doesn’t ruin the look of my menu.

The main menu with the hit areas visible

Another restriction of the DVD/Blu-ray specs is that button hit areas can’t overlap. Given the restriction I mentioned earlier, that they must be rectangular, you can see from the layout of my menu that it isn’t possible for the hit areas of Play Movie and Scene Selection to include the text for those buttons without overlapping each other. I choose not to compromise the design of the menu and trust that users will soon find the hit area with a quick sweep of the mouse over the whole image.

I save the image in Photoshop and return to Encore. I can now see the button hit areas outlined on the menu. If I click the icon for “show selected subpicture highlights” (see below image) I can see the highlights too. It’s now simply a case of setting the target for each button using the pick-whip in the properties panel.

The Encore interface with the button to view the highlights hovered over

When users return to the main menu, after they’ve visited the special features menu, for example, I don’t want them to have to sit through the intro part of the menu again; I want them to go straight to the loop point. So I’ll go to the main menu button in the special features menu and set the target – not using the pick-whip, but through the pull-down menu. I’ll select “specifiy link” and in the dialogue box which appears I make sure to tick the “set to loop point” checkbox.

One final point. The version of Encore I used (CS5.1) has a bug whereby any motion menu longer than 70 seconds will not loop smoothly; a second or so of black will appear each time the player gets to the end of the loop. This issue does not occur in Encore’s preview, only when you’ve burnt the disc. There’s no workaround that I can find other than shortening the menu.

I hope this has been some help to those of you out there who are still burning your films onto physical discs. Let me know if you’d like to hear more about any part of the disc authoring process.

How to Create a Blu-ray Motion Menu in Adobe Encore

Bargain

Zoran and Nazir
Zoran and Nazir

Filmmakers Calum Rhys, Lawrence Donello and Matt Johnson recently launched a Kickstarter campaign for their feature film Бargain. It’s always great to see new film projects coming out of my local area (the team are based in Worcester), so I asked Matt to fill me in on the details.

Give us the pitch, Matt. What is Бargain?

Бargain is an urban thriller about the relationship between Zoran (a Bosnian asylum seeker with a troubled past) and a young Albanian girl called Nazir, threatened by loan sharks and thugs on the sink estate where they both live. Reluctantly, Zoran is drawn into what he thinks is a vigilante conspiracy by McMurtagh, a former IRA terrorist turned gangster, in order to protect Nazir. In fact, he’s being set up to murder a police protected witness. When Zoran tries to pull out of his side of the “bargain,” Nazir is threatened (and later kidnapped) to make Zoran go through with the killing. Now, on the wrong side of the law, he must use all his resources and test his moral boundaries to breaking point to rescue Nazir while confronting McMurtagh and his own nemesis from the war in Mostar.

Nazir under threat
Nazir under threat

You have an international cast attached – how hard was it to get these people on board? Did you go through their agents, and if so how did the agents response when you told them you planned to raise the budget through crowd-funding?

Something which surprised and encouraged us was how quickly significant European actors grasped the international significance of this movie, such as Amarildo Kola who plays Croatian gangster DIMITRI and was also in he brilliant and award winning THE FEAR on Channel 4.

Other key actors? We have known our lead Greg Hobbs who plays Zoran for years now and he was involved in the original teaser we shot two years ago. Greg is also now a producer of the film. He has extensive links to Birmingham’s Bosnian community, speaks serbo-Croat and has played a major role in refining Zoran’s character. The chemistry between Greg and Sophia, the young Bulgarian actress who plays Nazir, is also terrific and it would be very hard to imagine anyone playing Zoran as well.

As for our antagonist we are very lucky to have Tommy O’Neil as McMurtagh. As well as his acting abilities, (THE GENERAL, A BELFAST STORY), Tommy has the right kind of South Belfast background to play McMurtagh’s role with conviction and even knew Cahill, the notorious “General” of Dublin’s underworld, in his youth. Roger Cottrell, who wrote BARGAIN and lives in Ireland, first met Tommy at the Irish Film Centre in Dublin and was immediately impressed with Tommy’s grasp of McMurtagh’s role as Mestopholes in the narrative. Much as in TS Eliot’s poem, THE WASTELAND, or a novel or film by Graham Greene, contemporary society is depicted as a Hell in which the inmates (like Zoran) must also make moral choices if they are not to be damned. McMurtagh, in this respect, is more than just a criminal but rather the devil, in the tradition of Iago in Shakespeare’s OTHELLO, who is out not merely to destroy Zoran but to corrupt him and steal his soul. Tommy got this right away and brought to the role its emotional charge.

Zoran on a mission
Zoran on a mission

You have some really eye-catching concept art/storyboards – how important would you say these kind of visuals are to a crowd-funding campaign?

They are crucial because films are visual experiences. If you look at a film noir by a great, classical director like John Cassavetes – there was a Cassavetes retrospective in London, recently – the way that he used shadow and camera angles to depict everyday life as a threatening and hostile environment went to the core of what he was saying about social alienation. We are trying to achieve a similar effect in the digital age using the technology that is available to us. The look of a great movie is never incidental and that is why our director has meticulously story-boarded to this extent.

Is your £3,000 target the whole budget or do you have other sources of financing lined up? If not, I’m intrigued to know how you’re going to make a feature with an international cast for that figure!

Good Grief no. We’re currently seeking co-producers to help us raise more funds but the three thousand will really help us get the ball rolling. We want to shoot on Red Epic and we have had really great camera operators get in touch with us offering to come on board for expenses but, naturally, we also want everybody (including ourselves) to finally be paid the union rate! Guerilla filmmaking shouldn’t be about exploitation or antagonising BECTU but about kick-starting a project which otherwise wouldn’t be made. The actual budget, which has been meticulously worked out, is for £500,000. We have put in an application to the BFI which is currently being processed. Of course something like 99% of BFI applications get rejected but we feel we have a real strong case. We’re also looking for co-producers and for any other funding we can get so if anybody would like product placement or to talk to us about investment tax breaks or equity then get in touch.

Everyone and their dog seems to be crowd-funding these days – what are you doing to try and stand out amongst all those other project vying for people’s cash?

The visuals we have up in terms of a teaser, the storyboards, the publicity shots are important but I think the most important aspect is generating a buzz around the film. This isn’t just a film idea we have, or any old knock off revenge film that dumbs down Death Wish to Dudley. it’s a milestone urban thriller that’s also a state of the nation statement, in the solid tradition of Get Carter, The Long Good Friday, Face, Eastern Promises and Ill Manors that film students will be studying 20 years from now. It’s a great package that includes international cast, great script, global appeal yet with it’s roots still firmly in Britain. Бargain is the next big thing and we want to offer people a chance to play a part in getting it made.

You can find out for about Бargain and contribute to the crowd-funding campaign on their Kickstarter page.

Zoran rescues Nazir
Zoran rescues Nazir


Bargain

Managing Visual Effects Without a Budget

Stages of the basement shelves replication effect by Mary Lapena
Stages of Stop/Eject’s basement shelves replication effect by Mary Lapena

Stop/Eject is my fourth major project to include visual effects, and also the fourth where it’s been a struggle to get all the visual effects done. As any micro-budget filmmaker knows, it’s par for the course for some cast and crew to pull out, sometimes without warning or explanation, and VFX artists are no exception. On Soul Searcher, for example, I needed a CG artist for the 80+ shots featuring “spectral umbilical cords”. Four artists started the work and then quit, citing various excuses from exploding PCs to miscarriages, before the fifth delivered the goods.

Stop/Eject has a surprising 31 VFX shots (most of which you’d never know were VFX shots), of which the twelve simplest were handled by me and Miguel, the editor. With the remaining nineteen needing to be outsourced, how did I apply what I’d learnt from my previous projects?

  1. I advertised for multiple artists, knowing from Soul Searcher (and before that The Beacon) that relying on a single person was not a good idea. More than half the people who agreed to work on Stop/Eject never completed a single shot.
  2. I created and uploaded zip files to my webspace for each shot. Each zip contained all the footage and information needed for that shot. This way if an artist dropped out, it was quick and easy for me to point another artist to that zip file to take over the shot.
  3. I re-advertised regularly. Beware that the law of diminishing returns applies here: each ad will reap fewer responses than the last.
  4. I assigned the most difficult shots first. That way the shots that are left at the end when the reliable artists are all burnt out and your adverts are getting no responses are – in theory – the easy ones which you can just about do yourself.
  5. I regularly checked in on the artists’ progress. If I didn’t get a reply within a couple of days, I’d assume that the artist had dropped out and I’d re-assign their shot to someone else. Harsh, but necessary.
Another of Stop/Eject's FX shots, this one by Dominic Stephenson
Another of Stop/Eject’s FX shots, this one by Dominic Stephenson

I want to say a huge thanks to those artists who came through for the project: David Robinson, Mary Lapena, Matt Collett, Eranga Mudiyanselage, Dominic Stephenson and Naveed Aftab. You all worked incredibly hard and produced fantastic results – you should be proud of yourselves.

Finally, a few technical points about our workflow, for anyone interested in such things. We shot on a DSLR, so the source footage was in H.264, a format that due to its structure cannot be trimmed without losing a generation. So I supplied the VFX artists with the entire take (along with details of the in and out timecodes of the piece used in the edit) and asked them to deliver their finished shots as 16-bit TIFF sequences. This ensured that we would lose zero quality. The downside to this workflow is that there is a danger of errors being made with the timecodes, leading to a shot not being long enough when you go to conform the edit…. Yes, that happened. There must be a better way. What’s your workflow for DSLR projects with VFX?

Managing Visual Effects Without a Budget

5 Things to Do with a 5-in-1 Reflector

Collapsible reflector
5-in-1 reflector

Reflectors are incredibly useful tools, whether you’re a one-man crew or a DP on a big set. And with a 5-in-1 reflector costing only around £10 on Amazon there’s really no excuse not to own one. Here are some of the things you can do with one of these:

  1. On a cloudy day, use the SILVER side to bounce light into the shadows on your subject’s face.
  2. On a sunny day, use the WHITE side for the same purpose (the silver side would be bright enough to make the subject squint) and to put a nice white reflection in the subject’s eyes.
  3. To simulate firelight, bounce a lamp off the GOLD side of the reflector and wobble it gently.
  4. Use the BLACK side for negative fill, useful when shooting in a room with white walls to get some shape and definition back into your subject’s face.
  5. Strip the reflector down to the TRANSLUCENT WHITE centre and rig it on a C-stand above the subject’s head to reduce and diffuse harsh sunlight.
After
Two reflectors, one below and one above frame, perform functions 2 and 5 respectively. (Georgina Sherrington as Kate in Stop/Eject)

5 Things to Do with a 5-in-1 Reflector

Girl and a Scar: Using Lighting to Help Tell a Story Arc

Whatever position you occupy on a film crew, you are always a storyteller. Everyone is working to build and enhance the narrative and emotional threads which will engage the audience.

Cinematography is certainly no exception, and on the recent shoot for Dave Cave’s dark fantasy Girl and a Scar, my task was to take the lighting of an interior location on a journey which mirrored that of the titular Girl (Ileana Cardy), starting from a place of heightened realism, building to a crescendo of crazy and then finally returning to normality. It was a great visual script, describing candelight, daylight seeping in through cracks in boarded-up windows, wind and lightning, so there was plenty to get my creative juices flowing.

(Check out Girl and a Scar’s Facebook page. Lighting package courtesy of Dave Morgan.)

Stage 1 of the lighting arc. Copyright 2013 Fever Films
Copyright 2013 One For All Productions and Yellow Fever Films

Above is the wide shot from the opening scene. I’ve used a classic cool/warm colour contrast between the moonlight and the candlelight. The windows of the house were supposed to be boarded up, so the barn doors of the 650W tungsten fresnel (gelled with full CTB) off camera right are fairly narrow to create the streak of light on the back wall. A second blue-gelled 650W fresnel is behind the frosted door on the left, providing a bit of depth and suggesting another window or hole in the roof.

The candlelight is provided by an orange-gelled 300W fresnel hidden behind the corner of the fireplace to the left of screen. The difficulty with candlelight is always matching the angle the light should be coming from, and in particular hiding the shadow of the candle itself, which in reality would not exist. We solved the problem in this instance by splattering dark wax over the shadow on the top of the cabinet. A dimmer was used to flicker the 300W appropriately.

Stage 2 of the lighting arc. Copyright 2013 Fever Films
Copyright 2013 One For All Productions and Yellow Fever Films

Above is the third interior scene, and one of my favourite shots in the film. To kick up the stylisation a notch I’ve used flags to make the streak of light on the back wall a little harder-edged.

This shot is a good example of how effective side lighting can be. There are no light sources on the camera side of the subject at all; it’s all coming on from the side and slightly behind, leaving the camera side of her in darkness. We call this dark side of a subject the “down side”, and it’s always more interesting to have this side be the one facing camera.

Stage 3 of the lighting arc. Copyright 2013 Fever Films
Copyright 2013 One For All Productions and Yellow Fever Films

Above is the scene which represents the height of weirdness in the story. There are two things I’ve done to make the lighting more stylised. Firstly I’ve introduced some green light, motivated by an off-screen doorway. This combines with the make-up and a fantastic performance from the actress to enhance the character’s sickness. Secondly I’ve adjusted the blue-gelled 650W fresnel that was behind the frosted door in the first scene. It’s no longer bouncing off the wall in that back room – instead it’s pointed directly at the talent with the door now open. This creates a strong, steely backlight. Combined with a dutched handheld camera, the overall effect is suitably unsettling.

Stage 4 of the lighting arc. Copyright 2013 Fever Films
Copyright 2013 One For All Productions and Yellow Fever Films

The scene ends with the curtains of the room’s main window opening to bathe the Girl in light as she comes out of the other side of her dark journey. To enhance the natural light that would come in when the curtains were opened, I bounced a fresnel off the ceiling and ran it through a dimmer board so it could be faded up as the curtains parted. Another 650W was placed outside the window, positioned exactly behind the talent’s head to give her a halo of light and create lens flares when she moved her head to reveal the light. (The lamp itself can’t be made out on camera because it’s so bright.)

So that’s an example of how cinematography can serve narrative and character. How have you used light to tell the story?

Girl and a Scar: Using Lighting to Help Tell a Story Arc

Sophie Black’s Guide to the Cannes Short Film Corner: Part 2

The Short Film Corner at Cannes

In part one of this guide, filmmaker Sophie Black explained exactly what you get when you pay your 95 Euros to submit your short to Le Court Métrage at the Cannes Film Festival. Today she takes us through what happens in practice and what you can do to promote your film while attending the festival. Over to you, Sophie…

From the start, as soon as your submission goes through successfully, you are part of the SFC [Short Film Corner] mailing list, and the regular emails not only give you lists of lectures and contact details for the short film buyers, but give you temporary access to Cinando (an online database/catalogue where you can contact many industry professionals who will be useful to your career) along with other tips for a successful Cannes, so use all of these to your advantage if you can. Cannes will also share your details with other related parties, many of whom have clearly paid them to do so, which will result in a little spam.

Amongst this spam are emails from various PR companies wanting to promote your film. But it is a costly £400+ for these services, many of which just involve promoting the film through social networks, and emailing people to tell them to go and watch your film, which you can easily do yourself (although it may sound better coming from a PR firm).

Sophie's Ashes poster (top right) has a brief stint on the SFC banner.
Sophie’s Ashes poster (top right) has a brief stint on the SFC banner.

Due to PR costs, the majority of SFC applicants ignore said emails and choose a DIY approach to marketing their films. This way, however much or little you do is up to you – the minimum being just putting up a poster and hoping people will be inspired to go and watch your film (if your poster is still up and not covered by other peoples’ by the second day). It also means that every time you go to the Corner, you are met by a flurry of bright-eyed young things, all of whom think their film is great and who want you to go and see it. 

The real challenge is to branch out into other areas of the festival, and persuade people with money and power to leave their ritzy pavilion (and free drinks all-day-round, for bearers of certain passes) and come and queue in a hot room underground to view your film. But if you impress them enough, and network well, it can happen, and the results of this will be much more helpful to you in the long run.

It’s also important to think outside the box to get you and your film noticed at Cannes. I hammer on about this all the time, but you really can’t go with the flow. During the much-treasured Jane Campion lecture at the SFC, she encouraged us all to write down a question for her on pieces of paper, and put these into a hat. One clever girl wrote her question on the back of a postcard-sized poster of her film, and handed this in. Cue Jane Campion noticing the poster amongst all the blank white paper, and taking the time to study it. This small gesture is one of the cleverest things I saw at Cannes this year, and it left me with the irritating feeling of “I wish I’d thought of that!”

Although I did promote my film Ashes, and inspired a few people to go and watch it, my main reason for going down to the Corner was to meet with the people who might actually want to distribute it. I learnt something from all of these meetings although they ranged from genuine interest to an actual no-show. (Rule number one about arranging meetings: make sure you actually make contact with the person you’re meeting beforehand, even via email, and not just with their assistant – who isn’t even in Cannes this year!)

The Buyers Corner
The Buyers Corner

The designated meeting rooms looked a bit like the lobby in an accountant’s office, complete with random film-noir blinds, and the blank walls everywhere left room for your creativity to shine if you let it. During my meetings I not only had mini Ashes posters left, but also a set of promotional stills in my press kit, so I laid all these out before one distributor had arrived, and it gave him a full presentation of the film straight away. I definitely recommend doing this for your meetings if you’re left waiting for any length of time beforehand; what’s even more important is to make sure you have a copy of the film and trailer on you – if you don’t have a tablet or laptop, you should at least have it on your phone! Basically, these people are buyers, and you need to prove that you have a product to sell, and that you’re not just “all talk”.

With my mind clearly fixed on meetings and networking, I chose not to book out the screening room, although I did attend a good screening and recommend you do the same (if nothing else, you get to see what the screening rooms look like, and see if it’s somewhere you’d like to have your films played). The on-demand service gives your film more chances to actually be seen. You also get daily statistics emails saying how many times your film has been watched – along with contact details for who watched them, so you can chase these up for feedback and to create potential collaborations/work. Although, with thousands of other films out there, even having your film played 20 times on the system is not as good as having one screening and shoving 30 people in there (although I suppose it does depend on the viewer).

Also, a big thing to remember whilst you’re soaking in the sights and the sun, is that you’re not just representing yourself out there. Photos and souvenir mementos aren’t just things to make your parents proud – with your film you carry the name of everyone who worked on it with you, and you can’t help but think how much a screening of the film at Cannes would mean to your cast and crew. But, at the same time, a successful distribution deal or further festival acceptances will probably mean a great deal more. In the end, you have to do what is best for your own film, and plan your Cannes strategy around personalised rules, using everyone else’s experiences as your guidelines.

Find out more about Sophie and her work on her blog at triskelle-pictures.blogspot.co.uk and her website www.triskellepictures.co.uk

Sophie Black’s Guide to the Cannes Short Film Corner: Part 2

Sophie Black’s Guide to the Cannes Short Film Corner: Part 1

Sophie Black with AD Chris Newman (left) and myself at the Ashes premiere
Sophie Black with AD Chris Newman (left) and myself at the Ashes premiere in London

Last month filmmaker Sophie Black, producer of my short Stop/Eject and director of the brilliant, dark fantasy-drama Ashes, attended the Cannes Film Festival and market for the first time. (Watch our vlogs from the festival here.) She entered Ashes into the Short Film Corner, an area of the festival which many filmmakers don’t fully understand until they’ve attended it themselves. So, if you’re making a short and aiming for the Corner next year or further down the line, let Sophie explain exactly what it is.

Let me start with an uncomfortable fact. You may have made an absolutely stunning short film – you may have rented the best camera your budget can afford, and even got a named actor in a small or voice role. But it is still near-impossible to get your film into the Cannes Film Festival.

There were no British films “in Competition”, “out of Competition” or in the “Un Certain Regard” category this year – although two British films made it into the “Director’s Fortnight” section of the festival – and there was a similar absence of Brits in the official short film selections as well. Taking into account the amount of people who undoubtedly submitted their short films from this country, many of which I’m sure were wonderful, you can see how difficult it is to get your film into Cannes.

The Short Film Corner

But, for the thousands of short film makers who receive the dreaded rejection email, Cannes offers a lifeline – the Court Metrage (or Short Film Corner), a “meeting place dedicated to short film professionals”.

When Ashes (then still a work-in-progress) didn’t make it into the official selection, I took this lifeline without fully researching what the SFC actually is, basically wanting any way to get the Cannes logo on my film’s poster (which is the biggest appeal of the SFC, although the logo you’re allowed to use from there is simple, blocky and sadly laurel-free). The submission process for SFC is decidedly easier than the Official Selection – you upload your film to them rather than sending off a DVD copy, and as long as it plays well and you pay the (somewhat pricey) entry fee, you get a confirmation email pretty much straight away. Which causes a bit of a “jump for joy” moment, I can tell you – particularly if you don’t have Java script and have to spend an evening or two installing it to make the online submission system work first!

Le Palais des Festivals. Photo: Sophie Black

The SFC website doesn’t exactly spell out what it is; it is worded with strong adjectives to make it sound like a professional, esteemed experience when all you really want is bullet points and dumb language to tell you exactly what you get for your money. So here is what you get:

  • Your film will be available on the Cannes SFC database and is viewable on selected computers, all of which are in booths at the Short Film Corner, in the basement of the Palais des Festivals. Sort of like a Vimeo service, but not open to the public. But there are always big queues to this section, so if you want to find a computer which is free, come first thing in the morning (when everyone else is still hungover from the parties).
  • There is a public area leading up to the booths where you can stick up the film’s poster, as well as racks for flyers and postcards, to attract passers-by to come into the booths. But, as I discussed in my recent blog post, it can be quite difficult to get your poster in there – and even more difficult to get it to stay there!
  • There are “three screening rooms available to you” – which is how the website phrases it without further explanation. Basically there are three enclosed cubicles (of varied size, with varied numbers of chairs, none of which fit more than about forty people at a squeeze) all of which are painted black inside with a personal cinema-sized screen, and a projector linked up to a laptop with the Cannes SFC database (the Vimeo service again) on it. These rooms are shared between every filmmaker with an entry in the SFC, and you need to book it if you want to screen your film there. You can book on the day rather than planning it in advance, but this leaves you less time to persuade people to come. Also, these cubicles get ridiculously stuffy, prompting anyone in there to want to leave before your (optional) post-film Q&A even starts.
  • There is a bar in the public area, with free strong espresso in the morning – the brand depends on who is sponsoring the festival that year – and a happy hour with free alcohol around teatime. Ask at the information desk about different types of happy hour because there was a Mexican-themed one on an evening we missed (although it was only the drinks which were themed, not the attire). Coming to the SFC during happy hour is a good time to meet people and network because it’s always packed, with people from other areas of the festival coming along for the free drinks, although it can get hot and difficult to move. And the beer always goes first.
  • There are certain lectures held only in the SFC area. As members, you are emailed a list of these in advance, including ones which you have to book for because places are limited (such as pitching sessions to industry professionals for feedback, and lectures on funding). But with some talks, you just have to queue up and arrive early to make sure you get a seat – including a talk with one of my favourite directors, Jane Campion, which we learnt about two hours in advance due to word-of-mouth in a queue for a stuffy cubicle screening.
  • Most importantly, there is a separate area next to the screening booths called the Buyers Corner, where people who genuinely buy short films come and meet with you. You will have to book meetings well in advance (although we did try leaving notes for some buyers we couldn’t get hold of in advance), but again, you will be given a list of buyers and contact details via email when your submission goes through. If you are attending Cannes for business rather than pleasure, as I was, then this is your most important asset. But if you are a first-timer, or if you have not dealt with these people before, expect to be treated somewhat differently than those they greet with a “hello again, you!” and a hug. Those people will be given coffee while they wait; you will be lucky to be offered water. And sometimes, you may just get stood up.
  • Finally, as with any submission to the Cannes festival, you are given a free festival pass, which you wear everywhere to access the rest of the festival (although priority access is given to those with gold strips on their passes, whereas yours is silver). This is worth submitting for – even if you don’t visit the SFC at all, you get to see screenings (if you can get in) and network in the pavilions and marketplace. In fact, if you want a cheap way to get into Cannes, submit a film to the SFC – which, as I said, has a minimal selection process – and get a pass for around £70 rather than £250! [Note: you can get a free festival pass if you apply early enough and can prove you are active in the film industry. – Neil] You also get a souvenir Cannes shoulder bag and a load of booklets, brochures and magazines with your submission – although some of these are in French and it all soon gets heavy as you cart everything round from place to place.

That’s what you get included in your submission price, but your Cannes experience is what you make of it, and the possibilities are endless.

In part two we’ll hear about those possibilities and how everything above works in practice once you get off the plane at Nice. Find out more about Sophie and her work on her blog at triskelle-pictures.blogspot.co.uk and her website www.triskellepictures.co.uk

SaveSave

Sophie Black’s Guide to the Cannes Short Film Corner: Part 1