While we have been looking for an editor to refine Stop/Eject, I’ve made a start on the behind-the-scenes documentary for the DVD. I can now announce the title of this documentary: Record & Play. Do you see what I did there?
Here are some frame grabs from the bits I’ve edited so far. Click the thumbnails for larger images.
I’ll be presenting some clips from Record & Play and talking about the making of Stop/Eject and what I’ve learnt about crowd-funding at the Hay Festival of British Film next Saturday. Watch this space for more details during the week.
Here’s a video blog I recorded last year at the Cannes Film Festival. It’s an interview with Quay Chu, who served as script editor on my in-development fantasy feature The Dark Side of the Earth for several months. He talks about his role and gives some examples of how he helped me to shape the script.
Remember that you can get feedback on your own short screenplay, and help me to finish my current short film Stop/Eject, by visiting stopejectmovie.com/donate and selecting the £20 “Script Editor” reward.
When we created the range of rewards available to people who sponsor our short fantasy-drama Stop/Eject, we wanted to offer collaboration – we wanted to share our skills. One such reward is Script Editor. In return for a £20 donation you can have your short screenplay (up to 15 pages) read by Tommy Draper, Stop/Eject’s co-writer, with constructive critical feedback. Just click the button below to make your contribution and claim this reward.
I recently interviewed Tommy about his current projects and his thoughts on writing.
Tommy on location for Stop/Eject (from footage by Brett Chapman)
How did you get into screenwriting?
Tommy: I got into screenwriting quite a few years ago after posting my first short screenplay online on the website SimplyScripts.com. The screenplay was called ‘Same Room Same Time’ and it was read by Miguel Gaudêncio who wanted to make it (at the time he was looking to take the step from commercials and music videos into movies). It took several years but the movie was released into film festivals in 2008 and from there more contacts were made and more movies (shorts and features) have been produced.
What are you working on at the moment?
Tommy: At the moment I have 2 short films in pre-production with Hamburg based director Sascha Zimmermann. I have been working with Sascha since 2009 and over the last few years we have ended up with a backlog of screenplays we want to make. We are starting with two that are ready to go and I am about to work on new drafts of three other screenplays so these can be made in 2013 (and 2014 if necessary). My zombie feature film Wasteland is a day or two away from finishing filming by Derby based Light Films Ltd, when this is complete I will be talking to the Producer and Director about what project we want to work on next. I am talking to Stop/Eject producer Sophie Black about a feature film screenplay that she has written and would like me to come on board to rewrite, this project is in its infancy and will be worked on during 2013. In addition to all of this I have a feature film script of mine called ‘Rock n Roll Romantics’ which I have been planning on writing for quite some time and I am getting the script ready in-between projects.
Why is it important to for a writer to get impartial feedback?
Tommy: Feedback for a writer on their screenplay is very very important, a fresh pair of eyes can make all the difference. Everyone sees the story and characters in a different way so the feedback you get can identify faults or create new and interesting paths that can take your story from good to great. Getting feedback that is totally impartial is also very tough. A lot of people, especially if they know you, won’t tell you exactly what they think. A lot of the time it is more important for someone to point to out what doesn’t work more than point out what does and the best people to give you this kind of honest feedback is someone who doesn’t know you at all.
What is the most useful feedback you’ve ever received on one of your scripts?
Tommy: The most useful feedback I’ve ever received was on an old screenplay I wrote for Miguel Gaudêncio. The screenplay was written prior to Same Room Same Time getting made and after a few drafts Miguel got an established writer friend of his to take a look at it. I received a fair share of positives and negatives about the script but it was the negatives about the first act not working that helped the most. It was too long, gave away too much and made the screenplay drag. I took the suggestions and chopped out lots of scenes from the opening section (at the time I was reluctant to do this not seeing the issues) and the screenplay really took shape. I then went through the rest of the screenplay looking for cuts to make and a much leaner screenplay evolved which worked a lot better.
In your opinion, what is the best-written movie ever and why?
Tommy: Tough question this as there are so many brilliant screenplays out there. If I had to pick one movie then it has to be Reservoir Dogs. I think the script is extremely clever, the structure of the story with its flashbacks to give the characters depth is amazing. I also love that the you never see the robbery but you know exactly what happened and what went wrong. The best thing about it are the characters themselves, each one rich and totally individual. You understand their motivation and once wound up they play out their role in an honest, unforced way, which is hard skill but Tarantino masters that in all his movies. Reservoir Dogs was the first time I had seen a movie and then read the screenplay, it has been a massive inspiration on me ever since.
Last night we launched a special collection of new rewards for Stop/Eject sponsors. Available only until midnight next Friday, these rewards are already going fast, so grab yours quickly before they’re all gone. At the time of writing, a screen-used poster, one personalised cassette and four t-shirts are still available.
The Tape Collection
In the top right is the genuine poster seen behind Georgina Sherrington (Kate) and Oliver Park (Dan) in the living room scenes of Stop/Eject, signed on the back by yours truly. At bottom left is a unique opportunity to have one of the screen-used cassettes from the film relabelled and beautifully calligraphed by Sophie Black with a date and 90 minute time segment of your choice (though please note the tape is actually only sixty minutes long). There’s only one poster and one personalised tape available, so don’t miss your opportunity to scoop them up.
Bottom right is a Stop/Eject t-shirt featuring Alain Bossuyt’s competition-winning poster design. These are printed to order in your size, and we only have four more available at the time of writing. Thanks to Sam Tansley for modelling this.
This is a pretty esoteric post, I’ll warn you now.
Some of the Stop/Eject behind-the-scenes footage was shot on a Canon camcorder set to “24P Cinema Mode”. It took me ages to figure out how to convert this material to 25 frames per second without the motion becoming very jerky. So I’m going to set down how I eventually did it, in case it can help any other poor souls in the same situation. I was working on an iMac with Lion and FCP Studio 7.
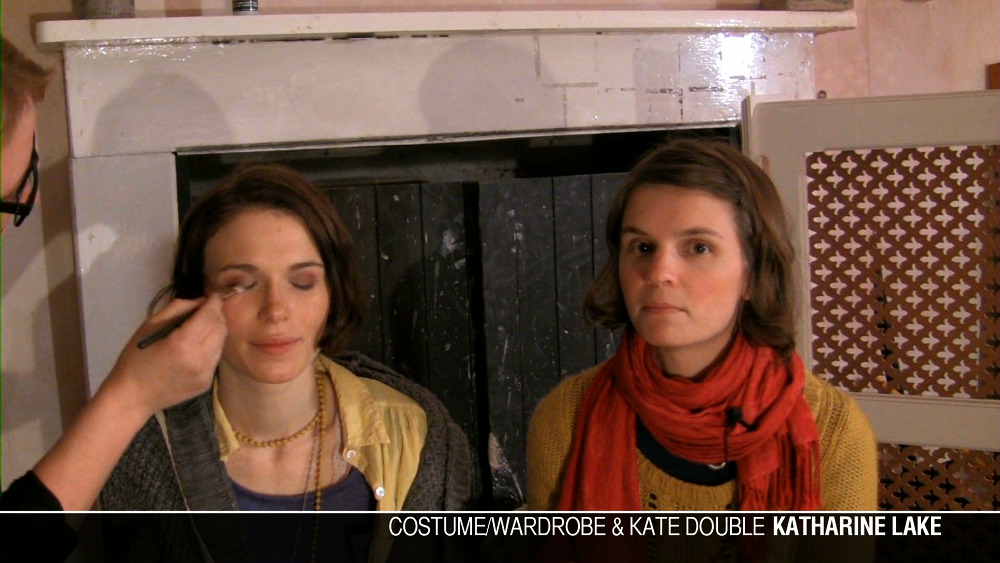
The 24P footage I converted includes a dual interview with Kate (Georgina Sherrington) and Copy-Kate (Katie Lake), shot by Laura Iles and Kurt Baker.
What is 24P Cinema Mode? It’s aimed at American users, and emulates how “real” movies look when they’re broadcast on US TV. Real movies are shot at 24fps and telecined to 30fps (actually 29.97fps, but we’ll say 30 for simplicity’s sake) which is the standard frame-rate of American TVs, DVD players and so on. 24P Cinema Mode captures 24 frames per second and converts them, as the camera is recording, to 30fps. It essentially does this by duplicating every fifth frame and using interlacing to smooth out the motion. This is known as 2:3 pulldown. More expensive cameras embed metadata in their 2:3 pulldown footage so that software like Final Cut Pro can automatically restore it to genuine 24fps, but the material I was working with had no such metadata. I believe it was shot on a Canon Vixia HF10 or similar.
Step 1: Converting to 1080i60 Quicktimes using Adobe Media Encoder
The other problem I had with the footage in question was its format: AVCHD (identified by a .MTS file extension), which Macs don’t really like. Final Cut Pro will convert them via the Log and Transfer window, but only if they’re on an SD card or a disc image of an SD card. But I’d been given the footage on a data DVD, and copying it to an SD card did not fool Final Cut. After much trawling of the magical interweb and trying various free applications that didn’t work very well, I discovered that Adobe Media Encoder accepts MTS files. (If you don’t have the Adobe suite, you can buy an application called VoltaicHD that will apparently do the job.)
So here are the three transcoding stages I went through to convert the material into editable 1080P25:
Step 2: reversing the telecine effect using Compressor
I used Adobe Media Encoder to convert the source files to Quicktimes. I chose the HDV 1080i60 codec and retained the interlacing, field order (upper first), frame size (1440×1080 anamorphic) and frame rate (29.97fps) of the original material.
I followed the method on this web page using Apple Compressor. In a nutshell, you take an existing preset – say one of the ProRes ones, if that’s the format you like to edit footage in – and alter two things: the frame rate, found by clicking the video Settings button in the Encoder tab, and the deinterlace option, found in the Frame Controls tab. Set the former to 23.976 and the latter to Reverse Telecine (after first enabling the Frame Controls by clicking the small gear next to the on/off pulldown menu, and selecting On from said menu). At this stage you can also resize the image to true HD, 1920×1080. The resulting video file should be genuine 24fps with no interlacing.
Next bring your 24fps file back into Compressor and drop another preset onto it. Again, use ProRes or whatever your codec of choice is, but this time make sure the frame rate is set to 25fps, deinterlace is NOT set to Reverse Telecine and, at the bottom of the Frame Controls tab, where it says “Set Duration to”, click the last radio button, “so source frames play at 25.00 fps”. What this does is to speed up your video about 4% so that it runs at 25fps. This is the smoothest way to convert 24fps to 25fps, and the speed difference will not be noticeable on playback. In fact, whenever you watch a movie on UK TV it is sped up like this.
Step 3: retiming to 25fps with Compressor
If you’re in any doubt as to whether it’s worked, step through the video frame by frame in Final Cut and see if there are any duplicated, skipped or interlaced frames.
Of course, after all this transcoding, the image quality will have suffered a bit, but at least the motion should be smooth. Has anyone out there found a better method of doing this? I’d love to hear from you if so. Alternatively, if you want any more details on the steps above, just leave a comment and I’ll be happy to share them.
The moral of the story is, if you’re in the UK, don’t use 24P Cine Mode. Just like shooting 24fps on celluloid, it unnecessarily complicates post-production. Stick to 25fps and everything will come up smelling of roses.
Ray Bullock Jnr. as Joe, preparing to fight the marauding demon
As we search for an editor for Stop/Eject, here’s a demonstration of the power an editor wields.
A few weeks before the premiere of Soul Searcher, my fantasy-action feature about a trainee Grim Reaper, I showed the film to my flatmates of the time. One comment concerned a scene in which the trainee reaper, Joe (Ray Bullock Jnr.), fights a demon (Shane Styen) while drunken revellers cheer him on.
As scripted, the scene covers only the start of the fight – enough to show how cocky Joe has become in his new role. (On the day of shooting we decided to extend the scene to show Joe killing the demon, but after a couple of shots Shane injured himself, forcing us to revert to the shorter version.) My flatmate wanted to see Joe kill the demon, and I decided he was right.
I certainly wasn’t going to do a reshoot at that stage in the game, but nonetheless I was able to alter the scene to have the demon die. I did it in three steps, and these conveniently illustrate the three prongs of attack you can use in post-production to change and improve your story.
Re-purpose existing footage. The demon knocks Joe’s scythe from his hand early in the scene, so my first challenge was to get the hero his blade back so he could strike the fatal blow. Fortunately I had left the camera running while shooting a series of takes of Joe’s scythe hitting the ground. Therefore I had also caught the scythe being picked up on camera. This was never intended to be used, but it worked a treat.
Visual effects. I’m no fan of digital fixes, but there’s no denying they can get you out of a tight spot. The existing cut of the scene had a shot of Joe walking up to the demon, but now I needed to put the scythe into his hand, so I cut out the scythe from a freeze-frame of another shot and motion-tracked it to Joe’s movements.
Sound. This is the most commonly-used tool for changing things in post. Any time in a movie that a line of exposition is delivered without the speaker’s mouth being clearly seen, chances are that it’s Additional Dialogue Recording (ADR). It’s far easier to get the actor into a recording studio to perform a new line than to go back to a location or a long-struck set and reshoot. But in this case all I needed to do was put in some slicing, crunching sounds and a grunt, which I ran over a handy shot of the drunken revellers.
Here is the original scene followed by the bits I changed and then the final version:
Remember that with great power comes great responsibility. I’ve heard of actors who’ve found themselves edited into scenes they’d never shot. If you’ve substantially changed the character with your tinkerings, or placed an actor into a sensitive or controversial scene, be sure to discuss it with them just as you would have done beforehand if it had been shot conventionally. The same goes for the writer if you’ve made a big change to their script.
Some might look at all this as cheating, and I confess I have mixed feelings about it myself. I believe in getting things right in-camera, but the reality is that all films are prototypes, and you’re often well into post-production – at least – before you really figure out what the best way is to make this particular movie.
A camera operator needs batteries, lenses, cards, filters. A wardrobe supervisor has racks of costumes. A sound recordist carries a dead cat on a stick. But a director needs only his folder. Like Her Majesty’s handbag, the contents of this hallowed portfolio have forever been a mystery. Until now.
Here’s what I kept in my Stop/Eject folder while shooting the film:
To-do list
The first thing I see on opening the folder is a to-do list. These are all things that need doing the day before the shoot begins, including things that I need to pack in the van for the journey up to Derbyshire.
Budget
A copy of the production budget comes next, with highlighted figures like catering and travel being the ones that are still available to spend.
Schedule
Next up is the schedule, one of several documents I can satisfyingly cross parts off as the shoot progresses. You can download the schedule here.
Contacts
A list of contact details for the cast, crew, locations and people we’re borrowing props and equipment from.
Script
Then we come to the script. The fact that it’s this far back in the folder tells you how many other things a director who is also co-producing and has no AD has on his mind. Ideally the script and the storyboards would be the only things in my folder. You can see that I’ve drawn tram lines. Normally a script supervisor does this during shooting to indicate which part of the scene a shot covers, but I’ve drawn them in advance to remind me which part of the scene I want each shot to cover.
Storyboards
The largest section of my folder is the storyboards. The ones with the pink highlights are shots I felt would make good production photos, the idea being that we would switch the camera to stills mode after the take and snap a few – but we usually forgot.
Lighting plans
Next are the lighting plans for each location. I covered these in detail in my lighting breakdown posts.
Artwork
Sophie’s concept art is next. Not much use by the time you’re in production, since it’s all been built and dressed already, but nice to look at.
A new Stop/Eject behind-the-scenes video has been released, featuring an interview with leading man Oliver Park.
Thanks to Sophie for editing this video. You can visit Oliver’s website at oliverpark.co.uk and remember you can watch the trailer for Stop/Eject and help the film get completed over at stopejectmovie.com
Here’s one from the archives. This is one of the featurettes from The Beacon‘s long-forgotten DVD in which I break down a crude but effective VFX shot.
Compositing elements shot against black in my living room was an MO I heavily expanded on when I made my next feature, Soul Searcher, and you can see the extensive break-downs for that film by renting or buying the deluxe package below.


 and Copy-Kate (Katie Lake).")


