Here’s a VFX breakdown that didn’t make it onto the Stop/Eject DVD, showing how rotoscoping and compositing techniques were brought to bear on a shot of Kate passing through Dan.
Stop/Eject
Making a Digital Cinema Package

Now that huge reels of 35mm film are all but obsolete, Digital Cinema Packages (DCPs) are the new means of getting a film to a cinema. Many top film festivals will only screen off a DCP or 35mm print, and in terms of picture and sound quality and compatibility it is your best option for screening at theatrical venues in general. Much has been written about how you can make a DCP at home for nothing, but having just gone through the process myself for Stop/Eject I’m going to round up some of the best sources of information I came across and enlarge on the area of disc formatting which hasn’t been too well covered elsewhere.
To ensure maximum compatibility of your DCP you need to:
- convert your film to 24fps if it isn’t already at that frame rate
- use a standard 2K aspect ratio, 2048×1080 or 2048×858
- put it on a disc that is EXT3 formatted
- supply that disc in a Cru Dataport DX-115
I’ve spoken to filmmakers who have ignored many or all of the above and still run their DCPs successfully in cinemas, but I decided to play it safe and do all of the above, except the Cru Dataport, which was a little too expensive. Instead I bought a 500GB LaCie Rugged USB drive and put my DCP on there. Read Knut Erik Evensen’s excellent blog post on DCP delivery for more info on Dataports and USB compatibility.
So, here is the process I went through. I was starting out with 25,409 uncompressed 16-bit TIFF files representing each individual frame of Stop/Eject, and six mono 24-bit linear PCM WAV files for the 5.1 surround soundtrack. The TIFFs were in 1080P (1920×1080) letterboxed to an aspect ratio of 2.35:1.
- First of all I used Photoshop to batch convert all the TIFFs to the 2048×858 aspect ratio. This is actually 2.39:1 rather than the 2.35:1, so it meant cropping a sliver of the actual picture off the top and bottom, not just the black bars, as well as enlarging the picture slightly. It took my poor iMac about 12 hours to convert the 25,409 frames. I’m sure there’s quicker batch conversion software out there than Photoshop if you hunt around though.
- Next I used a free piece of audio software called Audacity to slow down each of the six audio files by 4% so that they will match the images when they run at 24fps. (Stop/Eject was shot and edited at 25fps.) Thanks to Matt Cameron’s blog for this tip.
- Then I downloaded and ran OpenDCP, the brilliant free software that actually creates the Digital Cinema Package for you. It’s very simple to use, but check out the help Wiki and Danny Lacey’s seminal blog post to guide you through it. The end result was six files: four XML files and two MXF files, one for sound and one for picture. Encoding at the default bitrate of 125mb/s, which the Wiki says is more than good enough for 2K at 24fps, Stop/Eject’s DCP was just under 17GB, so about 1GB per minute.
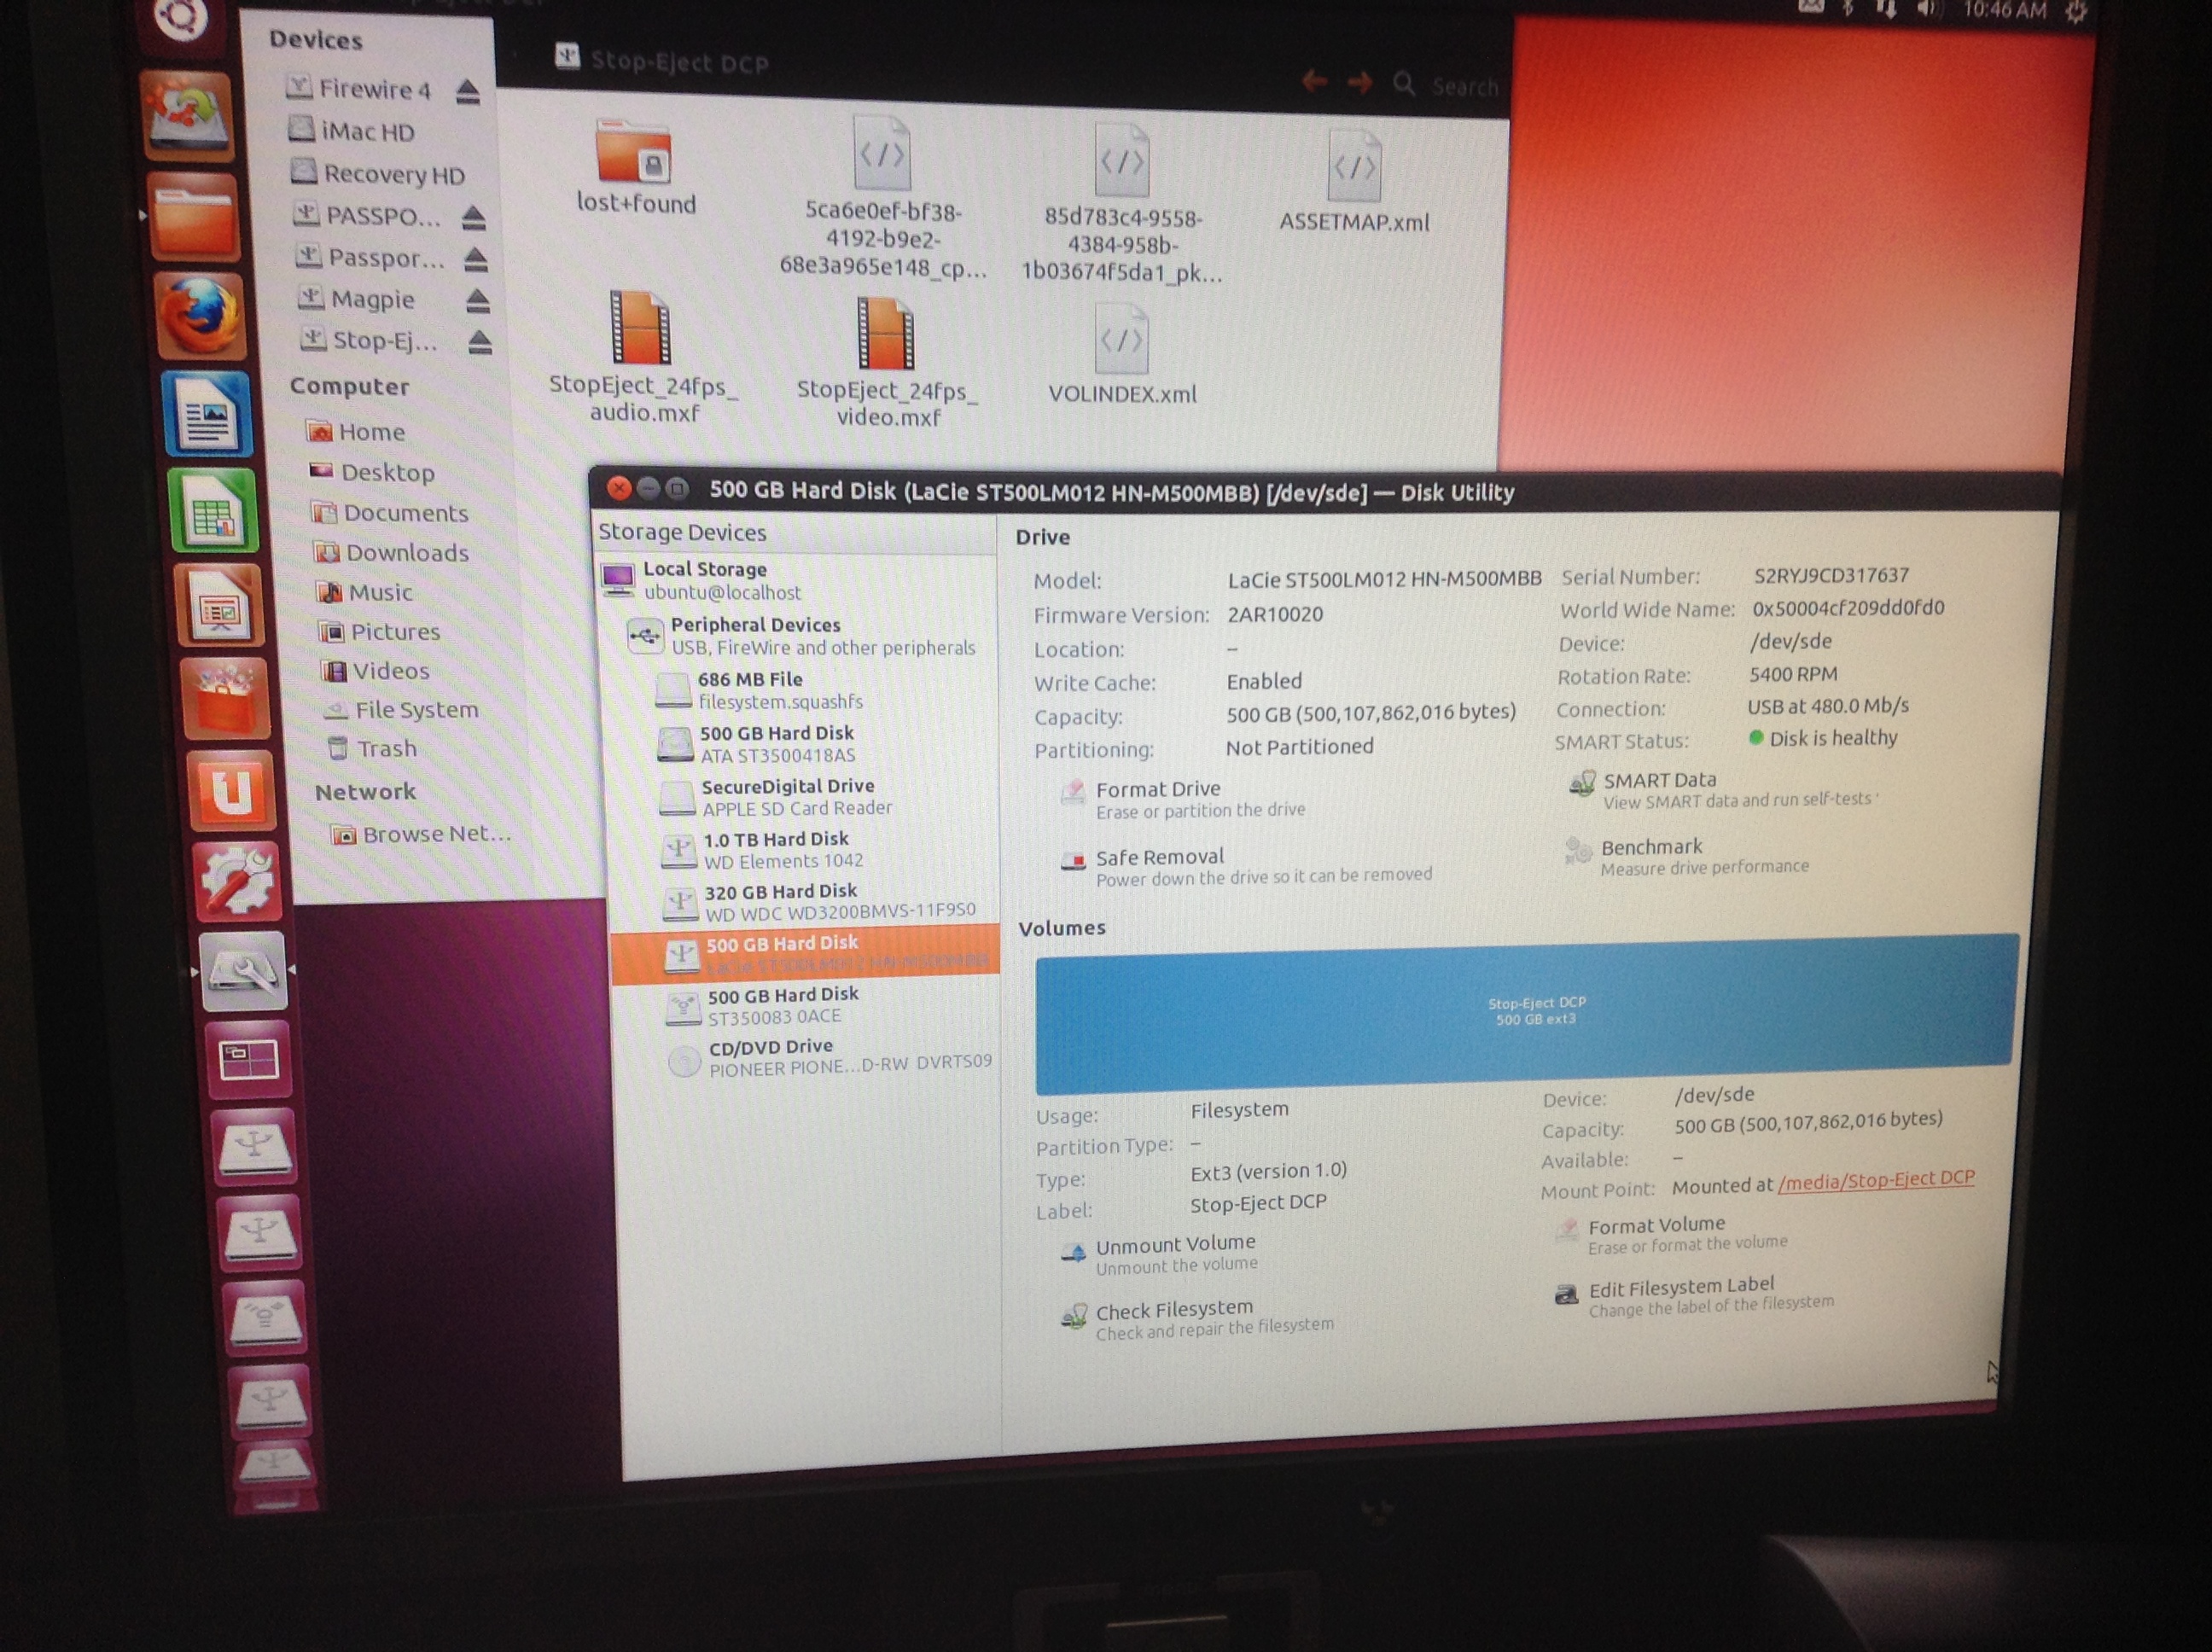
- Now the tricky bit – copying those six files onto an EXT3 formatted drive. EXT3 is a Linux file system, and is not supported by MacOS. So I downloaded Ubuntu, a free operating system which does support it. (Choose the 64-bit download unless you have quite an old computer.) The downloaded file is a disc image (.ISO) which you can burn to DVD using Disk Utlity (found in the utilities sub-folder of MacOS’s Applications folder). Then restart your Mac, with the DVD still in the drive, and hold down C when you hear the chimes. This will boot up your Mac in the Ubuntu operating system. (You can release C when you see the black screen and Ubuntu logo.)
- Once Ubuntu was running, I right-clicked the LaCie Rugged in the list of drives in the lower left of the desktop and chose format from the contextual menu. To get more than the default options, I clicked Disk Utility in the dialogue box that came up. I could now select EXT3 as the file system (leaving the other settings at their default values). When I clicked format, Ubuntu didn’t seem to be doing anything, but after a few minutes the Disk Utility showed that the volume had been created. I could then close the Disk Utility, and drag and drop the six DCP files from another hard drive (MacOS formatted) onto my newly EXT3 formatted LaCie. Apparently you can put these files inside a folder if you want, but again to be extra safe I put them in the root directory.
After completing the DCP I took it to the Courtyard, my local arts centre, where head projectionist Simon Nicholls was kind enough to let me test it. To my very pleasant surprise it worked perfectly, uploading at about real time via the Doremi server’s USB 2 socket and playing shortly afterwards with superb sound and picture quality. Much as I love celluloid, the ease and cheapness of this process are breathtaking, the purchase of the hard drive being the only cost. I’ll let you know how I get on running it at other cinemas.
How to Create a Blu-ray Motion Menu in Adobe Encore
Today I thought I’d share the process I figured out for creating looping menus in Encore for DVD and Blu-ray. If, like me, you want to do it all from scratch rather than using any of the built-in templates, the process isn’t particularly intuitive, and was sufficiently different from DVD Studio Pro (the software I’m used to) to leave me scratching my head from time to time, but here’s how I did it in the end. I’ll use Stop/Eject‘s main menu as the example. I’m going to assume you already know the basics of Encore and can find your way around Photoshop.
First of all you have to understand how DVDs and Blu-rays (henceforth collectively referred to simply as “discs”) work. They’re not like websites or Flash movies where you can do anything you want; the specifications are quite narrow. A motion menu consists of two elements:
- The background, which is a video (typically with audio) that you can create in Final Cut Pro, Premiere, or whatever.
- The button highlights, which show the user which button is currently selected. The user will only ever see one of these at a time.
Hang on – background, button hightlights…. but what about the buttons themselves? These have to be part of the background. Yes, you can import your background movie as a Quicktime into Encore and then add buttons to it within Encore, but when you come to build your disc the software will render those buttons into the background movie. All the disc player can deal with is a background movie and the highlights.
I prefer to build my buttons into the background movie in my editing software (Final Cut) rather than add them in Encore, and that’s the approach I’ll outline here.
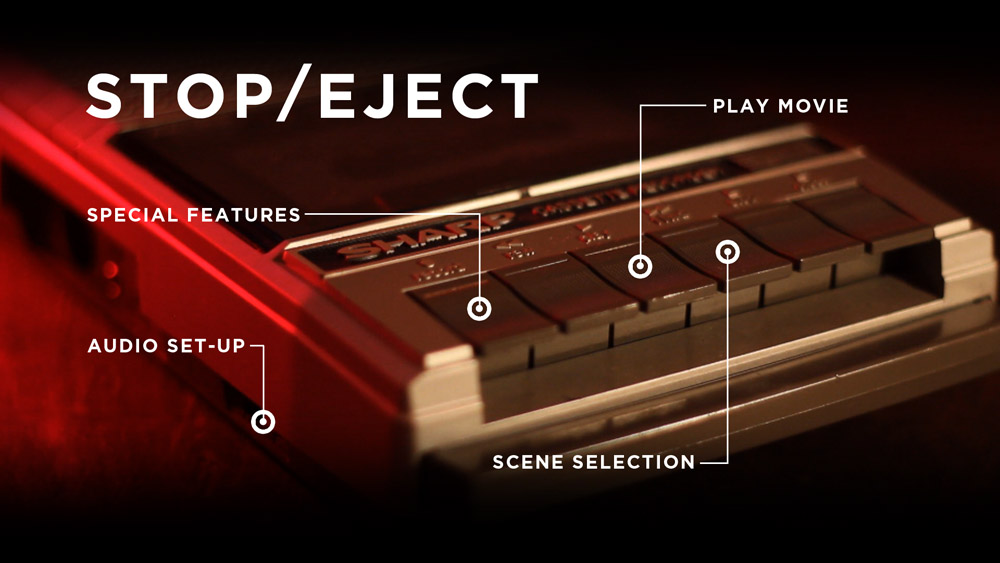
Another crucial point to understand is that each button highlight can only be one colour. So look at the Stop/Eject main menu below. The button highlights are the white rings. They could not be red-and-white striped rings, like life preservers; they can only be one solid colour.
So, now you appreciate all of the above you can get started on your menu. The first step for me was shooting and editing the background movie, although for most people this will be a computer-generated graphic rather than something shot with a camera. It’s important to think about where your loop point is going to be so that the menu will loop smoothly.
The following video shows my edited background movie. The buttons were created in Photoshop and added to the movie in Final Cut, before exporting as a ProRes Quicktime (with these buttons now baked in) ready to be imported into Encore.
In Encore I can now create a new menu and use the pick-whip in the properties panel to select my Quicktime file as the source for both the video and the audio. I can also set the loop point in the same panel.
I need to make sure that the loop point is at a place in the video where the audio track is silent or at least is playing a constant background noise – e.g. an air conditioning hum – that will not jump unpleasantly when the menu loops. You’ll notice that my menu’s audio track has a beat or two of silence around the loop point. If you’re using music, don’t start it immediately at the loop point as many players take a fraction of a second to kick in the audio after they loop.
I also need to ensure that all of the buttons have appeared before the loop point. This is because the loop point is the place at which the player will start displaying the button highlight. If your menu loops back to a point before the buttons have appeared, the user will momentarily see the highlight without the corresponding button.
To create the button highlights, right-click (or ctrl-click if you’re using a single button mouse) on the menu and choose “edit menu in Photoshop” from the contextual menu. Photoshop will open with a still of your menu as it appears at the loop point. Annoyingly, this still will be in standard definition even if you’re creating a Blu-ray disc, so the first thing you’ll need to do in Photoshop is to change the pixel aspect ratio to square and re-size the image to 1920×1080.
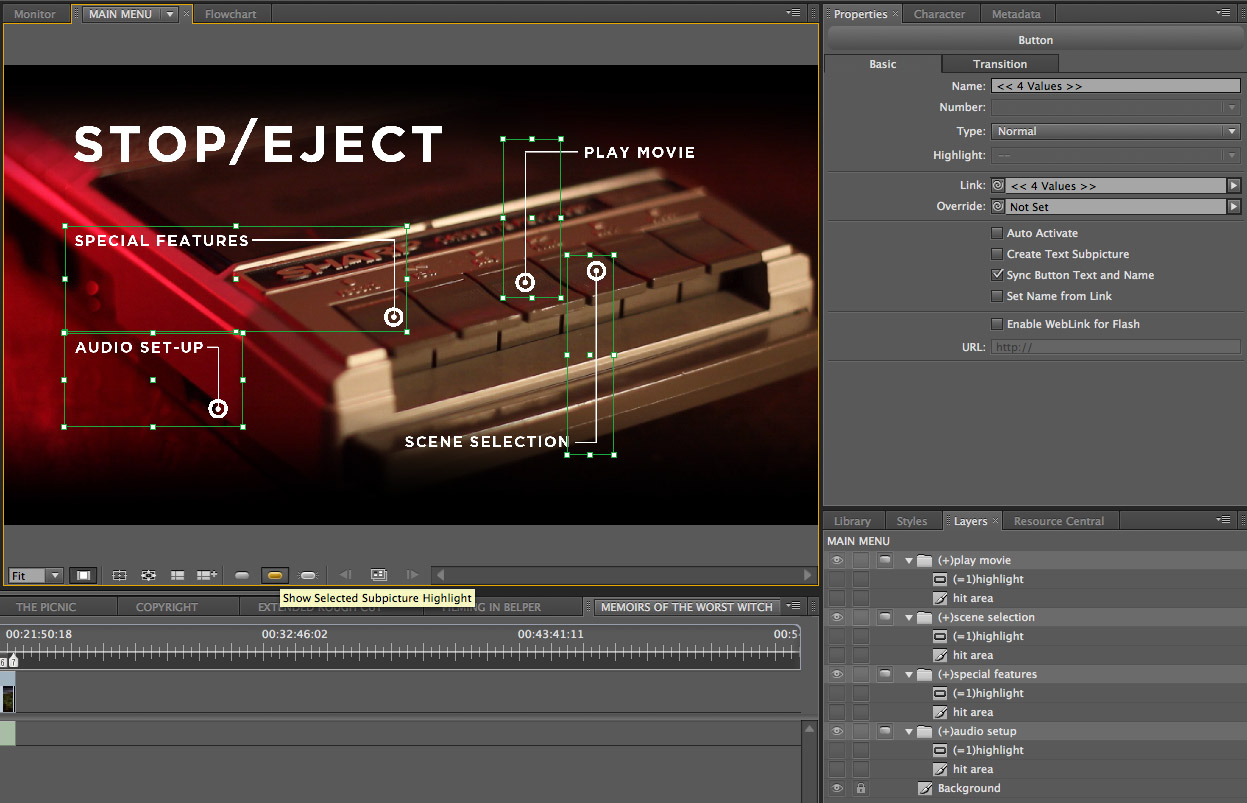
For each button, create a new group in the layers palette and give it a name that starts with (+). When you go back to Encore it will recognise this folder as pertaining to a button. Within the group, make a new layer and call it (=1)highlight. Draw your button highlight on this layer, remembering that it can only be one colour.
Now we need to pause a moment and consider hit areas. When your disc is played in a computer, the user can select buttons with the mouse. The hit area determines what part of the screen the user must hover the mouse pointer over for the button to be considered selected. This area MUST be rectangular. For each button, Encore will look at all the layers within the relevant group and draw the smallest possible rectangle that will completely enclose all those layers; that will be your button’s hit area.
In my case, right now the only layers in my groups are the white rings which are the button highlights themselves. But what if someone hovers the mouse over the words “special features”? I want the button to be selected then too, so in the (+)special features group I’ll create a second layer (critically, it must be below the highlight layer) and draw a rectangle where I want my hit area to be. I can then click the eye icon next to this in the layer palette so it becomes invisible and doesn’t ruin the look of my menu.

Another restriction of the DVD/Blu-ray specs is that button hit areas can’t overlap. Given the restriction I mentioned earlier, that they must be rectangular, you can see from the layout of my menu that it isn’t possible for the hit areas of Play Movie and Scene Selection to include the text for those buttons without overlapping each other. I choose not to compromise the design of the menu and trust that users will soon find the hit area with a quick sweep of the mouse over the whole image.
I save the image in Photoshop and return to Encore. I can now see the button hit areas outlined on the menu. If I click the icon for “show selected subpicture highlights” (see below image) I can see the highlights too. It’s now simply a case of setting the target for each button using the pick-whip in the properties panel.
When users return to the main menu, after they’ve visited the special features menu, for example, I don’t want them to have to sit through the intro part of the menu again; I want them to go straight to the loop point. So I’ll go to the main menu button in the special features menu and set the target – not using the pick-whip, but through the pull-down menu. I’ll select “specifiy link” and in the dialogue box which appears I make sure to tick the “set to loop point” checkbox.
One final point. The version of Encore I used (CS5.1) has a bug whereby any motion menu longer than 70 seconds will not loop smoothly; a second or so of black will appear each time the player gets to the end of the loop. This issue does not occur in Encore’s preview, only when you’ve burnt the disc. There’s no workaround that I can find other than shortening the menu.
I hope this has been some help to those of you out there who are still burning your films onto physical discs. Let me know if you’d like to hear more about any part of the disc authoring process.
Managing Visual Effects Without a Budget

Stop/Eject is my fourth major project to include visual effects, and also the fourth where it’s been a struggle to get all the visual effects done. As any micro-budget filmmaker knows, it’s par for the course for some cast and crew to pull out, sometimes without warning or explanation, and VFX artists are no exception. On Soul Searcher, for example, I needed a CG artist for the 80+ shots featuring “spectral umbilical cords”. Four artists started the work and then quit, citing various excuses from exploding PCs to miscarriages, before the fifth delivered the goods.
Stop/Eject has a surprising 31 VFX shots (most of which you’d never know were VFX shots), of which the twelve simplest were handled by me and Miguel, the editor. With the remaining nineteen needing to be outsourced, how did I apply what I’d learnt from my previous projects?
- I advertised for multiple artists, knowing from Soul Searcher (and before that The Beacon) that relying on a single person was not a good idea. More than half the people who agreed to work on Stop/Eject never completed a single shot.
- I created and uploaded zip files to my webspace for each shot. Each zip contained all the footage and information needed for that shot. This way if an artist dropped out, it was quick and easy for me to point another artist to that zip file to take over the shot.
- I re-advertised regularly. Beware that the law of diminishing returns applies here: each ad will reap fewer responses than the last.
- I assigned the most difficult shots first. That way the shots that are left at the end when the reliable artists are all burnt out and your adverts are getting no responses are – in theory – the easy ones which you can just about do yourself.
- I regularly checked in on the artists’ progress. If I didn’t get a reply within a couple of days, I’d assume that the artist had dropped out and I’d re-assign their shot to someone else. Harsh, but necessary.

I want to say a huge thanks to those artists who came through for the project: David Robinson, Mary Lapena, Matt Collett, Eranga Mudiyanselage, Dominic Stephenson and Naveed Aftab. You all worked incredibly hard and produced fantastic results – you should be proud of yourselves.
Finally, a few technical points about our workflow, for anyone interested in such things. We shot on a DSLR, so the source footage was in H.264, a format that due to its structure cannot be trimmed without losing a generation. So I supplied the VFX artists with the entire take (along with details of the in and out timecodes of the piece used in the edit) and asked them to deliver their finished shots as 16-bit TIFF sequences. This ensured that we would lose zero quality. The downside to this workflow is that there is a danger of errors being made with the timecodes, leading to a shot not being long enough when you go to conform the edit…. Yes, that happened. There must be a better way. What’s your workflow for DSLR projects with VFX?
Stop/Eject DVD and Blu-ray Features
I can at last reveal the full list of bonus features that will grace the DVD and Blu-ray editions of Stop/Eject. Please note these discs are for sponsors, cast and crew only. It is likely to be 18 months or so before the film is available to the general public, other than at festivals.
DVD edition
- The film with Dolby Digital 5.1 surround sound (17 mins)
- Cast commentary with Georgina Sherrington (Kate), Oliver Park (Dan) and Therese Collins (Alice)
- Filmmakers commentary with producer Sophie Black and the director, Yours Truly
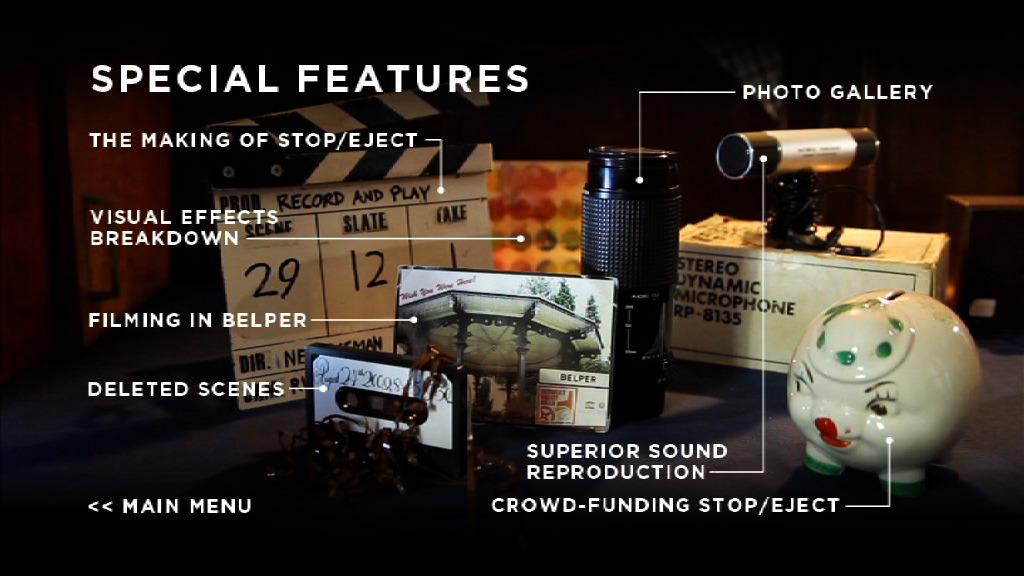
- Record & Play: The Making of Stop/Eject – brand new behind-the-scenes documentary featuring interviews with all the cast and crew (30 mins)
- Crowd-funding Stop/Eject – Sophie and I relate the ups and downs of financing the film, the many ways we promoted the campaign and the lessons we learnt from it all. (10 mins)
- Filming in Belper – visual essay by Sophie about Stop/Eject’s north Derbyshire locations, featuring clips from other independent productions shot in the town and interviews with Stop/Eject’s cast (5 mins)
- Superior Sound Reproduction – a unique look at the little-understood area of postproduction sound, from Additional Dialogue Recording (ADR) through sound effects and music to the final mix, featuring interviews with re-recording mixer Jose Pereira, sound designer Henning Knoepfel, composer Scott Benzie, Georgina Sherrington and Oliver Park (10 mins)
- Deleted scenes (5 mins)
- Visual effects breakdown – revealing the layers of work that went into Stop/Eject’s visual effects shots (3 mins)
- Photo gallery
Blu-ray edition
- All of the DVD features except for the deleted scenes
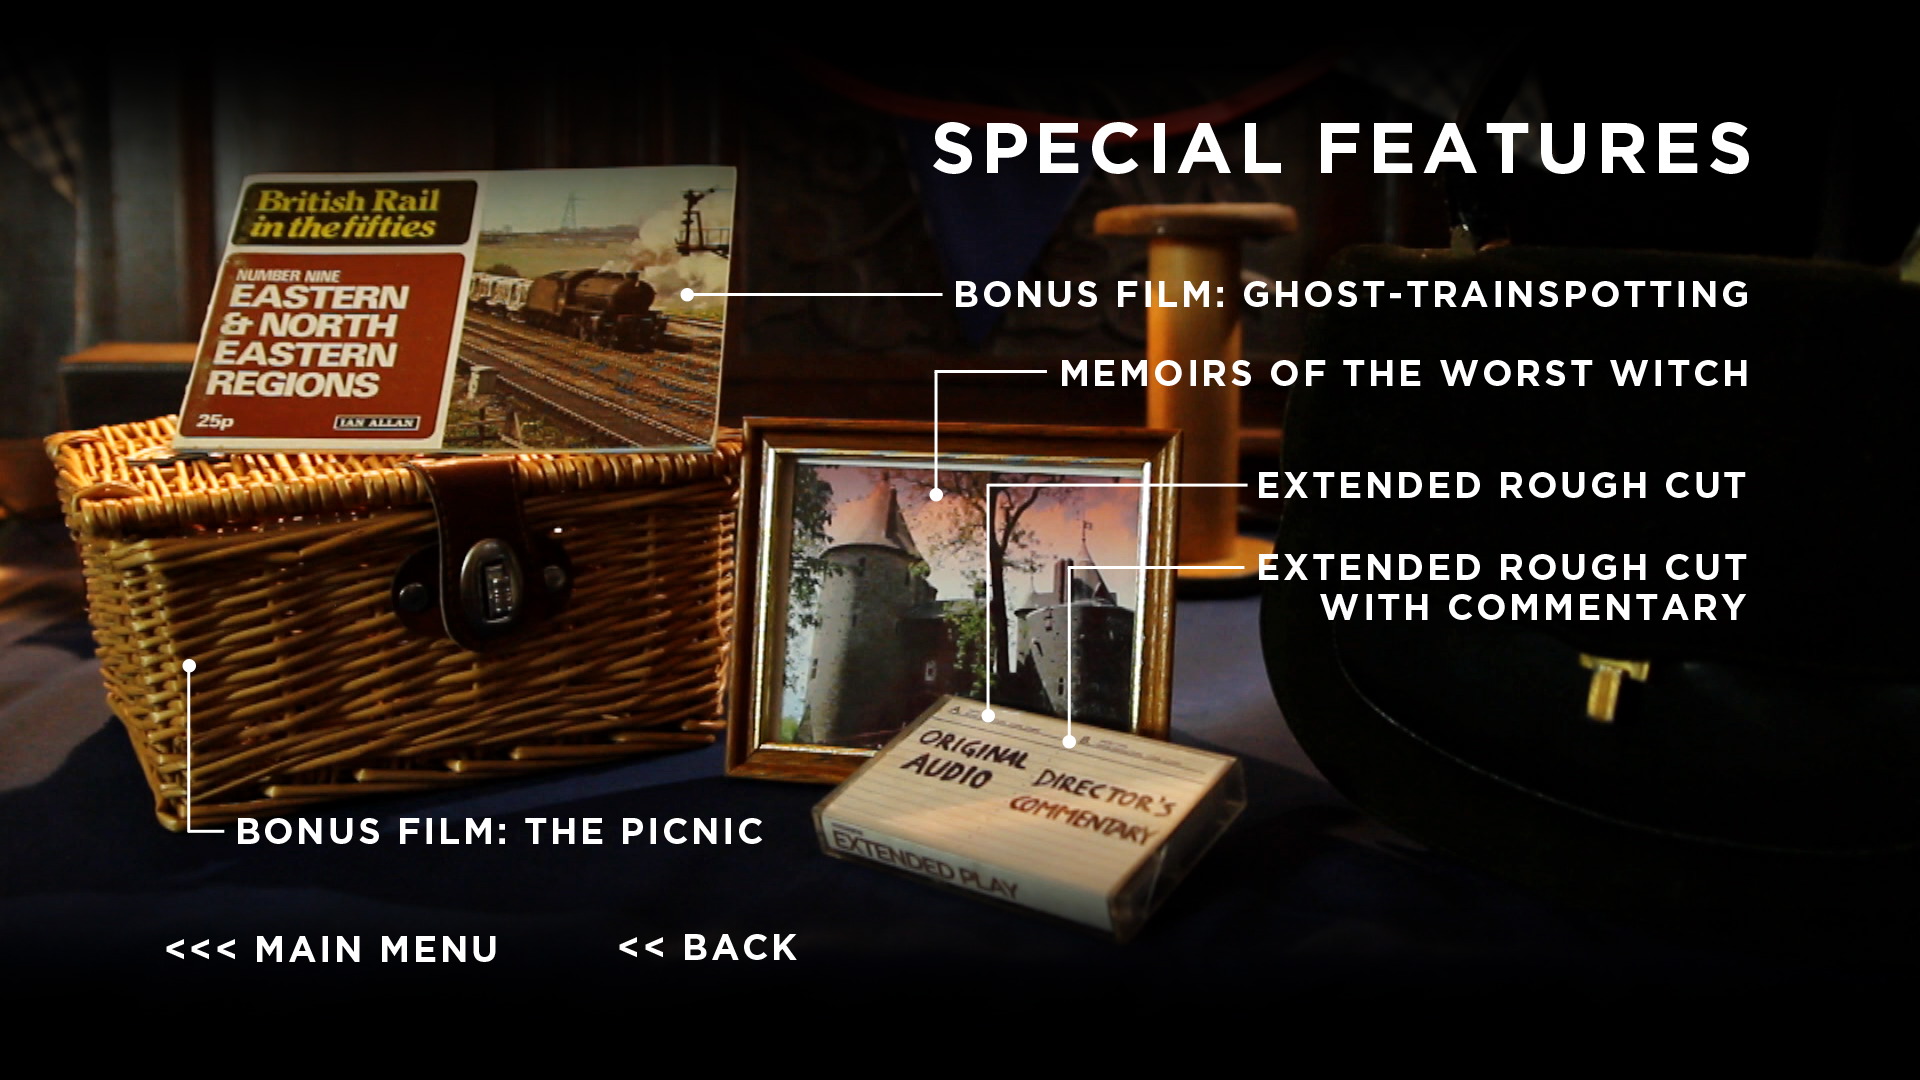
- Extended rough cut with optional director’s commentary – an early edit of the film containing dialogue, moments and entire scenes excised from the final version (22 mins)
- Memoirs of the Worst Witch – exclusive interview with Georgina Sherrington, looking back on her time playing Mildred Hubble in the popular ITV series (20 mins)
- Bonus film: The Picnic – starring Therese Collins. When a gentleman arrives for a romantic picnic with his girlfriend, he is enraged to find her in the arms of another man. (2 mins)
- Bonus film: Ghost-trainspotting – Norman sets out to spot the fabled Flying Welshman, the spectre of an ill-fated steam train. (2 mins)
- All content in full HD (1080P)
Cannes 2013 Video Blogs
Find out more about the Cannes film festival and market in these video blogs featuring me and fellow filmmaker Sophie Black.
Grading Stop/Eject

On Monday, Stop/Eject entered the final phase of postproduction: grading. In the optical days, this process involved adjusting the cocktail of chemicals and the length of time the film would be bathed in those chemicals to make basic adjustments to the amount of red, green and blue in each shot and the brightness.
The reason for this can be most readily appreciated if you imagine a scene shot outdoors, in which one camera angle may have been recorded under warm, direct sunlight, whereas another which is cut to immediately after may have been recorded when the sun was behind a cloud and the light was cooler in colour. But even artificially lit scenes will need a little work to match up each shot to the next; the human eye is quite sensitive to changes in colour and brightness.
With the digital revolution came an exponentially expanded toolset for grading. Individual colours can be isolated and changed, shadows and highlights can be adjusted independently, and feathered masks can be applied to highlight or shade just one part of the frame – with the software even able to track elements if they move around so that the mask always stayed lock to that element. (Watch the Digital Intermediate featurette on the Fellowship of the Ring DVD to get a glimpse into what’s possible.)
Stop/Eject was graded by Michael Stirling at the company he runs in East London, White Cross Post Production. He very kindly put in a lot of hours, including two evenings, to make sure we got the best out of the film’s images. Even at this late stage in the game we were still telling the story: drawing the viewer’s eye to critical elements in the frame, enhancing lighting transitions when time stops and starts, making the happy past sequences warm and inviting, and contrasting those with cooler, darker scenes in the present.
Given that we shot in 16:9 (standard widescreen) but were cropping to 2:35:1 (cinemascope), we had the opportunity to move the images up or down behind the widescreen mask to reframe shots slightly; this is known as re-racking. We also added some subtle 35mm grain to the whole film.
The grade was the first time – and perhaps the last – that I was able to see the film on a really high quality, properly calibrated projector. It really exposed the quality of the camera and glass that were used. And while the Canon 600D and relatively cheap lenses look great on every other screen I’ve watched it on, on Whitecross’ projector I could really see the value of investing in high-end lenses. Even the difference between the Canon 50mm/f1.8 (£60) and the more expensive Sigma 20mm and 105mm lenses was apparent.
But I digress. The important things are: the grade looks great, and Stop/Eject is now finished. Hooray!
Sophie and I are off to Cannes this weekend – subscribe to my YouTube channel to get our daily video blogs. And when we get back it’s film festival submissions, DVD/Blu-ray authoring, and premiere arranging all the way.
Mixing Stop/Eject

Yesterday I travelled down to London to sit in on the final mix for Stop/Eject. This is the last part of the filmmaking process as far as the audio is concerned. All of the disparate elements – dialogue recorded on set, dubbed dialogue (ADR), ambience, footsteps, effects and music – must be combined into one seamless whole.
Guiding the audience’s ears through the soundtrack of Stop/Eject was Jose Pereira, re-recording mixer. Alchemea, the college in north London where he works, very kindly gave us the use of their postproduction room, a very nice little studio with a big screen, cinema seating, surround sound monitoring and more knobs than Nobby the Nobber’s Knob Emporium.
The film sounded great already, thanks to the talents of sound designer Henning Knoepfel and Jose’s diligent pre-mixing. It was a very painless process to do the necessary surround sound positioning, adjust a few levels here and there and arrive at a final mix.
It was a world away from Soul Searcher, my first real mixing experience. Yes, Soul Searcher was a feature and yes, it had a lot of action, but looking back I can’t help but think it would have been much easier to mix if I knew then what I know now. Back then I was doing my own sound design, and I was convinced that quantity was quality, creating layer upon layer of noise which took an age to sort through and balance in the mix. I obstinately foleyed every footstep even when it had no hope of being heard under the music and gunfire. I believed logic was the key to every decision, that the same location had to have the same ambience every time we returned to it, even if the story and emotions would have been better served by something a little different. And I was determined to make as much use of the rear speakers as possible, even at the risk of confusing or distracting the viewer.
Now I know that less is more, that a few well-chosen sounds trump fifteen tracks of poor ones, that the rear speakers should be use sparingly and that you don’t always need to hear every clothing rustle and every footstep.
Anyway, with Stop/Eject’s sound mix in the bag, it only remains to grade the images, and I hope to have a date set up for that soon.
The One That Got Away
Meet the star of my next film, a Virgin Media Shorts entry called The One That Got Away.

He’s being made by my wife Katie, on whose idea the film is based. As usual, you can follow the making of this project right here at neiloseman.com
Meanwhile Stop/Eject is within reaching distance of completion. All the music, sound and VFX are in place. This weekend the final credits roller will go on, and on Monday Jose Pereira and I will do the final 5.1 surround sound mix at Alchemea College near Islington.
Work is gathering pace on my next major production too, the title of which I’m still keeping secret. Currently the script is at fourth draft stage, and I hope to reveal some of the behind-the-scenes talent attached soon. Stay tuned.
Stop/Eject DVD Sneak Peek
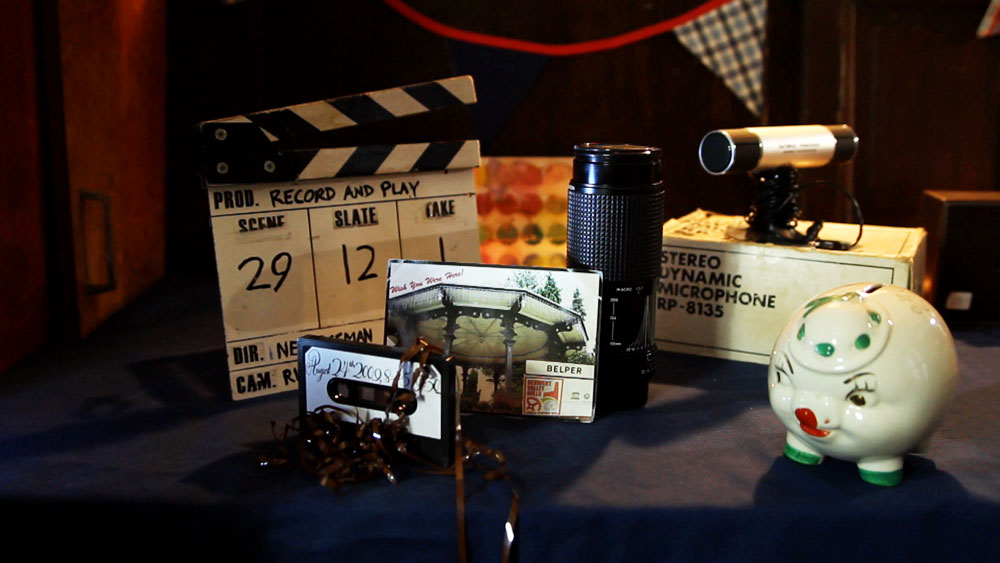
It would be nice to be able to hand out DVDs and Blu-rays to the cast, crew and sponsors at the premiere of Stop/Eject. That means finishing the discs pretty sharpish after the movie is done. I’ve been working on the discs on and off for a while, and yesterday I shot the menus. Yes, you read that right. I shot the menus.
I feel that DVD/BR menus should be an extension of the world of the movie, and I figure: what better way to do that than to use footage from the film combined with new shots that appear to be in the same locations? So, for example, the Special Features menu is a shelf in the charity shop, where each item of junk represents one of the special features. Some of these were found in real charity shops, some of them were made by Sophie, and others were borrowed from friends (thanks to Colin, and Joel at the Rural Media Company). Before long I hope to officially announce the DVD and Blu-ray bonus features, but for now I’ll leave you to guess what each item might represent.