Ever since digital cinematography became the norm, DPs have sought to counter the format’s perfection with characterful vintage lenses. Having just completed a feature film shoot, Hamlet, on Cooke Panchros and a Cooke 10:1 Varotal, I’m over the moon with the beautiful, creamy, organic look they brought to the production. However, I can’t deny that they have some disadvantages over modern glass which you should take into consideration before choosing the vintage approach.
1. Softness
Vintage lenses simply aren’t as sharp as their modern counterparts, particularly at the edges of frame and particularly when the iris is wide open. On Hamlet I deliberately shot with the Panchros wide open to soften the image, rather than adding a diffusion filter like I’ve often done in the past, but that look is not for everyone, and it does make things a little harder for your focus puller. Be sure to test the sharpness and view the results on a large screen before committing.
2. BreathING
https://www.youtube.com/watch?v=YcpLAk34fkk
Breathe is the phenomenon whereby a lens appears to zoom slightly in or out when the focus is pulled. The Cooke Varotal is especially prone to this. As a result, my focus puller Aristide Russo had to be very gentle with his pulls otherwise the breathing was distracting.
3. Veiling
Many DPs love lens flares, and beautiful, natural flares were one of the reasons I picked the vintage Cooke glass. But look out for veiling flare – a milkiness and lift in the shadows affecting the whole frame. I noticed this a lot when shooting under the practical fluorescents in Hamlet‘s stage set, especially with handheld shots where the veiling would appear and disappear depending on the camera’s angle to the lights. I decided to embrace it and make it part of the film’s look, but if maintaining high contrast at all times is important to you, lenses without modern coatings may not be the right choice.
4. Vignetting
Check for dark patches in the corners of your image. The Varotal I used vignetted at certain parts of the zoom range and not at others, so the dark corners would appear and disappear during a zoom. Although not ideal, it isn’t noticeable most of the time. Besides, I figured that most colourists add vignettes to most shots anyway, so I was simply saving them a little time!
5. Mechanics
Older lenses are, quite naturally, less reliable. Even if they have been rehoused, like our Cooke “Century” Panchros had been in 2000, you may find that the iris and/or focus sticks sometimes. Our 25mm started to play up halfway through our shoot, forcing Aris to use the rosettes to support the matte box, otherwise the motor wasn’t powerful enough to turn the focus ring. This possibility was flagged for me during testing when we had a similar issue with the 50mm. Even if all your lenses seem to be fine during prep, know that a vintage lens could start misbehaving at any time, and your rental house may not have another on the shelf to replace it with.
6. Uniformity
Don’t expect a set of vintage primes to all have the same maximum aperture or the same external configuration. The iris ring might be buried in the matte box, the matte box might not fit on at all, or it may be impossible to engage both iris and focus motors at the same time.
All this sounds quite negative, but the flares, softness, breathing and vignettes can be absolutely beautiful. Be aware of the downsides of using vintage glass, absolutely, but if they suit your story then embrace the flaws and get ready to be blown away by your dailies.
In case you missed them the first time, I’ll leave you with some highlights from my Hamlet lens tests.
Recently I discovered Tailslate, a podcast by DPs Ed Moore, BSC and Benedict Spence. The second episode focuses on equipment, and the two men discuss the pros and cons of having your own gear. I have some pretty strong feelings on this myself, so I thought I’d share them here.
I owned equipment for the first 17 years of my career. I was fortunate that at the time I first went freelance (late 1999) I had a small inheritance which I was able to invest in the wonderful new Mini-DV/Firewire technology that had recently emerged. I bought my first semi-professional camera, a Canon XM-1, along with a decent Manfrotto 501/520 tripod, a basic tracking dolly, sound gear, and for editing a PowerMac G4, Mini-DV/VHS deck and a pair of Yamaha MSP5 active nearfield speakers. (The speakers are the only things I still have, and I’m using them as I write, 20 years on. They are the best thing I’ve ever bought. Nothing else has ever served me for so long, so frequently and so reliably.)
Shooting on my Canon XL1-S back in 2003
Apart from the speakers, everything else got replaced every few years as it fell into obsolescence or simply packed up. The XM-1 was replaced with an XL-1S, then I moved onto HDV with a Sony A1, then onto DSLRs with a Canon 600D/T3i, then a Blackmagic Production Camera, which turned out to be my last camera.
Immediately you can see one of the key problems with owning equipment: the fast pace of technological progression and the need to upgrade regularly to keep up. But owning equipment had disadvantages even before the fast-paced digital revolution. In a fascinating Clubhouse Conversation from the American Society of Cinematographers, M. David Mullen, ASC recounts his own experience with gear:
I ended up never owning a camera package. Because of that, I shot mostly 35mm in my early days… People I know who bought a [super]-16 camera, they ended up shooting [super]-16 films for the next ten years or so. So you can get tied to your own equipment.
But there are benefits to owning kit, of course. Corporate clients expect you to provide the gear yourself or to hire it in without any fuss. Clearly the former allows you to make more money from these jobs.
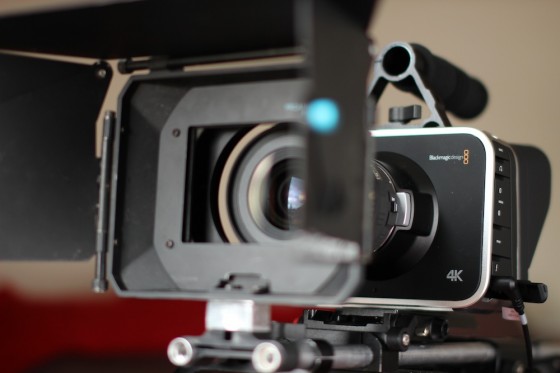
My last camera, the Blackmagic Production Camera 4K
For creative jobs, things aren’t so cut and dried. Owning a camera will certainly get you more work of a certain type. That type is unpaid and low-paid. If you expect to charge a hire fee on your gear, forget it. The type of productions that want you to have your own gear is the type that can’t afford to hire, either from you or from a facilities house. They’ll expect you to come along and bring your gear for free.
We all need to do this type of work at the start of our careers, which is why owning equipment is great at that point. But ultimately I sold my Blackmagic in 2017 and didn’t replace it because I no longer wanted that type of work.
I think things are a little different if you can afford to own a high-end camera. I’m pretty certain that I’ve lost jobs in the past, despite being a better cinematographer than the successful applicant, because they had a Red and I only had a DSLR or a Blackmagic. If you can afford an Alexa then you might well be able to get quality jobs off the back of it, but most of us aren’t in that position!
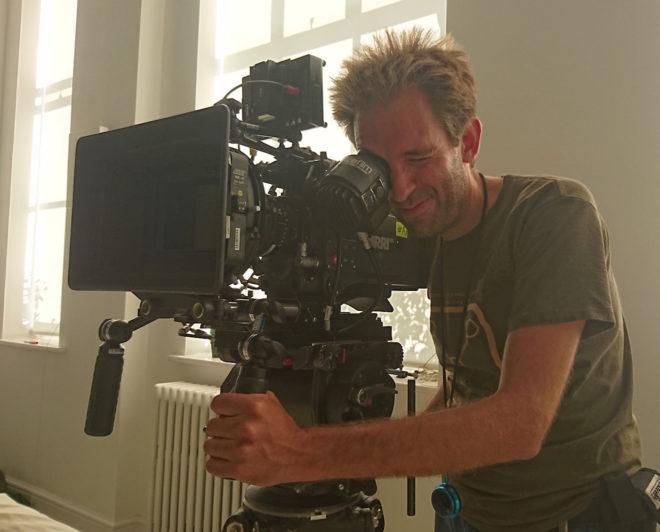
A camera that I could never afford to buy
The best thing about not owning gear is that you’re free to select the best equipment to tell each particular story (budget and production mandates notwithstanding). Each production is different, and there is no single camera or lens set that is best for all of them. Resolution, high frame rates, colour science, contrast, sharpness, weight, size, cost – all these factors and more influence a DP’s choice, and it’s a critical choice to make. If you’re pushing your own camera or lenses to the production just so you can recoup some of the cash you spent to buy them, you’re doing the story a disservice.
In conclusion, whether or not to invest equipment depends on your budget and the type of work you want to do. But if you’re shooting a drama, even if you own equipment, you should be asking yourself what camera and lenses will best set the tone and tell this story.
Each month I get a digital copy of American Cinematographer to my inbox, filled with illuminating (pun intended) articles about the lighting and lensing of the latest theatrical releases. As a rule of thumb, I only read the articles if I’ve seen the films. Trouble is, I don’t go to the cinema much any more… even before Coronavirus put a stop to all that anyway.
Why? TV is better, simple as that. Better writing, better cinematography, better value for money. (Note: I include streaming services like Netflix and Amazon under the umbrella of “TV” here.) But whereas I can turn to AC to discover the why and how of the cinematography of a movie, there is no equivalent for long-form content. I would love to see a magazine dedicated to the beautiful cinematography of streaming shows, but until then I’ll try to plug the gap myself.
I’d like to start with a look at the increasing use of anamorphic lenses for the small screen. Let’s look at a few examples and try to discover what anamorphic imaging adds to a project.
Lenses with an anamorphic element squeeze the image horizontally, allowing a wider field of view to be captured. The images are restored to their correct proportions in postproduction, but depth of field, bokeh (out of focus areas), barrel distortion and lens flare all retain different characteristics to those obtained with traditional spherical lenses.
The Cinematic look
“Doctor Who: The Woman Who Fell to Earth”, DP: Denis Crossan
The venerable Doctor Who, which started off shooting on 405-line black-and-white videotape more than half a century ago, has employed Arri Alexas and Cooke Anamorphic/i glass since the introduction of Jodie Whittaker’s 13th Doctor. “[Director Jamie Childs] suggested we shoot on anamorphic lenses to give it a more filmic look,” says DP Denis Crossan. “You get really nice background falloff and out of focus ellipses on light sources.”
While most viewers will not be able to identify these visual characteristics specifically, they will certainly be aware of a more cinematic feel to the show overall. This is because we associate anamorphic images – even if we do not consciously know them as such – with the biggest of Hollywood blockbusters, everything from Die Hard to Star Trek Beyond.
It’s not just the BBC who are embracing anamorphic. DP Ollie Downey contrasted spherical glass with vintage anamorphics to deliberate effect in “The Commuter”, an episode of the Channel 4/Amazon sci-fi anthology series Electric Dreams.
The story revolves around Ed (Timothy Spall) whose mundane but difficult life turns upside down when he discovers Macon Heights, a town that seems to exist in an alternate reality. “Tim Spall’s character is torn between his real life and the fantastical world of Macon Heights,” Downey explains on his Instagram feed. “We shot Crystal Express Anamorphics for his regular life, and Zeiss Super Speed Mk IIs for Macon Heights.”
The anamorphic process was invented as a way to get a bigger image from the same area of 35mm negative, but in today’s world of ultra-high-resolution digital sensors there is no technical need for anamorphics, only an aesthetic one. In fact, they can actually complicate the process, as Downey notes: “We had to shoot 8K on the Red to be able to punch in to our Crystal Express to extract 16:9 and still deliver 4K to Amazon.”
“Electric Dreams: The Commuter”, DP: Ollie Downey
Evoking a period
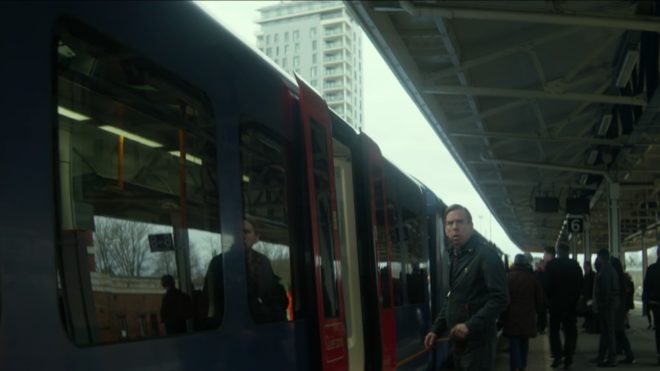
Back at the BBC, last year’s John le Carré adaptation The Little Drummer Girl uses anamorphic imaging to cement its late 1970s setting. The mini-series revolves around Charmian, an actress who is recruited by Israeli intelligence via the mysterious agent Becker. The truth is distorted throughout, just as the wide anamorphic lenses distort every straight line into a curve.
Reviewing the show for The Independent, Ed Cumming notes that director Park Chan-wook “does not aim to be invisible but to remind you constantly that what you are seeing is a creation. Take the scene at a beachside taverna in Greece, where Charmian and Becker start talking properly to each other. The camera stays still, the focus snaps between him and her.” Such focus pulls are more noticeable in anamorphic because the subject stretches vertically as it defocuses.
The Little Drummer Girl is slavish in its recreation of the period, in camera style as well as production design. Zooms are used frequently, their two-dimensional motion intricately choreographed with the actors who step in and out of multiple planes in the image. Such shots were common in the 70s, but have since fallen very much out of fashion. When once they would have passed unnoticed, a standard part of film grammar, they now draw attention.
“The Little Drummer Girl”, DP: Woo-Hyung Kim
Separating worlds
Chilling Adventures of Sabrina, a Netflix Original, also draws attention with its optics. Charting the trials and tribulations of a teenaged witch, the show uses different makes of lenses to differentiate two worlds, just like “The Commuter”.
According to DP David Lazenberg’s website, he mixed modern Panavision G series anamorphics with “Ultragolds”. Information on the latter is hard to find, but they may be related to the Isco Ultra Star adapters which some micro-budget filmmakers have adopted as a cheap way of shooting anamorphic.
The clean, sharp G series glass is used to portray Sabrina’s ordinary life as a small-town teenager, while the Ultragolds appear to be used for any scenes involving witchcraft and magic. Such scenes display extreme blur and distortion at the edges of the frame, making characters squeeze and stretch as the camera pans over them.
“Chilling Adventures of Sabrina: Chapter Ten: The Witching Hour”, DP: Stephen Maier
Unlike the anamorphic characteristics of Doctor Who or “The Commuter”, which are subtle, adding to the stories on a subconscious level, the distortion in Sabrina is extreme enough to be widely noticed by its audience. “Numerous posts on Reddit speak highly of Chilling Adventures of Sabrina’s content and cinematography,” reports Andy Walker, editor of memeburn.com, “but a majority have a collective disdain for the unfocused effect.”
“I hate that blurry s*** on the side of the screen in Sabrina,” is the more blunt appraisal of Twitter user @titanstowerr. Personally I find the effect daring and beautiful, but it certainly distracted me just as it has distracted others, which forces me to wonder if it takes away more from the story than it adds.
And that’s what it all comes down to in the end: are the technical characteristics of the lens facilitating or enhancing the storytelling? DPs today, in both cinema and long-form series, have tremendous freedom to use glass to enhance the viewers’ experience. Yes, that freedom will sometimes result in experiments that alienate some viewers, but overall it can only be a good thing for the expressiveness of the art form.
After seeing Barry Lyndon (1975) on the big screen this week, I felt compelled to write a blog post about its cinematography. But what aspect of the cinematography? The painterly look? The many zooms? The use of natural light?
What I knew for certain is that I should definitely not write about the entirely candlelit scenes lensed on f/0.7 Nasa glass, because everyone knows that story. However, reading the vintage American Cinematographer article and some other material, I found the details surrounding this groundbreaking use of high-speed lenses so interesting that I decided to do it anyway.
The Vision
Barry Lyndon is the 18th century tale of a low-born Irishman who strives – through various misadventures, and ups and downs of fortune – to become a gentleman. The key visual influence of director Stanley Kubrick and DP John Alcott, BSC were the great painters of the story’s era, such as Vermeer.
Next week’s post will look at this painterly influence in Barry Lyndon more closely, but for now the important thing is the use of candlelight on those classical canvases, and Kubrick’s desire to replicate that look. According to lens expert Ed DiGuilio, who was tasked with adapting the f/0.7 glass for Lyndon, Kubrick “wanted to preserve the natural patina and feeling of these old castles at night as they actually were”.
Typically in movies, a candle in frame may motivate the lighting, but most of the illumination on the actors actually comes from an orange-gelled lamp just out of frame. Kubrick wasn’t interested in shooting Lyndon that way. He wanted all the light in those night interior scenes to genuinely come from the candles themselves.
The Problem
How much light does a candle shed? Conveniently, there is a unit of illumination called the foot-candle. One foot-candle is the amount of light received from a standard candle one foot away. Without going into the detail of what a “standard” candle is, it is enough for our purposes to say that the scene below has a key light of about three foot-candles…
… because there are three candles, about a foot away from the actor’s face. (The level of your key light, and consequently where you set your aperture, is almost always measured at your subject’s face, as that is usually the focus of the shot and the most important thing to get correctly exposed. This is why we DPs are always waving light meters in actors’ faces.)
If we look at an exposure table, such as this one, we can see that a three foot-candle key can be correctly exposed with an aperture of T1.4 and an EI (exposure index) of 800. Today that would be no problem, with many digital cameras having a native EI of 800, and the availability of fast lenses like Zeiss Master Primes and Super Speeds.
In the mid-seventies however, long before the advent of digital cameras, things were not so simple. Kubrick and Alcott had little choice but to shoot on Eastman Kodak 100T 5254. Those first three digits denote the film stock’s exposure index: 100. Alcott pushed the stock (brought the brightness up during processing) one stop, re-rating it to an EI of 200. But it still needed four times more light, or two stops more light than our modern-day Alexa or Red. (Check out my post on f-stops and T-stops if you’re getting lost.)
If we’re losing two stops on the EI, we need to gain two stops on the aperture to compensate. And two stops up from T1.4 is T0.7. You may notice that T0.7 isn’t on that table I linked to. This is because a lens with such a large relative aperture pretty much doesn’t exist.
Pretty much…
The Solution
Kubrick obsessively researched the problem. He eventually discovered that Nasa had commissioned Carl Zeiss to build ten Planar 50mm f/0.7 stills lenses in the sixties, which were used to take photos of the dark side of the moon. (I was unable to find out the T-stop of these lenses, but I’ll assume it was close enough to T0.7 for it to make little difference to my calculations above.) The developments leading to these lenses stretched back through Nazi military applications during WW2 all the way to the late Victorian era, when the double-Gauss cell at the core of the lenses was first invented.
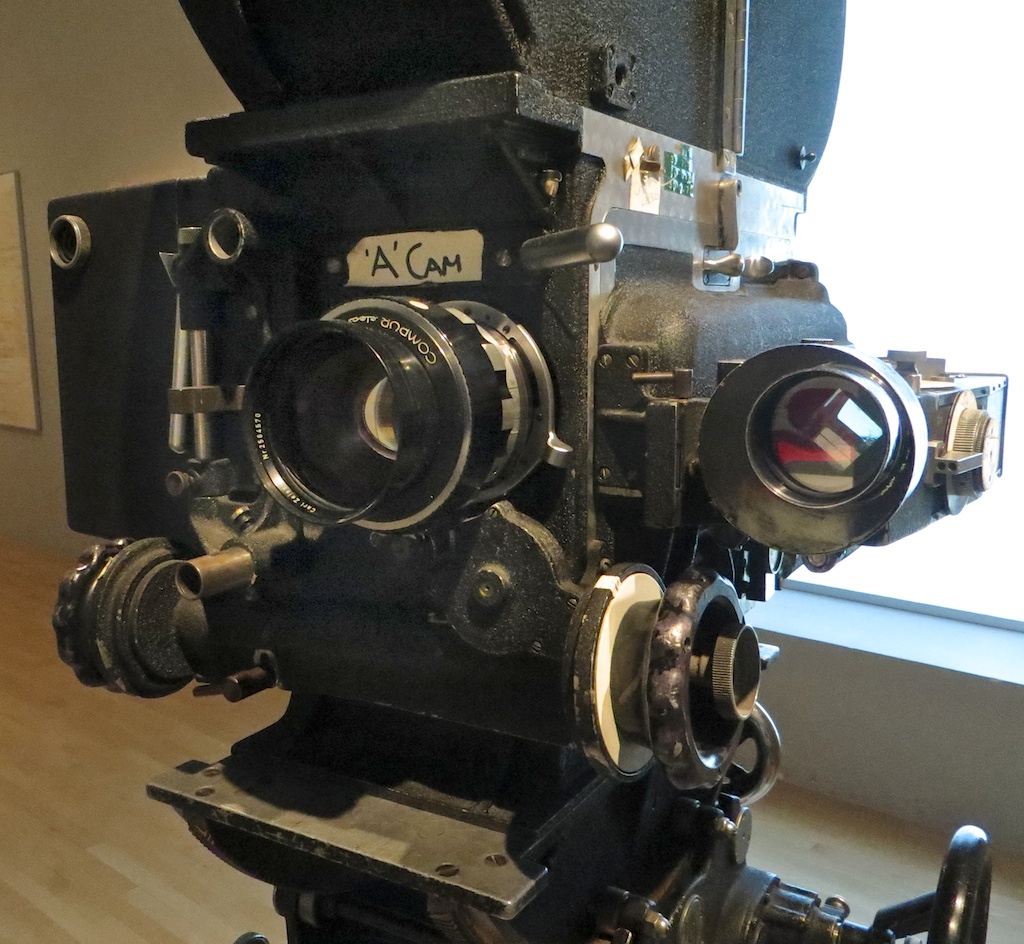
Anyway, Kubrick promptly bought three of the Zeiss Planars. He liked to own equipment himself, rather than hire it in, and to this end he had also purchased at least one Mitchell BNC camera. As befits Kubrick’s perfectionism, these were perhaps the world’s most precisely engineered cameras, previously used for special effects work.
This is where Ed DiGuilio comes in: “[Kubrick] called one day to ask me if I thought I could fit a Zeiss lens he had procured… to his BNC.” It wasn’t simply a case of the f/0.7 glass having the wrong mount. The rear element was so large and needed to be so close to the film plane that DiGuilio had to extensively modify the camera, literally cutting parts out of it.
Ed DiGuilio (left), President of Cinema Products Corporation, working on adapting a zoom lens for Kubrick’s Mitchell BNC
Once this was done, extensive testing ensued. The focus scale (distances marked on the barrel) had to be calibrated from scratch, and indeed the focus ring was re-engineered to allow the precision focusing that the lens’ tiny depth of field would require. Whereas the focus ring on a stills lens will turn about 90° to go from infinity to close focus, and the ring on a cine lens might turn 270°, the rings on these unique Planars now turned a whopping 720° – two whole revolutions!
50mm is a very useful lens length for close-ups, but Kubrick understandably wanted a wider option as well. Accordingly, DiGuilio located an adapter designed to adjust the throw of cinema projector lenses. Mounted onto one of the 50s, it gave an effective focal length of 36.5mm with only very minor light loss. A 24mm version was also tested, but Kubrick disliked the amount of distortion in its images, and rejected it.
The Execution
The colour brown and the trousers of Doug Milsone, Barry Lyndon‘s focus puller, cannot have been strangers to each other. Imagine trying to hold focus on this dolly-back at f/0.7!
By my calculations (which were difficult, because most depth of field tables/calculators don’t go to f/0.7!) an MCU on Kubrick’s 50mm Planar with the subject at 2.5m (8.2ft) and the iris wide open would have had a depth of field of about 43mm (1.7″). To get this same depth of field at f2.8, a popular working stop for cinematographers today, the subject would have to be just 1m (3.3ft) from the sensor plane, which would be a biggish close-up. And remember that focus monitors, peaking and Cine Tape did not exist in the seventies.
To give Milsone a fighting chance, a unique system of focus assist was developed. While the main camera shot an actor from the front, a CCTV camera captured them in profile. This profile image was piped to a monitor, over which a grid was placed. This grid was marked off with distances so that Milsone could see how much the actor had moved by, far more accurately than judging it by eye from beside the lens.
Another problem thrown up by the low-light cinematography was with the viewfinder. Interestingly, the Mitchell BNC was a non-reflex camera, meaning that it didn’t have a mirror on the shutter, reflecting the image to the viewfinder when the shutter was closed. Instead, the camera body racked over to one side to allow the viewfinder to get an image during line-ups and rehearsals, and when it was actually rolling the operator got their images from a side viewfinder with its own lens – just like in a disposable 35mm stills camera. The original prism-based viewfinder on Kubrick’s Mitchell BNC suffered from far too much light loss for a candlelit image to be visible through it, so it was replaced with a mirror-based viewfinder adapted from a Technicolor camera.
The shots resulting from all of these technical challenges are quite soft to the modern eye, but I think that only adds to their beauty. Barry Lyndon captured the exquisite fragility of candelight, and 42 years on the images are still unique and captivating.
I wrote the bulk of this post over two years ago, when I wrapped photography on Sophie Black’s short drama Night Owls. As usual for no-budget shorts, there followed a long postproduction and then a festival run (it premiered at London Short Film Festival this January) which prevented us releasing any footage online.
But this week a number of great things have happened for the film. Firstly, Night Owls has been released online – you can see it here – and every view counts towards Promofest’s “Short of the Year” competition, so have a watch and help us win! Secondly, the film won an Honourable Mention and Best Actor (Jonny McPherson) at the LA Film Awards. Thirdly, my work on the film won me Best Cinematography at the Festigious International Film Festival.
Photo by Elly Lucas
So this is the perfect time to finally publish this look at the decisions and techniques I used in lighting and lensing the film. Night Owls was one of the first projects I shot on my Blackmagic Production Camera, and you can read what I thought of the camera in action in this post from May 2014.
Sophie wanted a soft, warm and cozy look to the short, which is set over a single night, mostly in one room, and tells how a teenage girl and an older man become unlikely friends. At the same time, the dialogue-driven script had moments which hinted at darkness and suffering in the past of both characters. And a cozy look suggests practicals like table lamps, which by their nature cast pools of light and leave other areas in darkness.
On a practical level – if you’ll excuse the pun – I knew that the need to hide lights that would boost the apparent output of the practicals would limit my options in the wide shots, and therefore also in the close-ups which would of course have to match. When shooting a day interior, you can easily stick a huge light outside the window and then shoot pretty much anywhere in the room, crabbing the light to one side or the other if it threatens to come into shot or cast a shadow of the camera. In a night scene with practicals, it’s not so simple.
Dedo rail
We knew in advance that we could not screw anything into the location’s ceiling, so I was relieved to find that the room had a nice, chunky picture rail all the way around. This soon became a dedo rail, as I used magic arms and k-clamps to rig two of the little spotlights in a classic cross-lighting formation. What I mean by this is that each light was positioned so as to provide backlight on one character and frontlight on the other. This is almost always my starting point when lighting a scene with two characters, and it really came into its own on this project. (See my post on cross-backlighting for more info.)
We had to shoot most of the scenes during the day, so the windows were blacked out. The one that appears on camera was tented around so that we could shine in a blue-gelled redhead, to suggest moonlight, without allowing any daylight in. Another blue-gelled redhead was set in the hall outside the door, creating depth and colour contrast. Our 1.2K HMI was placed in the next room, right at the far end. In front of it we rigged a sort of faux stained glass panel, that had conveniently broken out of another door in the house just the previous week, in order to cast a window-like shadow and give the impression of moonlight coming through a window in the next room.
The reason we rigged so many cool sources was that the first scene in the living room featured only Kent (played by Jonny McPherson), and Sophie had requested that the images only become warmer when Mari (played by Holly Rushbrooke) enters the film. We turned on fewer of the practicals for this first scene, but it was still necessary for their light (represented by the dedos) to be warm in colour to establish that for the later scenes. To counteract this and bring everything back into the blues a bit more, I set up a third dedo, gelled blue, to produce a cool lens flare.
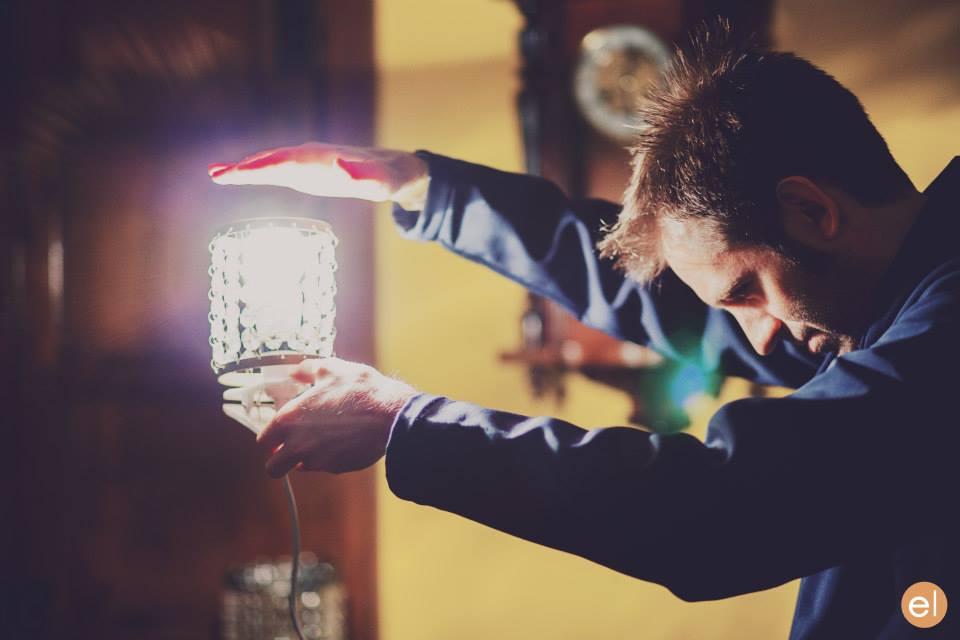
Setting up for the first living room scene. The crossed dedos can be seen in the top left and top right, while the dedo in the foreground is solely to produce lens flare.
Sophie and I had talked about various ways of softening the image. We considered hiring a black promist filter, but after rewatching Christopher Ecclestone’s season of Doctor Who, which appears to be have been entirely shot using a black promist, I decided the look was far too cheesy. In the end we went for a set of Zeiss lenses which had had their anti-flare coating ground off. We felt that lens flares would give some sparkle and magic to the images, as well as giving us the opportunity to soften the contrast in the image when necessary. The flares were usually created by an additional lamp, often a dedo or a battery-powered pag light held by Col, aimed directly at the lens.
When Mari enters, Kent has lit the fire, so Col and I set up our usual cluster of 100W tungsten bulbs covered with an orange gel and rigged to a dimmer board. With hindsight we could have gone much more orange with the gel and much more flickery with the dimmer board action, but since the fire at the location was a wood burning stove with only a very small window, it’s probably good that the source of the light remains ambiguous. For the close-ups, the cluster of four bulbs was rearranged into a straight line, which gave a lovely, soft underlight to the character’s faces.
Night Owls’ signature overhead shot. Sophie had a far more complicated shot planned, but it just wasn’t achievable with equipment we could afford.Shooting the top-down shot. The redhead in the centre of the image is providing lens flare. The white blob at the end of the C-stand arm on the left is a 100W bulb surrounded by a string-of-crystals lampshade.
A major scene later on sees the two characters lying top-and-tail on the floor, and was shot from a jib kindly provided by All Doors Lead Somewhere Productions. Overhead shots of people lying down can look very flat, but rather than trying to combat that with cross-lighting, I decided to embrace it and light entirely from above. Sophie and Anya Kordecki, the production designer, had found these great practical lights surrounded by strings of crystals, which cast lovely shadows. Knowing that two of these lights were supposed to be just out of shot on either side of frame, I took some license and rigged them one directly over each character’s face, replacing the 40W bulbs with 100W ones. This created a nice pattern of light and shadow radiating out from the faces. To add further contrast, I spotted two dedos up on the actors as well, one for each, gelled with half CTB, so that the centre of each radial pattern had a cooler, brighter circle of light. I decided to shoot on a white balance of 4,500K so that these centre spots would appear white and the radiating pattern would appear slightly orange.
When the characters sit up later in the scene, the two practical lights were almost perfectly positioned to provide cross-backlight. Again I used the dedos to produce the light that is supposedly coming from the practicals. I cheated Mari’s key light around quite a bit; it should really have lit the camera-right side of her face given where the practical was positioned, but we lost too much of her expression that way when she looked at Kent, not to mention that it didn’t look as aesthetically pleasing.
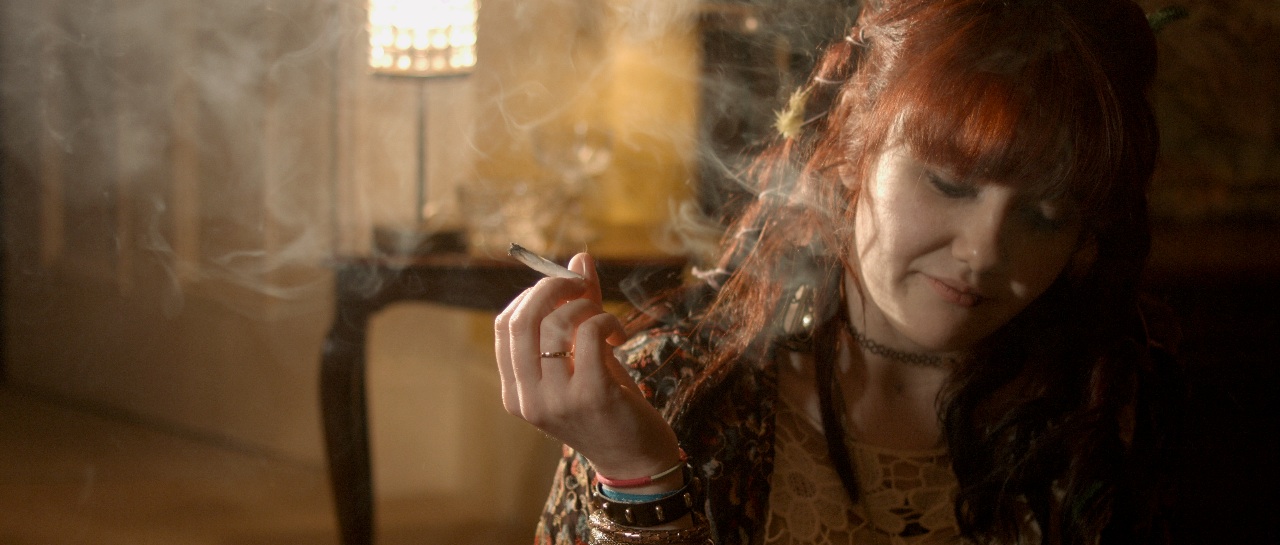
The film noir shot. A dedo out the rear left of frame provides the hot backlight, while Mari’s key is a second dedo also off left, but in front of her. A miniscule amount of fill is provided by another practical behind the camera.
I hadn’t been intending to use so much hardlight. I’d actually purchased a sheet of unbleached muslin prior to the shoot with the aim of rigging some kind of book light, and I almost did it for these sitting-up close-ups. But Sophie had asked for Mari’s close-up to have a film noir look, highlighting the smoke from her spliff, besides which the weed was bringing out some home truths for the characters, so it made sense to go with stark lighting. The dedos were perfect for this, with their intense, focused light showing up the smoke brilliantly when shone from behind, and spotlighting the actors when shone in from the side. The dark sides of the characters’ faces were lit by a tiny amount of light that’s genuinely coming from the practicals.
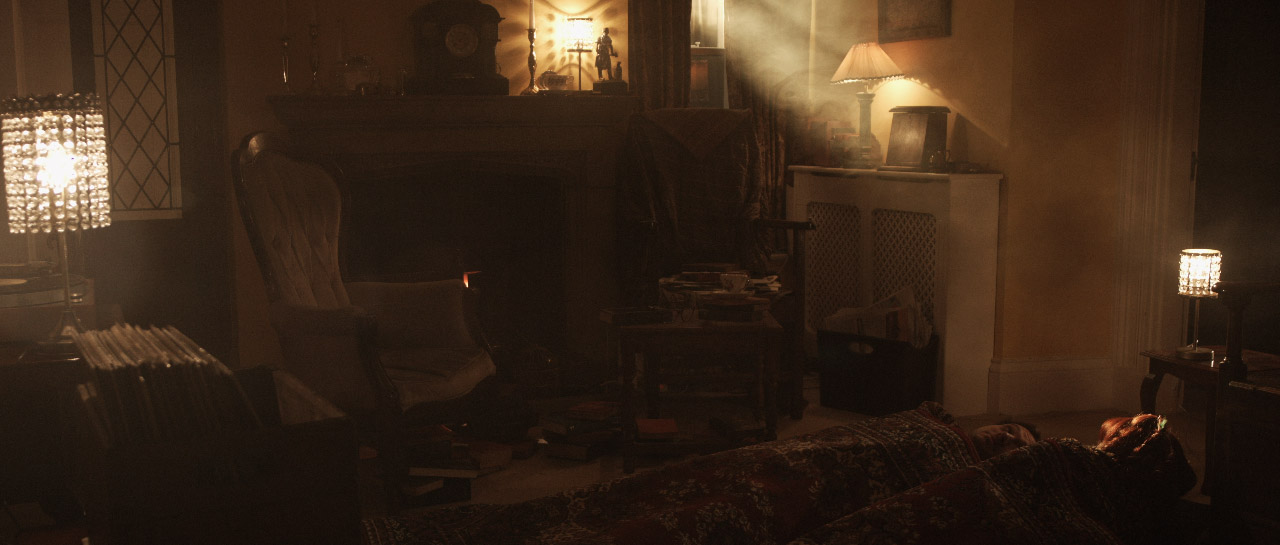
The sun – a 1.2K HMI – bursts through.
Near the end of the film, the sun rises, throwing a shaft of light into the room. This was supplied by the 1.2K HMI. With hindsight, cranking up a wind-up stand would have been the best way to create the rising effect, but we didn’t have one, so instead the lamp remained static and Col lowered a sheet of card to give the impression of the sun rising over the horizon. Copious smoke was used so that the beam of “sunlight” would show up on camera.
The 1.2K HMI backlights Mari and the rain, while Kent holds a practical just out of frame for key.
Night Owls is book-ended by doorstep scenes, the first set at night during a rainstorm, the other on a sunny morning. For both scenes I used the HMI as backlight. This was particularly neccesary for the night scene in order for the rain – actually created by a hosepipe – to show up. (For more on faking rain, check out this post.) At night I set my white balance to 3,200K so that the HMI would appear blue, suggesting moonlight, and in the morning I gelled the HMI with Light Straw and shot on a 5,600K white balance. Fill light was provided at night by the electric candelabra Kent was holding, and in the morning by a makeshift bounce card (a square piece of mountboard covered in silver wrapping paper) hidden from camera by Kent’s body, plus a blue-gelled redhead off to the side of the hall. When we turned round to shoot outdoors looking in, it was necessary to diffuse or dim the HMI, and to break up its light (which now looked very flat due to the lamp being so close to the camera) using tree branches.
That’s about it! Though I think I would do some things differently if I was shooting it now (more soft light, definitely), I’m still really proud of the film and the work I did on it. It’s very satisfying that Night Owls is now gaining the recognition it deserves. Don’t forget to check the film out here. And if you want to know more about the lighting set-ups described above, subscribe to my Instagram feed to see some lighting diagrams and behind-the-scenes photos over the next few days.
Images from Night Owls courtesy of Triskelle Pictures, Stella Vision and Team Chameleon. Produced by Sophia Ramcharan and Lauren Parker. Starring Jonny McPherson and Holly Rushbrooke.
Here’s my video breaking down the cinematography of episode two of Ren: The Girl with the Mark. This week I discuss lighting Ren’s house, tweaking wide-shot lighting for close-ups, and depth of field.
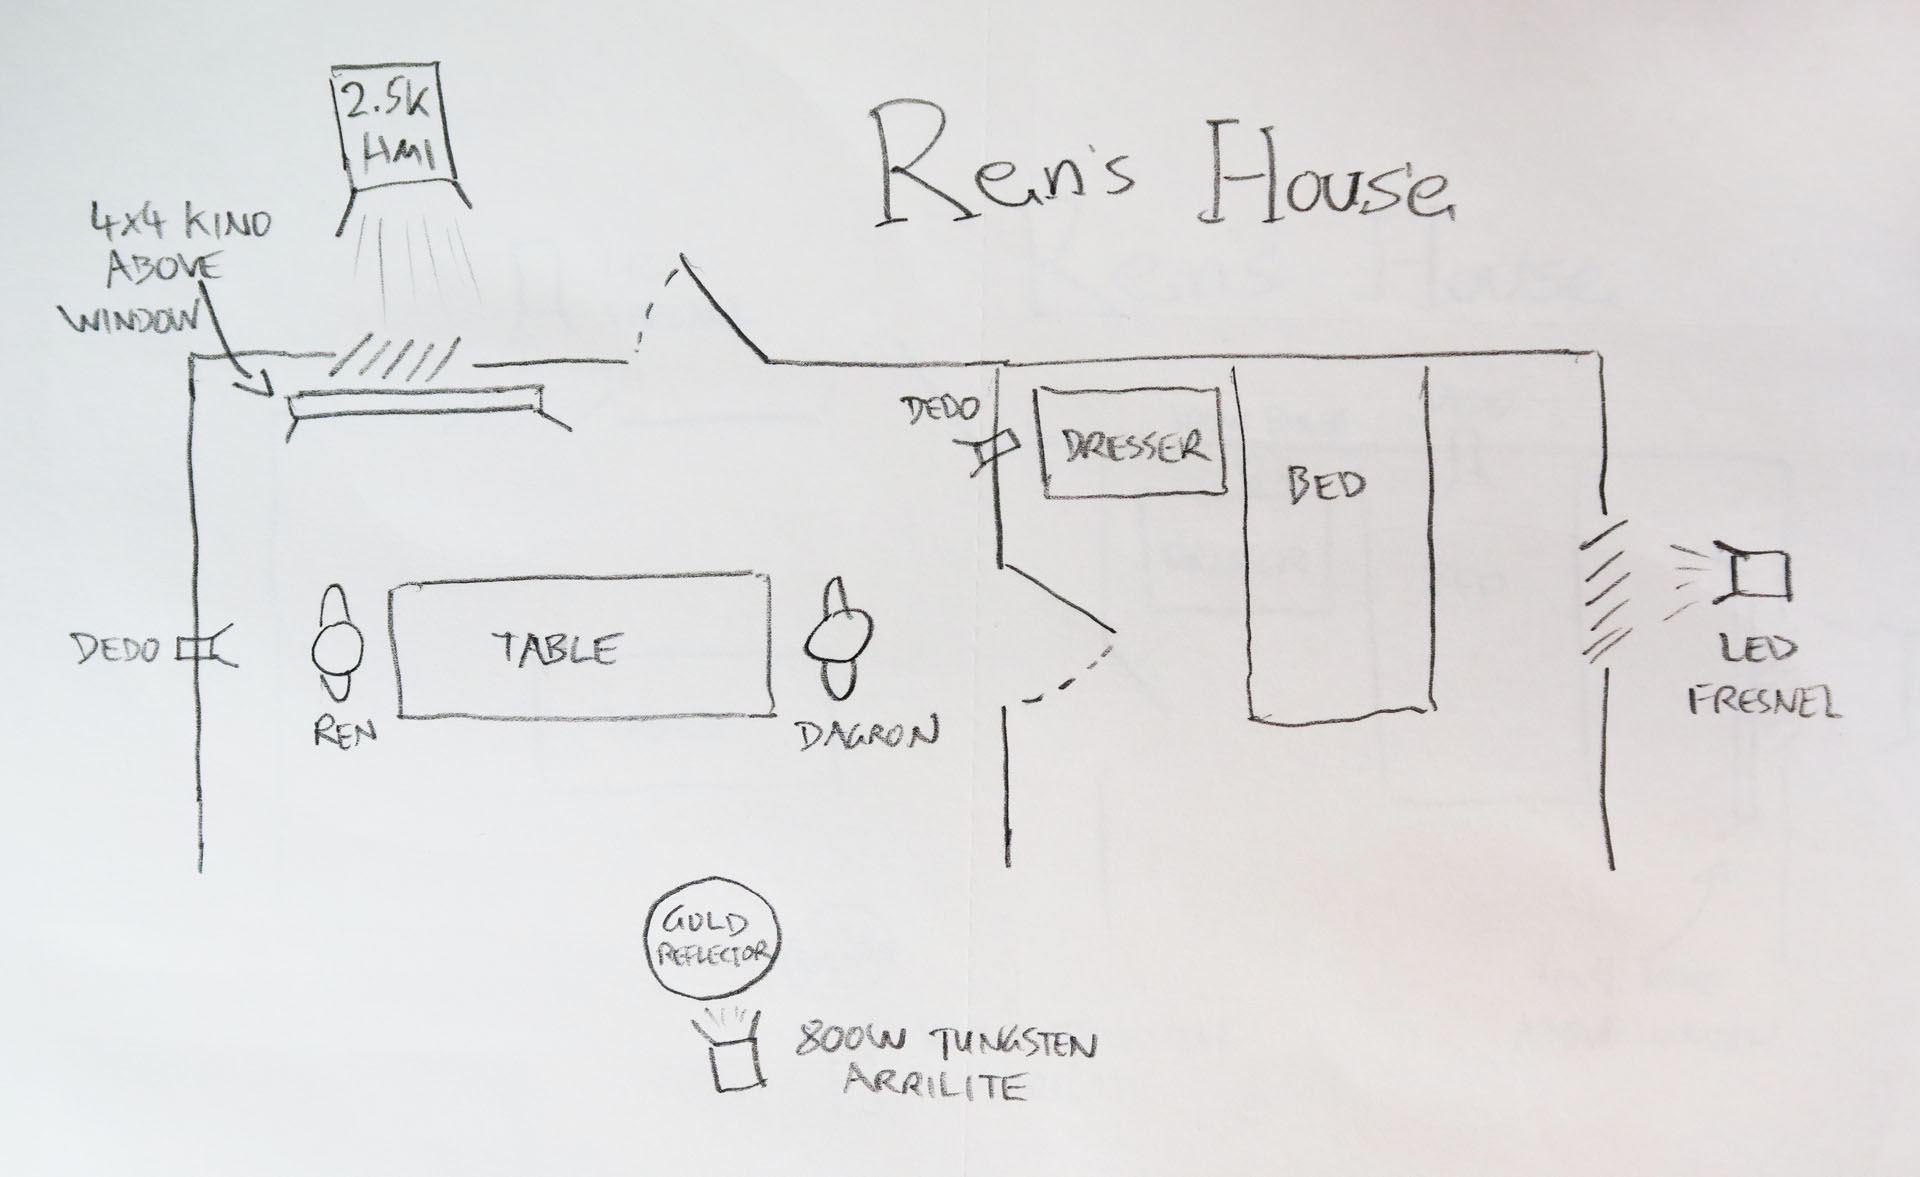
Here is the lighting plan for Ren’s house:
And here is a video blog from the set of Ren’s house:
Check back next Saturday for another instalment of Lensing Ren, and meanwhile watch the next episode of Ren itself from Tuesday at 8pm GMT at rentheseries.com
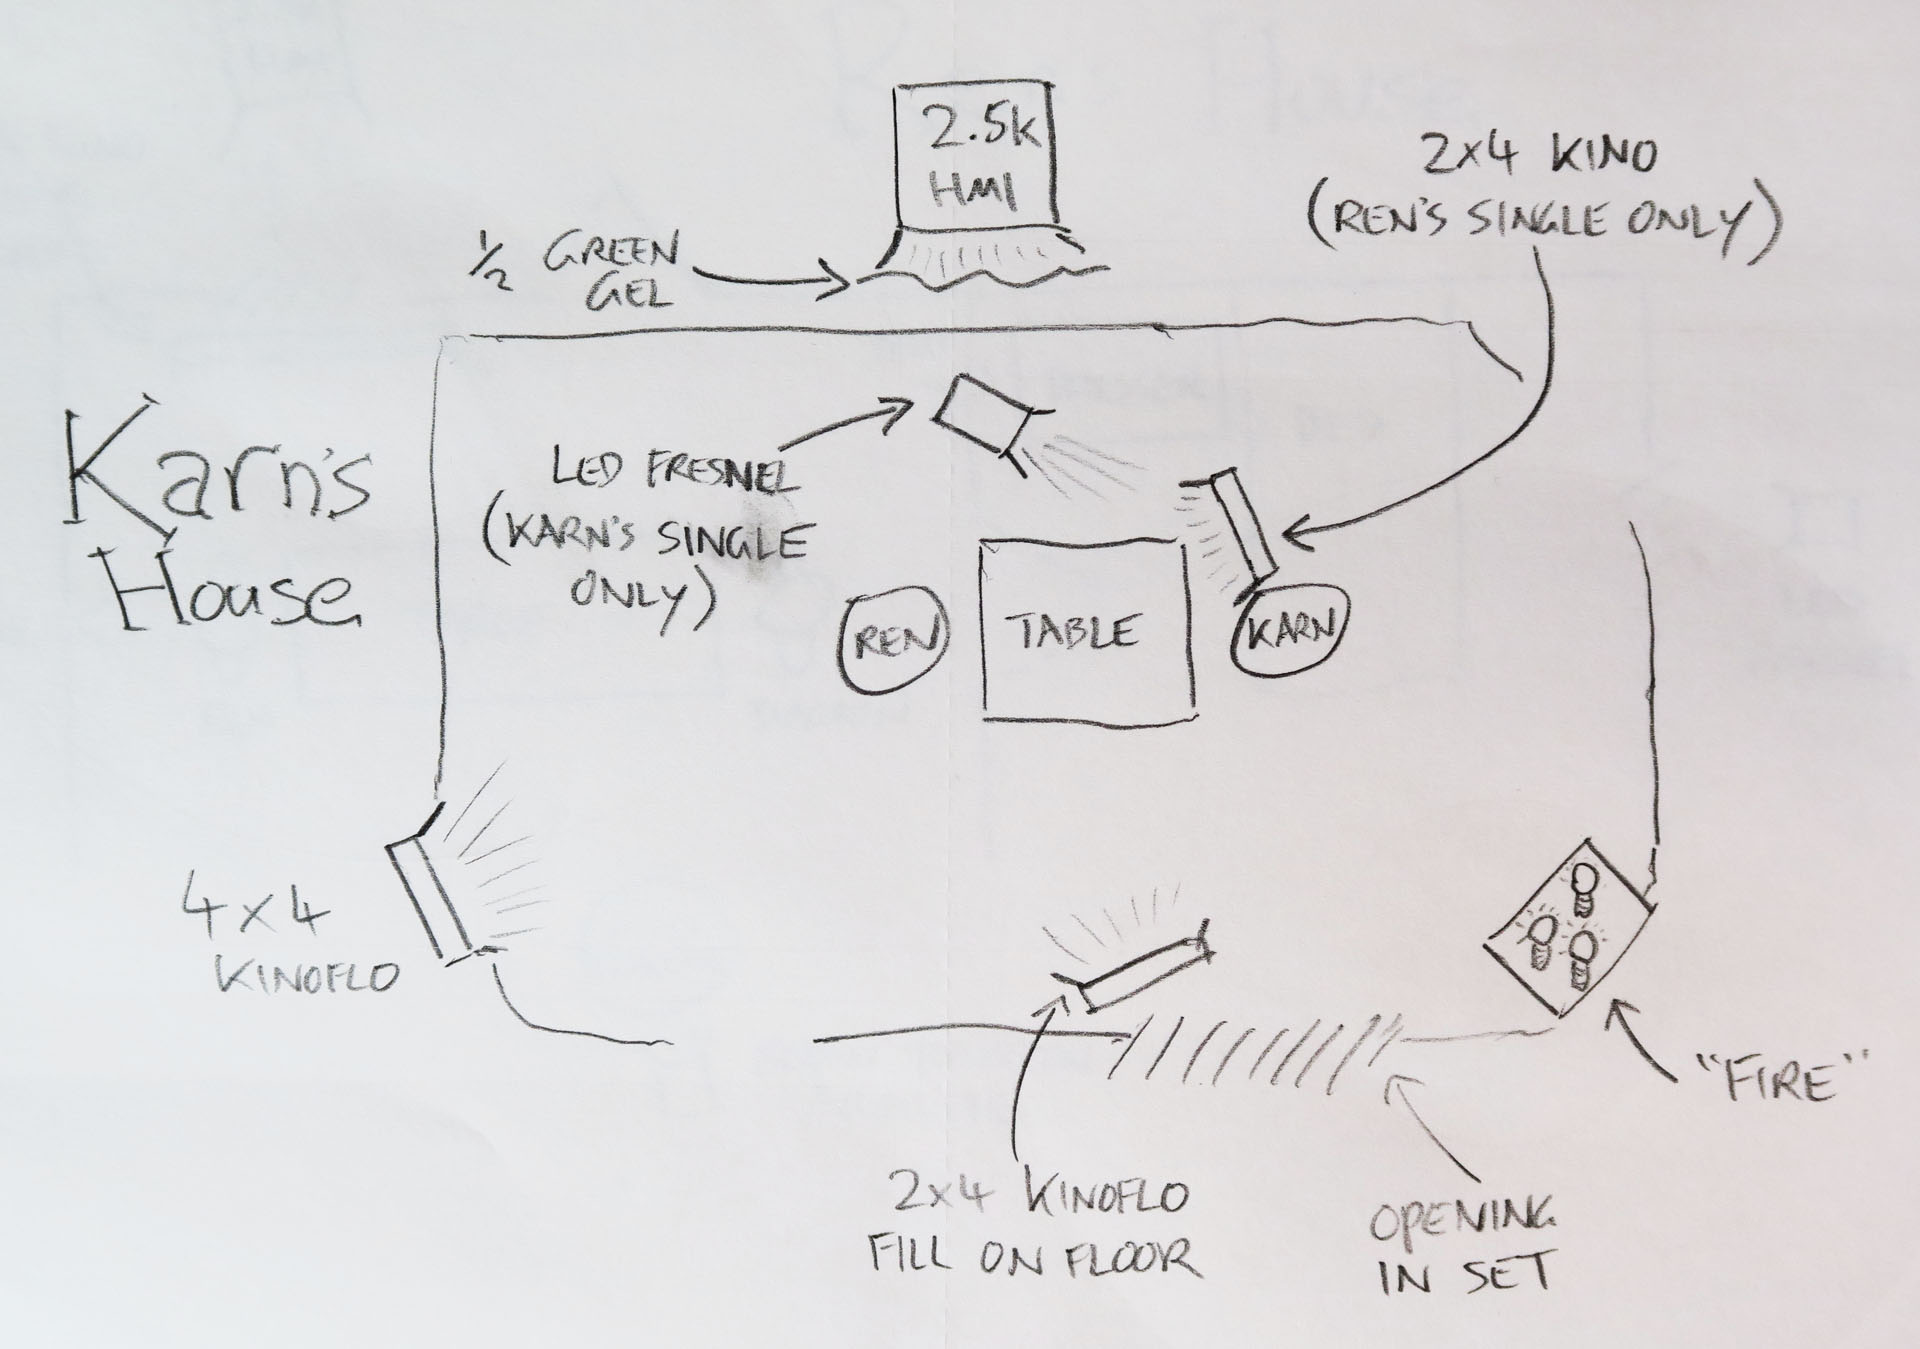
Here is the first in a series of cinematography videos I’m publishing to compliment the five episodes of Ren: The Girl with the Mark as they are released over the coming weeks. These videos will tell you the how, what and why of photographing the show. This week I discuss the camera equipment used, differentiating characters photographically, and lighting Karn’s magical woodland house.
Here is the lighting plan for Karn’s house:
And here is a video blog from the set of Karn’s house:
You may be interested to read my article on Masculine and Feminine Lighting, which gives some more detail on the techniques used to light Ren and Karn in the riverside scene.
Check back next Saturday for another instalment of Lensing Ren, and meanwhile watch the next episode of Ren itself from Tuesday at 8pm GMT at rentheseries.com
 Ever since digital cinematography became the norm, DPs have sought to counter the format’s perfection with characterful vintage lenses. Having just completed a feature film shoot, Hamlet, on Cooke Panchros and a Cooke 10:1 Varotal, I’m over the moon with the beautiful, creamy, organic look they brought to the production. However, I can’t deny that they have some disadvantages over modern glass which you should take into consideration before choosing the vintage approach.