Stop/Eject‘s producer Sophie Black gives us a virtual tour of the film’s locations, stopping off along the way to see the work of other filmmakers who have shot in the area. Featuring interviews with actors Georgina Sherrington and Therese Collins, and Yours Truly. Clips courtesy of All Doors Lead Somewhere Productions and Sam Jordan.
preproduction
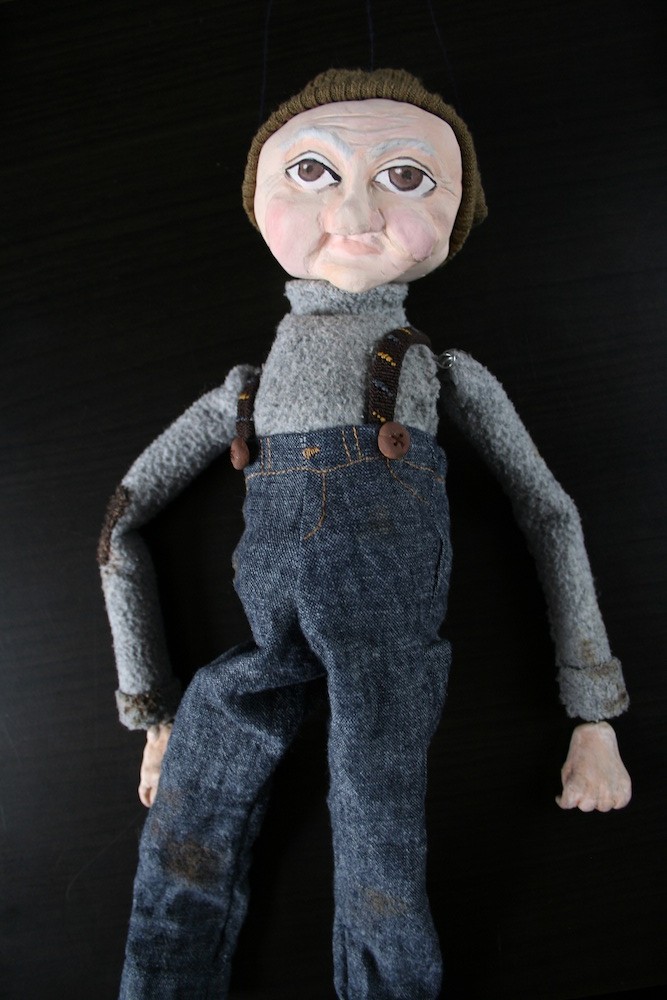
The Making of Henry
Guest blogger Katie Lake tells the story of how Henry Otto, the marionette star of The One That Got Away, came into this world. Click here to watch the film and please tweet about it to help us make the competition shortlist.

It started as a whim, a crazy idea. I have wanted to do a puppet film with Neil for a while. But if I couldn’t make a puppet, there would be no puppet film. No pressure.
I started with his head. I wound newspaper around metal wire that would become his controls, then covered the newspaper ball with a layer of air-drying clay, shaping his head, and face. I did a test with lights to see if I liked the shape I got (1).

I then made his body. This started out as a toilet roll tube, covered in papier-mâché, and his arms and legs were rolled up newspaper “beads”. I then painted them beige, and sculpted hands using more clay over wire. I fit the legs and arms with wire, and before I put him together this was how he was looking (2). I liked the big head, spindly legs and long arms. So together he went.
I made the start of a neck, and then painted his face. He now had an expression, a look, a character. I (hesitantly) fell in love with Henry when I first sculpted his head and face, but was really worried that I wouldn’t be able to do him justice with paint. Thankfully I was pleased with the results. And this is when I knew the name swirling around in my head, was the name he was going to be. There is something about him that reminds me of my maternal grandfather’s side of the family, so Henry is sort of an homage.

He then needed some clothes. Despite, or maybe because of my costume background, deciding what clothes to make for him was by far the hardest bit. In the end we decided jeans were a good place to start. I drafted a pattern in cloth, then altered it, and cut them out of an old charity shop skirt. I also gave him some hand stitched details around the waist. I temporarily strung him up, and tested out what we could get him to do. This was also his first camera test (3).

It was now that we realised he needed lateral head controls (one on either side of his head so we could make him look left and right). Oops. I attached lateral controls to the outside of his head as I didn’t want to risk drilling, so he now needed a hat or wisps of hair to hide the wire. He also needed a top, and boots.

Enter Jo Henshaw, who kindly offered to come and help out. She helped finalize costume design decisions, and made him his cute beanie (out of an old sleeve) and started his sweater (out of an old sweater) (4).
I made boots (out of more toilet roll tubes cut and bent, glued into shape and then papier-mâchéd, and then painted black) (5). I should also mention stop-motion animator Emily Currie, another helpful volunteer, who used her expertise to ensure the lateral controls stayed put.
Henry’s sweater was then sewn onto him, covering the multiple pieces. I kept the arms separate for greater movement. I finished him off with braces made out of old shoe laces, made buttons out of clay which I painted brown, sewed a patch onto his arm from an old scrap and aged his costume with some brown and black paint.
Lastly I strung him up using extra strong navy thread. The T bar I made using a piece of flat doweling, some screw eyes (upcycled from old curtain rings) and nails to make the cross bars removable. And Henry was ready for his debut (6).
You can visit Katie’s blog at www.katiedidonline.com. To find out what Henry’s up to, why not befriend him on Facebook?
Tomorrow I’ll look at the camera and lighting techniques used to shoot the film.
Top Ten Crowd-funding Tips

To finish my look back at the decisions, successes and failures of the Stop/Eject crowd-funding campaigns, here are my ten top tips based on the sum of our experiences on this project:
- You need “elements” – aspects of the project which have an existing audience base, such as a name actor or a director with a strong social media following. Sometimes people will donate because the film is being shot in their home town, or maybe it’s about a subject they have an interest in. Whatever it is, figure out where that existing audience base is and what they want, and create your rewards and promotions accordingly.
- Work out in advance how much your rewards will cost to produce, and reject any that aren’t cost or time efficient. I suggest they should consume no more than ten percent of your budget.
- Make your pitch video professional – tightly edited, well lit, well shot and with broadcast quality sound. No-one will sponsor a filmmaker who can only be bothered posting a five minute ramble shot on a webcam. Your “elements” should appear in the video.
- Whether building your own crowd-funding platform or using an existing one, make sure it’s extremely quick and easy to donate, with a minimal number of clicks.
- A longer campaign doesn’t necessarily mean more money raised, but it does mean more work for you promoting it.
- If you take a day off from promoting your campaign, people will take a day off from donating. You cannot sit back and expect the money to roll in. It doesn’t work that way.
- Keep reminding people about your campaign, but do it indirectly by publishing new content like blogs, behind-the-scenes videos or storyboards. Most sponsors will have to see your campaign several times before deciding to donate.
- The internet isn’t the only way to promote your campaign. Go to events in the real world and plug it. Take a donations bucket or hand out cards or flyers with the campaign address on.
- Make people feel involved in your project, both during and after crowd-funding. Run competitions, invite feedback on things like poster designs, issue updates and answer questions.
- The endorsement of a well-recognised person or entity can give your campaign a massive boost. BBC Midlands Today putting a Stop/Eject report on their Facebook page worked for us, but the holy grail is getting a celebrity to retweet your campaign link.
If you’re still hungry to learn more about crowd-funding, check out James J. Heath’s Top 5 Crowd-funding Mistakes and Indiegogo’s Field Guide.
(Links to previous parts of the evaluation: part 1, part 2, part 3, part 4, part 5, part 6, part 7.)
Crowd-funding Evaluation Part 7: Promotion and Engagement
(Links to previous parts of the evaluation: part 1, part 2, part 3, part 4, part 5, part 6.)

The single biggest tool we had to promote our second fundraising campaign for Stop/Eject was the trailer. This was followed by a crowd-funding pitch in the same video file, so as soon as people had been wowed by the trailer, they found out how to get involved and support it, wherever that trailer was screened or embedded. There are lots of tips on editing trailers in a blog post I wrote last year.
You can’t just post on Facebook every day of your crowd-funding campaign (particularly if it runs for eight months as ours did) asking for money. You have to find other ways to remind people of the project’s existence without directly holding out your begging cap.
One way to do this is through uploading content like blogs and behind-the-scenes videos. As previously discussed, our system of public rewards hampered this to some extent, but we still blogged regularly about the project’s progress, also updating people via the Facebook page, Twitter and emails to the sponsors. Any time we did any interesting work on the film we took photos or video and shared them with the community we were building.
Speaking of community, you have to nurture it by allowing them to engage with the project. For example, we ran a poster design competition and later invited the public to submit interview questions to be posed to the cast.
Whenever we needed additional crew, those shout-outs served not only as a form of crowd-sourcing but also as promotion of the crowd-funding.
You shoudn’t neglect “real world” promotional opportunities. I gave a couple of talks about Stop/Eject during the campaign, each time encouraging audiences to donate. It’s best to provide a bucket for cash by the exit, because if you tell people to go home and donate online, the vast majority of them will forget.
Georgie helped a lot, making her fanbase aware of the campaign, and we tried to seek out Worst Witch sites and communities to post on too. In fact all of the cast and crew helped to spread the word.
We discovered it was the 50th anniversary of the invention of cassette tapes halfway through our campaign, but too late to do much about it except get interviewed on BBC Radio Hereford & Worcester. Sophie and I also managed to get some local newspaper coverage, but our biggest coup was Sophie’s appearance on BBC East Midlands Today. That didn’t lead directly to any donations, but a Stop/Eject article on a website about Matlock, one of the towns we shot in, did lead to a few.

The final part of my evaluation will take the form of ten top tips for crowd-funding, based on our experiences with Stop/Eject. Watch this space.
Crowd-funding Evaluation Part 6: Elements and Sponsors
(Links to previous parts of the evaluation: part 1, part 2, part 3, part 4, part 5.)
One of the key lessons learnt from Stop/Eject‘s first crowd-funding campaign is that people don’t tend to donate unless they have a pre-existing connection to some element of the project, e.g. they know the filmmaker, it’s being shot in their home town, it has an actor in it they like, or it’s about a subject they’re interested in. That first campaign was very much dependent on people knowing me and wanting to support me, as we had no other “elements” at that stage.

When, a week prior to shooting Stop/Eject, we cast Georgina Sherrington in the lead role, the last thing on our minds was crowd-funding. But her cult status as the former child star of ITV’s The Worst Witch provided a new “element” when we came to launch our second campaign.

We found that sponsors of the second campaign generally fell into two camps: Georgina Sherrington fans, and sponsors putting in larger amounts who were either doing so purely philanthropically or who wanted custom rewards to help them with their own filmmaking endeavours. Other than these custom requests, the rewards aimed at filmmakers were unsuccessful (most of them got zero sales, so aren’t included on the above graphs), proving beyond a doubt that I was not the major “element” in this second campaign.
The “Memoirs of the Worst Witch” reward was added after our campaign had already been running for a few months and the total had been stuck for a while around the halfway point. It was a download of a 20 minute interview with Georgina about her time on The Worst Witch, and it turned out to be one of the most popular rewards in terms of units sold.

In an effort to combat the disadvantages of a campaign without a deadline (see part 5), we introduced “Collections” – groups of four new rewards that were only available in limited numbers and for a limited time. These helped keep awareness of the campaign up, but didn’t bring much money in.
In general, several of the rewards required a ridiculous amount of time (and in some cases money) to produce in relation to the amount of sponsorship they brought in, most notably the glossy photo books. If I had to run this campaign all over again, I’d offer a smaller number of rewards, and most of them at the lower price breaks (£10-£50), with just a couple of suggestions for custom rewards at maybe £100 and £200.
Next time I’ll talk about how we promoted the campaign and engaged with the audience, before summing up my overall thoughts and feelings on crowd-funding Stop/Eject in the eighth and final part.
Crowd-funding Evaluation Part 5: Setting up the Second Campaign

In January of last year, following the successful completion of Stop/Eject‘s preproduction crowd-funding campaign, I posted a series of four blogs evaluating the campaign. I’m now going to extend this to the postproduction campaign, once again looking at the choices we made, good and bad, and the lessons we learnt.
We knew we didn’t want to use crowdfunder.co.uk again, because it required an off-putting number of clicks for people to donate – so one of the first discussions we had was about what platform to use instead. We quickly ruled out the “all or nothing” sites. Now that the film was in the can, the important thing was to get at least some money to finish it with; the possibility of getting none at all was too risky.
My intial thought was to use Sponsume, but producer Sophie Black and my wife Katie both believed we needed to try something completely different. In the end we decided to run a campaign with no deadline, since it didn’t matter how long it took to finish the film.

We also came up with the idea of “public rewards”, so that as well as individuals receiving (for example) DVDs or premiere tickets when they donated, additional rewards would be published online for every £100 the total went up. These mostly took the form of video podcasts documenting the shoot, though a few were special blog entries breaking down the production design, lighting or budget.
As for the individual rewards, I decided to offer two options at most of the price breaks: one related to Stop/Eject, and one aimed at other filmmakers – since they had made up a significant proportion of the sponsors in the first campaign. The former type included the obvious things like DVD or Blu-ray copies of the film, invites to the premiere and glossy photo books. The latter type included a budget breakdown of my last feature film, script feedback or storyboards for your project, homemade sandbags for weighing down lighting stands, and a Skype chat with yours truly.
The public rewards and the lack of a time limit meant that no existing crowd-funding platform was suitable, so I had to knock up our own website – www.stopejectmovie.com – with a bit of simple Flash and PHP scripting and some Paypal buttons. One advantage of doing this is that only Paypal are taking a cut of the money, but a disadvantage is that a visitor to the site has less reason to trust that everything is above board.
We launched the campaign in late May of last year, with a target of £1,500. This was simply the amount we needed; it wasn’t compromised by any considerations of how much we thought we could raise.

I’m not convinced that public rewards were a good idea. When the total got stuck for a long time we were unable to use what could have been our best tool to encourage donations – releasing a podcast – because we had set up this system of releasing them only when people did donate. On the other hand, there was a knock-on effect whereby one donation would trigger the release of a public reward which would in turn trigger further donations.
I’m not sure a campaign without a deadline is something I can recommend either. In fact, I’ve since read that there’s statistical evidence showing that longer crowd-funding campaigns do not raise more money than short ones. Without the urgency of a looming deadline, many potential sponsors will say to themselves, “I’ll get around to that later,” and never do. There is also the risk that people will get fed up of being tapped for cash repeatedly over a long period.
In the next instalment I’ll look at who donated and why.
Stop/Eject Production Budget Breakdown

This post has been created and published because the total raised in Stop/Eject‘s post-production crowd-funding campaign has passed the £1,100 mark. I’m going to look at how the money you all contributed in pre-production was spent in order to get Stop/Eject in the can.
Stop/Eject was originally meant to be filmed in autumn 2011 under the auspices of another production company. Prior to the project’s postponement and subsequent resurrection as a crowd-funded movie, Sophie and I spent some money on set dressing (£149.76), costumes (£206.20) and travel (£60). We absorbed these costs personally and they’re not included in the budget.
 Download the budget here as a PDF (34Kb).
(If you don’t follow my blog regularly, you may wish to check out the following resources first so you have a clearer picture of the project I’m discussing: the trailer, a blog post summarising how the shoot went, an evaluation of the shooting schedule, a playlist of behind-the-scenes videos from the shoot. Stop/Eject was a twenty page script that took five and a half days to shoot.)
As you can see, the crowdfunder.co.uk campaign was the main source of income, although a significant amount was donated after this campaign closed, in cash or via the Paypal button I had on this website for a while. Two of the three Soul Searcher lectures were failures, with few or no attendees; only the Derby lecture (done as part of a Five Lamps Film Night) took more cash than it cost me to travel there. Selling Benedict Cumberbatch’s costume from The Dark Side of the Earth’s pilot was the last part of the pre-production funding jigsaw.

Moving onto the expenditure, the first thing you have to do with any type of fundraising is deduct the costs involved in that fundraising process – in this case crowdfunder.co.uk’s fee and the production and postage of the rewards/perks for sponsors. These costs represent less than 8% of the budget, which I think is pretty good value.
Under pre-production you can see that more props and costumes were purchased in 2012, in addition to those we’d already bought in 2011. The total costumes outlay across the two years was £407.94, making it one of the largest costs of the production. This was due to the high number of story days in the script (eleven), each of which required a new outfit. A significant chunk of the props budget went on 400 cassette cases for the scene in the Tape Archive, while the construction materials included the wood and antique doors which the alcove set was made from. Auditions were held at Conway Hall in Holborn, London, owned by the very strange but pleasingly cheap South Place Ethical Society.

Travel is the biggest expense under production and indeed for the entire project, totalling £1,049.49 if you include the van costs and the pre-production and 2011 costs, even though some of the local crew waived their mileage and parking expenses. The high travel expenditure was partly due to many key cast and crew members living at least a two hour journey away from where we were filming, but even on more local projects I’ve often found that travel can be the most expensive element (assuming you’re not paying anyone fees). Hiring the van was relatively cheap in the grand scheme of things, and was worth every penny and more. Without it we couldn’t have moved the alcove set or some of the larger props around, and squeezing all the equipment into cars would have been a nightmare.
I was very surprised how little we spent on food and catering. £248.33 fed about ten people for five and a half days. Many of the meals were cooked in advance, frozen and reheated on set or cooked from scratch on set by Katie or Debs, but we bought takeaways for everyone on at least two occasions. That figure also includes supplies like plastic beakers, disposable plates, bowls and cutlery and a thermos flask. We borrowed a fridge and a hotplate and brought our own microwave along.
When drawing up a new budget for Stop/Eject after its initial postponement, accommodation seemed like a killer cost that might prevent the film from ever being made. Research indicated that I could expect to pay around £2,000 to hire a holiday cottage large enough to house everyone for a week. As it turned out, we found Magpie, not only a brilliant location for the shop and many other settings, but also a place where some of us could stay (albeit in less than ideal conditions). The owner asked just for a token amount to cover the utilities costs, and with Sophie’s spare room also put to good use we only had to hire one hotel room for one night.
If you’re wondering where I got the public and employers’ liability insurance from, the answer is Essex Insurance Brokers. They specialise in short-term policies for low-budget filmmakers and you can get a quote and activate a policy in just a few minutes using their web form. If that sounds like a blatant advert, let me counter it by saying they were utterly unhelpful and a bit rude when I tried to get insurance for The Dark Side of the Earth‘s pilot from them.

Finally, a word on the stuff we didn’t spend money on. None of the cast and crew were paid, which caused lots of stress and hassle in the month leading up to the shoot as several crew and both lead actors pulled out in order to do paying work that clashed. As a result I’ve sworn never to do anything again but simple little one-day shoots unless I can afford to pay people. Feel free to remind me of this if I ever seem to be going astray. We also spent nothing on equipment hire. Most of it (camera, lenses, tripod, dolly, shoulder rig, smoke machine) was mine and the rest of it was borrowed. Thanks to Steve Lawson for loan of the jib, Colin Smith for the Glidecam and additional lights, The Rural Media Company for an additional light and some sound kit, and Ian Preece for the sound recorder.
When all the figures were totted up, I was as shocked as anyone to see we’d come in more than £400 under budget. This meant we were able to set our post-production crowd-funding target at £1,500 rather than the £2,000 we had planned. We’re now less than £400 away from that target, so please help us get there by toddling over to stopejectmovie.com and hitting Donate. And if you’re curious to know how the budget of a indie feature film breaks down, choose the £10 “Line Producer” reward and you’ll get a full and detailed analysis of Soul Searcher’s monetary ins and outs.
The Role of a Script Editor
Here’s a video blog I recorded last year at the Cannes Film Festival. It’s an interview with Quay Chu, who served as script editor on my in-development fantasy feature The Dark Side of the Earth for several months. He talks about his role and gives some examples of how he helped me to shape the script.
Remember that you can get feedback on your own short screenplay, and help me to finish my current short film Stop/Eject, by visiting stopejectmovie.com/donate and selecting the £20 “Script Editor” reward.
Ghost-trainspotting: The Script
You can now download the script for Ghost-trainspotting, my Virgin Media Shorts entry for this year.
Download Ghost-trainspotting script (.pdf, 61kb)
Oliver Park Interview
A new Stop/Eject behind-the-scenes video has been released, featuring an interview with leading man Oliver Park.
Thanks to Sophie for editing this video. You can visit Oliver’s website at oliverpark.co.uk and remember you can watch the trailer for Stop/Eject and help the film get completed over at stopejectmovie.com