Forced Perspective

The Ark
The Ark

The other day I watched a 1966 Doctor Who story called The Ark. It’s easy to look at a TV show that old and laugh at the stilted acting, rubber monsters and crude effects. But given the archaic and draconian conditions the series was made under back then, I can only admire the creativity displayed by the director and his team in visualising a script which was scarcely less demanding than a contemporary Who story.

Studio floor plan from the very first episode of Doctor Who, showing camera positions (coloured circles)

In the sixties, each Doctor Who episode was recorded virtually as live on a Friday evening, following a week of rehearsals. BBC rules strictly limited the number of times the crew could stop taping during the 90 minute recording session, which was to produce a 22 minute episode. Five cameras would glide around the tightly-packed sets in a carefully choroegraphed dance, with the vision mixer cutting between them in real-time as per the director’s shooting script. (Interesting side note: some of Terminator 2 was shot in a very similar fashion to maximise the number of angles captured in a day.) It’s no wonder that fluffed lines and camera wobbles occasionally marred the show, as there was rarely time for re-takes.

But what’s really hard for anyone with a basic knowledge of visual effects to get their head around today is that, until the Jon Pertwee era began in 1970, there was no chromakey (a.ka. blue- or green-screening) in Doctor Who. Just think about that for a moment: you have to make a science fiction programme without any electronic means of merging two images together, simple dissolves excepted.

Setting up a foreground miniature for a later Who story, Inferno (1970)

So the pioneers behind those early years of Doctor Who had to be particularly creative when when they wanted to combine miniatures with live action. One of the ways they did this in The Ark was through forced perspective.

Forced perspective is an optical illusion, a trick of scale. We’ve all seen holiday photos where a friend or relative appears to be holding up the Eiffel Tower or the Leaning Tower of Pisa. The exact same technique can be used to put miniature spaceships into a full-scale live action scene.

In these frames from The Ark, two miniature landing craft are lowered into the background before the camera pans to a full-size craft in the foreground:

The camera pans from a miniature descending in the background to a full-scale craft in the foreground.

And in these later frames, another miniature craft is placed much closer to the camera than the Monoid (a.k.a. a man in a rubber suit). The miniature craft takes off, pulled up on a wire I presume – a feat which time, money and safety would have rendered impossible with the full-size prop:

The camera pulls focus from a foreground miniature taking off to an actor in the background. A greater depth of field would have made the shot more convincing, but  the principle is sound.
The camera pulls focus from a foreground miniature taking off to an actor in the background. A greater depth of field would have made the shot more convincing, but the principle is sound.

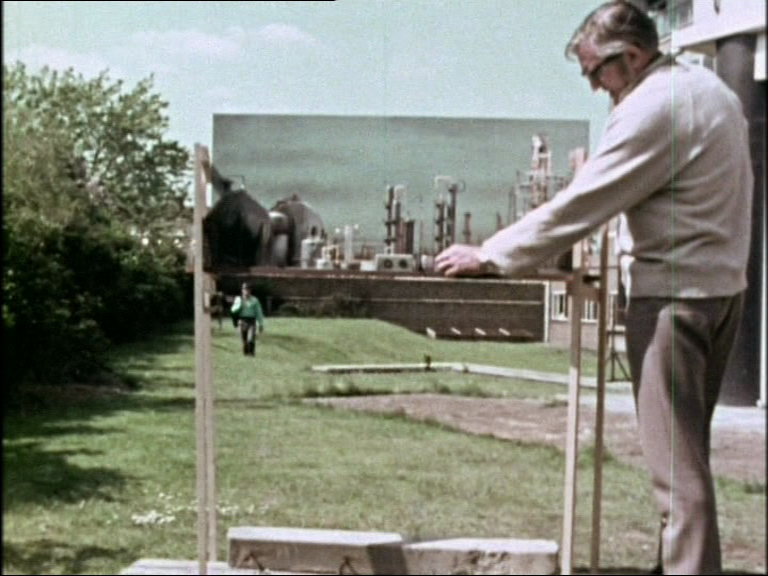
Of course, Doctor Who was not by any means the first show to use forced perspective, nor was it the last. This nineties documentary provides a fascinating look at the forced perspective work in the Christopher Guest remake of Attack of the 50 Ft. Woman, and other films…

And Peter Jackson famously re-invented forced perspective cinematography for the Lord of the Rings trilogy, when his VFX team figured out a way to maintain the illusion during camera moves, by sliding one of the actors around on a motion control platform…

So remember to consider all your options, even the oldest tricks in the book, when you’re planning the VFX for your next movie.

Forced Perspective

Soul Searcher: Low Tech FX

In this 2005 featurette I break down many of the visual effects in my feature film Soul Searcher, revealing how they were created using old school techniques, like pouring milk into a fishtank for apocalyptic clouds. Watch the shots being built up layer by layer, starting with mundane elements like the water from a kitchen tap or drinking straws stuck to a piece of cardboard.

Soul Searcher: Low Tech FX

Managing Visual Effects Without a Budget

Stages of the basement shelves replication effect by Mary Lapena
Stages of Stop/Eject’s basement shelves replication effect by Mary Lapena

Stop/Eject is my fourth major project to include visual effects, and also the fourth where it’s been a struggle to get all the visual effects done. As any micro-budget filmmaker knows, it’s par for the course for some cast and crew to pull out, sometimes without warning or explanation, and VFX artists are no exception. On Soul Searcher, for example, I needed a CG artist for the 80+ shots featuring “spectral umbilical cords”. Four artists started the work and then quit, citing various excuses from exploding PCs to miscarriages, before the fifth delivered the goods.

Stop/Eject has a surprising 31 VFX shots (most of which you’d never know were VFX shots), of which the twelve simplest were handled by me and Miguel, the editor. With the remaining nineteen needing to be outsourced, how did I apply what I’d learnt from my previous projects?

  1. I advertised for multiple artists, knowing from Soul Searcher (and before that The Beacon) that relying on a single person was not a good idea. More than half the people who agreed to work on Stop/Eject never completed a single shot.
  2. I created and uploaded zip files to my webspace for each shot. Each zip contained all the footage and information needed for that shot. This way if an artist dropped out, it was quick and easy for me to point another artist to that zip file to take over the shot.
  3. I re-advertised regularly. Beware that the law of diminishing returns applies here: each ad will reap fewer responses than the last.
  4. I assigned the most difficult shots first. That way the shots that are left at the end when the reliable artists are all burnt out and your adverts are getting no responses are – in theory – the easy ones which you can just about do yourself.
  5. I regularly checked in on the artists’ progress. If I didn’t get a reply within a couple of days, I’d assume that the artist had dropped out and I’d re-assign their shot to someone else. Harsh, but necessary.
Another of Stop/Eject's FX shots, this one by Dominic Stephenson
Another of Stop/Eject’s FX shots, this one by Dominic Stephenson

I want to say a huge thanks to those artists who came through for the project: David Robinson, Mary Lapena, Matt Collett, Eranga Mudiyanselage, Dominic Stephenson and Naveed Aftab. You all worked incredibly hard and produced fantastic results – you should be proud of yourselves.

Finally, a few technical points about our workflow, for anyone interested in such things. We shot on a DSLR, so the source footage was in H.264, a format that due to its structure cannot be trimmed without losing a generation. So I supplied the VFX artists with the entire take (along with details of the in and out timecodes of the piece used in the edit) and asked them to deliver their finished shots as 16-bit TIFF sequences. This ensured that we would lose zero quality. The downside to this workflow is that there is a danger of errors being made with the timecodes, leading to a shot not being long enough when you go to conform the edit…. Yes, that happened. There must be a better way. What’s your workflow for DSLR projects with VFX?

Managing Visual Effects Without a Budget

More Random Updates from the World of Stop/Eject

Here are some more disjointed updates from the post-production of Stop/Eject:

Scott Benzie has written all of the score now. A few cues just need tweaking before we start to think about the logistics of recording it with live players.

The ADR session has been organised for next week. Standing variously for Automated Dialogue Replacement or Additional Dialogue Recording, ADR is the process of dubbing lines because of intrusive background noise or to adjust a performance, or even to add entirely new lines to clarify story points. This will be the first time the principal cast have been reunited since the shoot almost a year ago, and we’ll be taking the opportunity to record some extra bits and pieces for podcasts, DVD extras and sponsor rewards. Lots more news on that to come in the near future.

A VFX shot in progress by Mary Lapena

Work is well underway on visual effects. As expected, there has been a certain amount of attrition amongst the VFX artists, as paying projects understandably take priority. Nonetheless, several key shots involving frozen time and cloned cassette tapes are finished or nearly finished.

The opening and closing titles are being designed by Andy Roberts of speakersfive, who recently laid out the lovely illustrated script books for sponsors.

Two of the main extra features for the DVD and Bluray are near completion, with work on the menus underway and some commentaries to record in the coming weeks. Sophie Black and Chris Newman will soon be shooting another featurette in their part of the world, along with a last couple of pick-ups for Stop/Eject itself.

On Sunday I gave a talk about the whole process of making the film to the lovely folks at CEMRIAC in Worcester, and next Monday The Courtyard in Hereford will screen the trailer as part of Borderlines Film Festival.

In a nutshell, it’s all happening.

More Random Updates from the World of Stop/Eject

Planning VFX: Traditional Techniques

Over a month ago I wrote a post about the advantages of computer generated imagery over more traditional ways of creating visual effects. Apologies for the delay, but here at last is the flipside of that coin: the advantages of old-school technqiues.

Here’s an alternate ending from Blade (1998)….

It was ditched after test audiences responded poorly to it. They had invested in the film’s villain throughout the movie and they felt cheated to see him turn into a CGI blobby thing for the final battle. The filmmakers cut the scene and replaced it with a sword duel between Blade and the baddie in human form.

This highlights CGI’s chief difficulty – it’s unreality. There is something disappointing about being served up an image that has been created with ones and zeros. It feels like a cheat. And that can take an audience out of the story.

In contrast to CGI, model shots tend to look more realistic but move less realistically, due to the unavoidable physics involved. But there can often be a charm to this motion that allows us to forgive it. Indeed, I think the best reason to use traditional effects today is when you want things to look unreal in a very appealing way. Take for example Lemony Snicket’s A Series of Unfortunate Events, which used forced perspective and painted backdrops to create a beautiful fantasy world. Or The Life Aquatic’s stop motion marine creatures…. except that the animation was so good they looked real.

Some other advantages of traditional techniques over CGI:

  • Some techniques, like puppetry, can be achieved in camera, giving the actors something real to react to.
  • All the randomness of nature is automatically built in.
  • Effects like fire and water are theoretically easier, though in practice can be difficult to control and to scale correctly.
  • Today’s audiences are used to CGI and can generally recognise it, but model shots are perhaps more likely to fool them.

In writing this post I’ve realised how CGI has advanced even in the few years since I stopped actively developing The Dark Side of the Earth (an ambitious fantasy feature intended to include stop motion, puppetry, miniatures and matte paintings).

Almost no-one today is still shooting miniatures without enhancing them digitally. Savvy filmmakers like Peter Jackson, Duncan Jones and Sam Mendes combine models and CGI to get the best of both worlds. It seems traditional techniques alone can really only be used now as a deliberate stylistic choice. That saddens me. I’d be delighted if anyone can prove me wrong.

If anyone out there is contemplating using miniatures in their indie film, here are some tips…

Planning VFX: Traditional Techniques

Planning VFX: Computer Generated Imagery

Following on from last week’s thoughts on planning VFX shots, I’m now going to look at the issue of CGI vs. miniatures. In this post I’ll cover some of the advantages of choosing computer generated imagery, and next time I’ll look at the advantages of miniatures. As any regular readers will know, I much prefer miniatures, but I aim to be completely impartial in what follows.

To start off with let’s go back 20 years to Jurassic Park, the movie that really started the CGI revolution, and find out why Steven Spielberg chose this emerging technology over traditional techniques. (Skip to 13:12.)

So Spielberg favoured CGI because it produced more realistic motion. In fact, watching Jurassic Park these days I find the CG dinosaurs are easily differentiated from Stan Winston’s full size animatronics by the fact that the former move much more fluidly. Even when miniatures move “live”, i.e. without stop motion animation – vehicles powered by motors or pulled on hidden wires, for example – the motion is often less realistic than a CGI equivalent because the laws of physics dictate a small thing will always move differently from a large thing.

Next up, here’s a clip from Going to Hell: The Making of Soul Searcher, in which I discuss how I arrived at CGI as the best method of creating the spectral umbilical cords the script required. (You can watch the whole of this feature-length documentary at neiloseman.com/soulsearcher.)

So control was the key thing there. There were 80 shots, many with camera moves, and the umbilical cords had to be locked to the characters. Trying to achieve this with string and cables was just not realistic, or would have required so much manipulation in post as to make shooting a real element pointless. CGI can be controlled completely and adjusted quickly, without the need for reshoots.

Here are some other pros of CGI over traditional techniques:

  • No shooting required, so no crew to pay, feed, transport, etc. On a micro-budget where the crew are unpaid, CGI is completely free, whereas any kind of miniature shoot will always have costs.
  • CG elements can be tracked to moving plates without the need for expensive motion control cameras.
  • There are far more talented and experienced CG artists out there than model-makers.
  • You can create anything you can imagine, without any practical or logistical restrictions.

Can you think of any others? Let me know. Next time I’ll look at the advantages of traditional techniques.

Planning VFX: Computer Generated Imagery

Planning VFX

A few years back I taught a module on Visual Effects for filmmaking degree students at the SAE Institute in north London. Rather than getting into the nitty gritty of how to actually do VFX, it focused instead on how directors and producers should approach and plan for them.

Here is one of the examples I gave, using a shot from my 2005 feature Soul Searcher. Joe Fallow (Ray Bullock Jnr.) sprints down the platform of Hereford station as the Hades Express departs, bearing away the villain of the piece and the kidnapped love interest.

Finished shot from Soul Searcher

The train was a 1:18 scale miniature and was dropped into the live action plate by means of a simple, static matte drawn in Photoshop – essentially a splitscreen effect.

But what if I, as director, had chosen a different camera angle?

Alternate angle 1

To achieve this version, the model train would have needed to have been shot against a green screen to make it appear in front of Joe and the platform. This would have complicated shooting the miniature slightly, as lighting for a green screen can be quite time-consuming.

Alternate angle 2

Here we have the opposite; now Joe is in the foreground, so he’s the one that needs to be shot against a green screen. Since he and the station are full size, the green screen would need to be much bigger and would require much more light. And remember we’re now talking about an impact on the main unit’s time on a location, rather than a small model unit in a studio, so the cost implications are magnified.

Alternate angle 3

Finally, what if I’d gone for a camera move? Now we’re into motion control rigs, to record the camera’s movement on location and applied a scaled-down version of that same move to the camera shooting the miniature. Either that or the live action plate has to be 3D-tracked in post-production, and that tracking data fed into the motion control rig that shoots the miniature. More time, more people, more equipment, more money.

This is the first step in planning for VFX: understanding how your choice of shots influences the techniques required to achieve them and therefore impacts on the schedule and the budget. Stay tuned for more on this topic, and remember you can watch Soul Searcher in full for free at neiloseman.com/soulsearcher

Planning VFX

Ghost-trainspotting VFX Breakdown

As promised, here is the VFX breakdown for the main shot of the ghost train in my recent Virgin Media Shorts entry, showing how a crude model shot can work a treat, given the right compositing:

Due to the looming nature of the competition deadline, this was a pretty quick and dirty shot. Having said that, my VFX skills are pretty limited and I doubt I could have significantly improved it even if I’d had more time. It took a couple of hours to set up and shoot the miniature, and no more than an hour to do the compositing you see above. (I re-used smoke footage shot for Soul Searcher.)

As always, my approach was low-tech, avoiding any CG elements, and I did all the compositing work in Final Cut Pro. Soul Searcher had loads of shots that utilised this low-tech method, creating effects with everything from indoor sparklers to milk being poured into a fish tank. You can see a breakdown of all those effects as part of the Deluxe Package rental of Going to Hell: The Making of Soul Searcher. And remember, if you embed this video on your own site, you get a cut of any sales made through it.

Ghost-trainspotting VFX Breakdown

The Dark Side Guide to Miniature Effects

The DSG-ME, as all the cool kids are calling it, is a ten minute dash through the logistics and fiscalities (if such a word there be) of filming things wot are tiny. For any filmmaker contemplating a traditional models-based approach to special effects, this featurette provides a plethora of practical advice including how to choose a scale, what format to shoot on and how much it will cost. I share everything I learnt about working with miniatures while making the demo sequence for my fantasy-adventure feature The Dark Side of the Earth, starring Benedict Cumberbatch (Sherlock), Kate Burdette (The Duchess) and Mark Heap (Spaced, Green Wing).

What there wasn’t room to include – and also I didn’t want to digress too much into Soul Searcher (a fear I don’t have in this blog, home to many a digression [in fact, case in point, just look at how much parenthetical digression there is in this one sentence]) – were pyrotechnical considerations, since model work and blowing things up go hand in hand. First off, you should always get a properly qualified and licensed pyrotechnician. They will come with their own insurance, and will know the proper procedures, like informing the police and so on. Even if they agree to work for free, you will have to cover the costs of the explosives themselves, and the specialised transport to deliver them.

You will definitely need to shoot on film, as now you’re not just trying to make the thing look full-size, you’re trying to make it look full-size and in slow motion – necessitating ultra-highspeed shooting. Make sure you protect the camera from flying debris; styrene sheeting from a DIY store will do the trick. Build your miniature extra large, since even with the styrene you won’t want to put the camera very close, and a long lens will make the model look smaller.

All in, unless you’re able to borrow the film equipment, expect it to cost about a grand for one or two shots.

The Dark Side Guide to Miniature Effects