Here’s my video breaking down the cinematography of episode two of Ren: The Girl with the Mark. This week I discuss lighting Ren’s house, tweaking wide-shot lighting for close-ups, and depth of field.
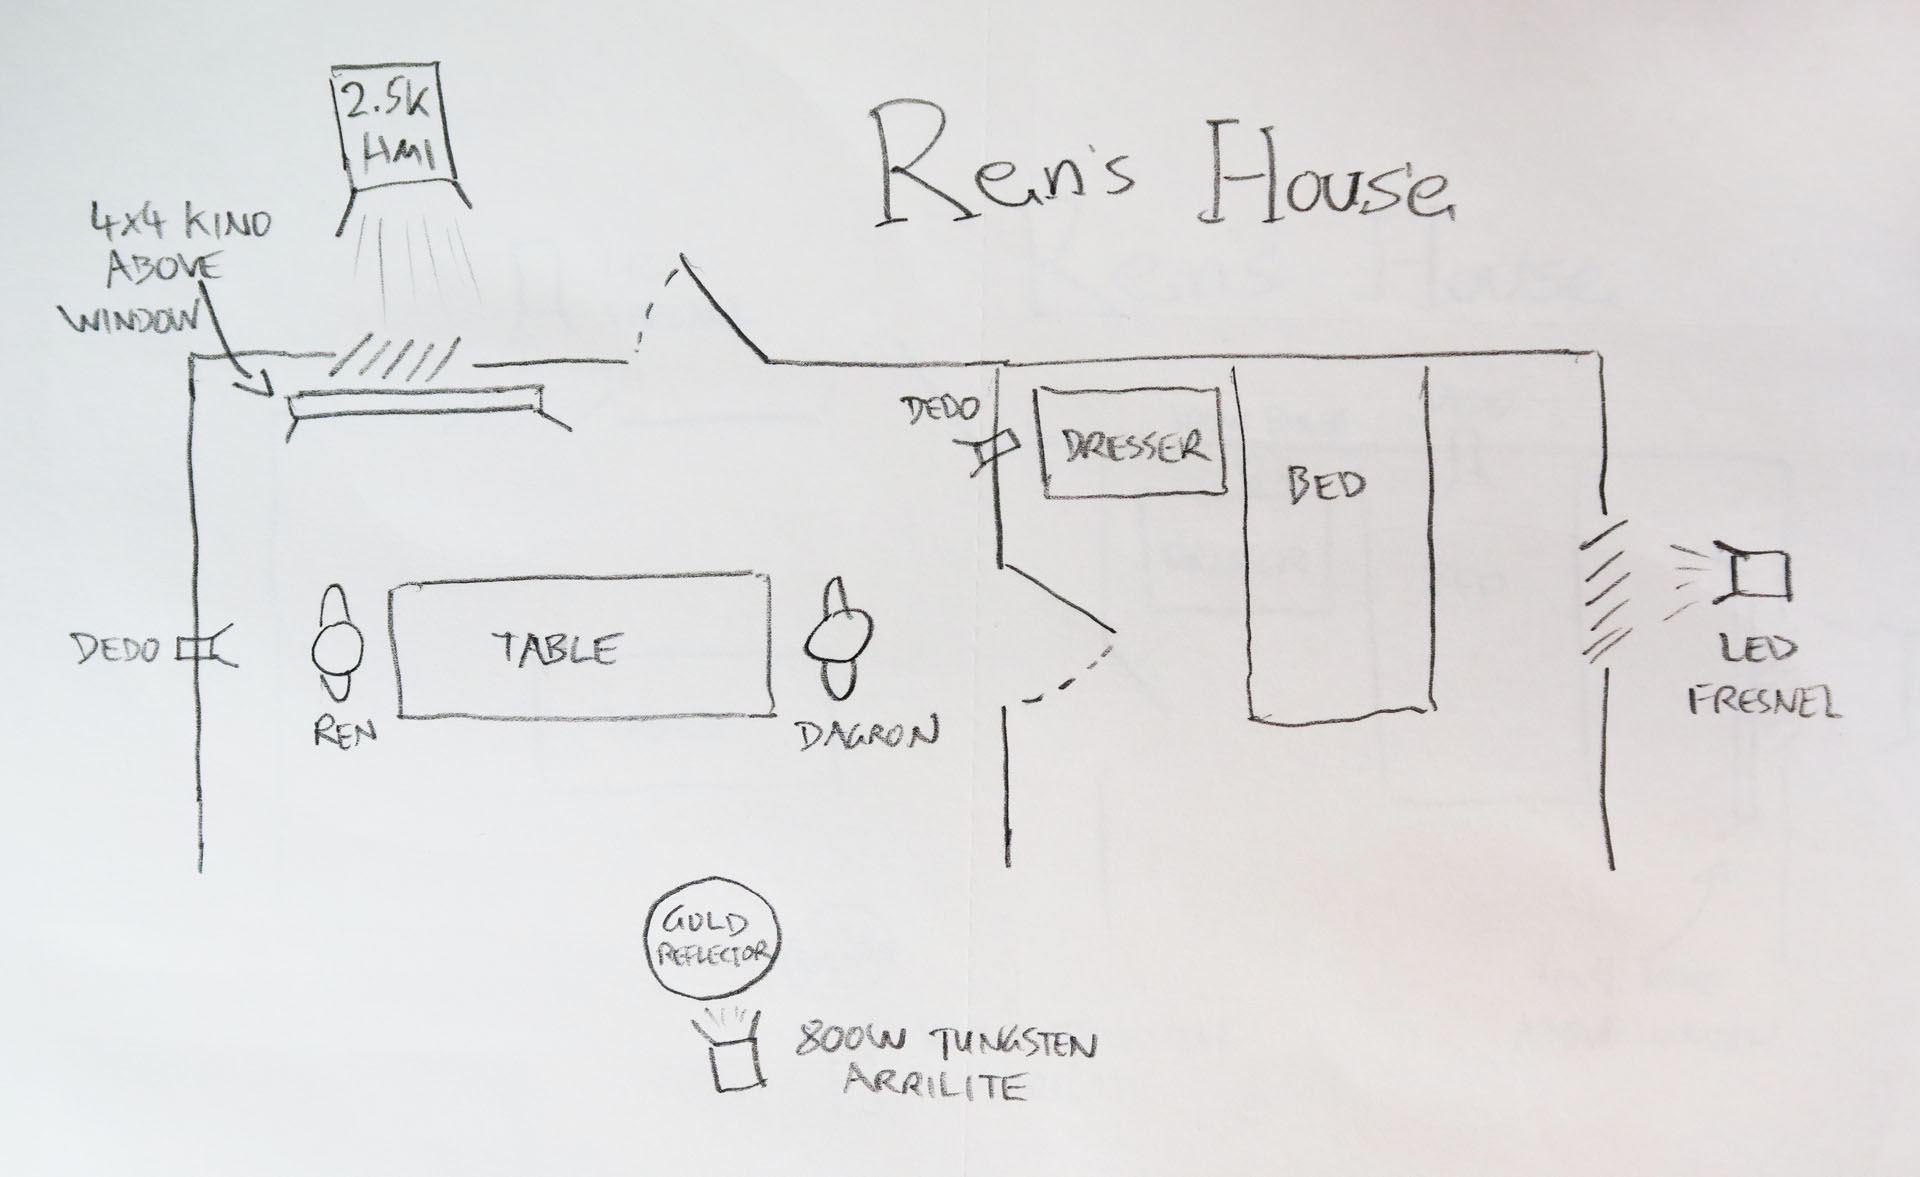
Here is the lighting plan for Ren’s house:
And here is a video blog from the set of Ren’s house:
Check back next Saturday for another instalment of Lensing Ren, and meanwhile watch the next episode of Ren itself from Tuesday at 8pm GMT at rentheseries.com
Here is the first in a series of cinematography videos I’m publishing to compliment the five episodes of Ren: The Girl with the Mark as they are released over the coming weeks. These videos will tell you the how, what and why of photographing the show. This week I discuss the camera equipment used, differentiating characters photographically, and lighting Karn’s magical woodland house.
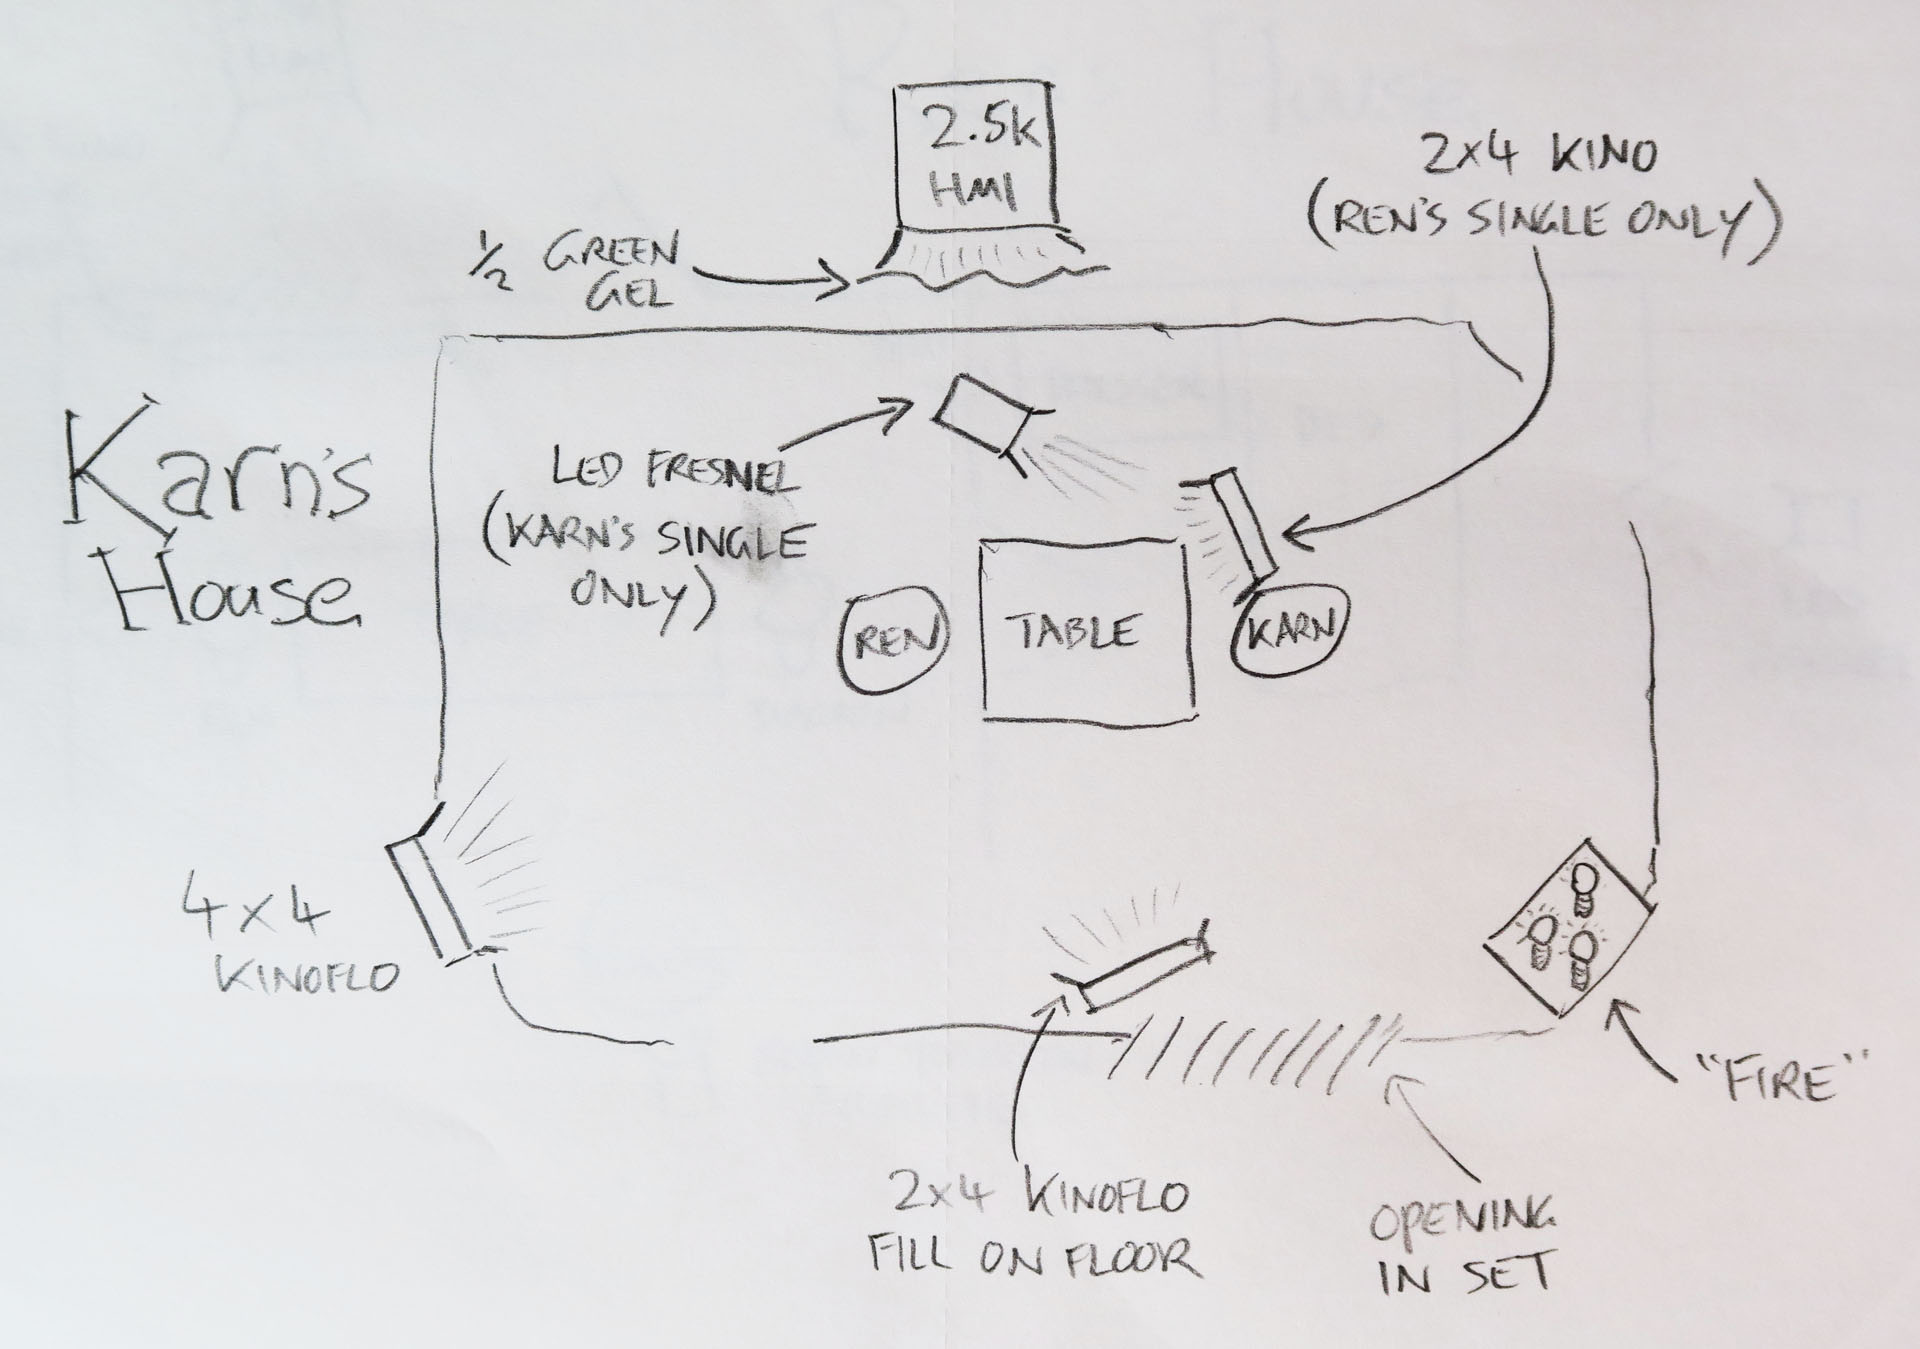
Here is the lighting plan for Karn’s house:
And here is a video blog from the set of Karn’s house:
You may be interested to read my article on Masculine and Feminine Lighting, which gives some more detail on the techniques used to light Ren and Karn in the riverside scene.
Check back next Saturday for another instalment of Lensing Ren, and meanwhile watch the next episode of Ren itself from Tuesday at 8pm GMT at rentheseries.com
I’m very excited to say that the fantasy action series I DPed in 2014 – and have spent most of my time since then helping with post on! – will premiere free online on March 1st. Here’s the new trailer which I cut for the show…
Our lead actress, Sophie Skelton, set the internet buzzing last week when she was cast as the pivotal Brianna Randall in the Starz series Outlander, ending months of speculation. Meanwhile, other members of the cast have appeared in Doctor Who, Stargate, Jekyll & Hyde and will appear in this year’s season of The Musketeers. And of course the director is the brilliant Kate Madison, whose last film Born of Hope is at 35 million views on YouTube and still clocking.
I’m prouder of Ren than anything else I’ve ever worked on, and I can’t wait for you guys to see the series at last. Check out the official Facebook page, where we’ll be sharing new micro-trailers (which I also edited) and lots of other content throughout February. And when the series is released in March on rentheseries.com, look out for some special blog posts right here on neiloseman.com breaking down the lighting set-ups and the thinking behind them.
Following on from last week’s filmmakers commentary, today I’ve posted the cast commentary for Stop/Eject on YouTube. It features Georgina Sherrington, Oliver Park and Therese Collins all chatting about the film as it unrolls before their eyes. Click the annotations in the video to access a commentary-less version if you haven’t seen Stop/Eject before.
My award-winning short fantasy-drama Stop/Eject is just coming to the end of its festival run, and soon I’ll be publishing a breakdown of that run, how much it cost and how many festivals it got into. But in the meantime, here’s the director and producer’s commentary which Sophie Black and I recorded at the Cannes Film Festival in 2013.
If you haven’t seen the film, you can watch it without commentary below.
Next week I’ll be posting the cast commentary with Georgina Sherrington, Oliver Park and Therese Collins.
Accessing the compositing modes in Final Cut Pro 7
When it comes to shooting elements for VFX, green-screen gets all the press. But certain kinds of elements can be tricky to key well, and sometimes it’s not the right look. In the last few days Kate Madison and I have needed to shoot last-minute elements for some shots in Ren: The Girl with the Mark, and we turned to monochromatic backgrounds.
Why? How does it work? Well certainly you can key out black or white just like you’d key out green, but the most powerful way to use these backgrounds is not with keying at all, but by a bit of basic maths. And don’t worry, the computer does the maths for you.
If you’ve ever used Photoshop, you’ll have noticed some layer modes called Screen and Multiply. Final Cut Pro has the same modes (it also has Add, which to most intents and purposes is the same as Screen) and so do all the major editing and FX packages.
Screen adds the brightness of each pixel of the layer to the layer underneath. Since black has a brightness of zero, your black screen disappears, and the element in front of it is blended seamlessly into the background image, with its apparent solidity determined by its brightness.
Multiply, as the name suggests, multiplies the brightness of each pixel with the layer underneath. Since white has a brightness of one, and any number multiplied by one is that same number, your white screen vanishes. Whatever element is in front of your screen is blended into the background image, with darker parts of the element showing up more than lighter parts.
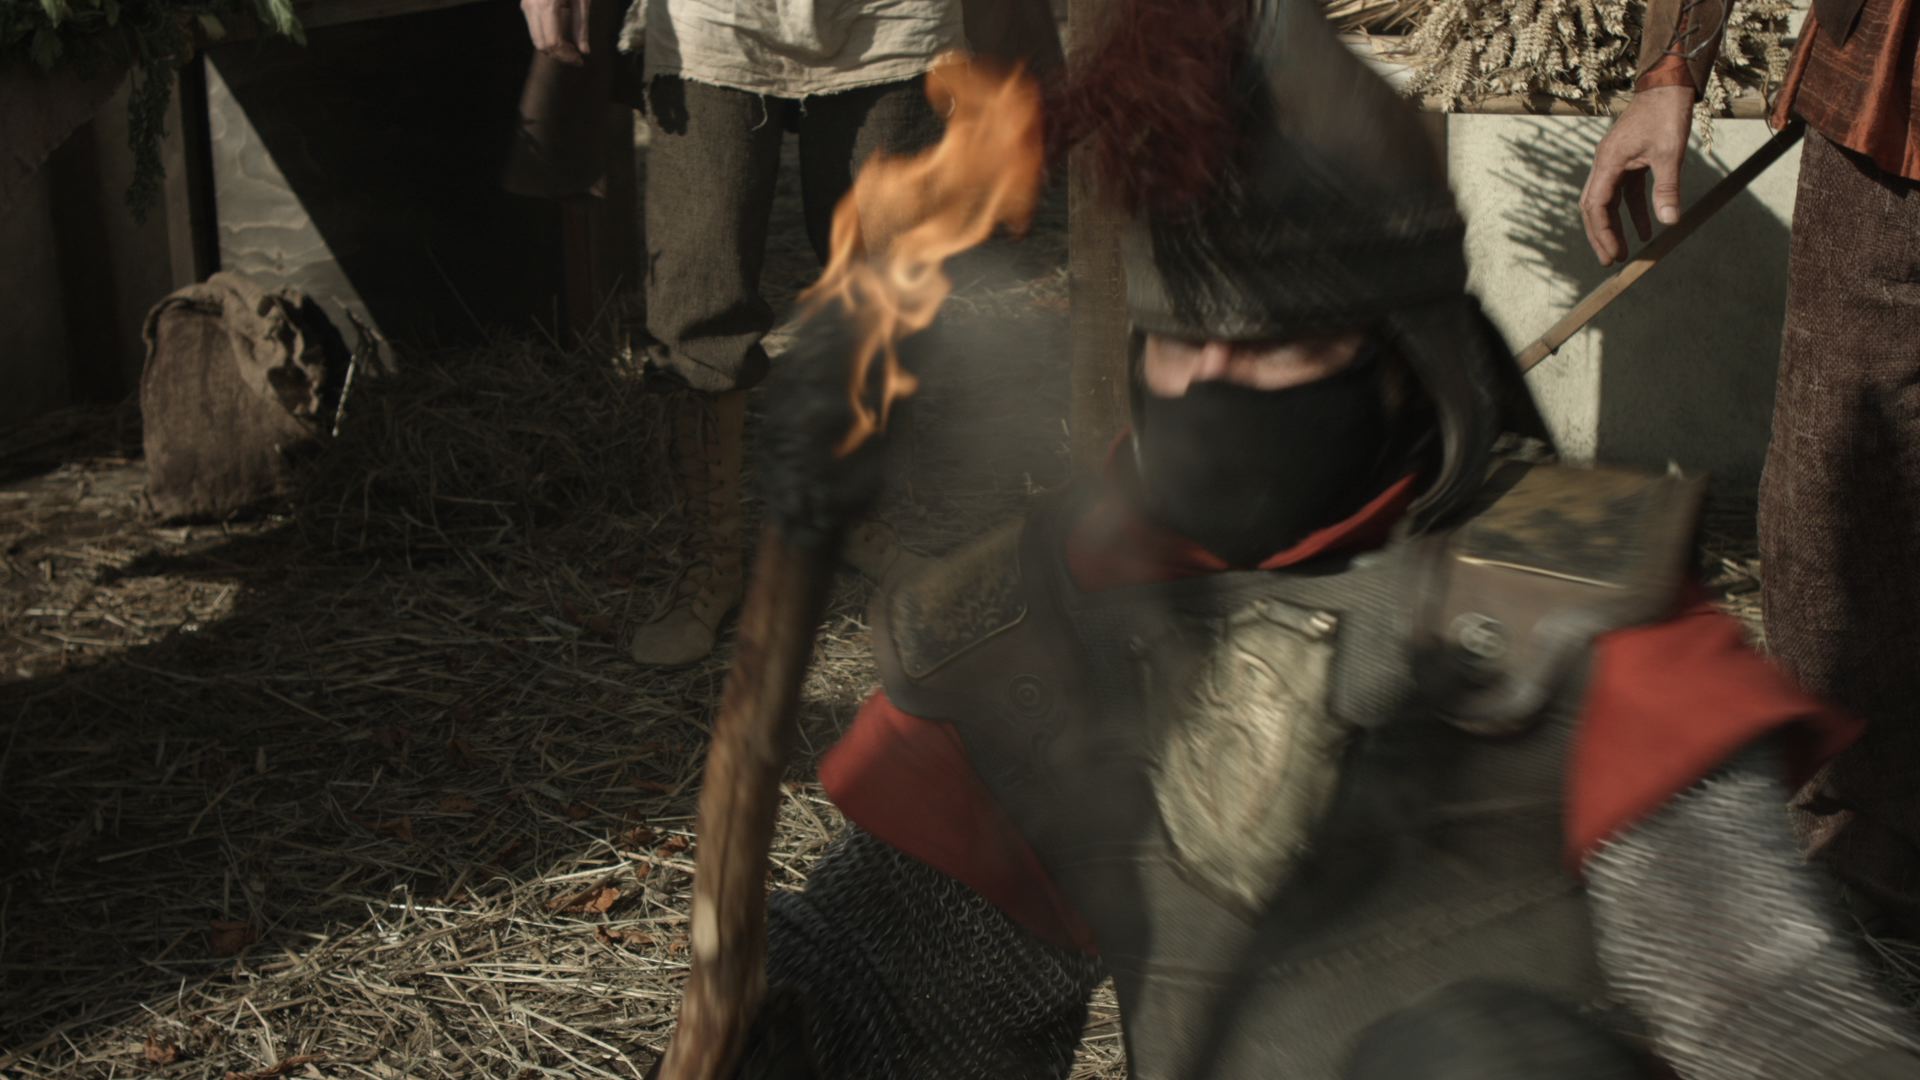
One of the elements Kate and I needed to shoot was a flame, to be comped onto a torch. We lit a torch and clamped it to a stand, shooting at night with the pitch black garden in the background. It was the work of moments to comp this element into the shot using Screen mode.
The flame element, shot at night in the garden to ensure a seamless black backgroundI adjusted the flame’s size and used Screen mode to composite it over the background.
Fire is the perfect partner for black-screen shooting, because it generates its own light and it’s not solid. Solid objects composited using Screen/Add or Multiply take on a ghostly appearance – perfect for, er, ghost effects – but not ideal in other situations; because of the way Screen mode works, anything that’s not peak white will be transparent to some degree.
We shot some fast-moving leaves and debris against black, but only the high level of motion blur allowed us to get away with it. In fact, if you know you’re going to have a lot of motion blur, black-screen might be the ideal method, because it will be tricky to get a clean key off a green-screen.
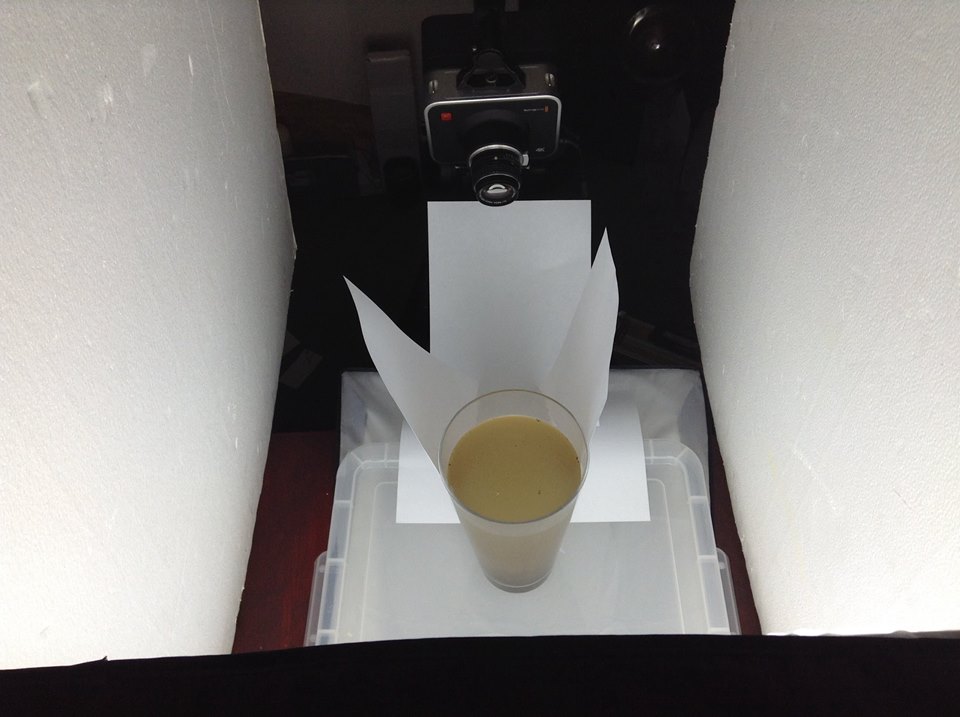
A smoke element shot against a black drape and backlit so that the smoke is visible but the drape is notShooting dirt in a vase of water against white
Other things that work well against black-screen are sparks, smoke and water/rain, again because they’re not solid. If you want to add rain or snow to a shot, black-screen is the way to go – check out my post about that here.
Yesterday Kate and I needed to shoot a whirlwind element. One of the VFX team suggested swirling sand in a vase of water. After a few experiments in the kitchen, we ended up using dirt from the garden. We used fluorescent softboxes for the background, ensuring we got a bright white background, and made weird arrangements of white paper to eliminate as many of the dark reflections in the vase as we could.
One of the tornado elements shot with the set-up pictured above. We let the dirt settle in the bottom of the water, then swirled the water with a spoon (which had to be kept out of frame).
A few weeks back we shot hosepipe water against black, inverted it and used Multiply to superimpose it as blowing dirt.
With a little thinking outside the box, you can shoot all kinds of elements against white or black to meet your VFX needs. I’ll leave you with this featurette I made in 2006, breaking down the various low-tech FX – many of them black-screen – that I employed on my feature film Soul Searcher.
After 18 months in the making and 2 years on the festival circuit, the short fantasy-drama Stop/Eject is now available to watch for free on YouTube. Here it is…
Stop/Eject stars Georgina Sherrington – best known as Mildred Hubble from ITV’s The Worst Witch – as a grieving widow who discovers a mysterious old tape recorder that can stop and rewind time… but can she save her husband?
The journey of getting Stop/Eject to the screen has had its ups and downs, with the whole project almost collapsing in autumn 2011, before being reborn and shot in April 2012, then a very quiet period of rejection upon rejection from festivals until its official selection for Raindance 2014 and its subsequent long-listing for a Bafta this year. A feature-length version was even in development for a while, until I realised that the concept just doesn’t work beyond a short. For me the high-point was a screening last week ahead of Back to the Future at the Arts Picturehouse in Cambridge, with a buzzing audience of almost 100 people.
Those of you who have been waiting a while to see Stop/Eject, I very much hope you enjoy it. If you want a copy to own, we’re selling a very small number of DVDs and Blu-rays that are left over – go to stopejectmovie.com/buy.html
While in Japan recently, I was finally able to get hold of that country’s version of my 2005 feature film, Soul Searcher. I thought this would be a good opportunity to talk a little bit about international distribution and the mysterious M&E mix.
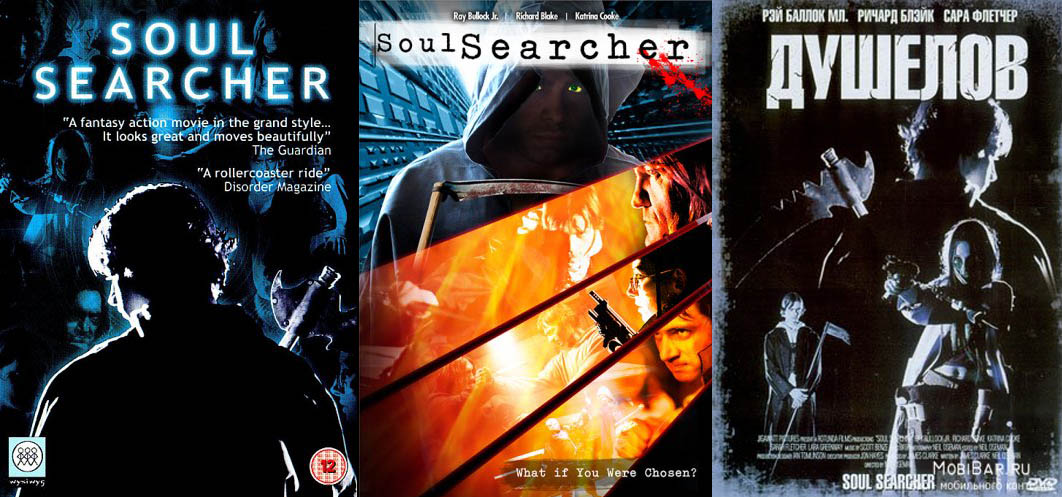
The story of an ordinary guy who gets trained to be the new Grim Reaper, Soul Searcher was picked up for distribution by a small UK company called Wysiwyg Films (now defunct). After releasing it on DVD in the UK, they sold all the foreign rights (much to my chagrin) to American sales agents Loose Cannon. Loose Cannon put out a US DVD, aiming to misleadingly tap the horror market by adding a splash of blood to the cover art, along with a stock photo of a random hooded guy with glowing eyes.
Loose Cannon then sub-sub-licensed the rights to five other territories: Benelux, Russia, Argentina, Thailand and Japan. Russian pirates hilariously dubbed the film into their own language (see some clips here), but the only territory to officially dub rather than subtitle the movie was Japan.
Presumably because of the film’s numerous martial arts fights, the Japanese distributors paid more for the film than any other country: $24,750. I know this from the Loose Cannon sales reports that were eventually forwarded to me by Wysiwyg. The only reason I know anything else about the Japanese release is from extensive googling (using the actors’ names as search terms proved most fruitful) which led me to the Amazon.jp page for the DVD a few years ago.
At first I thought I’d made a mistake. The cover art displayed on the page was completely new to me, showing an unfamiliar man holding a huge sword (a weapon never used by Soul Searcher’s hero). Beneath that was the title, in both Japanese and English: Blade X. It was only after Google Translating the page that the customer reviews confirmed this was indeed my very own Soul Searcher. Perhaps unsurprisingly, the reviews complained of the film’s lack of Wesley Snipes, the lack of correlation between the movie’s scythe-wielding hero and the cover’s sword-bearing imposter, plus many other flaws that are common to the English version!
Sadly, this is how low budget film sales work. The distributors know that the films are unlikely to generate much positive word of mouth, so they resort to tricking consumers into buying them with misleading covers and references to more successful films.
Left to right: the UK, US and Russian covers for Soul Searcher. The Russian one is my favourite.
Anyway, when I saw that Amazon’s tech specs listed a Japanese audio track, I was desperate to get my hands on the DVD. But I could never find a seller who would import it for less than an eye-watering £40, so I waited, and in June this year I finally visited Japan and bought a copy.
But how does dubbing work? Well, amongst the delivery materials that a sales agent will require when you sell them your film will be an M&E mix – that’s Music and Effects. What this means is that you supply a version of the film which contains music, sound effects, foley, atmospheres, everything except the dialogue. This is one of the reasons for the existence of foley (footsteps, clothing rustles and other mundane sounds added to the film in postproduction); if you relied on the footsteps recorded along with the dialogue on set, those footsteps would disappear when you muted the dialogue tracks to produce the M&E mix.
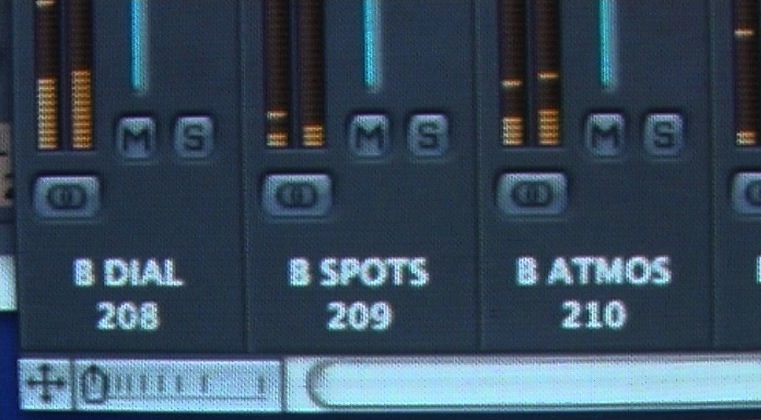
Some of the buses in the Logic mix of Soul Searcher
It’s always worth running off an M&E version when mixing a feature, whatever you feel its chances of achieving distribution are. Trying to create an M&E track after the fact, when the mixer has moved on to other projects, the source files may no longer exist, etc, etc, is likely to be a real headache. Instead, take five minutes in your mixing session to mute the dialogue tracks and bounce it out.
Along with the M&E mix, sales agents will require a dialogue list – essentially a transcription of the film, so it can be translated ready for dubbing or subtitling.
The following video compares some clips from Soul Searcher, showing the original English versions, followed by the M&E track, then the Japanese dub.
The Japanese distributors made a good job of dubbing Soul Searcher. As far as I can tell, the voice cast seem to give decent performances, and the mixer has blended everything carefully together. I wonder how much this dub cost them? Undoubtedly, factoring in the manufacturing and advertising costs, and the $24,750 they paid to Loose Cannon for the rights, they will have spent more on the film than my investors and I did in making it (£28,000).
If you want to know more about distribution contracts, check out my post on what to look for in one, and for the full story of Soul Searcher’s financing, expenditure, and distribution revenue, look no further than this exhaustive, no-holds-barred video…
Strap on your scabbard and saddle your horse – The First Musketeer has arrived! After 21 months in postproduction, the action-adventure web series shot in the south of France is finally out on YouTube. I served as director of photography on the show, written and directed by Harriet Sams. Watch all six episodes now!
I’ve written several blog posts about lighting and shooting the show, and there are more to come. Here are the best of the ones currently available:
Know Your Lights – a video blog in which I show you the lamps in our lighting package and explain the advantages of each.
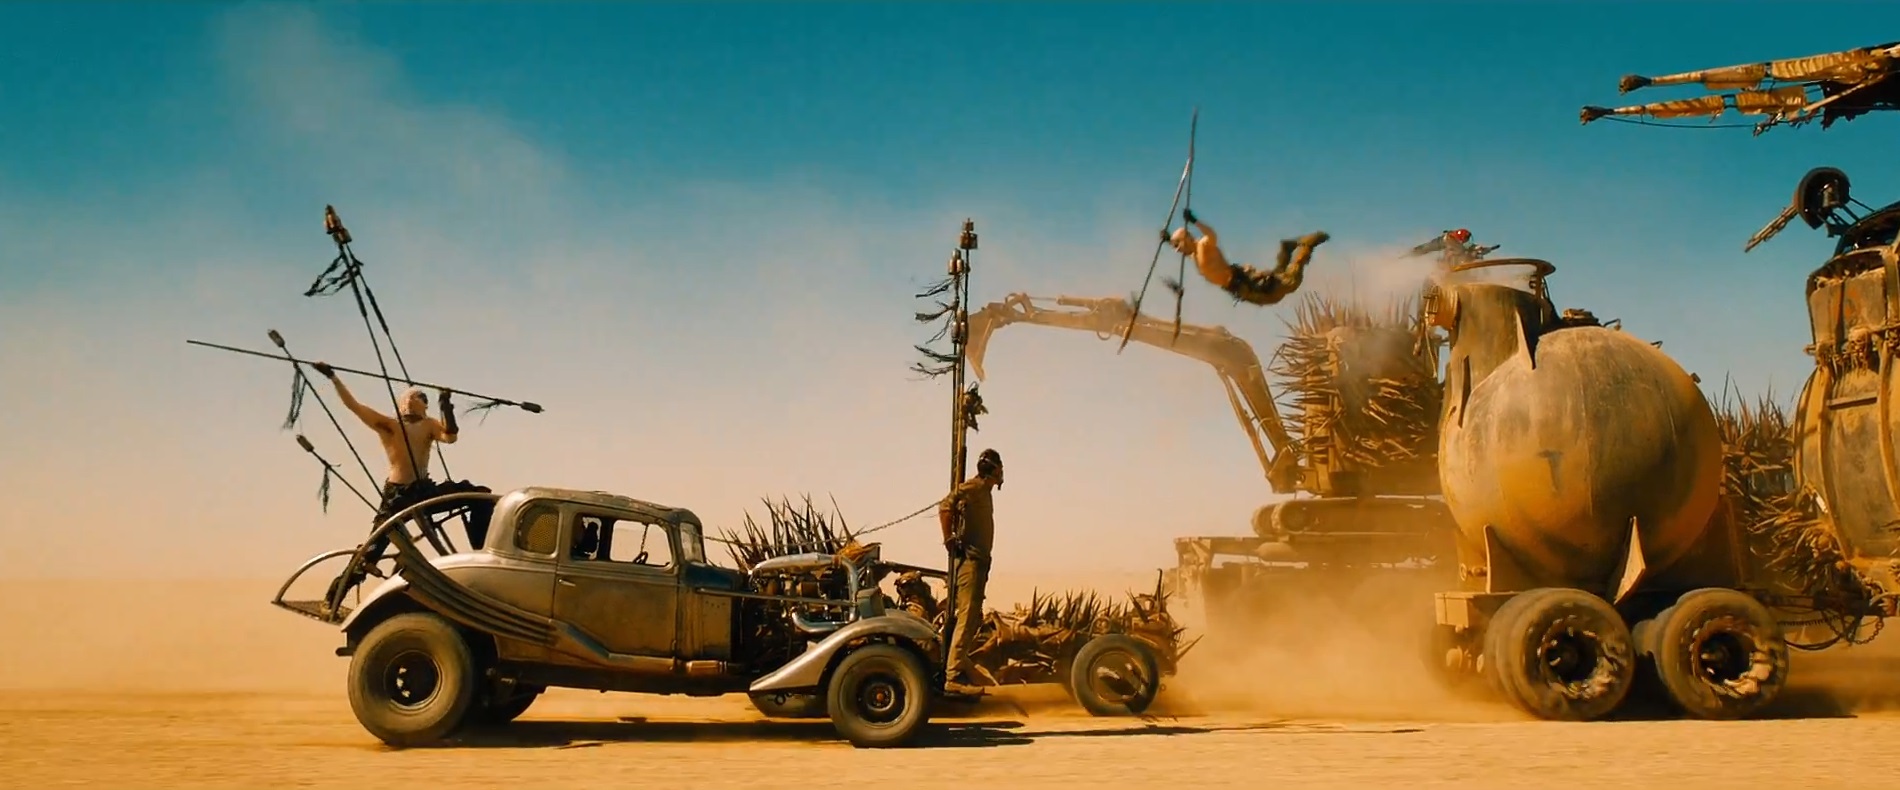
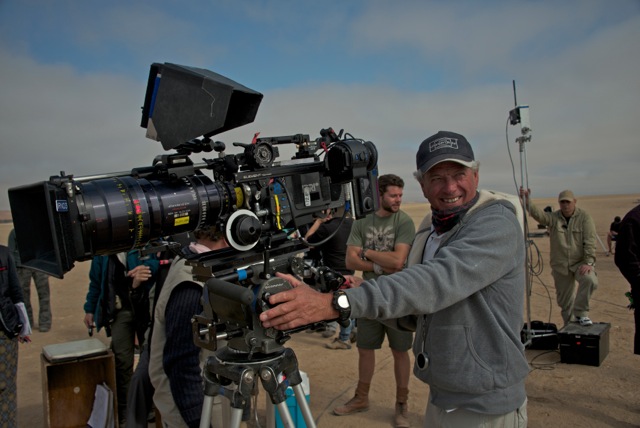
The Australian Cinematographers’ Society has released a video of a two hour talk by Fury Road DP John Seale, ACS, ASC. It’s a fascinating watch, with lots of interesting info and some dry Aussie wit; more than once Seale talks about “taking to the drink” when things got tricky!
Here are the most interesting points I took from it, with a few extra details added from American Cinematographer’s article on Fury Road:
The team spent years developing a new 3D camera based on a sensor built for the US military. Director George Miller wanted something rugged enough to survive dusty desert work and small enough to fit into the truck cabs. Camera tests revealed it had only five stops of dynamic range, nowhere near enough to capture detail both outside and inside the cabs in the same frame.
The film was ultimately shot on Arri Alexas (four Ms and six Pluses) and converted to 3D in post. Absolutely no consideration to the 3D format was given during shooting.
When early footage failed to please DIT Marc Jason Maier and his meters, Seale agreed to downrate the Alexa from its published 800 ASA to 400 ASA. The subsequent footage was deemed technically correct by Maier and made Seale much more comfortable that he was recording what he thought he was recording in terms of exposure.
Dailies were rendered with two different LUTs: the standard Rec 709 and a custom one designed to emulate a one-light celluloid work-print. This was for the benefit of Seale, for whom Fury Road was his first digital movie.
Canon 5D Mark IIs with the Technicolor CineStyle profile were used as crash cams. Sky replacement had to be executed on many of the 5D shots to remove banding, presumably caused by the small colour space.
Olympus and Nikon DSLRs were used a little as well.
For close-ups of Max escaping the Citadel early in the film, a Blackmagic Cinema Camera with a Tokina 11-16mm zoom (a combination I used frequently on The First Musketeer!) was rigged on a Movi.
The film was lensed predominantly on zooms, with a few Super Speed primes kept on standby for when the daylight was running out.
Custom-built 15mm and 16mm primes were used inside the cab of the War Rig. The lenses’ hyperfocal distance had been adjusted so that everything from 0′ to 9′ (i.e. everything inside the cab) would be in focus.
Lighting and camera rigs hung from the roofs of the vehicles had to be stripped back because of the shadows they cast. Instead, platforms were rigged on the sides of the trucks, and a track-and-pulley system was built into the War Rig’s cab’s ceiling from which cameras could be suspended.
Scenes in the cab were shot at T5.6, with strips of LEDs mounted on the ceiling and on the pillars between the front and rear doors to bring up the actors inside.
Day-for-night scenes were overexposed by two stops so that characters in the shadows could be lifted in the grade, if necessary, without noise.
The film was storyboarded early on, but a script was only written when the studio demanded it!
Miller wanted to shoot everything single-camera, including action, but Seale began sneaking in with extra cameras and soon convinced his director of the efficacy of this method.
Much of the film was shot as Poor Man’s Process, or “Sim Trav” as Seale calls it.
In post, Miller chose shots with camera shake that he liked and had that shake digitally applied to other shots.
Miller decreed that the subject of the shot should always be framed centrally. This allowed him to edit faster, because time wouldn’t be lost on each cut as the viewer searched the width of the anamorphic frame for the subject.
Extensive use was made of two Edge Arms. An evolutionary step up from Russian Arms, these are cameras mounted on robotic arms which are in turn mounted on pick-up trucks.
Other vehicle rigs included custom-built buggies with Alexa Pluses mounted front and rear, and a “Ledge” mount which was a 30′ truss tower built on the back of a truck, allowing high angles without the need for drones or helicopters.
Leaf blowers were used, via flexible pipes, to keep sand off the lenses in moving shots.
It’s interesting to hear how laid-back Seale is. He gave his focus puller a great degree of leeway in choosing the lens package, and let his DIT, gaffer and operator handle the technical side of recording and exposing the image. This level of trust in his team must give him tremendous capacity to focus (pardon the pun) on the creative side of his job without worrying about the details.
I’ll leave you with the EPK B-roll from Fury Road…