Earlier this year I blogged about a visit to the National Portrait Gallery, studying the lighting in traditional portraits. I noted that, contrary to the current cinematographic trend for short key lighting, almost all of those paintings used broad key. And while watching the high-end Netflix series The Crown this week, I noticed the same thing. Why might this be?
Short key (left) vs. broad key (right). Photos from SLR Lounge
First of all, a reminder: a short key is a key light on the side of the face away from camera, while a broad key hits the side of the face towards camera. Short key is generally preferred amongst cinematographers because it gives better “modelling” – i.e. a better sense of the shape of the face – and focuses the viewer ON the face, rather than the ear and the side of the head. A broad key, meanwhile, presents less shadow to the camera, and arguably shows the hairstyle and the shape of the head better – which may be reasons for the preponderance of broad key in classical portraiture, which were more concerned with overall appearance than with emotion/performance.
An array of broad key paintings at the National Portrait Gallery
But I don’t believe these direct pros and cons were the primary motivation in cinematographer Ole Bratt Birkeland’s decision to use broad key lighting in a crucial scene from The Crown.
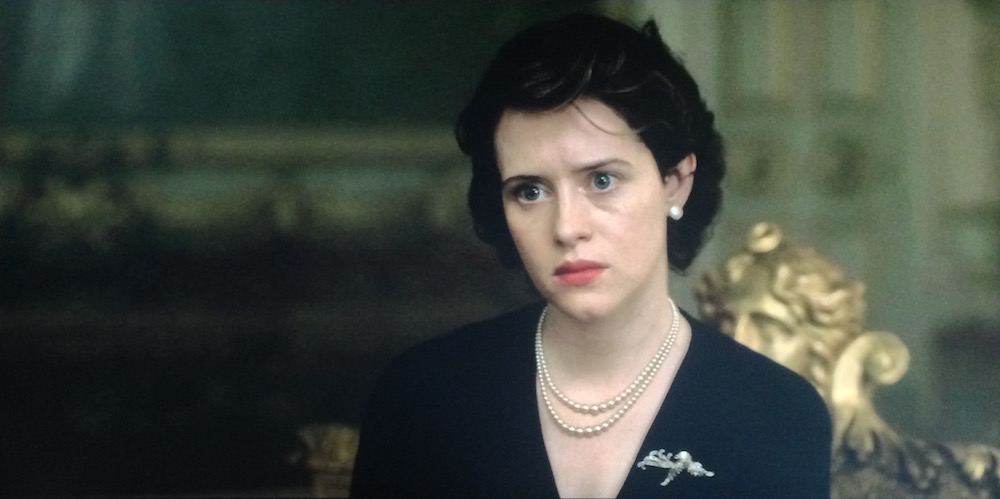
The central themes of the series, which dramatises the early life of the Queen, are tradition and duty. Queen Mary often reminds her granddaughter Queen Elizabeth II of the long and noble lineage of the English royal family, a weight of history and responsibility which Elizabeth keenly feels. “The crown must always win,” Mary intones in the trailer.
In episode 4 the young Queen seeks advice, desperate to ensure she does not tarnish the monarchy’s centuries-old reputation. To symbolise this burden, Birkeland evokes the imagery of traditional portraiture – the subjects of which were always high-born individuals, often royals. Consider this frame grab from the scene, beneath an official portrait.
See how the light models the face the same way in both images? Note also the absence of backlight in the frame grab, another feature common to traditional paintings, which typically relied on a single window light source. Elizabeth’s dark hair blends into parts of the dark background.
Combined with the timeless regal production design, this lighting subtly places the Queen within the frame of an official portrait, trapping her within the overwhelming tradition of the monarchy. Can I say for certain that Birkeland did this deliberately? No, but I’d be very surprised if he hadn’t looked at royal portraits while prepping the show, and I’d be equally surprised if they hadn’t at least influenced him unconsciously.
Either way, this is a first-rate example of the power of cinematography to enhance theme and narrative by guiding the viewer to make subconscious associations. If you haven’t seen The Crown, I can highly recommend it; it’s not just the cinematography that’s top notch.
Micro-filmmaker Magazine’s Jeremy Hanke recently got in touch and asked if I would review his book, “Green Screen Made Easy”. I used to make a lot of micro- and no-budget movies packed full of VFX, but I usually avoided green-screen because I could never make it look good. Although those kind of projects are behind me, I agreed to the review because I figured that this book might help others succeed where I’d failed – and also I was interested to find out why I had failed!
What Jeremy and his co-author Michele Terpstra set out to do is to cover the entire process from start to finish: defining chromakeying, buying or building a green screen, lighting and shooting it, sourcing or shooting background plates, choosing keying software, and all aspects of the keying itself.
The book is aimed at no-budget filmmakers, hobbyists or aspiring professionals making self-funded or crowd-funded productions, those digital auteurs who are often their own producers, writers, DPs, editors, colourists and VFX artists. Perhaps you’ve tried green-screening before and been disappointed with the results. Perhaps you’ve always seen it as a bit too “techie” for you. Perhaps the unpaid VFX artist you had lined up for your sci-fi feature just pulled out. Or perhaps you’ve already reached a certain level of competency with keying and now you want to step up a level for your next production. If any of these scenarios ring true with you, I believe you’ll find this book very useful.
“Green Screen Made Easy” is divided into two halves, the first half (by Jeremy) on prepping and executing your green screen shoot, and the second half (by Michele) on the postproduction process. Both authors clearly write from extensive first-hand experience; throughout the text are the kind of tips and work-arounds that only come from long practice. By necessity there is a fair amount of technical content, but everything is lucidly explained and there’s a handy glossary if any of the terms are unfamiliar to you.
The section on lighting and shooting green screen material contained few surprises for me as a cinematographer – see my post on green screen for my own tips on this subject – but will be very useful to those newer to the field. The chapters on equipment are very thorough, considering everything from which camera and settings to choose to ensure the best key later on, to buying or building a mobile green screen, or even kitting out your own green screen studio – all with various alternatives to suit any budget.
The postproduction chapters revealed clearly why I struggled with keying in the past. Michele explains how the process is much more than simply pulling a single key, and can involve footage clean-up, garbage matting, a core key and a separate edge key, spill suppression, hold-out matting and light wrapping. The book guides you through all these steps, and outlines the pros and cons of the software and plug-in options for each step.
Once you’ve read this book, I’d say the only other thing you’ll need before you can start successfully green-screening is to watch some YouTube tutorial videos specific to your software. While the instructions in the book look pretty good (as far as I can tell without attempting to follow them) the medium of text seems a little restrictive in teaching what is inherently a visual process. There are explanatory images throughout “Green Screen Made Easy”, but in the ebook version at least I found it difficult to discern the subtle differences in some of the before-and-after comparisons.
Ultimately what will make you the best “green-screener” is practice, practice, practice, but by reading this book first you’ll give yourself a rock-solid foundation, an appreciation of the entire process from start to finish, and the insider knowledge to avoid a lot of time-sucking pitfalls. And keep it handy, because you’ll be sure to thumb through it and re-read those handy tips throughout your prep, production and post.
“Green Screen Made Easy” is available in paperback and ebook editions from Amazon.
I wrote the bulk of this post over two years ago, when I wrapped photography on Sophie Black’s short drama Night Owls. As usual for no-budget shorts, there followed a long postproduction and then a festival run (it premiered at London Short Film Festival this January) which prevented us releasing any footage online.
But this week a number of great things have happened for the film. Firstly, Night Owls has been released online – you can see it here – and every view counts towards Promofest’s “Short of the Year” competition, so have a watch and help us win! Secondly, the film won an Honourable Mention and Best Actor (Jonny McPherson) at the LA Film Awards. Thirdly, my work on the film won me Best Cinematography at the Festigious International Film Festival.
Photo by Elly Lucas
So this is the perfect time to finally publish this look at the decisions and techniques I used in lighting and lensing the film. Night Owls was one of the first projects I shot on my Blackmagic Production Camera, and you can read what I thought of the camera in action in this post from May 2014.
Sophie wanted a soft, warm and cozy look to the short, which is set over a single night, mostly in one room, and tells how a teenage girl and an older man become unlikely friends. At the same time, the dialogue-driven script had moments which hinted at darkness and suffering in the past of both characters. And a cozy look suggests practicals like table lamps, which by their nature cast pools of light and leave other areas in darkness.
On a practical level – if you’ll excuse the pun – I knew that the need to hide lights that would boost the apparent output of the practicals would limit my options in the wide shots, and therefore also in the close-ups which would of course have to match. When shooting a day interior, you can easily stick a huge light outside the window and then shoot pretty much anywhere in the room, crabbing the light to one side or the other if it threatens to come into shot or cast a shadow of the camera. In a night scene with practicals, it’s not so simple.
Dedo rail
We knew in advance that we could not screw anything into the location’s ceiling, so I was relieved to find that the room had a nice, chunky picture rail all the way around. This soon became a dedo rail, as I used magic arms and k-clamps to rig two of the little spotlights in a classic cross-lighting formation. What I mean by this is that each light was positioned so as to provide backlight on one character and frontlight on the other. This is almost always my starting point when lighting a scene with two characters, and it really came into its own on this project. (See my post on cross-backlighting for more info.)
We had to shoot most of the scenes during the day, so the windows were blacked out. The one that appears on camera was tented around so that we could shine in a blue-gelled redhead, to suggest moonlight, without allowing any daylight in. Another blue-gelled redhead was set in the hall outside the door, creating depth and colour contrast. Our 1.2K HMI was placed in the next room, right at the far end. In front of it we rigged a sort of faux stained glass panel, that had conveniently broken out of another door in the house just the previous week, in order to cast a window-like shadow and give the impression of moonlight coming through a window in the next room.
The reason we rigged so many cool sources was that the first scene in the living room featured only Kent (played by Jonny McPherson), and Sophie had requested that the images only become warmer when Mari (played by Holly Rushbrooke) enters the film. We turned on fewer of the practicals for this first scene, but it was still necessary for their light (represented by the dedos) to be warm in colour to establish that for the later scenes. To counteract this and bring everything back into the blues a bit more, I set up a third dedo, gelled blue, to produce a cool lens flare.
Setting up for the first living room scene. The crossed dedos can be seen in the top left and top right, while the dedo in the foreground is solely to produce lens flare.
Sophie and I had talked about various ways of softening the image. We considered hiring a black promist filter, but after rewatching Christopher Ecclestone’s season of Doctor Who, which appears to be have been entirely shot using a black promist, I decided the look was far too cheesy. In the end we went for a set of Zeiss lenses which had had their anti-flare coating ground off. We felt that lens flares would give some sparkle and magic to the images, as well as giving us the opportunity to soften the contrast in the image when necessary. The flares were usually created by an additional lamp, often a dedo or a battery-powered pag light held by Col, aimed directly at the lens.
When Mari enters, Kent has lit the fire, so Col and I set up our usual cluster of 100W tungsten bulbs covered with an orange gel and rigged to a dimmer board. With hindsight we could have gone much more orange with the gel and much more flickery with the dimmer board action, but since the fire at the location was a wood burning stove with only a very small window, it’s probably good that the source of the light remains ambiguous. For the close-ups, the cluster of four bulbs was rearranged into a straight line, which gave a lovely, soft underlight to the character’s faces.
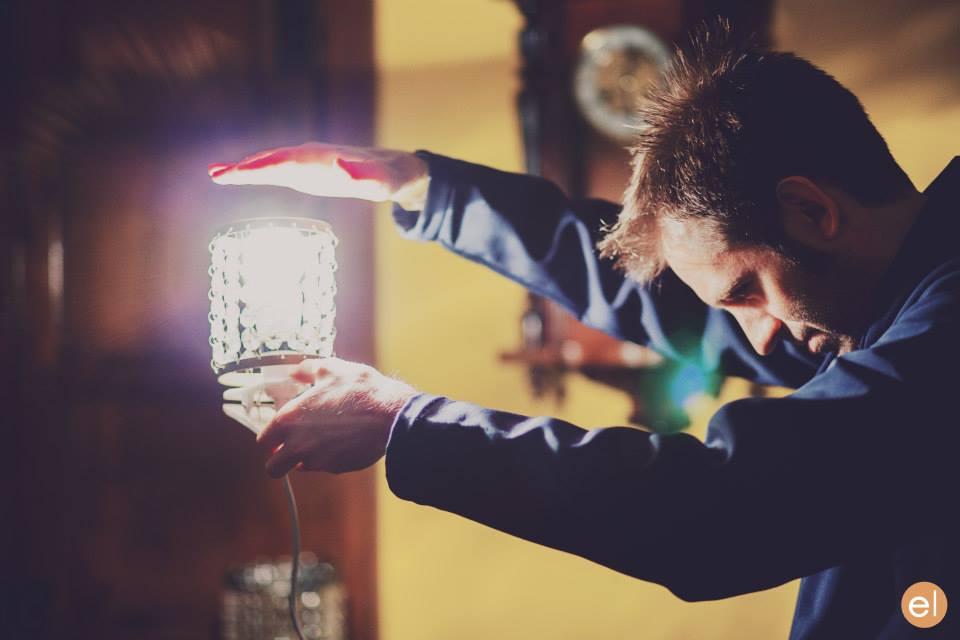
Night Owls’ signature overhead shot. Sophie had a far more complicated shot planned, but it just wasn’t achievable with equipment we could afford.Shooting the top-down shot. The redhead in the centre of the image is providing lens flare. The white blob at the end of the C-stand arm on the left is a 100W bulb surrounded by a string-of-crystals lampshade.
A major scene later on sees the two characters lying top-and-tail on the floor, and was shot from a jib kindly provided by All Doors Lead Somewhere Productions. Overhead shots of people lying down can look very flat, but rather than trying to combat that with cross-lighting, I decided to embrace it and light entirely from above. Sophie and Anya Kordecki, the production designer, had found these great practical lights surrounded by strings of crystals, which cast lovely shadows. Knowing that two of these lights were supposed to be just out of shot on either side of frame, I took some license and rigged them one directly over each character’s face, replacing the 40W bulbs with 100W ones. This created a nice pattern of light and shadow radiating out from the faces. To add further contrast, I spotted two dedos up on the actors as well, one for each, gelled with half CTB, so that the centre of each radial pattern had a cooler, brighter circle of light. I decided to shoot on a white balance of 4,500K so that these centre spots would appear white and the radiating pattern would appear slightly orange.
When the characters sit up later in the scene, the two practical lights were almost perfectly positioned to provide cross-backlight. Again I used the dedos to produce the light that is supposedly coming from the practicals. I cheated Mari’s key light around quite a bit; it should really have lit the camera-right side of her face given where the practical was positioned, but we lost too much of her expression that way when she looked at Kent, not to mention that it didn’t look as aesthetically pleasing.
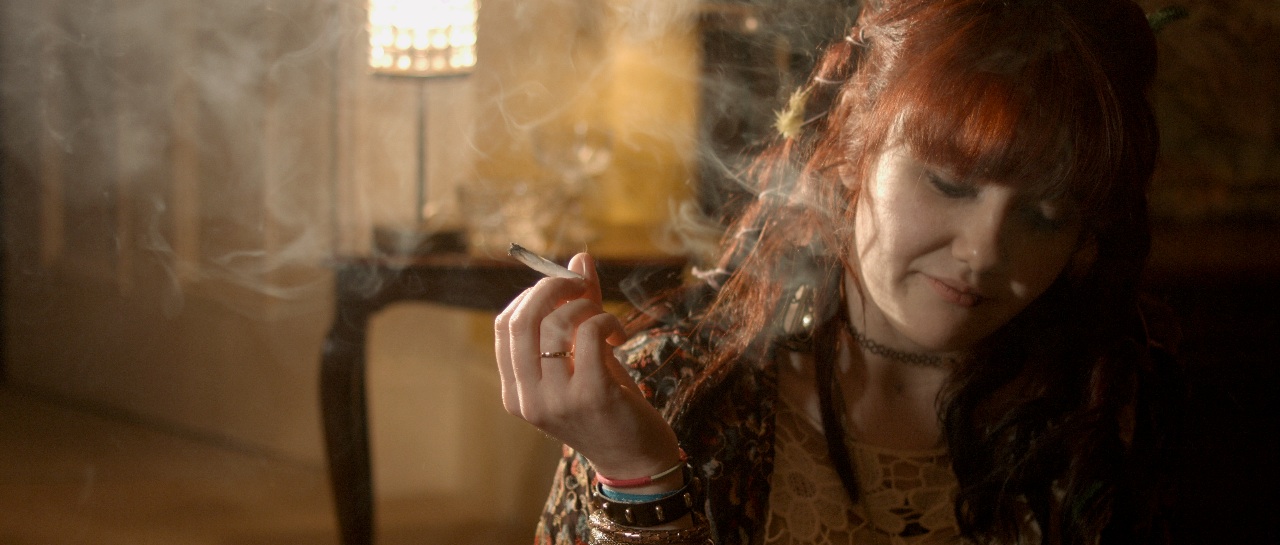
The film noir shot. A dedo out the rear left of frame provides the hot backlight, while Mari’s key is a second dedo also off left, but in front of her. A miniscule amount of fill is provided by another practical behind the camera.
I hadn’t been intending to use so much hardlight. I’d actually purchased a sheet of unbleached muslin prior to the shoot with the aim of rigging some kind of book light, and I almost did it for these sitting-up close-ups. But Sophie had asked for Mari’s close-up to have a film noir look, highlighting the smoke from her spliff, besides which the weed was bringing out some home truths for the characters, so it made sense to go with stark lighting. The dedos were perfect for this, with their intense, focused light showing up the smoke brilliantly when shone from behind, and spotlighting the actors when shone in from the side. The dark sides of the characters’ faces were lit by a tiny amount of light that’s genuinely coming from the practicals.
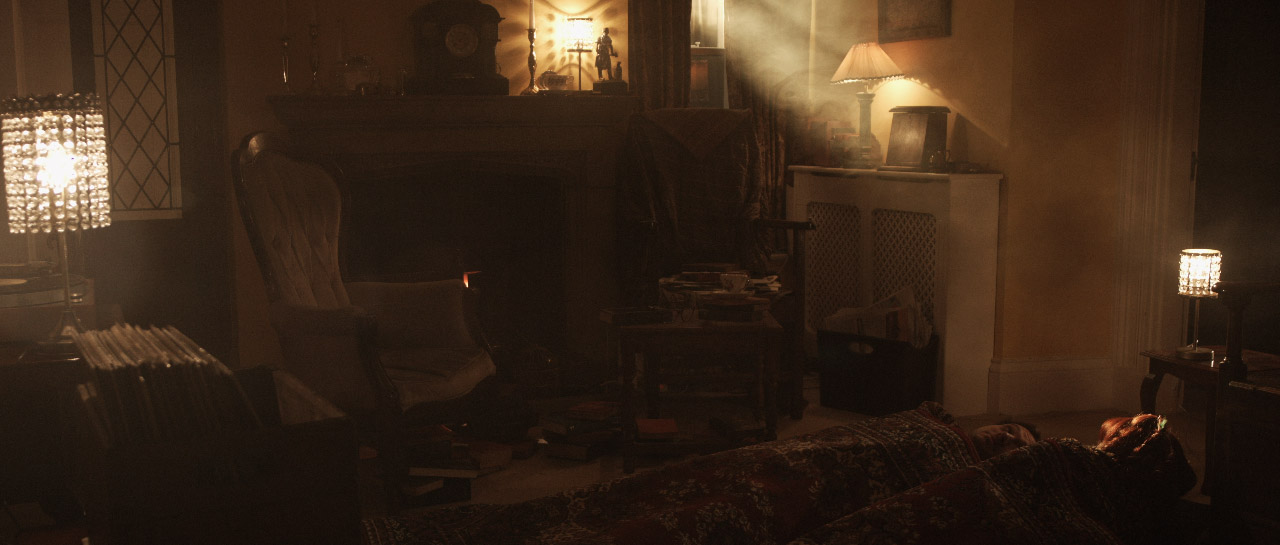
The sun – a 1.2K HMI – bursts through.
Near the end of the film, the sun rises, throwing a shaft of light into the room. This was supplied by the 1.2K HMI. With hindsight, cranking up a wind-up stand would have been the best way to create the rising effect, but we didn’t have one, so instead the lamp remained static and Col lowered a sheet of card to give the impression of the sun rising over the horizon. Copious smoke was used so that the beam of “sunlight” would show up on camera.
The 1.2K HMI backlights Mari and the rain, while Kent holds a practical just out of frame for key.
Night Owls is book-ended by doorstep scenes, the first set at night during a rainstorm, the other on a sunny morning. For both scenes I used the HMI as backlight. This was particularly neccesary for the night scene in order for the rain – actually created by a hosepipe – to show up. (For more on faking rain, check out this post.) At night I set my white balance to 3,200K so that the HMI would appear blue, suggesting moonlight, and in the morning I gelled the HMI with Light Straw and shot on a 5,600K white balance. Fill light was provided at night by the electric candelabra Kent was holding, and in the morning by a makeshift bounce card (a square piece of mountboard covered in silver wrapping paper) hidden from camera by Kent’s body, plus a blue-gelled redhead off to the side of the hall. When we turned round to shoot outdoors looking in, it was necessary to diffuse or dim the HMI, and to break up its light (which now looked very flat due to the lamp being so close to the camera) using tree branches.
That’s about it! Though I think I would do some things differently if I was shooting it now (more soft light, definitely), I’m still really proud of the film and the work I did on it. It’s very satisfying that Night Owls is now gaining the recognition it deserves. Don’t forget to check the film out here. And if you want to know more about the lighting set-ups described above, subscribe to my Instagram feed to see some lighting diagrams and behind-the-scenes photos over the next few days.
Images from Night Owls courtesy of Triskelle Pictures, Stella Vision and Team Chameleon. Produced by Sophia Ramcharan and Lauren Parker. Starring Jonny McPherson and Holly Rushbrooke.
As well as the general principles of cinematography like three-point lighting, short key and so on, there are specific principles that apply to certain situations only. Since these situations don’t always come up, it can take a little longer to develop a mental toolkit to get the best out of them. One such situation is shooting water – scenes by riversides, on beaches, beside swimming pools or in bathrooms. What are the tricks you can use to get the most cinematic look?
1. Use a circular polarising filter
Without (left) and with (right) a polarising filter
A polarising filter cuts out all light waves except those travelling in a certain plane. Since reflections are usually only in a single plane, by rotating a circular polariser filter until you hit the right angle, you should be able to reduce the reflections you’re seeing. This can have an impact on how water appears on camera. On an overcast day, a CP will allow you to reduce the reflections of the grey sky, making the water look clearer and bluer.
2. Get sparkly
Shooting towards the sun provides both lovely backlight and sparkles on the river in this shot from Stop/Eject.
Water will always look prettier, particularly large bodies of it, if the sun is sparkling on it. How do you capture this on camera? Use the principle that the angle of incidence equals the angle of reflection, the same principle you use when positioning a bounce board. As with all day exteriors, shooting at the correct time of day is critical. You want the sun to bounce off the surface of the water and into your lens, which means being on the opposite side of the water to the sun, with the camera facing the sun. Use a top flag on your matte box (a.k.a. “top chop” or “eyebrow”) to prevent lens flare if you so wish.
3. Get rippling light
Using a paddling pool and a par can to create a rippling light effect for close-ups on The Little Mermaid. Note the black fabric as per tip 4 below. At the white end of the paddling pool you can see the stool where the talent sat.
The same principle can be applied to capture rippling light effects on walls, faces, etc. This time you want the sun, or artificial light source, to bounce off the surface of the water and hit your subject. You can suggest an off-camera body of water when there is none by carefully positioning a fish tank, paddling pool or similar in relation to the light and your subject.
4. Kill the bottom bounce
Beware that not all the light will bounce off the surface of the water. Some will pass through it, bounce off the bottom of the pool and then hit your subject. If the bottom of the pool isn’t a dark colour, this unmoving bounce light will overpower the rippling light coming off the surface. Lay duvetyne or other black fabric on the bottom of the pool so that the only bounce is from the surface.
5. Fake it
Grip Sawyer Oubre standing by to fake rippling watery light on The Little Mermaid
If you need to create a rippling light effect without using water, you can fake it with a sheet of blue gel on a frame in place of the water surface. Wobble the frame slightly (only slightly, or the sound department will start to yell at you) and the gel will ripple in the frame, creating a similar effect to water. Thanks to my key grip on The Little Mermaid, Jason Batey, for introducing me to this technique.
Another way to simulate watery light is to bounce a lamp off silver paper or fabric which is being rippled by a fan. More on this technique here.
What about shooting UNDER water? Just one tip for that: hire an underwater DP.