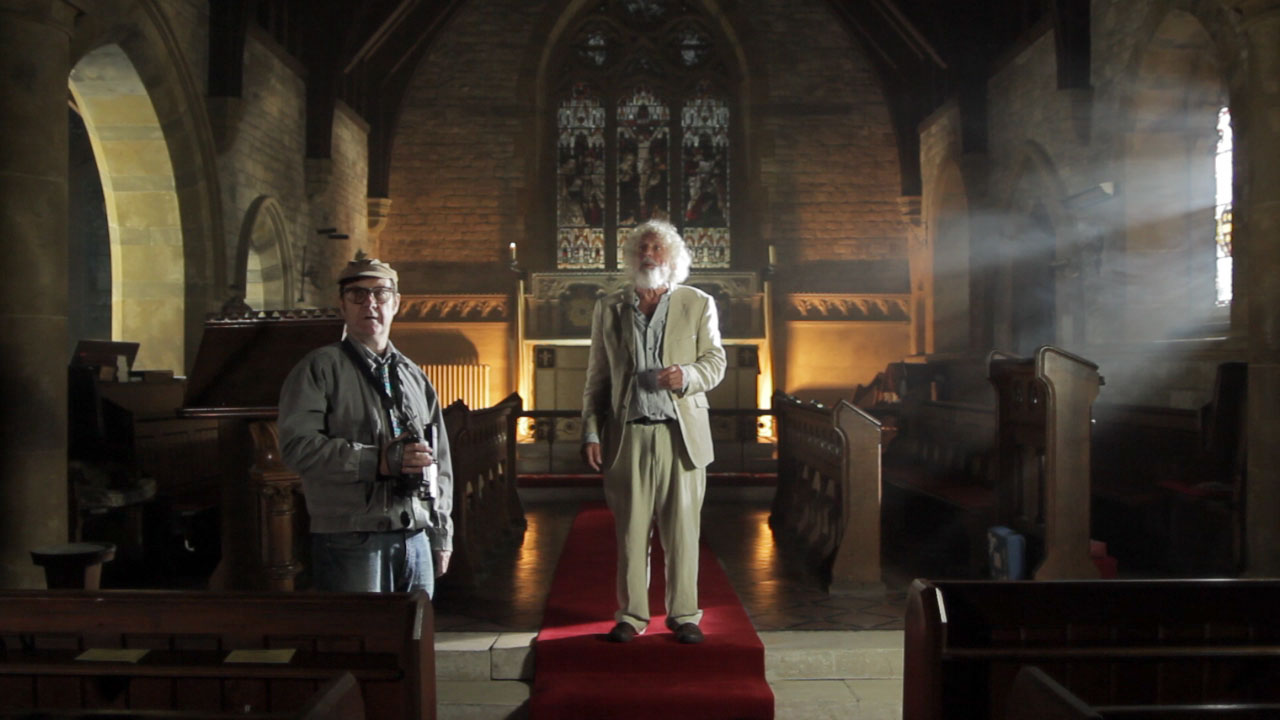
Roger Harding (left) and Jeremy Heynes in The Deaths of John Smith. A 1.2K HMI punches through the window on the right, while a fluorescent softbox illuiminates the arches on the left. Background light comes from two 500W halogen work-lights rigged to a dimmer, while fill (given that it was getting dark outside at this point) comes from a blue-gelled 1K Arrilite behind and to the left of camera.
This weekend shooting began on Roger Harding and Darren Scott’s feature-length comedy The Deaths of John Smith. As director of photography I was called on to light a beautiful rural church on a limited budget. Here are some tips for ecclesial cinematography:
Hire HMIs – powerful, daylight-balanced lamps. Without at least one you will never have enough light to illuminate anything but the tiniest of churches. As a backlight on a mezzanine level, a 2.5K HMI will illuminate most churches. Better still, put them outside the windows and create artificial sunbeams. (A blue-gelled blonde or redhead outside a stained glass window is pretty much useless; those windows cut out so much light.)
Use smoke. A £50 disco smoke machine is perfectly sufficient – use it to volumize the light and emphasise the depth and scale of the building. If you’re struggling to expose a bright enough image, smoke helps there too – because it catches the backlight and lightens up the shadows.
Candlelight is a good way to introduce colour contrast into your scene. Dedos are the best lamps to fake candelight with, as they can produce a small circular pool of light. Failing that, any tungsten source will do, ideally rigged to a dimmer board for a bit of flickering.
Assuming you’ve got your HMIs punching directly in through all the windows on one side of your church (that’s the side the “sun” is on), you now need soft light coming in through the opposite windows. Ideally these would be larger HMIs playing off bounce boards, but you might get away with soft boxes or bounced tungsten sources (gelled blue, of course) hidden behind pillars inside the building.
Sellotape together some old bits of coloured gel and rig them in front of a fresnel to simulate daylight through a stained glass window. Note that this doesn’t really work with unfocused lamps like redheads.
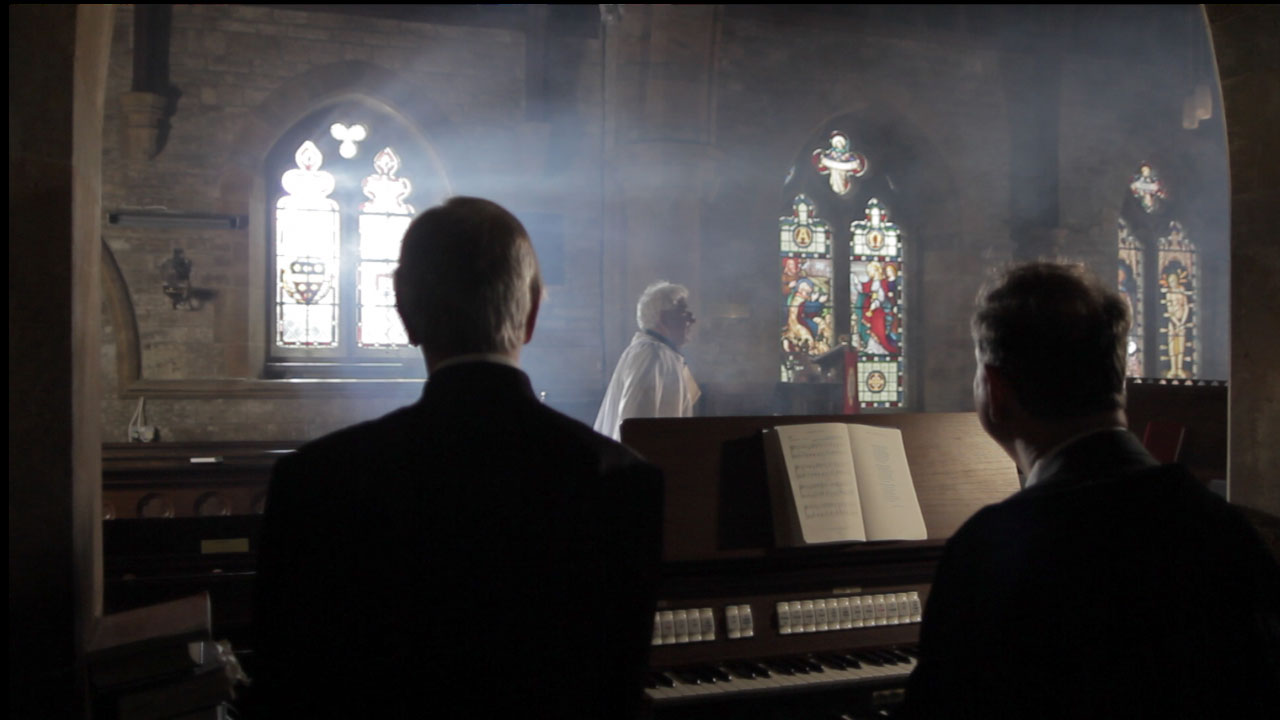
Left to right: David Draper, Bryan Ferriman and Adrian Moore. Our single HMI shines through the lefthand window, suitably volumized with smoke, leaving natural light to deal with the other two. A blue-gelled 1K Arrilite off to the right of frame creates the edge-light on the righthand side of each character. An existing halogen spotlight over the organ was gelled with half CTB to cool it down a little. I chose to leave the nearside of the characters dark to contrast the foreground with the brighter background.
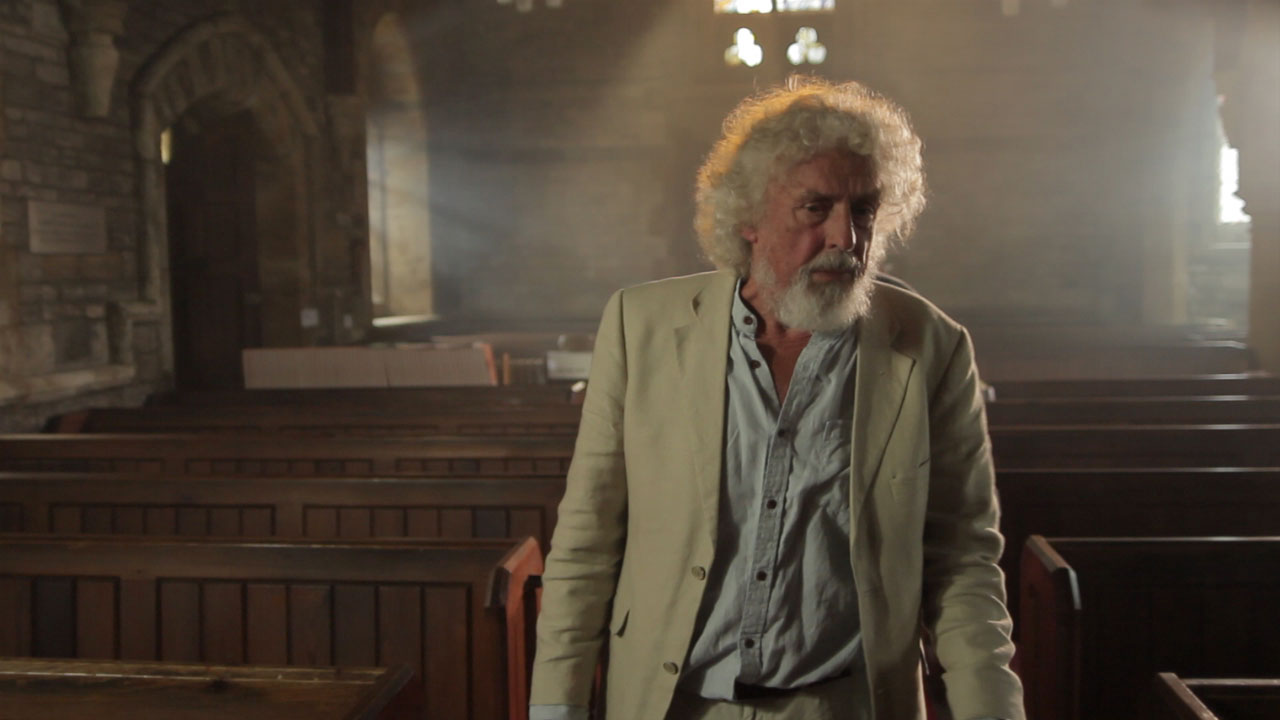
On The Deaths of John Smith I only had access to one HMI, so for every shot I needed to carefully choose which window to put it outside of for the maximum impact. I relied on natural light as well as blue-gelled redheads and fluorescent softboxes just out of frame for fill light. Nonetheless, I’m very pleased with the results. Next weekend we have to repeat the performance with a large congregation….
Here the “sun” (HMI) is outside of the lefthand background window, but I couldn’t resist cheating a little and pushing a 1K Arrilite through a nice yellow stained glass window in the top centre background. Additional backlight comes from a blue-gelled Arrilite off frame right, while a softbox behind and to the left of camera illuminates the actor’s face.
Stop/Eject‘s producer Sophie Black gives us a virtual tour of the film’s locations, stopping off along the way to see the work of other filmmakers who have shot in the area. Featuring interviews with actors Georgina Sherrington and Therese Collins, and Yours Truly. Clips courtesy of All Doors Lead Somewhere Productions and Sam Jordan.
Conventional wisdom with marionettes is probably to go for very flat lighting with no backlight, to make it as difficult as possible to see the strings. But on TOTGA I wanted to embrace and celebrate the tactile, handmade look of the puppets and sets, so I chose a traditional three-point lighting scheme that imparted depth and made no effort to hide the strings.
Normally I shoot wide open – typically f1.8 – on my DSLR, but as the puppets were small the depth of field would have been ridiculously shallow at that aperture. Instead I lit the set very brightly (about 3KW of tungsten horsepower in our cramped living room – not very pleasant during a heatwave!) and stopped down to around f4.
Daylight
The clouds cast shadows on the sky, but I think that adds to the charm.
For the daylight scenes I used my three open-face tungsten Arrilites: a 1K poking over the top of the backdrop for backlight, another 1K with tough-spun diffuser off camera left for key, and an 800W bouncing off the ceiling for fill. This last lamp was gelled blue to suggest ambient skylight.
I tried to simulate the camerawork that would have been used had this been shot at sea with real actors, so:
the camera bobs up and down in wide shots, as if Henry’s boat is being shot from another vessel;
the camera and boat are fixed in close-ups, with the background bobbing up and down, as if we’re now shooting on a tripod in Henry’s boat.
Underwater
A cool white balance and blue gels help to give an underwater look.
The underwater dream sequence was all shot dry-for-wet at 50fps for a watery slow motion. Using Magic Lantern I dialled in a cool white balance of around 2500K, and pumped in smoke to add diffusion and suggest currents. (I wished I’d use a lot more smoke, but we would have all choked to death.)
I used just two light sources: the 1K backlight, now gelled blue, and the other 1K, bounced off sheets of silver wrapping paper tacked loosely to the ceiling. This is exactly the same method I used for a scene in Ashes – flapping a piece of card at the wrapping paper makes the light ripple in a very watery way.
Shallow depth of field working nicely in the romantic underwater dream sequence
The underwater lighting scheme was a lot darker than the daylight one, so I opened up to around f2, giving a crazily shallow depth of field that worked nicely for this dream sequence. The mermaid’s close-ups were all shot through a CD case for an old-school soft-focus look.
I would have liked to have shot this sequence handheld, but a lack of crew meant I had to lock the camera off so I could operate the smoke machine, fan the wrapping paper and move little fish through frame.
Sunset
When Henry awakens from his dream, the fish escapes and he gives chase. Orange gels and lens flare were used to suggest the sun getting lower in the sky, until finally Henry and his quarry are silhouetted against the solar disc itself. This is a domestic 100W tungsten bulb peeking over the back wave. The only other light source is a row of six more such bulbs under a sheet of orange gel, just behind and below the first one.
The sun is an ordinary 100W tungsten lightbulb.
As the scene moves into twilight, the first bulb is removed and the orange gel over the other six is replaced with a purple one. The 1K backlight is turned back on (possibly it would have been more realistic without, but I’m just a sucker for backlight) and some pink fill is provided by placing a sheet of Minus Green gel on the other 1K and bouncing it off a reflector.
Pink and purple gels are used to give a post-sunset tinge to the final scene.
Whatever position you occupy on a film crew, you are always a storyteller. Everyone is working to build and enhance the narrative and emotional threads which will engage the audience.
Cinematography is certainly no exception, and on the recent shoot for Dave Cave’s dark fantasy Girl and a Scar, my task was to take the lighting of an interior location on a journey which mirrored that of the titular Girl (Ileana Cardy), starting from a place of heightened realism, building to a crescendo of crazy and then finally returning to normality. It was a great visual script, describing candelight, daylight seeping in through cracks in boarded-up windows, wind and lightning, so there was plenty to get my creative juices flowing.
Copyright 2013 One For All Productions and Yellow Fever Films
Above is the wide shot from the opening scene. I’ve used a classic cool/warm colour contrast between the moonlight and the candlelight. The windows of the house were supposed to be boarded up, so the barn doors of the 650W tungsten fresnel (gelled with full CTB) off camera right are fairly narrow to create the streak of light on the back wall. A second blue-gelled 650W fresnel is behind the frosted door on the left, providing a bit of depth and suggesting another window or hole in the roof.
The candlelight is provided by an orange-gelled 300W fresnel hidden behind the corner of the fireplace to the left of screen. The difficulty with candlelight is always matching the angle the light should be coming from, and in particular hiding the shadow of the candle itself, which in reality would not exist. We solved the problem in this instance by splattering dark wax over the shadow on the top of the cabinet. A dimmer was used to flicker the 300W appropriately.
Copyright 2013 One For All Productions and Yellow Fever Films
Above is the third interior scene, and one of my favourite shots in the film. To kick up the stylisation a notch I’ve used flags to make the streak of light on the back wall a little harder-edged.
This shot is a good example of how effective side lighting can be. There are no light sources on the camera side of the subject at all; it’s all coming on from the side and slightly behind, leaving the camera side of her in darkness. We call this dark side of a subject the “down side”, and it’s always more interesting to have this side be the one facing camera.
Copyright 2013 One For All Productions and Yellow Fever Films
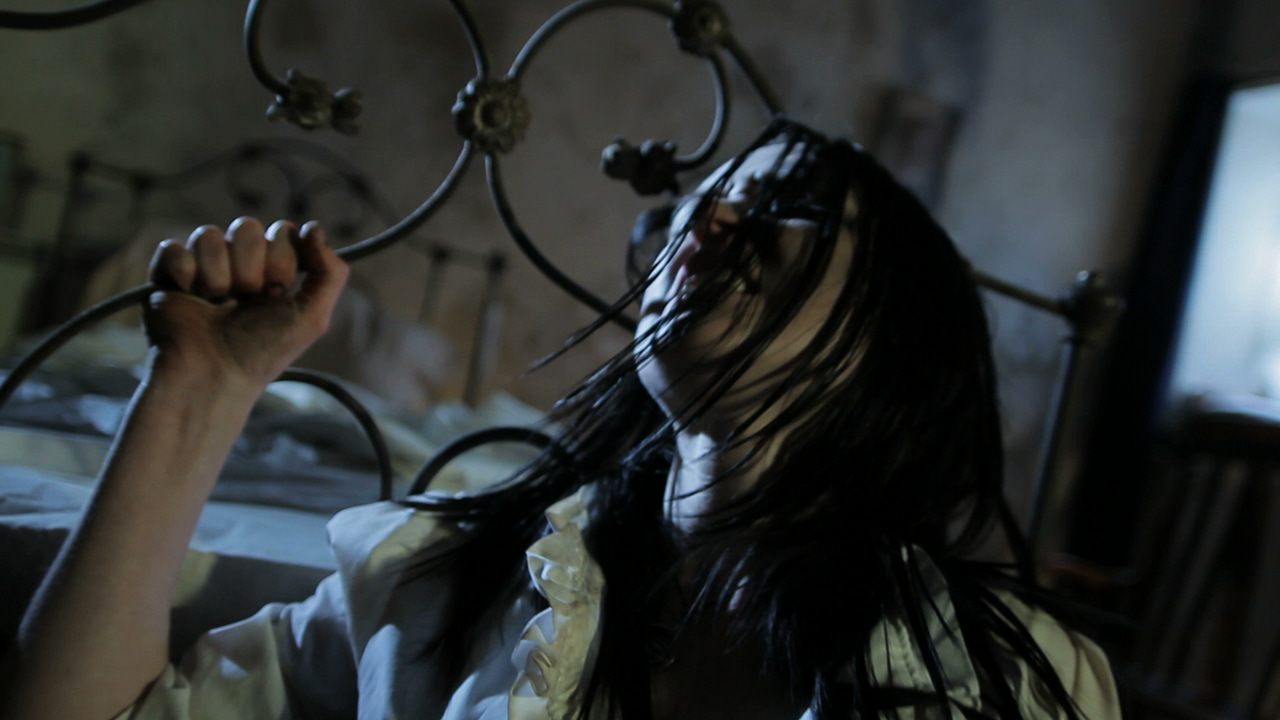
Above is the scene which represents the height of weirdness in the story. There are two things I’ve done to make the lighting more stylised. Firstly I’ve introduced some green light, motivated by an off-screen doorway. This combines with the make-up and a fantastic performance from the actress to enhance the character’s sickness. Secondly I’ve adjusted the blue-gelled 650W fresnel that was behind the frosted door in the first scene. It’s no longer bouncing off the wall in that back room – instead it’s pointed directly at the talent with the door now open. This creates a strong, steely backlight. Combined with a dutched handheld camera, the overall effect is suitably unsettling.
Copyright 2013 One For All Productions and Yellow Fever Films
The scene ends with the curtains of the room’s main window opening to bathe the Girl in light as she comes out of the other side of her dark journey. To enhance the natural light that would come in when the curtains were opened, I bounced a fresnel off the ceiling and ran it through a dimmer board so it could be faded up as the curtains parted. Another 650W was placed outside the window, positioned exactly behind the talent’s head to give her a halo of light and create lens flares when she moved her head to reveal the light. (The lamp itself can’t be made out on camera because it’s so bright.)
So that’s an example of how cinematography can serve narrative and character. How have you used light to tell the story?
Earlier this year I was hired to DP some promotional spots for Onstage in London. Onstage produces content for the web, hotel TV channels and the growing number of TVs in London taxi cabs, on the subject of West End theatre. The brief was to shoot interviews with actors and creatives against a white backdrop, to be intercut with EPK (Electronic Press Kit) footage of the shows or edited into montages like this one:
I’ve always been a bit wary of shooting against white screens. The danger can be that you have to pump in so much light to make the screen blow out on camera (meaning it turns to complete, uniform white) that the whole image becomes flat and you’re left with no shape to your talent’s face.
Further complicating matters was that, on the first day of shooting, we were travelling to the talent, rather than vice versa, so we were often setting up the backdrop, lights and camera in cramped dressing rooms.
Here is the set-up I came up with:
Set-up 1
Yes, just one light. That one light does four things:
Its direct light blows out the white backdrop.
Its direct light through the diffuser serves as the talent’s key.
Its bounce light creates a little edging on the talent. (I initially set up a dedicated backlight, but found that this bounce was doing a better job. Besides, if you put in too much backlight the talent starts to blend into the white screen.)
The level of ambient light it created in the room served as fill. Sometimes there was too much fill, in which case I would have Colin hold up a black card near the talent’s down side (i.e. the side not lit by the key) to block some of the ambience and restore some shape and contrast to the image.
The next time we shot for this project we were in just one room, with significantly more space than we’d had before, so I plumped for a different set-up:
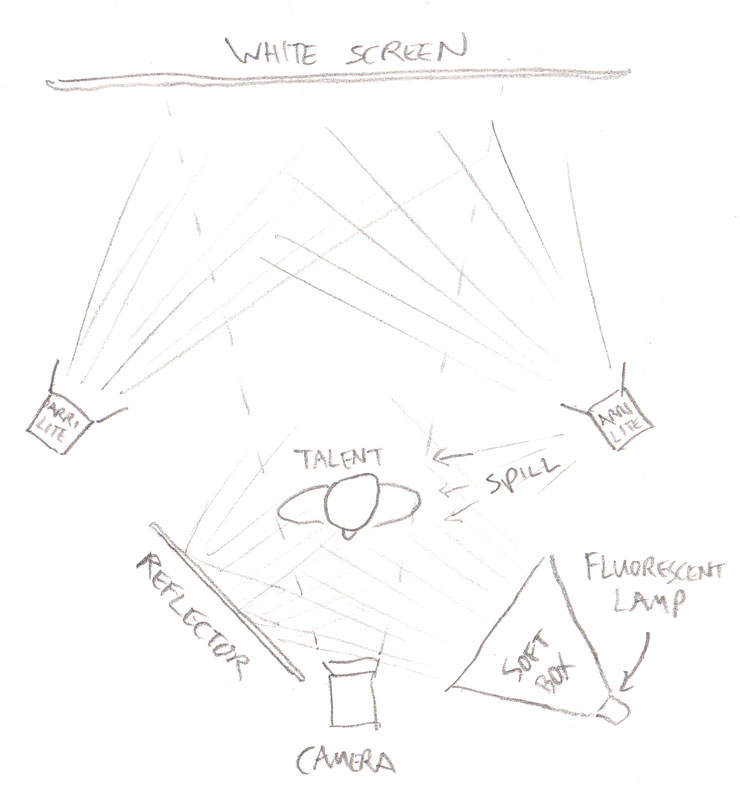
Set-up 2
This time there was enough room to place the talent well away from the backdrop and light them separately. Two Arrilites blow out the backdrop while the fluorescent lamp serves as the talent’s key. Fill is provided by a reflector and a touch of edge light is serendipitously provided by spill from the cooling vents on the side of one Arrilite.
Has anyone else out there shot against a white screen recently? I’m interested to hear what your approach to lighting it was.
Colin Smith lines up the Super-8 camera as director Sophie Black pans the mirror.
After an unseemly delay, here’s the third and final part of my series about lighting Ashes, Sophie Black‘s dark fantasy drama. Read part one here and part two here.
For the fantasy world dubbed “Toybox” by the production team, Sophie wanted a gritty, grainy, comfortable look. She was keen to shoot the scene on Super-8 and wanted to make full use of that high contrast celluloid look with harsh spotlighting, deep shadows and vignetting.
The biggest problem for me was how to get a spotlight effect in a fairly small room with an ordinary daylight fresnel. To get a circle of light small enough to fit entirely within the camera’s frame required the lamp to be much further from the subject than was possible within the space. I suggested shooting at night and putting the light outside the window, but the schedule couldn’t accommodate that.
The problem was solved by bouncing the light off a circular mirror. This masked the light into a relatively sharp circle, because the lamp was the entire length of the room away from the mirror. (The closer a mask is placed to a lamp, the fuzzier the edge of the mask will appear when thrown on the subject, so simply cutting a circle out of cardboard and placing it in front of the lamp would have given us a blob of light instead of a defined circle, because there wouldn’t have been enough space to put the cardboard far enough away from the lamp.)
Bouncing a redhead off a circular mirror for the sweeping light effect. Photo: Sophie Black
Not only did the mirror allow us to achieve a key shadow puppet shot which Sophie had conceived, it also enabled us to create a sweeping light effect for other parts of the sequence. Inspired by one of Lana del Rey’s music videos, Sophie wanted the effect of headlights passing by outside a window. We were able to do this simply by panning a redhead across the mirror.
The Toybox scene was shot both on Super-8 (by Col) and on my Canon 600D as a back-up. I set the ISO to 1600 on the DSLR to bake in a grainy look. I won’t do this again, however, because I failed to take into account the effect of the camera’s H.264 compression. The grain looked fine on the viewfinder, but once compressed and recorded there were lots of blocky artifacts. I hoped that the Super-8 film would come out well so this sub-standard digital material wouldn’t have to be used, but alas there were some focus issues and several of the shots were inexplicably missing from the reels when they came back from the lab. Fortunately the day was saved by a talented VFX artist who applied a very convincing Super-8 look to the 600D footage, which hides the compression artifacts.
Ashes is nearly finished now and we’re all very excited to see how it’s turned out. Meanwhile, here’s the trailer:
How do you create nice, thick, artificial rain for a dramatic fight scene, with no budget to speak of? Here’s how we did it on Soul Searcher.
This is a clip from the feature-length documentary Going to Hell: The Making of Soul Searcher. You can rent the whole doc digitally from the Distrify player below for a small charge, and you can watch Soul Searcher itself for free at neiloseman.com/soulsearcher
The clip shows how we created a fake downpour for a fight between the outgoing Grim Reaper, Ezekiel (Jonny Lewis, doubled by Simon Wyndham), and his replacement, Joe (Ray Bullock Jnr.). Ironically it was actually raining for real, but not heavily enough to show up on camera with the impact we needed. We’d had some rain bars made (lengths of hosepipe with holes drilled in them, strapped to bamboo canes) but we found the water squirted out in unrealistic jets. Luckily the location – Westons Cider in Much Marcle, Herefordshire – had a high pressure hose and we found that by pointing it upwards the water back down looking like rain.
The WidthScribe promotional video I recently completed for Astute Graphics involved the actress driving a car – except we ended up casting an actress who can’t drive. We got around this in a few different ways, including the obvious substitution of a qualified driver in the wide shots, complete with appropriate wig.
Perhaps the most interesting technique we used, and one which I might well have used even if she could drive, was Poor Man’s Process. Nowadays, most fake driving shots in films and TV shows are achieved by shooting against a greenscreen and replacing that screen in post with a moving background plate. A more traditional technique is to film against a rear projection screen – a screen onto which previously-shot footage of a moving background is projected in real time behind the actors. This was known as Process Photography.
Poor Man’s Process leaves out the screen altogether, shooting against a plain, ambiguous background that doesn’t reveal the lack of movement – typically empty sky. Careful use of camera movement and dynamic lighting create the illusion of movement.
Here is the set-up we used on the WidthScribe promo.
Making the magic
The car is parked on Nick’s drive, which is conveniently sloped so that – from the camera’s point of view – only sky and a bit of a distant tree are visible in the background.
A light behind the car represents the sun, and Nick chops a piece of cardboard up and down in front of it to represent the shadows of passing trees.
Low budget wind machine
Sophie operates a hairdryer to blow Laura’s hair around.
Col shines a reporter light into the lens, moving it around to create the impression of the sun changing position relative to the camera.
And I dolly the camera side-to-side while vibrating it ever so slightly.
When intercut with wide shots of Nick’s wife driving the car for real, you’d never know the close-ups were cheated. (An additional trick we employed was to sit Laura in the passenger seat of the moving car then flop the image in post, for the over-the-shoulder shot of the pylon passing by.)
The drapes are to cut out the reflections in the windscreen.
Poor Man’s Process works best at night, but with the shallow depth of field provided by DSLRs it’s now possible to get away with it in daylight too, so long as the shot is kept fairly tight and the road you’re meant to be driving on is fairly open.
You’ll want to vary the lighting effects you use according to the surroundings the car is supposed to be in. You can use spinning mirrors to sweep “headlights” or “streetlights” over your actors, or move a keylight representing the sun or moon slowly side-to-side, or even place two out-of-focus bulbs in the background of your shot to represent another car behind.
I’ll leave you with an example of Poor Man’s Process in use on a big-budget Hollywood film, Michael Bay’s 1997 Alcatraz actioner, The Rock. All the close-ups in the cars were shot static in a car park.
This post has been created and published because the total raised in Stop/Eject‘s post-production crowd-funding campaign has passed the £1,100 mark. I’m going to look at how the money you all contributed in pre-production was spent in order to get Stop/Eject in the can.
Stop/Eject was originally meant to be filmed in autumn 2011 under the auspices of another production company. Prior to the project’s postponement and subsequent resurrection as a crowd-funded movie, Sophie and I spent some money on set dressing (£149.76), costumes (£206.20) and travel (£60). We absorbed these costs personally and they’re not included in the budget.
As you can see, the crowdfunder.co.uk campaign was the main source of income, although a significant amount was donated after this campaign closed, in cash or via the Paypal button I had on this website for a while. Two of the three Soul Searcher lectures were failures, with few or no attendees; only the Derby lecture (done as part of a Five Lamps Film Night) took more cash than it cost me to travel there. Selling Benedict Cumberbatch’s costume from The Dark Side of the Earth’s pilot was the last part of the pre-production funding jigsaw.
Costume designer Katie Lake models one of the outfits purchased in 2011.
Moving onto the expenditure, the first thing you have to do with any type of fundraising is deduct the costs involved in that fundraising process – in this case crowdfunder.co.uk’s fee and the production and postage of the rewards/perks for sponsors. These costs represent less than 8% of the budget, which I think is pretty good value.
Under pre-production you can see that more props and costumes were purchased in 2012, in addition to those we’d already bought in 2011. The total costumes outlay across the two years was £407.94, making it one of the largest costs of the production. This was due to the high number of story days in the script (eleven), each of which required a new outfit. A significant chunk of the props budget went on 400 cassette cases for the scene in the Tape Archive, while the construction materials included the wood and antique doors which the alcove set was made from. Auditions were held at Conway Hall in Holborn, London, owned by the very strange but pleasingly cheap South Place Ethical Society.
If you have a problem, if no-one else can help… (photo: Colin Smith)
Travel is the biggest expense under production and indeed for the entire project, totalling £1,049.49 if you include the van costs and the pre-production and 2011 costs, even though some of the local crew waived their mileage and parking expenses. The high travel expenditure was partly due to many key cast and crew members living at least a two hour journey away from where we were filming, but even on more local projects I’ve often found that travel can be the most expensive element (assuming you’re not paying anyone fees). Hiring the van was relatively cheap in the grand scheme of things, and was worth every penny and more. Without it we couldn’t have moved the alcove set or some of the larger props around, and squeezing all the equipment into cars would have been a nightmare.
I was very surprised how little we spent on food and catering. £248.33 fed about ten people for five and a half days. Many of the meals were cooked in advance, frozen and reheated on set or cooked from scratch on set by Katie or Debs, but we bought takeaways for everyone on at least two occasions. That figure also includes supplies like plastic beakers, disposable plates, bowls and cutlery and a thermos flask. We borrowed a fridge and a hotplate and brought our own microwave along.
When drawing up a new budget for Stop/Eject after its initial postponement, accommodation seemed like a killer cost that might prevent the film from ever being made. Research indicated that I could expect to pay around £2,000 to hire a holiday cottage large enough to house everyone for a week. As it turned out, we found Magpie, not only a brilliant location for the shop and many other settings, but also a place where some of us could stay (albeit in less than ideal conditions). The owner asked just for a token amount to cover the utilities costs, and with Sophie’s spare room also put to good use we only had to hire one hotel room for one night.
If you’re wondering where I got the public and employers’ liability insurance from, the answer is Essex Insurance Brokers. They specialise in short-term policies for low-budget filmmakers and you can get a quote and activate a policy in just a few minutes using their web form. If that sounds like a blatant advert, let me counter it by saying they were utterly unhelpful and a bit rude when I tried to get insurance for The Dark Side of the Earth‘s pilot from them.
Steve Lawson’s kindly-lent jib in action outside Magpie. Photo: Paul Bednall
Finally, a word on the stuff we didn’t spend money on. None of the cast and crew were paid, which caused lots of stress and hassle in the month leading up to the shoot as several crew and both lead actors pulled out in order to do paying work that clashed. As a result I’ve sworn never to do anything again but simple little one-day shoots unless I can afford to pay people. Feel free to remind me of this if I ever seem to be going astray. We also spent nothing on equipment hire. Most of it (camera, lenses, tripod, dolly, shoulder rig, smoke machine) was mine and the rest of it was borrowed. Thanks to Steve Lawson for loan of the jib, Colin Smith for the Glidecam and additional lights, The Rural Media Company for an additional light and some sound kit, and Ian Preece for the sound recorder.
When all the figures were totted up, I was as shocked as anyone to see we’d come in more than £400 under budget. This meant we were able to set our post-production crowd-funding target at £1,500 rather than the £2,000 we had planned. We’re now less than £400 away from that target, so please help us get there by toddling over to stopejectmovie.com and hitting Donate. And if you’re curious to know how the budget of a indie feature film breaks down, choose the £10 “Line Producer” reward and you’ll get a full and detailed analysis of Soul Searcher’s monetary ins and outs.