“Quantum Leaper”

This week issue 40 of Infinity magazine comes out, featuring a couple of articles I wrote, including one about the cult sci-fi series Quantum Leap. The show saw Dr. Sam Beckett (Scott Bakula) bouncing around time into other people’s bodies and striving to put right what once went wrong, while his holographic friend Al (Dean Stockwell) smoked cigars, letched, and relayed exposition from Ziggy the computer.

I end the article by wondering whether it’s time for someone like Netflix to bring the show back (it definitely is). What I don’t mention in the magazine is that – unbeknownst to almost everyone – Quantum Leap has already been rebooted once.

This, my loyal readers, is the story of Quantum Leaper.


Season One (1995)

As teenagers, my friend David Abbott and I were huge Quantum Leap fans, and were bereft when the show was axed in 1993. I was developing an interest in filmmaking, having dabbled in 2D computer animation on my Atari ST and borrowed my grandfather’s Video-8 camcorder on a couple of occasions. When I was given that camcorder for my 15th birthday, David and I decided that we would make our own version of Quantum Leap, which we imaginatively titled Quantum Leaper.

The first episode was called “Just What the Doctor Ordered” and saw my character – named, again with great imagination, Neil – leaping into a doctor just as his patient is flatlining. I don’t remember much about the plot, but I do remember that we climbed the nearby Malvern Hills to film a fight scene.

Dave played Albert, my holographic helper, communicating with Project Quantum Leap’s supercomputer Ziggy by means of a special hand-link, just like Dean Stockwell did. Unlike Dean Stockwell’s, this hand-link was a calculator.

The two of us also played all the supporting characters (often with the judicious addition of a hat or jacket) and operated the camera, unless we were both in shot, in which case it was locked off. Much of the the editing was done in camera – rewinding the 8mm videotape, cueing it up to the exact moment the last piece of action ended, then hitting record and calling action simultaneously – and the rest I did tape-to-tape with two VCRs connected together. A cheap four-track disco mixer enabled the addition of music (badly composed by me) and sound effects (many of which were sampled from Quantum Leap itself). As YouTube was still years away, the only viewers for the series were our parents and friends, forced to sit down in front of the TV and watch it off VHS.

Episode two, “Boom!”, saw the fictional Neil as a bomb disposal expert supposedly in Northern Ireland in 1980, though like the first episode it was all shot in and around my house. My sister Kate was drafted in to play a journalist whose life Neil has to save.

“A Leap into the Blue” was the next episode, with Neil in the body of a parachutist. Scenes of characters in free-fall were shot with us standing in front of a white wall; I digitised the footage on my ST with a Videomaster cartridge and composited scrolling clouds into the background. The resolution of the Videomaster was very limited – maybe 320×240 – the frame rate was very low too, and it could only do black and white.

A digitised visual effect using a shot of a plane stolen from some TV programme or other

Next we shot a “pilot” episode explaining how Neil and Albert switched places with Sam and Al. I remember digitising shots of Scott Bakula and Dean Stockwell from Quantum Leap and compositing them atrociously into our own footage. At about 30 minutes long, the pilot was double the length of our other episodes.

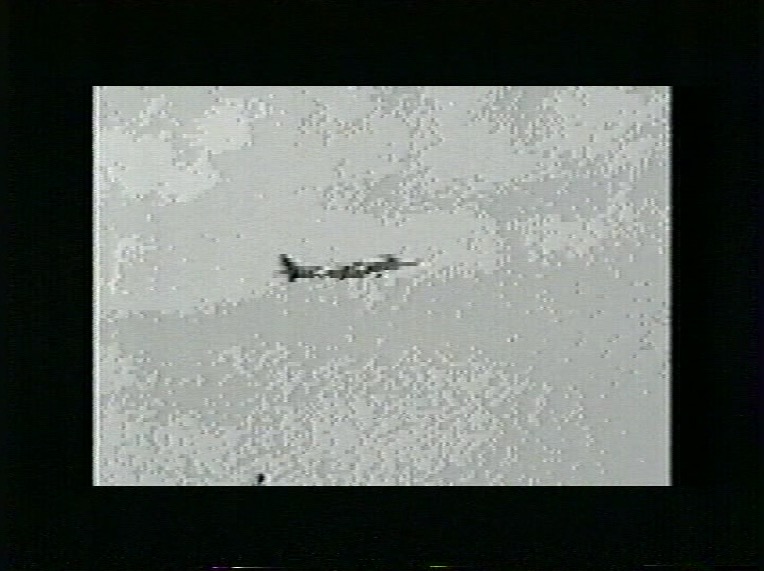
Then we continued the series where we’d left off. Dave’s script “One Giant Leap” has Neil on a space shuttle mission, an episode that included NASA footage taped off the TV. We made almost no attempt to create sets; the space shuttle cockpit was a plain wall, a computer keyboard and a piece of card to cover an incongruous bookcase.

The space shuttle cockpit “set”

The next two episodes find Neil meeting (and shooting) an evil future version of himself, then leaping into the crazy future space year of 2017. The latter involves a flying car – my mum’s Citroen AX with the wheels framed out, intercut with an extremely crude CGI model.

Dave’s episodes “Virtual Leaping” and “Bullets Over Leaping” see Neil become a VR programmer (with a headset made of Lego) and then an actor (in a studio suspiciously like Dave’s shed).

The VR headset “prop”

My next episode has Neil leaping into himself and saving his father’s life. (My actual dad provided some splendidly wooden acting.) But doing this causes a paradox, and the season finale sees Neil and Albert swap places (as Sam and Al do in a classic Quantum Leap episode) and Neil having to restore the timeline to prevent the destruction of the universe.

We were ambitious. You can say that much for us.


Season Two (1996)

The following year, while doing our GCSEs, we began work on a second season. In between I’d made a bad 40-minute comedy, Bob the Barbarian, and an appalling feature-length sci-fi film, The Dark Side of the Earth, and I’d learnt a few things that would lift the production values of Season Two very slightly. I’d also nagged my parents into buying me a genlock which would let me superimpose CGI over analogue video, meaning I didn’t have to digitise footage and suffer the horrendous image degradation any more.

The holographic Albert enters the Imaging Chamber, an effect enabled by my new genlock.

The actual Quantum Leaping effect from this era of the show is surprisingly decent given the equipment we were working with. We would lock the camera off and jump-cut to a blue filter being over the lens, then a white glow would creep over me – an animation I achieved in software called Deluxe Paint – followed by tendrils of electricity. The screen would then fade to white and a similar effect would play out in reverse to show the leap in.

Leaping from life to life, striving to put right what once went wrong…

Another improvement was that we managed to convince a few other friends to act in the series, including fellow Quantum Leap fan Lee Richardson, as well as Chris Jenkins, Conrad Allen, Matt Hodges, Si Timbrell and Jim McKelvie. Recognising my lack of musical talent at last, I abandoned composing and instead used soundtrack CDs from Star Trek: Deep Space Nine (Dennis McCarthy), the John Woo film Broken Arrow (Hans Zimmer), and the Doctor Who story “The Curse of Fenric” (Mark Ayres). Albert’s hand-link prop got an upgrade too, from a calculator to a custom Lego build with flashing lights.

Lee Richardson “acting” in the control room “set”

Season Two opens with Dave’s episodes “Project Hijacked” and “Oh Brother, Where Art Thou?” which focus on events at Project Quantum Leap, supposedly a high-tech facility in the New Mexico desert in 2005. In reality it was a living room with a control console made out of painted cardboard boxes and Christmas lights. In an early manifestation of my cinematography leanings, I snooted the ceiling light with a rolled-up piece of silver card, lending a little bit of mood to the look.

At the time, Dave’s family were training a hearing dog, Louis, so I wrote an episode to feature him; “Silence is Golden” sees Neil leap into a deaf man, and was followed by the morbid “Ashes to Ashes” where he leaps into a corpse.

The next episode, Dave’s “Driven to Distraction”, is probably the best of the lot. For once there were few enough characters that no-one needed to confusingly play dual roles, and there is plenty of action to boot. (I uploaded this episode to YouTube so long ago that the ten-minute time limit still applied.)

The X-Files-inspired “Close Encounters of the Leaping Kind” comes next, with Neil as a ufologist bothered by a shadowy government agent. Then Neil becomes a teenager who must prevent a drugs overdose, then a one-armed man who must overcome prejudice to hold down a job. Cringingly entitled “Not So Armless”, this latter was shot in a newsagent’s owned by a friend’s parents, one of the series’ few non-domestic locations.

Like Quantum Leap we had a mirror shot in every episode where Neil would see the leapee’s reflection looking back at him. Sometimes Dave would track the camera behind my back and we’d hide a cut in the darkness to swap me with whoever was playing the reflection. Another time we pretended the serving hatch in Dave’s house was a mirror and the two of us synchronised our movements. For a fight scene in “Not So Armless” Chris hid one arm inside his t-shirt so that Neil’s mirror image could appear to punch the antagonist with an invisible fist!

Facing mirror images that were not his own…

The penultimate episode of the season features several brief leaps, ending with one to Hiroshima in 1945, where the A-bomb detonation (more footage off the TV) causes both Neil and Albert to leap simultaneously. In the finale, Albert becomes a mountaineer caught in an avalanche, while Neil is a member of the rescue team – a premise thieved from the Quantum Leap novel “Search and Rescue”. We started shooting it during snowy weather, but the snow thawed and the episode was never completed. The friends who had been appearing as supporting characters now had part-time jobs and couldn’t spare the time for filming.


Legacy

We wrote all six episodes of a third season which would have explained how Neil became the evil future version of himself seen in an earlier episode, but nothing was ever filmed.

In 1997 we began a remake of the pilot using the experience we had gained since shooting the original, but again it was never completed. One part we did film was an action sequence with me on the roof rack of a car while the driver swerves around trying to throw me off. We shot this on Malvern’s Castlemorton Common and used a dummy of me for some of the wider and more dangerous shots. Its acting was probably better than mine. We remade the scene four years later as part of my Mini-DV feature The Beacon.

Today only five of the 20 Quantum Leaper episodes that we made survive, the rest having been callously taped over at some point in my late teens. That’s probably for the best, as most of it was hilariously bad, but making it taught me a hell of a lot about filmmaking. Without it, I doubt I’d have a career in cinematography today.

His only guide on these journeys is Al, an observer from his own time…
“Quantum Leaper”

What’s in a DP’s Set Bag?

I used to own a whole bunch of equipment – camera, lenses, lights – but for reasons I’ve detailed elsewhere I got rid of all that back in 2017. These days I travel pretty light (no pun intended) to set, but there are a few items I wouldn’t like to be without.

Here’s what’s in my set bag, roughly in descending order of importance.


1. Phone

Alright, this isn’t technically in my set bag, but it is the most used thing on a typical day on set. I use Chemical Wedding‘s Artemis Pro app all the time to find frames and select lenses, the same company’s Helios Pro to look at sun paths, and occasionally other specialist apps like Arri Photometrics (to work out if a particular light is powerful enough at a particular distance) and Flicker Finder (to check if a light will flicker on camera). I’ve also got Lux Calc installed but so far I’ve never used it.

Other common uses of my phone are looking at call sheets and other production documents if hardcopies aren’t supplied, checking my Google Sheets breakdown to remind myself of my creative intentions for the scene, and taking photos of lighting set-ups in case I need to recreate them for pick-ups.

To enable Artemis Pro to simulate wider lenses with my iPhone 7’s relatively tight built-in lens I also carry a clip-on 0.67x wide angle adaptor.


2. Light Meter

I’ve written before about why light meters are still important. My Sekonic L-758D gets heavy use on set, mostly in incident mode but sometimes the spot reflectance mode too; see my post on judging exposure to learn about what these modes do.

I make sure to carry spare batteries for it too.


3. Gaffer’s Glass

On The Little Mermaid the crew took pity on me using a broken ND filter wrapped in ND gel as a gaffer’s glass and bought me a proper one. This is like a monocle with an ND 3.6 filter in it for looking into fresnels and other directional fixtures to see if the spot of light is aimed exactly where it should be. I mostly use mine to look at the clouds and see when the sun is going to go in and come out, but you shouldn’t use one to look at the naked sun because even with all the ND it can still damage your eyes.


4. Power bank

With the heavy use my phone gets on set the charge doesn’t always last the whole day, so a power bank is essential to keep it running, as of course is the mains charger just in case.


5. Travel mug/flask

Most productions are environmentally conscious enough now to dissuade people from using disposable coffee cups and water bottes (though there are still a million half-finished water bottles on set at the end of the day). I always bring my own travel mug and metal water bottle. Keeping the mug clean(ish), especially when switching between tea and coffee consumption, is a daily struggle.


6. Croc clips

I always keep a couple of croc clips on my belt when shooting. Although I rarely gel lights myself on larger productions, I find them useful for adjusting curtains to admit just the right amount of daylight, or attaching a rain cover or light-blocking cloth to the camera, or clipping my jacket to something as a last-minute lighting flag.


7. Multi-tool

On some productions I’ve worn a multi-tool on my belt every day and only used it once or twice (usually to open wrap beers), so now it stays in my bag unless it’s specifically needed. As a head of department I theoretically shouldn’t be doing any tasks that would require a multi-tool, but it’s annoying to need one and not have one.


8. Tape Measure

I think my mum gave me this tiny tape measure which I keep in my set bag because it’s so small and light there’s no reason not to. I’ve used it exactly once so far: to work out if an Alexa Classic with a Cooke 10:1 zoom on would fit into certain tight locations on Hamlet.


9. Gel swatches

I picked up a set of Rosco filter swatches at either the BSC Expo or the Media Production Show. I don’t think I’ve ever used it.


10. Compass

Occasionally Helios Pro isn’t playing ball and I need to work out roughly where the sun is going to be, so out comes the traditional compass.


One final thing. Until very recently I carried a pair of gardening gloves for handling hot lights, but again I shouldn’t really be doing this myself and incandescent lamps aren’t too common on sets any more anyway, so when my gloves became worn out enough to need replacing I decided not to bother.

What’s in a DP’s Set Bag?

“Mission: Impossible” and the Dawn of Virtual Sets

The seventh instalment in the Mission: Impossible franchise was originally scheduled for release this July. It’s since been pushed back to next September, which is a minor shame because it means there will be no release in 2021 to mark the quarter of a century since Tom Cruise first chose to accept the mission of bringing super-spy Ethan Hunt to the big screen.

Today, 1996’s Mission: Impossible is best remembered for two stand-out sequences. The first, fairly simple but incredibly tense, sees Cruise descend on a cable into a high-security vault where even a single bead of sweat will trigger pressure sensors in the floor.

The second, developing from the unlikely to the downright ludicrous, finds Cruise battling Jon Voight atop a speeding Channel Tunnel train, a fight which continues on the skids of a helicopter dragged along behind the Eurostar, ending in an explosion which propels Cruise (somehow unscathed) onto the rear of the train.

It is the second of those sequences which is a landmark in visual effects, described by Cinefex magazine at the time as “the dawn of virtual sets”.

“In Mission: Impossible, we took blue-screen elements of actors and put them into believable CG backgrounds,” said VFX supervisor John Knoll of Industrial Light and Magic. Building on his work on The Abyss and Terminator 2, Knoll’s virtual tunnel sets would one day lead to the likes of The Mandalorian – films and TV shows shot against LED screens displaying CG environments.

Which is ironic, given that if Tom Cruise was remaking that first film today, he would probably insist on less trickery, not more, and demand to be strapped to the top of a genuine speeding Eurostar.

The Channel Tunnel had only been open for two years when Mission: Impossible came out, and the filmmakers clearly felt that audiences – or at least American audiences – were so unfamiliar with the service that they could take a number of liberties in portraying it. The film’s tunnel has only a single bore for both directions of travel, and the approaching railway line was shot near Glasgow.

That Scottish countryside is one of the few real elements in the sequence. Another is the 100ft of full-size train that was constructed against a blue-screen to capture the lead actors on the roof. To portray extreme speed, the crew buffeted the stars with 140mph wind from a parachute-training fan.

Many of the Glasgow plates were shot at 12fps to double the apparent speed of the camera helicopter, which generally flew at 80mph. But when the plate crew tried to incorporate the picture helicopter with which Jean Reno’s character chases the train, the under-cranking just looked fake, so the decision was taken to computer-generate the aircraft in the vast majority of the shots.

The train is also CGI, as are the tunnel entrance and some of its surroundings, and of course the English Channel is composited into the Glaswegian landscape. Once the action moves inside the tunnel, nothing is real except the actors and the set-pieces they’re clinging to.

“We cheated the scale to keep it tight and claustrophobic,” said VFX artist George Hull, admitting that the helicopter could not have fitted in such a tunnel in reality. “The size still didn’t feel right, so we went back and added recognisable, human-scale things such as service utility sheds and ladders.”

Overhead lights spaced at regular intervals were simulated for the blue-screen work. “When compositing the scenes into the CG tunnel months later, we could marry the environment by timing those interactive lights to the live-action plates,” explained Hull.

Employing Alias for modelling, Softimage for animation, RenderMan for rendering, plus custom software like ishade and icomp, ILM produced a sequence which, although it wasn’t completely convincing even in 1996, is still exciting.

Perhaps the best-looking part is the climactic explosion, which was achieved with a 1/8th scale miniature propelled at 55mph through a 120ft tunnel model. (The runaway CGI which followed Jurassic Park’s 1993 success wisely stayed away from explosions for many years, as their dynamics and randomness made them extremely hard to simulate on computers of the time.)

Knoll went on to supervise the Star Wars prequels’ virtual sets (actually miniatures populated with CG aliens), and later Avatar and The Mandalorian. Meanwhile, Cruise pushed for more and more reality in his stunt sequences as the franchise went on, climbing the Burj Khalifa for Ghost Protocol, hanging off the side of a plane for Rogue Nation, skydiving and flying a helicopter for Fallout, and yelling at the crew for Mission: Impossible 7.

At least, I think that last one was real.

“Mission: Impossible” and the Dawn of Virtual Sets

Shutter Maths: Flicker-free Screens and Exposure Compensation

An actor’s view by Alan Hay as I fiddle with a TV’s settings to reduce its flickering on camera

In last week’s post I mentioned the minor trouble we had on Harvey Greenfield is Running Late with a flickering TV screen in the background of shot. In today’s post I’m going to look at the underlying maths, find out why the 144° shutter angle I ultimately chose gave the best results and how to calculate the exposure compensation when you change your shutter angle like this.

If you haven’t already read my exposure series, particularly the posts about shutter and ISO, I suggest you look at those before diving into this one.


Working out the shutter interval

Harvey Greenfield was shot at 24fps here in the UK, where the mains current alternates at 50Hz (i.e. 50 cycles per second). To avoid certain light sources and any screens in shot from flickering, you generally want to match your shutter interval – the period of time during which light is allowed to charge the sensor’s photosites – to the AC frequency, i.e. 1/50th of a second in the UK. That works out to a shutter angle of 172.8° because…

frame rate x (360 ÷ shutter angle) = shutter interval denominator

… which can also be stated as…

frame rate x shutter interval x 360 = shutter angle

24 x (1 ÷ 50) x 360 = 172.8

So, as with all features I shoot in the UK, I captured most of Harvey at a shutter angle of 172.8°.

Going back to the TV problem, I scrolled through the Red Gemini’s available shutter angles until I found the one that gave the least flicker: 144°. With the twin wonders of hindsight and maths I can work out what frequency the TV was operating at, using the first version of the formula above.

24 x (360 ÷ 144) = 60

144° with a frame rate of 24 meant that the Red was capturing 1/60th of a second’s worth of light each frame. To produce (almost) no flickering at this camera setting, the TV was evidently operating at 60Hz.

The TV screen reflects in the Soft FX filter.


Working out the exposure compensation

Reducing your shutter angle reduces the amount of light captured by the sensor each frame, i.e. it reduces the exposure. I was happy with the depth of field and didn’t want to change the aperture, so instead I compensated by increasing the ISO from 800 to 1280. This was a guess made under time pressure on set, but now I can calculate the right exposure compensation at my leisure.

Fortunately, unlike f-stops, shutter angles and ISO are linear scales. Double the shutter angle or ISO and you double the exposure; halve the shutter angle or ISO and you halve the exposure. This makes the maths relatively easy.

172.8° was my original shutter angle. Let’s think of this as 100% exposure. When I went down to 144°, what percentage of the original exposure was that? I still remember the mantra from calculating maths workbook scores in secondary school: “What you got divided by what you could have got, times 100.”

(144 ÷ 172.8) x 100 = 83%

Now we turn to the ISO. At its original value, 800, the camera is only providing 83% of the desired exposure, thanks to the reduced shutter angle. What must we increase the ISO to in order to hit 100% again?

(800 ÷ ?) x 100 = 83%

800 ÷ ? = 0.83

800 ÷ 0.83 = ? = 960

So I should have been at ISO 960 ideally. The closest available setting on the Red is ISO 1000, not 1280 as I selected, so I was actually over-exposing by a third of a stop. Given that we were shooting in RAW, so the ISO is only metadata, and I could see from the false colours display that nothing was clipping, this is a very minor error indeed.

“The question we have to ask ourselves is: how many 83 percents are left? And the answer is: not many.”

Letting the meter do the maths

One more thing. My Sekonic L-758D light meter assumes a 180° shutter (so I set it to 25fps when I’m actually shooting 24fps at 172.8°, as both work out to 1/50th of a second). Another way I could have worked the correct exposure out, if I’d clocked the 60Hz frequency of the TV at the time, is to have set the meter to 30fps (1/60th of a second at 180°) and then changed the ISO until it gave me the stop I wanted.

Shutter Maths: Flicker-free Screens and Exposure Compensation