How Does a DP Choose Lenses?

There is a huge range of glass available to filmmakers today – everything from vintage cinema lenses from the 60s to modern stills glass made for DSLRs. How can a DP choose which is right for their production?


Mount

The first thing to take into account is the lens mount on your camera. If it is PL mount you will have access to a huge range of cinema lenses, some of them with decades of movie history. Other mounts such as Canon EF also provide plenty of choice, but mainly glass aimed at stills rather than cinematography. Some lenses can be mount-converted, some cameras can switch mounts, and adapters are available too, but it’s important to know upfront which lenses are going to be ruled out by your camera choice and which aren’t.


Spherical or Anamorphic

Test of a 30mm Cooke Xtal anamoprhic lens

Anamorphic lenses squeeze the image horizontally, to be unsqueezed in post-production. The results are a wider picture, distinctive oval bokeh (out of focus areas) and often lens flares with horizontal streaks in them. This look is very cinematic, but anamorphic lenses tend to be bigger, heavier, more expensive, need more light than and don’t focus as close as their spherical counterparts, so think carefully before you choose them.


Speed

The speed of a lens – i.e. its maximum aperture – is one of its most important characteristics. A fast prime lens might open to T1.4, while a zoom or anamorphic prime might only go to T4. That’s three stops’ difference, equating to eight times more light required by the T4 lens. That can have a big impact on the size and number of lights you need. The ISO you plan to shoot at will also factor into this, of course.

Also consider how deep or shallow a depth of field you want. If you’re after super-blurry backgrounds, only a fast lens will give you those (though shooting on a large-format camera will help). This brings us to…


Bokeh

A quick bokeh test of a Sigma Cine 50-100mm zoom lens using fairy lights

Bokeh is the appearance of out-of-focus areas in your image. It is most noticeable in small highlights such as fairy lights, which generally turn into big circles when they’re out of focus. Just how big and how smoothly circular depends on the lens and the aperture settings. Some lenses will have more geometric bokeh, octagons for example, which is a result of the shape and number of iris blades within. The bokeh may look rounder when the lens is wide open and more geometric when it is stopped down, or vice versa. It will also have a different shape at the edges of frame. What this comes down to is what look you feel is most aesthetically pleasing or appropriate for your story.


Lens Flares

Testing the flare of a Cooke Century 32mm

Another aesthetic choice. How much does the lens flare when light shines straight into it? What about when the light is just out of frame? Is there much veiling flare – an overall milkiness to the image? Do you like the colours and shapes of the flare? Do they feel natural or intrusive, and which is most fitting for the tone of your piece?


Sharpness

This is an important factor with the resolutions of cameras ever increasing. Any decent lens will be sharp at T5.6, but the more you open the iris the more you might start to see the image softening, especially when it is wide open (or conversely when it is stopped down to its minimum aperture). Check also the edges of frame, which may be less sharp than the centre, especially on a vintage or anamorphic lens. If you plan to do a lot of central framing then soft edges may not matter, or may even help to draw the viewer’s eye to the subject, but if you plan to put your subjects at the extreme sides of the frame then you should be careful what lenses you select.


Breathing

A lens is said to breathe when pulling the focus makes the image zoom in or out slightly. It is most noticeable with zoom lenses, some stills lenses and older glass. If you are racking back and forth between the characters in a deep two-shot, lens breathing can become very distracting.


Other Considerations

Other things to look out for are diffraction spikes, the star effect that happens around bright light sources, and colour rendition, which can vary slightly from lens to lens. If you expect to be physically close to your subject you should note the minimum focus distance of the lenses, which will be different for each length in the series. Also consider what focal lengths your chosen lens series contains – are there enough different lengths to cover everything you hope to shoot, especially at the shortest and longest ends of the range?

If you’re still not sure where to start, test footage and comparison videos of different lenses can be found online, like this one I made in 2017:

Better still, ask a rental house if you can come in for a day and shoot your own tests.

See also:

How Does a DP Choose Lenses?

How a Film’s Budget Affects the Role of the DP

A Micro Cinema Camera for a micro budget, on “Above the Clouds”, fittingly kept in place by a wallet

I recently read a document – I think it was published by the BFI – that gave some definitions of the different scales of feature film productions: low-, micro- and no-budget. While admitting that there is no universal agreement on figures for these categories, the document suggested the following:

  • No budget: up to £50,000
  • Micro budget: up to £250,000
  • Low budget: up to £1,000,000

I have shot features in all three of these categories (and at least one above them, presumably ranking as a medium-budget film) so I thought it would be interesting to look at the differences between them as experienced by the director of photography. I’m going to focus mainly on the contrast between no- and low-budget, because micro-budget is often very similar to no-budget in every respect except that the cast and crew are paid.


Prep

The biggest difference is in pre-production. On a low budget the DP tends to get a period of paid prep time equal to the number of shooting days, so if there are five weeks of filming, you get five weeks of prep beforehand. On a no-budget film you are likely to get a single day of location recces and nothing else.

Some of the things you’d do during your low-budget prep period will have to get done in your spare time on no budget: lining up your crew, watching any reference films the director suggests, making an equipment list. You won’t be conducting any camera tests (but you probably won’t get much of a choice about the camera anyway – see below). The chances are that you will not be reading and breaking down the script as carefully. You may cobble a few images together as references, but you will not be creating an extensive mood board. You might read through a shot list which the director sends you, but you won’t be giving a great deal of advance thought to shot ideas of your own. Inevitably a no-budget project will be less of a collaboration between director and DP than a low-budget one.

Your relationship with the gaffer will also be different. On a low budget you can expect to have at least one good recce of every location with them, maybe two, and lengthy meetings where you can really hash out how each scene will be lit. On no-budget films they might never be able to attend a recce, and all you get is a Zoom call where you screen-share your location photos and talk in general terms about the look. Lighting has to be much more improvised on the day.


Crew

No-budget vs. medium-budget camera dept.

This brings us onto crew. Most no-budget producers plan for a single camera assistant and a one-person lighting team, and don’t really think about who is going to back up the footage. On a low budget you can expect to get a 1st AC, 2nd AC, camera trainee, data wrangler, grip, gaffer, best boy or girl, and spark, though you may have to push the line producer for one or two of these. There is usually some allowance for spark dailies too when bigger scenes are shot.

When we wrap for the day on a low-budget film, I have no problem walking straight off set because I know there is a full camera and lighting crew to take care of packing away the gear. I can spend what remains of my energy reviewing the dailies, meeting with the director and planning for upcoming scenes. On a micro-budget film I will help pack up because the small crew needs all the hands it can get, but then I probably won’t get to the other stuff. So I might not spot the things in the rushes that I could improve on, or be as well prepared for the next day as I could have been.


Equipment

Equipment, of course, is hugely budget-dependent. Many no-budget films are unable to hire anything at all, relying on gear owned by the director and/or DP, and other bits begged, borrowed or scrounged. Emphasis is often placed on having a decent camera, with everything else neglected – cheap lenses, no filters, few of the accessories that make the camera dept run smoothly, and very limited lighting.

Getting kit around is often very challenging for no-budget producers. Just hiring a van and finding someone to drive it are big deals when you have no money. Sending someone to a rental house in London to collect the gear – even if renting can be afforded – is a logistical headache which a low-budget production doesn’t think twice about. This is why gear owned by crew members is so attractive to no-budget producers, because they don’t have to worry about how it gets to set, or the insurance.

On a low-budget production you will draw up your camera list maybe a couple of weeks into prep, with the assistance of the 1st AC, and the gaffer will handle the lighting list. Usually the first drafts of these lists will prove too expensive when the line producer has got the quotes back from the rental house, and you’ll have to cut a few things, but you’ll get most of what you wanted.

How a Film’s Budget Affects the Role of the DP

Pre-production for “Harvey Greenfield is Running Late”

Next week filming commences for Harvey Greenfield is Running Late, a comedy feature based on the critically acclaimed one-man play by Paul Richards. Paul reprises the title role in the film, directed by Jonnie Howard, who I previously worked with on A Cliché for the End of the World and The Knowledge.

The production is based locally to me in Cambridgeshire, and over the last couple of months I’ve attended recces, rehearsals and meetings. I’ve tried to approach it the same way I did Hamlet, reading each draft of the script carefully and creating a spreadsheet breakdown. Scene by scene, the breakdown lists my ideas for camerawork and lighting.

Harvey is a stressed and neurotic character who can’t say no to anything. The film takes place over a single day of his life when he finds himself having to attend a wedding, a funeral, a big meeting at his office, a school play and an appointment at a garage. Numerous scenes see him jogging from commitment to commitment (always running late in more ways than one) while taking phone calls that only add to the pressure. In the finest tradition of Alfie, Ferris Bueller and Fleabag, he also talks to camera.

Talking of finest traditions, the budget is very low but ambitions are high! With 100 script pages and 14 days the shoot will be more of a sprint than a marathon.

The UK film and TV industry is busier at present than I’ve ever known it, making up for lost time last year, so sourcing crew and kit has certainly been challenging. But thanks to generous sponsorship by Global Distribution and Sigma we will be shooting on a Red Ranger Gemini – which regular readers may recall I almost selected for Hamlet – with Sigma Cine primes and zooms. I will be working with a completely new camera team and gaffer.

One of the first things Jonnie told me was that he wanted to use a lot of wide lenses. This makes a lot of sense for the story. Wide lenses fill the background with more clutter, making the frame busier and more stressful for Harvey. They also put us into Harvey’s headspace by forcing the camera physically close to get a tighter shot. We shot some tests early on with Paul, primarily on the Sigma Cine 14mm, to start getting a feel for that look.

Influences include Woody Allen, the Coen brothers, Wes Anderson, Terry Gilliam and Napoleon Dynamite, and as usual, watching reference films has formed an important part of prep for me.

Based on the colour palette Nicole Stone has put together for her costumes, I’ve decided to use orange as Harvey’s stress colour and green when he’s calmer. For most of the film this will just be a case of framing in orange or green elements when appropriate, or putting a splash of the relevant colour in the background. For key scenes later in the story we may go so far as to bathe Harvey in the colour.

Right, I’d better get back to trying to sort out the lighting kit hire, which is still up in the air. Possibly this post should have been called Pre-production for “Harvey Greenfield” is running late.

Pre-production for “Harvey Greenfield is Running Late”

“The Little Mermaid”: Shooting Shirley

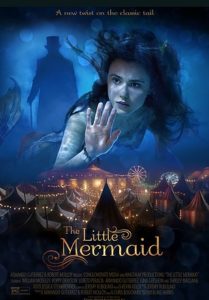
The Little Mermaid, an independent live-action take on the Hans Christian Andersen fairytale, is now showing in cinemas across the USA. To mark the release, over the next few weeks I’ll be posting a series of articles about my cinematography of the film, using extracts from the diary I kept during production.

In this first instalment I’ll focus on the “pre-shoot”, two days of capturing the present-day scenes, undertaken a few weeks before principal photography began. For these scenes, we were all very excited to be working with bona fide Hollywood royalty in the form of Shirley MacLaine. Since debuting in the 1955 Hitchcock comedy The Trouble with Harry (and winning a Golden Globe), Shirley’s career has taken in six Oscar nominations as well as a win for Terms of Endearment, plus an AFI Life Achievement Award, two Baftas, an Emmy and several more Golden Globes.

No pressure then….


Saturday

Shirley is installed at a five-star hotel in downtown Savannah for hair, make-up and wardrobe tests. Taking it easy at the studio, I get a call from the UPM telling me that Shirley wants to meet me. Nervously I transfer my lighting reference images (including screen grabs I gathered last week from her previous movies) to my iPad and await my car.

When I get to the hotel I bump into her and the rest of the crew in the hall. Plunging straight in, I shake her hand and introduce myself as “Neil Oseman, the DP”. Evidently not hearing that last bit, and presuming I’m a PA or possibly a fan, she looks me up and down and asks me who I am. I repeat that I am the director of photography. “You’re so young!” she exclaims, laughing at her mistake.

“Well, I’ve been doing this for fifteen years,” I reply, all too aware of how short my career is compared with hers.

“Which pictures? Tell me,” she says.

Again acutely aware that my credits list isn’t going to sound very impressive to her, I mention Heretiks, and Ren: The Girl with the Mark and mutter something about doing lots of features.

To my great relief she doesn’t press the point, instead asking what I think of the wig and make-up she’s wearing. I ask her to step into the daylight, and assure her that it looks good, but that I’d like to warm up her skin tone a little with the lighting, an idea she responds well to.

Satisfied, Shirley moves on to other things, and I hang out in a meeting room at the hotel drawing storyboards, until it’s time for a production meeting.


SUNDAY

The present-day scenes were shot on Arri Alexas using Zeiss Super Speed Mark I primes and an Angenieux Optimo zoom, diffused with Tiffen Soft FX filters.

I arrive on location before even the early crew call of 8am, with my gaffer Mike Horton. His and key grip Jason Batey’s teams have rigged a dark box around the beach house’s deck/balcony so we can shoot day-for-night interiors.

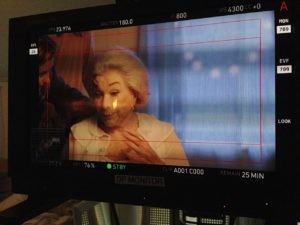
At 10am Shirley arrives, blocks the scene, then goes off to hair and makeup. We’re starting with close-ups of her, so the grip and electric teams come in and build a book light. (This is a V-shaped arrangement of bounce and diffusion material, resembling an open book, which greatly softens the light fired into it.) When we start to turn over and Shirley watches playback, I’m gratified to find she is very happy with how she looks on camera. We shoot out all her close-ups, then bring in the little girls playing opposite her and block the wide shots.

In the lefthand foreground here is the 2K source for the book light. In the top right you can see the diffusion frame it’s firing through, and you can just make out the poly or rag we attached to the wall to bounce the light back onto Shirley (in the white nightgown). The net in the upper centre is cutting some light off the background. The camera can just be seen on the right of the photo.

As time begins to crunch, I fall back on cross-backlighting as a quick no-brainer solution to get the wide shot looking good. It’s so important to have these lighting templates up your sleeve when the pressure’s on. (Later on in this blog series I’ll discuss the use of cross-backlighting in several other scenes in the movie.)

For a little while it looks like we might not make the day, but I suggest a way to maximise the beautiful beach view at twilight and get the story beats covered in one two-camera set-up. The shot feels like something out of a classic old movie. Shirley MacLaine walking off into the sunset! Everyone loves how it looks, including Shirley. The praise of an actor as experienced as her is high praise indeed, and it makes my day!


Monday

At the monitors with producer Rob Molloy. Photo: Brooks Patrick Allen

We start lighting for our “sunset” scene, which involves firing a pink-gelled 6K through the window and netting the background to get some highlight detail into it. Rather than a book light, this time I use a diffused 4×4 Kino Flo as Shirley’s key. I take a risk and place it further off to the side to get a bit more shape into the light.

Shirley enters, takes one glance at the lighting and remarks, “So, you like this cross-light, huh?”

Busted!

We compromise by adding a little fill from a reflector which Shirley positions herself before each take. Her awareness of how she’s being photographed is astounding. She knows more about lighting than some DPs I’ve met!

Looking at the scenes now, I realise that a large white horizontal reflector in front of Shirley would have been perfect to simulate bounce off the bed, which we moved out when we were shooting the close-ups. Hindsight is 20/20, but I’m still pleased with how it turned out.

Next week I’ll break down the huge lighting set-up required for the night exterior circus scenes.

“The Little Mermaid”: Shooting Shirley

How Big a Light do I Need?

Experience goes a long way, but sometimes you need to be more precise about what size of lighting instruments are required for a particular scene. Night exteriors, for example; you don’t want to find out on the day that the HMI you hired as your “moon” backlight isn’t powerful enough to cover the whole of the car park you’re shooting in. How can you prep correctly so that you don’t get egg on your face?

There are two steps: 1. determine the intensity of light you require on the subject, and 2. find a combination of light fixture and fixture-to-subject distance that will provide that intensity.


The Required intensity

The goal here is to arrive at a number of foot-candles (fc). Foot-candles are a unit of light intensity, sometimes more formally called illuminance, and one foot-candle is the illuminance produced by a standard candle one foot away. (Illuminance can also be measured in the SI unit of lux, where 1 fc ≈ 10 lux, but in cinematography foot-candles are more commonly used. It’s important to remember that illuminance is a measure of the light incident to a surface, i.e. the amount of light reaching the subject. It is not to be confused with luminance, which is the amount of light reflected from a surface, or with luminous power, a.k.a. luminous flux, which is the total amount of light emitted from a source.)

Usually you start with a T-stop (or f-stop) that you want to shoot at, based on the depth of field you’d like. You also need to know the ISO and shutter interval (usually 1/48th or 1/50th of a second) you’ll be shooting at. Next you need to convert these facets of exposure into an illuminance value, and there are a few different ways of doing this.

One method is to use a light meter, if you have one, which you enter the ISO and shutter values into. Then you wave it around your office, living room or wherever, pressing the trigger until you happen upon a reading which matches your target f-stop. Then you simply switch your meter into foot-candles mode and read off the number. This method can be a bit of a pain in the neck, especially if – like mine – your meter requires fiddly flipping of dip-switches and additional calculations to get a foot-candles reading out of.

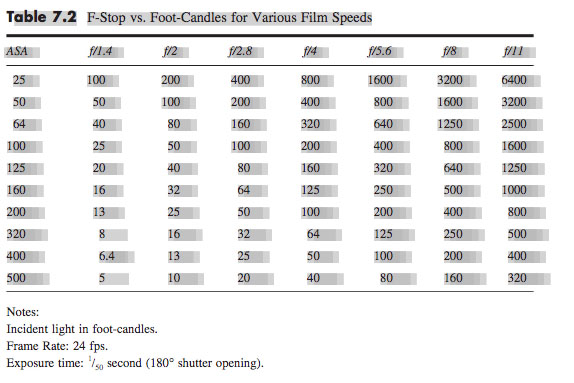
A much simpler method is to consult an exposure table, like the one below, or an exposure calculator, which I’m sure is a thing which must exist, but I’ll be damned if I could find one.

Some cinematographers memorise the fact that 100fc is f/2.8 at ISO 100, and work out other values from that. For example, ISO 400 is four times (two stops) faster than ISO 100, so a quarter of the light is required, i.e. 25fc.

Alternatively, you can use the underlying maths of the above methods. This is unlikely to be necessary in the real world, but for the purposes of this blog it’s instructive to go through the process. The equation is:

where

  • b is the illuminance in fc,
  • f is the f– or T-stop,
  • s is the shutter interval in seconds, and
  • i is the ISO.

Say I’m shooting on an Alexa with a Cooke S4 Mini lens. If I have the lens wide open at T2.8, the camera at its native ISO of 800 and the shutter interval at the UK standard of 1/50th (0.02) of a second…

… so I need about 12fc of light.


The right instrument

In the rare event that you’re actually lighting your set with candles – as covered in my Barry Lyndon and Stasis posts – then an illuminance value in fc is all you need. In every other situation, though, you need to figure out which electric light fixtures are going to give you the illuminance you need.

Manufacturers of professional lighting instruments make this quite easy for you, as they all provide data on the illuminance supplied by their products at various distances. For example, if I visit Mole Richardson’s webpage for their 1K Baby-Baby fresnel, I can click on the Performance Data table to see that this fixture will give me the 12fc (in fact slightly more, 15fc) that I required in my Alexa/Cooke example at a distance of 30ft on full flood.

Other manufacturers provide interactive calculators: on ETC’s site you can drag a virtual Source Four back and forth and watch the illuminance read-out change, while Arri offers a free iOS/Android app with similar functionality.

If you need to calculate an illuminance value for a distance not specified by the manufacturer, you can derive it from distances they do specify, by using the Inverse Square Law. However, as I found in my investigatory post about the law, that could be a whole can of worms.

If illuminance data is not available for your light source, then I’m afraid more maths is involved. For example, the room I’m currently in is lit by a bulb that came in a box marked “1,650 lumens”, which is the luminous power. One lumen is one foot-candle per square foot. To find out the illuminance, i.e. how many square feet those lumens are spread over, we imagine those square feet as the area of a sphere with the lamp at the centre, and where the radius r is the distance from the lamp to the subject. So:

where

  • is again the illuminance in fc,
  • is the luminous power of the souce in lumens, and
  • r is the lamp-to-subject distance in feet.

(I apologise for the mix of Imperial and SI units, but this is the reality in the semi-Americanised world of British film production! Also, please note that this equation is for point sources, rather than beams of light like you get from most professional fixtures. See this article on LED Watcher if you really want to get into the detail of that.)

So if I want to shoot that 12fc scene on my Alexa and Cooke S4 Mini under my 1,650 lumen domestic bulb…

… my subject needs to be 3’4″ from the lamp. I whipped out my light meter to check this, and it gave me the target T2.8 at 3’1″ – pretty close!


Do I have enough light?

If you’re on a tight budget, it may be less a case of, “What T-stop would I like to shoot at, and what fixture does that require?” and more a case of, “Is the fixture which I can afford bright enough?”

Let’s take a real example from Perplexed Music, a short film I lensed last year. We were shooting on an Alexa at ISO 1600, 1/50th sec shutter, and on Arri/Zeiss Ultra Primes, which have a maximum aperture of T1.9. The largest fixture we had was a 2.5K HMI, and I wanted to be sure that we would have enough light for a couple of night exteriors at a house location.

In reality I turned to an exposure table to find the necessary illuminance, but let’s do the maths using the first equation that we met in this post:

Loading up Arri’s photometrics app, I could see that 2.8fc wasn’t going to be a problem at all, with the 2.5K providing 5fc at the app’s maximum distance of 164ft.

That’s enough for today. All that maths may seem bewildering, but most of it is eliminated by apps and other online calculators in most scenarios, and it’s definitely worth going to the trouble of checking you have enough light before you’re on set with everyone ready to roll!

See also: 6 Ways of Judging Exposure

SaveSave

SaveSave

How Big a Light do I Need?

How “The Crown” Uses Broad Key Lighting to Evoke Tradition

Earlier this year I blogged about a visit to the National Portrait Gallery, studying the lighting in traditional portraits. I noted that, contrary to the current cinematographic trend for short key lighting, almost all of those paintings used broad key. And while watching the high-end Netflix series The Crown this week, I noticed the same thing. Why might this be?

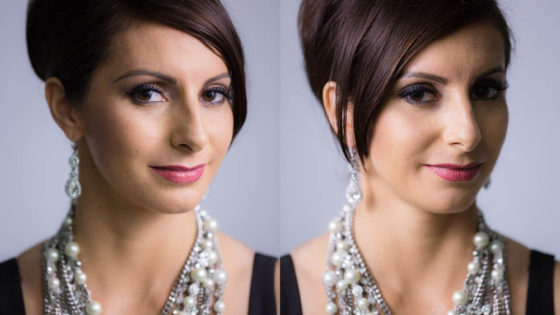
Short key (left) vs. broad key (right). Photos from SLR Lounge

First of all, a reminder: a short key is a key light on the side of the face away from camera, while a broad key hits the side of the face towards camera. Short key is generally preferred amongst cinematographers because it gives better “modelling” – i.e. a better sense of the shape of the face – and focuses the viewer ON the face, rather than the ear and the side of the head. A broad key, meanwhile, presents less shadow to the camera, and arguably shows the hairstyle and the shape of the head better – which may be reasons for the preponderance of broad key in classical portraiture, which were more concerned with overall appearance than with emotion/performance.

An array of broad key paintings at the National Portrait Gallery

But I don’t believe these direct pros and cons were the primary motivation in cinematographer Ole Bratt Birkeland’s decision to use broad key lighting in a crucial scene from The Crown.

The central themes of the series, which dramatises the early life of the Queen, are tradition and duty. Queen Mary often reminds her granddaughter Queen Elizabeth II of the long and noble lineage of the English royal family, a weight of history and responsibility which Elizabeth keenly feels. “The crown must always win,” Mary intones in the trailer.

In episode 4 the young Queen seeks advice, desperate to ensure she does not tarnish the monarchy’s centuries-old reputation. To symbolise this burden, Birkeland evokes the imagery of traditional portraiture – the subjects of which were always high-born individuals, often royals. Consider this frame grab from the scene, beneath an official portrait.

mw58197

img_1647

See how the light models the face the same way in both images? Note also the absence of backlight in the frame grab, another feature common to traditional paintings, which typically relied on a single window light source. Elizabeth’s dark hair blends into parts of the dark background.

Combined with the timeless regal production design, this lighting subtly places the Queen within the frame of an official portrait, trapping her within the overwhelming tradition of the monarchy. Can I say for certain that Birkeland did this deliberately? No, but I’d be very surprised if he hadn’t looked at royal portraits while prepping the show, and I’d be equally surprised if they hadn’t at least influenced him unconsciously.

Either way, this is a first-rate example of the power of cinematography to enhance theme and narrative by guiding the viewer to make subconscious associations. If you haven’t seen The Crown, I can highly recommend it; it’s not just the cinematography that’s top notch.

How “The Crown” Uses Broad Key Lighting to Evoke Tradition